
Chapter 7: Testing Gin HTTP Routes
In this chapter, you will learn how to test a Gin web-based application, which involves running Go unit and integration tests. Along the way, we will explore how to integrate external tools to identify potential security vulnerabilities within your Gin web application. Finally, we will cover how to test the API HTTP methods using the Postman Collection Runner feature.
As such, we will cover the following topics:
- Testing Gin HTTP handlers
- Generating code coverage reports
- Discovering security vulnerabilities
- Running Postman collections
By the end of this chapter, you should be able to write, execute, and automate tests for a Gin web application from scratch.
Technical requirements
To follow the instructions in this chapter, you will need the following:
- A complete understanding of the previous chapter—this chapter is a follow-up of the previous one and it will use the same source code. Hence, some snippets won't be explained, to avoid repetition.
- Previous experience using the Go testing package.
The code bundle for this chapter is hosted on GitHub at https://github.com/PacktPublishing/Building-Distributed-Applications-in-Gin/tree/main/chapter07.
Testing Gin HTTP handlers
So far, we have learned how to design, build, and scale a distributed web application with Gin framework. In this chapter, we will cover how to integrate different types of tests to eliminate possible errors at release. We will start with unit testing.
Note
It's worth mentioning that you need to adopt a test-driven development (TDD) approach beforehand to get a head start in writing testable code.
To illustrate how to write a unit test for a Gin web application, you need to dive right into a basic example. Let's take the hello world example covered in Chapter 2, Setting up API Endpoints. The router declaration and HTTP server setup have been extracted from the main function to prepare for the tests, as illustrated in the following code snippet:
package main
import (
"net/http"
"github.com/gin-gonic/gin"
)
func IndexHandler(c *gin.Context) {
c.JSON(http.StatusOK, gin.H{
"message": "hello world",
})
}
func SetupServer() *gin.Engine {
r := gin.Default()
r.GET("/", IndexHandler)
return r
}
func main() {
SetupServer().Run()
}
Run the application, then issue a GET request on localhost:8080. A hello world message will be returned, as follows:
curl localhost:8080
{"message":"hello world"}
With the refactoring being done, write a unit test in the Go programming language. To do so, apply the following steps:
- Define a main_test.go file with the following code in the same project directory. The SetupServer() method we previously refactored is injected into a test server:
package main
func TestIndexHandler(t *testing.T) {
mockUserResp := `{"message":"hello world"}`
ts := httptest.NewServer(SetupServer())
defer ts.Close()
resp, err := http.Get(fmt.Sprintf("%s/", ts.URL))
if err != nil {
t.Fatalf("Expected no error, got %v", err)
}
defer resp.Body.Close()
if resp.StatusCode != http.StatusOK {
t.Fatalf("Expected status code 200, got %v",
resp.StatusCode)
}
responseData, _ := ioutil.ReadAll(resp.Body)
if string(responseData) != mockUserResp {
t.Fatalf("Expected hello world message, got %v",
responseData)
}
}
Each test method must start with a Test prefix—so, for example, TestXYZ will be a valid test. The previous code sets up a test server using the Gin engine and issues a GET request. Then, it checks the status code and response payload. If the actual results don't match the expected results, an error will be thrown. Hence, the test will fail.
- To run tests in Golang, execute the following command:
go test
The test will be successful, as seen in the following screenshot:

Figure 7.1 – Test execution
While you have the ability to write complete tests with the testing package, you can install a third-party package such as testify to use advanced assertions. To do so, follow these steps:
- Download testify with the following command:
Go get github.com/stretchr/testify
- Next, update TestIndexHandler to use the assert property from the testify package to make some assertions about the correctness of the response, as follows:
func TestIndexHandler(t *testing.T) {
mockUserResp := `{"message":"hello world"}`
ts := httptest.NewServer(SetupServer())
defer ts.Close()
resp, err := http.Get(fmt.Sprintf("%s/", ts.URL))
defer resp.Body.Close()
assert.Nil(t, err)
assert.Equal(t, http.StatusOK, resp.StatusCode)
responseData, _ := ioutil.ReadAll(resp.Body)
assert.Equal(t, mockUserResp, string(responseData))
}
- Execute the go test command and you will have the same results.
That's how you write a test for a Gin web application.
Let's move forward and write unit tests for the HTTP handlers of the RESTful API covered in previous chapters. As a reminder, the following schema illustrates the operations exposed by the REST API:
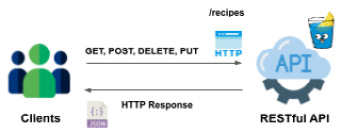
Figure 7.2 – API HTTP methods
Note
The API source code is available on the GitHub repository under the chapter07 folder. It's recommended to start this chapter based on the source code available in the repository.
The operations in the image are registered in the Gin default router and assigned to different HTTP handlers, as follows:
func main() {
router := gin.Default()
router.POST("/recipes", NewRecipeHandler)
router.GET("/recipes", ListRecipesHandler)
router.PUT("/recipes/:id", UpdateRecipeHandler)
router.DELETE("/recipes/:id", DeleteRecipeHandler)
router.GET("/recipes/:id", GetRecipeHandler)
router.Run()
}
Start with a main_test.go file, and define a method to return an instance of the Gin router. Then, write a test method for each HTTP handler. For instance, the TestListRecipesHandler handler is shown in the following code snippet:
func SetupRouter() *gin.Engine {
router := gin.Default()
return router
}
func TestListRecipesHandler(t *testing.T) {
r := SetupRouter()
r.GET("/recipes", ListRecipesHandler)
req, _ := http.NewRequest("GET", "/recipes", nil)
w := httptest.NewRecorder()
r.ServeHTTP(w, req)
var recipes []Recipe
json.Unmarshal([]byte(w.Body.String()), &recipes)
assert.Equal(t, http.StatusOK, w.Code)
assert.Equal(t, 492, len(recipes))
}
It registers the ListRecipesHandler handler on the GET /recipes resource, then it issues a GET request. The request payload is then encoded into a recipes slice. If the number of recipes is equal to 492 and the status code is a 200-OK response, then the test is considered successful. Otherwise, an error will be thrown, and the test will fail.
Then, issue a go test command, but this time, disable the Gin debug logs and enable verbose mode with a –v flag, as follows:
GIN_MODE=release go test -v
The command output is shown here:

Figure 7.3 – Running tests with verbose output
Note
In Chapter 10, Capturing Gin Application Metrics, we will cover how to customize the Gin debug logs and how to ship them into a centralized logging platform.
Similarly, write a test for the NewRecipeHandler handler. It will simply post a new recipe and check if the returned response code is a 200-OK status. The TestNewRecipeHandler method is shown in the following code snippet:
func TestNewRecipeHandler(t *testing.T) {
r := SetupRouter()
r.POST("/recipes", NewRecipeHandler)
recipe := Recipe{
Name: "New York Pizza",
}
jsonValue, _ := json.Marshal(recipe)
req, _ := http.NewRequest("POST", "/recipes",
bytes.NewBuffer(jsonValue))
w := httptest.NewRecorder()
r.ServeHTTP(w, req)
assert.Equal(t, http.StatusOK, w.Code)
}
In the preceding test method, you declared a recipe using the Recipe structure. The struct is then marshaled into JSON format and added as a third parameter of the NewRequest function.
Execute the tests, and both TestListRecipesHandler and TestNewRecipeHandler should be successful, as follows:

Figure 7.4 – Running multiple tests
You are now familiar with writing unit tests for Gin HTTP handlers. Go ahead and write the tests for the rest of the API endpoints.
Generating code coverage reports
In this section, we will cover how to generate coverage reports with Go. Test coverage describes how much of a package's code is exercised by running the package's tests.
Run the following command to generate a file that holds statistics about how much code is being covered by the tests you've written in the previous section:
GIN_MODE=release go test -v -coverprofile=coverage.out ./...
The command will run the tests and display the percentage of statements covered with those tests. In the following example, we're covering 16.9% of statements:

Figure 7.5 – Test coverage
The generated coverage.out file contains the number of lines covered by the unit tests. The full code has been cropped for brevity, but you can see an illustration of this here:
mode: set
/Users/mlabouardy/github/Building-Distributed-Applications-in-Gin/chapter7/api-without-db/main.go:51.41,53.2 1 1
/Users/mlabouardy/github/Building-Distributed-Applications-in-Gin/chapter7/api-without-db/main.go:65.39,67.50 2 1
/Users/mlabouardy/github/Building-Distributed-Applications-in-Gin/chapter7/api-without-db/main.go:72.2,77.31 4 1
/Users/mlabouardy/github/Building-Distributed-Applications-in-Gin/chapter7/api-without-db/main.go:67.50,70.3 2 0
/Users/mlabouardy/github/Building-Distributed-Applications-in-Gin/chapter7/api-without-db/main.go:98.42,101.50 3 0
/Users/mlabouardy/github/Building-Distributed-Applications-in-Gin/chapter7/api-without-db/main.go:106.2,107.36 2 0
You can visualize the code coverage using a HyperText Markup Language (HTML) presentation, using the go tool command, as follows:
go tool cover -html=coverage.out
The command will open the HTML presentation on your default browser, showing the covered source code in green and the uncovered code in red, as illustrated in the following screenshot:
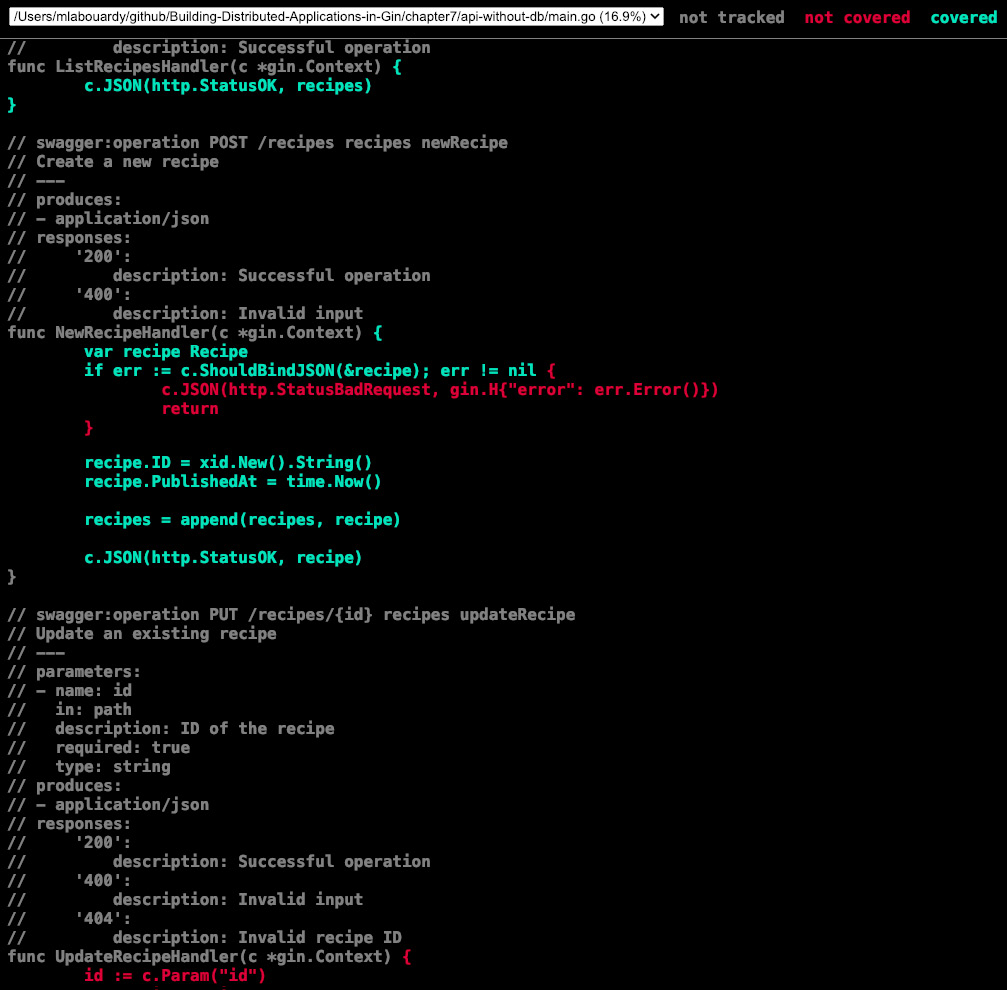
Figure 7.6 – Viewing results
Now that it's easier to spot which methods are covered with your tests, let's write an additional test for the HTTP handler, responsible for updating an existing recipe. To do so, proceed as follows:
- Add the following code block to the main_test.go file:
func TestUpdateRecipeHandler(t *testing.T) {
r := SetupRouter()
r.PUT("/recipes/:id", UpdateRecipeHandler)
recipe := Recipe{
ID: "c0283p3d0cvuglq85lpg",
Name: "Gnocchi",
Ingredients: []string{
"5 large Idaho potatoes",
"2 egges",
"3/4 cup grated Parmesan",
"3 1/2 cup all-purpose flour",
},
}
jsonValue, _ := json.Marshal(recipe)
reqFound, _ := http.NewRequest("PUT",
"/recipes/"+recipe.ID, bytes.NewBuffer(jsonValue))
w := httptest.NewRecorder()
r.ServeHTTP(w, reqFound)
assert.Equal(t, http.StatusOK, w.Code)
reqNotFound, _ := http.NewRequest("PUT", "/recipes/1",
bytes.NewBuffer(jsonValue))
w = httptest.NewRecorder()
r.ServeHTTP(w, reqNotFound)
assert.Equal(t, http.StatusNotFound, w.Code)
}
The code issues two HTTP PUT requests.
One of these has a valid recipe ID and checks for the HTTP response code (200-OK).
The other has an invalid recipe ID and checks for the HTTP response code (404-Not found).
- Re-execute the tests, and the coverage percentage should increase from 16.9% to 39.0%. The following output confirms this:
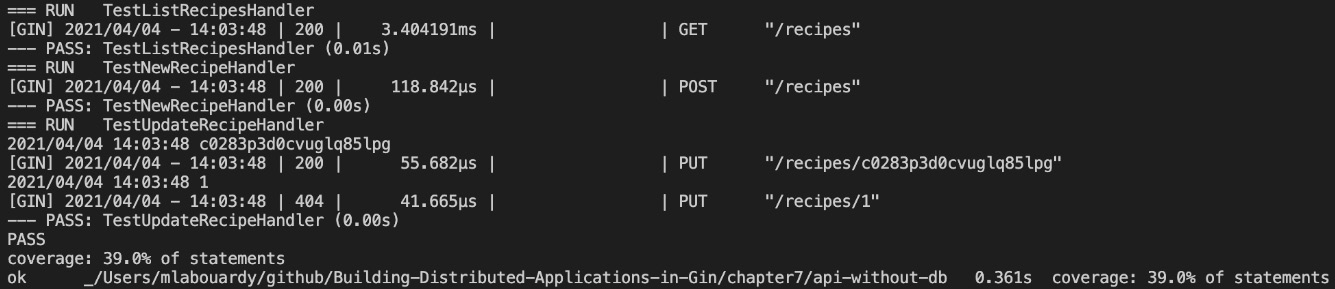
Figure 7.7 – More code coverage
Awesome! You are now able to run unit tests and get code coverage reports. So, go forth, test, and cover.
While unit tests are an important part of software development, it is equally important that the code you write is not just tested in isolation. Integration and end-to-end tests give you that extra confidence by testing parts of your application together. These parts may work just fine on their own, but in a large system, units of code rarely work separately. That's why, in the next section, we will cover how to write and run integration tests.
Performing integration tests with Docker
The purpose of integration tests is to verify that separated developed components work together properly. Unlike unit tests, integration tests can depend on databases and external services.
The distributed web application written so far interacts with the external services MongoDB and Reddit, as illustrated in the following screenshot:
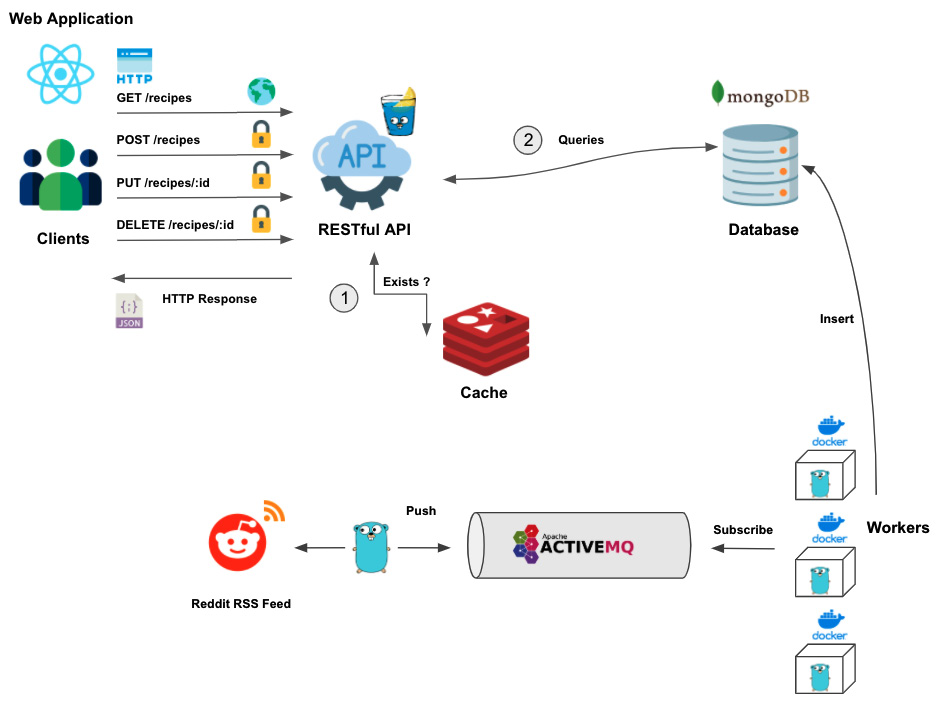
Figure 7.8 – Distributed web application
To get started with integration tests, proceed as follows:
- Run the needed services for our integration tests with Docker Compose. The following docker-compose.yml file will start a MongoDB and Redis container:
version: "3.9"
services:
redis:
image: redis
ports:
- 6379:6379
mongodb:
image: mongo:4.4.3
ports:
- 27017:27017
environment:
- MONGO_INITDB_ROOT_USERNAME=admin
- MONGO_INITDB_ROOT_PASSWORD=password
- Now, test each endpoint exposed by the RESTful API. For example, to test out the endpoint responsible for listing all recipes, we can use the following code block:
func TestListRecipesHandler(t *testing.T) {
ts := httptest.NewServer(SetupRouter())
defer ts.Close()
resp, err := http.Get(fmt.Sprintf("%s/recipes", ts.URL))
defer resp.Body.Close()
assert.Nil(t, err)
assert.Equal(t, http.StatusOK, resp.StatusCode)
data, _ := ioutil.ReadAll(resp.Body)
var recipes []models.Recipe
json.Unmarshal(data, &recipes)
assert.Equal(t, len(recipes), 10)
}
- To run tests, provide the MongoDB Uniform Resource Identifier (URI) and database before the go test command, as follows:
MONGO_URI="mongodb://admin:password@localhost:27017/test?authSource=admin&readPreference=primary&ssl=false" MONGO_DATABASE=demo REDIS_URI=localhost:6379 go test
Great! The test will pass successfully, as illustrated here:

Figure 7.9 – Running integration tests
The test issues a GET request on the /recipes endpoint and verifies if the number of recipes returned by the endpoint is equal to 10.
Another important but neglected test is the security test. It's mandatory to ensure your application is free from major security vulnerabilities, otherwise risks of data breaches and data leaks are high.
Discovering security vulnerabilities
There are many tools that help in identifying major security vulnerabilities in your Gin web application. In this section, we will cover two tools, out of a few, that you can adopt while building a Gin application: Snyk and Golang Security Checker (Gosec).
In the upcoming sections, we will demonstrate how to use these tools to inspect security vulnerabilities in a Gin application.
Gosec
Gosec is a tool written in Golang that inspects the source code for security problems by scanning the Go abstract syntax tree (AST). Before we inspect the Gin application code, we need to install the Gosec binary.
The binary can be downloaded with the following cURL command. Here, version 2.7.0 is being used:
curl -sfL https://raw.githubusercontent.com/securego/gosec/master/install.sh | sh -s -- -b $(go env GOPATH)/bin v2.7.0
Once the command is installed, run the following command on your project folder. The ./... argument is set to recursively scan all the Go packages:
gosec ./...
The command will identify three major issues related to unhandled errors (Common Weakness Enumeration (CWE) 703 (https://cwe.mitre.org/data/definitions/703.html), as illustrated in the following screenshot:
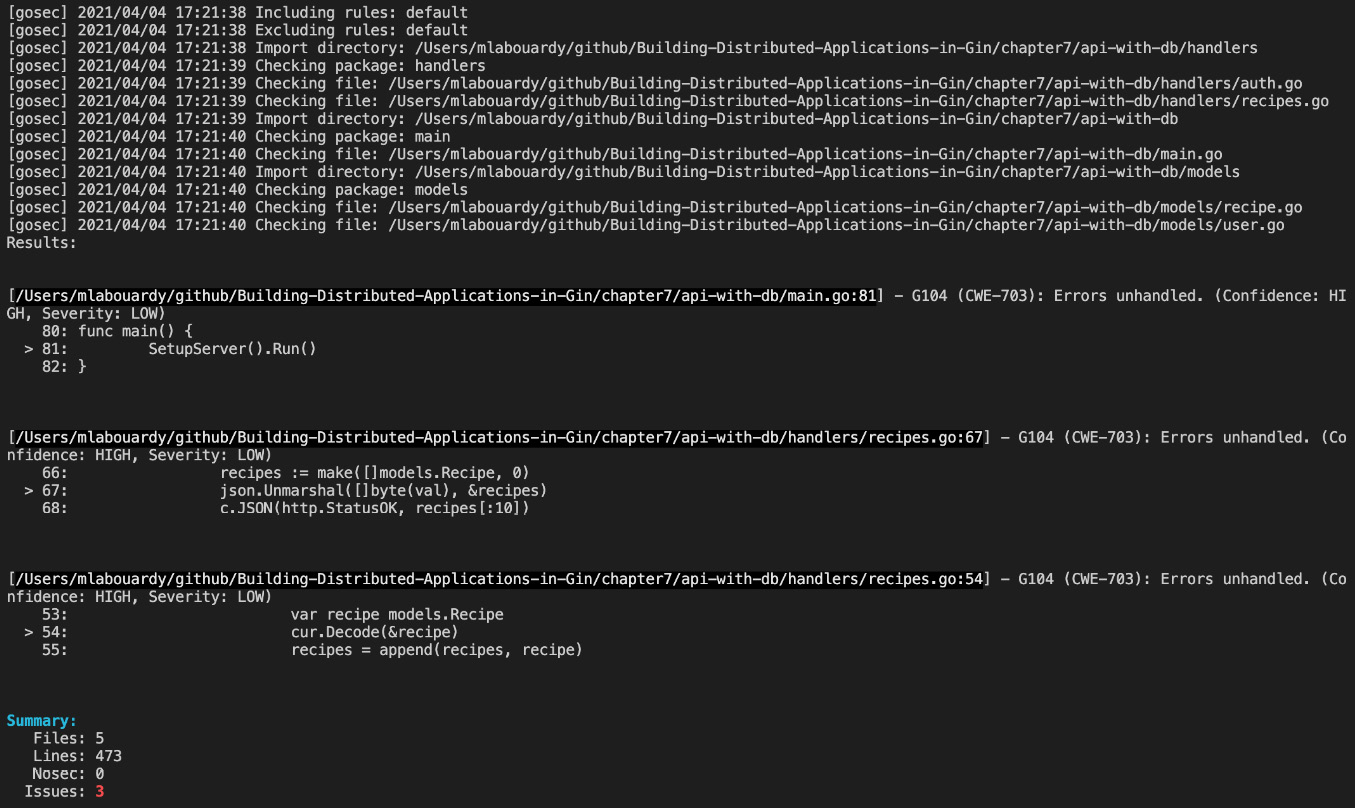
Figure 7.10 – Unhandled errors
By default, Gosec will scan your project and validate it against the rules. However, it's possible to exclude some rules. For instance, to exclude the rule responsible for the Errors unhandled issue, issue the following command:
gosec -exclude=G104 ./...
Note
A complete list of available rules can be found here:
https://github.com/securego/gosec#available-rules
The command output is shown here:
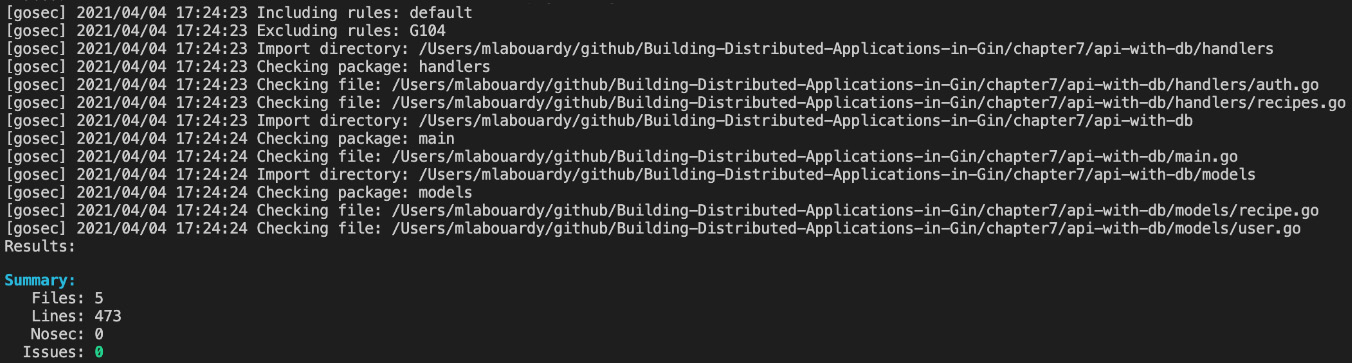
Figure 7.11 – Excluding Gosec rules
You should now be able to scan your application source code for potential security vulnerabilities or sources of errors.
Securing Go modules with Snyk
Another way to detect potential security vulnerabilities is by scanning the Go modules. The go.mod file holds all the dependencies used by the Gin web application. Snyk (https://snyk.io) is a software-as-a-service (SaaS) solution used to identify and fix security vulnerabilities in your Go application.
Note
Snyk supports all main programming languages including Java, Python, Node.js, Ruby, Scala, and so on.
The solution is pretty simple. To get started, proceed as follows:
- Create a free account by signing in with your GitHub account.
- Then, install the Snyk official command-line interface (CLI) using Node Package Manager (npm), as follows:
npm install -g snyk
- Next, associate your Snyk account with the CLI by running the following command:
snyk auth
The preceding command will open a browser tab and redirect you to authenticate the CLI with your Snyk account.
- Now, you should be ready to scan the project vulnerabilities with the following command:
snyk test
The preceding command will list all identified vulnerabilities (major or minor), including their path and remediation guidance, as illustrated in the following screenshot:
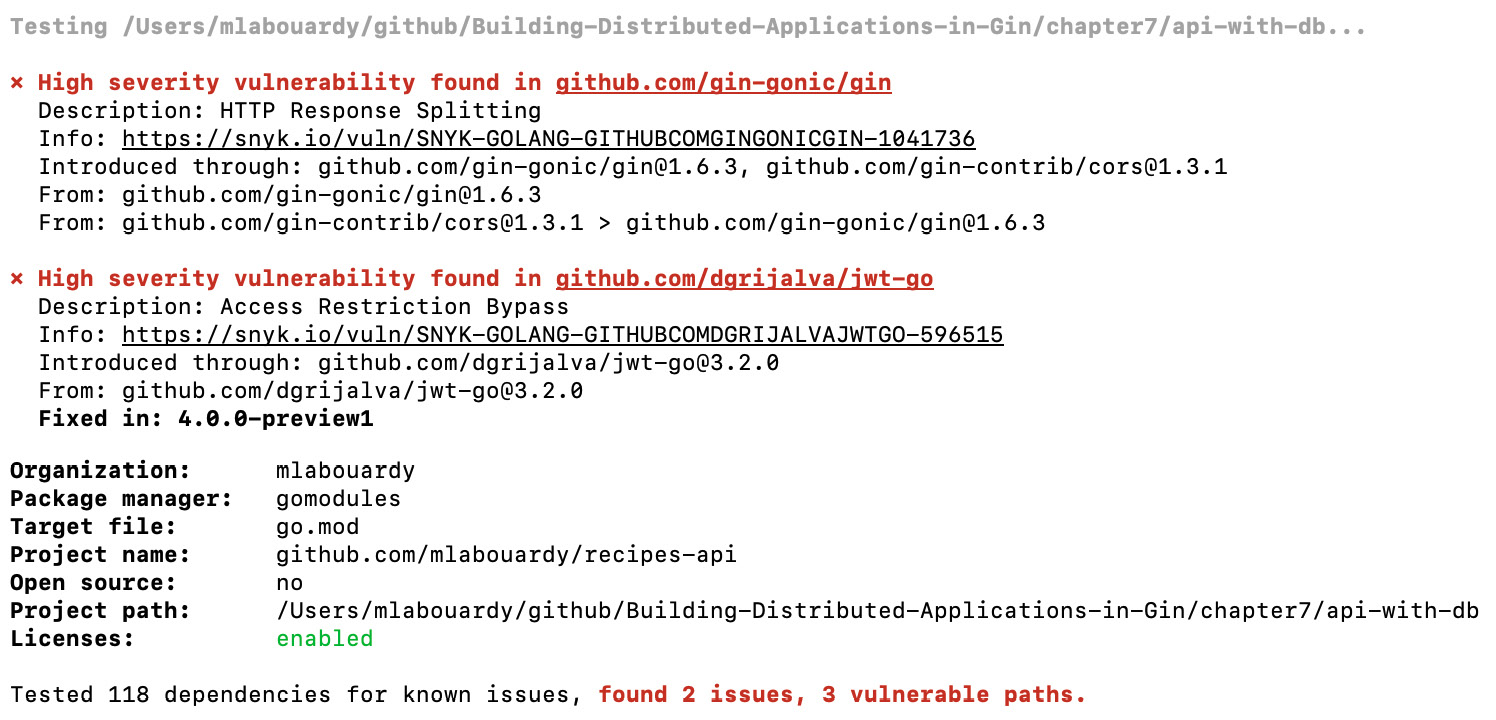
Figure 7.12 – Snyk vulnerability findings
- According to the output, Snyk identified two major issues. One of them is with the current version of the Gin framework. Click on the Info URL—you will be redirected to a dedicated page where you can learn more about the vulnerability, as illustrated in the following screenshot:
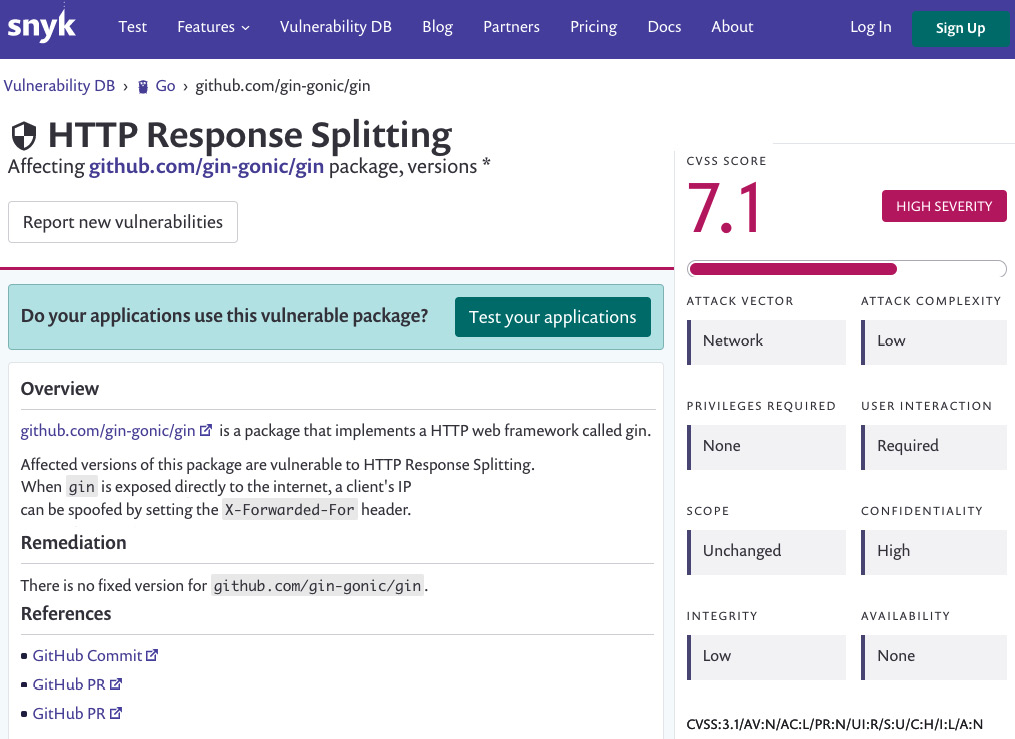
Figure 7.13 – HTTP Response Splitting page
- Most security vulnerabilities can be fixed by upgrading the packages to the latest stable version. Run the following command to upgrade your project dependencies:
go get -u
All dependencies listed in your go.mod file will be upgraded to the latest available version, as illustrated in the following screenshot:

Figure 7.14 – Upgrading Go packages
For the spotted vulnerabilities, there's an open pull request on GitHub that is merged and available in the Gin 1.7 version, as illustrated in the following screenshot:
Figure 7.15 – Vulnerability fix
That's it—you now know how to scan your Go modules with Snyk as well!
Note
We'll cover how to embed Snyk in the continuous integration/continuous deployment (CI/CD) pipeline in Chapter 9, Implementing a CI/CD pipeline, to continuously inspect the application's source code for security vulnerabilities.
Running Postman collections
Throughout the book, you have learned how to use the Postman REST client to test out the API endpoints. In addition to sending API requests, Postman can be used to build test suites by defining a group of API requests within a collection.
To set this up, proceed as follows:
- Open the Postman client and click on the New button from the header bar, then select Collection, as illustrated in the following screenshot:
Figure 7.16 – New Postman collection
- A new window will pop up— name your collection Recipes API and click on the Create button to save the collection. Then, click on Add request to create a new API request and call it List Recipes, as illustrated in the following screenshot:
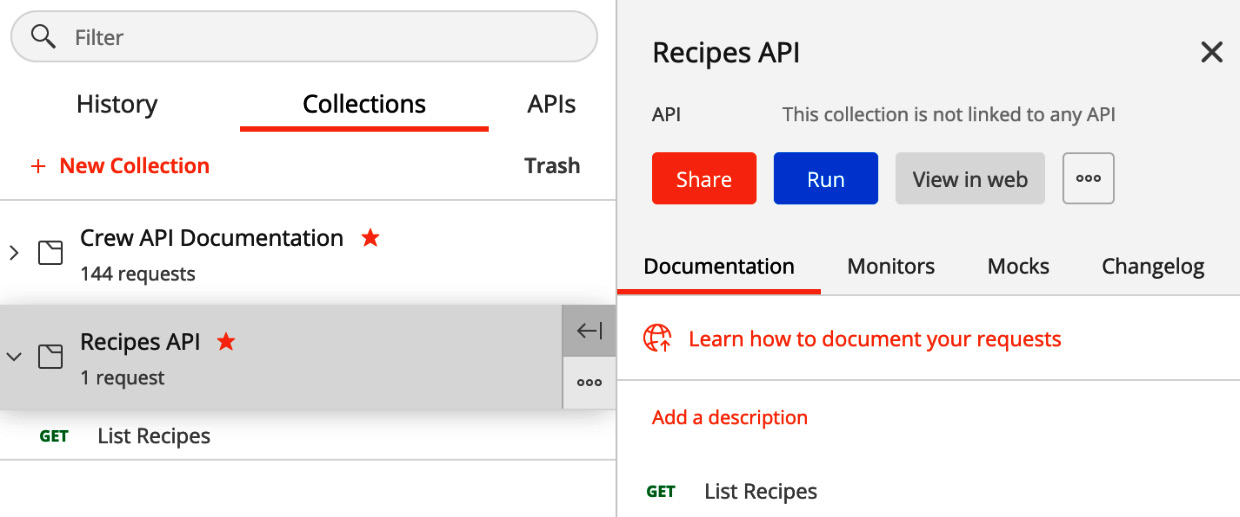
Figure 7.17 – New request
- Click on the Save button—a new tab will open with your given request name. Enter http://localhost:8080/recipes in the address bar and select a GET method.
All right—now, once that is done, you will write some JavaScript code in the Tests section.
In Postman, you can write JavaScript code that will be executed before sending a request (pre-request script) or after receiving a response. Let's explore how to achieve that in the next section.
Scripting in Postman
Test scripts can be used to test whether your API is working accordingly or not or to check that new features have not affected any functionality of existing requests.
To write a script, proceed as follows:
- Click on the Tests section and paste the following code:
pm.test("More than 10 recipes", function () {
var jsonData = pm.response.json();
pm.expect(jsonData.length).to.least(10)
});
The script will check if the number of recipes returned by the API requests is equal to 10 recipes, as illustrated in the following screenshot:
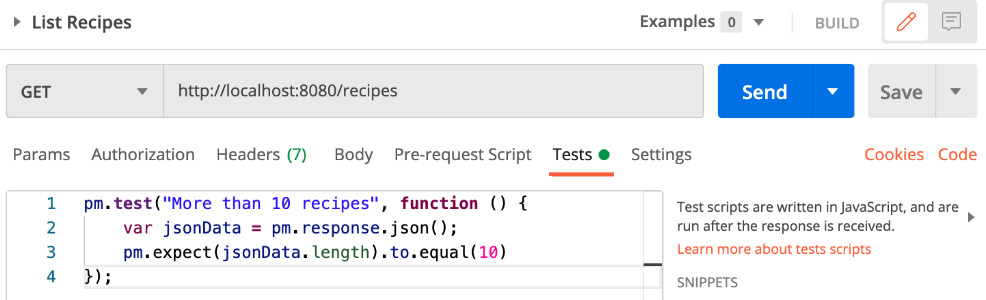
Figure 7.18 – Scripting in Postman
- Press the Send button and check the Postman console, which is shown in the following screenshot:

Figure 7.19 – Running a test script
You can see in Figure 7.19 that the test script has passed.
You may have noticed that the API URL is hardcoded in the address bar. While this is working fine, if you're maintaining multiple environments (sandbox, staging, and production), you'll need some way to test your API endpoints without duplicating your collection requests. Luckily, you can create environment variables in Postman.
To use the URL parameter, proceed as follows:
- Click the eye icon available in the top-right corner and click on Edit. In the VARIABLE column, set the name and the URL, which is http://localhost:8080, as illustrated in the following screenshot. Click on Save:
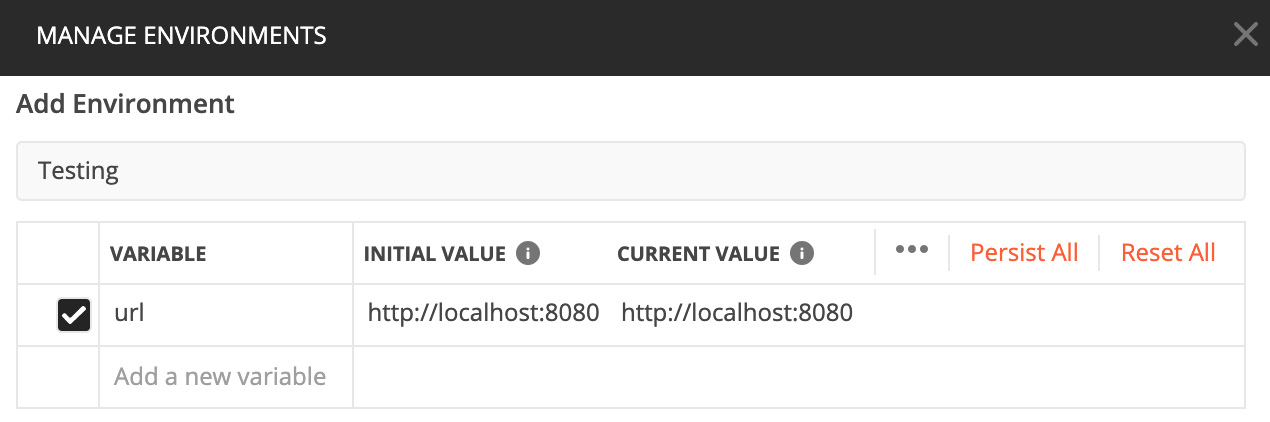
Figure 7.20 – Environment variables
- Go back to your GET request and use the following URL variable. Make sure to select the Testing environment from the drop-down menu in the top-right corner, as illustrated in the following screenshot:
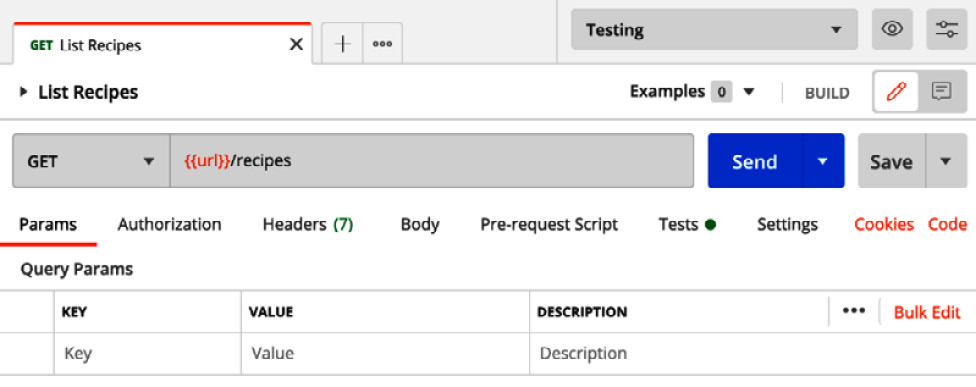
Figure 7.21 – Parameterizing request
- Now, go ahead and add another test script for the API request. The following script will look for a particular recipe in the response payload:
pm.test("Gnocchi recipe", function () {
var jsonData = pm.response.json();
var found = false;
jsonData.forEach(recipe => {
if (recipe.name == 'Gnocchi') {
found = true;
}
})
pm.expect(found).to.true
});
- Press the Send button, and both test scripts should be successful, as depicted here:
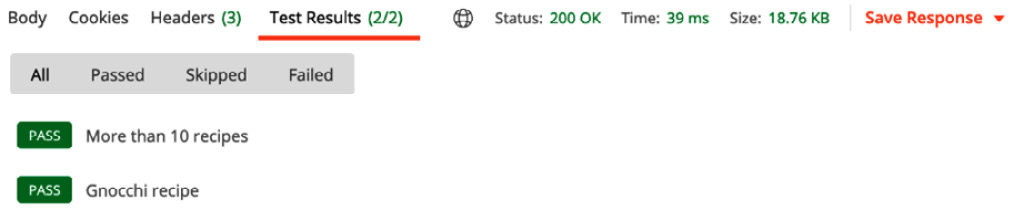
Figure 7.22 – Running multiple test scripts
You can now define multiple test case scenarios for your API endpoints.
Let's take this further and create another API request, this time for the endpoint responsible for adding a new recipe, as illustrated in the following screenshot:
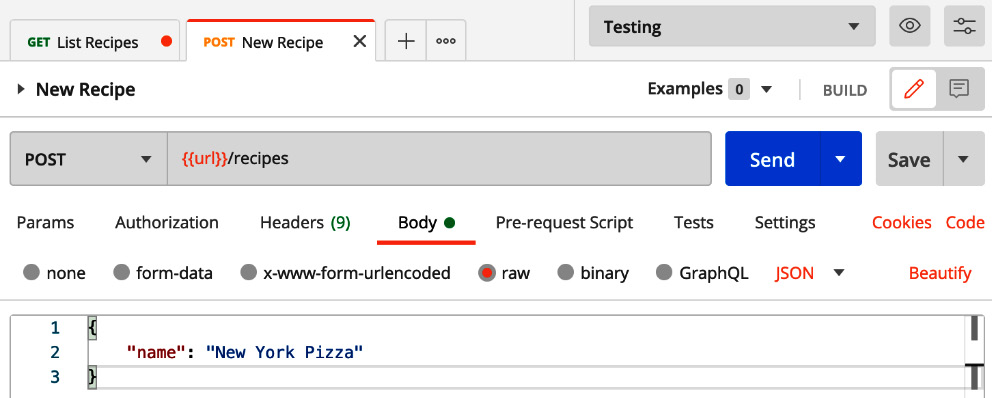
Figure 7.23 – New recipe request
To do so, proceed as follows:
- Define a test script to check if the HTTP status code returned upon successful insert operation is a 200-OK code, as follows:
pm.test("Status code is 200", function () {
pm.response.to.have.status(200);
});
- Define another one to check if the ID of inserted is a string of 24 characters, as follows:
pm.test("Recipe ID is not null", function(){
var id = pm.response.json().id;
pm.expect(id).to.be.a("string");
pm.expect(id.length).to.eq(24);
})
- Click the Send button. The test script will fail because the actual status code is 401 – Unauthorized, which is normal because the endpoint expects an authorization header in the HTTP request. You can see the output in the following screenshot:

Figure 7.24 – 401 Unauthorized response
Note
To learn more about API authentication, head back to Chapter 4, Building API Authentication, for a step-by-step guide.
- Add an Authorization header with a valid JSON Web Token (JWT). This time, the test scripts pass successfully!
- You now have two different API requests in a collection. Run the collection by clicking on the Run button. A new window will pop up, as illustrated in the following screenshot:
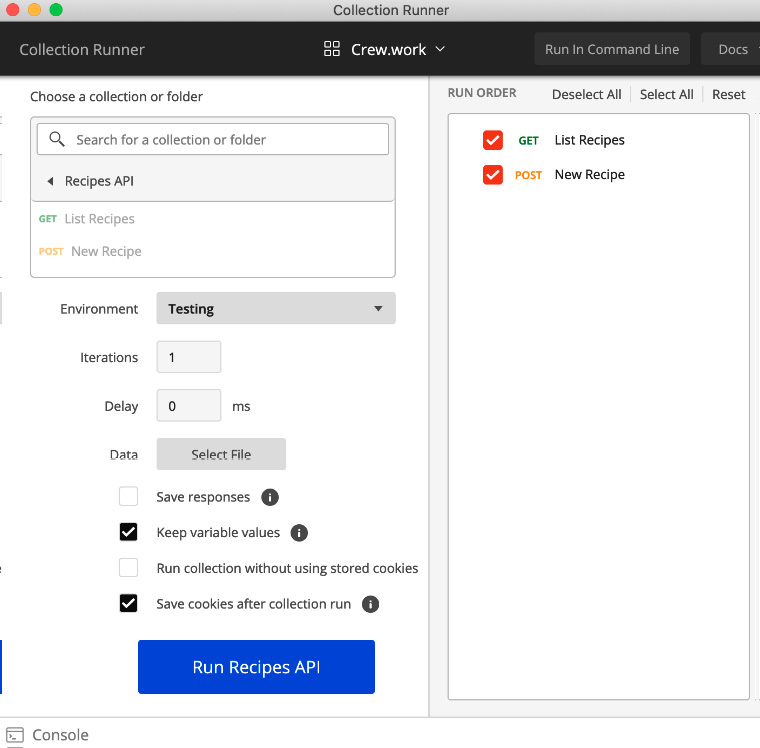
Figure 7.25 – Collection Runner
- Click on the Run Recipes API button, and both API requests will be executed sequentially, as illustrated in the following screenshot:
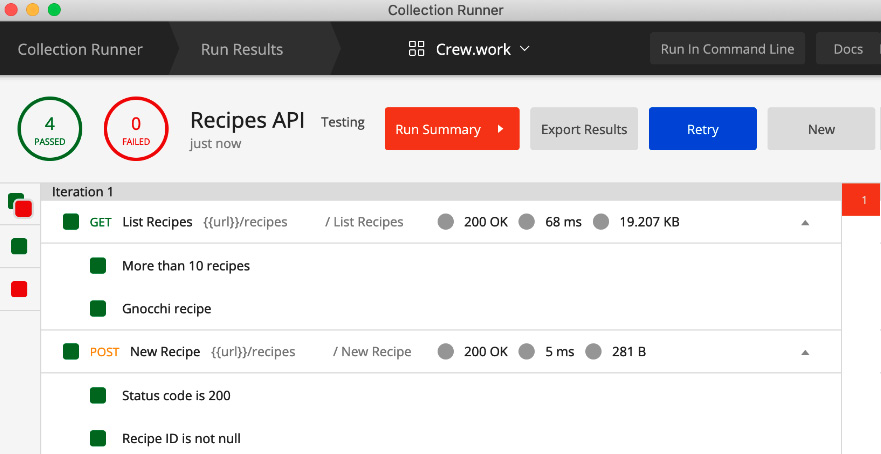
Figure 7.26 – Run Results screen
- You can export the collection and all API requests by clicking the Export button. A JSON file should be created with the following structure:
{
"info": {},
"item": [
{
"name": "New Recipe",
"event": [
{
"listen": "test",
"script": {
"exec": [
"pm.test("Recipe ID is not
null", function(){",
"var id = pm.response
.json().id;",
"pm.expect(id).
to.be.a("string");",
"pm.expect(id.length)
.to.eq(24);",
"})"
],
"type": "text/javascript"
}
}
],
"request": {
"method": "POST",
"header": [],
"body": {
"mode": "raw",
"raw": "{ "name": "New York
Pizza" }",
"options": {
"raw": {
"language": "json"
}
}
},
"url": {
"raw": "{{url}}/recipes",
"host": [
"{{url}}"
],
"path": [
"recipes"
]
}
},
"response": []
}
],
"auth": {}
}
With the Postman collection exported, you can run it from the terminal using Newman (https://github.com/postmanlabs/newman).
In the next section, we will run the previous Postman collection with the Newman CLI.
Running collections with Newman
With all tests being defined, let's execute them using the Newman command line. It's worth mentioning that you can take this further and run those tests within your CI/CD workflow as post-integration tests to ensure the new API changes and that the features are not generating any regression.
To get started, proceed as follows:
- Install Newman with npm. Here, we are using version 5.2.2:
npm install -g newman
- Once installed, run Newman with the exported collection file as an argument, as follows:
newman run postman.json
The API requests should fail because the URL parameter isn't being defined, as illustrated in the following screenshot:
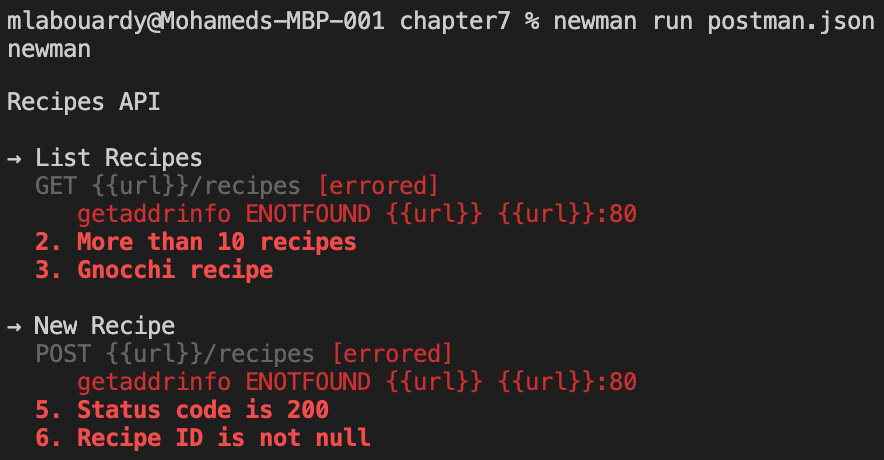
Figure 7.27 – Collection with failing tests
- You can set its value using a --env-var flag, as follows:
newman run postman.json --env-var "url=http://localhost:8080"
This should be the output if all calls are passed:
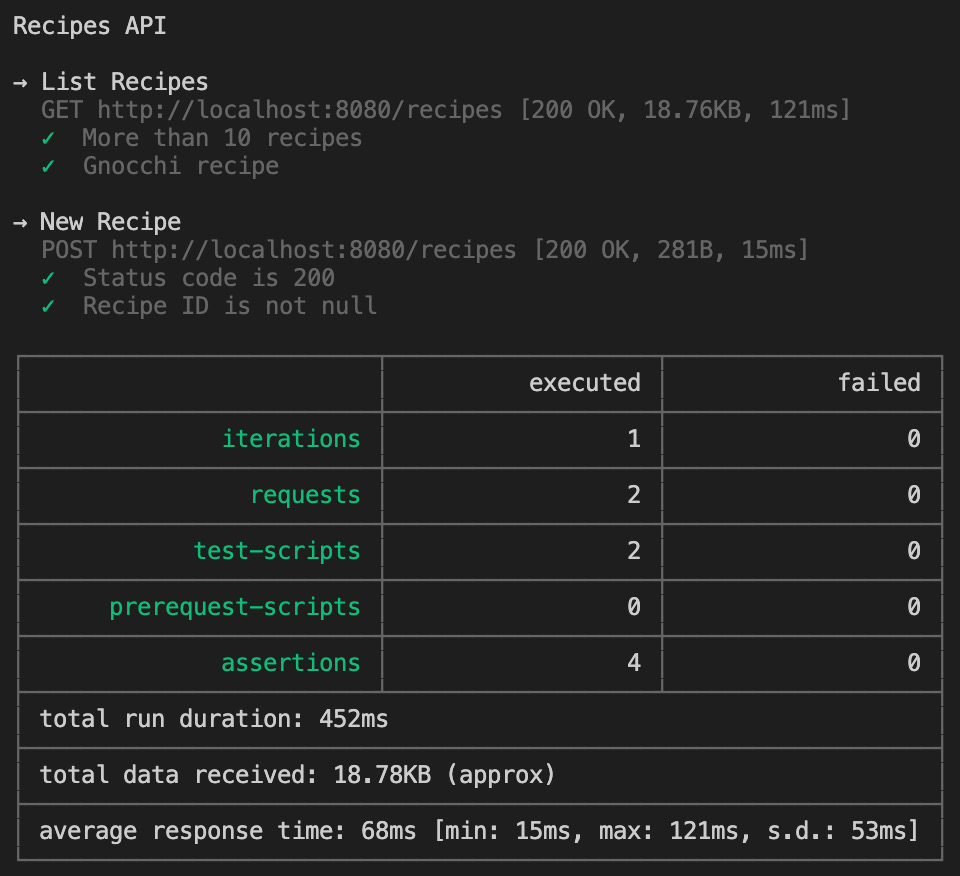
Figure 7.28 – Collection with successful tests
You should now be able to automate your API endpoints testing with Postman.
Note
In Chapter 10, Capturing Gin Application Metrics, we will cover how to trigger newman run commands within a CI/CD pipeline upon a successful application release.
Summary
In this chapter, you have learned how to run different automated tests for a Gin web application. You have also explored how to integrate external tools such as Gosec and Snyk to inspect code quality, detect bugs, and find potential security vulnerabilities.
In the next chapter, we will cover our distributed web application on the cloud, mainly on Amazon Web Services (AWS) using Docker and Kubernetes. You should now be able to ship an almost bug-free applications and spot potential security vulnerabilities ahead of releasing new features to production.
Questions
- Write a unit test for the UpdateRecipeHandler HTTP handler.
- Write a unit test for the DeleteRecipeHandler HTTP handler.
- Write a unit test for the FindRecipeHandler HTTP handler.
Further reading
Go Design Patterns by Mario Castro Contreras, Packt Publishing