
Chapter 12. Isomorphic React.js at WalmartLabs
We are going through an application architecture metamorphosis at WalmartLabs. We are just now slowly beginning to emerge from our warm, secure Java cocoon and have started to spread our beautiful isomorphic JavaScript wings. It is this transition that we will be sharing in this chapter.
Origin of a Species
Walmart has undergone many changes since early 2013. This is because executive leadership set the wheels in motion years ago to make the digital and physical experience seamless for Walmart customers. A large part of this has been an investment in technology and infrastructure. It has been an evolutionary process. Some technologies and projects have thrived and others have become extinct. So it goes. Extinctions have occurred for a variety of reasons, but we learn from each and move forward. One of the latest and most germane to this book is the gradual extinction of Java and Backbone + Handlebars in the UI layer in Walmart.com. In the world of software nothing really dies unless the business or a particular initiative dies. The same problem is just solved in a different (and hopefully better) way using other technologies (Figure 12-1).
Figure 12-1. In the world of software, nothing really dies
The problems we faced with Walmart.com are now being addressed with React.js and Node.js.
The Problem
Typically people see the problem to be solved as simply achieving feature parity with an existing solution—i.e., delivering Walmart.com. While achieving feature parity using a newly developed, unproven technology stack is not a trivial undertaking, that in itself does not provide any real value to the business or the customer. It just moves the eggs from one basket to another.
The real problem is not just delivering Walmart.com, but rather considering how it is delivered and how that delivery solution scales across multiple tenants and clients. Even this problem definition fails to adequately describe the true scope of the problem and the potential for value add by a new technology stack. The real value is determined by whether the new technology and processes can achieve the following guiding principles better than the previous solution:
-
Attract and retain engineering talent
-
Increase development velocity
-
Improve code quality
Ultimately these guiding principles translate to reducing engineering costs to the business and delivering better experiences to the customer, faster. For instance, switching to a single language and runtime container that can be deployed across servers and clients increases development velocity, which in turn allows the business to quickly deliver product enhancements and services across channels. This also reduces development costs. Another example is providing engineers with tools and technologies that they are passionate about using. This will help to attract and retain talent. It will help improve the stack and developer knowledge, because a community will organically arise around these technologies. Lastly, if you select a technology that is flexible but still defines a rendering lifecycle, event interface, and composition pattern, then code quality will improve because there will be clear standards for these core UI patterns. If not, engineers across the organization will make the same decisions multiple times with different design outcomes, which causes reusability and integration issues and increases development costs.
There are too many examples to enumerate, but if you focus your solution and decisions on the guiding principles outlined here, then you will be much better off than if you just ride the latest technology bandwagon for the sake of popularity.
The Solution
As noted earlier, at Walmart the problem is being solved by React and Node. This is because these technologies met our needs and aligned with our goals of attracting and retaining talent, increasing development velocity, and improving code quality—in addition to solving the typical issues addressed by any isomorphic JavaScript solution by providing all of the following:
-
SEO support
-
Distributed rendering
-
Single code base
-
Optimized page load
-
Single stack/rendering lifecycle
React also allowed us to easily share encapsulated pieces of UI rendering logic (i.e., components) across tracks, which greatly improved reusability and the quality of the components as numerous tracks enhanced them. It also provided a common interface for application developers to construct web and native mobile UIs. Furthermore, it provided a great composition model and the community had already defined composition patterns/best practices, such as container components, and presentation components that we could follow. Additionally, the low cost of rerendering the entire UI afforded by the virtual DOM makes UI state management much simpler than the approach of programmatically cherry-picking and manipulating sections of the DOM in application code. Finally, the React community is very active and there are numerous supporting libraries, patterns, and case studies for building and maintaining applications.
React Boilerplate and Patterns
Before we cover the specific approach Walmart took, we will outline the common boilerplate and patterns for an isomorphic React application.
Assumptions and Further Information
The following code examples assume basic knowledge of React, JSX, and ES6. If you are looking to get started with React or create an isomorphic React application, there are numerous examples and boilerplate projects available online to help you get started.
Rendering on the Server
The general approach is to run a Node web framework such as hapi or Express and call React’s renderToString method. There are many variations to this, but its simplest form can be seen in Example 12-1.
Example 12-1. Render component to string
importHapifrom'hapi';importReactfrom'react';import{renderToString}from'react-dom/server';importhtmlfrom'./html';importHellofrom'./hello';classHelloextendsReact.Component{render(){return<div>Hello{this.props.text}!</div>;}}constserver=newHapi.Server({debug:{request:['error']}});server.connection({host:'localhost',port:8000});server.route({method:'GET',path:'/{42*}',handler:(request,reply)=>{reply(html({html:renderToString(<Hellotext="World"/>)}));}});server.start((err)=>{if(err){throwerr;}console.log('Server running at:',server.info.uri);});
The HTML string from the Hello component is rendered to the template that is returned as the handler response, as seen in Example 12-2.
Example 12-2. HTML document template
exportdefaultfunction(context){return(`<html lang="en"><head><meta charSet="utf-8" /></head><body><div id="content">${context.html}</div><!--this would be a webpack or browserify bundle<script src="${context.js}"></script>--></body></html>`);}
This approach works well for static sites in which components do not rely on data on the client. To ensure that this data makes it to the client, a step is added to serialize any data used when rendering on the server (Example 12-3).
Example 12-3. Serialize data (handler from Example 12-1)
server.route({method:'GET',path:'/{42*}',handler:(request,reply)=>{// this could be data from a service, DB, etc.constdata={text:'World'};reply(html({data:`window.__DATA__ =${JSON.stringify(data)};`,html:renderToString(<Hellotext={data.text}/>)}));}});
This data is then passed to the template along with the HTML string, as seen in Example 12-4.
Example 12-4. HTML document template with data
exportdefaultfunction(context){return(`<html lang="en"><head><meta charSet="utf-8" /><script>${context.data}</script></head><body><div id="content">${context.html}</div><!--this would be a webpack or browserify bundle<script src="${context.js}"></script>--></body></html>`);}
The next enhancement usually added is a router that can be shared across the server and the client. This is necessary because without a way to match URLs to handlers—components, in this case—every URL would return the same response. The most commonly used router is the react-router because it was designed to work with React and is a React component itself. The typical approach is to use the react-router match function to map incoming requests to a route, as shown in Example 12-5.
Example 12-5. Matching routes on the server
importHapifrom'hapi';importReactfrom'react';import{renderToString}from'react-dom/server';import{match,RouterContext,Route}from'react-router';importhtmlfrom'./html';// code omitted for brevity...constwrapper=(Component,props)=>{return()=>{return<Component{...props}/>}}server.route({method:'GET',path:'/{42*}',handler:(request,reply)=>{// this could be data from a service, DB, etc.constdata={text:'World'};constlocation=request.url.path;constroutes=(<Routepath="/"component={wrapper(Hello,data)}/>);match({routes,location},(error,redirect,props)=>{if(error){// render 500 pagereturn;}if(redirect){returnreply.redirect(`${redirect.pathname}${redirect.search}`);}elseif(props){returnreply(html({data:`window.__DATA__ =${JSON.stringify(data)};`,html:renderToString(<RouterContext{...props}/>)}));}});// render 404 pagereturn;}});
Quite a bit of new code was introduced in this example. Let’s break it down:
-
wrapperis used to injectpropsintoreact-routerroute handlers. -
The
react-routermatchfunction is used in conjunction with thepath(location) to determine if there is a matching route. -
If
propsexists, then a route was matched and theRouterContext—i.e., the route handler component, which is the wrappedHellocomponent in this case—is rendered.
Resuming on the Client
The previous section described the fundamental steps that most isomorphic React applications execute when rendering on the server. Everyone has their own slightly different implementation, but in the end an HTML document consisting of markup from the rendering of the React component tree to a string and related data is sent to the client. It is then up to the client to pick up where the server left off. In isomorphic React applications this is done simply by calling React.render on the DOM node where the output from renderToString was injected on the server (see Example 12-6).
Example 12-6. Rendering on the client
importReactfrom'react';importReactDOMfrom'react-dom';classHelloextendsReact.Component{render(){return<div>Hello{this.props.text}!</div>;}}constprops=window.__DATA__;ReactDOM.render(<Hello{...props}/>,document.getElementById('content'));
Rendering on the Client and Server
The return value of component render methods should not differ between the client and the server, given the same data. If they do, then the DOM will be rerendered when ReactDOM.render is called, which can cause performance issues and degrade the user experience. To prevent this, make sure the data passed to components is the same on the client and the server for a given route.
Example 12-6 will rerender the component tree, applying any differences between the virtual DOM created by ReactDOM.render and the actual DOM. It will also bind all component event listeners (among other things; see the React documentation). The same principle applies when using the react-router, as illustrated in Example 12-7.
Example 12-7. Rendering on the client with the react-router
importReactfrom'react';importReactDOMfrom'react-dom';import{Router,browserHistory}from'react-router'classHelloextendsReact.Component{render(){return<div>Hello{this.props.text}!</div>;}}constwrapper=(Component,props)=>{return()=>{return<Component{...props}/>}}constprops=window.__DATA__;constroutes=(<Routepath="/"component={wrapper(Hello,props)}/>);ReactDOM.render(<Routerhistory={browserHistory}routes={routes}/>,document.getElementById('content'));
This approach works really well because now routes can be shared between the client and the server. The last piece of the puzzle is ensuring that any rehydrated data is passed to the components. This is usually handled by a wrapper or provider component that resolves data for the component tree (e.g., react-resolver, async-props, Redux, etc.). However, we are using the wrapper approach just as we did on the server for simplicity.
Virtual DOM and Checksums
React uses a virtual DOM to represent a component rendering tree when render is called. This virtual DOM is compared with the DOM and any differences are patched. So, when ReactDOM.render is called on the client, there shouldn’t be any differences and only the event listeners will be bound. The mechanism that React uses to do this is data-react-checksum attributes, which are covered in “Component Rendering Optimization”.
That is all it takes to get a simple isomorphic React application up and running. As you can see, these steps are easily translated to the steps described in Part II, with some being combined and occurring implicitly (e.g., ReactDOM.render binds event listeners and creates component instances).
The Walmart Approach
Walmart uses a variant of the approach described in “React Boilerplate and Patterns”. The primary difference is that we do not transition to an SPA after the first page load. The reasoning is that this is an optimization. It is not required for a minimal viable product (MVP), a complete migration of Walmart.com, nor is it part of our primary objectives (described in “The Problem”). However, we still serialize and rehydrate on the client. At a high level, these are the steps that occur when a route is matched on the server:
-
An application that responds to a subset of routes is initialized.
-
The application creates a
reduxstore and bootstrap actions are fired that prime the store with data in response to a request. -
The
react-routermatches a particular route. -
The matched route is then rendered using the
react-dom/serverrenderToStringmethod using thereduxstore and other data. -
The response is sent to the client including serialized
reduxstore data.
Then, on the client:
-
The client initializes the
reduxstore with data serialized from the server. -
The
react-domrendermethod is called on the application (a React provider/wrapper component) and thereact-router.
Easy, right? Maybe to describe at a high level. There were actually many challenges. One of these will be highlighted in the next section.
Overcoming Challenges
The first cut is always sh*t.
Jason Strimpel
No matter how talented you are or how much you prepare, something will always go wrong. Mistakes will be made or unknowns will arise and wreak havoc on your best-designed and carefully executed plan. How you react to these challenges is what counts. Many challenges were encountered and are still being encountered with Walmart’s migration from Java and Backbone + Handlebars to React and Node. This is the story of one of these challenges.
Time to First Byte
When we started migrating to React, we immediately found that our Time to First Byte (TTFB) was not on par with our existing apps. Server-side CPU profiling revealed that a majority of the time was being spent in ReactDOMServer’s renderToString code to render the initial markup on the server.
Note
Time to First Byte is a standard way of measuring the responsiveness of a web application server. As the name indicates, this is simply the time it takes for the browser to receive the first byte of the page. A slow TTFB is an indication that the application server is taking a long time to process the request and generate the response.
It turns out that React’s server-side rendering can become a performance bottleneck for pages requiring many virtual DOM nodes. On large pages, ReactDOMServer.renderToString(..) can monopolize the CPU, block Node’s event loop, and starve out incoming requests to the server. That’s because for every page request, the entire page needs to be rendered—even fine-grained components, which, given the same props, always return the same markup. CPU time is wasted in unnecessarily rerendering the same components for every page request. We knew that in order for React to work for us we had to change something fundamental to the framework in order to reduce the rendering time on the server.
Component Rendering Optimization
We decided to trade space for CPU time. We applied two complimentary optimizations: component memoization and component templatization.
Component memoization
We had an intuition. We knew that given the same props, pure components will always return the same HTML markup. Similar to a pure function in functional programing, a pure component is simply a function of props, which means it should be possible to memoize (or cache) the rendered results to speed up rendering significantly after the first response. So the question became: could we optimize the React rendering time on our servers by avoiding the need to rerender the same components with the exact same props?
After peeling through the React code base we discovered React’s mountComponent function. This is where the HTML markup is generated for a component. We knew that if we could intercept React’s instantiateReactComponent module by using a require hook we could avoid the need to fork React and inject our memoization optimization. Example 12-8 a simplified version of the injected cache optimization we implemented.
Example 12-8. Caching a component on the server using a require hook
constInstantiateReactComponent=require("react/lib/instantiateReactComponent");...constWrappedInstantiateReactComponent=_.wrap(InstantiateReactComponent,function(instantiate){constcomponent=instantiate.apply(instantiate,[].slice.call(arguments,1));component._instantiateReactComponent=WrappedInstantiateReactComponent;component.mountComponent=_.wrap(component.mountComponent,function(mount){constcacheKey=config.components[cmpName].keyFn(component._currentElement.props);constrootID=arguments[1];constcachedObj=lruCache.get(cacheKey);if(cachedObj){returncachedObj.markup.replace(newRegExp('data-reactid="'+cachedObj.rootId,"g"),'data-reactid="'+rootID);}constmarkup=mount.apply(component,[].slice.call(arguments,1));lruCache.set(cacheKey,{markup:markup,rootId:rootID});returnmarkup;});}returncomponent;});Module.prototype.require=function(path){constm=require_.apply(this,arguments);if(path==="./instantiateReactComponent"){returnWrappedInstantiateReactComponent;}returnm;};
As you can see, we keep a Least Recently Used (LRU) cache that stores the markup of rendered components (replacing the data-reactid attribute appropriately). We also wanted the ability to memoize any pure component, not just those that implement a certain interface, so we created a configurable component caching library that accepts a map of component names to a cacheKey generator function. It looks something like Example 12-9.
Example 12-9. Configurable component caching library
varcomponentCache=require("@walmart/react-component-cache");varcacheKeyGenerator=function(props){returnprops.id+":"+props.name;};varcomponentCacheRef=componentCache({components:{'Component1':cacheKeyGenerator,'Component2':cacheKeyGenerator},lruCacheSettings:{// LRU cache options, see below}});
Application owners can opt into this caching by specifying the component’s name and referencing the cacheKey generator function. This function returns a string representing all inputs into the component’s rendering and is used as a cache key for the rendering optimization. Subsequent renderings of the component with the same name will have a cache hit and return the cached result.
Our goal for using React in the first place was to reuse components across different pages and apps, so we already had a set of reusable pure components with well-defined interfaces. These pure components always return the same result given the same props, and they don’t depend on the state of the application. Because of that, we were able to use the configurable component caching code shown here and memoize most of the components in our page’s global header and footer without having to make any code changes to the components themselves.
Component templatization
This solution took us far in our goal to reduce the CPU footprint on our servers. But we wanted to take this caching optimization a step further and enable component templatization to allow cached rendered markup to include more dynamic data. Even though pure components “should” always render the same markup structure, there are certain props that might be more dynamic than others. Take for example the simplified React product component in Example 12-10.
Example 12-10. React product component
varReact=require('react');varProductView=React.createClass({render:function(){vardisabled=this.props.inventory>0?'':'disabled';return(<divclassName="product"><imgsrc={this.props.product.image}/><divclassName="product-detail"><pclassName="name">{this.props.product.name}</p><pclassName="description">{this.props.product.description}</p><pclassName="price">Price:${this.props.selected.price}</p><buttontype="button"onClick={this.addToCart}disabled={disabled}>{this.props.inventory?'Add To Cart':'Sold Out'}</button></div></div>);}});module.exports=ProductView;
This component takes props like product image, name, description, and price. If we were to apply the component memoization described previously, we’d need a cache large enough to hold all the products. Moreover, less frequently accessed products would likely have more cache misses. This is why we added the component templatization feature. This feature requires classifying properties in two different groups:
- Template attributes
-
Set of properties that can be templatized. For example, in a
<link>component, theurlandlabelare template attributes since the structure of the markup does not change with differenturlandlabelvalues. - Cache key attributes
-
Set of properties that impact the rendered markup. For example, the
availabilityStatusof an item impacts the resulting markup (e.g., generating an “Add To Cart” button versus a “Get In-Stock Alert” button, along with pricing display, etc.).
These attributes are configured in the component caching library, but instead of providing a cacheKey generator function you’d pass in the templateAttrs and keyAttrs instead (see Example 12-11).
Example 12-11. Configurable component caching library with template and key attributes
"use strict";// Example component cache that can be used templatizedvarcomponentCache=require("@walmart/react-component-cache");varcomponentCacheRef=componentCache({components:{"ProductView":{templateAttrs:["product.image","product.name","product.description","product.price"],keyAttrs:["product.inventory"]},"ProductCallToAction":{templateAttrs:["url"],keyAttrs:["availabilityStatus","isAValidOffer","maxQuantity","preorder","preorderInfo.streetDateType","puresoi","variantTypes","variantUnselectedExp"]}}});
Notice that the template attributes for ProductView are all the dynamic props that would be different for each product. In this example, we also used the product.inventory prop as a cache key attribute since the markup changes based on inventory logic to enable the “Add To Cart” button.
When template attributes are configured, the corresponding props are switched with template delimiters (i.e., ${ prop_name }) during the React component rendering cycle. The template is then compiled, cached, and executed to hand the markup backup to React. The cache key attributes are used to cache the template. For subsequent requests, the component’s render is short-circuited with a call to the compiled template. Example 12-12 shows the component caching library with template attributes and template delimiters.
Example 12-12. Component caching library with templatization
component.mountComponent=_.wrap(component.mountComponent,function(mount){constcacheKey=...constrootID=arguments[1];// Iterate over configured template attributes// and set template delimiters on propstemplateAttrs.forEach((attrKey)=>{const_attrKey=attrKey.replace(".","_");templateAttrValues[_attrKey]=_.get(curEl.props,attrKey);_.set(curEl.props,attrKey,"${"+_attrKey+"}");});constcachedObj=lruCache.get(cacheKey);if(cachedObj){constcacheMarkup=restorePropsAndProcessTemplate(cachedObj.compiled,templateAttrs,templateAttrValues,curEl.props);returncacheMarkup.replace(newRegExp('data-reactid="'+cachedObj.rootId,"g"),'data-reactid="'+rootID);}constmarkup=mount.apply(component,[].slice.call(arguments,1));constcompiledMarkup=_.template(markup);self.lruCache.set(cacheKey,{compiled:compiledMarkup,rootId:rootID});returnrestorePropsAndProcessTemplate(compiledMarkup,templateAttrs,templateAttrValues,curEl.props);});
In the restorePropsAndProcessTemplate(..) function we take the template attributes, set the attribute key props, and execute the template with attribute values:
constrestorePropsAndProcessTemplate=(compiled,templateAttrs,templateAttrValues,props)=>{templateAttrs.forEach((attrKey)=>{const_attrKey=attrKey.replace(".","_");_.set(props,attrKey,templateAttrValues[_attrKey]);});returncompiled(templateAttrValues);};
Performance Improvements
By applying the memoization and templatization optimizations we were able to improve the mean request time by 40% and the 95-percentile request time by nearly 50%. These optimizations freed up more of the event loop on our Node servers and allowed them to do what Node does best: asynchronous data fetching. The result was lower CPU time for each page request and more concurrent requests that are not blocked on renderToString(..). As you can see in Figure 12-2, the CPU profiles of one server request after applying the optimizations looked much better.
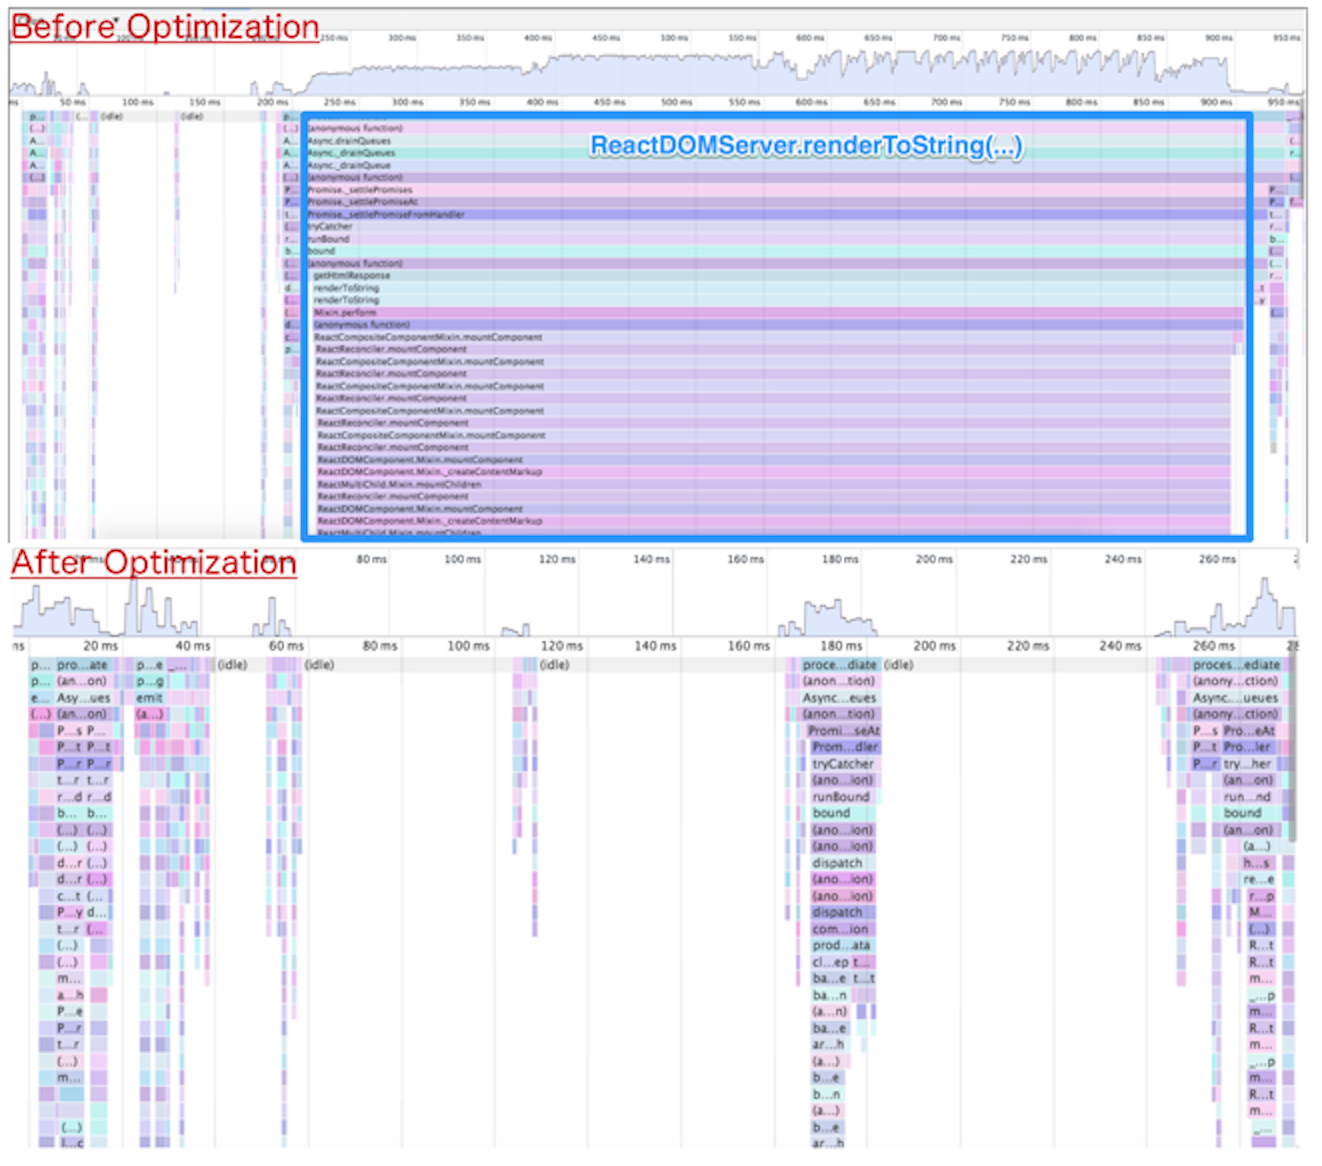
Figure 12-2. CPU profile with and without optimization
If we were to highlight all the cached markup that was returned to a sample page, it would look something like Figure 12-3 (the shaded area indicates markup that was cached on the server).

Figure 12-3. Example page using optimization (the shaded area indicates markup that was cached)
It is important to note that there are several other independent projects that are endeavoring to solve the React server-side rendering bottleneck. Projects like react-dom-stream and react-server attempt to deal with the synchronous nature of ReactDOM.renderToString by rendering React pages asynchronously. Streaming React rendering helps on the server by preventing synchronous render processing from starving out other concurrent requests. Streaming the initial HTML markup also means that browsers can start painting the page earlier (without having to wait for the entire response). These approaches help improve the user’s perception of performance since content can be painted sooner on the screen. However, the total CPU time remains the same since an equivalent amount of work needs to be done on the server, whether it is done synchronously or asynchronously. In contrast, component memoization and templatization reduce the total amount of CPU time for subsequent requests that rerender the same components again. These rendering optimizations can be used in conjunction with other performance enhancements like asynchronous rendering.
Next Steps
The next steps for us at Walmart will be to continue to identify and fix performance bottlenecks like the problem discussed in “Overcoming Challenges”. Eventually, when we are ready, we will flip the isomorphic switch and take advantage of the SPA model for subsequent “page” renders. Finally, we will be open sourcing everything!
Acknowledgments
Anyone who has undergone a similar transformation knows it is not easy, especially in a company the size of Walmart. Aside from the technical and scaling challenges, there are organizational, cultural, and resource challenges. Fortunately, there has been great collaboration, vision, and leadership across teams. This whole endeavor has been an organization-wide team effort, but we wanted to thank the leadership at WalmartLabs for making the investment. We also wanted to thank Alex Grigoryan in particular for supporting the production of this chapter and allowing us to share the story of the transformation he has been leading. Lastly, we wanted to thank Jack Herrington for initiating and inspiring this change, and for all the groundbreaking work he drove and delivered. We will never forget your jars of change video.
Postscript
We have come a long way, and we feel privileged to have played a part, if an extremely minor one, in this journey. The best part, at least from our perspective, is that this journey has just begun, which means that there are many opportunities to engineer more great solutions to difficult problems. So if you are looking for a challenge, we strongly encourage you to take a look at the opportunities at WalmartLabs. Lastly, make sure to follow @walmartlabs on Twitter, watch the GitHub organization, and peruse the WalmartLabs Engineering blog, as we will be sharing our journey in more detail and our code with the community!