
While working with data, you began with data retrieval. You used remote HTTP services to make GET calls and show the data on the screen in an Angular application. You created the ability to cache resources including data calls. As you progress, applications need to create, update, and delete data. In an application that supports offline functionality, the create, update, and delete actions are complex.
This chapter establishes a use case for handling such scenarios. It details how to build Angular components and services that perform the create action. The example can be easily upgraded to edit and delete actions. The previous chapter introduced IndexedDB for persisting data in the browser. It is typically used for managing cache. The use case described in this chapter helps take full advantage of the IndexedDB implementation. As you proceed further in the book, the next chapter details how to perform offline actions with IndexedDB, so you need to understand the use case we will build in this chapter.
In Web Arcade, the create, update, and delete actions are performed on the game details page. The page will call remote HTTP services to save data. The chapter begins by explaining the HTTP methods for the previously mentioned actions. Next, it details how to create the component. It introduces Angular routing for navigation between the list component, which shows a list of board games and the details page. Next, it details the features we build on the game details page while developing the use case. Finally, the chapter details how to build mock server-side services to support the Angular application.
Web Arcade: Game Details Page
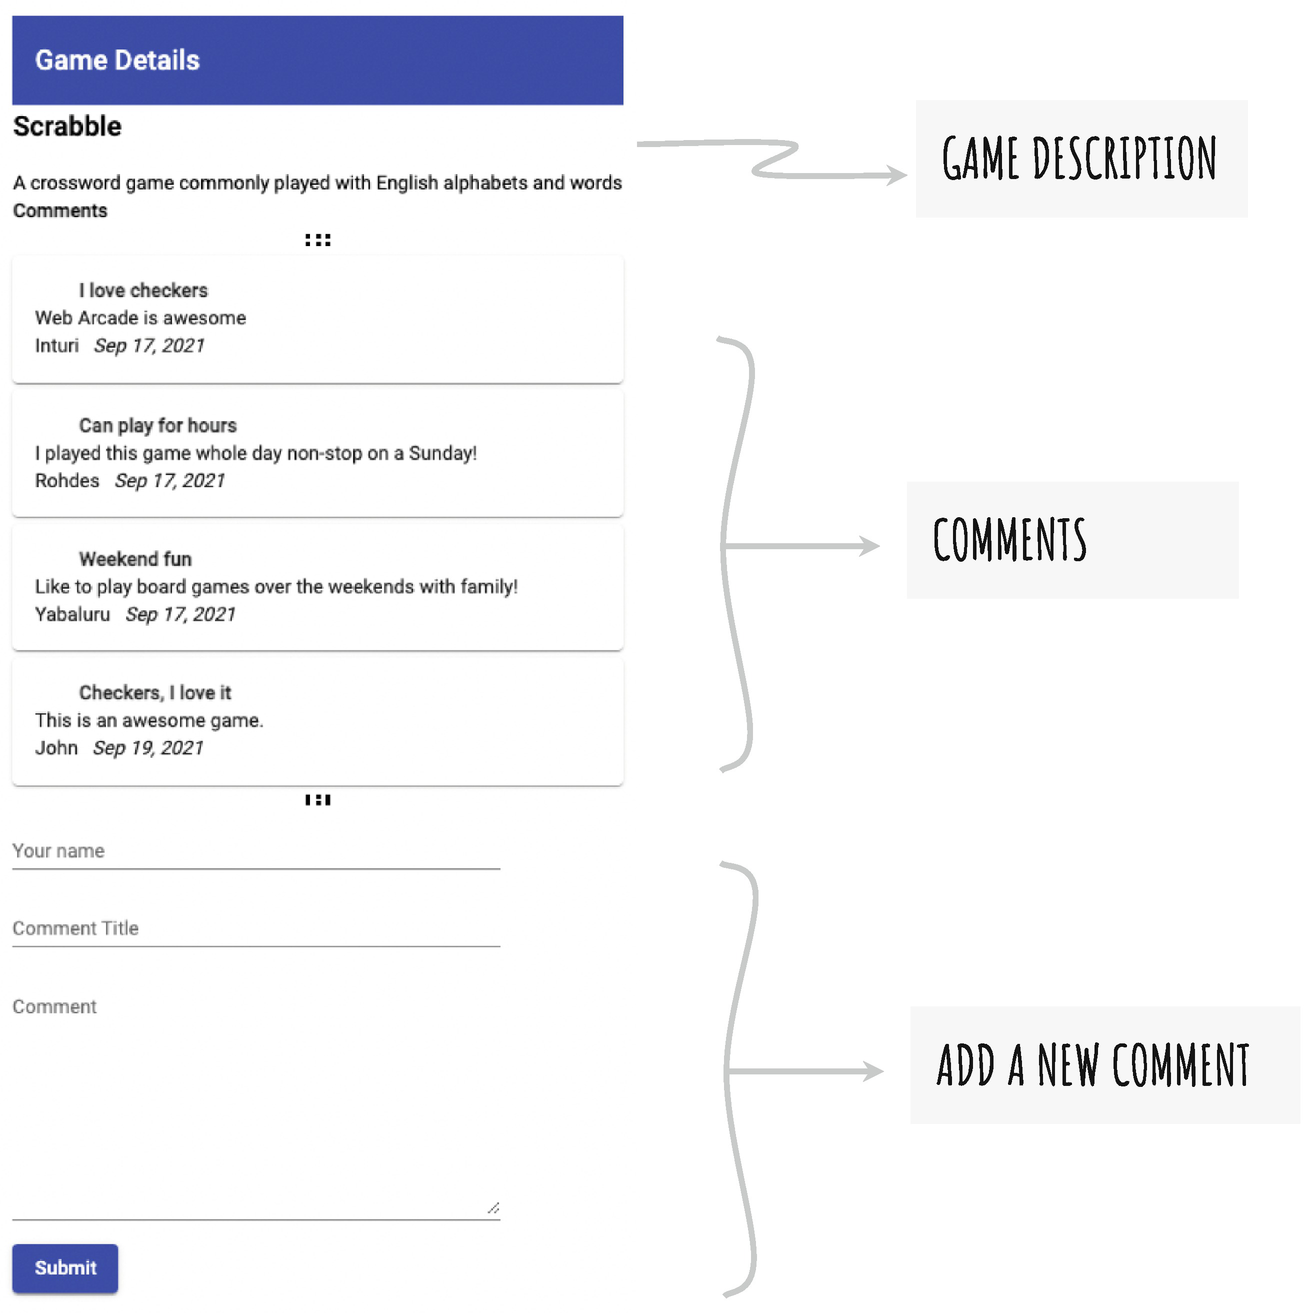
The game details page shows the details of a selected game. We use this page to showcase an example of how to synchronize offline actions with a remote HTTP service.
GET retrieves data. For example, it retrieves a list of board games.
POST submits or creates an entity. For example, it creates a service to create a board game or add user comments on a game that implements the POST method.
PUT replaces or fully updates an entity. For example, consider a board game entity with fields for a game ID, the game title, a game description, a web link with comprehensive details about the game, the origin, etc. For a given game ID, use a PUT method to replace all the fields. Even if a few fields do not change, you can provide the same values again while using the PUT method.
PATCH replaces or updates a few fields on an entity. In the previous example, consider updating just the origin field. Develop an HTTP service with PATCH to update the origin field on an entity.
DELETE removes or deletes an entity.
In addition to the previous HTTP methods, there are other less used HTTP methods including HEAD, CONNECT, OPTIONS, and TRACE.
So far, offline access was provided to GET service calls. This chapter uses IndexedDB to cache and synchronize POST service calls. You may use a similar implementation on the remaining HTTP methods.

Navigation to a game details page
Fields on game details page
Offline Scenario
A user can submit comments. When online, the service calls an HTTP service to post new comments. However, if offline, use IndexedDB to save the comments temporarily. Once back online, post the comments to the remote service.
Creating a Component for Game Details
Routing
Angular routing enables Angular applications to take advantage of the URL (see the address bar in a browser) and load content on the fly. You map a component to a path in the URL. The component loads as the user navigates to the respective path.
Route Configuration
Notice that the board games component is configured to load with the path /home, and the game details component is configured to load with the path /details, for example, http://localhost:4200/home and http://localhost:4200/details.
Navigate to Game Details Page
Board Games Component Template
See lines 6 and 19. Each game (card) is enclosed in a hyperlink element, <a></a>.
Notice that line 5 iterates through a list of games with the ngFor directive. The variable game represents a game in the iteration.
In line 6, the click event is handled by the gameSelected() function. Notice the game variable is passed in as a parameter. This is the variable with game data in the current iteration.
Navigate to the Details Page
A router service instance is injected in line 4.
Line 7 uses a router instance to navigate to the details page.
Notice that a query param game ID is provided. The game object is passed in from the template. See the earlier Listing 8-2.
The game-id selected in the current list component (BoardGamesComponent) will be used in the game details component. It retrieves complete details of the selected game.
Retrieve Game ID from Query Params
The sample uses the ActivatedRoute service to read query params in the URL.
Line 2 imports the ActivatedRoute service from Angular’s router module. Next, line 11 injects the service into the component. The service instance is named router.
See the ngOnInit() function between lines 13 and 18. This function is invoked after the constructor and during the component initialization.
See the code between lines 14 and 17. Notice that the code uses router.queryParams. The queryParams is an observable. Subscribe to it to access the query params.
The result of the queryParams subscription is named r. Access the game ID as a field on the result, r['gameId']. Now, you have access to the game ID provided by BoardGamesComponent.
Pass the game ID as a function parameter to a private function, getGameById(). This function is defined in lines 20 to 27.
The getGameById() function invokes another function with the same name getGameById() defined as part of GamesService. It returns an observable, and subscribing to it returns results from an HTTP service. The remote HTTP service provides game details by GameId.
In line 23, you set the results from the HTTP service onto a game object on the component, which is used in the HTML template.
The HTML template shows the game details to the user.
Next, call the private function getComments(), which retrieves comments on the given board game. See lines 29 to 31. It invokes the getComments() function on the GameService instance, which obtains data from a remote HTTP service.
Set results from the HTTP service onto a commentsObservable object on the component, which is used in the HTML template. The HTML template shows the comments.
Game Details Component HTML Template
Lines 10 and 11 show the game title and description. Line 9 checks if the game object is defined (with an ngIf directive). This is to avoid errors with the component before the game data is obtained from the service. As you can imagine, when the component first loads, the service call is still in progress. The game title, description, and other fields are not yet available. Once retrieved from the service, the ngIf condition turns true, and the data is displayed.
See line 21. It iterates through the comments. Line 24 shows the comment title. Lines 28 and 29 show the comment description, username, and comment timestamp.
See Listing 8-4. commentsObservable is of type Observable. Hence, line 27 in Listing 8-5 uses | async.
- Notice the following HTML styling decisions:
The listing uses Angular Material’s Toolbar component (mat-toolbar) to show the title. See lines 3 to 5.
Each comment is shown on an Angular Material card. See the components mat-card, mat-card-header, and mat-card-content on lines 21 to 31.
Listing 8-4 uses two functions from a service: getGameById() and getComments(). As you can imagine, the Angular service function invokes a remote HTTP service to get the data.
Remember, we developed mock services to demonstrate remote HTTP service functionality. You returned mock JSON for board games. For the previous two functions, getGameById() and getComments(), you will extend the Node.js Express service. It is covered later in the chapter, in the section “Updates to Mock HTTP Services.”
A real-world service integrates with and creates, retrieves, and updates data in mainstream databases such as Oracle, Microsoft SQL Server, or MongoDB. It is out of scope for this book. To ensure the code samples are functional, we created mock services.
However, as you have seen in the previous code samples, the components do not integrate directly with remote HTTP services. You use an Angular service, which uses other services to abstract this functionality from the components. The components purely focus on presentation logic for the application.
Game Service Invoking Remote HTTP Services
Line 6 injects the HttpClient service. It is an out-of-the-box service provided by Angular to make HTTP calls.
See lines 10 and 18. The functions use the HttpClient instance httpClient. It invokes the remote HTTP service.
Both the functions use the GET HTTP method. The first parameter is the endpoint URL.
It is advisable to configure URLs (instead of hard-coding them in the application). Hence, the URLs are updated in an environment file. See Listing 8-7 for the environment file.
Notice that both the functions require gameId as a parameter. See lines 8 and 16.
The game is passed as a query param to the remote HTTP service. See lines 12 and 20.
Notice that getGameById() returns an observable of type BoardGamesEntity (Observable<BoardGamesEntity>). The remote service is expected to return a JSON response adhering to the interface contract specified in BoardGamesEntity. See Listing 8-8(a) for the interface definition.
getComments() returns an observable of type CommentsEntity (Observable<CommentsEntity>). As multiple comments are retrieved from the service, it is an array. The remote service is expected to return a JSON response adhering to the interface contract specified in CommentsEntity. See Listing 8-8(b) for the interface definition.
The remote service calls return an observable because they are asynchronous. The service does not return the data as soon as the browser invokes it. The code does not wait until the result is returned. Hence, a subscriber callback function is invoked once the data is available from the remote service.
Environment File with Additional Endpoints
TypeScript Interface BoardGamesEntity
TypeScript Interface CommentsEntity
The URLs are required in two files: src/environments/environment.ts and src/environments/environment.prod.ts. The environment.ts file is used for development builds (for example, yarn start). The environment.prod.ts file is used for production builds (for example, yarn build or ng build).
Adding Comments
See Figure 8-2. Notice the last section with a data form to add a comment. It enables users to add comments about the board game. So far you have largely worked with data retrieval. This is an example of creating an entity, namely, a comments entity. As mentioned earlier, you use the HTTP POST method for creating an entity in the back-end system.
Add Comment HTML Template
Notice lines 1 to 20. They create form fields for the username, title, and comment detail.
The listing uses Material Design components and directives. Lines 4, 11, and 18 use matInput with the elements input and text area, respectively. These Angular Material elements need the Material Design input module. See Listing 8-10, lines 1 and 8.
The mat-form-field component encapsulates the form field and the label. The component mat-label shows a label for the form field.
Lines 4, 11, and 18 use change event data binding with the functions updateName(), updateTitle(), and updateComments(). Listing 8-11 sets the value of a form field to a variable in the component. The change event occurs every time a change occurs (a user types in a value) in the form field.
In Listing 8-9, notice the click event data binding in the HTML template on line 22. The TypeScript function submitComments() is called as and when the user clicks the button.
Import Angular Material Input Module
Comments Form Handlers
See lines 19 to 29 for the functions updateName(), updateTitle(), and updateComments(). Remember, they are invoked on change events in the form fields. Notice the function definition uses event.target.value. The event’s target refers to the form field (DOM element). The value returns the data typed in by the user.
The values are set to the class variables name (for user name), title (for comment title), and comments (for comment description).
The submit button’s click event is data bound to the submitComment() function. See lines 32 to 38. Notice that it invokes the addComments() function on the service GameService instance (gameSvc). On line 16, GameService is injected to be used in the component.
Notice the service function requires a list of parameters including the username, title, and description. The values captured earlier (with the change event handler) are passed into the service function.
addComments() invokes the server-side HTTP service. If the add comment action is successful, the success callback for the observable is invoked. It shows a success message, providing the feedback on the add comment action.
GameService Implementation
Line 11 injects the HttpClient service. This is an out-of-the-box service provided by Angular to make HTTP calls.
In lines 14 and 22, the functions use the HttpClient instance called httpClient. This invokes the remote HTTP service.
In line 16, notice you are making an HTTP POST call. The first parameter is the service URL. Considering that the URL is a configuration artifact, it is updated in the environment file.
The second parameter is the POST method’s request body. See Figure 8-5 to understand how the values translate to the request body on the network.
One comments URL is used for two actions, retrieving and creating comments. A RESTful service uses the HTTP method GET for retrieval. For a create action, the same URL is used with the POST HTTP method.
Updates to Mock HTTP Services
The new components need additional data and features from the remote HTTP services. This section details changes to the mock services. In a real-world application, such services and features are developed by querying and updating the database. As it is out of scope for the book, we will develop mock services.
Filtering Game Details by ID
The game details component needs one game detail at a time. Remember, in an earlier chapter, you developed a service to return all the board games. This section details how to retrieve game data by ID.
Filter Game by an ID
Line 7 filters board games by game ID. The statement dataset .boardGames.find( i => +i.gameId === +req.query.gameId) returns the game details with the given ID. Typically, we expect a single game with an ID. In a different scenario, if you anticipate more than one result, use the filter() function instead of find().
- The results from the find() function are passed in as a parameter to the send() function on the response object (variable name res). This returns the results to the client (browser). See Figure 8-3.
See line 3. The mock service retrieves a list of board games from a mock JSON object in the data directory.
See line 5. The HTTP method for this filter endpoint is GET.
See line 6. The response content type is set to JSON, which is a ready-to-use format for the Angular services and components.

Filtering the game by an ID
Notice the + symbol on line 7. This is a way in JavaScript to type case a string to a number.
Retrieving Comments
The game details page lists comments, as shown in Figure 8-2. Notice the list of comments below the game description. This section details how to create a mock server-side service to retrieve comments.
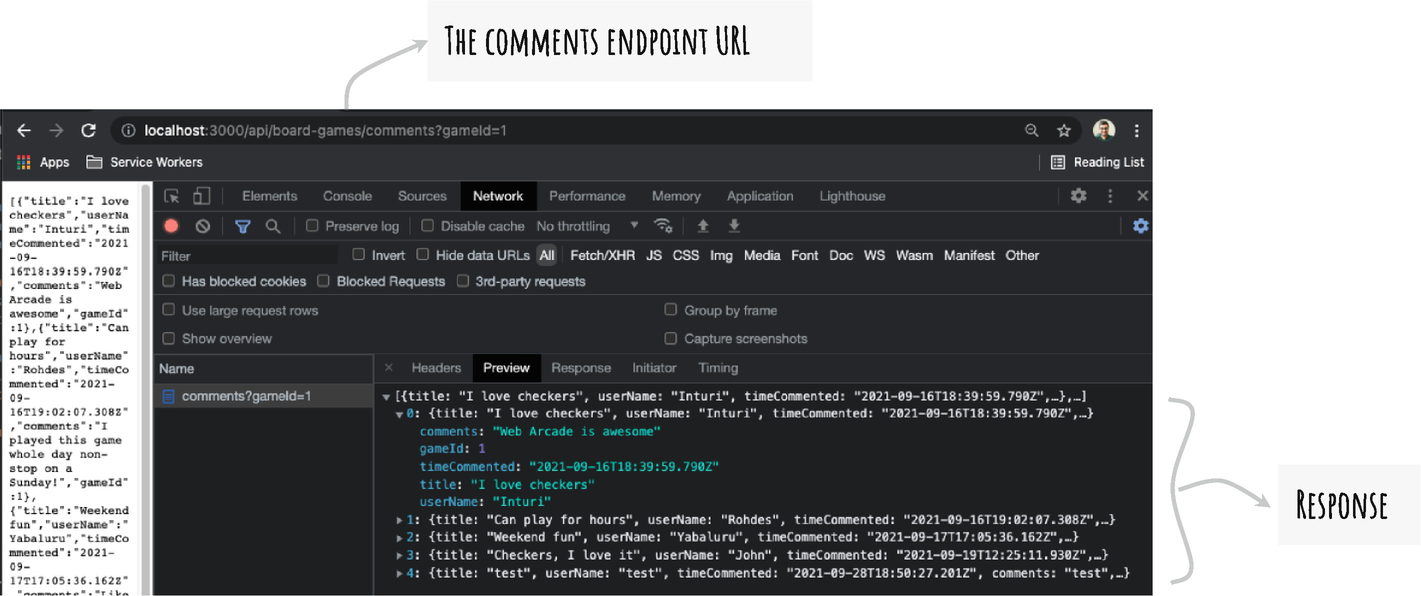
The comments endpoint
An Endpoint to Retrieve Comments
Line 5 creates an endpoint, which responds to an HTTP method, GET. The get() function on the express router instance enables you to create the endpoint.
Line 6 retrieves a current list of comments from a file on disk, data/comments.json.
The readFile() function on the fs module (for “file system”) is asynchronous. You provide a callback function, which is invoked as the API successfully reads a file or errors out. In Listing 8-14, notice the callback function between lines 6 and 18.
While the first parameter, err, represents an error, the second parameter, data, contains the contents of the file. See lines 8 to 10. If an error is returned, it is logged and returns the control out of the function.
Assuming there are no errors reading the file, the file contents include an entire list of comments belonging to all the games in the system. The service is expected to return a comment only for the given game. Hence, you filter the comments by game ID. See the code on lines 13 to 16, which creates a filter. The filter() function is defined on JavaScript array objects. The predicate on line 15 tests each item in the array. The comments with the given game ID are returned.
See line 17, which responds with the filtered comments to the client (e.g., browser).
Adding Comments
The game details page allows users to comment, as shown in Figure 8-2. The form has fields for a username, a title, and a detailed comment. This section details how to create a mock server-side service to save comments.

The create comments endpoint
A POST Endpoint to Create Comments
Line 5 creates an endpoint, which responds to the HTTP POST method. The post() function on the express router instance enables you to create the endpoint.
The endpoint needs to append the new comments to the current list of comments. The file data/comments.json has an array of the current list of comments.
The readFile() function on the fs module is asynchronous. You provide a callback function, which is invoked as the API successfully reads a file or errors out. In Listing 8-15, notice the callback function on lines 8 to 21.
While the first parameter, err, represents an error, the second parameter, data, has contents of the file. See lines 9 to 11. If an error is returned, it is logged and returns the control out of the function.
Assuming there is no error reading the file, line 12 adds comments in the file to a local variable called commentsData.
Next, line 13 concatenates a new list of comments on the request object to the commentsData variable. As mentioned earlier, the POST method has a request body. It includes a list of comments provided by the Angular application.
The consolidated list of comments are written back to the file. See line 15, which writes the entire list of comments to the file.
Summary
This chapter builds on the Web Arcade use case. It is crucial for understanding the offline function we will build in the next chapter. So far, while working with data, you performed data retrieval and caching. This chapter established a use case for the create, update, and delete scenarios.
The game details page just shows a title and a description for a board game. However, the mock service and the TypeScript interface include many additional fields including origin, alternate names, recommended number of players, etc. Include the additional fields on the game details page.
The add comment functionality shows a Snackbar component message if the action is successful (see Listing 8-11, line 36). The sample does not show a message for an error. Update the code sample to show a Snackbar component alert for errors.
Implement a back button on the game details page to navigate back to the list screen.