5. Communication and Viral Features
Most successful apps are spread through a few users; these users install the app, and then they tell their friends about it, and they tell their friends, and so on and so on. MySpace and OpenSocial have four built-in viral features designed to speed up and improve that process:
1. opensocial.requestShareApp
2. opensocial.requestSendMessage
3. opensocial.requestCreateActivity
4. MyOpenSpace.requestCreateNotification
These four features make up the communication components that will help you spread your app virally. If you’d like to learn more about actually marketing and growing an app, see Chapter 14, Marketing and Monetizing.
In this chapter we’ll cover each of these four viral features in detail, using examples built into our Tic-Tac-Toe application.
Using opensocial.requestShareApp to Spread Your App to Other Users
Let’s start by looking at how opensocial.requestShareApp works. The requestShareApp function is essentially a request to install the app that is sent from one MySpace user to another. For example:
1. Susan has the Tic-Tac-Toe app installed.
2. The app provides the requestShareApp functionality via a button on the Canvas surface.
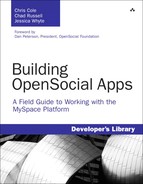
3. Susan invokes requestShareApp (see Figure 5.1) to invite Matt to also install the app and clicks Send.
Figure 5.1 Screen shot of the requestShareApp function prompting a user to send an add request to friends.
4. Matt logs in and sees a New App Invite in the Updates module on his Home page and clicks it, which takes him to the app invite.
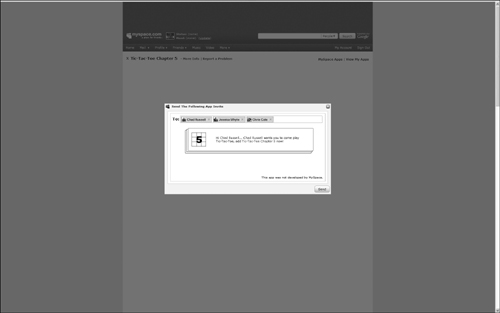
5. Matt sees each app invite under Notifications → App Invites in his Mail Center (see Figure 5.2).
Figure 5.2 Screen shot of the requestShareApp function inviting another user to add the app.
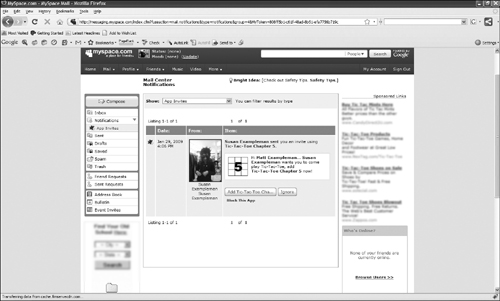
6. Matt clicks the Add Tic-Tac-Toe button and the Add App install modal dialog pops up, as shown in Figure 5.3.
Figure 5.3 Screen shot of the requestShareApp function prompting the user to install the app.
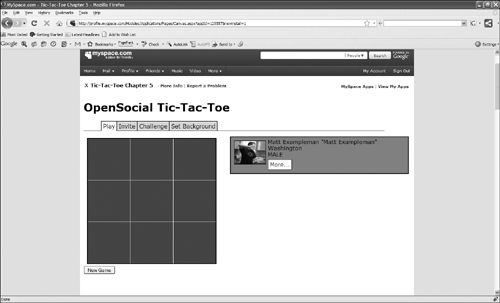
7. Matt clicks Add and is taken to the app’s Canvas page, as shown in Figure 5.4.
Figure 5.4 The user is transported to the app’s Canvas page.
Defining requestShareApp
opensocial.requestShareApp has the following signature:
opensocial.requestShareApp =
function(recipients, reason, opt_callback, opt_params)
The recipients parameter can be either an array of strings or a single string. This means that you can send an invite to multiple recipients, something that isn’t possible with requestSendMessage on the MySpace platform. MySpace actually allows integer IDs like 6221, integer IDs as strings, like "6221", or IDs in the form "myspace.com:6221". Any combination of these IDs can be placed inside an array or passed individually. The maximum number of recipients, as of this writing, is 20.
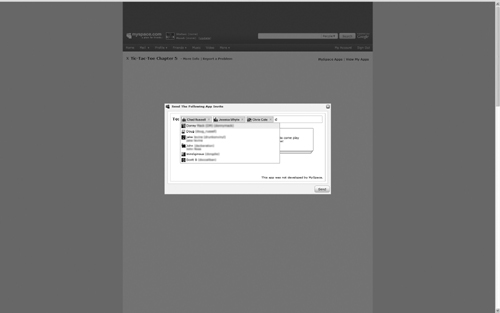
Once the modal pop-up loads, the user also has another chance to manipulate the recipient list. The To: box in the pop-up actually has autocomplete functionality; after clicking inside the box, the user can type the name (display name, user name, or real name) of another recipient and select that user from the drop-down (see Figure 5.5). The user can also delete any current recipient.
Figure 5.5 As the user starts typing, a drop-down list of friends appears.
The reason object is an object of type opensocial.Message and is defined by OpenSocial as “the reason why the user wants the gadget to share itself.” The reason contains the content of the message that appears in the recipient’s Mail Center page. The intention is to make the app sound fun or interesting so the recipient will install it. The sender also sees a preview of the message before it’s sent, so it should be something the sender approves.
The reason parameter does not allow HTML markup, but it does provide a simple templating system. The message can be up to 150 characters long, but that limit doesn’t include the following template variables:
• [sender]: Turns into a link to the sender’s Profile; the text is the sender’s display name.
• [app]: Turns into a link to the app’s Profile; the text is the app’s name.
• [recipient]: Turns into a link to the recipient’s Profile; the text is the recipient’s display name.
For example, your reason might read “[sender] wants you, [recipient], to install [app]” or “Hey, you, install this: [app].” The first example might render to something like this:
“Susan wants you, Matt, to install Tic-Tac-Toe.”
The last two parameters, opt_callback and opt_params, are optional. opt_callback specifies the function to call once the request has been processed and the user has closed the Add App pop-up. opt_params is used to provide the function with additional parameters; however, MySpace doesn’t support any of the additional parameters, so opt_params can be safely ignored.
Writing the requestShareApp Code
Now that we’ve defined our requestShareApp function, let’s take it for a test drive. The following code wraps the requestShareApp functionality so that you can use it throughout your application:
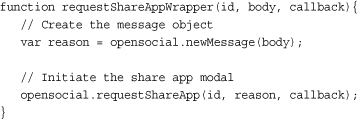
This simple code starts out by creating an opensocial.Message object to use as our reason parameter. Only the body field of the message object is used, though; all other fields are ignored. Next, the recipient IDs, along with the callback function, are used to initiate the opensocial.requestShareApp function.
Calling requestShareApp
But how will we use this function throughout our Tic-Tac-Toe application? How will it be called?
Typically, the IDs of the recipients are found by running a newFetchPeopleRequest API request and presenting your user with a list of the friends whom they can then invite to the app. Once the user selects some friends, their IDs will be passed into the requestShareApp function.
We showed how to fetch a list of friends in Chapter 3, Getting Additional MySpace Data, so let’s build on that. Assume that each div tag containing a friend’s information has an onclick event handler. When invoked, that handler takes the ID of the clicked friend and adds it to an array. In the app we have a button with the following code:

First, we check to see that at least one friend has been picked. We then define the actual reason text and pass it, along with the array of IDs, into the requestShareAppWrapper function we created earlier. But what about the callback? What’s it for?
The requestShareApp Callback
The callback function is invoked either after the user has closed the modal pop-up prompt or if an error occurred before the pop-up prompt could be displayed. Once invoked, the callback is passed an opensocial.ResponseItem as a parameter. This ResponseItem behaves similarly to the way it did in API callbacks (see Chapter 2, Getting Basic MySpace Data, to learn how basic callbacks work). The difference is that the API callbacks were passed an opensocial.DataResponse object that contained opensocial.ResponseItem objects. Here we just have the opensocial.ResponseItem object as the response, so you can directly access things like hadError(), getErrorCode(), or getData().
Once the pop-up is shown, there are four possible outcomes:
1. The user accepts the request to share the app. In this case the value of getData() is the number 1.
2. The user cancels the request; in this case the response is 0.
3. Some error occurred with the page that loads inside the pop-up; in this case the response is the number −1.
4. There was an error with your request syntax. This causes the hadError() function to return true. Details of this error are found using getErrorCode() and getErrorMessage().
One thing to remember is that once the pop-up has been shown, the user can adjust the recipients. So you may think you know who the recipients are going to be, but the user can completely alter that list. To get around that problem, MySpace pushes a couple of additional bits of data down into the callback function. In the following function we make use of this data; let’s take a look at how it works:
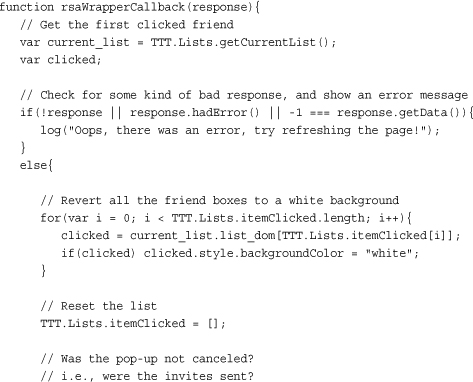
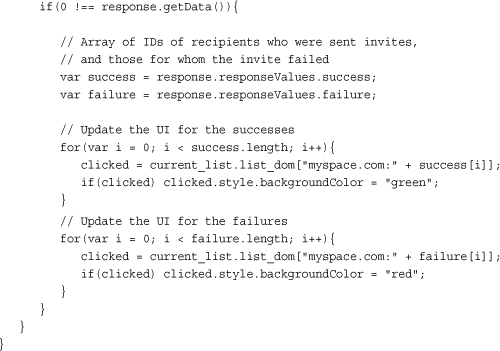
So, there is a lot going on here. The callback for requestShareApp is especially important. The first thing that really happens is that the various types of errors are trapped, and an error message is displayed if one is found.
If there was no error, we cycle through the list of currently selected users, revert the background of the corresponding div tags to white, and reset the list. There are now two possibilities: the user either canceled the pop-up or hit Send. If the pop-up was canceled, there’s no more work to do. If the pop-up wasn’t canceled, the user must have hit the Send button, so we need to figure out who the actual recipients were. We do this by accessing the responseValues object in the ResponseItem that’s passed back to us. responseValues contains two arrays: One, success, contains the list of users who were successfully sent an invite. The other, failure, contains the list of users who had an error occur when the invite was sent. Both arrays contain the integer IDs of the specified users.
There are a couple of things to note when accessing the success and failure arrays. First, users who already have the app installed won’t get the invite, but neither will they show up in either array. Second, the IDs in the array are integers, so they don’t exactly match the IDs that are sent by the API (in the format "myspace.com:6221").
Back to the function at hand. We extract the success and failure arrays and loop through them. We turn the background color of all the successful recipients to green, and that of all the failures to red. You’ll notice that we have to append "myspace.com:" to the beginning of each ID so it matches up with the IDs we fetched from the API.
It may be useful to add a More button to your app, something like “Select Random 20” that will randomly select 20 of the user’s friends. This will help encourage users to share the app with a larger group of friends; turning 20 clicks into one click makes it much easier for your users.
Using opensocial.requestSendMessage to Send Messages and Communications
Let’s examine how opensocial.requestSendMessage works. The requestSendMessage function provides a number of ways for apps to communicate with users.
MySpace supports the following message types:
• Send Message: a private one-to-one message that will arrive in the user’s Mail Center in-box
• Comment: a public one-to-one message that will appear on the user’s Profile page in the Comments section
• Bulletin: a one-to-many message that will appear in the Bulletins module of each of the user’s friends’ Home pages
• Blog: a one-to-many message that will appear on a MySpace user’s Blog
• Profile: not a message per se; allows an app to edit/update the user’s Profile. The following Profile sections can be edited and are chosen by the user in a drop-down menu:
About Me
I’d Like to Meet
Interests
Edit Artist Profile
Movies
Television
Books
Heroes
Defining requestSendMessage
opensocial.requestSendMessage has the following signature:
opensocial.requestSendMessage =
function(recipients, message, opt_callback, opt_params)
You probably noticed that the signature for opensocial.requestSendMessage is very similar to that of opensocial.requestShareApp. The big difference is that you’re allowed to define only one recipient ID at a time; the container will reject an array of IDs. Similar to requestShareApp, however, are opt_callback, which is the function that’s invoked when the pop-up modal has closed, and opt_params, which is unused.
Note
Some targets don’t require a recipient; these are Bulletin, Profile, and Blog. Any recipient value passed in for these targets will be ignored.
The message parameter is an object of type opensocial.Message. The supported content of the message depends on the message type; here’s a quick breakdown:
• Types that support a message title are Send Message, Comment, Bulletin, and Blog. The title doesn’t support any HTML markup.
• All of the message types support a message body. All support some HTML markup in the body. Tags like <div>, <script>, and <span> are stripped out, but tags like <a>, <img>, <b>, and <em> are allowed.
When creating the opensocial.Message object, you need to specify the opensocial.Message.Field.Type property; this specifies which of the message types will be sent. Table 5.1 shows the list of supported types and the opensocial.Message.Field.Type fields to which they correspond.
Table 5.1 Supported Message Types
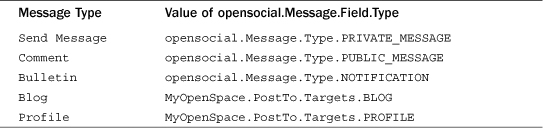
Profile and Blog are MySpace-specific extensions and not in the OpenSocial spec, which is why they’re namespaced a little differently. In the code that follows, we’ll show you how to make use of the message types when using requestSendMessage.
Writing the requestSendMessage Code
Now that we’ve defined our requestSendMessage function, let’s plug it into our Tic-Tac-Toe app and try it out. The following example function wraps requestSendMessage and is useful if you want to use requestSendMessage in multiple places throughout your app:
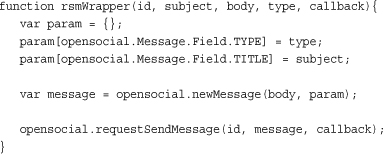
Note that the function is fairly similar to the requestShareApp wrapper. This function just requires two additional parameters to construct the opensocial.Message object: subject and type. The type parameter corresponds to one of the opensocial.Message.Field.Type values found in Table 5.1.
Now that we have our requestSendMessage wrapper, we can make use of it in the app by creating different types of messages. A fairly simple and effective type of message is a bulletin; it is a one-to-many message that gets blasted out to all the user’s friends.
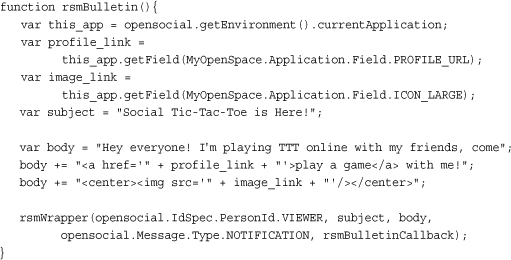
Since bulletins don’t use any template messaging, we have to generate all the links ourselves. To do this, we make use of the instance of a MyOpenSpace.Application object for this app. When an app is rendered, the MySpace platform pushes down a script-accessible representation of the app’s information. This object may be accessed from the environment with the call
opensocial.getEnvironment().currentApplication
Specific data that may be found in this object includes:
1. App ID, accessed via the field enum MyOpenSpace.Application.Field.ID
2. Name, accessed via the field enum MyOpenSpace.Application.Field.Name
3. Profile URL, accessed via the field enum MyOpenSpace.Application.Field.PROFILE_URL
4. Install URL, which for right now is the same as the Profile URL (which is where the app is installed from), accessed via the field enum MyOpenSpace.Application.Field.INSTALL_URL
5. Canvas URL, accessed via the field enum MyOpenSpace.Application.Field.CANVAS_URL
6. The 64×64 icon URL, accessed via the field enum MyOpenSpace.Application.Field.ICON_LARGE
7. The 16×16 icon URL, accessed via the field enum MyOpenSpace.Application.Field.ICON_SMALL
The Application object behaves just like the Person object—data is accessed through the getField function. For example, to access the app’s name in your script code, you would make the following call:
opensocial.getEnvironment().currentApplication.getField(
MyOpenSpace.Application.Field.NAME);
Here we use the app’s Profile URL and the large icon to generate the bulletin message. Some of the supported HTML tags are also used for the body. Then the wrapper function is called and voilà! We’ve sent our first message!
Bulletins are great for getting the word out to a large audience, but they lack a personal touch. In our Tic-Tac-Toe app, one user can challenge another user to a game. When this challenge is initiated, we send out a message from the challenger to the challenged. The code for that looks like this:
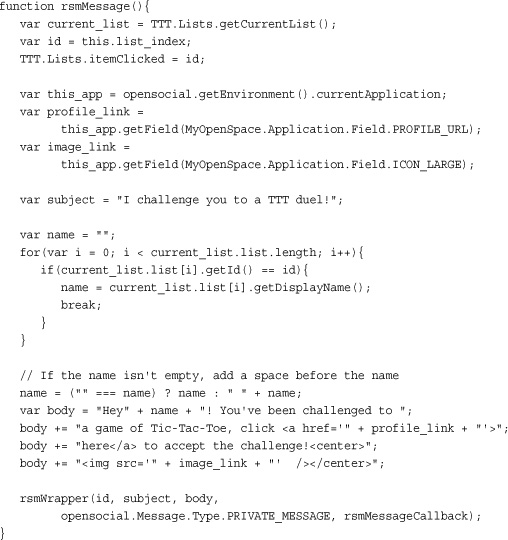
This code is fairly similar to the bulletins code. We use the MyOpenSpace.Application object to generate a message and then invoke the wrapper. There is also some app-specific code in this function that determines the ID and name of the challenged user; this ID is sent into the wrapper while the name is used to personalize the message. Adding a person’s name to a message is an old trick that helps the message seem a little less like a form letter.
Callback in requestSendMessage
The callback for requestSendMessage works the same as requestShareApp. An error could be generated before the modal dialog is shown; otherwise the value 1, 0, or −1 is returned.
Let’s take a look at one quick example:
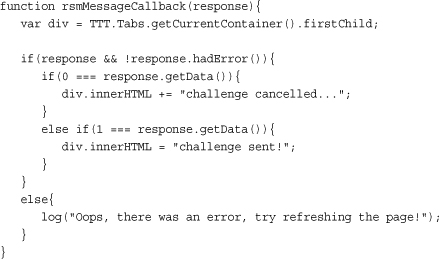
First we check for an error. If one was found, we display an error message asking the user to refresh the page.
Most errors that occur with the messaging system are intermittent and can be fixed with a refresh. If there was no error, a simple message is displayed reaffirming the user’s action.
Getting Your App Listed on the Friend Updates with opensocial.requestCreateActivity Basics
On every user’s MySpace Home page there is a module that displays the user’s Friend Updates. These updates are a feed and might include information like “John added a new photo,” “Mary and John are now friends,” or “Susan installed the Tic-Tac-Toe application.” These updates are ordered by date, and the newest information is always displayed on top.
When an app creates an activity, the activity appears in this feed. That makes any app activity a one-to-many message that will appear in the Friend Updates feed for each of the user’s friends. With activities, applications can define numerous custom messages that will appear in a user’s Friend Updates.
Activities can be created only from the app’s Canvas surface, but they’re a great way to embed your app into a user’s MySpace experience and promote your application at the same time.
Defining opensocial.requestCreateActivity
opensocial.requestCreateActivity has the following signature:
opensocial.requestCreateActivity = function(activity, priority, opt_callback)
This means it’s a function that must include an activity (opensocial.Activity), a priority (opensocial.CreateActivityPriority) setting for the request, and opt_callback as the function to call once the request has been processed.
Note
At the time of this writing, opensocial.CreateActivityPriority is not being checked or used by MySpace. You’ll notice in the code that follows that we always pass in a value of high (opensocial.CreateActivityPriority.HIGH) as opposed to low (opensocial.CreateActivityPriority.LOW).
If you have opensocial.CreateActivityPriority in your code and MySpace starts making use of it, the behavior of your app may be affected, so it’s good to keep this in mind should your app suddenly start doing something.
Let’s take a quick look at how OpenSocial defines the priorities:
High: If the activity is of high importance, it is created even if this requires asking the user for permission. This might cause the container to open a user flow that navigates away from your gadget.
Low: If the activity is of low importance, it is not created if the user has not given permission for the current app to create activities. With this priority, the requestCreateActivity call never opens a user flow.
Using the Template System to Create Activities
One of the most important elements of creating and raising activities is the template system. In fact, it’s so important that it needs to be explained before we start looking at code. Unlike messages, which are completely defined and passed into the function as static text, activities make use of a custom template system. Basically, you create a template for your activities’ messages and the variables are resolved at runtime. Templates must be used for activities. Every template must have a title containing up to a maximum of 160 visible characters. Each template may also optionally specify a body having up to 260 visible characters.
Your message template is based on a text string with some optional variables (which you may occasionally hear referred to as “tokens”) thrown in. These variables are replaced by real data once the activity is raised. A basic activity’s message might look something like this:
"Susan installed Tic-Tac-Toe on: ${date}."
When the template is run, you’ll specify that ${date} will be replaced with a string containing the current date and time. So, if you give the variable ${date} a value like “September 28, 2010,” the resulting message would read
“Susan installed Tic-Tac-Toe on: September 28, 2010.”
Data Types
In our first example, the ${date} variable was a string. However, you can also specify the data type of a variable. The two currently available data types are Literal and Person.
A Literal data type, used in our first date example, is any string. Your variable is then simply replaced by that straightforward string.
A Person data type is slightly more complex. If a variable is defined as a Person data type, the variable is then replaced by a person’s display name and a link to the person’s Profile when it appears in the feed.
For example, let’s say we have a template where the variable ${opponent} is of type Person. It might look like this:
"You've been bested at Tic-Tac-Toe by ${opponent}."
To get this template message to display correctly, you need to pass in the opponent’s user ID. For example, if we pass in the string "6221" (Tom’s ID) for our ${opponent} variable, our message would read
“You’ve been bested at Tic-Tac-Toe by Tom.”
The word Tom would then link to Tom’s Profile.
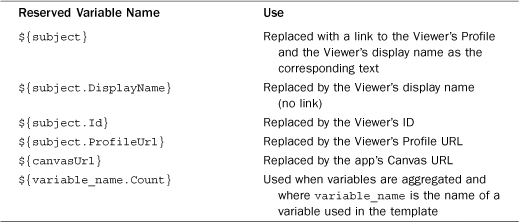
Reserved Variable Names
There are a number of variables that are reserved (see Table 5.2), but the most interesting one is ${sender}. This is because ${sender} is actually a required variable in your template title, meaning you’ll be using it a lot.
Table 5.2 Reserved Variable Names
The variable ${sender} is a Person-type variable, which means it’s replaced by the Viewer’s name and Profile link. For example, let’s say we changed our template to read
"${sender} raised this event, making ${sender} the Viewer!"
If Susan were to raise an event with that variable, the resulting message would read
“Susan raised this event, making Susan the Viewer!”
But if her arch-nemesis, Tom, raised the event, the message would read
“Tom raised this event, making Tom the Viewer!”
In each instance the Viewer’s information is used for the ${sender} variable.
Aggregation
When a user has a large number of applications, and friends who like applications, the user’s feeds can get crowded with information and updates. Because of this, activity feeds are aggregated. If a user has five friends all playing Tic-Tac-Toe and raising activities for the app, all of those activities are aggregated into a single feed entry for Tic-Tac-Toe.
For example, let’s create a new message template and see what would happen when it’s raised multiple times. Let’s start with a new template:
"${sender} is playing Tic-Tac-Toe with ${opponent}."
In this example we’d want to aggregate the ${opponent} variable (you can learn how to specify aggregated variables by skipping ahead to the section on using the Template Editor). The first time I raise the event, my opponent’s ID is "6221" (Tom, again!). The resulting message reads
“Susan is playing Tic-Tac-Toe with Tom.”
If Susan raises the event again, this time challenging her friend Matt to a game, the resulting message reads
“Susan is playing Tic-Tac-Toe with Tom and Matt.”
And if Susan raises the event a third time, but this time challenging Tila Tequila to a battle of Tic-Tac-Toe, the resulting message would read
“Susan is playing Tic-Tac-Toe with Tom, Matt, and Tila!”
Now that’s a game I would like to see. Notice that not only does the templating system keep aggregating your message feeds, it also makes them grammatically correct by adding commas and the word and.
Body and Media Items
We have variables and data types, but there’s more to a message template than that. What about pictures and the message itself? That’s where body and media items come into play.
The body is similar to a template’s title, but it’s optional and can hold more characters. If you include a body, it displays on the second line under your specified title.
Media items can be any picture on MySpace that’s accessible to the Viewer. In Chapter 3, Getting Additional MySpace Data, we fetched a list of the Viewer’s photos, displayed them on the page, and allowed the player to select one for a custom board background. If a custom background is selected, it is used as a media item in any raised activity.
You’re allowed to include a maximum of three media items in a message template. All will be rendered on the second line of the message.
Using the Template Editor to Create Templates
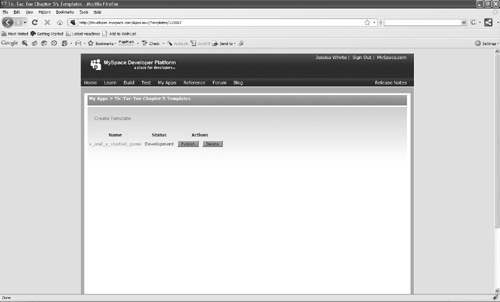
Now that you know how templates work, you’re ready to create some new templates for your app. To do this, you’ll use the Template Editor tool found on your My Apps page. Under each application there is a tool entitled Templates (Figure 5.6); click it to be taken to your Templates page (shown in Figure 5.7).
Figure 5.6 Screen shot of My Apps → Templates link
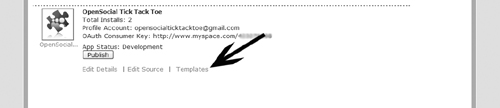
Figure 5.7 Screen shot of an existing Templates list
Click on Create Template to create new templates for your app. This will take you to the template creation screen.
From this screen (Figure 5.8) you can edit existing templates or create a new one. Let’s look at an existing template for our Tic-Tac-Toe application.
Figure 5.8 Screen shot of the Templates screen
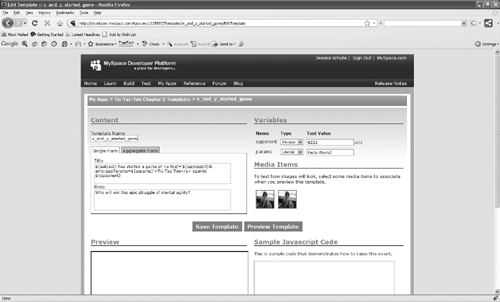
On the individual Template screen, you can see all of the pertinent template information. Under Content you’ll find the template’s name and unique identifier along with the title and the body. There are also separate tabs for Single Form instances (when just one activity is raised) and Aggregate Form instances (multiple activities are raised).
Under Variables, you can add and specify data types and even test values for each of your variables. Below this section are sample media items that you can use to test how they’ll appear when you preview or run your template.
To test your template, click the Preview Template button. This creates a preview of your template in the bottom portion of the screen using the test data you indicated under Variables and Media Items.
You’ll also be provided with sample JavaScript code that can be used to raise the event. You can actually just cut and paste this code into your app to begin raising activities, but you’ll most likely want to customize it (see “Raising the Event” in the following section).
If you’re satisfied with your template, click the Save Template button to save your template for later use.
Once your template is saved, you can switch it from development status to live status. To do this:
1. Go back to your Templates page.
2. Click the Publish button next to the template you want to make live.
3. Click OK when prompted.
From your Templates page you can also delete or edit an existing template.
Using opensocial.requestCreateActivity
Now that we understand what opensocial.requestCreateActivity looks like and how to construct a template, let’s actually use the function.
Raising the Event
The template we’re using for our activity is the following:
![]()
We’re doing something a bit tricky with the href attribute in the anchor tag. This actually allows us to send custom parameters into the Canvas surface of the app if the link is clicked. This can be especially useful for tracking purposes. You can try different messages, each with a different ${params} value, and see which one is clicked more often.
The actual code to raise the event looks like the following:
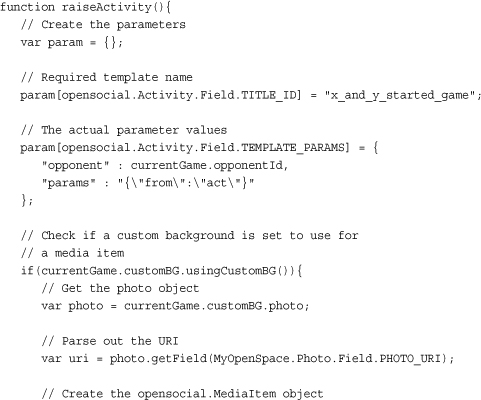
First, the activity template is defined as "x_and_y_started_game". This is the unique identifier for the desired template and can be found in the Template Editor under Template Name.
The template variables are then given actual values; the ${opponent} variable is assigned the value of the ID of the opponent, and the ${params} variable is assigned a JSON object. This is an example of how you might use different template messages for tracking purposes, since here we’re saying the user got to the Canvas page from an activity. Meanwhile, the two variables correspond to the list of variables in the Template Editor under Variables.
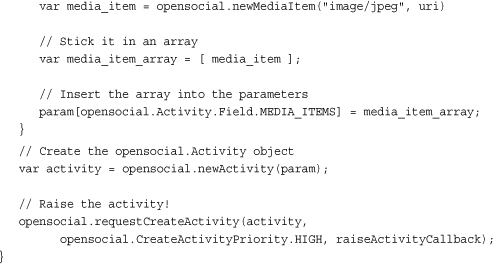
The next block of code attaches a media item to the activity. A couple of things to note here: First, the media item URI must conform to an API-style URI and not a regular old URL, such as www.example.com/my_picture.jpg. The best way to get these API URIs is through the API itself, as we do here in the app.
In our code we fetch the list of photos for a user and save those values into a list. When a photo is selected, we match it to the correct entry in the list and parse out the URI. This URI is accessed from the MyOpenSpace.Photo object using the MyOpenSpace.Photo.Field.PHOTO_URI.
The second thing to note is that an activity requires an array of media items. So, even if you have only one media item, make sure to stick it in an array.
Once all the parameters are set up, the opensocial.Activity object is created and it’s passed into requestCreateActivity.
Note
What are we doing there with the custom parameters in the template? Well, custom values can be passed into an app’s Canvas surface by appending an "appParams" key to the query string. So, for example, by appending &appParams={"hello"%3A"goodbye"%2C"from"%3A"act"} to the end of the Canvas URL, we pass the JSON object { "hello" : "goodbye", "from" : "act" } into the app.
These values can be picked up inside the Canvas by doing the following:
gadgets.views.getParams().hello;
gadgets.views.getParams().from;
In this case, the first line resolves to "goodbye" and the second to "act".
Using Activity Callbacks to Combat Permission-Denied Errors
Uh-oh! Permission denied? It turns out that a separate permission is required to raise an activity for a user. If this permission isn’t set, the container blocks the request and returns an error. So that’s that, I guess. Oh well, better luck next time...
Not necessarily; opensocial.requestPermission to the rescue again! In a method similar to one used in Chapter 3, Getting Additional MySpace Data, where we requested permission to fetch photos, we can request permission here to raise an activity:
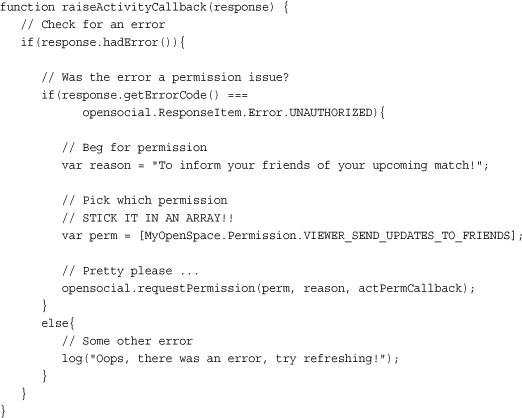
If there was an error, we first check whether it was a permissions error. If so, we specify why we want the permission and which permission we want. Again, don’t forget to stick the MyOpenSpace.Permission object into an array or it will be rejected. Once requestPermission is closed, it will invoke the specified callback function. Let’s take a look at it:
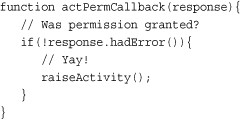
Very simple; if no new permissions were granted, the response has an error. No error means the permission has been granted, so retry the activity. This is a great way to ensure that the activity is sent while also providing a nice flow for the user.
Sending Notifications
The fourth and final way to communicate with your users is the app notification. Notifications are great for turn-based games as they are a quick and easy way to let players know when it’s their turn in the game. This is exactly how we use them in our Tic-Tac-Toe app. It’s also highly regarded because it’s the only message type that doesn’t require the user’s confirmation.
When using notifications, you have to watch that you’re not spamming your users. You could be shut down, or worse, you’ll annoy your user base and lose installs. But, if you keep it reasonable, notifications are a great way to increase user engagement.
When a user gets a notification, he or she gets an indicator on the Home page saying a new notification has arrived. Clicking on the indicator takes the user to the Mail Center, where he or she will see the message in the notification folder. Each notification can have zero to two buttons to allow the user to take some action. In our Tic-Tac-Toe app, we tell users it’s their turn and provide one button to take them back to the Canvas page to play the game.
Notifications are a MySpace-specific extension, but they are patterned after requestCreateActivity, so the code should be somewhat familiar. Let’s take a look at what that means:
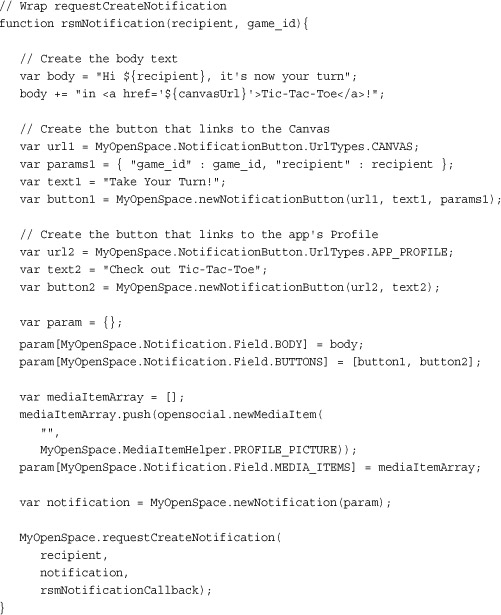
Notifications use a built-in template, similar to requestShareApp. However, only the variables ${recipient} and ${canvasUrl} are available, and you’ll need to use the activities-style variable format ${variable_name}, as opposed to the requestShareApp style of [variable_name].
The button is defined by a MyOpenSpace.NotificationButton object. This object has three fields:
• MyOpenSpace.NotificationButton.URL
• MyOpenSpace.NotificationButton.PARAMS
• MyOpenSpace.NotificationButton.TEXT
The URL can be one of two values: MyOpenSpace.NotificationButton.UrlTypes.CANVAS or MyOpenSpace.NotificationButton.UrlTypes.APP_PROFILE.
You probably won’t want to take your users back to your app Profile, especially considering that only users who have installed the app receive notifications. Here, we want to take the user back to the Canvas instead.
The PARAMS field allows us to define custom parameters that are sent into the Canvas page. In our Tic-Tac-Toe app, we append three custom parameters—essentially creating a tracking parameter. This parameter is used to let us know that a user came to the Canvas from a notification, what action the user wants to take, and which game the user wants to play.
Once the button is created, we’re ready to create the MyOpenSpace.Notification object itself. We assign the body text first, using MyOpenSpace.Notification.Field.BODY, and then add the button using MyOpenSpace.Notification.Field.BUTTONS. The button has to be placed in an array, so if you have more than one button, you’d add each one to the array. Omitting the BUTTONS parameter or passing in an empty array would just attach no buttons to the message.
The notification is then sent off using a recipient ID, the notification object, and a callback. The recipient can be a single ID or an array of IDs, up to a maximum of ten. The callback behaves exactly like the other callbacks mentioned earlier, so we won’t go into detail.
A sent notification will appear in the recipient’s Mail Center page; see Figure 5.9 for exactly how it’ll look.
Figure 5.9 The notification in the recipient’s Mail Center page

Tip
Notifications use the permission MyOpenSpace.Permission.VIEWER_SEND_NOTIFICATIONS. You may want to use opensocial.hasPermission (followed possibly by opensocial.requestPermission) to check that permission before attempting to send the message. See Chapter 3 to learn how to check and request permissions.
Summary
The primary source of growth for most apps is friend-to-friend advertising. A user installs the app and then invites a few friends, or a posting appears in the Friend Updates feed with a link to the app. Either way, the app developer has written various activities, messages, and invitations as a way of advertising and seeding the application.
It’s important to remember that while these tools must be used, they should never be abused. An app that’s spammy will quickly annoy users, leaving you with few installs and a declining user base.
Note
Code listings and/or code examples for this chapter can be found on our Google Code page under http://opensocialtictactoe.googlecode.com.