In the previous chapter, we reviewed key configuration, setup home, customization consideration, and DevOps and studied the real-world digital transformation case study to support the enterprise Salesforce practice. We also learned more on the key configuration and setup and recommended approach. In this chapter, we will cover Salesforce Experience Cloud (community cloud), security, email, Lightning Usage, and key Salesforce resources.
Salesforce Experience Cloud
Lightning Bolt
Process Builder
Flow
Putting it all together
Lightning Bolt
Lightning Bolt is a feature within Experience Cloud that acts as a community template. Previously, templates for your community were only provided by Salesforce. With the introduction of Lightning Bolt, partners may also create templates for you to use, increasing the number of options available to you by quite a lot. Use Bolts to easily preassemble and preconfigure your new communities.
A Lightning Bolt includes a theme, layout, pages, and components. A piece is a way the community site looks and has CSS. Pages hold components, and components are the building blocks of the page. Several elements may be combined on pages to get the output you want.
An easy way to build your Bolt is to start with another Bolt as a base. Remove pages you do not need for your specific use cases and add on new pages where necessary. Change existing pages if they are close to what you need. Add, remove, and modify components on each page to further customize and tailor the Bolt to your needs. After you have made all your changes, you now have a Bolt of your own, which you can export as your package.
Process Builder
Process Builder is a simple point-and-click development tool provided by Salesforce to drive business process automation. It is differentiated from Flow by being more straightforward as well as quicker to use. However, it is not as powerful.
Processes are made up of a trigger, a criteria node, and at least one action. Triggers identify when a process should be run. As an example, a trigger can be set to run a function when a record is updated or created. Criteria set the rules for whether the process should be run after a trigger is hit. These can be data validation rules, for example. Finally, Actions are what the function does after the criteria have been met. Actions may be scheduled or taken immediately and can do things such as create records, send emails, or post messages to a Chatter feed.
Consider using the Process Builder for your community to update child cases as parent cases are changed. It can also be used to create new cases and automate the process. Finally, use it to update your solutions and add comments to your cases.
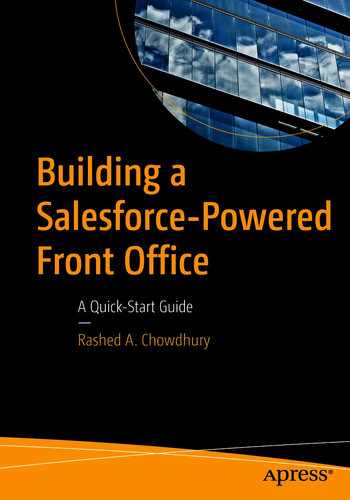
Flow
Flow design in Salesforce

Flow Builder User Interface (screen components, edit screen, and screen properties)
A Flow is comprised of elements that represent actions, connectors to show the path of the Flow, and finally resources, which are values the Flow references throughout its courses. All of these come together to manipulate data in Salesforce in an intelligent, controlled manner.

Assign Stage – Flow Builder designer

Flow Builder create records
Any quick actions you have created within your organization are also available to use in your Flows.
The last main element of a Flow is, again, Resources. These are the objects which hold the data which gets passed around and altered. One widely used Resource is the variable. It contains values that get passed throughout the Flow. These values can also change both due to the Flow and through external input. Collection variables are similar, but instead are a series of variables with the same data type.
A subject variable is like a regular variable, but it holds a record of a specific object type. This means that while a variable has one value, a subject may have several values, and you can access all the record’s fields. There are also subject collections of which you can probably guess the purpose – they hold multiple records of the same type.
There are many more Resource types, but here are just a few more. A Constant is a value, similar to a variable, except it never changes throughout the Flow. A Formula uses Resources in the Flow as input to generate an output value. Lastly, there is the Choice. This is simply an individual choice to be made in the Flow .
Putting It All Together
Now that we have gone over the different components which can go into creating your Salesforce Community, it is time to put it all together. Hopefully, you have a pretty good understanding of the different parts which go together to make your Bolt page. For more in-depth explanations, you can always find online help from Salesforce and Trailhead.
To start, find a preexisting Bolt that is close to what your business needs. Make changes to it, such as adding, removing, or changing pages and components. Once you have the Bolt in a state which works best for you, create Processes using the Process Builder that it will need to run. Implement those, and then use Flow to create more powerful Processes.
Once your Processes have been integrated, it is time to finalize the creation of your Bolt. Export the Bolt and then build a package. Finally, install that package. Once that has been done, your Bolt is finished and ready to use. Your business has its very own self-service community, prepared to go.
Security – Health Check
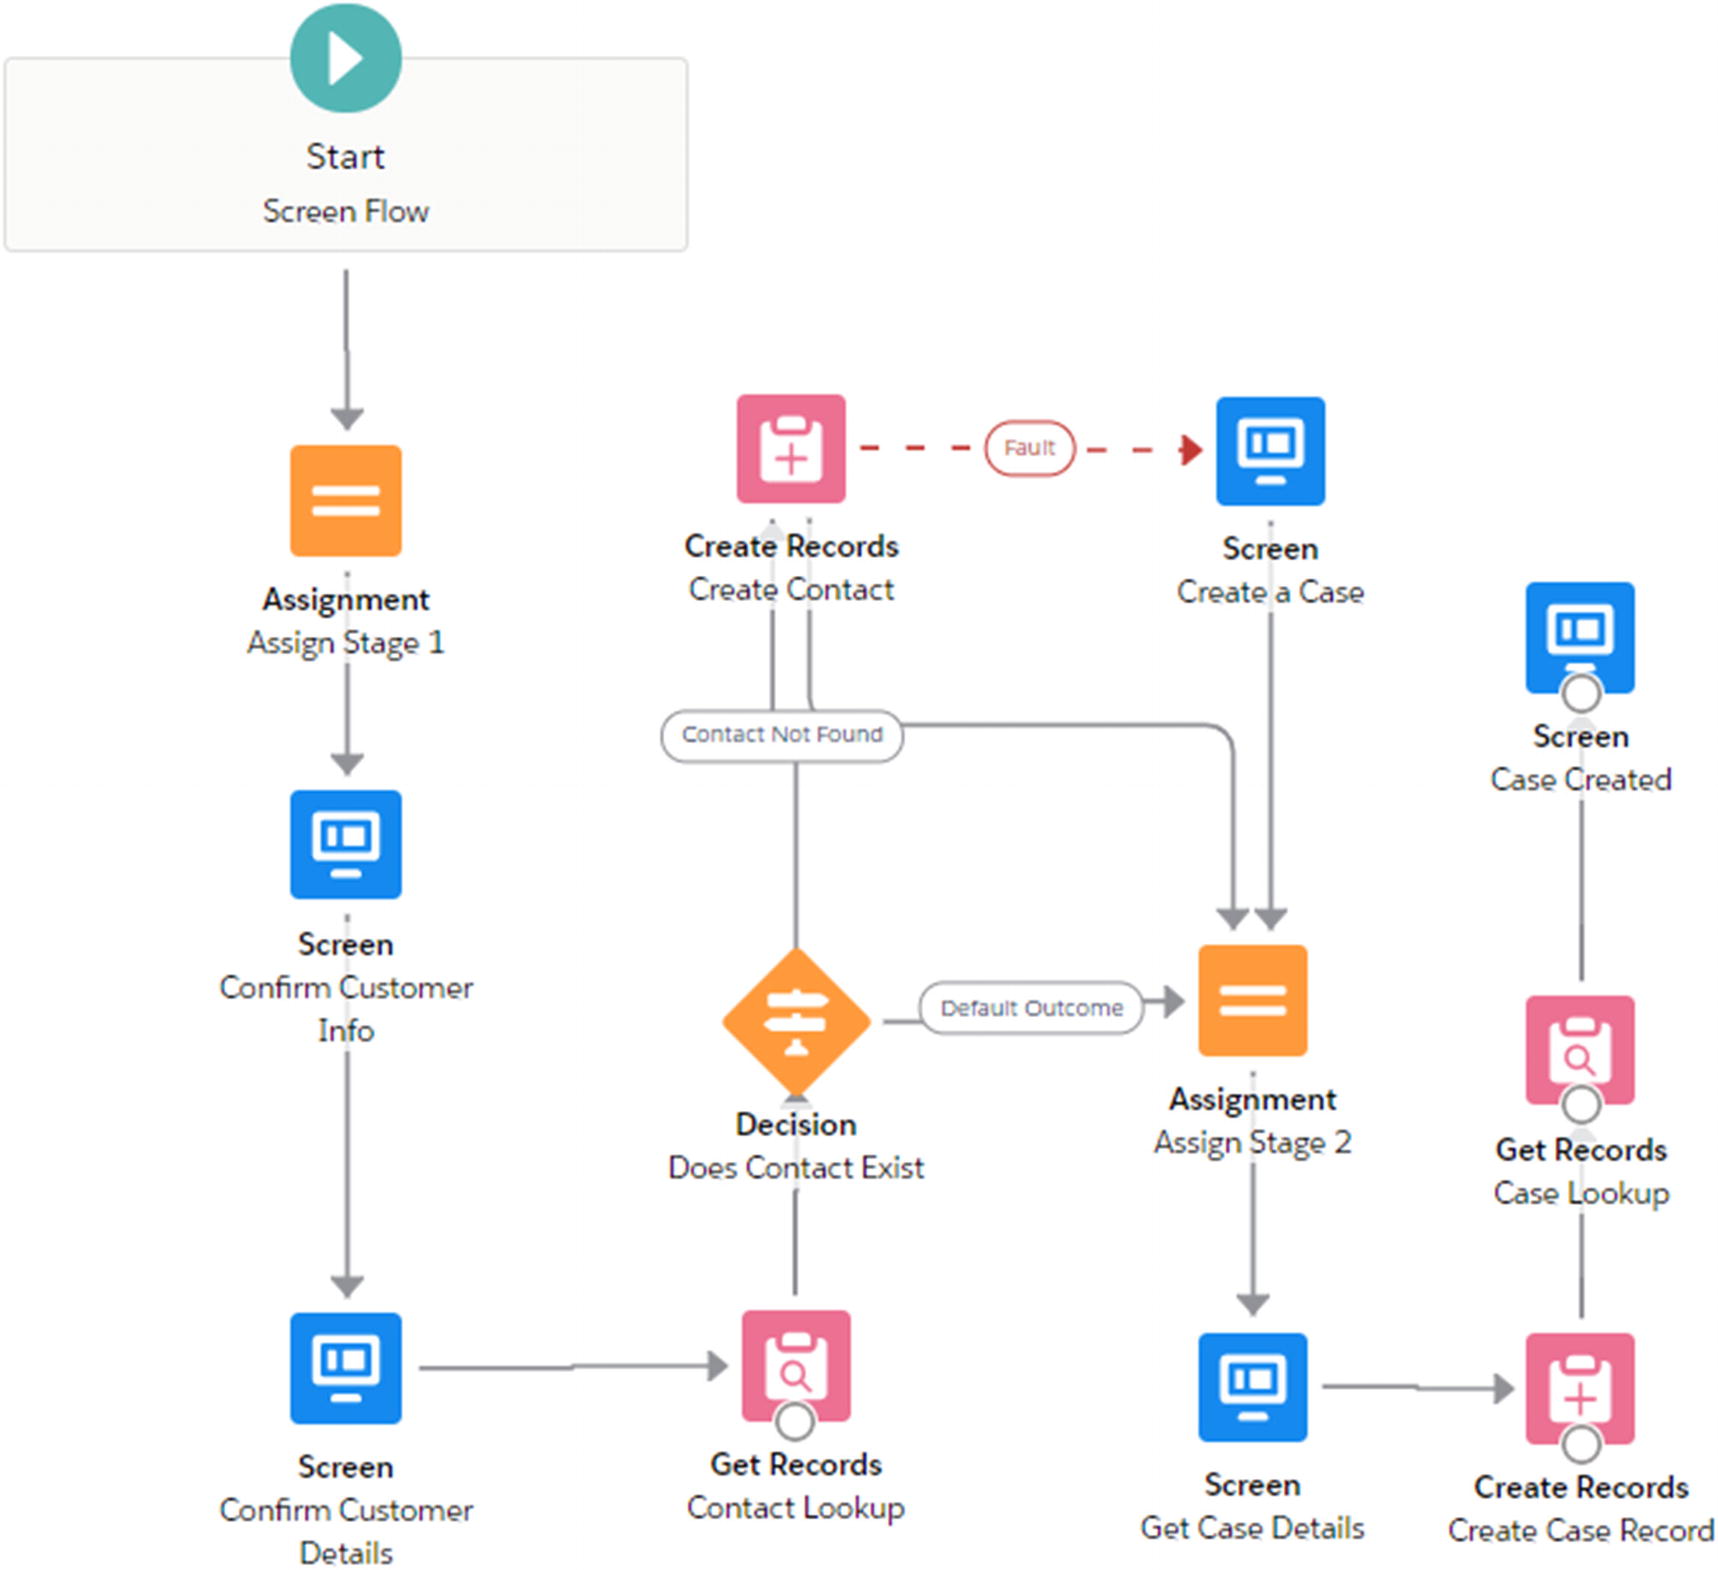
How well does your org meet Salesforce security standards? This is an important topic of interest for many IT organizations, especially for the IT executives. What and how many security risks does your org have and how to mitigate them. Before you solve the problem, you have to identify the problem. The Salesforce Health Check page has the answer which you will find under security settings. Here is the click path: Settings ➤ Security ➤ Health Check. Let’s reduce your security risk and limit data loss by optimizing the following areas.
When I ran the Salesforce baseline standard, the system generated a health check report (Figure 12-5) and scored my org 59% – poor.
Status
Settings
Group
Your value
Standard value
Action
Health check

Health check status
I recommend after reviewing all the critical settings (red), press the Fix Risk button which will fix the security setting issues and will provide a new and improved health score.
Login Access Policies

Login access policies
Administrators Can Log in as Any User should be selected. I also recommend Salesforce support to be available to users, and this option should be checked. This way, your users can open up a support case with Salesforce directly to resolve issues without involving your Salesforce administrator.
Lightning Usage
The new and improved Salesforce provides a built-in Lightning Usage App that tracks the adoption and usage of Lightning Experience, so you can monitor the progress of your transition and understand your users’ needs. The Lightning Usage page can be accessed from the Setup Home.
To learn more tips and tricks, check out the Lightning Experience Rollout Specialist on Trailhead or run the Salesforce Optimizer to receive a personalized report highlighting exactly how you can improve your org.

Lightning Usage key metrics

Lightning Usage by month and last seven days
You may also want to check out the Lightning Experience Rollout Specialist on Trailhead or run the Salesforce Optimizer to receive a personalized report highlighting exactly how you can improve your org today!
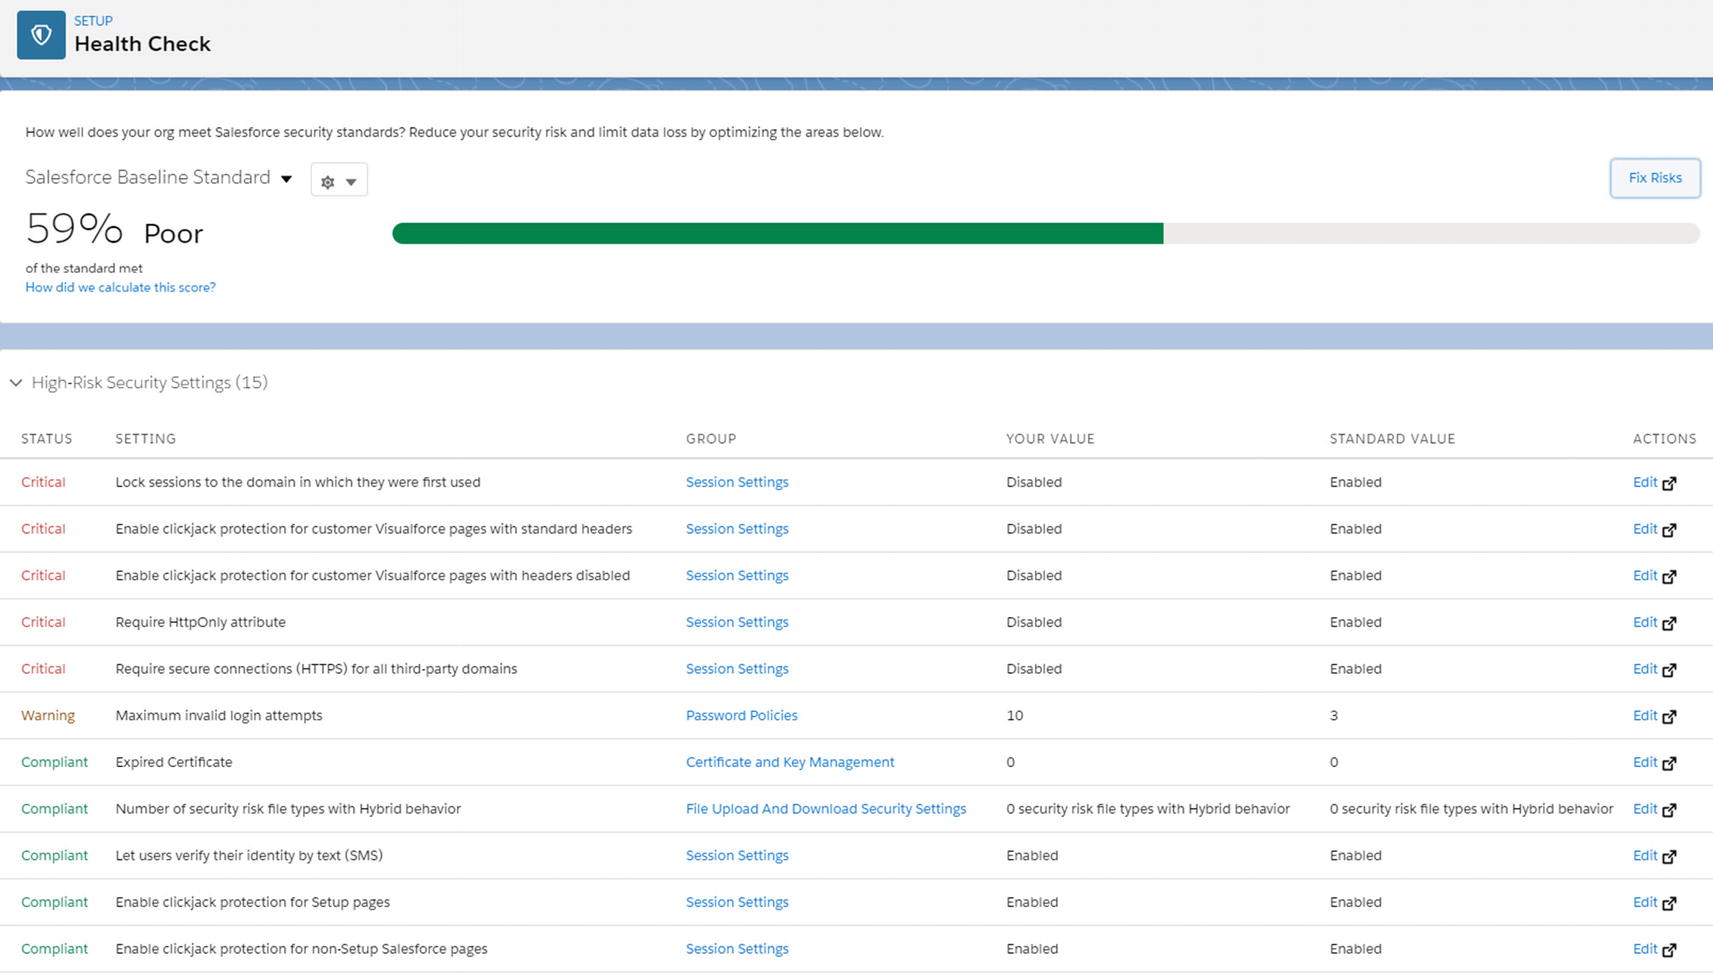
Salesforce Optimizer
You can have your administrator analyze your implementation to find ways to simplify customizations and drive feature adoption. Consider running Salesforce Optimizer as part of your monthly maintenance, before installing a new app, before each Salesforce release, or at least once a quarter. I highly recommend this practice.
Allow access to enable the Salesforce Optimizer app. This step is required to use the app.
Decide if the app should automatically run and update.
Run monthly.
You can always open Salesforce Optimizer from the App Launcher.
Salesforce Optimizer PDF
Salesforce Optimizer
When you work through each of the feature items listed in the report, you will be presented with status and result.

Salesforce Optimizer with immediate action and recommendation
It would be best if you considered having your administrator run the optimizer at least once a month and identify immediate action and action-required items at a minimum. Review required and not currently enabled should be next in line once the first two sets of critical item sets are resolved.
Email plays a huge role at Salesforce, and it is an important platform offering as part of Salesforce’s core capabilities. There are a few things to consider when setting up email in Salesforce that include a letterhead for classic email, org-wide email footer, enhanced email, outlook configuration, and more.
Classic Letterheads
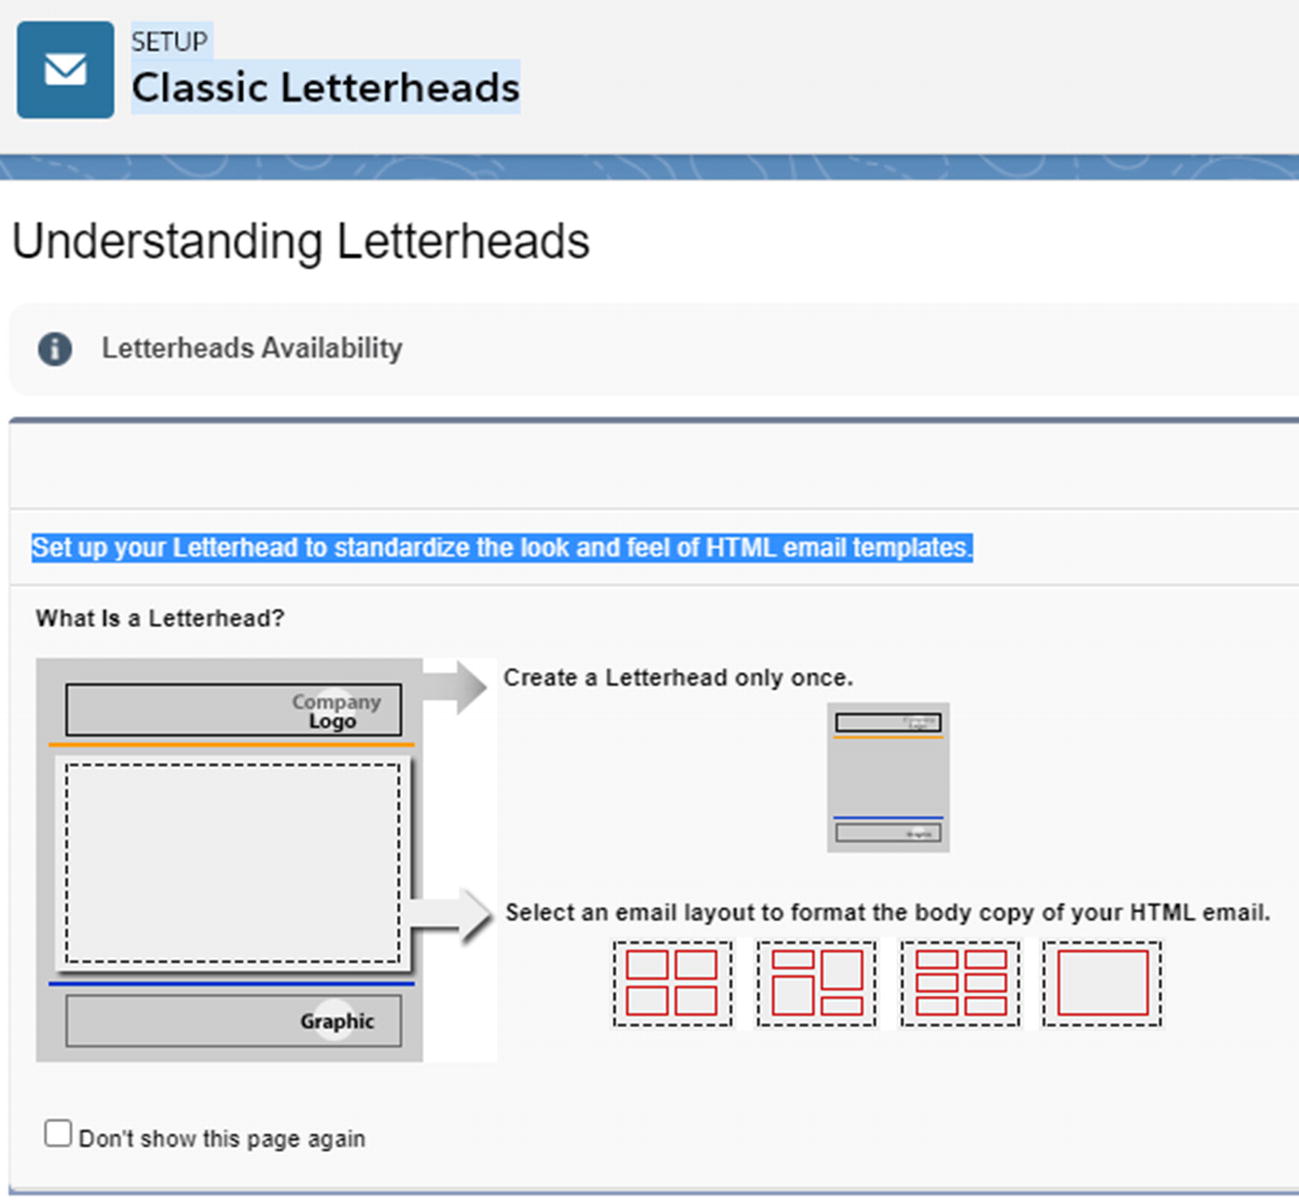
Classic email letterheads
You have to create a letterhead only once. There are three main parts to a letterhead – header, body, and footer. Your administrator can customize the look and feel of your letterhead.
Unfiled Public Classic Email Templates
Approvals
Big Deal Alert
Cases
Case Assignment Rules
Case Escalation Rules
Communities
Email to Case
Lead Assignment Rules
Process Builder
Web to Lead
Workflow
Lightning Email Action (in Lightning Experience only)
Lightning List Email Action (in Lightning Experience only)
Salesforce Classic Email Author (in Salesforce Classic only)

Unfiled public classic email templates
Marketing: Product Inquiry Response
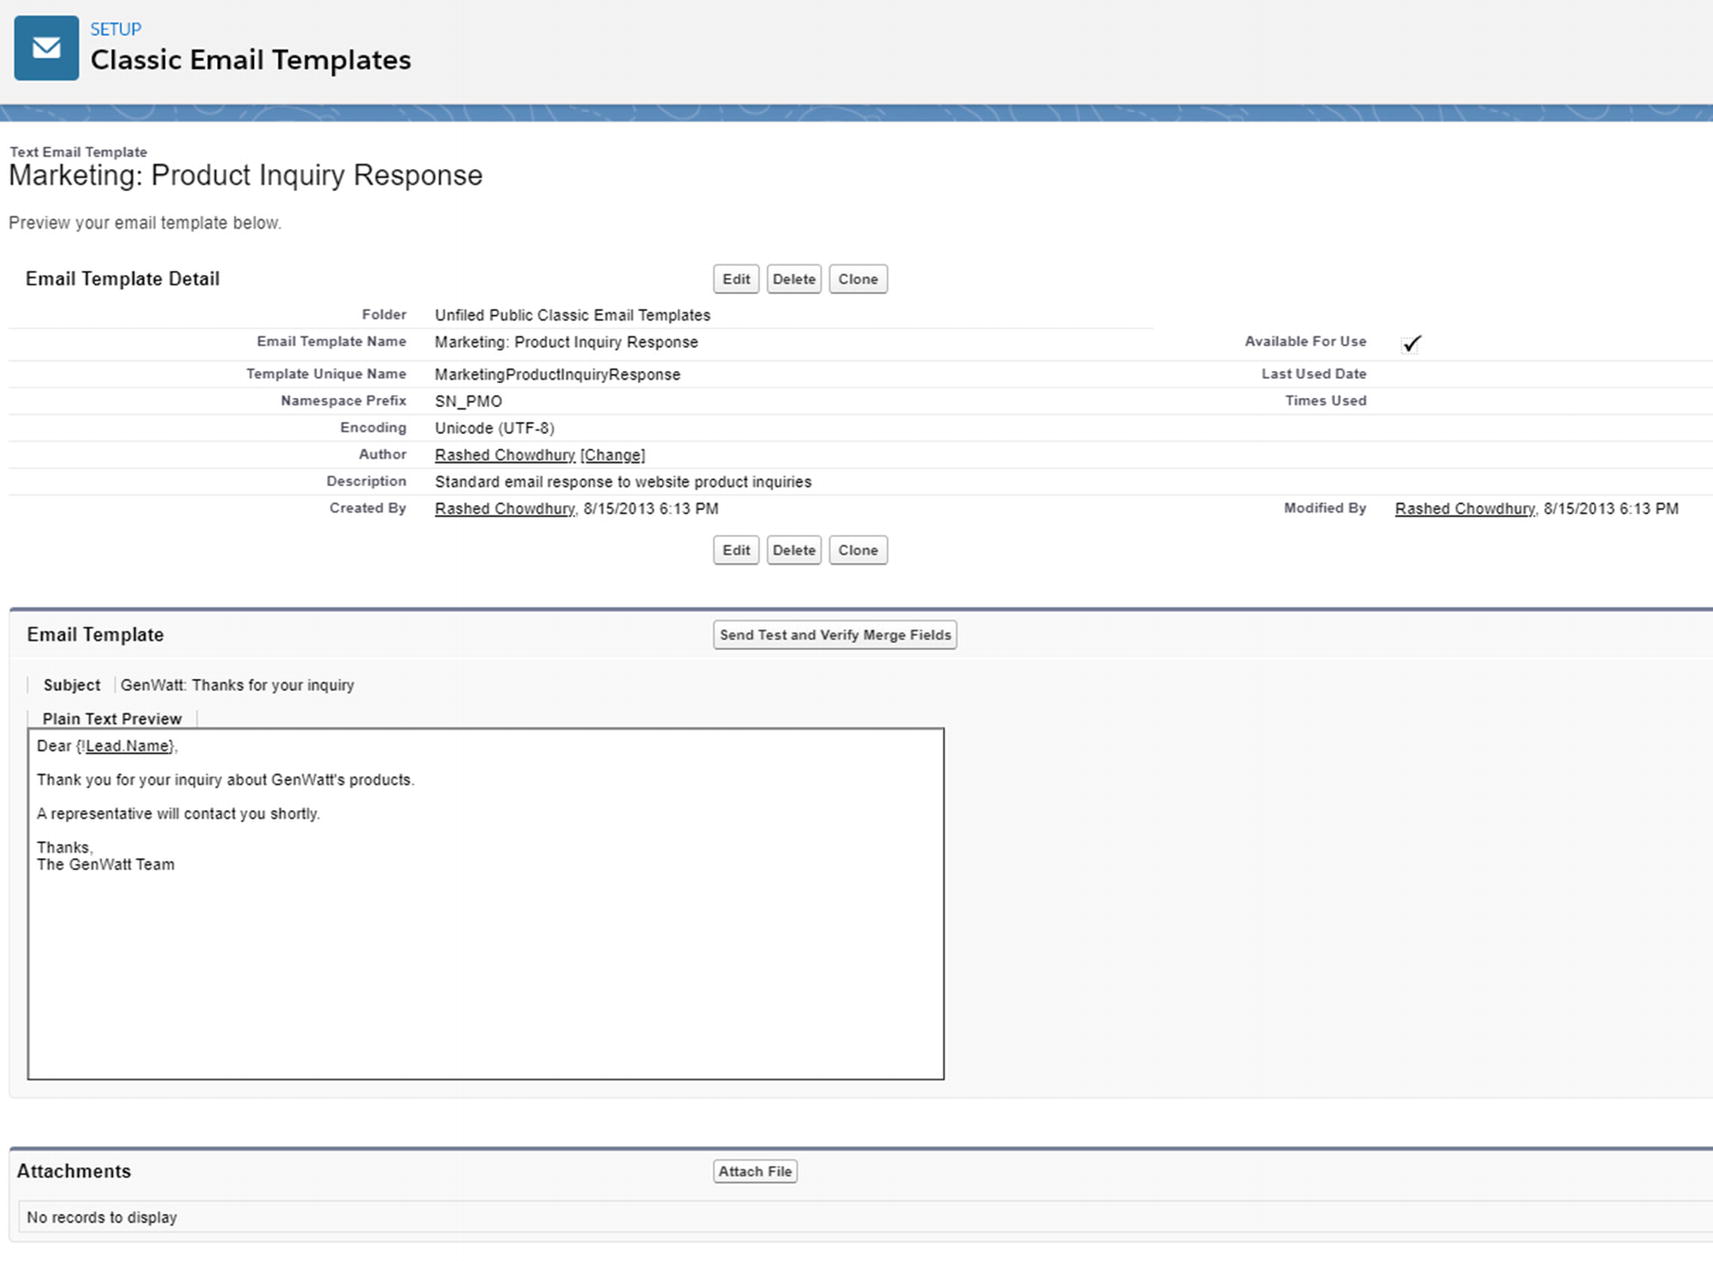
Classic email templates definition
Note that the description field is for internal use only. It will be listed as the title of any email activities you log when sending mass email.
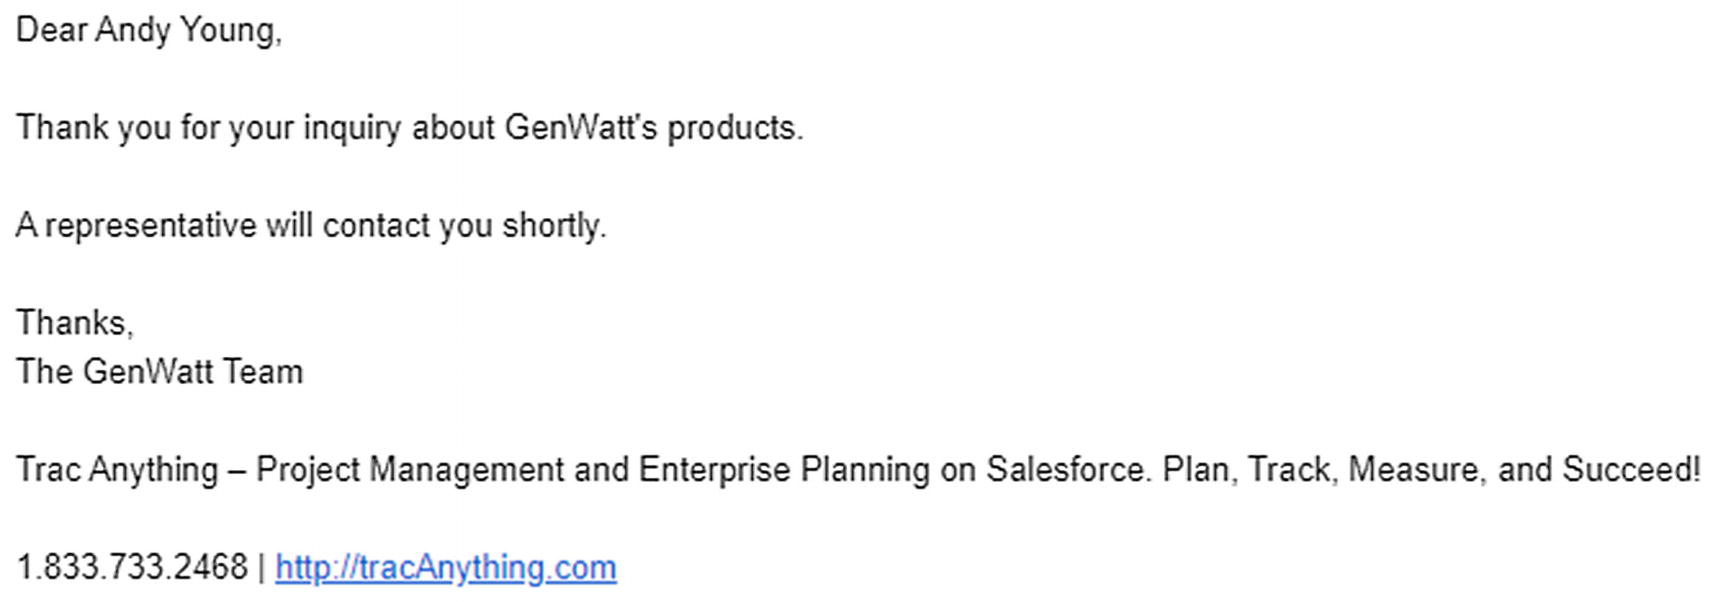
Sample template
Email to Salesforce
Email to Salesforce allows you to automatically log emails you send from third-party email accounts as activities on Lead and contact records in Salesforce.

Email notification to users within Salesforce
Organization-Wide Email Footers

Organization-wide email footer
Default footers are used if no footers match the outgoing email's character encoding.
Enhanced Email
Your administrator can enhance email or elevate email to a standard Salesforce object, with customization options and an API. Emails are no longer stored as tasks, but as full-featured records, complete with details, related lists, and collaboration tools. On email records, users can view their messages exactly as their customers do, complete with formatting.
Organization-Wide Email Addresses

Organization-wide email address
You will have to verify the email link which will be sent from Salesforce .
Outlook Configurations

Microsoft Outlook synchronization – Events
Outlook configurations define the settings that are applied to Salesforce for Outlook for specific groups of users. Setting up an outlooking configuration in Salesforce is straightforward. You have to define the options like Side Panel, Add Email, Create Case, or Default Sync rules in the email settings to control the services’ behavior. You also have to consider defining the rules under Sync Settings to control the behavior of Contacts, Events, and Tasks objects. Let’s talk Sync direction for a moment. In this setting, your Salesforce administrator has to define which direction record will sync: Salesforce to Outlook, Outlook to Salesforce, or Sync both ways. Another important setting is conflict behavior. Who wins when there is sync conflict. You could set Outlook always wins, or Salesforce always wins depending on the business strategy and system you trust as the authoritative system of record.

Microsoft Outlook synchronization – Tasks

Microsoft Outlook configuration
Salesforce Mobile App

Salesforce mobile app
Build fast: Build Lightning apps, pages, and components once, then make them available on a desktop, mobile, or both!
Build custom: Use Lightning tools to tailor experiences for your mobile users, whether you create a mobile-only experience or simply hide components that don’t make sense for mobile.
Empower users: Put users in control of their workflows with desktop navigation personalizations that sync with mobile.
Schema Builder

Salesforce Schema Builder
In Salesforce, Schema Builder provides an interactive environment to be able to view and edit all the existing objects and relationships of a given Salesforce organization (database instance).
There is a lot of work that goes behind the scene to design and implement a solid data model to support the business application. Schema Builder provides an easier and simpler way to manage the entire data model including building it from scratch.
Creating custom objects
Defining relationships (Lookup relationships, Master-detail relationships)
- Creating all custom fields (checkbox, currency, date, email, number, percent, phone, picklist, multiselect, text, rich text area, URL, etc., except geolocation). See Figure 12-25 for reference.4
 Figure 12-24
Create new object using Schema Builder
Create new custom field using Schema Builder
Also, if you set the first Record Name to be a number field, consider using a display format. For example, in this case, I used PRJ- {0000}, so that all of the database record for this field will follow a standard format (PRJ-0001, PRJ-0002, etc.) which in turn will be easy to recognize. The Allow Reports option will ensure you can report on this field in the future. Allow Activities will ensure setting up a task or creating a calendar event in the custom object is available.
Developing an App
Database: The database is the host of the data model of the application.
Logic: Business logic and automation (workflow, advanced configuration, etc.) to execute specific business scenarios in given conditions.
User interface: To surface and present data to the app user so that the user can work with the data using prebuilt functionalities.
- Website: Expose your data-driven app on the Web to show external-facing capabilities and interact with the exterior world.Table 12-1
High-level app development activities
Create the App
Create a Project Management Application
Data model
Develop custom objects
Develop custom fields
Define data model and add relationship
Create tabs
Create users and permissions and establish security
Add logic
Add formulas and validation rules
Add workflow and approval process
Develop email template
Add business rules and advanced logic using Apex code
Add tests
Develop tests
Evaluate code coverage
Iterate and improve
Develop user interface
Develop a custom page layout
Develop roles and profiles
Create user assignments
Develop custom user interface using a visual force page (VFP)
Add Lightning web components (LWC)
Integration
Integrate with core CRM functionalities
Define relationship with Account, Contact, and other standard CRM objects
Customization to connect with ERP system
Website
Enable Salesforce mobile app
Create a public website using Sites
Salesforce Service Cloud – Core Offering
Salesforce service cloud accepts support inquiries from most of the channels where your customers are active, including your website, email, phone, chat, and relevant online communities. Any organization can support these channels by using the automation features to create and assign support cases.
Salesforce service cloud manages your support processes by establishing support statuses for your support processes and automatically escalating cases based on the criteria you define. Also, you can set up entitlements to enforce your support processes. You can monitor your overall support activities through reports and dashboards.
You can boost engagement and productivity by promoting case deflection through community engagement. Salesforce service cloud can deliver a 360-degree view of your customer using the service console. You can do more from within the console, including making and receiving phone calls and accepting knowledge articles.
Key Salesforce Resources
Trailblazer Community: https://trailblazers.salesforce.com/
AppExchange: https://appexchange.salesforce.com/
IdeaExchange: https://trailblazer.salesforce.com/ideaSearch
Events: www.salesforce.com/events/
Help Portal: Documentation, Trailhead, Trailblazer Community, track progress. https://help.salesforce.com/home
Developer Portal: Development with Salesforce is free and easy. Anyone can sign up with a Salesforce development environment with an email address. https://developer.salesforce.com
Summary
In this chapter, we covered Salesforce Experience Cloud (community cloud), security, email, Lightning Usage, and key Salesforce resources. In the next chapter, you will learn how companies can partner with Salesforce and become an independent software vendor (ISV). We will discuss partner designations, partner onboarding, channel management, channel sales, and AppExchange app development processes.