
Automatically implemented properties
Implicitly typed local variables
Object and collection initializers
Implicitly typed arrays
Anonymous types
We start looking at C# 3 in the same way that we finished looking at C# 2—with a collection of relatively simple features. These are just the first small steps on the path to LINQ, however. Each of them can be used outside that context, but they’re all pretty important for simplifying code to the extent that LINQ requires in order to be effective.
One important point to note is that while two of the biggest features of C# 2—generics and nullable types—required CLR changes, there are no significant changes to the CLR that ships with .NET 3.5. There are some bug fixes, but nothing fundamental. The framework library has grown to support LINQ, along with introducing a few more features to the base class library, but that’s a different matter. It’s worth being quite clear in your mind which changes are only in the C# language, which are library changes, and which are CLR changes.
The fact that there are no CLR changes for .NET 3.5 means that almost all of the new features exposed in C# 3 are due to the compiler being willing to do more work for you. We saw some evidence of this in C# 2—particularly with anonymous methods and iterator blocks—and C# 3 continues in the same vein. In this chapter, we’ll meet the following features that are new to C#3:
Automatically implemented properties—. Removing the drudgery of writing simple properties backed directly by fields.
Implicitly typed local variables—. When you declare a variable and immediately assign a value to it, you no longer need to specify the type in the declaration.
Object and collection initializers—. Simple ways to initialize objects in single expressions.
Implicitly typed arrays—. Let the compiler work out the type of new arrays, based on their contents.
Anonymous types—. Primarily used in LINQ, these allow you to create new “ad hoc” types to contain simple properties.
As well as describing what the new features do, I’ll make recommendations about their use. Many of the features of C# 3 require a certain amount of discretion and restraint on the part of the developer. That’s not to say they’re not powerful and incredibly useful—quite the reverse—but the temptation to use the latest and greatest syntactic sugar shouldn’t be allowed to overrule the drive toward clear and readable code.
The considerations I’ll discuss in this chapter (and indeed in the rest of the book) will rarely be black and white. Perhaps more than ever before, readability is in the eye of the beholder—and as you become more comfortable with the new features, they’re likely to become more readable to you. I should stress, however, that unless you have good reason to suppose you’ll be the only one to ever read your code, you should consider the needs and views of your colleagues carefully.
Enough navel gazing for the moment. We’ll start off with a feature that shouldn’t cause any controversy—and that I always miss when coding in C# 2. Simple but effective, automatically implemented properties just make life better.
Our first feature is probably the simplest in the whole of C#3. In fact, it’s even simpler than any of the new features in C#2. Despite that—or possibly because of that—it’s also immediately applicable in many, many situations. When you read about iterator blocks in chapter 6, you may not immediately have thought of any areas of your current code-base that could be improved by using them, but I’d be surprised to find any nontrivial C# program that couldn’t be modified to use automatically implemented properties. This fabulously simple feature allows you to express trivial properties with less code than before.
What do I mean by a trivial property? I mean one that is read/write and that stores its value in a straightforward private variable without any validation or other custom code. In other words, it’s a property like this:
string name;
public string Name
{
   get { return name; }
   set { name = value; }
}
Now, that’s not an awful lot of code, but it’s still five lines—and that’s assuming your coding conventions allow you to get away with the “one line” forms of the getter and setter. If your coding conventions force you to keep member variables in one area of code and properties in another, it becomes a bit uglier—and then there’s the question of whether to add XML documentation to the property, the variable, or both.
The C#3 version using an automatically implemented property is a single line:
public string Name { get; set; }Where previously you might have been tempted to use a public variable (particularly for “throwaway code”—which we all know tends to live for longer than anticipated) just to make the code simple, there’s now even less excuse for not following the best practice of using a property instead. The compiler generates a private variable that can’t be referenced directly in the source, and fills in the property getter and setter with the simple code to read and write that variable.
Note
Terminology: Automatic property vs. automatically implemented property—. When automatically implemented properties were first discussed, long before the full C# 3 specification was published, they were called automatic properties. Personally, I find this a lot less of a mouthful than the full name, and it’s not like anything other than the implementation is going to be automatic. For the rest of this book I will use automatic property and automatically implemented property synonymously.
The feature of C#2 that allows you to specify different access for the getter and the setter is still available here, and you can also create static automatic properties. You need to be careful with static properties in terms of multithreading, however—although most types don’t claim to have thread-safe instance members, publicly visible static members usually should be thread-safe, and the compiler doesn’t do anything to help you in this respect. It’s best to restrict automatic static properties to be private, and make sure you do any appropriate locking yourself. Listing 8.1 gives an example of this.
An alternative in this case is to use a simple static variable and rely on Interlocked. Increment to update the instance counter. You may decide that’s simpler (and more efficient) code than using an explicit lock—it’s a judgment call. Due to this sort of issue, static automatic properties are rarely useful: it’s usually better to implement normal properties, allowing you more control. Note that you can’t use automatic properties and use Interlocked.Increment: you no longer have access to the field, so you can’t pass it by reference to the method.
The other automatic properties in listing 8.1, representing the name and age of the person, are real no-brainers. Where you’ve got properties that you would have implemented trivially in previous versions of C#, there’s no benefit in not using automatic properties.
One slight wrinkle occurs if you use automatic properties when writing your own structs: all of your constructors need to explicitly call the parameterless constructor—this()—so that the compiler knows that all the fields have been definitely assigned. You can’t set the fields directly because they’re anonymous, and you can’t use the properties until all the fields have been set. The only way of proceeding is to call the parameterless constructor, which will set the fields to their default values.
That’s all there is to automatically implemented properties. There are no bells and whistles to them—for instance, there’s no way of declaring them with initial default values, and no way of making them read-only. If all the C# 3 features were that simple, we could cover everything in a single chapter. Of course, that’s not the case—but there are still some features that don’t take very much explanation. Our next topic removes duplicate code in another common but specific situation—declaring local variables.
In chapter 2, I discussed the nature of the C#1 type system. In particular, I stated that it was static, explicit, and safe. That’s still true in C#2, and in C# 3 it’s still almost completely true. The static and safe parts are still true (ignoring explicitly unsafe code, just as we did in chapter 2) and most of the time it’s still explicitly typed—but you can ask the compiler to infer the types of local variables for you.
In order to use implicit typing, all you need to do is replace the type part of a normal local variable declaration with var. Certain restrictions exist (we’ll come to those in a moment), but essentially it’s as easy as changing
MyType variableName = someInitialValue;into
var variableName = someInitialValue;The results of the two lines (in terms of compiled code) are exactly the same, assuming that the type of someInitialValue is MyType. The compiler simply takes the compile-time type of the initialization expression and makes the variable have that type too. The type can be any normal .NET type, including generics, delegates, and interfaces. The variable is still statically typed; it’s just that you haven’t written the name of the type in your code.
This is important to understand, as it goes to the heart of what a lot of developers initially fear when they see this feature—that C# has become dynamically or weakly typed. That’s not true at all. The best way of explaining this is to show you some invalid code:
var stringVariable = "Hello, world."; stringVariable = 0; |
That doesn’t compile, because the type of stringVariable is System.String, and you can’t assign the value 0 to a string variable. In many dynamic languages, the code would have compiled, leaving the variable with no particularly useful type as far as the compiler, IDE, or runtime environment is concerned. Using var is not like using a Variant type from COM or VB6. The variable is statically typed; it’s just that the type has been inferred by the compiler. I apologize if I seem to be going on about this somewhat, but it’s incredibly important.
In Visual Studio 2008, you can tell the type that the compiler has used for the variable by hovering over the var part of the declaration, as shown in figure 8.1. Note how the type parameters for the generic Dictionary type are also explained.
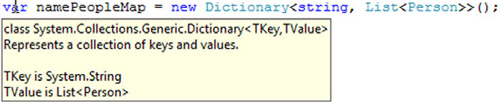
If this looks familiar, that’s because it’s exactly the same behavior you get when you declare local variables explicitly.
Tooltips aren’t just available at the point of declaration, either. As you’d probably expect, the tooltip displayed when you hover over the variable name later on in the code indicates the type of the variable too. This is shown in figure 8.2, where the same declaration is used and then I’ve hovered over a use of the variable.

Again, that’s exactly the same behavior as a normal local variable declaration. Now, there are two reasons for bringing up Visual Studio 2008 in this context. The first is that it’s more evidence of the static typing involved—the compiler clearly knows the type of the variable. The second is to point out that you can easily discover the type involved, even from deep within a method. This will be important when we talk about the pros and cons of using implicit typing in a minute. First, though, I ought to mention some limitations.
You can’t use implicit typing for every variable in every situation. You can only use it when
The variable being declared is a local variable.
The variable is initialized as part of the declaration.
The initialization expression isn’t a method group or anonymous function[1] (without casting).
The initialization expression isn’t
null.Only one variable is declared in the statement.
The type you want the variable to have is the compile-time type of the initialization expression.
The third and fourth points are interesting. You can’t write
var starter = delegate() { Console.WriteLine(); } |
This is because the compiler doesn’t know what type to use. You can write
var starter = (ThreadStart) delegate() { Console.WriteLine(); }but if you’re going to do that you’d be better off explicitly declaring the variable in the first place. The same is true in the null case—you could cast the null appropriately, but there’d be no point. Note that you can use the result of method calls or properties as the initialization expression—you’re not limited to constants and constructor calls. For instance, you could use
var args = Environment.CommandLine;
In that case args would then be of type string[]. In fact, initializing a variable with the result of a method call is likely to be the most common situation where implicit typing is used, as part of LINQ. We’ll see all that later on—just bear it in mind as the examples progress.
It’s also worth noting that you are allowed to use implicit typing for the local variables declared in the first part of a using, for, or foreach statement. For example, the following are all valid (with appropriate bodies, of course):
for (var i = 0; i < 10; i++)
using (var x = File.OpenText("test.dat"))
foreach (var s in Environment.CommandLine)
The variables in question would end up with types of int, StreamReader and string, respectively. Of course, just because you can do this doesn’t mean you should. Let’s have a look at the reasons for and against using implicit typing.
The question of when it’s a good idea to use implicit typing is the cause of an awful lot of community discussion. Views range from “everywhere” to “nowhere” with plenty of more balanced approaches between the two. We’ll see in section 8.5 that in order to use another of C#3’s features—anonymous types—you’ve often got to use implicit typing. You could avoid anonymous types as well, of course, but that’s throwing the baby out with the bathwater.
The main reason for using implicit typing (leaving anonymous types aside for the moment) is that it reduces not only the number of keystrokes required to enter the code, but also the amount of code on the screen. In particular, when generics are involved the type names can get very long. Figures 8.1 and 8.2 used a type of Dictionary<string, List<Person>>, which is 33 characters. By the time you’ve got that twice on a line (once for the declaration and once for the initialization), you end up with a massive line just for declaring and initializing a single variable! An alternative is to use an alias, but that puts the “real” type involved a long way (conceptually at least) from the code that uses it.
When reading the code, there’s no point in seeing the same long type name twice on the same line when it’s obvious that they should be the same. If the declaration isn’t visible on the screen, you’re in the same boat whether implicit typing was used or not (all the ways you’d use to find out the variable type are still valid) and if it is visible, the expression used to initialize the variable tells you the type anyway.
All of this sounds good, so what are the arguments against implicit typing? Paradoxically enough, readability is the most important one, despite also being an argument in favor of implicit typing! By not being explicit about what type of variable you’re declaring, you may be making it harder to work it out just by reading the code. It breaks the “state what are we declaring, then what value it will start off with” mind-set that keeps the declaration and the initialization quite separate. To what extent that’s an issue depends on both the reader and the initialization expression involved. If you’re explicitly calling a constructor, it’s always going to be pretty obvious what type you’re creating. If you’re calling a method or using a property, it depends on how obvious the return type is just from looking at the call. Integer literals are another example where guessing the inferred type is harder than one might suppose. How quickly can you work out the type of each of the variables declared here?
var a = 2147483647;
var b = 2147483648;
var c = 4294967295;
var d = 4294967296;
var e = 9223372036854775807;
var f = 9223372036854775808;
The answers are int, uint, uint, long, long, and ulong, respectively—the type used depends on the value of the expression. There’s nothing new here in terms of the handling of literals—C# has always behaved like this—but implicit typing makes it easier to write obscure code in this case.
The argument that is rarely explicitly stated but that I believe is behind a lot of the concern over implicit typing is “It just doesn’t feel right.” If you’ve been writing in a C-like language for years and years, there is something unnerving about the whole business, however much you tell yourself that it’s still static typing under the covers. This may not be a rational concern, but that doesn’t make it any less real. If you’re uncomfortable, you’re likely to be less productive. If the advantages don’t outweigh your negative feelings, that’s fine. Depending on your personality, you may wish to try to push yourself to become more comfortable with implicit typing—but you certainly don’t have to.
Here are some recommendations based on my experience with implicit typing. That’s all they are—recommendations—and you should feel free to take them with a pinch of salt.
Consult your teammates on the matter when embarking on a C# 3 project.
When in doubt, try a line both ways and go with your gut feelings.
Unless there’s a significant gain in code simplicity, use explicit typing. Note that numeric variables always fall into this category since you’d never gain more than a few characters anyway.
If it’s important that someone reading the code knows the type of the variable at a glance, use explicit typing.
If the variable is directly initialized with a constructor and the type name is long (which often occurs with generics) consider using implicit typing.
If the precise type of the variable isn’t important, but its general nature is clear from the context, use implicit typing to deemphasize how the code achieves its aim and concentrate on the higher level of what it’s achieving.
Effectively, my recommendation boils down to not using implicit typing either “because it’s new” or for reasons of laziness, saving a few keystrokes. Where it keeps the code tidier, allowing you to concentrate on the most important elements of the code, go for it. I’ll be using implicit typing extensively in the rest of the book, for the simple reason that code is harder to format in print than on a screen—there’s not as much width available.
We’ll come back to implicit typing when we see anonymous types, as they create situations where you are forced to ask the compiler to infer the types of some variables. Before that, let’s have a look at how C# 3 makes it easier to construct and populate a new object in one expression.
One would have thought that object-oriented languages would have streamlined object creation long ago. After all, before you start using an object, something has to create it, whether it’s through your code directly or a factory method of some sort. And yet in C#2 very few language features are geared toward making life easier when it comes to initialization. If you can’t do what you want using constructor arguments, you’re basically out of luck—you need to create the object, then manually initialize it with property calls and the like.
This is particularly annoying when you want to create a whole bunch of objects in one go, such as in an array or other collection—without a “single expression” way of initializing an object, you’re forced to either use local variables for temporary manipulation, or create a helper method that performs the appropriate initialization based on parameters.
C#3 comes to the rescue in a number of ways, as we’ll see in this section.
The expressions we’re going to be using in this section are called object initializers. These are just ways of specifying initialization that should occur after an object has been created. You can set properties, set properties of properties (don’t worry, it’s simpler than it sounds), and add to collections that are accessible via properties. To demonstrate all this, we’ll use a Person class again. To start with, there’s the name and age we’ve used before, exposed as writable properties. We’ll provide both a parameterless constructor and one that accepts the name as a parameter. We’ll also add a list of friends and the person’s home location, both of which are accessible as read-only properties, but that can still be modified by manipulating the retrieved objects. A simple Location class provides Country and Town properties to represent the person’s home. Listing 8.2 shows the complete code for the classes.
Example 8.2. A fairly simple Person class used for further demonstrations
public class Person
{
   public int Age { get; set; }
   public string Name { get; set; }

   List<Person> friends = new List<Person>();
   public List<Person> Friends { get { return friends; } }

   Location home = new Location();

   public Location Home { get { return home; } }

   public Person() { }

   public Person(string name)
   {
      Name = name;
   }
}

public class Location
{
   public string Country { get; set; }
   public string Town { get; set; }
}
Listing 8.2 is straightforward, but it’s worth noting that both the list of friends and the home location are created in a “blank” way when the person is created, rather than being left as just null references. That’ll be important later on—but for the moment let’s look at the properties representing the name and age of a person.
Now that we’ve got our Person type, we want to create some instances of it using the new features of C#3. In this section we’ll look at setting the Name and Age properties—we’ll come to the others later.
In fact, object initializers aren’t restricted to using properties. All of the syntactic sugar here also applies to fields, but the vast majority of the time you’ll be using properties. In a well-encapsulated system you’re unlikely to have access to fields anyway, unless you’re creating an instance of a type within that type’s own code. It’s worth knowing that you can use fields, of course—so for the rest of the section, just read property and field whenever the text says property.
With that out of the way, let’s get down to business. Suppose we want to create a person called Tom, who is four years old. Prior to C# 3, there are two ways this can be achieved:
Person tom1 = new Person();
tom1.Name = "Tom";
tom1.Age = 4;

Person tom2 = new Person("Tom");
tom2.Age = 4;
The first version simply uses the parameterless constructor and then sets both properties. The second version uses the constructor overload which sets the name, and then sets the age afterward. Both of these options are still available in C# 3 of course, but there are other alternatives:
Person tom3 = new Person() { Name="Tom", Age=4 };

Person tom4 = new Person { Name="Tom", Age=4 };

Person tom5 = new Person("Tom") { Age = 4 };
The part in braces at the end of each line is the object initializer. Again, it’s just compiler trickery. The IL used to initialize tom3 and tom4 is identical, and indeed it’s very nearly[2] the same as we used for tom1. Predictably, the code for tom5 is nearly the same as for tom2. Note how for tom4 we omitted the parentheses for the constructor. You can use this shorthand for types with a parameterless constructor, which is what gets called in the compiled code.
After the constructor has been called, the specified properties are set in the obvious way. They’re set in the order specified in the object initializer, and you can only specify any particular property at most once—you can’t set the Name property twice, for example. (You could, however, call the constructor taking the name as a parameter, and then set the Name property. It would be pointless, but the compiler wouldn’t stop you from doing it.) The expression used as the value for a property can be any expression that isn’t itself an assignment—you can call methods, create new objects (potentially using another object initializer), pretty much anything.
You may well be wondering just how useful this is—we’ve saved one or two lines of code, but surely that’s not a good enough reason to make the language more complicated, is it? There’s a subtle point here, though: we’ve not just created an object in one line— we’ve created it in one expression. That difference can be very important. Suppose you want to create an array of type Person[] with some predefined data in it. Even without using the implicit array typing we’ll see later, the code is neat and readable:
Person[] family = new Person[]
{
   new Person { Name="Holly", Age=31 },
   new Person { Name="Jon", Age=31 },
   new Person { Name="Tom", Age=4 },
   new Person { Name="William", Age=1 },
   new Person { Name="Robin", Age=1 }
};
Now, in a simple example like this we could have written a constructor taking both the name and age as parameters, and initialized the array in a similar way in C# 1 or 2. However, appropriate constructors aren’t always available—and if there are several constructor parameters, it’s often not clear which one means what just from the position. By the time a constructor needs to take five or six parameters, I often find myself relying on IntelliSense more than I want to. Using the property names is a great boon to readability in such cases.
This form of object initializer is the one you’ll probably use most often. However, there are two other forms—one for setting subproperties, and one for adding to collections. Let’s look at subproperties—properties of properties—first.
So far we’ve found it easy to set the Name and Age properties, but we can’t set the Home property in the same way—it’s read-only. However, we can set the town and the country of a person, by first fetching the Home property, and then setting properties on the result. The language specification refers to this as setting the properties of an embedded object. Just to make it clear, what we’re talking about is the following C#1 code:
Person tom = new Person("Tom");
tom.Age = 4;
tom.Home.Country = "UK";
tom.Home.Town = "Reading";
When we’re populating the home location, each statement is doing a get to retrieve the Location instance, and then a set on the relevant property on that instance. There’s nothing new in that, but it’s worth slowing your mind down to look at it carefully; otherwise, it’s easy to miss what’s going on behind the scenes.
C#3 allows all of this to be done in one expression, as shown here:
Person tom = new Person("Tom")
{
   Age = 4,
   Home = { Country="UK", Town="Reading" }
};
The compiled code for these snippets is effectively the same. The compiler spots that to the right side of the = sign is another object initializer, and applies the properties to the embedded object appropriately. One point about the formatting I’ve used—just as in almost all C# features, it’s whitespace independent: you can collapse the whitespace in the object initializer, putting it all on one line if you like. It’s up to you to work out where the sweet spot is in balancing long lines against lots of lines.
The absence of the new keyword in the part initializing Home is significant. If you need to work out where the compiler is going to create new objects and where it’s going to set properties on existing ones, look for occurrences of new in the initializer. Every time a new object is created, the new keyword appears somewhere.
We’ve dealt with the Home property—but what about Tom’s friends? There are properties we can set on a List<Person>, but none of them will add entries to the list. It’s time for the next feature—collection initializers.
Creating a collection with some initial values is an extremely common task. Until C#3 arrived, the only language feature that gave any assistance was array creation—and even that was clumsy in many situations. C# 3 has collection initializers, which allow you to use the same type of syntax as array initializers but with arbitrary collections and more flexibility.
As a first example, let’s use the now-familiar List<T> type. In C#2, you could populate a list either by passing in an existing collection, or by calling Add repeatedly after creating an empty list. Collection initializers in C#3 take the latter approach. Suppose we want to populate a list of strings with some names—here’s the C# 2 code (on the left) and the close equivalent in C#3 (on the right):
List<string> names = new List<string>();
names.Add("Holly");
names.Add("Jon");
names.Add("Tom");
names.Add("Robin");
names.Add("William"); | var names = new List<string>
{
"Holly", "Jon", "Tom",
"Robin", "William"
}; |
Just as with object initializers, you can specify constructor parameters if you want, or use a parameterless constructor either explicitly or implicitly. Also as before, the decision about how much whitespace to use is entirely yours—in real code (where there’s significantly more room than in a book), I might well have put the entire C# 3 statement on one line. The use of implicit typing here was partly for space reasons—the names variable could equally well have been declared explicitly. Reducing the number of lines of code (without reducing readability) is nice, but there are two bigger benefits of collection initializers:
The “create and initialize” part counts as a single expression.
There’s a lot less clutter in the code.
The first point becomes important when you want to use a collection as either an argument to a method or as one element in a larger collection. That happens relatively rarely (although often enough to still be useful)—but the second point is the real reason this is a killer feature in my view. If you look at the code on the right, you see the information you need, with each piece of information written only once. The variable name occurs once, the type being used occurs once, and each of the elements of the initialized collection appears once. It’s all extremely simple, and much clearer than the C#2 code, which contains a lot of fluff around the useful bits.
Collection initializers aren’t limited to just lists. You can use them with any type that implements IEnumerable, as long as it has an appropriate public Add method for each element in the initializer. You can use an Add method with more than one parameter by putting the values within another set of braces. The most common use for this is creating dictionaries. For example, if we wanted a dictionary mapping names to ages, we could use the following code:
Dictionary<string,int> nameAgeMap = new Dictionary<string,int>
{
   {"Holly", 31},
   {"Jon", 31},
   {"Tom", 4}
};
In this case, the Add(string, int) method would be called three times. If multiple Add overloads are available, different elements of the initializer can call different overloads. If no compatible overload is available for a specified element, the code will fail to compile. There are two interesting points about the design decision here:
The fact that the type has to implement
IEnumerableis never used by the compiler.The
Addmethod is only found by name—there’s no interface requirement specifying it.
These are both pragmatic decisions. Requiring IEnumerable to be implemented is a reasonable attempt to check that the type really is a collection of some sort, and using any public overload of the Add method (rather than requiring an exact signature) allows for simple initializations such as the earlier dictionary example. Nonpublic overloads, including those that explicitly implement an interface, are not used. This is a slightly different situation from object initializers setting properties, where internal properties are available too (within the same assembly, of course).
An early draft of the specification required ICollection<T> to be implemented instead, and the implementation of the single-parameter Add method (as specified by the interface) was called rather than allowing different overloads. This sounds more “pure,” but there are far more types that implement IEnumerable than ICollection<T>—and using the single-parameter Add method would be inconvenient. For example, in our case it would have forced us to explicitly create an instance of a KeyValuePair<string,int> for each element of the initializer. Sacrificing a bit of academic purity has made the language far more useful in real life.
So far we’ve only seen collection initializers used in a stand-alone fashion to create whole new collections. They can also be combined with object initializers to populate embedded collections. To show this, we’ll go back to our Person example. The Friends property is read-only, so we can’t create a new collection and specify that as the collection of friends—but we can add to whatever collection is returned by the property’s getter. The way we do this is similar to the syntax we’ve already seen for setting properties of embedded objects, but we just specify a collection initializer instead of a sequence of properties.
Let’s see this in action by creating another Person instance for Tom, this time with friends (listing 8.3).
Listing 8.3 uses all the features of object and collection initializers we’ve come across. The main part of interest is the collection initializer, which itself uses all kinds of different forms of object initializers internally. Note that we’re not specifying a type here as we did with the stand-alone collection creation: we’re not creating a new collection, just adding to an existing one.
We could have gone further, specifying friends of friends, friends of friends of friends, and so forth. What we couldn’t do with this syntax is specify that Tom is Ben’s friend—while you’re still initializing an object, you don’t have access to it. This can be awkward in a few cases, but usually isn’t a problem.
Collection initialization within object initializers works as a sort of cross between stand-alone collection initializers and setting embedded object properties. For each element in the collection initializer, the collection property getter (Friends in this case) is called, and then the appropriate Add method is called on the returned value. The collection isn’t cleared in any way before elements are added. For example, if you were to decide that someone should always be their own friend, and added this to the list of friends within the Person constructor, using a collection initializer would only add extra friends.
As you can see, the combination of collection and object initializers can be used to populate whole trees of objects. But when and where is this likely to actually happen?
Trying to pin down exactly where these features are useful is reminiscent of being in a Monty Python sketch about the Spanish Inquisition—every time you think you’ve got a reasonably complete list, another fairly common example pops up. I’ll just mention three examples, which I hope will encourage you to consider where else you might use them.
It’s not uncommon for me to want some kind of collection (often a map) that is effectively constant. Of course, it can’t be a constant as far as the C# language is concerned, but it can be declared static and read-only, with big warnings to say that it shouldn’t be changed. (It’s usually private, so that’s good enough.) Typically, this involves creating a static constructor and often a helper method, just to populate the map. With C# 3’s collection initializers, it’s easy to set the whole thing up inline.
When writing unit tests, I frequently want to populate an object just for one test, often passing it in as a parameter to the method I’m trying to test at the time. This is particularly common with entity classes. Writing all of the initialization “long-hand” can be longwinded and also hides the essential structure of the object from the reader of the code, just as XML creation code can often obscure what the document would look like if you viewed it (appropriately formatted) in a text editor. With appropriate indentation of object initializers, the nested structure of the object hierarchy can become obvious in the very shape of the code, as well as make the values stand out more than they would otherwise.
Sometimes patterns occur in production code that can be aided by C#3’s initialization features. For instance, rather than specifying several parameters to a single method, you can sometimes make code more straightforward by collecting the parameters together in an extra type. The framework ProcessStartInfo type is a good example of this—the designers could have overloaded Process.Start with many different sets of parameters, but using ProcessStartInfo makes everything clearer. C#3 allows you to create a ProcessStartInfo and fill in all the properties in a clearer manner—and you could even specify it inline in a call to Process.Start. In some ways, the method call would then act as if it had a lot of default parameters, with the properties providing the names of parameters you want to specify. It’s worth considering this pattern when you find yourself using lots of parameters—it was always a useful technique to know about, but C#3 makes it that bit more elegant.
Of course, there are uses beyond these three in ordinary code, and I certainly don’t want to put you off using the new features elsewhere. There’s very little reason not to use them, other than possibly confusing developers who aren’t familiar with C# 3 yet. You may decide that using an object initializer just to set one property (as opposed to just explicitly setting it in a separate statement) is over the top—that’s a matter of aesthetics, and I can’t give you much guidance there. As with implicit typing, it’s a good idea to try the code both ways, and learn to predict your own (and your team’s) reading preferences.
So far we’ve looked at a fairly diverse range of features: implementing properties easily, simplifying local variable declarations, and populating objects in single expressions. In the remainder of this chapter we’ll be gradually bringing these topics together, using more implicit typing and more object population, and creating whole types without giving any implementation details.
Our next topic appears to be quite similar to collection initializers when you look at code using it. I mentioned earlier that array initialization was a bit clumsy in C# 1 and 2. I’m sure it won’t surprise you to learn that it’s been streamlined for C# 3. Let’s take a look.
In C# 1 and 2, initializing an array as part of a variable declaration and initialization statement was quite neat—but if you wanted to do it anywhere else, you had to specify the exact array type involved. So for example, this compiles without any problem:
string[] names = {"Holly", "Jon", "Tom", "Robin", "William"};This doesn’t work for parameters, though: suppose we want to make a call to MyMethod, declared as void MyMethod(string[] names). This code won’t work:
MyMethod({"Holly", "Jon", "Tom", "Robin", "William"}); |
Instead, you have to tell the compiler what type of array you want to initialize:
MyMethod(new string[] {"Holly", "Jon", "Tom", "Robin", "William"});C#3 allows something in between:
MyMethod(new [] {"Holly", "Jon", "Tom", "Robin", "William"});Clearly the compiler needs to work out what type of array to use. It starts by forming a set containing all the compile-time types of the expressions inside the braces. If there’s exactly one type in that set that all the others can be implicitly converted to, that’s the type of the array. Otherwise, (or if all the values are typeless expressions, such as constant null values or anonymous methods, with no casts) the code won’t compile. Note that only the types of the expressions are considered as candidates for the overall array type. This means that occasionally you might have to explicitly cast a value to a less specific type. For instance, this won’t compile:
new[] { new MemoryStream(), new StringWriter() } |
There’s no conversion from MemoryStream to StringWriter, or vice versa. Both are implicitly convertible to object and IDisposable, but the compiler only considers types that are in the original set produced by the expressions themselves. If we change one of the expressions in this situation so that its type is either object or IDisposable, the code compiles:
new[] { (IDisposable) new MemoryStream(), new StringWriter() }The type of this last expression is implicitly IDisposable[]. Of course, at that point you might as well explicitly state the type of the array just as you would in C# 1 and 2, to make it clearer what you’re trying to achieve.
Compared with the earlier features, implicitly typed arrays are a bit of an anticlimax. I find it hard to get particularly excited about them, even though they do make life that bit simpler in cases where an array is passed as a parameter. You could well argue that this feature doesn’t prove itself in the “usefulness versus complexity” balance used by the language designers to decide what should be part of the language.
The designers haven’t gone mad, however—there’s one important situation in which this implicit typing is absolutely crucial. That’s when you don’t know (and indeed can’t know) the name of the type of the elements of the array. How can you possibly get into this peculiar state? Read on...
Implicit typing, object and collection initializers, and implicit array typing are all useful in their own right, to a greater or lesser extent. However, they all really serve a higher purpose—they make it possible to work with our final feature of the chapter, anonymous types. They, in turn, serve a higher purpose—LINQ.
It’s much easier to explain anonymous types when you’ve already got some idea of what they are through an example. I’m sorry to say that without the use of extension methods and lambda expressions, the examples in this section are likely to be a little contrived, but there’s a distinct chicken-and-egg situation here: anonymous types are most useful within the context of the more advanced features, but we need to understand the building blocks before we can see much of the bigger picture. Stick with it—it will make sense in the long run, I promise.
Let’s pretend we didn’t have the Person class, and the only properties we cared about were the name and age. Listing 8.4 shows how we could still build objects with those properties, without ever declaring a type.
Example 8.4. Creating objects of an anonymous type with Name and Age properties
var tom = new { Name = "Tom", Age = 4 };
var holly = new { Name = "Holly", Age = 31 };
var jon = new { Name = "Jon", Age = 31 };

Console.WriteLine("{0} is {1} years old", jon.Name, jon.Age);
As you can tell from listing 8.4, the syntax for initializing an anonymous type is similar to the object initializers we saw in section 8.3.2—it’s just that the name of the type is missing between new and the opening brace. We’re using implicitly typed local variables because that’s all we can use—we don’t have a type name to declare the variable with. As you can see from the last line, the type has properties for the Name and Age, both of which can be read and which will have the values specified in the anonymous object initializer used to create the instance—so in this case the output is “Jon is 31 years old.” The properties have the same types as the expressions in the initializers—string for Name, and int for Age. Just as in normal object initializers, the expressions used in anonymous object initializers can call methods or constructors, fetch properties, perform calculations—whatever you need to do.
You may now be starting to see why implicitly typed arrays are important. Suppose we want to create an array containing the whole family, and then iterate through it to work out the total age. Listing 8.5 does just that—and demonstrates a few other interesting features of anonymous types at the same time.
Putting together listing 8.5 and what we learned about implicitly typed arrays in section 8.4, we can deduce something very important: all the people in the family are of the same type. If each use of an anonymous object initializer in ![]() created a new type, there wouldn’t be any appropriate type for the array declared at
created a new type, there wouldn’t be any appropriate type for the array declared at ![]() . Within any given assembly, the compiler treats two anonymous object initializers as the same type if there are the same number of properties, with the same names and types, and they appear in the same order. In other words, if we swapped the
. Within any given assembly, the compiler treats two anonymous object initializers as the same type if there are the same number of properties, with the same names and types, and they appear in the same order. In other words, if we swapped the Name and Age properties in one of the initializers, there’d be two different types involved—likewise if we introduced an extra property in one line, or used a long instead of an int for the age of one person, another anonymous type would have been introduced.
Note
Implementation detail: how many types?—. If you ever decide to look at the IL (or decompiled C#) for an anonymous type, be aware that although two anonymous object initializers with the same property names in the same order but using different property types will produce two different types, they’ll actually be generated from a single generic type. The generic type is parameterized, but the closed, constructed types will be different because they’ll be given different type arguments for the different initializers.
Notice that we’re able to use a foreach statement to iterate over the array just as we would any other collection. The type involved is inferred ![]() , and the type of the
, and the type of the person variable is the same anonymous type we’ve used in the array. Again, we can use the same variable for different instances because they’re all of the same type.
Listing 8.5 also proves that the Age property really is strongly typed as an int—otherwise trying to sum the ages ![]() wouldn’t compile. The compiler knows about the anonymous type, and Visual Studio 2008 is even willing to share the information via tooltips, just in case you’re uncertain. Figure 8.3 shows the result of hovering over the
wouldn’t compile. The compiler knows about the anonymous type, and Visual Studio 2008 is even willing to share the information via tooltips, just in case you’re uncertain. Figure 8.3 shows the result of hovering over the person part of the person.Age expression from listing 8.5.
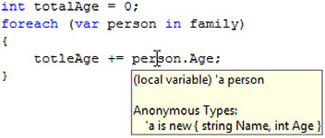
Figure 8.3. Hovering over a variable that is declared (implicitly) to be of an anonymous type shows the details of that anonymous type.
Now that we’ve seen anonymous types in action, let’s go back and look at what the compiler is actually doing for us.
Anonymous types are created by the compiler and included in the compiled assembly in the same way as the extra types for anonymous methods and iterator blocks. The CLR treats them as perfectly ordinary types, and so they are—if you later move from an anonymous type to a normal, manually coded type with the behavior described in this section, you shouldn’t see anything change. Anonymous types contain the following members:
A constructor taking all the initialization values. The parameters are in the same order as they were specified in the anonymous object initializer, and have the same names and types.
Public read-only properties.
Private read-only fields backing the properties.
Overrides for
Equals,GetHashCode, andToString.
That’s it—there are no implemented interfaces, no cloning or serialization capabilities—just a constructor, some properties and the normal methods from object.
The constructor and the properties do the obvious things. Equality between two instances of the same anonymous type is determined in the natural manner, comparing each property value in turn using the property type’s Equals method. The hash code generation is similar, calling GetHashCode on each property value in turn and combining the results. The exact method for combining the various hash codes together to form one “composite” hash is unspecified, and you shouldn’t write code that depends on it anyway—all you need to be confident in is that two equal instances will return the same hash, and two unequal instances will probably return different hashes. All of this only works if the Equals and GetHashCode implementations of all the different types involved as properties conform to the normal rules, of course.
Note that because the properties are read-only, all anonymous types are immutable so long as the types used for their properties are immutable. This provides you with all the normal benefits of immutability—being able to pass values to methods without fear of them changing, simple sharing of data across threads, and so forth.
We’re almost done with anonymous types now. However, there’s one slight wrinkle still to talk about—a shortcut for a situation that is fairly common in LINQ.
The anonymous object initializers we’ve seen so far have all been lists of name/value pairs—Name = "Jon", Age=31 and the like. As it happens, I’ve always used constants because they make for smaller examples, but in real code you often want to copy properties from an existing object. Sometimes you’ll want to manipulate the values in some way, but often a straight copy is enough.
Again, without LINQ it’s hard to give convincing examples of this, but let’s go back to our Person class, and just suppose we had a good reason to want to convert a collection of Person instances into a similar collection where each element has just a name, and a flag to say whether or not that person is an adult. Given an appropriate person variable, we could use something like this:
new { Name = person.Name, IsAdult = (person.Age >= 18) }That certainly works, and for just a single property the syntax for setting the name (the part in bold) is not too clumsy—but if you were copying several properties it would get tiresome. C# 3 provides a shortcut: if you don’t specify the property name, but just the expression to evaluate for the value, it will use the last part of the expression as the name—provided it’s a simple field or property. This is called a projection initializer. It means we can rewrite the previous code as
new { person.Name, IsAdult = (person.Age >= 18) }It’s quite common for all the bits of an anonymous object initializer to be projection initializers—it typically happens when you’re taking some properties from one object and some properties from another, often as part of a join operation. Anyway, I’m getting ahead of myself. Listing 8.6 shows the previous code in action, using the List.ConvertAll method and an anonymous delegate.
Example 8.6. Transformation from Person to a name and adulthood flag
List<Person> family = new List<Person>
{
   new Person {Name="Holly", Age=31},
   new Person {Name="Jon", Age=31},
   new Person {Name="Tom", Age=4},
   new Person {Name="Robin", Age=1},
   new Person {Name="William", Age=1}
};

var converted = family.ConvertAll(delegate(Person person)
   { return new { person.Name, IsAdult = (person.Age >= 18) }; }
);

foreach (var person in converted)
{
   Console.WriteLine("{0} is an adult? {1}",
                     person.Name, person.IsAdult);
}
In addition to the use of a projection initializer for the Name property, listing 8.6 shows the value of delegate type inference and anonymous methods. Without them, we couldn’t have retained our strong typing of converted, as we wouldn’t have been able to specify what the TOutput type parameter of Converter should be. As it is, we can iterate through the new list and access the Name and IsAdult properties as if we were using any other type.
Don’t spend too long thinking about projection initializers at this point—the important thing is to be aware that they exist, so you won’t get confused when you see them later. In fact, that advice applies to this entire section on anonymous types—so without going into details, let’s look at why they’re present at all.
I hope you’re not feeling cheated at this point, but I sympathize if you do. Anonymous types are a fairly complex solution to a problem we haven’t really encountered yet... except that I bet you have seen part of the problem before, really.
If you’ve ever done any real-life work involving databases, you’ll know that you don’t always want all of the data that’s available on all the rows that match your query criteria. Often it’s not a problem to fetch more than you need, but if you only need two columns out of the fifty in the table, you wouldn’t bother to select all fifty, would you?
The same problem occurs in nondatabase code. Suppose we have a class that reads a log file and produces a sequence of log lines with many fields. Keeping all of the information might be far too memory intensive if we only care about a couple of fields from the log. LINQ lets you filter that information easily.
But what’s the result of that filtering? How can we keep some data and discard the rest? How can we easily keep some derived data that isn’t directly represented in the original form? How can we combine pieces of data that may not initially have been consciously associated, or that may only have a relationship in a particular situation? Effectively, we want a new data type—but manually creating such a type in every situation is tedious, particularly when you have tools such as LINQ available that make the rest of the process so simple. Figure 8.4 shows the three elements that make anonymous types a powerful feature.
Figure 8.4. Anonymous types allow you to keep just the data you need for a particular situation, in a form that is tailored to that situation, without the tedium of writing a fresh type each time.
If you find yourself creating a type that is only used in a single method, and that only contains fields and trivial properties, consider whether an anonymous type would be appropriate. Even if you’re not developing in C#3 yet, keep an eye out for places where it might be worth using an anonymous type when you upgrade. The more you think about this sort of feature, the easier the decisions about when to use it will become. I suspect that you’ll find that most of the times when you find yourself leaning toward anonymous types, you could also use LINQ to help you—look out for that too.
If you find yourself using the same sequence of properties for the same purpose in several places, however, you might want to consider creating a normal type for the purpose, even if it still just contains trivial properties. Anonymous types naturally “infect” whatever code they’re used in with implicit typing—which is often fine, but can be a nuisance at other times. As with the previous features, use anonymous types when they genuinely make the code simpler to work with, not just because they’re new and cool.
What a seemingly mixed bag of features! We’ve seen four features that are quite similar, at least in syntax: object initializers, collection initializers, implicitly typed arrays, and anonymous types. The other two features—automatic properties and implicitly typed local variables—are somewhat different. Likewise, most of the features would have been useful individually in C# 2, whereas implicitly typed arrays and anonymous types only pay back the cost of learning about them when the rest of the C#3 features are brought into play.
So what do these features really have in common? They all relieve the developer of tedious coding. I’m sure you don’t enjoy writing trivial properties any more than I do, or setting several properties, one at a time, using a local variable—particularly when you’re trying to build up a collection of similar objects. Not only do the new features of C# 3 make it easier to write the code, they also make it easier to read it too, at least when they’re applied sensibly.
In our next chapter we’ll look at a major new language feature, along with a framework feature it provides direct support for. If you thought anonymous methods made creating delegates easy, just wait until you see lambda expressions...
[1] The term anonymous function covers both anonymous methods and lambda expressions, which we’ll delve into in chapter 9.
[2] In fact, the variable’s new value isn’t assigned until all the properties have been set. A temporary local variable is used until then. This is very rarely noticeable, though, and where it is the code should probably be more straightforward anyway.