
Introduction
In this chapter and the next, we connect our simple C++ library of statistical functions to R. We do this by creating an R package using Rcpp. We then use this wrapper component to expose the functionality we want. This chapter focuses on both the project setup and the mechanics of building packages with RStudio. The following chapter focuses on the details of using Rcpp as a framework for connecting C++ and R.
The project setup in this case is slightly more involved than previously. In general terms, we require the standard environment for building a CRAN1 package. More specifically, the development environment needs to use a suitable compiler. Because the outputs produced by different C++ compilers (GCC, MSVC, and so on) are not all the same, it is not possible to mix the generated object code from different compilers. The result, from our narrow practitioner perspective, is that we need to build a version of the C++ library of statistical functions with a different compiler/linker. Specifically, the GNU Compiler Collection (GCC) has to be used along with the corresponding g++ compiler (gcc) for the C++ language. This is in order to build an ABI (Application Binary Interface)-compatible component that will be hosted in R and which interoperates in the R environment.
- 1.
Install the required gcc tools.
- 2.
Setup and build a new static library (using CodeBlocks) from the same sources as before. The library output is libStatsLib.a.
- 3.
Create the Rcpp project in RStudio (StatsR).
- 4.
Configure the Rcpp project to use the new static library.
This will give us a working wrapper shell. Later on, we look at how the functionality is added. Unlike in previous chapters, we focus more on the toolchain (CodeBlocks, Rtools, and RStudio) in this chapter. We leave writing the Rcpp layer, and building and testing the functionality until the next chapter.
Prerequisites
Rtools
Rtools is a suite of tools for building R packages on Windows and includes the gcc compiler. The installer for Rtools is available from https://cran.r-project.org/bin/windows/Rtools/. You should install the 64-bit version of Rtools: rtools40-x86_64.exe. It is important to note that to install Rtools 4.0 you will need version 4.0.0 of R or above. After completing the installation, ensure that the RTOOLS40_HOME environment variable is set to the rtools directory. Also, add the rtools directory to the PATH environment variable. It is also possible to install Rtools directly from inside RStudio, using the command: install.Rtools(). This installs the latest version of Rtools. The following link gives instructions on how to do this: https://rdrr.io/cran/installr/man/install.Rtools.html. To check that Rtools has been installed correctly, open a PowerShell prompt and type gcc --version to display the program version information.
Installing CodeBlocks
In reality, installing CodeBlocks is not a prerequisite, it is a convenience. The installer is available from www.codeblocks.org/downloads/binaries. Our goal is to build an ABI-compliant static library with the gcc toolchain, and there are several ways to achieve this. If you are comfortable building libraries manually using makefiles or you prefer to use CMake to configure a build environment using the gcc toolchain , you do not need to use CodeBlocks. Appendix B contains basic instructions on configuring a Visual Studio CMake project StatsLibCM to build the library output we require. On the other hand, if you prefer Visual Studio Code as your C++ development environment, this can also be configured to work with GCC using MinGW. For further information, see the Additional resources section at the end of the chapter.
Because CodeBlocks is already configured for cross-platform C++ development using gcc, we will continue to use it here. In addition, CodeBlocks provides a wide variety of useful project types and several build targets (static-link library, dynamic-link library, for example). Moreover, the debugging support (including setting breakpoints and watch variables) is easier than using gdb from a console session.
CodeBlocks
Toolchain Setup

Compiler settings in CodeBlocks
In addition to the General settings (shown in Figure 5-1), there are a number of useful options for controlling aspects of the compilation. Specifically, there are options for debugging, profiling, warnings, optimization, and CPU architecture. For this project we do not make use of any of these options, but it is useful to know they exist.
Next, in the Toolchain executables tab, click the Auto Detect button. This should fill in the path to the compiler’s installation directory, for example, D:Program Filesmingw-w64x86_64-8.1.0-posix-seh-rt_v6-rev0mingw64. If this isn’t the case, click the “...” button, and manually select the MinGW directory (under which the gcc tools are located). Note that CodeBlocks itself installs the MinGW toolset. So, in addition to Rtools, you may have a second installation of MinGW. I have two versions of the MinGW packages – one with gcc 8.1.0 from CodeBlocks and one with gcc 8.3.0 from Rtools. This does not cause a problem since the outputs from both are ABI compatible. The MinGW installation from CodeBlocks puts the directory into the PATH environment variable, so this is what we use to build with. You can, however, change this to use the path to Rtools if you prefer.
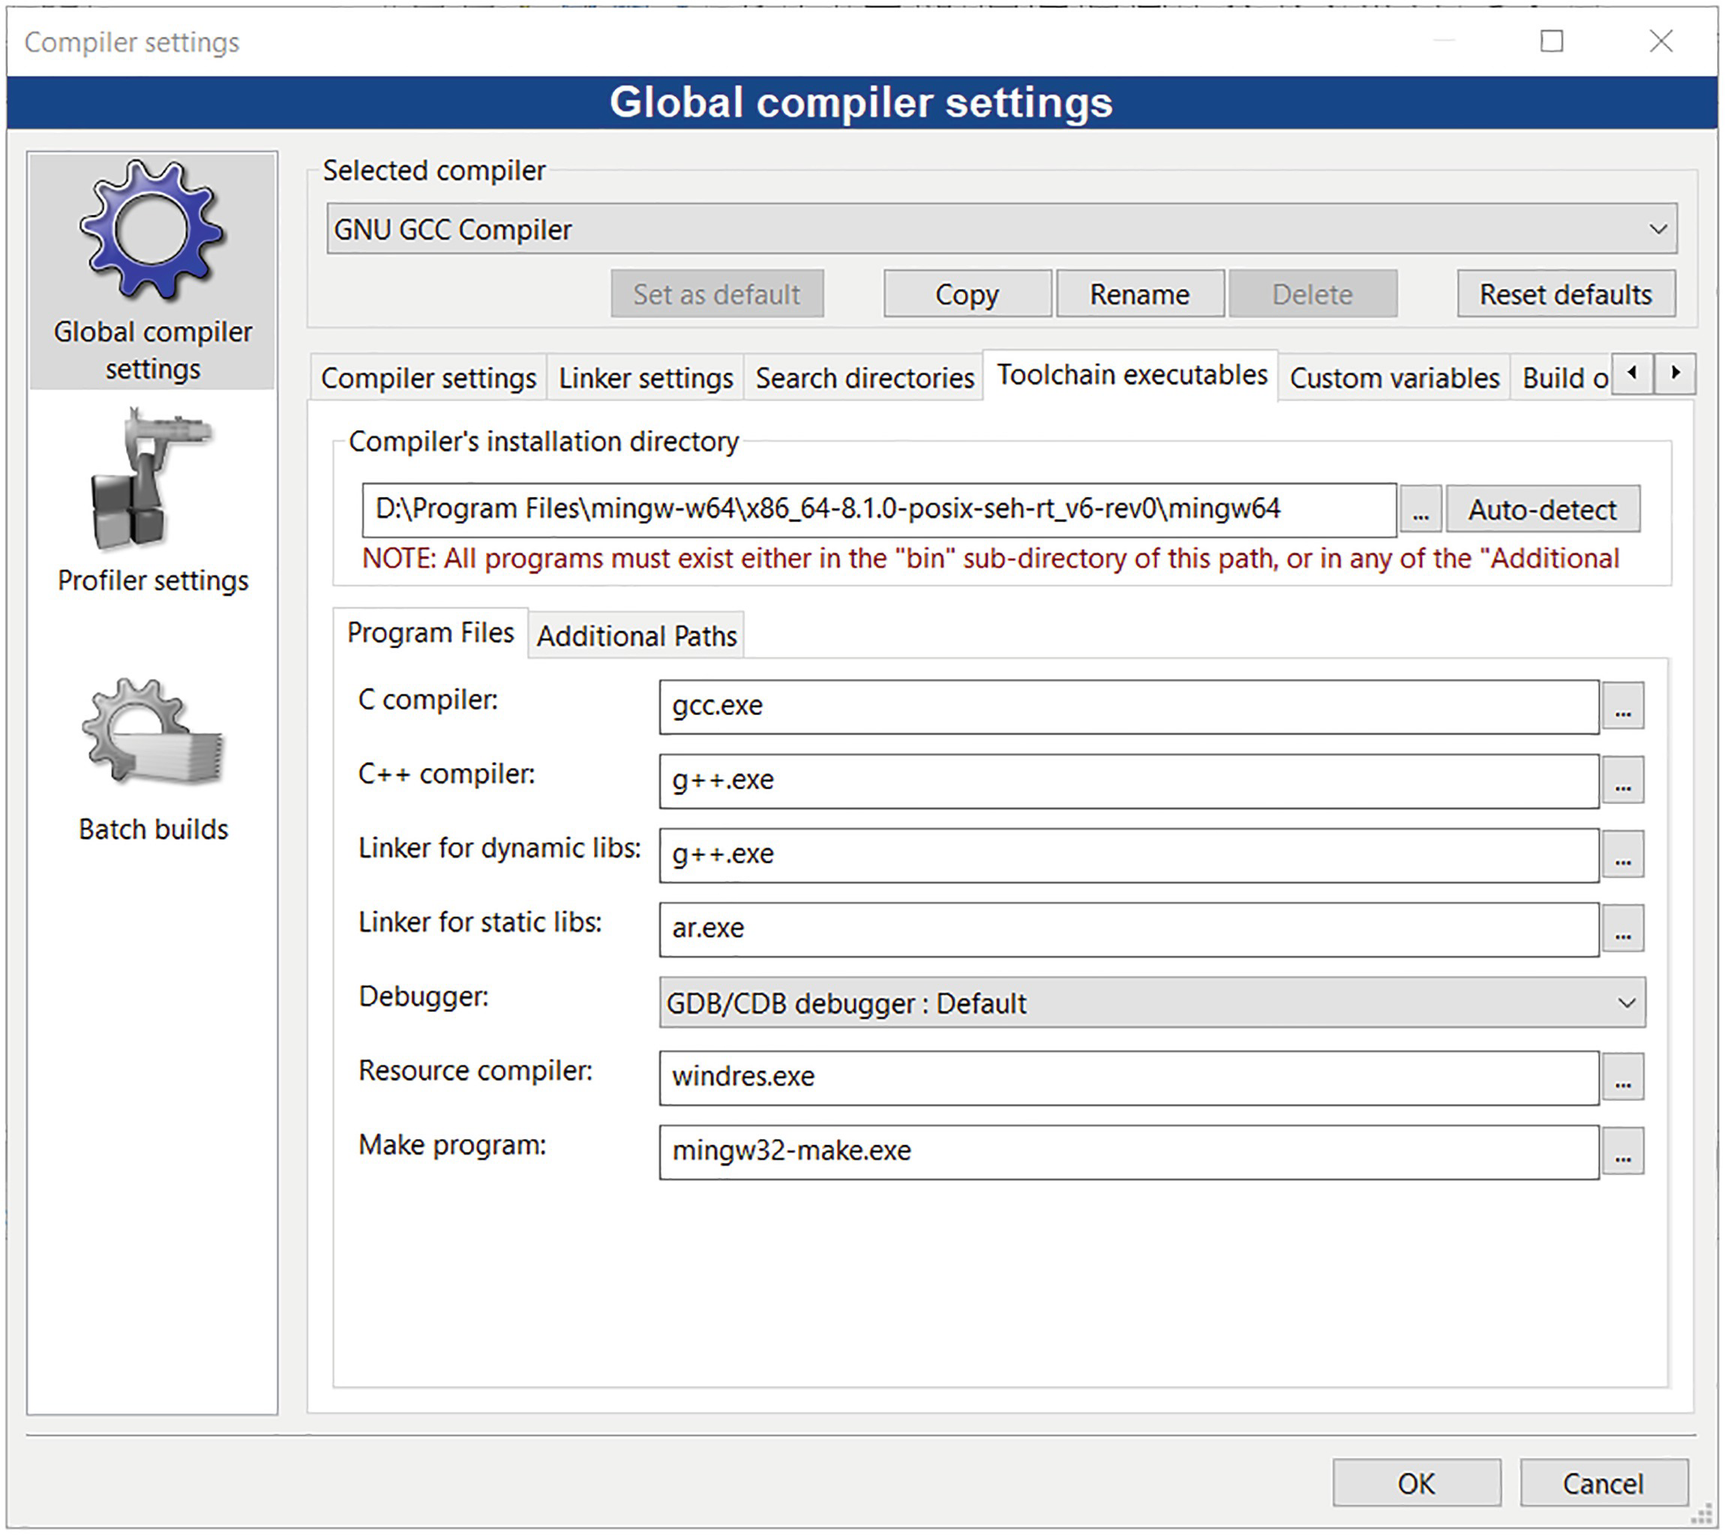
Toolchain executables
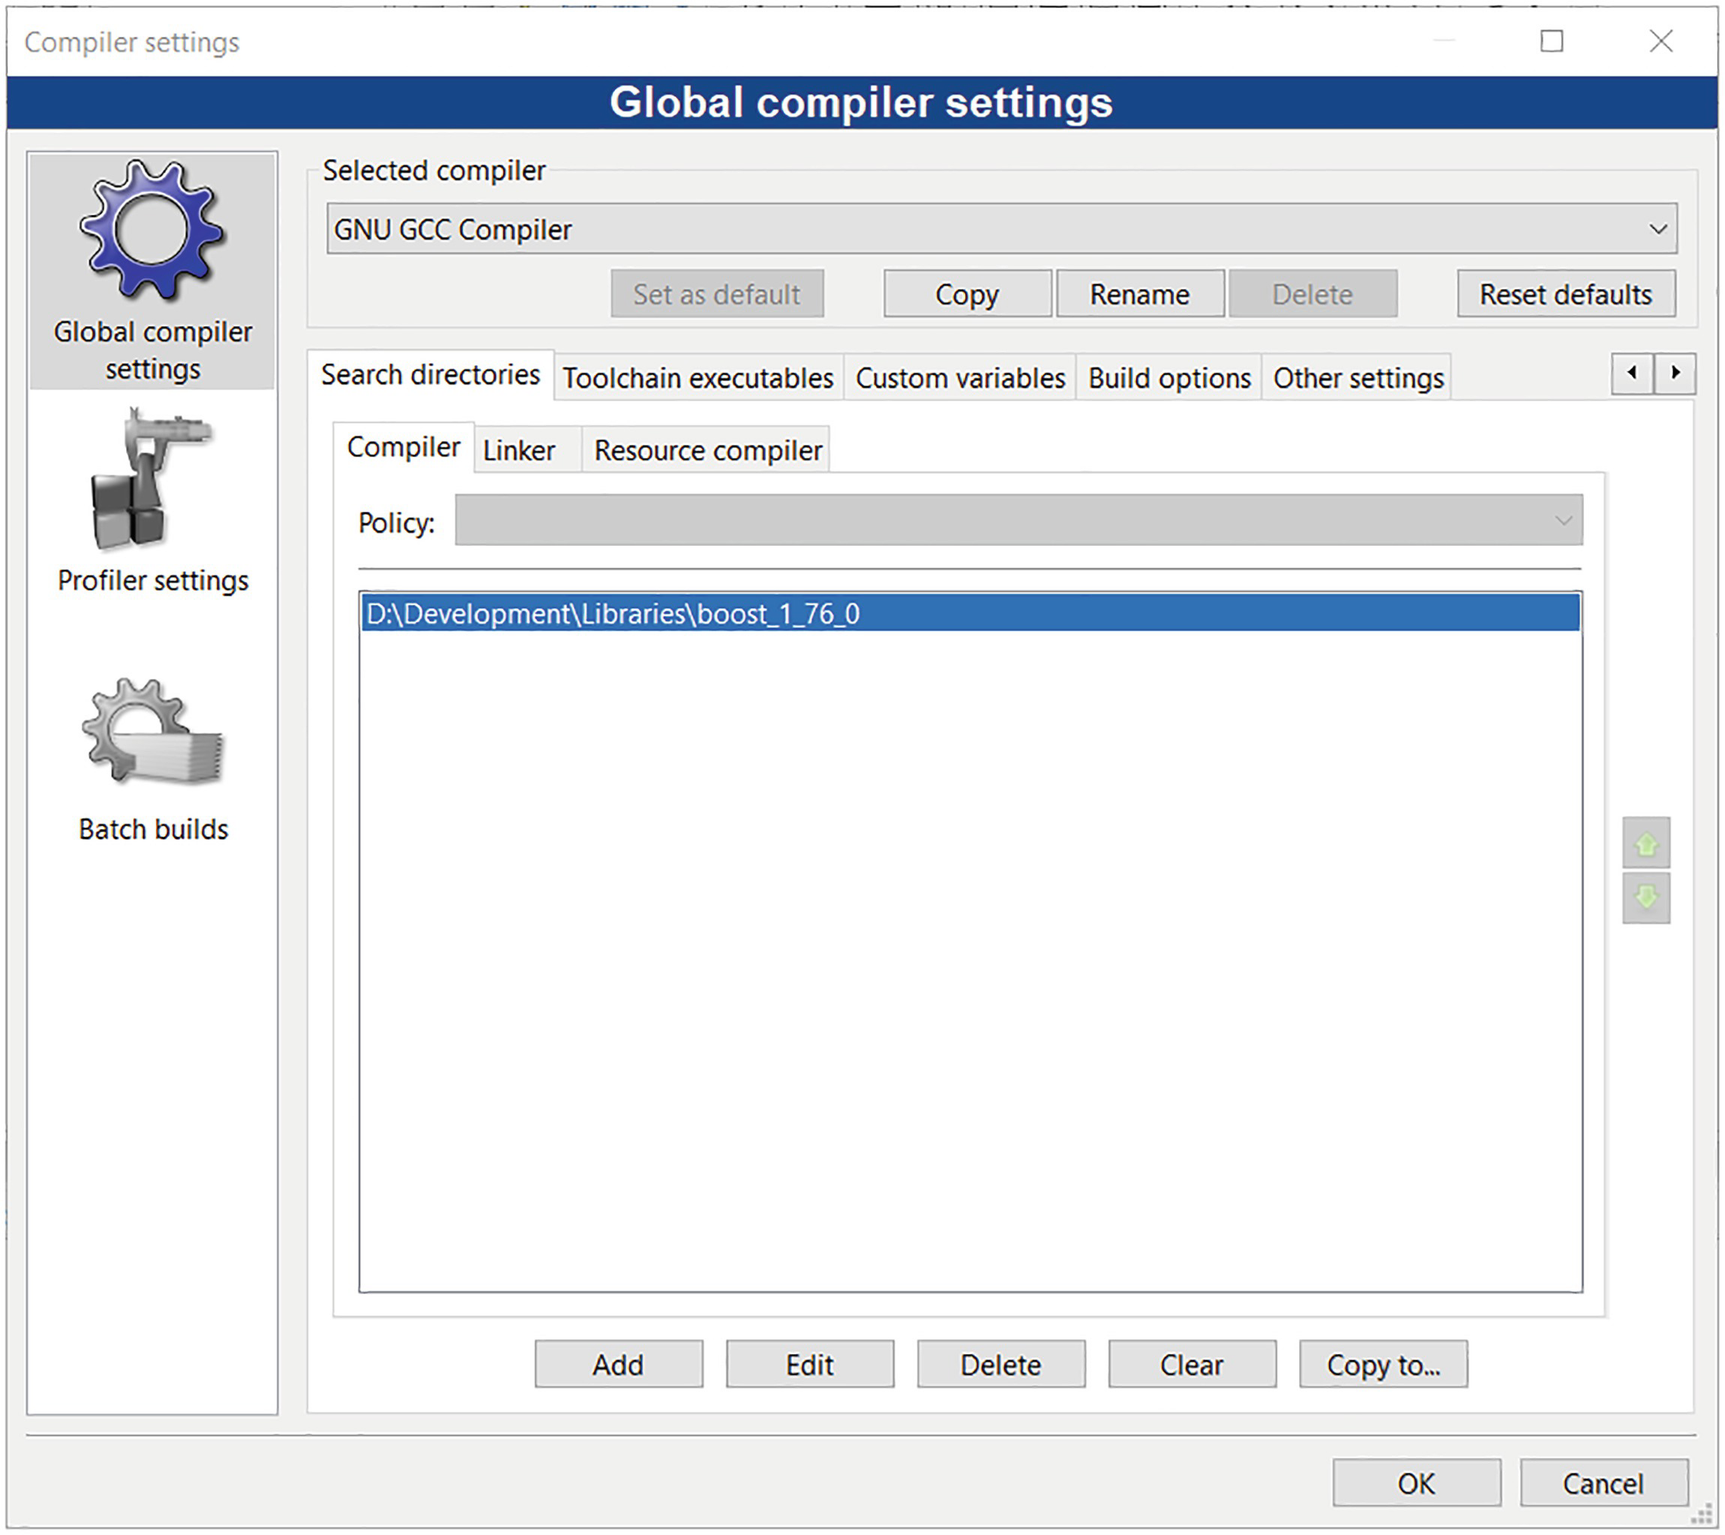
Setting the search path to use Boost
When you have finished configuring this, press OK to save any changes.
Project Setup

Project settings

Build targets for libStatsLib

The project node with the source and include files
Depending on how the StatsLibCB workspace node is being displayed (right-click on the node for various options), your view of the project files may be slightly different. At this stage, the project is ready to build. From the Build menu, select Build (Ctrl+F9). Build both the debug and release versions of the library. The Build log tool window displays the command line passed to the compiler and linker. The project should build without warnings or errors, and the library (libStatsLib.a) should be located in the output directory corresponding to the selected build target.
R/RStudio Packages
Background
For this section, you will need to have RStudio up and running. RStudio is the IDE of choice for hosting the R environment and developing applications using the R language. We could have used the more basic RGui; however, RStudio provides better facilities, specifically when it comes to building R packages. So, having built the ABI-compliant statistics library successfully, we are now ready to create an R package that uses it.
On Windows, R packages are dynamic-link libraries. They can be loaded dynamically using the dyn.load() function using the full filename (including the dll extension) or, more typically, using the library() command for installed (registered) packages. Among other things, RStudio provides a convenient IDE for managing the installation and loading of packages.
This calls the get_descriptive_statistics function with two parameters passed as collections: the data and a single key, “StdErr”. The results are returned as expected. The actual function name we use in making the call _StatsR_get_descriptive_statistics is the C-style exported function name. We could get this from inspecting the StatsR.dll using a tool like Depends.exe.
However, this API is quite low-level and not ideal for extended development. Our intention here is to expose a (limited) number of functions from the underlying C++ statistics library. Using the C-style API approach, we would need to declare all the functions to be of type extern "C" SEXP. This is a pointer to a SEXPREC or Simple EXPression RECord, an opaque pointer type used by R. Furthermore, the parameters would have to be typed as pointers to S EXPression objects (SEXP). Using the C-style API does allow us to exchange data and objects between C++ and R, but it is not a practical proposition for more complex C++ development.
The Rcpp framework solves this issue. The Rcpp layer sits above the .Call() API and shields the C++ developer from needing to use the low-level SEXP types. Rcpp provides an interface that automatically translates standard C++ into calls to the low-level API. From the point of view of development, Rcpp allows us to use standard C++ for the wrapper component.
Building a Package with Rcpp
Installing Rcpp
The Rcpp package can be installed by running the R command: install.packages("Rcpp"). Alternatively, from the RStudio menu, we can use the Tools ➤ Install Packages... command. Once completed, we are ready to build an Rcpp package. From inside RStudio, open the StatsR project: File ➤ Open Project ... . The StatsR.Rproj file is located in the StatsR directory under the SoftwareInteroperability directory.
The Project Files
StatsR.proj
This is the RStudio project file.
DESCRIPTION
This file contains descriptive information about this package (Package name, Type, Version, Date, Author, and so on). It also contains metadata about the package dependencies. See the Additional Resources section for links to more detailed information about package metadata.
NAMESPACE
This file contains three directives. Firstly, useDynLib(...) ensures that the dynamic library that is part of this package is loaded and registered. Next, the importFrom(...) directive imports variables from other packages (other than baseR, which are always imported). In this case, we import variables from the Rcpp and the evalCpp packages. The final directive, exportPattern(...), declares which identifiers should be globally visible from the namespace of this package. The default is to export all identifiers that start with a letter. This is defined in the regular expression.
manStatsR-package.Rd
This is an R markdown template file that is used for describing the package. You can edit this in RStudio. Pressing the Preview button displays the formatted contents in the Help window.
RRcppExports.R
This file contains the R language function calls generated by Rcpp.
srcRcppExports.cpp
This file contains the C++ functions generated by Rcpp.
srcMakevars.win
This file contains the configuration options for the compiler/linker.
srcStatsR.cpp
This is the main file we will be working with in this chapter and contains boilerplate code.
Editing the Makefile
PKG_LIBS: This flag is used to link in additional libraries (such as libStatsLib.a).
PKG_CXXFLAGS: This flag can be used to set additional debug or release options. For debugging, we build with debug information for gdb (-ggdb), the zero-optimization level (-o0), and the warning level (-Wall). For release builds, we remove these settings.
PKG_CPPFLAGS: These relate to preprocessor flags and can be used to set additional include directories with -I.
This will tell the linker to link with the release version of the libStatsLib library. Save your changes.
Boilerplate Code
Boilerplate C++ function in the StatsR package

In this file, we define a single C++ function called library_version that returns a hard-coded string. There are a couple of features that are worth highlighting in this small example.
Firstly, at the top of the file, we include Rcpp.h. This is the main Rcpp header. You can find this under libraryRcpp in your R distribution (e.g., D:RR-4.0.3library) alongside the rest of the source code. Rcpp is quite an extensive package (some 300+ files) and has a lot of facilities that are well worth exploring. The documentation directory (Rcppdoc) contains a number of useful bitesize reference documents that are worth referring to. We barely scratch the surface in the two chapters on R in this book.
This indicates that we want to make this C++ function available to R. The function itself is quite simple. It constructs a String object and returns it to the caller.
The RStudio IDE is good for writing and developing R scripts. However, for C++ development it is less useful, especially when it comes to being able to read through source code or go to definitions of types (like String in the preceding example). While not absolutely critical, it is nice to be able to right-click on a symbol and jump to the definition (if possible). This also makes both navigating around the source code and investigating any compilation errors related to type conversions slightly easier.
Adding include paths to the c_cpp_properties.json file in VSCode


Using Visual Studio Code to navigate the Rcpp source files
Looking at Figure 5-7, it turns out that the String class encapsulates a CHARSXP – an S-expression pointer of type char (roughly speaking).
Building StatsR
A simple test R script
Clean and Rebuild output

The R function stub generated from the library_version C++ code

Low-level C++ code generated by Rcpp
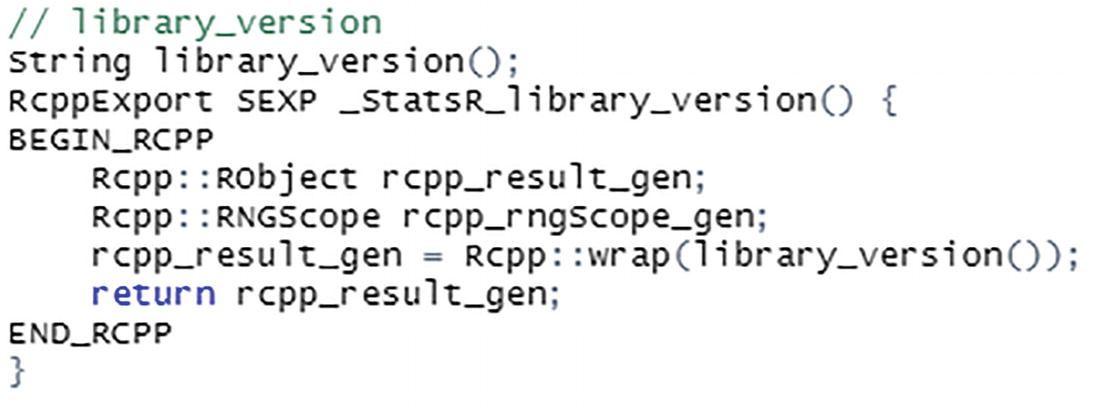
The first line (after the comment) is the function signature of the C++ function. This is followed by the C-style API declaration. Inside the function, Rcpp has generated code to call the function and return the results. We will have more to say about the Rcpp code generated here in the following chapter.
In addition to the generated C++ function wrappers, RcppExports.cpp also contains the module definition. This is a mapping from the function name to an exported function address. It also contains information about the number of parameters. You should never need to use these files directly. Both files (src/RcppExports.cpp and R/RcppExports.R) are flagged as read-only. Modifying these files by hand is not recommended.
To summarize what is happening so far: we have written a C++ function library_version (in fact this was boilerplate code, but the process is the same); Rcpp has generated an R function and the low-level wrapper code that translates Rcpp types to low-level types understood by the R .Call() API.
After the file generation, the build process then builds a DLL and makes it available to R. It does this by installing the package in the package location. You can confirm this by looking in your R distribution under library. In our case, it is under D:RR-4.0.3libraryStatsR. Finally, the build process generates some documentation. You can configure the build process to use roxygen2, if you require. In this case, we stick with the default R markdown documentation. This is used to generate an html version of the documentation in the package location (D:/R/R-4.0.3/library/StatsR/html/StatsR-package.html).
Obtaining a list of the loaded DLLs
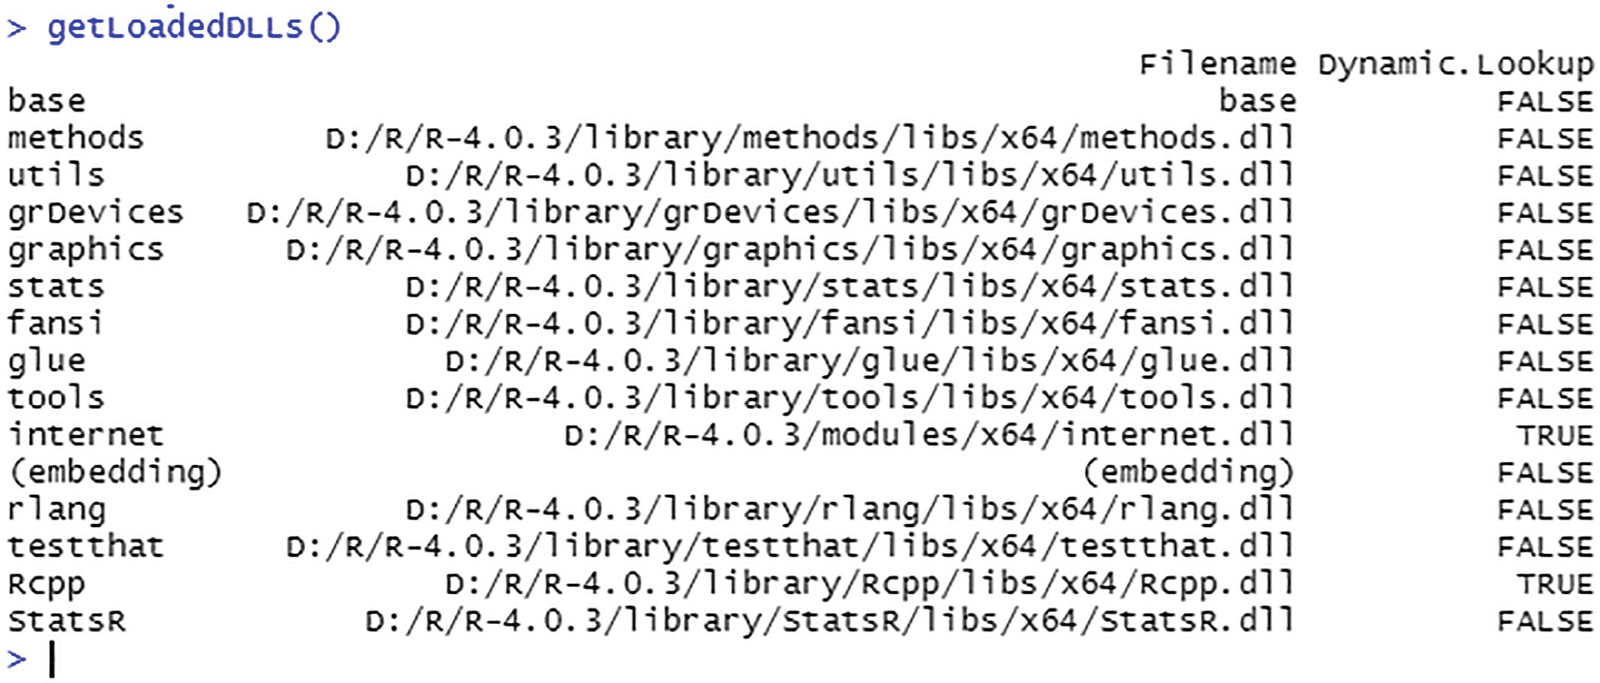
The output should be: [1] "StatsR, version 1.0".
With this completed, we have a fully working Rcpp package which provides a wrapper around our C++ library of statistical functions.
Summary
We’ve covered quite a lot of ground in this chapter. We have (re)built the library of statistics functions using the gcc compiler/linker . We have also built the wrapper component, StatsR.dll. This is convenient, as it allows us to reuse the sources without change, while at the same time separating the wrapper component (StatsR.dll) from the underlying C++ code.
This chapter has focused on setting up the infrastructure required to build R packages that consume C++ functionality. It should be emphasized that this arrangement is only one of a number of possible ways of organizing the R package development and build process. With CodeBlocks open as our C++ development IDE, we can now develop C++ code, which we can compile and build into a static library (libStatsLib.a), for example. Then, in RStudio, we can use our Rcpp project (StatsR) to expose the C++ functions. We can build this into an R package and make the functionality available immediately in an R session. We now have the infrastructure for end-to-end C++ and R development. With this infrastructure in place, we are now in a position to look at using Rcpp. In the next chapter, we look in more detail at the Rcpp framework we use in the wrapper component and how the statistical functions are exposed to R via Rcpp.
Additional Resources
Detailed information on using GCC with MinGW under Visual Studio Code is available from https://code.visualstudio.com/docs/cpp/config-mingw. In addition to configuring Visual Studio Code to use the GCC C++ compiler (g++) and the GDB debugger from mingw-w64, the tutorial demonstrates compiling and debugging.
The full documentation for CodeBlocks is available at www.codeblocks.org/user-manual/.
For full details about package metadata, the following link is very useful: https://r-pkgs.org/description.html, particularly Chapter 8.
If you are not familiar with GCC compiler settings and options, the following link provides a useful list: https://caiorss.github.io/C-Cpp-Notes/compiler-flags-options.html.
For detailed information about the compiler/linker switches, see the section on Using Makevars: https://cran.r-project.org/doc/manuals/r-devel/R-exts.html#Using-Makevars. This document also gives a lot of useful information about writing R extensions. The following Stackoverflow post provides a useful summary: https://stackoverflow.com/questions/43597632/understanding-the-contents-of-the-makevars-file-in-r-macros-variables-r-ma/43599233#43599233.
Exercises
The exercises that follow mainly deal with the effects of adding code to the C++ codebase and building these changes in a library that we can use to then build an R package. The exercises are concerned with setting up the infrastructure for usage in R/RStudio.
1) Rebuild libStatsLib.a in preparation for use inside R/RStudio. The intention here is to recompile the code in the static library and make sure that we can link this to the StatsR project.
Open the StatsLibCB project in CodeBlocks. The TimeSeries class is already incorporated as part of the project, so there is no need to do anything. Expand the Sources node and confirm that TimeSeries.cpp is present. Do the same for the header file. If you have added a ZTest class to the StatisticalTests.h/StatisticalTests.cpp, then they can be built immediately.
On the other hand, if you have added the ZTest class in separate files, then you will need to add the files to the StatsLibCB project. To do this, select Project ➤ Properties, Build targets tab, and add them.
Build both debug/release versions. They should build without warnings or errors. Check that the files are being compiled/linked.
Open RStudio. Select Build ➤ Clean and Rebuild and check that the build (still) works without warnings or errors. Confirm that the StatsR package loads and works.