Chapter 2
Configure, Verify, and Troubleshoot a Switch with VLANs and Interswitch Communications
The Cisco CCNA exam objectives covered in this chapter include the following:
- Select the appropriate media, cables, ports, and connectors to connect switches to other network devices and hosts.
- Explain the technology and media access control method for Ethernet networks.
- Explain network segmentation and basic traffic management concepts.
- Explain basic switching concepts and the operation of Cisco switches.
- Perform and verify initial switch configuration tasks, including remote access management.
- Verify network status and switch operation using basic utilities (including ping, traceroute, Telnet, SSH, arp, and ipconfig) and SHOW and DEBUG commands.
- Identify, prescribe, and resolve common switched network media issues, configuration issues, auto negotiation, and switch hardware failures.
- Describe enhanced switching technologies (including VTP, RSTP, VLAN, PVSTP, and 802.1q).
- Describe how VLANs create logically separate networks and the need for routing between them.
- Configure, verify, and troubleshoot VLANs.
- Configure, verify, and troubleshoot trunking on Cisco switches.
- Configure, verify, and troubleshoot interVLAN routing.
- Configure, verify, and troubleshoot VTP.
- Configure, verify, and troubleshoot RSTP operation.
- Interpret the output of various Show and Debug commands to verify the operational status of a Cisco switched network.
- Implement basic switch security (including port security, trunk access, management VLAN other than VLAN 1, etc.).
When Cisco discusses switching, they’re talking about layer 2 switching unless they say otherwise. Layer 2 switching is the process of using the hardware address of devices on a LAN to segment a network.
Because you’ve got the basic ideas down, I am going to focus on the particulars of layer 2 switching and nail down how it works.
Select the Appropriate Media, Cables, Ports, and Connectors to Connect Switches to Other Network Devices and Hosts
Ethernet cabling is an important discussion, especially if you are planning to take the Cisco exams. Three types of Ethernet cables are available:
- Straight-through cable
- Crossover cable
- Rolled cable
We will look at each of these types in the following sections.
Straight-Through Cable
The straight-through cable is used to connect
- Host to switch or hub
- Router to switch or hub
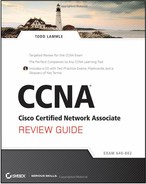
Four wires are used in straight-through cable to connect Ethernet devices. It is relatively simple to create this type; Figure 2-1 shows the four wires used in a straight-through Ethernet cable.
Notice that only pins 1, 2, 3, and 6 are used. Just connect 1 to 1, 2 to 2, 3 to 3, and 6 to 6, and you’ll be up and networking in no time. However, remember that this would be an Ethernet-only cable and wouldn’t work with voice, Token Ring, ISDN, and so on.
Figure 2-1: Straight-through Ethernet cable
Crossover Cable
The crossover cable can be used to connect the following:
- Switch to switch
- Hub to hub
- Host to host
- Hub to switch
- Router direct to host
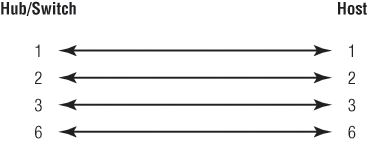
The same four wires are used in this cable as in the straight-through cable; you just connect different pins together. Figure 2-2 shows how the four wires are used in a crossover Ethernet cable.
Figure 2-2: Crossover Ethernet cable

Notice that instead of connecting 1 to 1, 2 to 2, and so on, here you connect pins 1 to 3 and 2 to 6 on each side of the cable.
Rolled Cable
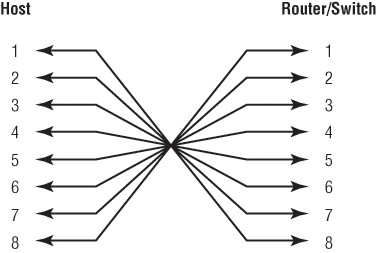
Although rolled cable isn’t used to connect any Ethernet connections, you can use a rolled Ethernet cable to connect a host to a router console serial communication (com) port.
If you have a Cisco router or switch, you would use this cable to connect your PC running HyperTerminal to the Cisco hardware. Eight wires are used in this cable to connect serial devices, although not all eight are used to send information, just as in Ethernet networking. Figure 2-3 shows the eight wires used in a rolled cable.
Figure 2-3: Rolled Ethernet cable
These are probably the easiest cables to make because you just cut the end off on one side of a straight-through cable, turn it over, and put it back on (with a new connector, of course).
We’ve looked at the most popular various RJ45 unshielded twisted pair (UTP) cables. Keeping this in mind, what cable is used between the switches in Figure 2-4?
Figure 2-4: RJ45 UTP

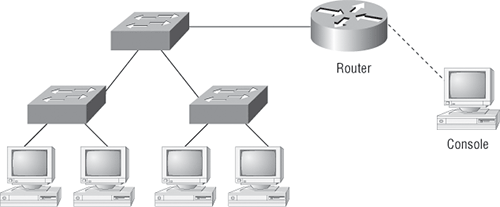
In order for Host A to ping Host B, you need a crossover cable to connect the two switches. What types of cables are used in the network shown in Figure 2-5?
In Figure 2-5, a variety of cables are in use. For the connection between the switches, you’d obviously use a crossover cable as you saw in Figure 2-2. The trouble is, a console connection that uses a rolled cable is in use. Plus, the connection from the router to the switch is a straight-through cable, as is true for the hosts to the switches. Keep in mind that if a serial connection were in use (which it isn’t), it would be a V.35 that could be used to connect to a WAN.
Exam Essentials
Remember the types of Ethernet cabling and when you would use them. The three types of cables that can be created from an Ethernet cable are straight-through (to connect a PC’s or a router’s Ethernet interface to a hub or switch), crossover (to connect hub to hub, hub to switch, switch to switch, or PC to PC), and rolled (for a console connection from a PC to a router or switch).
Figure 2-5: RJ45 UTP
Explain the Technology and Media Access Control Method for Ethernet Networks
Ethernet is a contention media access method that allows all hosts on a network to share the same bandwidth of a link. Ethernet is popular because it’s readily scalable, meaning that it’s comparatively easy to integrate new technologies, such as Fast Ethernet and Gigabit Ethernet, into an existing network infrastructure. It’s also relatively simple to implement in the first place, and with it, troubleshooting is reasonably straightforward. Ethernet uses both Data Link and Physical layer specifications, and this section of the chapter will give you both the Data Link layer and Physical layer information you need to effectively implement, troubleshoot, and maintain an Ethernet network.
Ethernet networking uses Carrier Sense Multiple Access with Collision Detection (CSMA/CD), a protocol that helps devices share the bandwidth evenly without having two devices transmit at the same time on the network medium. CSMA/CD was created to overcome the problem of those collisions that occur when packets are transmitted simultaneously from different nodes. And trust me—good collision management is crucial, because when a node transmits in a CSMA/CD network, all the other nodes on the network receive and examine that transmission. Only bridges and routers can effectively prevent a transmission from propagating throughout the entire network.
So, how does the CSMA/CD protocol work? Let’s start by taking a look at Figure 2-6.
Figure 2-6: CSMA/CD
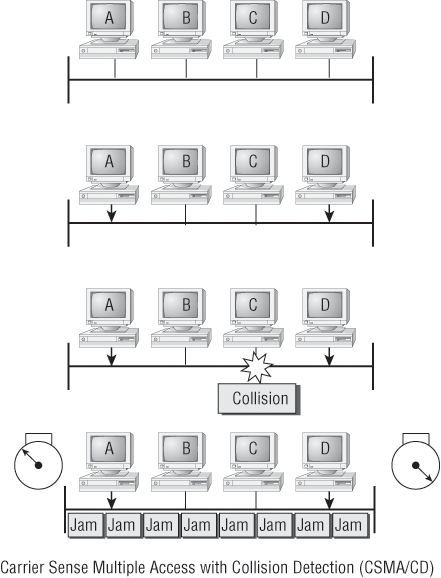
When a host wants to transmit over the network, it first checks for the presence of a digital signal on the wire. If all is clear (no other host is transmitting), the host will then proceed with its transmission—but it doesn’t stop there. The transmitting host constantly monitors the wire to make sure no other hosts begin transmitting. If the host detects another signal on the wire, it sends out an extended jam signal that causes all nodes on the segment to stop sending data (think busy signal). The nodes respond to that jam signal by waiting a while before attempting to transmit again. Backoff algorithms determine when the colliding stations can retransmit. If collisions keep occurring after 15 tries, the nodes attempting to transmit will then time out. Pretty clean!
When a collision occurs on an Ethernet LAN, the following happens:
- A jam signal informs all devices that a collision occurred.
- The collision invokes a random backoff algorithm.
- Each device on the Ethernet segment stops transmitting for a short time until the timers expire.
- All hosts have equal priority to transmit after the timers have expired.
The following are the effects of having a CSMA/CD network sustaining heavy collisions:
- Delay
- Low throughput
- Congestion
For more information and detail on Ethernet, please refer to Chapter 2 in my CCNA Cisco Certified Network Associate Study Guide, 7th Edition (Sybex, 2011).
Ethernet at the Physical Layer
Ethernet was first implemented by a group called DIX (Digital, Intel, and Xerox). They created and implemented the first Ethernet LAN specification, which the IEEE used to create the IEEE 802.3 Committee. This was a 10Mbps network that ran on coax and then eventually twisted-pair and fiber physical media.
The IEEE extended the 802.3 Committee to two new committees known as 802.3u (Fast Ethernet) and 802.3ab (Gigabit Ethernet on category 5) and then finally 802.3ae (10Gbps over fiber and coax).
Figure 2-7 shows the IEEE 802.3 and original Ethernet Physical layer specifications.
Figure 2-7: Ethernet Physical layer specifications

When designing your LAN, it’s really important to understand the different types of Ethernet media available to you. Sure, it would be great to run Gigabit Ethernet to each desktop and 10Gbps between switches, and although this might happen one day, justifying the cost of that network today would be pretty difficult. But if you mix and match the different types of Ethernet media methods currently available, you can come up with a cost-effective network solution that works great.
Each Ethernet cable type that is specified by the EIA/TIA has inherent attenuation, which is defined as the loss of signal strength as it travels the length of a cable and is measured in decibels (dB). The cabling used in corporate and home markets is measured in categories. A higher-quality cable will have a higher-rated category and lower attenuation. For example, category 5 is better than category 3 because category 5 cables have more wire twists per foot and, therefore, less crosstalk. Crosstalk is the unwanted signal interference from adjacent pairs in the cable.
Here are the original IEEE 802.3 standards:
10Base2 10Mbps, baseband technology, up to 185 meters in length. Known as thinnet and can support up to 30 workstations on a single segment. Uses a physical and logical bus with AUI connectors. The 10 means 10Mbps, Base means baseband technology (which is a signaling method for communication on the network), and the 2 means almost 200 meters. 10Base2 Ethernet cards use BNC (British Naval Connector, Bayonet Neill Concelman, or Bayonet Nut Connector) and T-connectors to connect to a network.
10Base5 10Mbps, baseband technology, up to 500 meters in length. Known as thicknet. Uses a physical and logical bus with AUI connectors. Up to 2,500 meters with repeaters and 1,024 users for all segments.
10BaseT 10Mbps using category 3 UTP wiring. Unlike with the 10Base2 and 10Base5 networks, each device must connect into a hub or switch, and you can have only one host per segment or wire. Uses an RJ45 connector (8-pin modular connector) with a physical star topology and a logical bus.
Latest Ethernet Standards
Here are the expanded IEEE Ethernet 802.3 standards, starting with Fast Ethernet:
100Base-TX (IEEE 802.3u) 100Base-TX, most commonly known as Fast Ethernet, uses EIA/TIA category 5, 5E, or 6 UTP two-pair wiring. One user per segment; up to 100 meters long. It uses an RJ45 connector with a physical star topology and a logical bus.
100Base-FX (IEEE 802.3u) Uses fiber cabling 62.5/125-micron multimode fiber. Point-to-point topology; up to 412 meters long. It uses ST and SC connectors, which are media-interface connectors.
1000Base-CX (IEEE 802.3z) Copper twisted-pair called twinax (a balanced coaxial pair) that can run only up to 25 meters and uses a special 9-pin connector known as the High-Speed Serial Data Connector (HSSDC).
1000Base-T (IEEE 802.3ab) Category 5, four-pair UTP wiring up to 100 meters long and up to 1Gbps.
1000Base-SX (IEEE 802.3z) The implementation of 1 Gigabit Ethernet running over multimode fiber-optic cable (instead of copper twisted-pair cable) and using short wavelength laser. Multimode fiber (MMF) using 62.5- and 50-micron core; uses an 850 nanometer (nm) laser and can go up to 220 meters with 62.5-micron, 550 meters with 50-micron.
1000Base-LX (IEEE 802.3z) Single-mode fiber that uses a 9-micron core and 1300nm laser and can go from 3 kilometers up to 10 kilometers.
1000Base-ZX (Cisco standard) 1000BaseZX (or 1000Base-ZX) is a Cisco-specified standard for Gigabit Ethernet communication. 1000BaseZX operates on ordinary single-mode fiber-optic link with spans up to 43.5 miles (70km).
10GBase-T 10GBase-T is a standard proposed by the IEEE 802.3ae Committee to provide 10Gbps connections over conventional UTP cables (category 5e, 6, or 7 cables). 10GBase-T allows the conventional RJ45 used for Ethernet LANs. It can support signal transmission at the full 100-meter distance specified for LAN wiring.
The following are all part of the IEEE 802.3ae standard.
10GBase-Short Range (SR) An implementation of 10 Gigabit Ethernet that uses short-wavelength lasers at 850nm over multimode fiber. It has a maximum transmission distance of between 2 and 300 meters, depending on the size and quality of the fiber.
10GBase-Long Range (LR) An implementation of 10 Gigabit Ethernet that uses long-wavelength lasers at 1,310nm over single-mode fiber. It also has a maximum transmission distance between 2 meters and 10km, depending on the size and quality of the fiber.
10GBase-Extended Range (ER) An implementation of 10 Gigabit Ethernet running over single-mode fiber. It uses extra-long-wavelength lasers at 1,550nm. It has the longest transmission distances possible of the 10-Gigabit technologies: anywhere from 2 meters up to 40km, depending on the size and quality of the fiber used.
10GBase-Short Wavelength (SW) 10GBase-SW, as defined by IEEE 802.3ae, is a mode of 10GBase-S for MMF with an 850nm laser transceiver with a bandwidth of 10Gbps. It can support up to 300 meters of cable length. This media type is designed to connect to SONET equipment.
10GBase-Long Wavelength (LW) 10GBase-LW is a mode of 10GBase-L supporting a link length of 10km on standard single-mode fiber (SMF) (G.652). This media type is designed to connect to SONET equipment.
10GBase-Extra Long Wavelength (EW) 10GBase-EW is a mode of 10GBase-E supporting a link length of up to 40km on SMF based on G.652 using optical-wavelength 1,550nm. This media type is designed to connect to SONET equipment.
If you want to implement a network medium that is not susceptible to electromagnetic interference (EMI), fiber-optic cable provides a more secure, long-distance cable that is not susceptible to EMI at high speeds.
Exam Essentials
Identify the IEEE physical standards for Ethernet cabling. These standards describe the capabilities and physical characteristics of various cable types and include but are not limited to 10Base2, 10Base5, and 10Base T.
Remember the Cisco proprietary 1000Base-ZX. 1000BaseZX (or 1000Base-ZX) is a Cisco-specified standard for Gigabit Ethernet communication. 1000BaseZX operates on ordinary single-mode fiber-optic link with spans up to 43.5 miles (70km).
Remember the distances possible with the latest IEEE 802.3 standards. 1000BaseZX (or 1000Base-ZX) is a Cisco-specified fiber that goes up to 43.5 miles (70km). The 1000Base-LX (long range) can go from 3 kilometers up to 10 kilometers. The ranges are: SX (short range), LX (long range), EX (extended range), and EW (extra long wavelength).
Explain Network Segmentation and Basic Traffic Management Concepts
There are a number of interchangeable terms you can use for “LAN,” depending on the context. They include:
- Broadcast domain (in the context of layer 2 versus layer 1 segmentation)
- Subnet or network (in the context of IP networking)
- Data Link (layer 2 in the OSI model)
- VLAN (in the context of creating broadcast domains in switched Ethernet environments)
As mentioned, these terms are roughly equivalent. They are used to describe the simple LAN in different contexts. Why discuss a simple LAN? Well, it is the basis of every internetwork. An internetwork is simply a collection of connected LANs. An individual LAN is created using a variety of devices and techniques, such as routers, switches, and bridges.
These devices connect the hosts on the single LAN to each other, and connect the LAN to the other LANs forming the internetwork.
It’s likely that at some point, you’ll have to break up one large network into a number of smaller ones because user response has dwindled to a trickle as networks have grown and grown and LAN traffic congestion has reached overwhelming proportions. Congestion is a really big problem. Some possible causes of LAN traffic congestion include:
- Too many hosts in a broadcast domain
- Broadcast storms
- Multicasting
- Low bandwidth
You can help solve the congestion issue by breaking up a large network into a number of smaller networks (otherwise known as network segmentation). Network segmentation is accomplished using routers, switches, and bridges.
Routers
Routers are used to connect networks together and route packets of data from one network to another. Cisco became the de facto standard of routers because of their high-quality router products, great selection, and fantastic service. Routers, by default, break up a broadcast domain, which is the set of all devices on a network segment that hear all broadcasts sent on that segment. Breaking up a broadcast domain is important because when a host or server sends a network broadcast, every device on the network must read and process that broadcast—unless you have a router. When the router’s interface receives this broadcast, it can respond by basically saying “Thanks, but no thanks,” and discard the broadcast without forwarding it on to other networks. Even though routers are known for breaking up broadcast domains by default, it’s important to remember that they also break up collision domains.
Two advantages of using routers in your network:
- They don’t forward broadcasts by default.
- They can filter the network based on layer-3 information (i.e., IP address).
Switches
Conversely, switches aren’t used to create internetworks; they’re employed to add functionality to a LAN. The main purpose of a switch is to make a LAN work better—to optimize its performance—providing more bandwidth for the LAN’s users, and switches don’t forward packets to other networks as routers do. Instead, they only “switch” frames from one port to another within the switched network.
By default, switches break up collision domains. This is an Ethernet term used to describe a network scenario wherein one particular device sends a packet on a network segment, forcing every other device on that same segment to pay attention to it. At the same time, a different device tries to transmit, leading to a collision, after which both devices must retransmit, one at a time. This situation is not good and is very inefficient. It is typically found in a hub environment where each host segment connects to a hub that represents only one collision domain and only one broadcast domain. By contrast, each and every port on a switch represents its own collision domain.
Switches create separate collision domains, but a single broadcast domain. Routers separate broadcast domains.
Bridges
The term bridging was introduced before routers and hubs were implemented, so it’s pretty common to hear people referring to bridges as “switches.” That’s because bridges and switches basically do the same thing—they break up collision domains on a LAN. So, what this means is that a switch is basically just a multiple-port bridge with more brainpower. Well, that’s pretty much it, but there are differences. Switches do provide this function, but they do so with greatly enhanced management ability and features. Plus, most of the time, bridges had only two or four ports. Yes, you could get your hands on a bridge with up to 16 ports, but that’s nothing compared to the hundreds available on some switches.
You would use a bridge in a network to reduce collisions within broadcast domains and to increase the number of collision domains in your network, which provides more bandwidth for users.
Exam Essentials
Understand the different terms used to describe a LAN. A LAN is basically the same thing as a VLAN, subnet, or network, broadcast domain, or data link. These terms all describe roughly the same concept in different contexts.
Understand which devices create a LAN and which separate and connect LANs. Switches and bridges are used to create LANs. While they do separate collision domains, they do not create separate LANs (collision domain and LAN are not the same concept). Routers are used to separate LANs and connect LANs (broadcast domains).
Explain Basic Switching Concepts and the Operation of Cisco Switches
Unlike bridges, which use software to create and manage a filter table, switches use application-specific integrated circuits (ASICs) to build and maintain their filter tables. But it’s still okay to think of a layer 2 switch as a multiport bridge because their basic reason for being is the same: to break up collision domains.
Layer 2 switching provides the following:
- Hardware-based bridging (ASIC)
- Wire speed
- Low latency
- Low cost
What makes layer 2 switching so efficient is that no modification to the data packet takes place. The device only reads the frame encapsulating the packet, which makes the switching process considerably faster and less error-prone than routing processes are.
If you use layer 2 switching for both workgroup connectivity and network segmentation (breaking up collision domains), you can create a flatter network design with more network segments than you can with traditional routed networks.
Plus, layer 2 switching increases bandwidth for each user because, again, each connection (interface) into the switch is its own collision domain. This feature makes it possible for you to connect multiple devices to each interface.
In the following sections, we will delve deeper into the layer 2 switching technology.
Limitations of Layer 2 Switching
Because layer 2 switching is commonly placed into the same category as bridged networks, people tend to think it has the same hang-ups and issues that bridged networks have. Keep in mind that bridges are good and helpful things if the network is designed correctly and their features and limitations are accommodated. To design well with bridges, these are the two most important considerations:
- The collision domains must be broken up absolutely correctly.
- The right way to create a functional bridged network is to make sure that its users spend 80 percent of their time on the local segment.
Bridged networks break up collision domains, but remember, that network is still one large broadcast domain. Neither layer 2 switches nor bridges break up broadcast domains by default—something that not only limits your network’s size and growth potential but also can reduce its overall performance.
Broadcasts and multicasts, along with the slow convergence time of spanning trees, can give you some major grief as your network grows. These are the big reasons that layer 2 switches and bridges cannot completely replace routers (layer 3 devices) in the internetwork.
Bridging versus LAN Switching
It’s true—layer 2 switches really are pretty much just bridges that give us a lot more ports, but there are some important differences you should always keep in mind:
- Bridges are software based, while switches are hardware based because they use ASIC chips to help make filtering decisions.
- A switch can be viewed as a multiport bridge.
- There can be only one spanning-tree instance per bridge, while switches can have many. (I’m going to tell you all about spanning trees in a bit.)
- Switches have a higher number of ports than most bridges.
- Both bridges and switches forward layer 2 broadcasts.
- Bridges and switches learn MAC addresses by examining the source address of each frame received.
- Both bridges and switches make forwarding decisions based on layer 2 addresses.
Three Switch Functions at Layer 2
Layer 2 switching has three distinct functions: address learning, forward/filter decisions, and loop avoidance. (You need to remember these!)
Address Learning Layer 2 switches and bridges remember the source hardware address of each frame received on an interface, and they enter this information into a MAC database called a forward/filter table.
Forward/Filter Decisions When a frame is received on an interface, the switch looks at the destination hardware address and finds the exit interface in the MAC database. The frame is only forwarded out the specified destination port.
Loop Avoidance If multiple connections between switches are created for redundancy purposes, network loops can occur. Spanning Tree Protocol (STP) is used to stop network loops while still permitting redundancy.
I’m going to talk about address learning, forward/filtering decisions, and loop avoidance in detail in the next sections.
Address Learning
When a switch is first powered on, the MAC forward/filter table is empty, as shown in Figure 2-8.
Figure 2-8: Empty forward/filter table on a switch

When a device transmits and an interface receives a frame, the switch places the frame’s source address in the MAC forward/filter table, allowing it to remember on which interface the sending device is located. The switch then has no choice but to flood the network with this frame out of every port except the source port because it has no idea where the destination device is actually located.
If a device answers this flooded frame and sends a frame back, then the switch will take the source address from that frame and place that MAC address in its database as well, associating this address with the interface that received the frame. Because the switch now has both of the relevant MAC addresses in its filtering table, the two devices can now make a point-to-point connection. The switch doesn’t need to flood the frame as it did the first time because now the frames can and will be forwarded only between the two devices. This is exactly the thing that makes layer 2 switches better than hubs. In a hub network, all frames are forwarded out all ports every time—no matter what. Figure 2-9 shows the processes involved in building a MAC database.
Figure 2-9: How switches learn hosts’ locations

In this figure, you can see four hosts attached to a switch. When the switch is powered on, it has nothing in its MAC address forward/filter table. When the hosts start communicating, the switch places the source hardware address of each frame in the table along with the port to which the frame’s address corresponds.
Let me give you an example of how a forward/filter table is populated:
1. Host A sends a frame to Host B. Host A’s MAC address is 0000.8c01.000A; Host B’s MAC address is 0000.8c01.000B.
2. The switch receives the frame on the E0/0 interface and places the source address in the MAC address table.
3. Because the destination address is not in the MAC database, the frame is forwarded out all interfaces—except the source port.
4. Host B receives the frame and responds to Host A. The switch receives this frame on interface E0/1 and places the source hardware address in the MAC database.
5. Host A and Host B can now make a point-to-point connection and only the two devices will receive the frames. Hosts C and D will not see the frames, nor are their MAC addresses found in the database because they haven’t yet sent a frame to the switch.
If Host A and Host B don’t communicate to the switch again within a certain amount of time, the switch will flush their entries from the database to keep it as current as possible.
Forward/Filter Decisions
When a frame arrives at a switch interface, the destination hardware address is compared to the forward/filter MAC database. If the destination hardware address is known and listed in the database, the frame is only sent out the correct exit interface. The switch doesn’t transmit the frame out any interface except the destination interface. This preserves bandwidth on the other network segments and is called frame filtering.
If the destination hardware address is not listed in the MAC database, then the frame is flooded out all active interfaces except the interface on which the frame was received. If a device answers the flooded frame, the MAC database is updated with the device’s location (interface).
If a host or server sends a broadcast on the LAN, the switch will flood the frame out all active ports except the source port by default. Remember, the switch creates smaller collision domains, but it’s still one large broadcast domain by default.
In Figure 2-10, Host A sends a data frame to Host D. What will the switch do when it receives the frame from Host A?
Because Host A’s MAC address is not in the forward/filter table, the switch will add the source address and port to the MAC address table and then forward the frame to Host D. If Host D’s MAC address was not in the forward/filter table, the switch would have flooded the frame out all ports except for port Fa0/3.
Figure 2-10: Forward/filter table
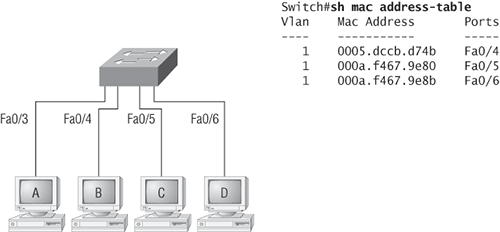
Now let’s take a look at the output of a show mac address-table:
Switch#sh mac address-table
Vlan    Mac Address       Type        Ports
----    -----------       --------    -----
   1    0005.dccb.d74b    DYNAMIC     Fa0/1
   1    000a.f467.9e80    DYNAMIC     Fa0/3
   1    000a.f467.9e8b    DYNAMIC     Fa0/4
   1    000a.f467.9e8c    DYNAMIC     Fa0/3
   1    0010.7b7f.c2b0    DYNAMIC     Fa0/3
   1    0030.80dc.460b    DYNAMIC     Fa0/3
   1    0030.9492.a5dd    DYNAMIC     Fa0/1
   1    00d0.58ad.05f4    DYNAMIC     Fa0/1
Suppose the preceding switch received a frame with the following MAC addresses:
Source MAC: 0005.dccb.d74b
Destination MAC: 000a.f467.9e8c
How will the switch handle this frame? The destination MAC address will be found in the MAC address table and the frame will be forwarded out Fa0/3 only. If the destination MAC address is not found in the forward/filter table, it will forward the frame out all ports of the switch looking for the destination device.
Exam Essentials
Remember the advantages of layer 2 switching. Switches use an ASIC’s chip, which provides fast switching of frames. In addition, each switch builds a MAC address table for forward/filtering decisions, and along with more collision domains, this provides more bandwidth for users.
Remember the three switch functions. Address learning, forward/filter decisions, and loop avoidance are the functions of a switch.
Remember the command show mac address-table. The command show mac address-table will show you the forward/filter table used on the LAN switch.
Perform and Verify Initial Switch Configuration Tasks, Including Remote Access Management
I’m going to show you how to start up and configure a Cisco Catalyst switch using the command-line interface (CLI). After you get the basic commands down, I’ll show you how to configure virtual LANs (VLANs) plus Inter-Switch Link (ISL), 802.1q routing, and Cisco’s Virtual Trunk Protocol (VTP) in the upcoming objectives.
Catalyst Switch Basic Configuration
When you connect switches to each other, remember that first you’ll need a crossover cable between the switches; newer switches auto-detect this type of connection, but the CCNA objectives assume no auto-detect mechanisms.
Let’s start the configuration by connecting into a switch and setting the administrative functions. We’ll also assign an IP address to the switch, but this isn’t really necessary to make the network function. The only reason to do that is so we can manage/administer it. Let’s use a simple IP scheme like 192.168.10.16/28. This mask should be familiar to you!
Check out the following output:
Switch>en
Switch#config t
Enter configuration commands, one per line.  End with CNTL/Z.
Switch(config)#hostname S1
S1(config)#enable secret todd
S1(config)#int F0/1
S1(config-if)#description 1st Connection to Core Switch
S1(config-if)#int F0/2
S1(config-if)#description 2nd Connection to Core Switch
S1(config-if)#int F0/3
S1(config-if)#description Connection to HostA
S1(config-if)#int F0/4
S1(config-if)#description Connection to PhoneA
S1(config-if)#int F0/8
S1(config-if)#description Connection to IVR
S1(config-if)#line console 0
S1(config-line)#password console
S1(config-line)#login
S1(config-line)#exit
S1(config)#line vty 0 ?
  <1-15>  Last Line number
  <cr>
S1(config)#line vty 0 15
S1(config-line)#password telnet
S1(config-line)#login
S1(config-line)#int vlan 1
S1(config-if)#ip address 192.168.10.17 255.255.255.240
S1(config-if)#no shut
S1(config-if)#exit
S1(config)#banner motd # This is the S1 switch #
S1(config)#exit
S1(config)#ip default-gateway 192.168.10.30
S1#copy run start
Destination filename [startup-config]? [enter]
Building configuration...
[OK]
S1#
The first thing to notice about this is that there is no IP address configured on the switch’s interfaces. Because all ports on a switch are enabled by default, there’s not much to configure. The IP address is configured under a logical interface, called a management domain or VLAN. You would typically use the default VLAN 1 to manage a switched network just as I did here. Also, notice the command ip default-gateway ip address, which provides remote management of the switch. This is an important objective.
The rest of the configuration is basically the same as the process you go through for router configuration. Remember, there are no IP addresses on switch interfaces, no routing protocols, and so on. We’re performing layer 2 switching at this point, not routing! Also, note that there is no aux port on Cisco switches.
Exam Essentials
Remember how to set an IP address on a switch. To configure an IP address on a switch, an address is never configured on a switch port, but rather what is called the management VLAN. By default this is VLAN 1. Here is an example of how to set an IP address on a switch using the default VLAN:
Switch(config)#int vlan 1
Switch(config-if)#ip address 192.168.10.17 255.255.255.240
Switch(config-if)#no shut
Remember how to configure a switch for remote management. To allow hosts from outside the management VLAN to access the switch for administrative purposes, you need to set a default gateway on the switch. Here is how you would do that:
Switch(config)#ip default-gateway 192.168.10.30
Verify Network Status and Switch Operation Using Basic Utilities (Including ping, traceroute, Telnet, SSH, arp, and ipconfig) and SHOW and DEBUG Commands
Let’s take a look at some common commands that you can use to help troubleshoot your network from both a PC and a Cisco router (the commands might do the same thing, but they are implemented differently).
Packet InterNet Groper (ping) Uses ICMP echo requests and replies to test if a node IP stack is initialized and alive on the network.
traceroute Displays the list of routers on a path to a network destination by using TTL time-outs and ICMP error messages. This command will not work from a DOS prompt.
tracert Same command as traceroute, but it’s a Microsoft Windows command and will not work on a Cisco router.
arp -a Displays IP-to-MAC address mappings on a Windows PC.
show ip arp Same command as arp -a, but displays the ARP table on a Cisco router. Like the commands traceroute and tracert, they are not interchangeable between DOS and Cisco.
ipconfig /all Used only from a DOS prompt, shows you the PC network configuration.
Once you’ve gone through all these steps and used the appropriate DOS commands, what do you do if you find a problem? How do you go about fixing an IP address configuration error? Let’s move on and discuss how to determine any IP address problems and how to fix them.
Checking Network Connectivity
You can use the ping and traceroute commands to test connectivity to remote devices, and both of them can be used with many protocols, not just IP.
Using the Ping Command
So far, you’ve seen many examples of pinging devices to test IP connectivity and name resolution using the DNS server. To see all the different protocols that you can use with ping, use the ping ? command like this:
Todd#ping ?
  WORD       Ping destination address or hostname
  apollo     Apollo echo
  appletalk  Appletalk echo
  clns       CLNS echo
  decnet     DECnet echo
  ip         IP echo
  ipx        Novell/IPX echo
  srb        srb echo
  tag        Tag encapsulated IP echo
  vines      Vines echo
  xns        XNS echo
  <cr>
The ping output displays the minimum, average, and maximum times it takes for a Ping packet to find a specified system and return. Here’s another example:
Todd#ping todd
Translating "todd"...domain server (192.168.0.70)[OK]
Type escape sequence to abort.
Sending 5, 100-byte ICMP Echos to 192.168.0.121, timeout
  is 2 seconds:
!!!!!
Success rate is 100 percent (5/5), round-trip min/avg/max
  = 32/32/32 ms
You can see that the DNS server was used to resolve the name, and the device was pinged in 32ms (milliseconds).
The ping command can be used in user and privileged mode, but not in configuration mode.
Using the Traceroute Command
Traceroute (the traceroute command, or trace for short) shows the path a packet takes to get to a remote device. To see the protocols that you can use with traceroute, use the traceroute ? command. Here’s an example:
Todd#traceroute ?
  WORD       Trace route to destination address or
             hostname
  appletalk  AppleTalk Trace
  clns       ISO CLNS Trace
  ip         IP Trace
  ipx        IPX Trace
  oldvines   Vines Trace (Cisco)
  vines      Vines Trace (Banyan)
  <cr>
The trace command shows the hop or hops that a packet traverses on its way to a remote device. Here’s an example:
Todd#trace r1
Type escape sequence to abort.
Tracing the route to r1.lammle.com (172.16.10.2)
  1 r1.lammle.com (172.16.10.2) 16 msec *  16 msec
You can see that the packet went through only one hop to find the destination.

Do not get confused on the exam. You can’t use the tracert command—it’s a Windows command. For a router, use the traceroute command!
Verifying Cisco Catalyst Switches
The first thing I like to do with any router or switch is to run through the configurations with a show running-config command. Performing a run-through gives me a really great headshot of each device. However, it’s time-consuming and showing you all those configurations would take up a lot of pages in this book. Besides, you can run other commands that will still stock you with really good information.
For example, to verify the IP address set on a switch, you can use the show interface command. Here is the output:
S1#sh int vlan 1
Vlan1 is up, line protocol is up
  Hardware is EtherSVI, address is 001b.2b55.7540 (bia 001b.2b55.7540)
  Internet address is 192.168.10.17/28
  MTU 1500 bytes, BW 1000000 Kbit, DLY 10 usec,
     reliability 255/255, txload 1/255, rxload 1/255
  Encapsulation ARPA, loopback not set, reliability 255/255, txload 1/255, rxload 1/255
  [output cut]
Remember that IP addresses aren’t needed on a switch. The only reason you would set an IP address, mask, or default gateway is for management purposes.
show mac address-table
I’m sure you remember being shown this command earlier in the chapter. Using it displays the forward filter table, also called a content addressable memory (CAM) table. Here’s the output from the S1 switch:
S1#sh mac address-table
          Mac Address Table
-------------------------------------------
Vlan    Mac Address       Type        Ports
----    -----------       --------    -----
 All    0100.0ccc.cccc    STATIC      CPU
 All    ffff.ffff.ffff    STATIC      CPU
[output cut]
   1    0002.1762.b235    DYNAMIC     Po1
   1    0009.b79f.c080    DYNAMIC     Po1
   1    000d.29bd.4b87    DYNAMIC     Po1
   1    000d.29bd.4b88    DYNAMIC     Po1
   1    0016.4662.52b4    DYNAMIC     Fa0/4
   1    0016.4677.5eab    DYNAMIC     Po1
   1    001a.2f52.49d8    DYNAMIC     Po1
   1    001a.2fe7.4170    DYNAMIC     Fa0/8
   1    001a.e2ce.ff40    DYNAMIC     Po1
   1    0050.0f02.642a    DYNAMIC     Fa0/3
Total Mac Addresses for this criterion: 31
S1#
The switches use what are called base MAC addresses that are assigned to the CPU, and the 2960s use 20. From the preceding output, you can see that five MAC addresses are dynamically assigned to EtherChannel port 1. Ports Fa0/3, Fa0/8, and Fa0/4 have only one MAC address assigned, and all ports are assigned to VLAN 1.
Let’s take a look at the S2 switch CAM and see what you can find.
S2#sh mac address-table
          Mac Address Table
-------------------------------------------
Vlan    Mac Address       Type        Ports
----    -----------       --------    -----
 All    0008.205a.85c0    STATIC      CPU
 All    0100.0ccc.cccc    STATIC      CPU
 All    0100.0ccc.cccd    STATIC      CPU
 All    0100.0cdd.dddd    STATIC      CPU
[output cut]
   1    0002.1762.b235    DYNAMIC     Fa0/3
   1    000d.29bd.4b80    DYNAMIC     Fa0/1
   1    000d.29bd.4b85    DYNAMIC     Fa0/1
   1    0016.4662.52b4    DYNAMIC     Fa0/1
   1    0016.4677.5eab    DYNAMIC     Fa0/4
   1    001b.2b55.7540    DYNAMIC     Fa0/1
Total Mac Addresses for this criterion: 26
S2#
You can see in the preceding output that four MAC addresses are assigned to Fa0/1. Of course, you can also see that there is one connection for each host on ports 3 and 4.
You can set a static MAC address in the MAC address table—but just like setting static MAC port security, that is a ton of work. In case you want to do it, here’s how it’s done:
S1#config t
S1(config)#mac-address-table static aaaa.bbbb.cccc vlan 1 int fa0/5
S1(config)#do show mac address-table
          Mac Address Table
-------------------------------------------
Vlan    Mac Address       Type        Ports
----    -----------       --------    -----
 All    0100.0ccc.cccc    STATIC      CPU
[output cut]
   1    0002.1762.b235    DYNAMIC     Po1
   1    0009.b79f.c080    DYNAMIC     Po1
   1    000d.29bd.4b87    DYNAMIC     Po1
   1    000d.29bd.4b88    DYNAMIC     Po1
   1    0016.4662.52b4    DYNAMIC     Fa0/4
   1    0016.4677.5eab    DYNAMIC     Po1
   1    001a.2f52.49d8    DYNAMIC     Po1
   1    001a.2fe7.4170    DYNAMIC     Fa0/8
   1    001a.e2ce.ff40    DYNAMIC     Po1
   1    0050.0f02.642a    DYNAMIC     Fa0/3
   1    aaaa.bbbb.cccc    STATIC      Fa0/5
Total Mac Addresses for this criterion: 31
S1(config)#
You can see that a static MAC address is now assigned permanently to interface Fa0/5, and that it’s also assigned to VLAN 1 only.
show spanning-tree
From reading the CCNA Cisco Certified Network Associate Study Guide, 7th Edition (Sybex, 2011), you should know that the show spanning-tree command is important. With it, you can see who the root bridge is and what our priorities are set to for each VLAN and your root port.
Understand that Cisco switches run what is called Per-VLAN Spanning Tree (PVST), which basically means that each VLAN runs its own instance of the STP protocol. If you enter show spanning-tree, you will receive information for each VLAN, starting with VLAN 1. For example, if you have multiple VLANs and you want to see what is up with VLAN 2, you can use the command show spanning-tree vlan 2.
Here is an output from the show spanning-tree command from switch S1. Because I am using only VLAN 1, I didn’t need to add the VLAN number to the command:
S1#sh spanning-tree
VLAN0001
  Spanning tree enabled protocol ieee
  Root ID    Priority    32769
             Address     000d.29bd.4b80
             Cost        3012
             Port        56 (Port-channel1)
             Hello Time   2 sec  Max Age 20 sec  Forward Delay 15 sec
  Bridge ID  Priority    49153  (priority 49152 sys-id-ext 1)
             Address     001b.2b55.7500
             Hello Time   2 sec  Max Age 20 sec  Forward Delay 15 sec
             Aging Time 15
  Uplinkfast enabled
Interface        Role Sts Cost      Prio.Nbr Type
---------------- ---- --- --------- -------- ----------
Fa0/3            Desg FWD 3100      128.3    Edge Shr
Fa0/4            Desg FWD 3019      128.4    Edge P2p
Fa0/8            Desg FWD 3019      128.8    P2p
Po1              Root FWD 3012      128.56   P2p
Because I have only VLAN 1 configured, there’s no more output for this command, but if I had more, I would have gotten another page for each VLAN configured on the switch. The default priority is 32768, but there’s something called the system ID extension (sys-id-ext), which is the VLAN identifier. The Bridge ID priority is incremented by the number of that VLAN. Because I have only VLAN 1, I incremented by one to 32769.
You must know how to find your root bridge, so if you type in show spanning-tree and the bridge is not the root, then look for your root port down in the bottom output. In the preceding example, Po1 is the root port, which connects to the root bridge. Just use the show cdp neighbors command to see what is connected to Po1 and you have your root bridge.
Exam Essentials
Understand when you would use the ping command. Packet Internet Groper (Ping) uses ICMP echo requests and ICMP echo replies to verify an active IP address on a network.
Understand the main purpose of the spanning tree protocol in a switched LAN. The main purpose of STP is to prevent switching loops in a network with redundant switched paths.
Remember the command show spanning-tree. You must be familiar with the command show spanning-tree and how to determine which switch is the root bridge.
Identify, Prescribe, and Resolve Common Switched Network Media Issues, Configuration Issues, Auto Negotiation, and Switch Hardware Failures
A network port, also called an RJ-45 port, connects a computer to a network or VLAN. The connection speed depends on the type of network port. Standard Ethernet can transmit up to 10Mbps; however, it is very common to have Fast Ethernet which can transmit up to 100Mbps. Gigabit Ethernet ports can transmit up to 1,000Mbps. The maximum length of network cable is 328 feet (100 meters).
Twisted-pair is a type of copper cabling that started in telephone communications and now is used in both telephony and most Ethernet networks. A pair of wires forms a circuit that can transmit data. The pair is twisted to provide protection against crosstalk, which is the noise generated by adjacent pairs of wires in the cable.
Common issues with cabling on a switched network include basic switch configuration issues, negotiating both the speed and duplex of a link from a PC to a switch, and the uncommon switch hardware failures.
The most common switch configuration error is not having a port configured into the correct VLAN membership. By using the show running-config command or show vlan command, you can easily see the port memberships. Always check your VLAN memberships when troubleshooting a switch issue.
At times, you may find a host is not communicating to a switch because of mismatched speed or duplex issues. This is not as much of a problem as it has been in the past because of the better hardware being produced, but it still may show up from time to time. The default on a switch and host is to use 100Mbps full-duplex. If your host or switch port does not support this configuration, you can configure the switch port with the duplex and speed commands.
The port LED will be green when everything is OK; however, it will be amber if the port is blocked by STP, and it will turn from green to amber when the port experiences errors.
Switches are made pretty resilient today; however, if you boot a switch and the POST completes successfully, the system LED turns green; if the POST fails, it will turn amber. Seeing the amber glow is a very bad thing—typically fatal.
Exam Essentials
Remember to check a switch port’s VLAN assignment when plugging in a new host. If you plug a new host into a switch, then you must verify the VLAN membership of that port. If the membership is different than what is needed for that host, the host will not be able to reach the needed network services, such as a workgroup server.
Remember how the system LED responds when the post test runs. If you boot a switch and the POST completes successfully, the system LED turns green; if the POST fails, it will turn amber.
Remember how the system LED responds if there are errors on a switch port. A switch port will turn from green to amber when the port experiences errors.
Describe Enhanced Switching Technologies (Including VTP, RSTP, VLAN, PVSTP, and 802.1q)
The basic goals of VLAN Trunking Protocol (VTP) are to manage all configured VLANs across a switched internetwork and to maintain consistency throughout that network. VTP allows you to add, delete, and rename VLANs—this information is then propagated to all other switches in the VTP domain.
Here’s a list of some of the cool features VTP has to offer:
- Consistent VLAN configuration across all switches in the network
- VLAN trunking over mixed networks, such as Ethernet to ATM LANE or even FDDI
- Accurate tracking and monitoring of VLANs
- Dynamic reporting of added VLANs to all switches in the VTP domain
- Plug and Play VLAN adding
This is all very nice; but before you can get VTP to manage your VLANs across the network, you have to create a VTP server. All servers that need to share VLAN information must use the same domain name, and a switch can be in only one domain at a time. Basically, this means that a switch can share VTP domain information with other switches only if they’re configured into the same VTP domain. You can use a VTP domain if you have more than one switch connected in a network, but if you have all your switches in only one VLAN, you just don’t need to use VTP. Do keep in mind that VTP information is sent between switches via only a trunk port.
Switches advertise VTP management domain information as well as a configuration revision number and all known VLANs with any specific parameters. But there’s also something called VTP transparent mode. In it, you can configure switches to forward VTP information through trunk ports but not to accept information updates or update their VTP databases.
If you’ve got sneaky users adding switches to your VTP domain behind your back, you can include passwords, but don’t forget—every switch must be set up with the same password. As you can imagine, this little snag can be a real hassle administratively.
Switches detect any added VLANs within a VTP advertisement, and then prepare to send information on their trunk ports with the newly defined VLAN in tow. Updates are sent out as revision numbers that consist of the notification plus 1. Anytime a switch sees a higher revision number, it knows the information it’s getting is more current, so it will overwrite the existing database with the latest information.
You should know these three requirements for VTP to communicate VLAN information between switches:
- The VTP management domain names of both switches must be set the same.
- One of the switches has to be configured as a VTP server.
- No router is necessary.
Now that you’ve got that down, we’re going to delve deeper in the world of VTP with VTP modes and VTP pruning.
VTP Modes of Operation
Figure 2-11 shows you all three different modes of operation within a VTP domain:
Figure 2-11: VTP modes
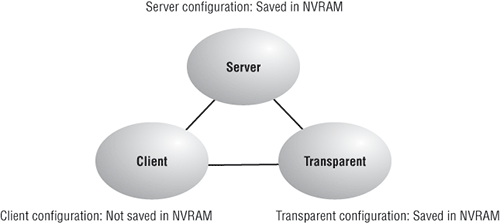
Server This is the default mode for all Catalyst switches. You need at least one server in your VTP domain to propagate VLAN information throughout that domain. It is also important to note that the switch must be in server mode to be able to create, add, and delete VLANs in a VTP domain. VTP information has to be changed in server mode, and any change made to a switch in server mode will be advertised to the entire VTP domain. In VTP server mode, VLAN configurations are saved in NVRAM.
Client In client mode, switches receive information from VTP servers, but they also send and receive updates, so in this way, they behave like VTP servers. The difference is that they can’t create, change, or delete VLANs. Plus, none of the ports on a client switch can be added to a new VLAN before the VTP server notifies the client switch of the new VLAN. Also good to know is that VLAN information sent from a VTP server isn’t stored in NVRAM, which is important because it means that if the switch is reset or reloaded, the VLAN information will be deleted. Here’s a hint: If you want a switch to become a server, first make it a client so it receives all the correct VLAN information, then change it to a server, which is so much easier!
So basically, a switch in VTP client mode will forward VTP summary advertisements and process them. This switch will learn about but won’t save the VTP configuration in the running configuration, and it won’t save it in NVRAM. Switches that are in VTP client mode will only learn about and pass along VTP information—that’s it!
Transparent Switches in transparent mode don’t participate in the VTP domain or share its VLAN database, but they’ll still forward VTP advertisements through any configured trunk links. They can create, modify, and delete VLANs because they keep their own database—one they keep secret from the other switches. Despite being kept in NVRAM, the VLAN database in transparent mode is actually only locally significant. The whole purpose of transparent mode is to allow remote switches to receive the VLAN database from a VTP server-configured switch through a switch that is not participating in the same VLAN assignments.
VTP only learns about normal-range VLANs, with VLAN IDs 1 to 1005; VLANs with IDs greater than 1005 are called extended-range VLANs, and they’re not stored in the VLAN database. The switch must be in VTP transparent mode when you create VLAN IDs from 1006 to 4094, so it would be pretty rare that you’d ever use these VLANs. There is one other thing: VLAN IDs 1 and 1002 to 1005 are automatically created on all switches and can’t be removed.
Rapid Spanning-Tree Protocol (RSTP) 802.1w
If you would like to have a good STP configuration running on your switched network (regardless of the brand of switches) and have all the features we just discussed built in and enabled on every switch, then you are in luck. Welcome to the world of Rapid Spanning-Tree Protocol (RSTP)!
Cisco created PortFast, UplinkFast, and BackboneFast to “fix” the holes and liabilities the IEEE 802.1d standard presented. The drawbacks to these enhancements are only that they are Cisco proprietary and need additional configuration. (These are discussed in detail in Chapter 10 of the CCNA Cisco Certified Network Associate Study Guide, 7th Edition.) The new 802.1w standard (RSTP) addresses all these “issues” in one tight package—just turn on RSTP and you’re good to go. Importantly, you must make sure that all the switches in your network are running the 802.1w protocol for 802.1w to work properly.
It might come as a surprise, but RSTP actually can interoperate with legacy STP protocols. Just know that the inherently fast convergence ability of 802.1w is lost when it interacts with legacy bridges.
PVST
Cisco switches run what is called Per-VLAN Spanning-Tree (PVST), which basically means that each VLAN runs its own instance of the STP protocol. If you entered show spanning-tree, you would receive information for each VLAN, starting with VLAN 1. For example, if you had multiple VLANs, and you wanted to see what’s up with VLAN 2, you would use the command show spanning-tree vlan 2.
IEEE 802.1q
Created by the IEEE as a standard method of frame tagging, IEEE 802.1q actually inserts a field into the frame to identify the VLAN. If you’re trunking between a Cisco switched link and a different brand of switch, you’ve got to use 802.1q for the trunk to work.
It works like this: You first designate each port that is going to be a trunk with 802.1q encapsulation. The ports must be assigned a specific VLAN ID, which makes them the native VLAN, in order for them to communicate. The ports that populate the same trunk create a group with this native VLAN, and each port gets tagged with an identification number reflecting that—again, the default is VLAN 1. The native VLAN allows the trunks to carry information that was received without any VLAN identification or frame tag.
The 2960s support only the IEEE 802.1q trunking protocol, but the 3560s will support both the ISL and IEEE methods.
The basic purpose of ISL and 802.1q frame-tagging methods is to provide interswitch VLAN communication. Also, remember that any ISL or 802.1q frame tagging is removed if a frame is forwarded out an access link—tagging is used across trunk links only.
Exam Essentials
Understand the purpose and configuration of VTP. VTP provides propagation of the VLAN database throughout your switched network. All switches must be in the same VTP domain.
Remember the three VTP modes. Every Cisco switch defaults to VTP server mode, which allows you to create, delete, and propagate the VLAN database. VTP clients receive VTP summary updates from a server and keep them in RAM, and do not save the VLAN database. Clients also forward VTP summary advertisements to other switches. VTP transparent mode switches have their own VLAN database so they just receive and forward the VTP summary advertisements.
Understand the Rapid Spanning-Tree Protocol. The 802.1w STP standard (RSTP) addresses all the problems found in the 802.1d STP protocol and is not Cisco proprietary. This is not enabled on any Cisco switch by default, and if you enable this protocol, you should enable it on all your switches for the fastest convergence times.
Be able to define PVST. Per-VLAN Spanning-Tree, each VLAN runs its own instance of the STP protocol.
Understand the term frame tagging. Frame tagging refers to VLAN identification; this is what switches use to keep track of all those frames as they’re traversing a switch fabric. It’s how switches identify which frames belong to which VLANs.
Understand the 802.1q VLAN identification method. This is a nonproprietary IEEE method of frame tagging. If you’re trunking between a Cisco switched link and a different brand of switch, you have to use 802.1q for the trunk to work.
Describe How VLANs Create Logically Separate Networks and the Need for Routing between Them
Figure 2-12 shows how layer 2 switched networks are typically designed—as flat networks. With this configuration, every broadcast packet transmitted is seen by every device on the network, regardless of whether the device needs to receive that data or not.
By default, routers allow broadcasts to occur only within the originating network, while switches forward broadcasts to all segments. It’s called a flat network because it’s one broadcast domain, not because the actual design is physically flat. In Figure 2-12, Host A is sending out a broadcast on all ports and all switches are forwarding it—all except the port that originally received it.
Figure 2-12: Flat network structure
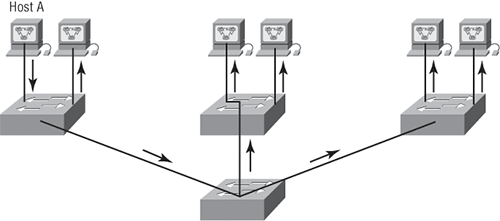
Now check out Figure 2-13. It depicts a switched network and shows Host A sending a frame with Host D as its destination. What’s important is that, as you can see, that frame is only forwarded out the port where Host D is located. This is a huge improvement over the old hub networks, unless having one collision domain by default is what you really want—which is probably not the case!
Figure 2-13: The benefit of a switched network

Now you already know that the largest benefit you gain by having a layer 2 switched network is that it creates individual collision domain segments for each device plugged into each port on the switch. This scenario frees us from the Ethernet distance constraints, so now larger networks can be built. But often, each new advance comes with new issues. For instance, the larger the number of users and devices, the more broadcasts and packets each switch must handle.
And here’s another issue: security! This one’s real trouble because within the typical layer 2 switched internetwork, all users can see all devices by default. You can’t stop devices from broadcasting—plus, you can’t stop users from trying to respond to broadcasts. This means your security options are dismally limited to placing passwords on your servers and other devices.
But wait—there’s hope! That is, if you create a virtual LAN (VLAN). You can solve many of the problems associated with layer 2 switching with VLANs, as you’ll soon see.
Here’s a short list of ways VLANs simplify network management:
- Network adds, moves, and changes are achieved with ease by just configuring a port into the appropriate VLAN.
- A group of users that need an unusually high level of security can be put into their own VLAN so that users outside of the VLAN can’t communicate with them.
- As a logical grouping of users by function, VLANs can be considered independent from their physical or geographic locations.
- VLANs greatly enhance network security.
- VLANs increase the number of broadcast domains while decreasing their size.
To understand how a VLAN looks to a switch, it’s helpful to begin by first looking at a traditional network. Figure 2-14 shows how a network was created by using hubs to connect physical LANs to a router.
Figure 2-14: Physical LANs connected to a router
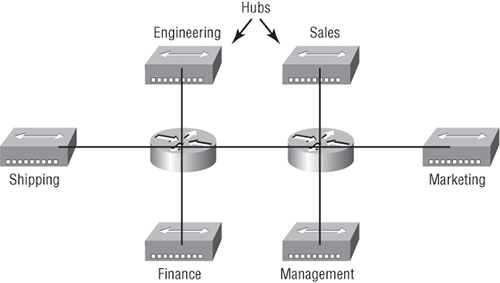
Here, you can see that each network is attached with a hub port to the router (each segment also has its own logical network number even though this isn’t obvious from looking at the figure). Each node attached to a particular physical network has to match that network’s number in order to be able to communicate on the internetwork. Notice that each department has its own LAN, so if you needed to add new users to—let’s say, Sales—you would just plug them into the Sales LAN, and they would automatically be part of the Sales collision and broadcast domain. This design really did work well for many, but there was one major flaw.
What happens if the hub for Sales is full and you need to add another user to the Sales LAN? Or, what do you do if there’s no more physical space where the Sales team is located for this new employee? If there happens to be plenty of room in the Finance section of the building, that new Sales team member will just have to sit in the same part of the building as the Finance people, and you’ll just plug the poor soul into the hub for Finance.
Doing this obviously makes the new user part of the Finance LAN, which is very bad for many reasons. First and foremost, you now have a major security issue. Because the new Sales employee is a member of the Finance broadcast domain, the newbie can see all the same servers and access all network services that the Finance folks can. Second, for this user to access the Sales network services needed to get his job done, he will have to go through the router to log into the Sales server, which is not exactly efficient.
Now let’s look at what a switch accomplishes. Figure 2-15 demonstrates how switches come to the rescue by removing the physical boundary to solve this problem. It also shows how six VLANs (numbered 2 through 7) are used to create a broadcast domain for each department. Each switch port is then administratively assigned a VLAN membership, depending on the host and which broadcast domain it’s placed in.
So now, if you need to add another user to the Sales VLAN (VLAN 7), you can just assign the port to VLAN 7 regardless of where the new Sales team member is physically located. Nice! This illustrates one of the sweetest advantages to designing your network with VLANs instead of the old collapsed backbone design. Now, cleanly and simply, each host that needs to be in the Sales VLAN is merely assigned to VLAN 7.
Figure 2-15: Switches removing the physical boundary
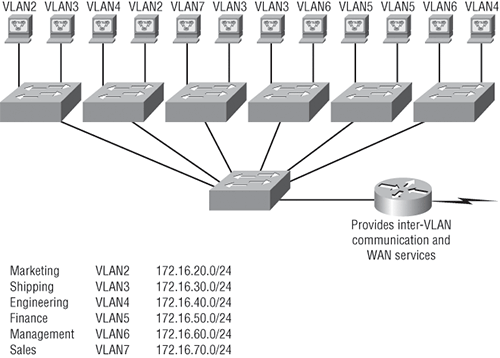
Notice that the VLANs were assigned beginning with VLAN number 2. The number is irrelevant, but you might be wondering what happened to VLAN 1? Well that VLAN is an administrative VLAN, and even though it can be used for a workgroup, Cisco recommends that you use it for administrative purposes only. You can’t delete or change the name of VLAN 1, and by default, all ports on a switch are members of VLAN 1 until you change them.
Because each VLAN is considered a broadcast domain, it also has to have its own subnet number (refer again to Figure 2-15). If you’re also using IPv6, then each VLAN must also be assigned its own IPv6 network number. So you don’t get confused, just keep thinking of VLANs as separate subnets or networks.
Looking at Figure 2-15, notice that there are seven VLANs, or broadcast domains, counting VLAN 1. The nodes within each VLAN can communicate with each other but not with anything in a different VLAN because the nodes in any given VLAN “think” that they’re actually in a collapsed backbone, as illustrated in Figure 2-14.
So, what handy little tool do you need to enable the hosts to communicate to a node or host on a different VLAN? You guessed it—a router! Those nodes positively need to go through a router, or some other layer 3 device, just as when they’re configured for internetwork communication (as shown in Figure 2-14). It works the same way it would if you were trying to connect different physical networks. Communication between VLANs must go through a layer 3 device. So, don’t expect mass router extinction anytime soon!
Exam Essentials
Remember what a virtual LAN is and why you’d create one. Virtual LANs (VLANs) are created on switches to break up layer 2 broadcast domains. Switches only break up collision domains by default, so you can create bridge groups by placing switch ports into VLANs. Each VLAN is a separate broadcast domain and subnet.
Remember that hosts in a VLAN can only communicate with hosts in the same VLAN. If you have multiple VLANs and need inter-VLAN communication, you must configure a router or buy a more expensive layer 3 switch to provide the routing on the backplane of the switch.
Configure, Verify, and Troubleshoot VLANs
It may come as a surprise to you, but configuring VLANs is actually pretty easy. Figuring out which users you want in each VLAN is not; it’s extremely time-consuming. But once you’ve decided on the number of VLANs you want to create and have established which users you want to belong to each one, it’s time to bring your first VLAN into the world.
To configure VLANs on a Cisco Catalyst switch, use the global config vlan command. In the following example, I’m going to demonstrate how to configure VLANs on the S1 switch by creating three VLANs for three different departments—again, remember that VLAN 1 is the native and administrative VLAN by default:
S1#config t
S1(config)#vlan ?
  WORD      ISL VLAN IDs 1-4094
  internal  internal VLAN
S1(config)#vlan 2
S1(config-vlan)#name Sales
S1(config-vlan)#vlan 3
S1(config-vlan)#name Marketing
S1(config-vlan)#vlan 4
S1(config-vlan)#name Accounting
S1(config-vlan)#^Z
S1#
From the preceding, you can see that you can create VLANs from 2 to 4094. This is only mostly true. As I said, VLANs can really only be created up to 1005, and you can’t use, change, rename, or delete VLANs 1 and 1002 through 1005 because they’re reserved. The VLAN numbers above that are called extended VLANs and won’t be saved in the database unless your switch is set to VTP transparent mode. You won’t see these VLAN numbers used too often in production. Here’s an example of attempting to set my S1 switch to VLAN 4000 when my switch is set to VTP server mode (the default VTP mode):
S1#config t
S1(config)#vlan 4000
S1(config-vlan)#^Z
% Failed to create VLANs 4000
Extended VLAN(s) not allowed in current VTP mode.
%Failed to commit extended VLAN(s) changes.
After you create the VLANs that you want, you can use the show vlan command to check them out. But notice that, by default, all ports on the switch are in VLAN 1. To change the VLAN associated with a port, you need to go to each interface and tell it which VLAN to be a part of.
Remember that a created VLAN is unused until it is assigned to a switch port or ports and that all ports are always assigned in VLAN 1 unless set otherwise.
Once the VLANs are created, verify your configuration with the show vlan command (sh vlan for short):
S1#sh vlan
VLAN Name                  Status    Ports
---- -----------------------------------------------------------
1    default                active    Fa0/3, Fa0/4, Fa0/5, Fa0/6
                                      Fa0/7, Fa0/8, Gi0/1
2    Sales                  active
3    Marketing              active
4    Accounting             active
[output cut]
This may seem repetitive, but it’s important, and I want you to remember it: You can’t change, delete, or rename VLAN 1 because it’s the default VLAN and you just can’t change that—period. It’s the native VLAN of all switches by default, and Cisco recommends that you use it as your administrative VLAN. Basically, any packets that aren’t specifically assigned to a different VLAN will be sent down to the native VLAN.
In the preceding S1 output, you can see that ports Fa0/3 through Fa0/8 and the Gi0/1 uplink are all in VLAN 1, but where are ports 1 and 2? Ports 1 and 2 are trunked. Any port that is a trunk port won’t show up in the VLAN database. You have to use the show interface trunk command to see your trunked ports.
Assigning Switch Ports to VLANs
You configure a port to belong to a VLAN by assigning a membership mode that specifies the kind of traffic the port carries, plus the number of VLANs to which it can belong. You can configure each port on a switch to be in a specific VLAN (access port) by using the interface switchport command. You can also configure multiple ports at the same time with the interface range command.
Remember that you can configure either static memberships or dynamic memberships on a port. For this book’s purpose, I’m only going to cover the static flavor. In the following example, I’ll configure interface Fa0/3 to VLAN 3. This is the connection from the S1 switch to a device:
S1#config t
S1(config)#int fa0/3
S1(config-if)#switchport ?
  access         Set access mode characteristics of the interface
  backup         Set backup for the interface
  block          Disable forwarding of unknown uni/multi cast addresses
  host           Set port host
  mode           Set trunking mode of the interface
  nonegotiate    Device will not engage in negotiation protocol on this
                 interface
  port-security  Security related command
  priority       Set appliance 802.1p priority
  protected      Configure an interface to be a protected port
  trunk          Set trunking characteristics of the interface
  voice          Voice appliance attributes
You may have noticed some new stuff showing up in the preceding output. You can see the various commands—some that I’ve already covered, some not. Don’t worry; I’m going to cover the access, mode, nonegotiate, trunk, and voice commands very soon in this chapter. Let’s start with setting an access port on S1, which is probably the most widely used type of port on production switches that has VLANs configured:
S1(config-if)#switchport mode ?
  access   Set trunking mode to ACCESS unconditionally
  dynamic  Set trunking mode to dynamically negotiate access or
trunk mode
  trunk    Set trunking mode to TRUNK unconditionally
S1(config-if)#switchport mode access
S1(config-if)#switchport access vlan 3
By starting with the switchport mode access command, you’re telling the switch that this is a layer 2 port. You can then assign a VLAN to the port with the switchport access command. Remember, you can choose many ports to configure at the same time if you use the interface range command. The dynamic and trunk commands are used for trunk ports exclusively.
That’s it. Well, sort of. If you plugged devices into each VLAN port, they can only talk to other devices in the same VLAN. You want to enable inter-VLAN communication, and you’re going to do that, but first you need to learn a bit more about trunking.
Exam Essentials
Remember to check a switch port’s VLAN assignment when plugging in a new host. If you plug a new host into a switch, then you must verify the VLAN membership of that port. If the membership is different from what is needed for that host, the host will not be able to reach the needed network services, such as a workgroup server.
Remember how to set a switch port to a VLAN membership. By default, all switch ports are members of VLAN 1. In order to change the membership, you must change the port. Here is an example of changing a switch port to VLAN 3:
Switch(config)#int F0/1
Switch(config-if)#switchport access vlan 3
Configure, Verify, and Troubleshoot Trunking on Cisco Switches
The 2960 switch only runs the IEEE 802.1q encapsulation method. To configure trunking on a Fast Ethernet port, use the interface command trunk [parameter]. It’s a tad different on the 3560 switch, and I’ll show you that in the next section.
The following switch output shows the trunk configuration on interface Fa0/8 as set to trunk on:
S1#config t
S1(config)#int fa0/8
S1(config-if)#switchport mode trunk
The following list describes the different options available when configuring a switch interface:
switchport mode access I discussed this in the previous section, but this puts the interface (access port) into permanent nontrunking mode and negotiates to convert the link into a nontrunk link. The interface becomes a nontrunk interface regardless of whether the neighboring interface is a trunk interface. The port would be a dedicated layer 2 port.
switchport mode dynamic auto This mode makes the interface able to convert the link to a trunk link. The interface becomes a trunk interface if the neighboring interface is set to trunk or desirable mode. This is now the default switchport mode for all Ethernet interfaces on all new Cisco switches.
switchport mode dynamic desirable This one makes the interface actively attempt to convert the link to a trunk link. The interface becomes a trunk interface if the neighboring interface is set to trunk, desirable, or auto mode. I used to see this mode as the default on some older switches, but not any longer. The default is dynamic auto now.
switchport mode trunk Puts the interface into permanent trunking mode and negotiates to convert the neighboring link into a trunk link. The interface becomes a trunk interface even if the neighboring interface isn’t a trunk interface.
switchport nonegotiate Prevents the interface from generating DTP frames. You can use this command only when the interface switchport mode is access or trunk. You must manually configure the neighboring interface as a trunk interface to establish a trunk link.
Dynamic Trunking Protocol (DTP) is used for negotiating trunking on a link between two devices, as well as negotiating the encapsulation type of either 802.1q or ISL. I use the nonegotiate command when I want dedicated trunk ports, no questions asked.
To disable trunking on an interface, use the switchport mode access command, which sets the port back to a dedicated layer 2 switch port.
Trunking with the Cisco Catalyst 3560 Switch
Let’s take a look at one more switch—the Cisco Catalyst 3560. The configuration is pretty much the same as it is for a 2960, with the exception that the 3560 can provide layer 3 services and the 2960 can’t. Plus, the 3560 can run both the ISL and the IEEE 802.1q trunking encapsulation methods—the 2960 can run only 802.1q. With all this in mind, let’s take a quick look at the VLAN encapsulation difference regarding the 3560 switch.
The 3560 has the encapsulation command, which the 2960 switch doesn’t:
Core(config-if)#switchport trunk encapsulation ?
  dot1q      Interface uses only 802.1q trunking encapsulation
 when trunking
  isl        Interface uses only ISL trunking encapsulation
 when trunking
  negotiate  Device will negotiate trunking encapsulation with peer on
             interface
Core(config-if)#switchport trunk encapsulation dot1q
Core(config-if)#switchport mode trunk
As you can see, there is the option to add either the IEEE 802.1q (dot1q) encapsulation or the ISL encapsulation to the 3560 switch. After you set the encapsulation, you still have to set the interface mode to trunk. Honestly, it’s pretty rare that you’d continue to use the ISL encapsulation method. Cisco is moving away from ISL—its new routers don’t even support it.
Defining the Allowed VLANs on a Trunk
As I’ve mentioned, trunk ports send and receive information from all VLANs by default, and if a frame is untagged, it’s sent to the management VLAN. This applies to the extended range VLANs as well.
However, you can remove VLANs from the allowed list to prevent traffic from certain VLANs from traversing a trunked link. Here’s how you’d do that:
S1#config t
S1(config)#int F0/1
S1(config-if)#switchport trunk allowed vlan ?
  WORD    VLAN IDs of the allowed VLANs when this port is in
trunking mode
  add     add VLANs to the current list
  all     all VLANs
  except  all VLANs except the following
  none    no VLANs
  remove  remove VLANs from the current list
S1(config-if)#switchport trunk allowed vlan remove ?
  WORD  VLAN IDs of disallowed VLANS when this port is in trunking mode
S1(config-if)#switchport trunk allowed vlan remove 4
The preceding command configured the trunk link on S1 port F0/1, causing it to drop all traffic sent and received for VLAN 4. You could try to remove VLAN 1 on a trunk link, but it would still send and receive management like CDP, PAgP, LACP, DTP, and VTP, so there would really be no point.
To remove a range of VLANs, just use a hyphen:
S1(config-if)#switchport trunk allowed vlan remove 4-8
If by chance someone has removed some VLANs from a trunk link and you want to set the trunk back to default, just use this command:
S1(config-if)#switchport trunk allowed vlan all
Or this command to accomplish the same thing:
S1(config-if)#no switchport trunk allowed vlan
Next, I want to show you how to configure or change the native VLAN on a trunk.
Changing or Modifying the Trunk Native VLAN
You really don’t want to change the trunk port native VLAN from VLAN 1, but you can, and some people do it for security reasons. To change the native VLAN, use the following command:
S1#config t
S1(config)#int F0/1
S1(config-if)#switchport trunk ?
  allowed  Set allowed VLAN characteristics when interface is
in trunking mode
  native   Set trunking native characteristics when interface
is in trunking mode
  pruning  Set pruning VLAN characteristics when interface is
in trunking mode
S1(config-if)#switchport trunk native ?
  vlan  Set native VLAN when interface is in trunking mode
S1(config-if)#switchport trunk native vlan ?
  <1-4094>  VLAN ID of the native VLAN when this port is in
 trunking mode
S1(config-if)#switchport trunk native vlan 40
S1(config-if)#^Z
So, you’ve changed the native VLAN on the trunk link to 40, and by using the show running-config command, you can see the configuration under the trunk link:
!
interface FastEthernet0/1
 switchport trunk native vlan 40
 switchport trunk allowed vlan 1-3,9-4094
 switchport trunk pruning vlan 3,4
!
Hold on! You didn’t really think it would be this easy. Here’s the rub: If none of the switches have the same native VLAN configured on the trunk links, then you’ll start to receive this error:
19:23:29: %CDP-4-NATIVE_VLAN_MISMATCH: Native VLAN mismatch
discovered on FastEthernet0/1 (40), with Core FastEthernet0/7 (1).
19:24:29: %CDP-4-NATIVE_VLAN_MISMATCH: Native VLAN mismatch
discovered on FastEthernet0/1 (40), with Core FastEthernet0/7 (1).
Actually, this is a good, noncryptic error, so either you go to the other end of the trunk link(s) and change the native VLAN or you set the native VLAN back to the default. Here’s how you’d do that:
S1(config-if)#no switchport trunk native vlan
Now the trunk link is using the default VLAN 1 as the native VLAN. Just remember that each connection between switches must use the same native VLAN or you’ll have some serious problems.
Exam Essentials
Remember how to configure a trunk port on a 2960 switch. The 2960 switch runs only the 802.1q trunking method, so the command to trunk a port is simple:
Switch(config-if)#switchport mode trunk
Remember how to configure a trunk port on a 3560 switch. The 3560 switch can use both the ISL and 802.1q frame-tagging methods, so you must set the encapsulation first. Here is an example of trunking a port on a 3560 switch using the 802.1q method:
Switch(config-if)#switchport trunk encapsulation dot1q
Switch(config-if)#switchport mode trunk
Remember how to change the native VLAN on a trunk link. The native VLAN on every switch, by default, is VLAN 1. This means that the traffic is untagged. If you wanted to change the native VLAN, typically for security reasons, here is how you’d do that:
S1(config-if)#switchport trunk native vlan vlan
Configure, Verify, and Troubleshoot InterVLAN Routing
By default, only hosts that are members of the same VLAN can communicate. To change this and allow inter-VLAN communication, you need a router or a layer 3 switch. I’m going to start with the router approach.
To support ISL or 802.1q routing on a Fast Ethernet interface, the router’s interface is divided into logical interfaces—one for each VLAN. These are called subinterfaces. From a Fast Ethernet or Gigabit interface, you can set the interface to trunk with the encapsulation command:
ISR#config t
ISR(config)#int F0/0.1
ISR(config-subif)#encapsulation ?
  dot1Q  IEEE 802.1q Virtual LAN
ISR(config-subif)#encapsulation dot1Q ?
  <1-4094>  IEEE 802.1q VLAN ID
Notice that my 2811 router (named ISR) supports only 802.1q. I’d need an older-model router to run the ISL encapsulation, but why bother?
The subinterface number is only locally significant, so it doesn’t matter which subinterface numbers are configured on the router. Most of the time, I’ll configure a subinterface with the same number as the VLAN I want to route. It’s easy to remember that way, because the subinterface number is used only for administrative purposes.
It’s really important that you understand that each VLAN is a separate subnet. I know. They don’t have to be, but it really is a good idea to configure your VLANs as separate subnets, so just do that.
Now, I need to make sure you’re fully prepared to configure inter-VLAN routing, as well as determine the port IP addresses of hosts connected in a switched VLAN environment. As always, it’s a good idea to be able to fix any problems that may arise. To set you up for success, let me give you a few examples.
First, start by looking at Figure 2-16, and read the router and switch configuration within it. By this point, you should be able to determine the IP address, masks, and default gateways of each of the hosts in the VLANs.
The next step after that is to figure out which subnets are being used. By looking at the router configuration in the figure, you can see that we’re using 192.168.1.64/26 with VLAN 1 and 192.168.1.128/27 with VLAN 10. By looking at the switch configuration, you can see that ports 2 and 3 are in VLAN 1 and port 4 is in VLAN 10. This means that HostA and HostB are in VLAN 1, and HostC is in VLAN 10.
Figure 2-16: Configuring Inter-VLAN
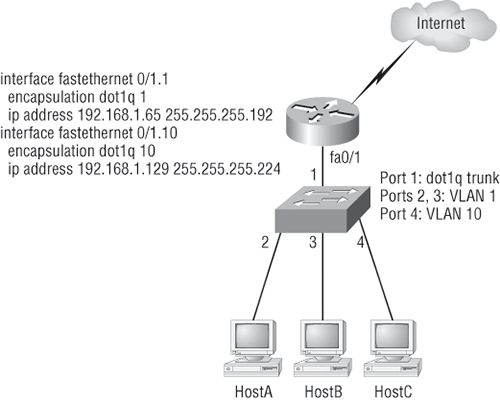
Here’s what the hosts’ IP addresses should be
HostA: 192.168.1.66, 255.255.255.192, default gateway 192.168.1.65
HostB: 192.168.1.67, 255.255.255.192, default gateway 192.168.1.65
HostC: 192.168.1.130, 255.255.255.224, default gateway 192.168.1.129
The hosts could be any address in the range—I just choose the first available IP address after the default gateway address. That wasn’t so hard, was it?
Now, again using Figure 2-16, let’s go through the commands necessary to configure switch port 1 to establish a link with the router and provide inter-VLAN communication using the IEEE version for encapsulation. Keep in mind that the commands can vary slightly depending on what type of switch you’re dealing with.
For a 2960 switch, use the following:
2960#config t
2960(config)#interface fa0/1
2960(config-if)#switchport mode trunk
As you already know, the 2960 switch can run only the 802.1q encapsulation, so there’s no need to specify it. You can’t anyway! For a 3560, it’s basically the same, but because it can run ISL and 802.1q, you have to specify the trunking protocol you’re going to use.
Remember that when you create a trunked link, all VLANs are allowed to pass data by default.
Let’s look at Figure 2-17 and see what you can learn from it. This figure shows three VLANs, with two hosts in each of them.
The router in Figure 2-17 is connected to the fa0/1 switch port, and VLAN 2 is configured on port F0/6. Looking at the diagram, these are the things that Cisco expects you to know:
- The router is connected to the switch using subinterfaces.
- The switch port connecting to the router is a trunk port.
- The switch ports connecting to the clients and the hub are access ports, not trunk ports.
The configuration of the switch would look something like this:
2960#config t
2960(config)#int F0/1
2960(config-if)#switchport mode trunk
2960(config-if)#int F0/2
2960(config-if)#switchport access vlan 1
2960(config-if)#int F0/3
2960(config-if)#switchport access vlan 1
2960(config-if)#int F0/4
2960(config-if)#switchport access vlan 3
2960(config-if)#int F0/5
2960(config-if)#switchport access vlan 3
2960(config-if)#int F0/6
2960(config-if)#switchport access vlan 2
Figure 2-17: Inter-VLAN
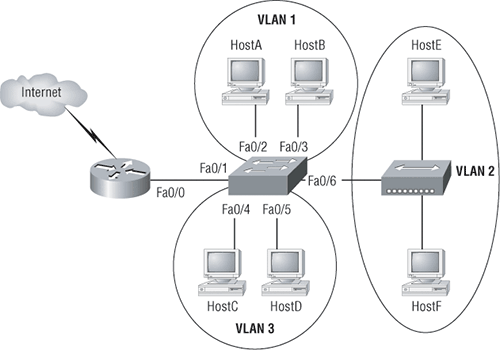
Before you configure the router, you need to design your logical network:
VLAN 1: 192.168.10.16/28
VLAN 2: 192.168.10.32/28
VLAN 3: 192.168.10.48/28
The configuration of the router would then look like this:
ISR#config t
ISR(config)#int F0/0
ISR(config-if)#no ip address
ISR(config-if)#no shutdown
ISR(config-if)#int F0/0.1
ISR(config-subif)#encapsulation dot1q 1
ISR(config-subif)#ip address 192.168.10.17 255.255.255.240
ISR(config-subif)#int F0/0.2
ISR(config-subif)#encapsulation dot1q 2
ISR(config-subif)#ip address 192.168.10.33 255.255.255.240
ISR(config-subif)#int F0/0.3
ISR(config-subif)#encapsulation dot1q 3
ISR(config-subif)#ip address 192.168.10.49 255.255.255.240
The hosts in each VLAN would be assigned an address from their subnet range, and the default gateway would be the IP address assigned to the router’s subinterface in that VLAN.
Exam Essentials
Remember that hosts in a VLAN can only communicate with hosts in the same VLAN. If you have multiple VLANs and need inter-VLAN communication, you must configure a router or buy a more expensive layer 3 switch to provide the routing on the backplane of the switch.
Remember how to create a Cisco “router on a stick” to provide inter-VLAN communication. You can use a Cisco Fast Ethernet or Gigabit Ethernet interface to provide inter-VLAN routing. The switch port connected to the router must be a trunk port; then you must create virtual interfaces (subinterfaces) on the router port for each VLAN connecting. The hosts in each VLAN will use this subinterface address as their default gateway address.
Remember how to create a subinterface on a router port. By creating a subinterface on a router, you can use one router port to allow inter-VLAN communication. You must create a subinterface for each VLAN. Here is an example of how to create a subinterface on a router port for VLAN 2:
Router#config t
Router(config)#int F0/0.1
Router(config-subif)#encapsulation dot1Q 2
Remember how to configure a trunk port on a 2960 switch. The 2960 switch only runs the 802.1q trunking method, so the command to trunk a port is simple:
Switch(config-if)#switchport mode trunk
Configure, Verify, and Troubleshoot VTP
All Cisco switches are configured to be VTP servers by default. To configure VTP, first you have to configure the domain name you want to use. Of course, once you configure the VTP information on a switch, you need to verify it.
When you create the VTP domain, you have a bunch of options, including setting the domain name, password, operating mode, and pruning capabilities of the switch. Use the vtp global configuration mode command to set all this information. In the following example, I’ll set the S1 switch to vtp server, the VTP domain to Lammle, and the VTP password to todd:
S1#config t
S1#(config)#vtp mode server
Device mode already VTP SERVER.
S1(config)#vtp domain Lammle
Changing VTP domain name from null to Lammle
S1(config)#vtp password todd
Setting device VLAN database password to todd
S1(config)#do show vtp password
VTP Password: todd
S1(config)#do show vtp status
VTP Version                     : 2
Configuration Revision          : 0
Maximum VLANs supported locally : 255
Number of existing VLANs        : 8
VTP Operating Mode              : Server
VTP Domain Name                 : Lammle
VTP Pruning Mode                : Disabled
VTP V2 Mode                     : Disabled
VTP Traps Generation            : Disabled
MD5 digest                      : 0x15 0x54 0x88 0xF2 0x50 0xD9 0x03 0x07
Configuration last modified by 192.168.24.6 at 3-14-93 15:47:32
Local updater ID is 192.168.24.6 on interface Vl1 (lowest numbered VLAN interface found)
Remember that all switches are set to VTP server mode by default, and if you want to change any VLAN information on a switch, you absolutely must be in VTP server mode. After you configure the VTP information, you can verify it with the show vtp status command as shown in the preceding output. The preceding switch output shows the VTP domain, the VTP password, and the switch’s mode.
Take a minute to reflect on the fact that the show vtp status output shows that the maximum number of VLANs supported locally is only 255. Because you can create more than 1,000 VLANs on some switches, this seems as though it would definitely be a problem if you have more than 255 VLANs and you’re using VTP.
Let’s configure some switches and set them into the Lammle VTP domain. It is very important to remember that the VTP domain name is case sensitive.
Core#config t
Core(config)#vtp mode client
Setting device to VTP CLIENT mode.
Core(config)#vtp domain Lammle
Changing VTP domain name from null to Lammle
Core(config)#vtp password todd
Setting device VLAN database password to todd
Core(config)#do show vtp status
VTP Version                     : 2
Configuration Revision          : 0
Maximum VLANs supported locally : 1005
Number of existing VLANs        : 5
VTP Operating Mode              : Server
VTP Domain Name                 : Lammle
VTP Pruning Mode                : Disabled
VTP V2 Mode                     : Disabled
VTP Traps Generation            : Disabled
MD5 digest                      : 0x2A 0x6B 0x22 0x17 0x04 0x4F 0xB8 0xC2
Configuration last modified by 192.168.10.19 at 3-1-93 03:13:16
Local updater ID is 192.168.24.7 on interface Vl1 (first interface found)
S2#config t
S2(config)#vtp mode client
Setting device to VTP CLIENT mode.
S2(config)#vtp domain Lammle
Changing VTP domain name from null to Lammle
S2(config)#vtp password todd
Setting device VLAN database password to todd
S2(config)#do show vtp status
VTP Version                     : 2
Configuration Revision          : 0
Maximum VLANs supported locally : 1005
Number of existing VLANs        : 5
VTP Operating Mode              : Client
VTP Domain Name                 : Lammle
VTP Pruning Mode                : Disabled
VTP V2 Mode                     : Disabled
VTP Traps Generation            : Disabled
MD5 digest                      : 0x02 0x11 0x18 0x4B 0x36 0xC5 0xF4 0x1F
Configuration last modified by 0.0.0.0 at 0-0-00 00:00:00
Nice. Now that all the switches are set to the same VTP domain and password, the VLANs I created earlier on the S1 switch should be advertised to the Core and S2 VTP client switches. Let’s take a look using the show vlan brief command on the Core and S2 switch:
Core#sh vlan brief
VLAN Name                 Status    Ports
---- ------------------ --------- ---------------------
1    default              active    Fa0/1,Fa0/2,Fa0/3,Fa0/4
                                    Fa0/9,Fa0/10,Fa0/11,Fa0/12
                                    Fa0/13,Fa0/14,Fa0/15,
                                    Fa0/16,Fa0/17, Fa0/18, Fa0/19,
                                    Fa0/20,Fa0/21, Fa0/22, Fa0/23,
                                    Fa0/24, Gi0/1, Gi0/2
2    Sales                 active
3    Marketing             active
4    Accounting            active
[output cut]
S2#sh vlan bri
VLAN Name                   Status    Ports
---- ---------------------- --------- ---------------------
1    default                active    Fa0/3, Fa0/4, Fa0/5, Fa0/6
                                      Fa0/7, Fa0/8, Gi0/1
2    Sales                  active
3    Marketing              active
4    Accounting             active
[output cut]
The VLAN database that I created on the S1 (2960) switch earlier in this chapter was uploaded to the Core and S2 switch via VTP advertisements. VTP is a great way to keep VLAN naming consistent across the switched network. You can now assign VLANs to the ports on the Core and S1 switches, and they’ll communicate with the hosts in the same VLANs on the S1 switch across the trunked ports between switches.
It’s imperative that you can assign a VTP domain name, set the switch to VTP server mode, and create a VLAN!
Troubleshooting VTP
If VTP is not configured correctly, it will not work, so you absolutely must be capable of troubleshooting VTP. Let’s take a look at a couple of configurations and solve the problems. Study the output from the two following switches:
SwitchA#sh vtp status
VTP Version                     : 2
Configuration Revision          : 0
Maximum VLANs supported locally : 64
Number of existing VLANs        : 7
VTP Operating Mode              : Server
VTP Domain Name                 : GlobalNet
VTP Pruning Mode                : Disabled
VTP V2 Mode                     : Disabled
VTP Traps Generation            : Disabled
SwitchB#sh vtp status
VTP Version                     : 2
Configuration Revision          : 1
Maximum VLANs supported locally : 64
Number of existing VLANs        : 7
VTP Operating Mode              : Server
VTP Domain Name                 : Lammle
VTP Pruning Mode                : Disabled
VTP V2 Mode                     : Disabled
VTP Traps Generation            : Disabled
So, what’s happening with these two switches? Why won’t they share VLAN information? At first glance, it seems that both servers are in VTP server mode, but that’s not the problem. Servers in VTP server mode will share VLAN information using VTP. The problem is that they’re in two different VTP domains. SwitchA is in VTP domain GlobalNet and SwitchB is in VTP domain Lammle. They will never share VTP information because the VTP domain names are configured differently.
Now that you know how to look for common VTP domain configuration errors in your switches, let’s take a look at another switch configuration:
SwitchC#sh vtp status
VTP Version                     : 2
Configuration Revision          : 1
Maximum VLANs supported locally : 64
Number of existing VLANs        : 7
VTP Operating Mode              : Client
VTP Domain Name                 : Todd
VTP Pruning Mode                : Disabled
VTP V2 Mode                     : Disabled
VTP Traps Generation            : Disabled
Why can’t you create a VLAN on SwitchC? Well, the VTP domain name isn’t the important thing in this example. What is critical here is the VTP mode. The VTP mode is client, and a VTP client cannot create, delete, add, or change VLANs. VTP clients keep only the VTP database in RAM, and that’s not saved to NVRAM. So, in order to create a VLAN on this switch, you’ve got to make the switch a VTP server first.
Here’s what will happen when you have the preceding VTP configuration:
SwitchC(config)#vlan 50
VTP VLAN configuration not allowed when device is in CLIENT mode.
So, to fix this problem, here’s what you need to do:
SwitchC(config)#vtp mode server
Setting device to VTP SERVER mode
SwitchC(config)#vlan 50
SwitchC(config-vlan)#
Wait, you’re not done. Now take a look at the output from these two switches and determine why SwitchB is not receiving VLAN information from SwitchA:
SwitchA#sh vtp status
VTP Version                     : 2
Configuration Revision          : 4
Maximum VLANs supported locally : 64
Number of existing VLANs        : 7
VTP Operating Mode              : Server
VTP Domain Name                 : GlobalNet
VTP Pruning Mode                : Disabled
VTP V2 Mode                     : Disabled
VTP Traps Generation            : Disabled
SwitchB#sh vtp status
VTP Version                     : 2
Configuration Revision          : 14
Maximum VLANs supported locally : 64
Number of existing VLANs        : 7
VTP Operating Mode              : Server
VTP Domain Name                 : GlobalNet
VTP Pruning Mode                : Disabled
VTP V2 Mode                     : Disabled
VTP Traps Generation            : Disabled
You may again be tempted to say it’s because they’re both VTP servers, but that is not the problem. All your switches can be servers and they can still share VLAN information. As a matter of fact, Cisco actually suggests that all switches stay VTP servers and that you just make sure the switch you want to advertise VTP VLAN information has the highest revision number. If all switches are VTP servers, then all of the switches will save the VLAN database. However, SwitchB isn’t receiving VLAN information from SwitchA because SwitchB has a higher revision number than SwitchA. It’s very important that you can recognize this problem.
Exam Essentials
Understand the purpose and configuration of VTP. VTP provides propagation of the VLAN database throughout your switched network. All switches must be in the same VTP domain.
Remember the command to verify VTP. Unfortunately, there are not a lot of ways to verify your VTP configuration. The best way is by using the command show vtp status. This shows you your domain name, password, and revision number.
Configure, Verify, and Troubleshoot RSTP Operation
Configuring RSTP actually is as easy as configuring any of our other 802.1d extensions. So, let’s turn it on in the Core switch now and see what happens:
Core#config t
Core(config)#spanning-tree mode ?
  mst         Multiple spanning tree mode
  pvst        Per-Vlan spanning tree mode
  rapid-pvst  Per-Vlan rapid spanning tree mode
Core(config)#spanning-tree mode rapid-pvst
Core(config)#
1d02h: %LINEPROTO-5-UPDOWN: Line protocol on Interface Vlan1,
 changed state to down
1d02h: %LINEPROTO-5-UPDOWN: Line protocol on Interface Vlan1,
 changed state to up
Sweet! The Core switch is now running the 802.1w STP. Let’s verify that:
Core(config)#do show spanning-tree
VLAN0001
  Spanning tree enabled protocol rstp
  Root ID    Priority    32769
             Address     000d.29bd.4b80
             This bridge is the root
             Hello Time   2 sec  Max Age 20 sec  Forward Delay 15 sec
  Bridge ID  Priority    32769  (priority 32768 sys-id-ext 1)
             Address     000d.29bd.4b80
             Hello Time   2 sec  Max Age 20 sec  Forward Delay 15 sec
             Aging Time 300
Interface        Role Sts Cost      Prio.Nbr Type
---------------- ---- --- --------- -------- ------------
Fa0/5            Desg FWD 19        128.5    P2p Peer(STP)
Fa0/6            Desg FWD 19        128.6    P2p Peer(STP)
Fa0/7            Desg FWD 19        128.7    P2p Peer(STP)
Fa0/8            Desg FWD 19        128.8    P2p Peer(STP)
This is interesting; it looks like nothing really happened. I can see on my two other switches that all ports have converged. Once everything was up, everything looked the same. The 802.1d and 802.1w switches seem to be cohabiting with no problem.
If you look under the hood more closely, you can see that the 802.1w switch has changed from 802.1w BPDUs to 802.1d BPDUs on the ports connecting to the other switches running 802.1d (which is all of them).
The S1 and S2 switches believe that the Core switch is actually running 802.1d because the Core reverted to 802.1d BPDUs just for them. Even though the S1 and S2 switches receive the 802.1w BPDUs, they don’t understand them, so they simply drop them. However, the Core does receive the 802.1d BPDUs and accepts them from the S1 and S2 switches, not knowing which ports to run 802.1d on. In other words, turning 802.1w on for just one switch didn’t really help our network at all!
One other important item to remember regarding RSTP is the port states. In order to converge quickly—the main reason to configure RSTP—the port states have gone from five to three. The RSTP port states are discarding, learning, and forwarding. The 802.1d port states are disabled, blocking, listening, learning, and forwarding.
Exam Essentials
Remember how to enable RSVP. To enable RSVP, use the following command:
Router(config)#spanning-tree mode rapid-pvst
Remember to reboot the switch when changing to RSVP. If you have a switch in your network that is not running 802.1w, then you need to reboot your switches when enabling RSTP to stop the 802.1d BPDU’s from being sent out the switch port.
Understand the port states with RSTP. STP doesn’t seem that different unless you really start looking under the hood. However, RSTP transitions through different port states very quickly, especially compared with 802.1d. The new port states are discarding, learning, and forwarding, instead of the 8021d port states of disabled, blocking, listening, learning, and forwarding.
Interpret the Output of Various SHOW and DEBUG Commands to Verify the Operational Status of a Cisco Switched Network
For information on this objective, please review the objective “Verify network status and switch operation using basic utilities (including ping, traceroute, Telnet, SSH, arp, and ipconfig) and SHOW and DEBUG commands,” which was covered earlier in this chapter.
Implement Basic Switch Security (Including Port Security, Trunk Access, Management VLAN Other Than VLAN 1, Etc.)
For information on the trunking part of this objective, please review the objective “Configure, verify, and troubleshoot trunking on Cisco switches,” which was covered earlier in this chapter.
Just how do you stop someone from simply plugging a host into one of your switch ports—or worse, adding a hub, switch, or access point into the Ethernet jack in their office? By default, MAC addresses will just dynamically appear in your MAC forward/filter database. You can stop them in their tracks by using port security. Here are your options:
Switch#config t
Switch(config)#int F0/1
Switch(config-if)#switchport mode access
Switch(config-if)#switchport port-security ?
   aging           Port-security aging commands
   mac-address     Secure mac address
   maximum         Max secure addresses
   violation       Security violation mode
   <cr>
Because all of Cisco’s latest switches ship with the ports in desirable mode (the port desires to trunk if it senses another switch just connected), you must first change the port from desirable mode to access mode or you won’t be able to configure port security. Once that is done, you can continue with port-security commands.
You can see clearly in the preceding output that the switchport port-security command can be used with four options. Personally, I like the port-security command because it allows me to easily control users on my network. You can use the switchport port-security mac-address mac-address command to assign individual MAC addresses to each switch port, but if you choose to go there, you’d better have a lot of time on your hands.
If you want to set up a switch port to allow only one host per port, and to shut down the port if this rule is violated, use the following commands:
Switch(config-if)#switchport port-security maximum 1
Switch(config-if)#switchport port-security violation shutdown
These commands are probably the most popular because they prevent random users from connecting to a switch or access point that’s in their office. The maximum setting of 1 (which is the port security default) means only one MAC address can be used on that port; if the user tries to add another host on that segment, the switch port will shut down. If that happens, you’d have to manually go into the switch and enable the port by cycling it with a shutdown and then a no shutdown command.
Probably one of my favorite commands is the sticky command. Not only does it perform a cool function, it has a cool name! You can find this command under the mac-address command:
Switch(config-if)#switchport port-security mac-address sticky
Switch(config-if)#switchport port-security maximum 2
Switch(config-if)#switchport port-security violation shutdown
Basically, what this does is provide static MAC address security without having to type in everyone’s MAC address on the network. Now, let’s verify the port security on one of the ports by using the show port-security interface command:
S1#sh port-security interface F0/3
Port Security              : Enabled
Port Status                : Secure-down
Violation Mode             : shutdown
Aging Time                 : 2 mins
Aging Type                 : Inactivity
SecureStatic Address Aging : Disabled
Maximum MAC Addresses      : 1
Total MAC Addresses        : 0
Configured MAC Addresses   : 0
Sticky MAC Addresses       : 0
Last Source Address:Vlan   : 0000.0000.0000:0
Security Violation Count   : 0
There are two other modes you can use instead of just shutting down the port. The protect mode means that another host can connect but its frames will just be dropped. Restrict mode is also pretty cool. It alerts you via SNMP that a violation has occurred on a port.
Exam Essentials
Remember how to set port security on a switch port. If you want to set up a switch port to allow only one host per port, and to shut down the port if this rule is violated, use the following commands:
 Switch#config t
 Switch(config)#int F0/1
 Switch(config-if)#switchport port-security maximum 1
 Switch(config-if)#switchport port-security violation shutdown
Remember how to configure a trunk port on a 2960 switch. The 2960 switch only runs the 802.1q trunking method, so the command to trunk a port is simple:
Switch(config-if)#switchport mode trunk
1. You need to configure a Catalyst switch so that it can be managed remotely. Which of the following would you use to accomplish this task?
A. Switch(configs)#int fa0/1
Switch(configs-if)#ip address 192.168.10.252 255.255.255.0
Switch(configs-if)#no shut
B. Switch(configs)#int vlan 1
Switch(configs-if)#ip address 192.168.10.252 255.255.255.0
Switch(configs-if)#ip default-gateway 192.168.10.254 255.255.255.0
C. Switch(configs)#ip default-gateway 192.168.10.254
Switch(configs)#int vlan 1
Switch(configs-if)#ip address 192.168.10.252 255.255.255.0
Switch(configs-if)#no shut
D. Switch(configs)#ip default-network 192.168.10.254
Switch(configs)#int vlan 1
Switch(configs-if)#ip address 192.168.10.252 255.255.255.0
Switch(configs-if)#no shut
2. What does a switch do when a frame is received on an interface and the destination hardware address is unknown or not in the filter table?
A. Forwards the switch to the first available link
B. Drops the frame
C. Floods the network with the frame looking for the device
D. Sends back a message to the originating station asking for a name resolution
3. If a switch receives a frame and the source MAC address is not in the MAC address table but the destination address is, what will the switch do with the frame?
A. Discard it and send an error message back to the originating host
B. Flood the network with the frame
C. Add the source address and port to the MAC address table and forward the frame out the destination port
D. Add the destination to the MAC address table and then forward the frame
4. You want to run the new 802.1w on your switches. Which of the following would enable this protocol?
A. Switch(config)#spanning-tree mode rapid-pvst
B. Switch#spanning-tree mode rapid-pvst
C. Switch(config)#spanning-tree mode 802.1w
D. Switch#spanning-tree mode 802.1w
5. In which circumstance are multiple copies of the same unicast frame likely to be transmitted in a switched LAN?
A. During high-traffic periods
B. After broken links are reestablished
C. When upper-layer protocols require high reliability
D. In an improperly implemented redundant topology
6. Which command was used to produce the following output:
Vlan    Mac Address       Type        Ports
----    -----------       --------    -----
   1    0005.dccb.d74b    DYNAMIC     Fa0/1
   1    000a.f467.9e80    DYNAMIC     Fa0/3
   1    000a.f467.9e8b    DYNAMIC     Fa0/4
   1    000a.f467.9e8c    DYNAMIC     Fa0/3
   1    0010.7b7f.c2b0    DYNAMIC     Fa0/3
   1    0030.80dc.460b    DYNAMIC     Fa0/3
A. show vlan
B. show ip route
C. show mac address-table
D. show mac address-filter
7. If you want to disable STP on a port connected to a server, which command would you use?
A. disable spanning-tree
B. spanning-tree off
C. spanning-tree security
D. spanning-tree portfast
8. Refer to the graphic. Why does the switch have two MAC addresses assigned to the Fa0/1 port in the switch address table?
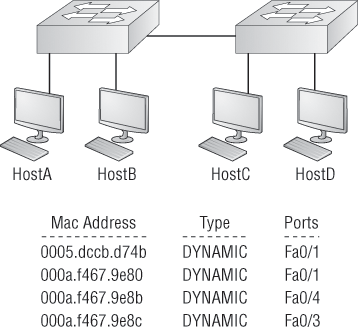
A. Data from HostC and HostD have been received by the switch port Fast Ethernet 0/1.
B. Data from two of the devices connected to the switch have been forwarded out to HostD.
C. HostC and HostD had their NIC replaced.
D. HostC and HostD are on different VLANs.
9. Layer 2 switching provides which of the following? (Choose four.)
A. Hardware-based bridging (ASIC)
B. Wire speed
C. Low latency
D. Low cost
E. Routing
F. WAN services
10. You type show mac address-table and receive the following output:
Switch#sh mac address-table
Vlan    Mac Address       Type        Ports
----    -----------       --------    -----
   1    0005.dccb.d74b    DYNAMIC     Fa0/1
   1    000a.f467.9e80    DYNAMIC     Fa0/3
   1    000a.f467.9e8b    DYNAMIC     Fa0/4
   1    000a.f467.9e8c    DYNAMIC     Fa0/3
   1    0010.7b7f.c2b0    DYNAMIC     Fa0/3
   1    0030.80dc.460b    DYNAMIC     Fa0/3
Suppose that the above switch received a frame with the following MAC addresses:
- Source MAC: 0005.dccb.d74b
- Destination MAC: 000a.f467.9e8c
What will it do?
A. It will discard the frame.
B. It will forward the frame out port Fa0/3 only.
C. It will forward it out Fa0/1 only.
D. It will send it out all ports except Fa0/1.
1. C. To manage a switch remotely, you must set an IP address under the management VLAN, which is, by default, interface vlan 1. Then, from global configuration mode, you set the default gateway with the ip default-gateway command.
2. C. Switches flood all frames that have an unknown destination address. If a device answers the frame, the switch will update the MAC address table to reflect the location of the device.
3. C. Because the source MAC address is not in the MAC address table, the switch will add the source address and the port it is connected to into the MAC address table and then forward the frame to the outgoing port.
4. A. 802.1w is also called Rapid Spanning-Tree Protocol. It is not enabled by default on Cisco switches, but it is a better STP to run because it has all the fixes that the Cisco extensions provide with 802.1d.
5. D. If the Spanning-Tree Protocol is not running on your switches and you connect them together with redundant links, you will have broadcast storms and multiple frame copies.
6. C. The command show mac address-table will display the forward/filter table, also called a CAM table on a switch.
7. D. If you have a server or other devices connected into your switch that you’re totally sure won’t create a switching loop if STP is disabled, you can use something called portfast on these ports. Using it means that the port won’t spend the usual 50 seconds to come up while STP is converging.
8. A. A switch can have multiple MAC addresses associated with a port. In the graphic, a hub is connected to port Fa0/1, which has two hosts connected.
9. A, B, C, D. Switches, unlike bridges, are hardware based. Cisco says its switches are wire speed and provide low latency, and they are considered low cost compared to their prices in the 1990s.
10. B. Because the destination MAC address is in the MAC address table (forward/filter table), it will send it out port Fa0/3 only.