Chapter 4
Configure, Verify, and Troubleshoot Basic Router Operation and Routing on Cisco Devices
The Cisco CCNA exam objectives covered in this chapter include the following:
- Describe basic routing concepts (including packet forwarding and the router lookup process).
- Describe the operation of Cisco routers (including the router bootup process, POST, and router components).
- Select the appropriate media, cables, ports, and connectors to connect routers to other network devices and hosts.
- Configure, verify, and troubleshoot RIPv2.
- Access and utilize the router to set basic parameters (including CLI/SDM).
- Connect, configure, and verify the operational status of a device interface.
- Verify device configuration and network connectivity using ping, traceroute, Telnet, SSH, or other utilities.
- Perform and verify routing configuration tasks for a static or default route given specific routing requirements.
- Manage IOS configuration files (including save, edit, upgrade, and restore).
- Manage Cisco IOS.
- Compare and contrast methods of routing and routing protocols.
- Configure, verify, and troubleshoot OSPF.
- Configure, verify, and troubleshoot EIGRP.
- Verify network connectivity (including using ping, traceroute, and Telnet or SSH).
- Troubleshoot routing issues.
- Verify router hardware and software operation using the SHOW and DEBUG commands.
- Implement basic router security.
In this chapter, I’m going to discuss the IP routing process. This is an important subject to understand because it pertains to all routers and configurations that use IP. IP routing is the process of moving packets from one network to another network using routers.
Describe Basic Routing Concepts (Including Packet Forwarding and the Router Lookup Process)
The term routing describes the process of taking a packet from one device and sending it through the network to another device on a different network. Routers don’t really care about hosts—they only care about networks and the best path to each network. The logical network address of the destination host is used to get packets to a network through a routed network, and then the hardware address of the host is used to deliver the packet from a router to the correct destination host.
If your network has no routers, it should be apparent that you are not routing. Routers route traffic to all the networks in your internetwork. To be able to route packets, a router must know, at a minimum, the following:
- Destination address
- Neighboring routers from which it can learn about remote networks
- Possible routes to all remote networks
- The best route to each remote network
- How to maintain and verify routing information
The router learns about remote networks from neighboring routers or from an administrator. The router then builds a routing table (a map of the internetwork) that describes how to find the remote networks. If a network is directly connected, then the router already knows how to get to it.
If a network isn’t directly connected to the router, the router must use one of two ways to learn how to get to the remote network: static routing, meaning that someone must hand-type all network locations into the routing table, or something called dynamic routing. In dynamic routing, a protocol on one router communicates with the same protocol running on neighboring routers. The routers then update each other about all the networks they know about and place this information into the routing table. If a change occurs in the network, the dynamic routing protocols automatically inform all routers about the event. If static routing is used, the administrator is responsible for updating all changes by hand into all routers. Typically, in a large network, a combination of both dynamic and static routing is used.
Let’s take a look at a simple example that demonstrates how a router uses the routing table to route packets out of an interface. I’ll go into a more detailed discussion of the process in the next section.
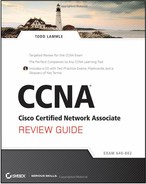
Figure 4-1 shows a simple two-router network. Lab_A has one serial interface and three LAN interfaces.
Figure 4-1: A simple routing example
By looking at Figure 4-1, can you see which interface Lab_A will use to forward an IP datagram to a host with an IP address of 10.10.10.10?
By using the command show ip route, you can see the routing table (map of the internetwork) that Lab_A uses to make forwarding decisions:
Lab_A#sh ip route
[output cut]
Gateway of last resort is not set
C      10.10.10.0/24 is directly connected, FastEthernet0/0
C      10.10.20.0/24 is directly connected, FastEthernet0/1
C      10.10.30.0/24 is directly connected, FastEthernet0/2
C      10.10.40.0/24 is directly connected, Serial 0/0
The C in the routing table output means that the networks listed are “directly connected.” Until a routing protocol—something like RIP, EIGRP, and so on—is added to the routers in the internetwork (or use static routes), only directly connected networks will be in the routing table.
So, let’s get back to the original question: By looking at the figure and the output of the routing table, can you tell what IP will do with a received packet that has a destination IP address of 10.10.10.10? The router will packet-switch the packet to interface FastEthernet0/0, and this interface will frame the packet and then send it out on the network segment.
Let’s try another example: Based on the output of the next routing table, from which interface will a packet with a destination address of 10.10.10.14 be forwarded?
Lab_A#sh ip route
[output cut]
Gateway of last resort is not set
C      10.10.10.16/28 is directly connected, FastEthernet0/0
C      10.10.10.8/29 is directly connected, FastEthernet0/1
C      10.10.10.4/30 is directly connected, FastEthernet0/2
C      10.10.10.0/30 is directly connected, Serial 0/0
First, you can see that the network is subnetted and each interface has a different mask. Because 10.10.10.14 would be a host in the 10.10.10.8/29 subnet connected to the FastEthernet0/1 interface, the packet will be forwarded out the FastEthernet0/1 interface.
For more information on IP routing, please see Chapter 8 of the CCNA Cisco Certified Network Associate Study Guide, 7th Edition (Sybex, 2011).
Exam Essentials
Understand the basic IP routing process. You need to remember that the frame changes at each hop but that the packet is never changed or manipulated in any way until it reaches the destination device.
Understand the term routing. Routing refers to the process of examining a packet from one device, determining its destination, locating the best path to that destination, and sending it through the network to the destination device. Routers don’t really care about hosts—they care only about networks and the best path to each network.
List the information required by a router to route packets. To be able to route packets, a router must know, at a minimum, the following:
- The destination address
- The neighboring routers from which it can learn about remote networks
- The possible routes to all remote networks
- The best route to each remote network
- How to maintain and verify routing information
Describe the Operation of Cisco Routers (Including the Router Bootup Process, POST, and Router Components)
To configure and troubleshoot a Cisco internetwork, you need to know the major components of Cisco routers and understand what each one does. Table 4-1 describes the major Cisco router components.
Table 4-1: Cisco Router Components
| Component | Description |
| Bootstrap | Stored in the microcode of the ROM, the bootstrap is used to bring a router up during initialization. It will boot the router and then load the IOS. |
| POST (Power-On Self-Test) | Stored in the microcode of the ROM, the POST is used to check the basic functionality of the router hardware and determine which interfaces are present. |
| ROM Monitor | Stored in the microcode of the ROM, the ROM monitor is used for manufacturing, testing, and troubleshooting. |
| Mini-IOS | Called the RXBOOT or bootloader by Cisco, the mini-IOS is a small IOS in ROM that can be used to bring up an interface and load a Cisco IOS into flash memory. The mini-IOS can also perform a few other maintenance operations. |
| RAM (Random Access Memory) | Used to hold packet buffers, ARP cache, routing tables, and the software and data structures that allow the router to function. Running-config is stored in RAM, and most routers expand the IOS from flash into RAM upon boot. |
| ROM (Read-Only Memory) | Used to start and maintain the router. Holds the POST and the bootstrap program, as well as the mini-IOS. |
| Flash Memory | Stores the Cisco IOS by default. Flash memory is not erased when the router is reloaded. It is EEPROM (Electronically Erasable Programmable Read-Only Memory) created by Intel. |
| NVRAM (Nonvolatile RAM) | Used to hold the router and switch configuration. NVRAM is not erased when the router or switch is reloaded. Does not store an IOS. The configuration register is stored in NVRAM. |
| Configuration Register | Used to control how the router boots up. This value can be found as the last line of the show version command output and by default is set to 0x2102, which tells the router to load the IOS from flash memory as well as to load the configuration from NVRAM. |
The Router Boot Sequence
When a router boots up, it performs a series of steps, called the boot sequence, to test the hardware and load the necessary software. The boot sequence consists of the following steps:
1. The router performs a POST. The POST tests the hardware to verify that all components of the device are present and operational. For example, the POST checks for the different interfaces on the router. The POST is stored in and runs from ROM (Read-Only Memory).
2. The bootstrap then looks for and loads the Cisco IOS software. The bootstrap is a program in ROM that is used to execute programs. The bootstrap program is responsible for finding where each IOS program is located and then loading the file. By default, the IOS software is loaded from flash memory in all Cisco routers.

The default order of an IOS loading from a router is flash, TFTP server, and then ROM.
3. The IOS software looks for a valid configuration file stored in NVRAM. This file is called startup-config and is present in NVRAM only if an administrator copies the running-config file into NVRAM. (Cisco’s new Integrated Services Router (ISR) has a small startup-config file preloaded.)
4. If a startup-config file is in NVRAM, the router will copy this file and place it in RAM and then call the file running-config. The router will use this file to run the router. The router should then be operational. If a startup-config file is not present in NVRAM, the router will attempt to locate a TFTP server that may contain this file. It will do so by broadcasting out any interface that detects carrier detect (CD), and if that fails, it will start the setup mode configuration process.
Exam Essentials
Remember the default configuration register setting. The default configuration register setting is 0x2102, which means “load the IOS from flash and the configuration from NVRAM.”
Remember where the IOS is stored by default. The IOS is stored and loaded from flash memory by default on all Cisco routers.
Define and identify the location of all router components. Identify all components listed in Table 4-1 and their locations.
Select the Appropriate Media, Cables, Ports, and Connectors to Connect Routers to Other Network Devices and Hosts
See the section titled “Select the Appropriate Media, Cables, Ports, and Connectors to Connect Switches to Other Network Devices and Hosts” in Chapter 2, “Configure, Verify, and Troubleshoot a Switch with VLANs and Interswitch Communications,” for coverage of LAN media, cables, and connections.
Router WAN Connections
As you can imagine, there are a few things you will need to know before you connect your WAN in order to make sure everything goes well. For starters, you have to understand the kind of WAN Physical layer implementation that Cisco provides and be familiar with the various types of WAN serial connectors.
The good news is that Cisco serial connections support almost any type of WAN service. The typical WAN connection is a dedicated leased line using HDLC, PPP, and Frame Relay with speeds that can kick it up to 45Mbps (T3).
HDLC, PPP, and Frame Relay can use the same Physical layer specifications. I’ll go over the various types of connections and then tell you all about the WAN protocols specified in the CCNA objectives.
Serial Transmission
WAN serial connectors use serial transmission, which takes place 1 bit at a time over a single channel.
Parallel transmission can pass at least 8 bits at a time, but all WANs use serial transmission.
Cisco routers use a proprietary 60-pin serial connector that you have to get from Cisco or a provider of Cisco equipment. Cisco also has a new, smaller proprietary serial connection that’s about 1⁄10 the size of the 60-pin basic serial cable, called the smart-serial. You must make sure that you have the right type of interface in your router before using this cable connector.
The type of connector you have on the other end of the cable depends on your service provider and their particular end-device requirements. Among the types of connectors in use are
- EIA/TIA-232
- EIA/TIA-449
- V.35 (used to connect to a CSU/DSU)
- EIA-530
Make sure that you’re clear on these things. Serial links are described in frequency or cycles per second (hertz). The amount of data that can be carried within these frequencies is called bandwidth. Bandwidth is the amount of data in bits per second that the serial channel can carry.
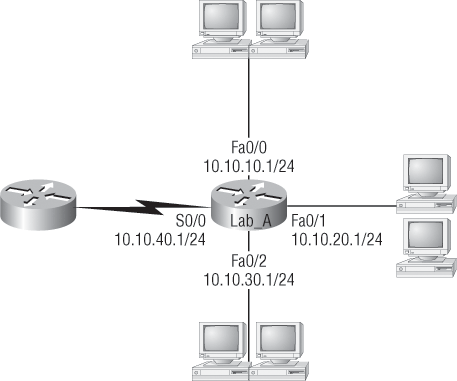
Data Terminal Equipment and Data Communication Equipment
By default, router interfaces are data terminal equipment (DTE), and they connect into data communication equipment (DCE) like a channel service unit/data service unit (CSU/DSU). The CSU/DSU then plugs into a demarcation location (demarc) and is the service provider’s last responsibility. Most of the time, the demarc is a jack that has an RJ-45 (8-pin modular) female connector located in a telecommunications closet.
Figure 4-2 shows a typical DTE-DCE-DTE connection and the devices used in the network.
Figure 4-2: A DTE-DCE-DTE WAN connection
The idea behind a WAN is to be able to connect two DTE networks through a DCE network. The DCE network includes the CSU/DSU, through the provider’s wiring and switches, all the way to the CSU/DSU at the other end. The network’s DCE device (CSU/DSU) provides clocking to the DTE-connected interface (the router’s serial interface).
As mentioned, the DCE network provides clocking to the router—this is the CSU/DSU. If you have a nonproduction network and you’re using a WAN crossover type of cable and do not have a CSU/DSU, then you need to provide clocking on the DCE end of the cable by using the clock rate command.
Terms such as EIA/TIA-232, V.35, X.21, and HSSI (High-Speed Serial Interface) describe the Physical layer between the DTE (router) and DCE device (CSU/DSU).
Exam Essentials
Understand the difference between DTE and DCE connections. Data terminal equipment (DTE) is considered your router connected to a WAN and is the customer’s responsibility. DTE devices connect into data communication equipment (DCE), typically considered the CSU/DSU, which then connects into the providers network.
Configure, Verify, and Troubleshoot RIPv2
RIP version 2 is almost the same as RIP version 1, but there are some important differences that make RIPv2 more scalable than RIPv1. Both RIPv1 and RIPv2 are distance-vector protocols, which means that each router running RIP sends its complete routing tables out on all active interfaces at periodic time intervals. Also, the timers and loop-avoidance schemes are the same in both RIP versions (i.e., holddown timers and split horizon rule). Both RIPv1 and RIPv2 are configured as classful addressing protocols, and both have the same administrative distance (120). Table 4-2 lists the differences between RIPv1 and RIPv2.
Table 4-2: RIPv1 Compared to RIPv2
| RIPv1 | RIPv2 |
| Distance vector | Distance vector |
| Maximum hop count of 15 | Maximum hop count of 15 |
| Classful | Classless |
| Broadcast based | Uses multicast 224.0.0.9 |
| No support for VLSM | Supports VLSM networks |
| No authentication | Allows for MD5 authentication |
| No support for discontiguous networks | Supports discontiguous networks |
RIPv2, unlike RIPv1, is a classless routing protocol (even though it is configured as classful, like RIPv1), which means that it sends subnet mask information along with the route updates. By sending the subnet mask information with the updates, RIPv2 can support variable length subnet masks (VLSMs) as well as the summarization of network boundaries. In addition, RIPv2 can support discontiguous networking.
Configuring RIPv2 is pretty straightforward. Here’s an example:
Lab_C(config)#router rip
Lab_C(config-router)#network 192.168.40.0
Lab_C(config-router)#network 192.168.50.0
Lab_C(config-router)#version 2
Now all you have to do is add the command version 2 under the (config-router)# prompt, and you are running RIPv2.
RIPv2 is classless and works in VLSM and discontiguous networks.
Let’s look at our routing table after enabling RIPv2.
     10.0.0.0/24 is subnetted, 12 subnets
C       10.1.11.0 is directly connected, FastEthernet0/1
C       10.1.10.0 is directly connected, FastEthernet0/0
R       10.1.9.0 [120/2] via 10.1.5.1, 00:00:23, Serial0/0/1
R       10.1.8.0 [120/2] via 10.1.5.1, 00:00:23, Serial0/0/1
R       10.1.12.0 [120/1] via 10.1.11.2, 00:00:18, FastEthernet0/1
R       10.1.3.0 [120/1] via 10.1.5.1, 00:00:23, Serial0/0/1
RIP has found four new routes in the routing table. I’m going to turn on debugging and see if that shows us anything new.
*Mar 17 19:34:00.123: RIP: sending v2 update to 224.0.0.9 via
   Serial0/0/1 (10.1.5.2)
*Mar 17 19:34:00.123: RIP: build update entries
*Mar 17 19:34:00.123:   10.1.10.0/24 via 0.0.0.0, metric 1, tag 0
*Mar 17 19:34:00.123:   10.1.11.0/24 via 0.0.0.0, metric 1, tag 0
*Mar 17 19:34:00.123:   10.1.12.0/24 via 0.0.0.0, metric 2, tag 0col
*Mar 17 19:34:03.795: RIP: received v2 update from 10.1.5.1 on
   Serial0/0/1
[output cut]
This shows that the networks are being advertised every 30 seconds, and they’re sending the advertisements as v2 and as a multicast address of 224.0.0.9. Let’s take a look at the show ip protocols output:
Router#sh ip protocols
Routing Protocol is "rip"
  Outgoing update filter list for all interfaces is not set
  Incoming update filter list for all interfaces is not set
  Sending updates every 30 seconds, next due in 27 seconds
  Invalid after 180 seconds, hold down 180, flushed after 240
  Redistributing: rip
  Default version control: send version 2, receive version 2
    Interface             Send  Recv  Triggered RIP  Key-chain
    FastEthernet0/1       2     2
    Serial0/0/1           2     2
  Automatic network summarization is not in effect
  Maximum path: 4
  Routing for Networks:
    10.0.0.0
  Passive Interface(s):
    FastEthernet0/0
    Serial0/0/0
  Routing Information Sources:
    Gateway         Distance      Last Update
    10.1.11.2            120      00:00:00
    10.1.5.1             120      00:00:02
  Distance: (default is 120)
The router is now sending and receiving RIPv2.
Exam Essentials
Remember the multicast address of RIPv2. RIPv2 does not use broadcasts like RIPv1; instead, it uses a multicast address of 224.0.0.9 to communicate with other routers running RIPv2.
Understand how to configure RIPv2. RIPv2 has a very simple configuration. You just add the command version 2 under the RIP configuration.
Compare and contrast RIPv1 and RIPv2. Identify the important differences that make RIPv2 more scalable than RIPv1 as listed in Table 4-2.
Access and Utilize the Router to Set Basic Parameters (Including CLI/SDM)
If you boot a router, the interface status messages appear, and if you press Enter, the Router> prompt will appear. This is called user exec mode (user mode), and it’s mostly used to view statistics, but it’s also a stepping stone to logging in to privileged mode.
You can only view and change the configuration of a Cisco router in privileged exec mode (privileged mode), which you can enter with the enable command as follows:
Router>enable
Router#
You now end up with a Router# prompt, which indicates that you’re in privileged mode, where you can view the router’s configuration. Privileged mode is also used to access global configuration mode, where changes can be made to the configuration. You can go back from privileged mode into user mode by using the disable command as follows:
Router#disable
Router>
At this point, you can type logout from either mode to exit the console:
Router>logout
Router con0 is now available
Press RETURN to get started.
In the following sections, I am going to show you how to perform some basic administrative configurations.
Overview of Router Modes
To configure from a CLI, you can make global changes to the router by typing configure terminal (or config t for short), which puts you in global configuration mode and changes what’s known as the running-config. A global command (a command run from global config) is set only once and affects the entire router.
You can type config from the privileged-mode prompt and then just press Enter to take the default of terminal, as shown here:
router#config
Configuring from terminal, memory, or network [terminal]? [press enter]
Enter configuration commands, one per line. End with CNTL/Z.
router(config)#
At this point, you make changes that affect the router as a whole (globally)—hence the term global configuration mode. To change the running-config—the current configuration running in dynamic RAM (DRAM)—you use the configure terminal command, as I just demonstrated.
To change the startup-config—the configuration stored in NVRAM—you use the configure memory command (or config mem for short), which merges the startup-config file into the running-config file in RAM. If you want to change a router configuration stored on a TFTP host, you use the configure network command (or config net for short), which also merges the file with the running-config file in RAM.
The configure terminal, configure memory, and configure network are all used to configure information into RAM on a router, although typically only the configure terminal command is used. However, it is possible that the commands config mem and config net can be useful if you want to to reapply your startup-config file and don’t want to reboot your router.
Here are some of the other options under the configure command:
router(config)#exit or press cntl-z
router#config ?
  confirm            Confirm replacement of running-config with a new config file
  memory             Configure from NV memory
  network            Configure from a TFTP network host
  overwrite-network  Overwrite NV memory from TFTP network host
  replace            Replace the running-config with a new config file
  terminal           Configure from the terminal
  <cr>
As you can see, Cisco has added a few more commands in the 12.4 IOS.
Defining Router Terms
Table 4-3 defines some of the terms used so far.
Table 4-3: Router Terms
| Mode | Definition |
| User EXEC mode | Limited to basic monitoring commands |
| Privileged EXEC mode | Provides access to all other router commands |
| Global configuration mode | Commands that affect the entire system |
| Specific configuration mode | Commands that affect interfaces/processes only |
| Setup mode | Interactive configuration dialog |
Gathering Basic Routing Information
The show version command will provide basic configuration for the system hardware as well as the software version and the boot images. Here’s an example:
router#show version
Cisco IOS Software, 2800 Software (C2800NM-ADVSECURITYK9-M), Version
   12.4(12), RELEASE SOFTWARE (fc1)
Technical Support: http://www.cisco.com/techsupport
Copyright (c) 1986-2006 by Cisco Systems, Inc.
Compiled Fri 17-Nov-06 12:02 by prod_rel_team
The preceding section of output describes the Cisco IOS running on the router. The following section describes the read-only memory (ROM) that’s used to boot the router and holds the POST:
ROM: System Bootstrap, Version 12.4(13r)T, RELEASE SOFTWARE (fc1)
The next section shows how long the router has been running, how it was restarted, where the Cisco IOS was loaded from, and the IOS name (if you see a system restarted by bus error, that is a very bad thing). Flash is the default.
router uptime is 2 hours, 30 minutes
System returned to ROM by power-on
System restarted at 09:04:07 UTC Sat Aug 25 2007
System image file is "flash:c2800nm-advsecurityk9-mz.124-12.bin"
The next section displays the processor, the amount of DRAM and flash memory, and the interfaces the POST found on the router:
[some output cut]
Cisco 2811 (revision 53.50) with 249856K/12288K bytes of memory.
Processor board ID FTX1049A1AB
2 FastEthernet interfaces
4 Serial(sync/async) interfaces
1 Virtual Private Network (VPN) Module
DRAM configuration is 64 bits wide with parity enabled.
239K bytes of non-volatile configuration memory.
62720K bytes of ATA CompactFlash (Read/Write)
Configuration register is 0x2102
The configuration register value is listed last.
Router and Switch Administrative Configurations
In this section, I’m going to lead you through configuring commands that will help you administrate your network.
The administrative functions that you can configure on a router and switch are the following:
- Hostnames
- Banners
- Passwords
- Interface descriptions
None of these will make your routers or switches work better or faster. However, if you take the time to set these configurations on each of your network devices, troubleshooting and maintaining your network will be much easier.
Hostnames
You can set the identity of the router with the hostname command. This is only locally significant, which means that it has no bearing on how the router performs name lookups or how the router works on the internetwork. I’ll cover an additional function of the hostname command when I discuss PPP in Chapter 8, “Implement and Verify WAN Links.”
Here’s an example:
router#config t
Enter configuration commands, one per line. End with
  CNTL/Z.
router(config)#hostname Todd
Todd(config)#
Even though it’s pretty tempting to configure the hostname after your own name, it’s definitely a better idea to name the router something pertinent to the location. This is because giving it a hostname that’s somehow relevant to where the device actually lives will make finding it a whole lot easier.
Banners
You can use a banner to display a security notice to anyone who attempts to Telnet or dial into your internetwork. You can create a banner to give anyone who shows up on the router exactly the information you want them to have.
There are four available banner types: exec process creation banner, incoming terminal line banner, login banner, and message of the day (MOTD) banner. All four of these banner types are illustrated in the following code:
Todd(config)#banner ?
  LINE            c banner-text c, where 'c' is a delimiting character
  exec            Set EXEC process creation banner
  incoming        Set incoming terminal line banner
  login           Set login banner
  motd            Set Message of the Day banner
  prompt-timeout  Set Message for login authentication timeout
  slip-ppp        Set Message for SLIP/PPP
MOTD is the most extensively used banner. It provides a message to every person dialing into or connecting to the router via Telnet or auxiliary port, or even through a console port. Its configuration is as follows:
Todd(config)#banner motd ?
LINE c banner-text c, where 'c' is a delimiting character
Todd(config)#banner motd #
Enter TEXT message. End with the character '#'.
$ Acme.com network, then you must disconnect immediately.
#
Todd(config)#^Z
Todd#
00:25:12: %SYS-5-CONFIG_I: Configured from console by
  console
Todd#exit
Router con0 is now available
Press RETURN to get started.
If you are not authorized to be in Acme.com network, then you must disconnect immediately.
Todd#
The preceding MOTD banner essentially tells everyone connecting to the router that if they’re not on the guest list, they need to leave! The delimiting character is used to tell the router when the message is done. You can use any character you want for it, but you can’t use the delimiting character in the message itself. The best way to use a delimiting character is to write your message, press Enter, type the delimiting character, and then press Enter again. It will still work if you don’t press the second Enter, but if you have more than one banner, they’ll be combined as one message on a single line.
Setting Passwords
Five passwords are used to secure your Cisco routers: console, auxiliary, Telnet (VTY), enable, and enable secret. Enable secret and enable passwords are used to set the password that’s used to secure privileged mode. This will prompt a user for a password when the enable command is used. The other three are used to configure a password when user mode is accessed through the console port, through the auxiliary port, or via Telnet.
Let’s take a closer look at each of these now.
Enable Passwords
You set the enable passwords from global configuration mode like this:
Todd(config)#enable ?
 last-resort Define enable action if no TACACS servers
             respond
 password    Assign the privileged level password
 secret      Assign the privileged level secret
 use-tacacs  Use TACACS to check enable passwords
Here’s an example of setting the enable passwords:
Todd(config)#enable secret todd
Todd(config)#enable password todd
The enable password you have chosen is the same as your
  enable secret. This is not recommended. Re-enter the
  enable password.
If you try to set the enable secret and enable password using the same word, the router will give you a nice, polite warning to change the second password. If you don’t have older legacy routers, don’t even bother to use the enable password.
User-mode passwords are assigned by using the line command as follows:
Todd(config)#line ?
  <0-337>  First Line number
  aux      Auxiliary line
  console  Primary terminal line
  tty      Terminal controller
  vty      Virtual terminal
  x/y      Slot/Port for Modems
  x/y/z    Slot/Subslot/Port for Modems
Here are the lines to be concerned with:
aux Sets the user-mode password for the auxiliary port. It’s usually used for attaching a modem to the router, but it can be used as a console as well.
console Sets a console user-mode password.
vty Sets a Telnet password on the router. If this password isn’t set, then Telnet can’t be used by default.
To configure the user-mode passwords, you configure the line you want and use either the login or no login command to tell the router to prompt for authentication. The next section provides a complete example of each line configuration.
Auxiliary Password
To configure the auxiliary password, go into global configuration mode and type line aux ?. You can see that the only choice is 0–0 (that’s because there’s only one port):
Todd#config t
Enter configuration commands, one per line. End with CNTL/Z.
Todd(config)#line aux ?
  <0-0>  First Line number
Todd(config)#line aux 0
Todd(config-line)#login
% Login disabled on line 1, until 'password' is set
Todd(config-line)#password aux
Todd(config-line)#login
It’s important to remember to use the login command, or the auxiliary port won’t prompt for authentication.
If you set the login command under a line and then don’t set a password, the line won’t be usable. It will prompt for a password that doesn’t exist. This is why Cisco won’t let you set the login command before a password is set on a line. So, this is a good feature, not a hassle!
Although Cisco has this new “password feature” on its routers, starting with its newer IOS (12.2 and above), it’s not in all its IOSs.
Console Password
To set the console password, use the line console 0 command at the (config) prompt. You could type line console 0 at the (config-line) prompt instead, but the help screens won’t function from that prompt—type exit to get back one level, and you’ll find that your help screens will work.
Here’s the example:
Todd(config-line)#line console ?
% Unrecognized command
Todd(config-line)#exit
Todd(config)#line console ?
  <0-0>  First Line number
Todd(config-line)#password console
Todd(config-line)#login
Because there’s only one console port in this example, you can choose only line console 0. You can set all your line passwords to the same password, but for security reasons, I’d recommend that you make them different.
Telnet Password
To set the user-mode password for Telnet access into the router, use the line vty command. Routers that aren’t running the Enterprise edition of the Cisco IOS default to five VTY lines, 0 through 4. If you’re using the Enterprise edition, you’ll have significantly more lines. The best way to find out how many lines you have is to use the question mark, as shown here:
Todd(config-line)#line vty 0 ?
% Unrecognized command
Todd(config-line)#exit
Todd(config)#line vty 0 ?
  <1-1180>  Last Line number
  <cr>
Todd(config)#line vty 0 1180
Todd(config-line)#password telnet
Todd(config-line)#login
Remember: You cannot get help from your (config-line)# prompt. You must go back to privilege mode in order to use the question mark (?).
You may or may not have to set the password command before the login command on the VTY lines; It depends on the IOS version. The result is the same either way.
If you try to Telnet into a router that doesn’t have a VTY password set, you’ll receive an error stating that the connection is refused because the password isn’t set. So, if you Telnet into a router and receive the message
Todd#telnet SFRouter
Trying SFRouter (10.0.0.1)…Open
Password required, but none set
[Connection to SFRouter closed by foreign host]
Todd#
then the remote router (SFRouter in this example) does not have the VTY (Telnet) password set.
After your routers are configured with an IP address, you can use the Telnet program to configure and check your routers instead of having to use a console cable. You can use the Telnet program by typing telnet from any command prompt.
Setting Up Secure Shell (SSH)
Instead of Telnet, you can use Secure Shell (SSH), which creates a more secure session than the Telnet application, which uses an unencrypted data stream. SSH uses encrypted keys to send data so that your username and password are not sent in the clear.
Here are the steps to setting up SSH:
1. Set your hostname:
Router(config)#hostname Todd
2. Set the domain name (both the hostname and domain name are required for the encryption keys to be generated):
Todd(config)#ip domain-name Lammle.com
3. Set the username to allow SSH client access:
Todd(config)#username Todd password Lammle
4. Generate the encryption keys for securing the session:
Todd(config)#crypto key generate rsa general-keys modulus ?
  <360-2048>  size of the key modulus [360-2048]
Todd(config)#crypto key generate rsa general-keys modulus 1024
The name for the keys will be: Todd.Lammle.com
% The key modulus size is 1024 bits
% Generating 1024 bit RSA keys, keys will be non-exportable...[OK]
*June 24 19:25:30.035: %SSH-5-ENABLED: SSH 1.99 has been enabled
5. Enable SSH version 2 on the router (although this isn’t mandatory, it is highly suggested):
Todd(config)#ssh version 2
6. Connect to the VTY lines of the router:
Todd(config)#line vty 0 1180
7. Configure SSH and then Telnet as access protocols:
Todd(config-line)#transport input ssh telnet
If you do not use the keyword telnet at the end of the command string, then only SSH will work on the router. I am not recommending one method over the other, but just understand that SSH is more secure than Telnet.
Descriptions
Setting descriptions on an interface is helpful to the administrator and, like the hostname, only locally significant. The description command is a helpful one because you can, for instance, use it to keep track of circuit numbers.
Here’s an example:
Todd#config t
Todd(config)#int s0/0/0
Todd(config-if)#description Wan to SF circuit number 6fdda12345678
Todd(config-if)#int fa0/0
Todd(config-if)#description Sales VLAN
Todd(config-if)#^Z
Todd#
You can view the description of an interface with either the show running-config command or the show interface command:
Todd#sh run
[output cut]
!
interface FastEthernet0/0
 description Sales VLAN
 ip address 10.10.10.1 255.255.255.248
 duplex auto
 speed auto
!
interface Serial0/0/0
 description Wan to SF circuit number 6fdda 12345678
 no ip address
 shutdown
!
[output cut]
Todd#sh int f0/0
FastEthernet0/0 is up, line protocol is down
  Hardware is MV96340 Ethernet, address is 001a.2f55.c9e8 (bia 001a.2f55.c9e8)
  Description: Sales VLAN
 [output cut]
Todd#sh int s0/0/0
Serial0/0/0 is administratively down, line protocol is down
  Hardware is GT96K Serial
  Description: Wan to SF circuit number 6fdda12345678
SDM objectives are covered solely on the CD of the CCNA Cisco Certified Network Associate Study Guide, 7th Edition (Sybex, 2011).
Exam Essentials
Remember how to configure your administrative functions. Administrative functions are your hostname, banners, passwords, and interface descriptions.
Remember what is required to configure SSH on your router. You must configure both your hostname and domain name on the router in order for SSH to be enabled.
Define the available router modes and identify them by their prompts. Understand the difference in functionality of user mode, privileged mode, and configuration mode. Identify each by its prompt.
Connect, Configure, and Verify the Operational Status of a Device Interface
Interface configuration is one of the most important router configurations. Without interfaces, a router is pretty much a completely useless object—plus, interface configurations must be totally precise to enable communication with other devices. Network layer addresses, media type, bandwidth, and other administrator commands are all used to configure an interface.
Based on the router model, you use different syntax to access interface configuration mode. To determine the proper syntax for identifying interfaces on your router, use the question mark to find your interface numbers as follows:
Router(config)#int serial ?
 <0-9> Serial interface number
Now it’s time to choose the interface you want to configure. Once you do that, you will be in the interface configuration for that specific interface. For example, you would use the following command to choose serial port 5:
Router(config)#int serial 5
Router(config)-if)#
The router in this example has one Ethernet 10BaseT port, so you can type interface ethernet 0 to configure that interface as follows:
Router(config)#int ethernet ?
 <0-0> Ethernet interface number
Router(config)#int ethernet 0
Router(config-if)#
As I showed you previously, the 2500 router is a fixed configuration router. This means that when you buy that model, you’re stuck with that physical configuration (which is a huge reason why I don’t use them much, and I certainly would never use them in a production setting anymore).
In the interface configuration examples so far, I have used the interface type number syntax, but the 2600 and 2800 series routers (actually, any ISR router for that matter) use a physical slot in the router, with a port number on the module plugged into that slot. So on a modular router, the configuration would be interface type slot/port, as shown here:
Router(config)#int fastethernet ?
 <0-1> FastEthernet interface number
Router(config)#int fastethernet 0
% Incomplete command.
Router(config)#int fastethernet 0?
/
Router(config)#int fastethernet 0/?
 <0-1> FastEthernet interface number
Note that you can’t just type int fastethernet 0. You must type the full command: type slot/port, or int fastethernet 0/0 (or int fa 0/0).
For the ISR series, it’s basically the same, only you get even more options. For example, the built-in Fast Ethernet interfaces work with the same syntax I just used in the last example with the 2600 series:
Todd(config)#int fastEthernet 0/?
  <0-1>  FastEthernet interface number
Todd(config)#int fastEthernet 0/0
Todd(config-if)#
The rest of the modules are different. They use three numbers instead of two. The first 0 is the router itself, and then you choose the slot, and then the port. Here’s an example of a serial interface on my 2811:
Todd(config)#interface serial ?
  <0-2>  Serial interface number
Todd(config)#interface serial 0/0/?
  <0-1>  Serial interface number
Todd(config)#interface serial 0/0/0
Todd(config-if)#
This can look a little dicey, but I promise it’s really not that hard. It helps to remember that you should always view a running-config output first so that you know the interfaces with which you have to deal. Here’s my 2801 output:
Todd(config-if)#do show run
Building configuration...
[output cut]
!
interface FastEthernet0/0
 no ip address
 shutdown
 duplex auto
 speed auto
!
interface FastEthernet0/1
 no ip address
 shutdown
 duplex auto
 speed auto
!
interface Serial0/0/0
 no ip address
 shutdown
 no fair-queue
!
interface Serial0/0/1
 no ip address
 shutdown
!
interface Serial0/1/0
 no ip address
 shutdown
!
interface Serial0/2/0
 no ip address
 shutdown
 clock rate 2000000
!
 [output cut]
For the sake of brevity, I didn’t include my complete running-config, but I displayed all you need. You can see the two built-in Fast Ethernet interfaces, the two serial interfaces in slot 0 (0/0/0 and 0/0/1), the serial interface in slot 1 (0/1/0), and the serial interface in slot 2 (0/2/0). Once you see the interfaces like this, it’s a lot easier to understand how the modules are inserted into the router.
Just understand that if you type interface e0 on a 2500, interface fastethernet 0/0 on a 2600, or interface serial 0/1/0 on a 2800, all you’re doing is choosing an interface to configure—and basically, they’re all configured the same way after that.
I’m going to continue with the router interface discussion in the next sections. I’ll include how to bring up the interface and set an IP address on a router interface.
Bringing Up an Interface
You can disable an interface with the interface command shutdown and enable it with the no shutdown command.
If an interface is shut down, it will display administratively down when you use the show interfaces command (sh int for short) as shown here:
Todd#sh int f0/1
FastEthernet0/1 is administratively down, line protocol is down
[output cut]
Another way to check an interface’s status is via the show running-config command. All interfaces are shut down by default. You can bring up the interface with the no shutdown command (no shut for short) as shown here:
Todd#config t
Todd(config)#int f0/1
Todd(config-if)#no shutdown
Todd(config-if)#
*Feb 28 22:45:08.455: %LINK-3-UPDOWN: Interface FastEthernet0/1,
     changed state to up
Todd(config-if)#do show int f0/1
FastEthernet0/1 is up, line protocol is up
[output cut]
Configuring an IP Address on an Interface
Although it’s not a requirement, IP is the most common LAN protocol used on a router and the most common type of interface addressing you will perform. To configure IP addresses on an interface, use the ip address command from interface configuration mode as follows:
Todd(config)#int f0/1
Todd(config-if)#ip address 172.16.10.2 255.255.255.0
Don’t forget to enable the interface with the no shutdown command. Remember to look at the command show interface int to see if it’s administratively shut down or not. The show running-config command will also give you this information.
The ip address address mask command starts the IP processing on the interface.
Serial Interface Commands
Before you configure a serial interface, you’ll need some key information. The interface will usually be attached to a CSU/DSU type of device that provides clocking for the line to the router, as shown in Figure 4-3.
Figure 4-3: A typical WAN connection

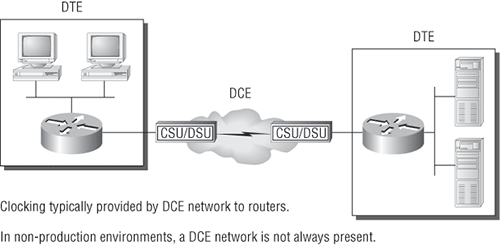
Here you can see that the serial interface is used to connect to a DCE network via a CSU/DSU that provides the clocking to the router interface. If you have a back-to-back configuration (for example, one that’s used in a lab environment as in Figure 4-4), one end—the data communication equipment (DCE) end of the cable—must provide clocking.
By default, Cisco routers are all data terminal equipment (DTE) devices, which means that you must configure an interface to provide clocking if you need it to act as a DCE device. Again, you would not provide clocking on a production T1 connection, for example, because you would have a CSU/DSU connected to your serial interface, as Figure 4-4 shows.
Figure 4-4: Providing clocking in a nonproduction network
You configure a DCE serial interface with the clock rate command, like this:
Todd#config t
Enter configuration commands, one per line. End with CNTL/Z.
Todd(config)#int s0/0/0
Todd(config-if)#clock rate 1000000
The clock rate command is set in bits per second. Besides looking at the cable end to check for a label of DCE or DTE, you can see if a router’s serial interface has a DCE cable connected with the show controllers int command as shown here:
Todd#sh controllers s0/0/0
Interface Serial0/0/0
Hardware is GT96K
DTE V.35idb at 0x4342FCB0, driver data structure at 0x434373D4
Here is an example of an output that shows a DCE connection:
Todd#sh controllers s0/2/0
Interface Serial0/2/0
Hardware is GT96K
DCE V.35, clock rate 1000000
The next command you need to get acquainted with is the bandwidth command. Every Cisco router ships with a default serial link bandwidth of T1 (1.544Mbps), but this has nothing to do with how data is transferred over a link. The bandwidth of a serial link is used by routing protocols such as EIGRP and OSPF to calculate the best cost (path) to a remote network. So, if you’re using RIP routing, the bandwidth setting of a serial link is irrelevant because RIP uses only hop count to determine that.
Here’s an example using the bandwidth command:
Todd#config t
Todd(config)#int s0/0/0
Todd(config-if)#bandwidth ?
  <1-10000000>  Bandwidth in kilobits
  inherit       Specify that bandwidth is inherited
  receive       Specify receive-side bandwidth
Todd(config-if)#bandwidth 1000
Note that, unlike the clock rate command, the bandwidth command is configured in kilobits.
Even though the new ISR router automatically detects the DCE connection and sets the clock rate to 2000000, you should still understand how to use the clock rate command.
Viewing, Saving, and Erasing Configurations
You can manually save the file from DRAM to NVRAM by using the copy running-config startup-config command (or the shortcut copy run start), as shown here:
Todd#copy running-config startup-config
Destination filename [startup-config]? [press enter]
Building configuration...
[OK]
Todd#
Building configuration...
When you see a question with an answer in [], it means that if you just press Enter, you’re choosing the default answer.
Also, when the command asked for the destination filename, the default answer was startup-config. It asks for one because you can copy the configuration pretty much anywhere you want to copy it. Take a look:
Todd#copy running-config ?
  archive:        Copy to archive: file system
  flash:          Copy to flash: file system
  ftp:            Copy to ftp: file system
  http:           Copy to http: file system
  https:          Copy to https: file system
  ips-sdf         Update (merge with) IPS signature configuration
  null:           Copy to null: file system
  nvram:          Copy to nvram: file system
  rcp:            Copy to rcp: file system
  running-config  Update (merge with) current system configuration
  scp:            Copy to scp: file system
  startup-config  Copy to startup configuration
  syslog:         Copy to syslog: file system
  system:         Copy to system: file system
  tftp:           Copy to tftp: file system
  xmodem:         Copy to xmodem: file system
  ymodem:         Copy to ymodem: file system
You can view the files by typing show running-config or show startup-config from privileged mode. The sh run command, which is a shortcut for show running-config, tells you that you are viewing the current configuration:
Todd#show running-config
Building configuration...
Current configuration : 3343 bytes
!
version 12.4
[output cut]
The sh start command—one of the shortcuts for the show startup-config command—indicates the configuration that will be used the next time the router is reloaded. It also indicates how much NVRAM is being used to store the startup-config file. Here’s an example:
Todd#show startup-config
Using 1978 out of 245752 bytes
!
version 12.4
[output cut]
Verifying Your Configuration
Once you take a look at the running-config, if all appears well, you can verify your configuration with utilities such as ping and Telnet. Ping is Packet Internet Groper, a program that uses ICMP echo requests and replies. Ping sends a packet to a remote host. If that host responds, you know that the host is alive—but you don’t know if it’s alive and also well. Just because you can ping a Microsoft server does not mean you can log in. Even so, ping is an awesome starting point for troubleshooting an internetwork.
You can also ping with different protocols. You can test this by typing ping ? at either the router user-mode or privileged-mode prompt, as shown here:
Router#ping ?
  WORD       Ping destination address or hostname
  appletalk  Appletalk echo
  clns       CLNS echo
  decnet     DECnet echo
  ip         IP echo
  ipv6       IPv6 echo
  ipx        Novell/IPX echo
  srb        srb echo
  tag        Tag encapsulated IP echo
  <cr>
If you want to find a neighbor’s Network layer address, you need to access the router or switch and type show cdp entry * protocol from that device to get the Network layer addresses you need for pinging.
Traceroute uses ICMP with IP time to live (TTL) time-outs to track the path a packet takes through an internetwork, in contrast to ping, which just finds the host and responds. Traceroute can also be used with multiple protocols.
Router#traceroute ?
  WORD       Trace route to destination address or hostname
  appletalk  AppleTalk Trace
  clns       ISO CLNS Trace
  ip         IP Trace
  ipv6       IPv6 Trace
  ipx        IPX Trace
  <cr>
Telnet, FTP, and HTTP use IP at the Network layer and TCP at the Transport layer to create a session with a remote host, and as such are really the best tools for verifying connectivity at the IP layer. If you can Telnet, ftp, or http into a device, your IP connectivity just has to be good.
Router#telnet ?
 WORD IP address or hostname of a remote system
 <cr>
From the router prompt, you just type a hostname or IP address, and it will assume you want to Telnet—you don’t need to type the actual telnet command.
In the following sections, I am going to show you how to verify the interface statistics.
Verifying with the show interface Command
Another way to verify your configuration is by typing show interface commands, the first of which is show interface ?. That will reveal all the available interfaces to configure.
The show interfaces command displays the configurable parameters and statistics of all interfaces on a router.
This command is very useful for verifying and troubleshooting router and network issues.
The following output is from my freshly erased and rebooted 2811 router:
Router#sh int ?
  Async              Async interface
  BVI                Bridge-Group Virtual Interface
  CDMA-Ix            CDMA Ix interface
  CTunnel            CTunnel interface
  Dialer             Dialer interface
  FastEthernet       FastEthernet IEEE 802.3
  Loopback           Loopback interface
  MFR                Multilink Frame Relay bundle interface
  Multilink          Multilink-group interface
  Null               Null interface
  Port-channel       Ethernet Channel of interfaces
  Serial             Serial
  Tunnel             Tunnel interface
  Vif                PGM Multicast Host interface
  Virtual-PPP        Virtual PPP interface
  Virtual-Template   Virtual Template interface
  Virtual-TokenRing  Virtual TokenRing
  accounting         Show interface accounting
  counters           Show interface counters
  crb                Show interface routing/bridging info
  dampening          Show interface dampening info
  description        Show interface description
  etherchannel       Show interface etherchannel information
  irb                Show interface routing/bridging info
  mac-accounting     Show interface MAC accounting info
  mpls-exp           Show interface MPLS experimental accounting info
  precedence         Show interface precedence accounting info
  pruning            Show interface trunk VTP pruning information
  rate-limit         Show interface rate-limit info
  stats              Show interface packets & octets, in & out, by switching
                     path
  status             Show interface line status
  summary            Show interface summary
  switching          Show interface switching
  switchport         Show interface switchport information
  trunk              Show interface trunk information
  |                  Output modifiers
  <cr>
The only “real” physical interfaces are Fast Ethernet, Serial, and Async; the rest are all logical interfaces or commands with which to verify.
The next command is show interface fastethernet 0/0. It reveals the hardware address, logical address, and encapsulation method, as well as statistics on collisions, as shown here:
Router#sh int f0/0
FastEthernet0/0 is up, line protocol is up
  Hardware is MV96340 Ethernet, address is 001a.2f55.c9e8 (bia 001a.2f55.c9e8)
  Internet address is 192.168.1.33/27
MTU 1500 bytes, BW 100000 Kbit, DLY 100 usec,
     reliability 255/255, txload 1/255, rxload 1/255
  Encapsulation ARPA, loopback not set
  Keepalive set (10 sec)
  Auto-duplex, Auto Speed, 100BaseTX/FX
  ARP type: ARPA, ARP Timeout 04:00:00
  Last input never, output 00:02:07, output hang never
  Last clearing of "show interface" counters never
  Input queue: 0/75/0/0 (size/max/drops/flushes); Total output drops: 0
  Queueing strategy: fifo
  Output queue: 0/40 (size/max)
  5 minute input rate 0 bits/sec, 0 packets/sec
  5 minute output rate 0 bits/sec, 0 packets/sec
     0 packets input, 0 bytes
     Received 0 broadcasts, 0 runts, 0 giants, 0 throttles
     0 input errors, 0 CRC, 0 frame, 0 overrun, 0 ignored
     0 watchdog
     0 input packets with dribble condition detected
     16 packets output, 960 bytes, 0 underruns
     0 output errors, 0 collisions, 0 interface resets
     0 babbles, 0 late collision, 0 deferred
     0 lost carrier, 0 no carrier
     0 output buffer failures, 0 output buffers swapped out
Router#
The preceding interface is working and looks to be in good shape. The show interfaces command will show you if you are receiving errors on the interface. It will also show you the maximum transmission units (MTUs), bandwidth (BW), reliability (255/255 means perfect), and load (1/255 means no load).
You can see the bandwidth is 100,000Kbit, which is 100,000,000 (Kbit means to add three zeros), which is 100Mbits per second, or FastEthernet. Gigabit would be 1,000,000Kbits per second.
The most important statistic of the show interface command is the output of the line and data-link protocol status. If the output reveals that FastEthernet 0/0 is up and the line protocol is up, then the interface is up and running:
Router#sh int fa0/0
FastEthernet0/0 is up, line protocol is up
The first parameter refers to the Physical layer, and it’s up when it receives carrier detect. The second parameter refers to the Data Link layer, and it looks for keepalives from the connecting end. (Keepalives are used between devices to make sure that connectivity has not dropped.)
Here’s an example of where the problem usually is found—on serial interfaces:
Router#sh int s0/0/0
Serial0/0 is up, line protocol is down
If you see that the line is up but the protocol is down, as shown in the preceding example, you’re experiencing a clocking (keepalive) or framing problem—which is possibly an encapsulation mismatch. Check the keepalives on both ends to make sure that they match, that the clock rate is set, if needed, and that the encapsulation type is the same on both ends. Therefore, the output in the preceding example would be considered a Data Link layer problem.
If you discover that both the line interface and the protocol are down, it’s a cable or interface problem. The following output would be considered a Physical layer problem:
Router#sh int s0/0/0
Serial0/0 is down, line protocol is down
If one end is administratively shut down (as shown in the following example), the remote end would present as down:
Router#sh int s0/0/0
Serial0/0 is administratively down, line protocol is down
To enable the interface, use the command no shutdown from interface configuration mode.
The next show interface serial 0/0/0 command demonstrates the serial line and the maximum transmission unit (MTU)—1,500 bytes by default. It also shows the default bandwidth (BW) on all Cisco serial links: 1.544Kbps. This is used to determine the bandwidth of the line for routing protocols such as EIGRP and OSPF. Another important configuration to notice is the keepalive, which is 10 seconds by default. Each router sends a keepalive message to its neighbor every 10 seconds, and if both routers aren’t configured for the same keepalive time, it won’t work.
Router#sh int s0/0/0
Serial0/0 is up, line protocol is up
 Hardware is HD64570
 MTU 1500 bytes, BW 1544 Kbit, DLY 20000 usec,
   reliability 255/255, txload 1/255, rxload 1/255
 Encapsulation HDLC, loopback not set, keepalive set
  (10 sec)
 Last input never, output never, output hang never
 Last clearing of "show interface" counters never
 Queueing strategy: fifo
 Output queue 0/40, 0 drops; input queue 0/75, 0 drops
 5 minute input rate 0 bits/sec, 0 packets/sec
 5 minute output rate 0 bits/sec, 0 packets/sec
   0 packets input, 0 bytes, 0 no buffer
   Received 0 broadcasts, 0 runts, 0 giants, 0 throttles
   0 input errors, 0 CRC, 0 frame, 0 overrun, 0 ignored,
   0 abort
   0 packets output, 0 bytes, 0 underruns
   0 output errors, 0 collisions, 16 interface resets
   0 output buffer failures, 0 output buffers swapped out
   0 carrier transitions
   DCD=down DSR=down DTR=down RTS=down CTS=down
You can clear the counters on the interface by typing the command clear counters, as shown here:
Router#clear counters ?
  Async              Async interface
  BVI                Bridge-Group Virtual Interface
  CTunnel            CTunnel interface
  Dialer             Dialer interface
  FastEthernet       FastEthernet IEEE 802.3
  Group-Async        Async Group interface
  Line               Terminal line
  Loopback           Loopback interface
  MFR                Multilink Frame Relay bundle interface
  Multilink          Multilink-group interface
  Null               Null interface
  Serial             Serial
  Tunnel             Tunnel interface
  Vif                PGM Multicast Host interface
  Virtual-Template   Virtual Template interface
  Virtual-TokenRing  Virtual TokenRing
  <cr>
Router#clear counters s0/0/0
Clear "show interface" counters on this interface
  [confirm][Enter]
Router#
00:17:35: %CLEAR-5-COUNTERS: Clear counter on interface
  Serial0/0/0 by console
Router#
Verifying with the show ip interface Command
The show ip interface command will provide you with information regarding the layer 3 configurations of a router’s interfaces, as in the following example:
Router#sh ip interface
FastEthernet0/0 is up, line protocol is up
  Internet address is 1.1.1.1/24
  Broadcast address is 255.255.255.255
  Address determined by setup command
  MTU is 1500 bytes
  Helper address is not set
  Directed broadcast forwarding is disabled
  Outgoing access list is not set
  Inbound  access list is not set
  Proxy ARP is enabled
  Security level is default
  Split horizon is enabled
[output cut]
This output includes the status of the interface, the IP address and mask, information on whether an access list is set on the interface, and basic IP information.
Using the show ip interface brief Command
The show ip interface brief command is probably one of the most helpful commands that you can ever use on a Cisco router. This command provides a quick overview of the router’s interfaces, including the logical address and status:
Router#sh ip int brief
Interface IP-Address      OK? Method Status  Protocol
FastEthernet0/0    unassigned      YES unset  up up
FastEthernet0/1    unassigned      YES unset  up up
Serial0/0/0        unassigned      YES unset  up down
Serial0/0/1        unassigned      YES unset  administratively down down
Serial0/1/0        unassigned      YES unset  administratively down down
Serial0/2/0        unassigned      YES unset  administratively down down
Remember, administratively down means that you need to type no shutdown under the interface configuration. Notice that Serial0/0/0 is up/down, which means that the Physical layer is good and carrier detect is sensed, but no keepalives are being received from the remote end. In a nonproduction network, like the one I am working with, the clock rate isn’t set.
Exam Essentials
Remember how to enable a router interface. From within the interface configuration, use the no shutdown command to enable a router interface.
Identify and configure router interfaces. Use the show interfaces command to identify your router interface and the interface command at the global configuration prompt to configure the interface.
Determine the DCE end of a back-to-back serial connection and configure clocking. In a lab environment, one end of the cable should be marked DCE. If you’re trying to determine this remotely, you can use the show versions command to identify the DCE end of the cable. The clock rate command is used to set the clock rate on the DCE end.
View, edit, save, and delete configurations. Use the show running-config and the show startup-config commands to view the configuration in RAM and NVRAM, respectively. To save changes made to the running-config, use the copy start run command.
Understand the output from the show interface command. An interface should show that Serial0/0 is up and line protocol is up, which means all is operational. If it shows Serial0/0 is up and line protocol is down, then you have a Data Link layer problem. If Serial0/0 is down and line protocol is down, then there is a Physical layer problem.
Verify Device Configuration and Network Connectivity Using ping, traceroute, Telnet, SSH, or Other Utilities
For coverage of this objective, please see the section titled “Verify Network Status and Switch Operation Using Basic Utilities (Including ping, traceroute, Telnet, SSH, arp, and ipconfig) and SHOW and DEBUG Commands)” in Chapter 2, as well as the section titled “Access and Utilize the Router to Set Basic Parameters (Including CLI/SDM)” in this chapter.
Perform and Verify Routing Configuration Tasks for a Static or Default Route Given Specific Routing Requirements
A fundamental knowledge of routing is required to pass the CCNA exam. This section will provide a solid review of static and default routing.
Static routing occurs when you manually add routes in each router’s routing table. There are pros and cons to static routing, but that’s true for all routing processes.
Static routing has the following benefits:
- There is no overhead on the router CPU, which means that you could possibly buy a cheaper router than you would need if you were using dynamic routing.
- There is no bandwidth usage between routers, which means that you could possibly save money on WAN links.
- It adds security, because the administrator can choose to allow routing access to certain networks only.
Static routing has the following disadvantages:
- The administrator must really understand the internetwork and how each router is connected in order to configure routes correctly.
- If a network is added to the internetwork, the administrator has to add a route to it on all routers—by hand.
- It’s not feasible in large networks because maintaining it would be a full-time job in itself.
The command syntax you use to add a static route to a routing table is as follows:
ip route [destination_network] [mask] [next-hop_address or
  exitinterface] [administrative_distance] [permanent]
Here’s a description of each command in the string:
ip route The command used to create the static route.
destination_network The network you’re placing in the routing table.
mask The subnet mask being used on the network.
next-hop_address The address of the next-hop router that will receive the packet and forward it to the remote network. This is a router interface that’s on a directly connected network. You must be able to ping the router interface before you add the route. If you type in the wrong next-hop address or the interface to that router is down, the static route will show up in the router’s configuration but not in the routing table.
exitinterface You can use this instead of the next-hop address if you want, and it will show up as a directly connected route.
administrative_distance By default, static routes have an administrative distance of 1 (or even 0 if you use an exit interface instead of a next-hop address). You can change the default value by adding an administrative weight at the end of the command. I’ll talk a lot more about this subject later in the chapter when we get to the section entitled “Compare and Contrast Methods of Routing and Routing Protocols.”
permanent If the interface is shut down or the router can’t communicate with the next-hop router, the route will automatically be discarded from the routing table. Choosing the permanent option keeps the entry in the routing table no matter what happens.
Before we dive into configuring static routes, let’s take a look at the following sample static route:
Router(config)#ip route 172.16.3.0 255.255.255.0 192.168.2.4
Here is how this command is interpreted:
- The ip route command tells you simply that it is a static route.
- 172.16.3.0 is the remote network to which you want to send packets.
- 255.255.255.0 is the mask of the remote network.
- 192.168.2.4 is the next hop, or router, to which you will send packets.
To configure a default route, you use wildcards in the network address and mask locations of a static route. In fact, you can just think of a default route as a static route that uses wildcards instead of network and mask information.
There’s another command you can use to configure a gateway of last resort—the ip default-network command. Figure 4-5 shows a network that needs to have a gateway-of-last-resort statement configured.
Figure 4-5: Configuring a gateway of last resort
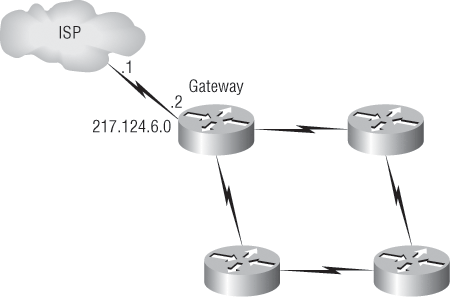
The interface leading to the ISP is Serial 0/0. Here are three commands (all providing the same solution) for adding a gateway of last resort on the gateway router to the ISP:
Gateway(config)#ip route 0.0.0.0 0.0.0.0 217.124.6.1
Gateway(config)#ip route 0.0.0.0 0.0.0.0 s0/0
Gateway(config)#ip default-network 217.124.6.0
As I said, all three of these commands would accomplish the goal of setting the gateway of last resort, but there are some small differences between them. First, the exit interface solution would be used over the other two solutions because it has an AD of 0. Also, the ip default-network command would advertise the default network when you configure an IGP (like RIP) on the router. This is so other routers in your internetwork will receive this route as a default route automatically.
Exam Essentials
Understand how to configure a static route. A static route is configured from global configuration mode. Here is the command structure: ip route remote_network remote_mask next_hop_address/exit_interface.
Understand how to configure a default route, which is also called a gateway of last resort. A default route is configured from global configuration mode. Here is the command structure: ip route 0.0.0.0 0.0.0.0 next_hop_address/exit_interface.
Compare and contrast static and dynamic routing. Static routing creates less network traffic and fewer CPU cycles on the router but cannot choose the best router or react to outages. Dynamic routing creates more traffic and workload on the router but can choose the best route and react to outages.
Manage IOS Configuration Files (Including Save, Edit, Upgrade, and Restore)
Any changes that you make to the router configuration are stored in the running-config file. If you don’t enter a copy run start command after you make a change to running-config, that change will not be saved if the router reboots or is powered down. So, you will probably want to make another backup of the configuration information just in case the router or switch completely dies on you. Even if your machine is healthy and happy, it’s good to have a backup copy of the configuration for reference and documentation.
In the following sections, I’ll describe how to copy the configuration of a router to a TFTP server and how to restore that configuration.
Backing Up the Cisco Router Configuration
To copy the router’s configuration from a router to a TFTP server, you can use either the copy running-config tftp or the copy startup-config tftp command. Either one will back up the router configuration that’s currently running in DRAM or that’s stored in NVRAM.
Verifying the Current Configuration
To verify the configuration in DRAM, use the show running-config command (sh run for short) like this:
Router#show running-config
Building configuration...
Current configuration : 776 bytes
!
version 12.4
The current configuration information indicates that the router is running version 12.4 of the IOS.
Verifying the Stored Configuration
Next, you should check the configuration stored in NVRAM. To see this, use the show startup-config command (sh start for short) like this:
Router#show startup-config
Using 776 out of 245752 bytes
!
version 12.4
The second line shows you how much room your backup configuration is using. Here, you can see that NVRAM is 239KB (again, memory is easier to see with the show version command when using an ISR router) and that only 776 bytes of it are used.
If you’re not sure that the files are the same and the running-config file is what you want, you can use the copy running-config startup-config command to verify that both files are, in fact, the same. I’ll go through this with you in the next section.
Copying the Current Configuration to NVRAM
To ensure that your running-config will always be reloaded if the router is rebooted, you should copy it to NVRAM where it will become the startup-config. In the new IOS version 12.0, you’re prompted for the filename you want to use.
Router#copy running-config startup-config
Destination filename [startup-config]?[enter]
Building configuration...
[OK]
Router#
The filename prompt appears because the copy command has many options, as shown in the following output:
Router#copy running-config ?
  archive:        Copy to archive: file system
  flash:          Copy to flash: file system
  ftp:            Copy to ftp: file system
  http:           Copy to http: file system
  https:          Copy to https: file system
  ips-sdf         Update (merge with) IPS signature configuration
  null:           Copy to null: file system
  nvram:          Copy to nvram: file system
  rcp:            Copy to rcp: file system
  running-config  Update (merge with) current system configuration
  scp:            Copy to scp: file system
  startup-config  Copy to startup configuration
  syslog:         Copy to syslog: file system
  system:         Copy to system: file system
  tftp:           Copy to tftp: file system
  xmodem:         Copy to xmodem: file system
  ymodem:         Copy to ymodem: file system
We’ll go over the copy command again in a minute.
Copying the Configuration to a TFTP Server
Once the file is copied to NVRAM, you can make a second backup to a TFTP server by using the copy running-config tftp command (copy run tftp for short), like this:
Router#copy running-config tftp
Address or name of remote host []?1.1.1.2
Destination filename [router-confg]?todd-confg
!!
776 bytes copied in 0.800 secs (970 bytes/sec)
Router#
In the preceding example, I entered the IP address of the TFTP server and named the file todd-confg because I had not set a hostname for the router. If you have a hostname already configured, the command will automatically use that hostname plus the extension -confg as the name of the file.
Restoring the Cisco Router Configuration
If you’ve changed your router’s running-config file and want to restore the configuration to the version in the startup-config file, the easiest way to do this is to use the copy startup-config running-config command (copy start run for short). You can also use the older Cisco command config mem to restore a configuration. Of course, this will work only if you first copied running-config into NVRAM before making any changes.
If you did copy the router’s configuration to a TFTP server as a second backup, you can restore the configuration using the copy tftp running-config command (copy tftp run for short) or the copy tftp startup-config command (copy tftp start for short), as shown here:
Router#copy tftp running-config
Address or name of remote host []?1.1.1.2
Source filename []?todd-confg
Destination filename[running-config]?[enter]
Accessing tftp://1.1.1.2/todd-confg...
Loading todd-confg from 1.1.1.2 (via FastEthernet0/0): !
[OK - 776 bytes]
776 bytes copied in 9.212 secs (84 bytes/sec)
Router#
*Mar  7 17:53:34.071: %SYS-5-CONFIG_I: Configured from
    tftp://1.1.1.2/todd-confg by console
Router#
The configuration file is an ASCII text file, meaning that before you copy the configuration stored on a TFTP server back to a router, you can make changes to the file with any text editor. Also, notice that the command was changed to a URL of tftp://1.1.1.2/todd-config.
It is important to remember that when you copy or merge a configuration from a TFTP server to a router’s RAM, the interfaces are shut down by default and you must manually enable each interface with the no shutdown command.
Erasing the Configuration
To delete the startup-config file on a Cisco router, use the command erase startup-config, like this:
Router#erase startup-config
Erasing the nvram filesystem will remove all configuration files!
    Continue? [confirm][enter]
[OK]
Erase of nvram: complete
*Mar  7 17:56:20.407: %SYS-7-NV_BLOCK_INIT: Initialized the geometry of nvram
Router#reload
System configuration has been modified. Save? [yes/no]:n
Proceed with reload? [confirm][enter]
 *Mar  7 17:56:31.059: %SYS-5-RELOAD: Reload requested by console.
    Reload Reason: Reload Command.
This command deletes the contents of NVRAM on the router. Typing reload at the privileged mode prompt and typing no to save changes will cause the router to reload and come up into setup mode.
Exam Essentials
Remember how to save the configuration of a router. There are a couple of ways to do this, but the most common (and the most tested) method is copy running-config startup-config.
Remember how to erase the configuration of a router. Type the privileged-mode command erase startup-config and reload the router.
Before you upgrade or restore a Cisco IOS, you should copy the existing file to a TFTP host as a backup just in case the new image crashes and burns. You can use any TFTP host to accomplish this. By default, the flash memory in a router is used to store the Cisco IOS. In the following sections, I’ll describe how to check the amount of flash memory, how to copy the Cisco IOS from flash memory to a TFTP host, and how to copy the IOS from a TFTP host to flash memory.
But before you back up an IOS image to a network server on your intranet, you’ve got to do these three things:
- Make sure that you can access the network server.
- Ensure that the network server has adequate space for the code image.
- Verify the file naming and path requirements.
If you have a laptop or a workstation’s Ethernet port directly connected to a router’s Ethernet interface (as shown in Figure 4-6), you need to verify the following before attempting to copy the image to or from the router:
- The TFTP server software must be running on the administrator’s workstation.
- The Ethernet connection between the router and the workstation must be made with a crossover cable.
- The workstation must be on the same subnet as the router’s Ethernet interface.
- The copy flash tftp command must be supplied the IP address of the workstation if you are copying from the router flash.
- If you’re copying “into” flash, you need to verify that there’s enough room in flash memory to accommodate the file to be copied.
Figure 4-6: Copying an IOS from a workstation to a router

Verifying Flash Memory
Before you attempt to upgrade the Cisco IOS on your router with a new IOS file, it’s a good idea to verify that your flash memory has enough room to hold the new image. You can verify the amount of flash memory and the file or files being stored in flash memory by using the show flash command (sh flash for short), like this:
Router#sh flash
-#- --length-- -----date/time------ path
1     21710744 Jan 2 2007 22:41:14 +00:00 c2800nm-advsecurityk9-mz.124-12.bin
[output cut]
32989184 bytes available (31027200 bytes used)
The ISR router in this example has 64MB of RAM, and roughly half of the memory is in use.
The show flash command will display the amount of memory consumed by the current IOS image, as well as the amount of memory available to hold current and new images. If there is not enough room for both the old and new images you want to load, the old image will be erased!
The amount of flash is actually easier to tally using the show version command on the ISR routers, as shown in the following example:
Router#show version
[output cut]
Cisco 2811 (revision 49.46) with 249856K/12288K bytes of memory.
Processor board ID FTX1049A1AB
2 FastEthernet interfaces
4 Serial(sync/async) interfaces
1 Virtual Private Network (VPN) Module
DRAM configuration is 64 bits wide with parity enabled.
239K bytes of non-volatile configuration memory.
62720K bytes of ATA CompactFlash (Read/Write)
You can see that the amount of flash shows up on the last line. By averaging up, you get 64MB of flash.
Notice that the filename in the show flash command example is c2800nm-advsecurityk9-mz.124-12.bin. The main difference in the output of the show flash and show version commands is that the show flash command displays the actual name of the file that the router is using to run the router, and the show version command shows all files in flash.
Backing Up the Cisco IOS
To back up the Cisco IOS to a TFTP server, you use the copy flash tftp command. It’s a straightforward command that requires only the source filename and the IP address of the TFTP server.
The key to success in this backup routine is to make sure that you’ve got good, solid connectivity to the TFTP server. Check this by pinging the TFTP device from the router console prompt like this:
Router#ping 1.1.1.2
Type escape sequence to abort.
Sending 5, 100-byte ICMP Echos to 1.1.1.2, timeout
  is 2 seconds:
!!!!!
Success rate is 100 percent (5/5), round-trip min/avg/max
  = 4/4/8 ms
After you ping the TFTP server to make sure that IP is working, you can use the copy flash tftp command to copy the IOS to the TFTP server as shown here:
Router#copy flash tftp
Source filename []?c2800nm-advsecurityk9-mz.124-12.bin
Address or name of remote host []?1.1.1.2
Destination filename [c2800nm-advsecurityk9-mz.124-12.bin]?[enter]
!!!!!!!!!!!!!!!!!!!!!!!!!!!!!!!!!!!!!!!!!!!!!!!!!!!!!!!!!!!!!!!!!!!!!!!!!!!!!!!!!!!!!!
21710744 bytes copied in 60.724 secs (357532 bytes/sec)
Router#
Just copy the IOS filename from either the show flash or show version command and then paste it when prompted for the source filename.
In the preceding example, the contents of flash memory were copied successfully to the TFTP server. The address of the remote host is the IP address of the TFTP host, and the source filename is the file in flash memory.
Restoring or Upgrading the Cisco Router IOS
If you need to restore the Cisco IOS to flash memory to replace an original file that has been damaged or if you want to upgrade the IOS, you can download the file from a TFTP server to flash memory by using the copy tftp flash command. This command requires the IP address of the TFTP host and the name of the file you want to download.
But before you begin, make sure that the file you want to place in flash memory is in the default TFTP directory on your host. When you issue the command, TFTP won’t ask you where the file is, so if the file you want to use isn’t in the default directory of the TFTP host, this just won’t work.
Router#copy tftp flash
Address or name of remote host []?1.1.1.2
Source filename []?c2800nm-advsecurityk9-mz.124-12.bin
Destination filename [c2800nm-advsecurityk9-mz.124-12.bin]?[enter]
%Warning:There is a file already existing with this name
Do you want to over write? [confirm][enter]
Accessing tftp://1.1.1.2/c2800nm-advsecurityk9-mz.124-12.bin...
Loading c2800nm-advsecurityk9-mz.124-12.bin from 1.1.1.2 (via
   FastEthernet0/0): !!!!!!!!!!!!!!!!!!!!!!!!!!!!!!!!!!!!!!!!!!!!!!!!!!!!!!!!!!!!!!!!!!!!!!!!!!!!!!!!!!!!!
[OK - 21710744 bytes]
21710744 bytes copied in 82.880 secs (261954 bytes/sec)
Router#
In this example, I copied the same file into flash memory, so it asked me if I wanted to overwrite it. Remember that I am “playing” with files in flash memory. If I just corrupted my file by overwriting the file, I wouldn’t know this until I rebooted the router. When you’re working with this command, be careful. If the file is corrupted, you’ll need to do an IOS restore from ROMMON.
If you are loading a new file and you don’t have enough room in flash memory to store both the new and existing copies, the router will ask to erase the contents of flash memory before writing the new file into flash memory.
Exam Essentials
Remember how to back up an IOS image. By using the privileged-mode command copy flash tftp, you can back up a file from flash memory to a TFTP (network) server.
Remember how to restore or upgrade an IOS image. By using the privileged-mode command copy tftp flash, you can restore or upgrade a file from a TFTP (network) server to flash memory.
Remember what you must complete before you back up an IOS image to a network server. Make sure that you can access the network server, ensure that the network server has adequate space for the code image, and verify the file naming and path requirements.
Compare and Contrast Methods of Routing and Routing Protocols
A routing protocol is used by routers to dynamically find all the networks in the internetwork and to ensure that all routers have the same routing table. Basically, a routing protocol determines the path of a packet through an internetwork. Examples of routing protocols are RIP, RIPv2, EIGRP, and OSPF.
Once all routers know about all networks, a routed protocol can be used to send user data (packets) through the established enterprise. Routed protocols are assigned to an interface and determine the method of packet delivery. Examples of routed protocols are IP and IPv6.
The administrative distance (AD) is used to rate the trustworthiness of routing information received on a router from a neighboring router. An administrative distance is an integer from 0 to 255, where 0 is the most trusted and 255 means no traffic will be passed via this route.
If a router receives two updates listing the same remote network, the first thing the router will check will be the AD. If one of the advertised routes has a lower AD than the other, then the route with the lowest AD will be placed in the routing table.
If both advertised routes to the same network have the same AD, then routing protocol metrics (such as hop count or bandwidth of the lines) will be used to find the best path to the remote network. The advertised route with the lowest metric will be placed in the routing table. If both advertised routes have the same AD as well as the same metrics, then the routing protocol will load-balance to the remote network (which means that it will send packets down each link).
Table 4-4 shows the default administrative distances that a Cisco router uses to decide which route to take to a remote network.
Table 4-4: Default Administrative Distances
| Route Source | Default AD |
| Connected interface | 0 |
| Static route | 1 |
| EIGRP | 90 |
| IGRP | 100 |
| OSPF | 110 |
| RIP | 120 |
| External EIGRP | 170 |
| Unknown | 255 (this route will never be used) |
If a network is directly connected, the router will always use the interface connected to the network. If you configure a static route, the router will then believe that route over any other learned routes. You can change the administrative distance of static routes; by default, they have an AD of 1. For example, you might set the AD of a static route to 150 or 151. This would let you configure routing protocols without having to remove the static routes. They can be used as backup routes in case the routing protocol experiences a failure of some type.
For example, if you have a static route, a RIP-advertised route, and an IGRP-advertised route listing the same network, then, by default, the router will always use the static route unless you change the AD of the static route.
Routing Protocols
There are three classes of routing protocols:
Distance-Vector The distance-vector protocols find the best path to a remote network by judging distance. Each time a packet goes through a router, that’s called a hop. The route with the least number of hops to the network is determined to be the best route. The vector indicates the direction to the remote network. Both RIP and IGRP are distance-vector routing protocols. They send the entire routing table to directly connected neighbors.
Link-State In link-state protocols, also called shortest-path-first protocols, the routers each create three separate tables. One of these tables keeps track of directly attached neighbors, one determines the topology of the entire internetwork, and one is used as the routing table. Link-state routers know more about the internetwork than any distance-vector routing protocol. OSPF is an IP routing protocol that is completely link-state. Link-state protocols send updates containing the state of their own links to all other routers on the network.
Hybrid Hybrid protocols use aspects of both distance-vector and link-state—for example, EIGRP.
There’s no set way of configuring routing protocols for use with every business. This is something you have to do on a case-by-case basis. If you understand how the different routing protocols work, you can make good, solid decisions that truly meet the individual needs of any business.
Exam Essentials
Be able to define a routing protocol. A routing protocol is used by routers to dynamically find all the networks in the internetwork and to ensure that all routers have the same routing table. Basically, a routing protocol determines the path of a packet through an internetwork. Examples of routing protocols are RIP, RIPv2, EIGRP, and OSPF.
Be able to define a routed protocol. Once all routers know about all networks, a routed protocol can be used to send user data (packets) through the established enterprise. Routed protocols are assigned to an interface and determine the method of packet delivery. Examples of routed protocols are IP and IPv6.
Define the three types of routing protocols. Routing protocols can be distance-vector, link-state, or hybrid. The distance-vector protocols find the best path to a remote network by judging distance. In link-state protocols, also called shortest-path-first protocols, the routers each create three separate tables. One of these tables keeps track of directly attached neighbors, one determines the topology, and one is used as the routing table. Hybrid protocols use aspects of both distance-vector and link-state—for example, EIGRP.
Configure, Verify, and Troubleshoot OSPF
Open Shortest Path First (OSPF) is an open standard routing protocol that’s been implemented by a wide variety of network vendors, including Cisco. If you have multiple routers and not all of them are Cisco routers, then you can’t use a Cisco proprietary protocol like EIGRP. So, your remaining CCNA objective options are basically RIP, RIPv2, and OSPF.
OSPF works by using the Dijkstra algorithm. First, a shortest path tree is constructed, and then the routing table is populated with the resulting best paths. OSPF converges quickly (although perhaps not as quickly as EIGRP), and it supports multiple, equal-cost routes to the same destination. Like EIGRP, it does support both IP and IPv6 routed protocols.
OSPF provides the following features:
- Consists of areas and autonomous systems
- Minimizes routing update traffic
- Allows scalability
- Supports VLSM/CIDR
- Has unlimited hop count
- Allows multi-vendor deployment (open standard)
OSPF is the first link-state routing protocol that most people are introduced to, so it’s useful to see how it compares to more traditional distance-vector protocols such as RIPv2 and RIPv1. Table 4-5 gives you a comparison of these three protocols.
Table 4-5: OSPF and RIP Comparison
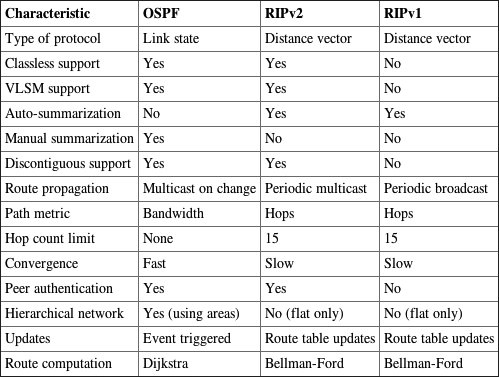
OSPF has many features beyond the few listed in Table 4-5, and all of them contribute to a fast, scalable, and robust protocol that can be actively deployed in thousands of production networks.
OSPF is designed to be implemented in a hierarchical fashion, which means separating the larger internetwork into smaller internetworks called areas. This is the best design for OSPF.
Here are some reasons for creating an OSPF hierarchically:
- To decrease routing overhead
- To speed up convergence
- To confine network instability to single areas of the network
These benefits make the additional configuration required by OSPF worth the effort.
Figure 4-7 shows a typical OSPF simple design. Notice how each router connects to the backbone—called area 0, or the backbone area. OSPF must have an area 0, and all other areas should connect to this area. (Areas that do not connect directly to area 0 by using virtual links are beyond the scope of this book.) Routers that connect other areas to the backbone area within an AS are called Area Border Routers (ABRs). Still, at least one interface of the ABR must be in area 0.
Figure 4-7: An OSPF design
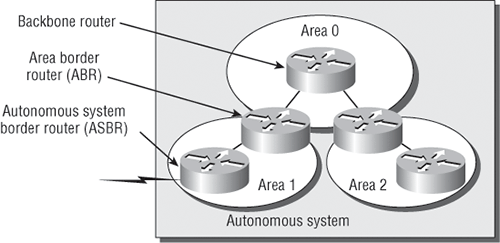
OSPF runs inside an autonomous system, but it can also connect multiple autonomous systems. The router that connects these ASs is called an Autonomous System Boundary Router (ASBR).
Ideally, you would create other areas of networks to help keep route updates to a minimum and to keep problems from propagating throughout the network. However, that’s beyond the scope of this chapter. Just make note of it.
Configuring OSPF Areas
After identifying the OSPF process, you need to identify the interfaces that you want to activate OSPF communications on as well as the area in which each resides. This will also configure the networks you’re going to advertise to others. OSPF uses wildcards in the configuration—which are also used in access-list configurations.
Here’s an OSPF basic configuration example:
Lab_A#config t
Lab_A(config)#router ospf 1
Lab_A(config-router)#network 10.0.0.0 0.255.255.255
 area ?
  <0-4294967295>  OSPF area ID as a decimal value
  A.B.C.D         OSPF area ID in IP address format
Lab_A(config-router)#network 10.0.0.0 0.255.255.255
 area 0
The areas can be any number from 0 to 4.2 billion. Don’t get these numbers confused with the Process ID, which is from 1 to 65,535.
Remember, the OSPF Process ID number is irrelevant. It can be the same on every router on the network, or it can be different—it doesn’t matter. It’s locally significant and just enables the OSPF routing on the router.
There are several ways to verify proper OSPF configuration and operation. In the following sections, we’ll review the OSPF show commands that you need to know in order to do this.
The show ip route Command
Let’s start by taking a quick look at the routing table of a router named Corp by issuing a show ip route command with the following output:
   10.0.0.0/24 is subnetted, 12 subnets
O       10.1.11.0 [110/65] via 10.1.5.2, 00:01:31, Serial0/2/0
O       10.1.10.0 [110/65] via 10.1.5.2, 00:01:31, Serial0/2/0
O       10.1.9.0 [110/74] via 10.1.4.2, 00:01:31, Serial0/1/0
O       10.1.8.0 [110/65] via 10.1.4.2, 00:01:31, Serial0/1/0
O       10.1.12.0 [110/66] via 10.1.5.2, 00:01:31, Serial0/2/0
C       10.1.3.0 is directly connected, Serial0/0/1
C       10.1.2.0 is directly connected, Serial0/0/0
C       10.1.1.0 is directly connected, FastEthernet0/1
O       10.1.7.0 [110/74] via 10.1.3.2, 00:01:32, Serial0/0/1
                 [110/74] via 10.1.2.2, 00:01:32, Serial0/0/0
O       10.1.6.0 [110/74] via 10.1.3.2, 00:01:32, Serial0/0/1
                 [110/74] via 10.1.2.2, 00:01:32, Serial0/0/0
C       10.1.5.0 is directly connected, Serial0/2/0
C       10.1.4.0 is directly connected, Serial0/1/0
The Corp router shows the found routes for 12 networks, with the O representing OSPF internal routes (the Cs are obviously the directly connected networks). It also found dual routes to networks 10.1.6.0 and 10.1.7.0. No bandwidth or delay commands were executed under the interfaces, so the defaults are being used to determine the metric—but remember, OSPF uses only bandwidth to determine the best path to a network.
This is important: OSPF can load-balance only across links of equal costs. It can’t load-balance across unequal-cost links as EIGRP can.
Next, I’ll show you all the OSPF verification commands that you need to know.
The show ip ospf Command
The show ip ospf command is used to display OSPF information for one or all OSPF processes running on the router. Information contained therein includes the Router ID, area information, SPF statistics, and LSA timer information. Let’s check the output from the Corp router:
Corp#sh ip ospf
 Routing Process "ospf 132" with ID 10.1.5.1
 Start time: 04:32:04.116, Time elapsed: 01:27:10.156
[output cut]
Notice the Router ID (RID) of 10.1.5.1, which is the highest IP address configured on the router.
The show ip ospf database Command
The show ip ospf database command will give you information about the number of routers in the internetwork (AS) plus the neighboring router’s ID (this is the topology database I mentioned earlier). Unlike the show ip eigrp topology command, this command shows the “OSPF routers,” not each and every link in the AS as EIGRP does.
The output is broken down by area. Here’s a sample output, again from Corp:
Corp#sh ip ospf database
            OSPF Router with ID (10.1.5.1) (Process ID 132)
                Router Link States (Area 0)
Link ID         ADV Router      Age         Seq#       Checksum Link count
10.1.5.1        10.1.5.1        72          0x80000002 0x00F2CA 9
10.1.7.1        10.1.7.1        83          0x80000004 0x009197 6
10.1.9.1        10.1.9.1        73          0x80000001 0x00DA1C 4
10.1.11.1       10.1.11.1       67          0x80000005 0x00666A 4
10.1.12.1       10.1.12.1       67          0x80000004 0x007631 2
                Net Link States (Area 0)
Link ID         ADV Router      Age         Seq#       Checksum
10.1.11.2       10.1.12.1       68          0x80000001 0x00A337
You can see five routers and the RID of each router (the highest IP address on each router). The router output shows the link ID (remember that an interface is also a link) and the RID of the router on that link under the ADV router, or advertising router.
The show ip ospf interface Command
The show ip ospf interface command displays all interface-related OSPF information. Data is displayed about OSPF information for all interfaces or for specified interfaces. The following example shows the key information in boldface type:
Corp#sh ip ospf interface f0/1
FastEthernet0/1 is up, line protocol is up
  Internet Address 10.1.1.1/24, Area 0
  Process ID 132, Router ID 10.1.5.1, Network Type BROADCAST, Cost: 1
  Transmit Delay is 1 sec, State DR, Priority 1
 Designated Router (ID) 10.1.5.1, Interface address 10.1.1.1
  No backup designated router on this network
  Timer intervals configured, Hello 10, Dead 40, Wait 40, Retransmit 5
    oob-resync timeout 40
    Hello due in 00:00:01
  Supports Link-local Signaling (LLS)
  Index 1/1, flood queue length 0
  Next 0x0(0)/0x0(0)
  Last flood scan length is 0, maximum is 0
  Last flood scan time is 0 msec, maximum is 0 msec
  Neighbor Count is 0, Adjacent neighbor count is 0
  Suppress hello for 0 neighbor(s)
The following information is displayed by this command:
- Interface IP address
- Area assignment
- Process ID
- Router ID
- Network type
- Cost
- Priority
- DR/BDR election information (if applicable)
- Hello and Dead timer intervals
- Adjacent neighbor information
I used the show ip ospf interface f0/1 command because I knew that there would be a designated router elected on the FastEthernet broadcast multi-access network. We’ll get into DR and DBR elections in detail in a minute.
The show ip ospf neighbor Command
The show ip ospf neighbor command is very useful because it summarizes the pertinent OSPF information regarding neighbors and the adjacency state. If a DR or BDR exists, that information will also be displayed. Here’s a sample:
Corp#sh ip ospf neighbor
Neighbor ID  Pri  State   Dead Time    Address     Interface
10.1.11.1     0   FULL/  - 00:00:37    10.1.5.2     Serial0/2/0
10.1.9.1      0   FULL/  - 00:00:34    10.1.4.2     Serial0/1/0
10.1.7.1      0   FULL/  - 00:00:38    10.1.3.2     Serial0/0/1
10.1.7.1      0   FULL/  - 00:00:34    10.1.2.2     Serial0/0/0
It is important for you to understand this command, because it’s extremely useful in production networks.
Let’s take a look at the R3 and 871W routers’ outputs:
R3#sh ip ospf neighbor
Neighbor ID  Pri  State   Dead Time    Address      Interface
10.1.5.1      0   FULL/  -  00:00:39    10.1.5.1    Serial0/0/1
10.1.11.2     1   FULL/BDR  00:00:31    10.1.11.2   FastEthernet0/1
871W#sh ip ospf nei
Neighbor ID   Pri  State   Dead Time    Address      Interface
10.1.11.1     1   FULL/DR   00:00:30    10.1.11.1     Vlan1
Because there’s an Ethernet link (broadcast multi-access) on the Corp router, there’s going to be an election to determine which will be the designated router and which will be the nondesignated router. You can see that R3 became the designated router, and it won because it had the highest IP address on the network. You can change this, but that’s the default.
The Serial 0/0/1 connection on Corp doesn’t have a DR or BDR listed in the output because elections don’t happen on point-to-point links by default. However, you can see that the Corp router is fully adjacent to two routers from its output.
Debugging OSPF
Debugging is a great tool for any protocol. Table 4-6 describes a few debugging commands for troubleshooting OSPF.
Table 4-6: Debugging Commands for Troubleshooting OSPF
| Command | Description/Function |
| debug ip ospf packet | Shows Hello packets being sent and received on your router. |
| debug ip ospf hello | Shows Hello packets being sent and received on your router. Shows more detail than the debug ip ospf packet output. |
| debug ip ospf adj | Shows DR and DBR elections on a broadcast and nonbroadcast multi-access network. |
I’ll start by showing you the output from the Corp router I received using the debug ip ospf packet command:
Corp#debug ip ospf packet
OSPF packet debugging is on
*Mar 23 01:20:42.199: OSPF: rcv. v:2 t:1 l:48 rid:172.16.10.3
      aid:0.0.0.0 chk:8075 aut:0 auk: from Serial0/1/0
Corp#
*Mar 23 01:20:45.507: OSPF: rcv. v:2 t:1 l:48 rid:172.16.10.2
      aid:0.0.0.0 chk:8076 aut:0 auk: from Serial0/0/0
*Mar 23 01:20:45.531: OSPF: rcv. v:2 t:1 l:48 rid:172.16.10.2
      aid:0.0.0.0 chk:8076 aut:0 auk: from Serial0/0/1
*Mar 23 01:20:45.531: OSPF: rcv. v:2 t:1 l:48 rid:172.16.10.4
      aid:0.0.0.0 chk:8074 aut:0 auk: from Serial0/2/0
*Mar 23 01:20:52.199: OSPF: rcv. v:2 t:1 l:48 rid:172.16.10.3
      aid:0.0.0.0 chk:8075 aut:0 auk: from Serial0/1/0
*Mar 23 01:20:55.507: OSPF: rcv. v:2 t:1 l:48 rid:172.16.10.2
      aid:0.0.0.0 chk:8076 aut:0 auk: from Serial0/0/0
*Mar 23 01:20:55.527: OSPF: rcv. v:2 t:1 l:48 rid:172.16.10.2
      aid:0.0.0.0 chk:8076 aut:0 auk: from Serial0/0/1
*Mar 23 01:20:55.531: OSPF: rcv. v:2 t:1 l:48 rid:172.16.10.4
      aid:0.0.0.0 chk:8074 aut:0 auk: from Serial0/2/0
In the preceding output, you can see that the router is both sending and receiving Hello packets every 10 seconds from neighbor (adjacent) routers. The next command will provide the same information, but with more detail. For example, you can see the multicast address used (224.0.0.5) and the area:
Corp#debug ip ospf hello
*Mar 23 01:18:41.103: OSPF: Send hello to 224.0.0.5 area 0 on
   Serial0/1/0 from 10.1.4.1
*Mar 23 01:18:41.607: OSPF: Send hello to 224.0.0.5 area 0 on
   FastEthernet0/1 from 10.1.1.1
*Mar 23 01:18:41.607: OSPF: Send hello to 224.0.0.5 area 0 on
   Serial0/0/0 from 10.1.2.1
*Mar 23 01:18:41.611: OSPF: Send hello to 224.0.0.5 area 0 on
   Serial0/2/0 from 10.1.5.1
*Mar 23 01:18:41.611: OSPF: Send hello to 224.0.0.5 area 0 on
   Serial0/0/1 from 10.1.3.1
*Mar 23 01:18:42.199: OSPF: Rcv hello from 172.16.10.3 area 0 from
   Serial0/1/0 10.1.4.2
*Mar 23 01:18:42.199: OSPF: End of hello processing
*Mar 23 01:18:45.519: OSPF: Rcv hello from 172.16.10.2 area 0 from
   Serial0/0/0 10.1.2.2
*Mar 23 01:18:45.519: OSPF: End of hello processing
*Mar 23 01:18:45.543: OSPF: Rcv hello from 172.16.10.2 area 0 from
   Serial0/0/1 10.1.3.2
*Mar 23 01:18:45.543: OSPF: End of hello processing
*Mar 23 01:18:45.543: OSPF: Rcv hello from 172.16.10.4 area 0 from
   Serial0/2/0 10.1.5.2
*Mar 23 01:18:45.543: OSPF: End of hello processing
The last debug command I’m going show you is the debug ip ospf adj command, which displays elections as they occur on broadcast and nonbroadcast multi-access networks:
Corp#debug ip ospf adj
OSPF adjacency events debugging is on
*Mar 23 01:24:34.823: OSPF: Interface FastEthernet0/1 going Down
*Mar 23 01:24:34.823: OSPF: 172.16.10.1 address 10.1.1.1 on
   FastEthernet0/1 is dead, state DOWN
*Mar 23 01:24:34.823: OSPF: Neighbor change Event on interface
   FastEthernet0/1
*Mar 23 01:24:34.823: OSPF: DR/BDR election on FastEthernet0/1
*Mar 23 01:24:34.823: OSPF: Elect BDR 0.0.0.0
*Mar 23 01:24:34.823: OSPF: Elect DR 0.0.0.0
*Mar 23 01:24:34.823: OSPF: Elect BDR 0.0.0.0
*Mar 23 01:24:34.823: OSPF: Elect DR 0.0.0.0
*Mar 23 01:24:34.823:        DR: none    BDR: none
*Mar 23 01:24:34.823: OSPF: Flush network LSA immediately
*Mar 23 01:24:34.823: OSPF: Remember old DR 172.16.10.1 (id)
*Mar 23 01:24:35.323: OSPF: We are not DR to build Net Lsa for
   interface FastEthernet0/1
*Mar 23 01:24:35.323: OSPF: Build router LSA for area 0, router ID
   172.16.10.1, seq 0x80000006
*Mar 23 01:24:35.347: OSPF: Rcv LS UPD from 172.16.10.2 on Serial0/0/1
   length 148 LSA count 1
*Mar 23 01:24:40.703: OSPF: Interface FastEthernet0/1 going Up
*Mar 23 01:24:41.203: OSPF: Build router LSA for area 0, router ID
   172.16.10.1, seq 0x80000007
*Mar 23 01:24:41.231: OSPF: Rcv LS UPD from 172.16.10.2 on Serial0/0/1
   length 160 LSA count 1
Exam Essentials
Be able to configure a single-area OSPF. A minimal single-area configuration involves only two commands: router ospf process-id and network x.x.x.x y.y.y.y area Z.
Be able to verify the operation of OSPF. There are many show commands that provide useful details on OSPF. You should be familiar with the output of each of the following:
show ip ospf
show ip ospf database
show ip ospf interface
show ip ospf neighbor
show ip protocols
List the features of OSPF. OSPF provides the following features:
- Consists of areas and autonomous systems
- Minimizes routing update traffic
- Allows scalability
- Supports VLSM/CIDR
- Has unlimited hop count
- Allows multi-vendor deployment (open standard)
Contrast RIPv1, RIPv2, and OSPF. Understand the differences between these protocols as listed in Table 4-5: OSPF and RIP comparison.
List the benefits of a hierarchical OSPF design. The benefits of a hierarchical OSPF design are
- To speed up convergence
- To decrease routing overhead
- To confine network instability to single areas of the network
Configure, Verify, and Troubleshoot EIGRP
You can enter EIGRP commands using two modes: router configuration mode and interface configuration mode. Router configuration mode is used to enable the protocol, specify which networks will run EIGRP, and set global characteristics. Interface configuration mode is used to customize summaries, metrics, timers, and bandwidth.
To start an EIGRP session on a router, use the router eigrp command followed by the autonomous system number of your network. Then enter the network numbers connected to the router using the network command followed by the network number.
Let’s look at an example of enabling EIGRP for autonomous system 20 on a router connected to two networks, with the network numbers being 10.3.1.0/24 and 172.16.10.0/24:
Router#config t
Router(config)#router eigrp 20
Router(config-router)#network 172.16.0.0
Router(config-router)#network 10.0.0.0
As with RIP, you use the classful network address (all subnet and host bits turned off) for EIGRP.
The AS number is irrelevant—as long as all routers use the same number. You can use any number from 1 to 65,535.
Verifying EIGRP
There are several commands that you can use on a router to troubleshoot and verify the EIGRP. Table 4-7 lists all of the most important commands that are used in conjunction with verifying EIGRP operation. It also offers a brief description of what each command does.
Table 4-7: EIGRP Troubleshooting Commands
| Command | Description/Function |
| show ip route | Shows the entire routing table |
| show ip route eigrp | Shows only EIGRP entries in the routing table |
| show ip eigrp neighbors | Shows all EIGRP neighbors |
| show ip eigrp topology | Shows entries in the EIGRP topology table |
| debug eigrp packet | Shows Hello packets sent/received between adjacent routers |
| debug ip eigrp notification | Shows EIGRP changes and updates as they occur on your network |
I’ll demonstrate how you would use the commands in Table 4-7 on a router named Corp that is configured with EIGRP.
The following router output is from the Corp router in the example:
Corp#sh ip route
     10.0.0.0/24 is subnetted, 12 subnets
D       10.1.11.0 [90/2172416] via 10.1.5.2, 00:01:05, Serial0/2/0
D       10.1.10.0 [90/2195456] via 10.1.5.2, 00:01:05, Serial0/2/0
D       10.1.9.0 [90/2195456] via 10.1.4.2, 00:01:05, Serial0/1/0
D       10.1.8.0 [90/2195456] via 10.1.4.2, 00:01:05, Serial0/1/0
D       10.1.12.0 [90/2172416] via 10.1.5.2, 00:01:05, Serial0/2/0
C       10.1.3.0 is directly connected, Serial0/0/1
C       10.1.2.0 is directly connected, Serial0/0/0
C       10.1.1.0 is directly connected, FastEthernet0/1
D       10.1.7.0 [90/2195456] via 10.1.2.2, 00:01:06, Serial0/0/0
D       10.1.6.0 [90/2195456] via 10.1.2.2, 00:01:06, Serial0/0/0
C       10.1.5.0 is directly connected, Serial0/2/0
C       10.1.4.0 is directly connected, Serial0/1/0
Notice that EIGRP routes are indicated with simply a D designation (DUAL) and that the default AD of these routes is 90. This represents internal EIGRP routes.
Let’s see what’s in Corp’s neighbor table:
Corp#sh ip eigrp neighbors
IP-EIGRP neighbors for process 10
H   Address     Interface  Hold Uptime   SRTT  RTO Q  Seq
                            (sec)         (ms)    Cnt Num
1   10.1.3.2    Se0/0/1     14 00:35:10    1   200  0  81
3   10.1.5.2    Se0/2/0     10 02:51:22    1   200  0  31
2   10.1.4.2    Se0/1/0     13 03:17:20    1   200  0  20
0   10.1.2.2    Se0/0/0     10 03:19:37    1   200  0  80
Here is what this table tells us:
- The H field indicates the order in which the neighbor was discovered.
- The hold time is how long this router will wait for a Hello packet to arrive from a specific neighbor.
- The uptime indicates how long the neighborship has been established.
- The SRTT field is the smooth round-trip timer—an indication of the time it takes for a round trip from this router to its neighbor and back. This value is used to determine how long to wait after a multicast for a reply from this neighbor. If a reply isn’t received in time, the router will switch to using unicasts in an attempt to complete the communication.
Now let’s see what’s in the Corp topology table by using the show ip eigrp topology command:
Corp#sh ip eigrp topology
IP-EIGRP Topology Table for AS(10)/ID(10.1.5.1)
Codes: P - Passive, A - Active, U - Update, Q - Query, R - Reply,
       r - reply Status, s - sia Status
P 10.1.11.0/24, 1 successors, FD is 2172416
        via 10.1.5.2 (2172416/28160), Serial0/2/0
P 10.1.10.0/24, 1 successors, FD is 2172416
        via 10.1.5.2 (2195456/281600), Serial0/2/0
P 10.1.9.0/24, 1 successors, FD is 2195456
        via 10.1.4.2 (2195456/281600), Serial0/1/0
P 10.1.8.0/24, 1 successors, FD is 2195456
        via 10.1.4.2 (2195456/72960), Serial0/1/0
P 10.1.12.0/24, 1 successors, FD is 2172416
        via 10.1.5.2 (2172416/28160), Serial0/2/0
P 10.1.3.0/24, 1 successors, FD is 76839936
        via Connected, Serial0/0/1
        via 10.1.2.2 (9849856/7719936), Serial0/0/0
P 10.1.2.0/24, 1 successors, FD is 2169856
        via Connected, Serial0/0/0
        via 10.1.2.2 (2681856/551936), Serial0/0/0
P 10.1.1.0/24, 1 successors, FD is 28160
        via Connected, FastEthernet0/1
P 10.1.7.0/24, 1 successors, FD is 793600
        via 10.1.2.2 (2195456/281600), Serial0/0/0
        via 10.1.3.2 (77081600/281600), Serial0/0/1
P 10.1.6.0/24, 1 successors, FD is 793600
        via 10.1.2.2 (2195456/281600), Serial0/0/0
        via 10.1.3.2 (77081600/281600), Serial0/0/1
P 10.1.5.0/24, 1 successors, FD is 2169856
        via Connected, Serial0/2/0
P 10.1.4.0/24, 1 successors, FD is 2169856
        via Connected, Serial0/1/0
Notice that every route is preceded by a P. This means that the route is in the passive state, which is a good thing because routes in the active state (A) indicate that the router has lost its path to this network and is searching for a replacement. Each entry also indicates the feasible distance, or FD, to each remote network plus the next-hop neighbor through which packets will travel to their destination. Plus, each entry also has two numbers in parentheses. The first indicates the feasible distance, and the second the advertised distance to a remote network.
Now here’s where things get interesting—notice that under the 10.1.7.0 and 10.1.6.0 outputs there are two links to each network and that the feasible distance and advertised distance are different. What this means is that there is one successor to the networks and one feasible successor—a backup route! You need to remember that even though both routes to network 10.1.6.0 and 10.1.7.0 are in the topology table, only the successor route (the one with the lowest metrics) will be copied and placed into the routing table.
In order for the route to be a feasible successor, its advertised distance must be less than the feasible distance of the successor route.
EIGRP will load-balance across both links automatically when they are of equal variance (equal cost), but EIGRP can load-balance across unequal-cost links as well if you use the variance command. The variance metric is set to 1 by default, meaning that only equal-cost links will load-balance. You can increase the metric value to a maximum of 128. Changing a variance value enables EIGRP to install multiple, loop-free routes with unequal cost in a local routing table.
So basically, if the variance is set to 1, only routes with the same metric as the successor will be installed in the local routing table. For example, if the variance is set to 2, any EIGRP-learned route with a metric less than two times the successor metric will be installed in the local routing table (if it is already a feasible successor).
Now’s a great time for us to check out some debugging outputs. First, let’s use the debug eigrp packet command that will show the Hello packets being sent between neighbor routers:
Corp#debug eigrp packet
EIGRP Packets debugging is on
    (UPDATE, REQUEST, QUERY, REPLY, HELLO, IPXSAP, PROBE, ACK, STUB,
    SIAQUERY, SIAREPLY)
Corp#
*Mar 21 23:17:35.050: EIGRP: Sending HELLO on FastEthernet0/1
*Mar 21 23:17:35.050:   AS 10, Flags 0x0, Seq 0/0 idbQ 0/0 iidbQ un/rely 0/0
*Mar 21 23:17:35.270: EIGRP: Received HELLO on Serial0/1/0 nbr 10.1.4.2
*Mar 21 23:17:35.270:   AS 10, Flags 0x0, Seq 0/0 idbQ 0/0 iidbQ
   un/rely 0/0 peerQ un/rely 0/0
*Mar 21 23:17:35.294: EIGRP: Received HELLO on Serial0/0/0 nbr 10.1.2.2
*Mar 21 23:17:35.294:   AS 10, Flags 0x0, Seq 0/0 idbQ 0/0 iidbQ
   un/rely 0/0 peerQ un/rely 0/0
*Mar 21 23:17:38.014: EIGRP: Received HELLO on Serial0/2/0 nbr 10.1.5.2
*Mar 21 23:17:38.014:   AS 10, Flags 0x0, Seq 0/0 idbQ 0/0 iidbQ
   un/rely 0/0 peerQ un/rely 0/0
Exam Essentials
Know the EIGRP features. EIGRP is a classless, advanced distance-vector protocol that supports IP, IPX, AppleTalk, and now IPv6. EIGRP uses a unique algorithm, called DUAL, to maintain route information and uses RTP to communicate with other EIGRP routers reliably.
Know how to configure EIGRP. Be able to configure basic EIGRP. This is configured the same as IGRP with classful addresses.
Know how to verify EIGRP operation. Know all of the EIGRP show commands and be familiar with their output and the interpretation of the main components of their output.
Verify Network Connectivity (Including Using ping, traceroute, and Telnet or SSH)
For information on these objectives, please see the section titled “Verify Device Configuration and Network Connectivity Using ping, traceroute, Telnet, SSH, or other Utilities” earlier in this chapter.
The best troubleshooting tools are show and debug commands, specifically show ip protocols and various routing protocol debugging commands. Let’s take a look.
First, the show ip protocols command will show you the routing protocols configured on your router. Hopefully, you have only one. Here is an example:
Router#sh ip protocols
Routing Protocol is "rip"
  Outgoing update filter list for all interfaces is not set
  Incoming update filter list for all interfaces is not set
  Sending updates every 30 seconds, next due in 27 seconds
  Invalid after 180 seconds, hold down 180, flushed after 240
  Redistributing: rip
  Default version control: send version 2, receive version 2
    Interface             Send  Recv  Triggered RIP  Key-chain
    FastEthernet0/1       2     2
    Serial0/0/1           2     2
  Automatic network summarization is not in effect
  Maximum path: 4
  Routing for Networks:
    10.0.0.0
  Passive Interface(s):
    FastEthernet0/0
    Serial0/0/0
  Routing Information Sources:
    Gateway         Distance      Last Update
    10.1.11.2            120      00:00:00
    10.1.5.1             120      00:00:02
  Distance: (default is 120)
This router output shows that the router is running RIPv2, the interfaces participating in the routing process, the next-hop gateways (neighbors), and the administrative distance. Also, you can see that the maximum path is 4, which means that RIP will load-balance across four equal-cost links by default.
There are dozens of debugging commands you can use, and for RIP, the debug ip rip command is the best tool for debugging RIP routing.
*Mar 17 19:34:00.123: RIP: sending v2 update to 224.0.0.9 via
   Serial0/0/1 (10.1.5.2)
*Mar 17 19:34:00.123: RIP: build update entries
*Mar 17 19:34:00.123:   10.1.10.0/24 via 0.0.0.0, metric 1, tag 0
*Mar 17 19:34:00.123:   10.1.11.0/24 via 0.0.0.0, metric 1, tag 0
*Mar 17 19:34:00.123:   10.1.12.0/24 via 0.0.0.0, metric 2, tag 0col
*Mar 17 19:34:03.795: RIP: received v2 update from 10.1.5.1 on
   Serial0/0/1
This debugging output shows that RIPv2 is running with multicast address 224.0.0.9.
For EIGRP, I am going to show you two commands—the debug eigrp packet command and the debug ip eigrp notification command:
Router#debug eigrp packet
EIGRP Packets debugging is on
    (UPDATE, REQUEST, QUERY, REPLY, HELLO, IPXSAP, PROBE, ACK, STUB,
    SIAQUERY, SIAREPLY)
*Mar 21 23:17:35.050: EIGRP: Sending HELLO on FastEthernet0/1
*Mar 21 23:17:35.050:   AS 10, Flags 0x0, Seq 0/0 idbQ 0/0 iidbQ un/rely 0/0
*Mar 21 23:17:35.270: EIGRP: Received HELLO on Serial0/1/0 nbr 10.1.4.2
*Mar 21 23:17:35.270:   AS 10, Flags 0x0, Seq 0/0 idbQ 0/0 iidbQ
   un/rely 0/0 peerQ un/rely 0/0
*Mar 21 23:17:35.294: EIGRP: Received HELLO on Serial0/0/0 nbr 10.1.2.2
*Mar 21 23:17:35.294:   AS 10, Flags 0x0, Seq 0/0 idbQ 0/0 iidbQ
   un/rely 0/0 peerQ un/rely 0/0
*Mar 21 23:17:38.014: EIGRP: Received HELLO on Serial0/2/0 nbr 10.1.5.2
*Mar 21 23:17:38.014:   AS 10, Flags 0x0, Seq 0/0 idbQ 0/0 iidbQ
   un/rely 0/0 peerQ un/rely 0/0
The EIGRP 224.0.0.10 multicast is sent out every 5 seconds, and the Hello packets are sent out of every active interface, as well as all the interfaces to which neighbors are connected. Did you notice the AS number provided in the update? It is provided because the Hello update will just be discarded if a neighbor doesn’t have the same AS number.
The debug ip eigrp notification command (called debug ip eigrp events on pre-12.4 routers) shouldn’t show you anything at all. The only time you’ll see output from this command is if there’s a problem on your network—or if you’ve added or deleted a network from a router in your internetwork. Because I have a problem-free network, I’m going to shut down an interface on my router in order to see some output:
Router(config)#int f0/1
Router(config-if)#shut
*Mar 21 23:25:43.506: IP-EIGRP(Default-IP-Routing-Table:10): Callback:
   route_adjust FastEthernet0/1
*Mar 21 23:25:43.506: IP-EIGRP: Callback: ignored connected AS 0 10.1.1.0/24
*Mar 21 23:25:43.506:           into: eigrp AS 10
*Mar 21 23:25:43.506: IP-EIGRP(Default-IP-Routing-Table:10): Callback:
   callbackup_routes 10.1.1.0/24
Corp(config-if)#n
*Mar 21 23:25:45.506: %LINK-5-CHANGED: Interface FastEthernet0/1,
   changed state to administratively down
*Mar 21 23:25:46.506: %LINEPROTO-5-UPDOWN: Line protocol on Interface
   FastEthernet0/1, changed state to down
Router(config-if)#no shut
Router(config-if)#^Z
*Mar 21 23:25:49.570: %LINK-3-UPDOWN: Interface FastEthernet0/1,
   changed state to up
*Mar 21 23:25:49.570: IP-EIGRP(Default-IP-Routing-Table:10): Callback:
   lostroute 10.1.1.0/24
*Mar 21 23:25:49.570: IP-EIGRP(Default-IP-Routing-Table:0): Callback:
   redist connected (config change) FastEthernet0/1
*Mar 21 23:25:49.570: IP-EIGRP(Default-IP-Routing-Table:0): Callback:
   redist connected (config change) Serial0/0/0
*Mar 21 23:25:49.570: IP-EIGRP(Default-IP-Routing-Table:0): Callback:
   redist connected (config change) Serial0/0/1
*Mar 21 23:25:49.570: IP-EIGRP(Default-IP-Routing-Table:0): Callback:
   redist connected (config change) Serial0/1/0
*Mar 21 23:25:49.570: IP-EIGRP(Default-IP-Routing-Table:0): Callback:
   redist connected (config change) Serial0/2/0
*Mar 21 23:25:49.570: IP-EIGRP(Default-IP-Routing-Table:10): Callback:
   route_adjust FastEthernet0/1
As previously mentioned, debugging is a great tool for any protocol. Table 4-8 describes a few debugging commands for OSPF.
Table 4-8: Debugging Commands for Troubleshooting OSPF
| Command | Description/Function |
| debug ip ospf packet | Shows Hello packets being sent and received on your router |
| debug ip ospf hello | Shows Hello packets being sent and received on your router. Shows more detail than the debug ip ospf packet output |
| debug ip ospf adj | Shows DR and DBR elections on a broadcast and nonbroadcast multi-access network |
I’ll start by showing you the output from the router I have, using the debug ip ospf packet command:
Router#debug ip ospf packet
OSPF packet debugging is on
*Mar 23 01:20:42.199: OSPF: rcv. v:2 t:1 l:48 rid:172.16.10.3
      aid:0.0.0.0 chk:8075 aut:0 auk: from Serial0/1/0
*Mar 23 01:20:45.507: OSPF: rcv. v:2 t:1 l:48 rid:172.16.10.2
      aid:0.0.0.0 chk:8076 aut:0 auk: from Serial0/0/0
*Mar 23 01:20:45.531: OSPF: rcv. v:2 t:1 l:48 rid:172.16.10.2
      aid:0.0.0.0 chk:8076 aut:0 auk: from Serial0/0/1
*Mar 23 01:20:45.531: OSPF: rcv. v:2 t:1 l:48 rid:172.16.10.4
      aid:0.0.0.0 chk:8074 aut:0 auk: from Serial0/2/0
*Mar 23 01:20:52.199: OSPF: rcv. v:2 t:1 l:48 rid:172.16.10.3
      aid:0.0.0.0 chk:8075 aut:0 auk: from Serial0/1/0
*Mar 23 01:20:55.507: OSPF: rcv. v:2 t:1 l:48 rid:172.16.10.2
      aid:0.0.0.0 chk:8076 aut:0 auk: from Serial0/0/0
In this output, you can see that the router is both sending and receiving Hello packets every 10 seconds from neighbor (adjacent) routers. The next command will provide the same information, but with more detail. For example, you can see the multicast address used (224.0.0.5) and the area in the following output:
Router#debug ip ospf hello
*Mar 23 01:18:41.103: OSPF: Send hello to 224.0.0.5 area 0 on
   Serial0/1/0 from 10.1.4.1
*Mar 23 01:18:41.607: OSPF: Send hello to 224.0.0.5 area 0 on
   FastEthernet0/1 from 10.1.1.1
*Mar 23 01:18:41.607: OSPF: Send hello to 224.0.0.5 area 0 on
   Serial0/0/0 from 10.1.2.1
*Mar 23 01:18:41.611: OSPF: Send hello to 224.0.0.5 area 0 on
   Serial0/2/0 from 10.1.5.1
*Mar 23 01:18:41.611: OSPF: Send hello to 224.0.0.5 area 0 on
   Serial0/0/1 from 10.1.3.1
*Mar 23 01:18:42.199: OSPF: Rcv hello from 172.16.10.3 area 0 from
   Serial0/1/0 10.1.4.2
*Mar 23 01:18:42.199: OSPF: End of hello processing
*Mar 23 01:18:45.519: OSPF: Rcv hello from 172.16.10.2 area 0 from
   Serial0/0/0 10.1.2.2
*Mar 23 01:18:45.519: OSPF: End of hello processing
The last debug command I’m going show you is the debug ip ospf adj command, which displays elections as they occur on broadcast and nonbroadcast multi-access networks:
Router#debug ip ospf adj
OSPF adjacency events debugging is on
*Mar 23 01:24:34.823: OSPF: Interface FastEthernet0/1 going Down
*Mar 23 01:24:34.823: OSPF: 172.16.10.1 address 10.1.1.1 on
   FastEthernet0/1 is dead, state DOWN
*Mar 23 01:24:34.823: OSPF: Neighbor change Event on interface
   FastEthernet0/1
*Mar 23 01:24:34.823: OSPF: DR/BDR election on FastEthernet0/1
*Mar 23 01:24:34.823: OSPF: Elect BDR 0.0.0.0
*Mar 23 01:24:34.823: OSPF: Elect DR 0.0.0.0
*Mar 23 01:24:34.823: OSPF: Elect BDR 0.0.0.0
*Mar 23 01:24:34.823: OSPF: Elect DR 0.0.0.0
*Mar 23 01:24:34.823:        DR: none    BDR: none
*Mar 23 01:24:34.823: OSPF: Flush network LSA immediately
*Mar 23 01:24:34.823: OSPF: Remember old DR 172.16.10.1 (id)
*Mar 23 01:24:35.323: OSPF: We are not DR to build Net Lsa for
   interface FastEthernet0/1
*Mar 23 01:24:35.323: OSPF: Build router LSA for area 0, router ID
   172.16.10.1, seq 0x80000006
*Mar 23 01:24:35.347: OSPF: Rcv LS UPD from 172.16.10.2 on Serial0/0/1
   length 148 LSA count 1
*Mar 23 01:24:40.703: OSPF: Interface FastEthernet0/1 going Up
*Mar 23 01:24:41.203: OSPF: Build router LSA for area 0, router ID
   172.16.10.1, seq 0x80000007
*Mar 23 01:24:41.231: OSPF: Rcv LS UPD from 172.16.10.2 on Serial0/0/1
   length 160 LSA count 1
Exam Essentials
Verify EIGRP with show and debug commands. Use the debug eigrp packet, sh ip eigrp topology, sh ip eigrp neighbors, and sh ip route commands to verify EIGRP.
Remember what the command debug ip ospf packet provides to you. Shows Hello packets being sent and received on your router.
Remember what the command debug ip ospf hello provides to you. Shows Hello packets being sent and received on your router. Shows more detail than the debug ip ospf packet output.
Remember what the command debug ip ospf adj provides to you. Shows DR and DBR elections on a broadcast and nonbroadcast multi-access network.
Verify Router Hardware and Software Operation Using the show and debug Commands
You can use the ping and traceroute commands to test connectivity to remote devices, and both of them can be used with many protocols, not just IP. Don’t forget that the show ip route command is a good troubleshooting command for verifying your routing table, and the show interfaces command will show you the status of each interface.
I am going to go over both the debug command and the show processes command you need to troubleshoot a router.
Using the ping Command
So far, you’ve seen many examples of pinging devices to test IP connectivity and name resolution using the DNS server. To see all the different protocols that you can use with the ping program, type ping ?:
Corp#ping ?
  WORD  Ping destination address or hostname
  clns  CLNS echo
  ip    IP echo
  srb   srb echo
  tag   Tag encapsulated IP echo
  <cr>
The ping output displays the minimum, average, and maximum times it takes for a ping packet to find a specified system and return. Here’s an example:
Corp#ping R1
Translating "R1"...domain server (192.168.0.70)[OK]
Type escape sequence to abort.
Sending 5, 100-byte ICMP Echos to 10.2.2.2, timeout
  is 2 seconds:
!!!!!
Success rate is 100 percent (5/5), round-trip min/avg/max
  = 1/2/4 ms
Corp#
You can see that the DNS server was used to resolve the name, and the device was pinged in 1ms (millisecond), an average of 2ms, and up to 4ms.
The ping command can be used in user mode and privileged mode but not in configuration mode.
Using the traceroute Command
Traceroute (the traceroute command, or trace for short) shows the path a packet takes to get to a remote device. It uses time to live (TTL) time-outs and ICMP error messages to outline the path a packet takes through an internetwork to arrive at a remote host.
Trace (the trace command) can be used from either user mode or privileged mode. Trace allows you to determine which router in the path to an unreachable network host should be examined more closely for the cause of the network’s failure.
To see the protocols that you can use with the traceroute command, type traceroute ?:
Corp#traceroute ?
  WORD       Trace route to destination address or hostname
  appletalk  AppleTalk Trace
  clns       ISO CLNS Trace
  ip         IP Trace
  ipv6       IPv6 Trace
  ipx        IPX Trace
  <cr>
The trace command shows the hop or hops that a packet traverses on its way to a remote device. Here’s an example:
Corp#traceroute r1
Type escape sequence to abort.
Tracing the route to R1 (10.2.2.2)
  1 R1 (10.2.2.2) 4 msec *  0 msec
Corp#
You can see that the packet went through only one hop to find the destination.
Do not get confused! You can’t use the tracert command—it’s a Windows command. For a router, use the traceroute command.
Here’s an example of using tracert from a Windows DOS prompt (notice the command tracert):
C:>tracert www.whitehouse.gov
Tracing route to a1289.g.akamai.net [69.8.201.107]
over a maximum of 30 hops:
  1     *        *        *     Request timed out.
  2    53 ms    61 ms    53 ms  hlrn-dsl-gw15-207.hlrn.qwest.net
         [207.225.112.207]
  3    53 ms    55 ms    54 ms  hlrn-agw1.inet.qwest.net [71.217.188.113]
  4    54 ms    53 ms    54 ms  hlr-core-01.inet.qwest.net [205.171.253.97]
  5    54 ms    53 ms    54 ms  apa-cntr-01.inet.qwest.net [205.171.253.26]
  6    54 ms    53 ms    53 ms  63.150.160.34
  7    54 ms    54 ms    53 ms  www.whitehouse.gov [69.8.201.107]
Trace complete.
Let’s move on and talk about how to troubleshoot your network using the debug command.
Debugging
The debug command is a troubleshooting command that’s available from the privileged exec mode of Cisco IOS. It’s used to display information about various router operations and the related traffic generated or received by the router, plus any error messages.
It’s a useful and informative tool, but you really need to understand some important facts about its use. Debugging is regarded as a very high-priority task, because it can consume a huge amount of resources and the router is forced to process-switch the packets being debugged. So, you don’t just use debug as a monitoring tool—it’s meant to be used for a short period of time and only as a troubleshooting tool. By using it, you can discover some significant facts about both working and faulty software and/or hardware components.
Because debugging output takes priority over other network traffic, and because the debug all command generates more output than any other debug command, it can severely diminish the router’s performance—even render it unusable. So, in virtually all cases, it’s best to use more-specific debug commands.
As you can see from the following output, you can’t enable debugging from user mode, only privileged mode:
Corp>debug ?
% Unrecognized command
Corp>en
Corp#debug ?
  aaa                     AAA Authentication, Authorization and Accounting
  access-expression       Boolean access expression
  adjacency               adjacency
  all                     Enable all debugging
[output cut]
If you’ve got the freedom to pretty much take out a router and you really want to have some fun with debugging, you can use the debug all command as shown in the following example:
Corp#debug all
This may severely impact network performance. Continue? (yes/[no]):yes
All possible debugging has been turned on
2d20h: SNMP: HC Timer 824AE5CC fired
2d20h: SNMP: HC Timer 824AE5CC rearmed, delay = 20000
2d20h: Serial0/0: HDLC myseq 4, mineseen 0, yourseen 0, line down
2d20h:
2d20h: Rudpv1 Sent: Pkts 0,  Data Bytes 0,  Data Pkts 0
2d20h: Rudpv1 Rcvd: Pkts 0,  Data Bytes 0,  Data Pkts 0
2d20h: Rudpv1 Discarded: 0,  Retransmitted 0
2d20h:
2d20h: RIP-TIMER: periodic timer expired
2d20h: Serial0/0: HDLC myseq 5, mineseen 0, yourseen 0, line down
2d20h: Serial0/0: attempting to restart
2d20h: PowerQUICC(0/0): DCD is up.
2d20h: is_up: 0 state: 4 sub state: 1 line: 0
2d20h:
2d20h: Rudpv1 Sent: Pkts 0,  Data Bytes 0,  Data Pkts 0
2d20h: Rudpv1 Rcvd: Pkts 0,  Data Bytes 0,  Data Pkts 0
2d20h: Rudpv1 Discarded: 0,  Retransmitted 0
2d20h: un all
All possible debugging has been turned off
Corp#
To disable debugging on a router, you can use the command no in front of the debug command, like this:
Corp#no debug all
I typically just use the undebug all command, because it is so easy when using the shortcut as shown here:
Corp#un all
Remember that instead of using the debug all command, it’s almost always better to use specific commands—and only for short periods of time. Here’s an example of deploying debug ip rip that will show you RIP updates being sent and received on a router:
Corp#debug ip rip
RIP protocol debugging is on
Corp#
1w4d: RIP: sending v2 update to 224.0.0.9 via Serial0/0 (192.168.12.1)
1w4d: RIP: build update entries
1w4d:   10.10.10.0/24 via 0.0.0.0, metric 2, tag 0
1w4d:   171.16.125.0/24 via 0.0.0.0, metric 3, tag 0
1w4d:   172.16.12.0/24 via 0.0.0.0, metric 1, tag 0
1w4d:   172.16.125.0/24 via 0.0.0.0, metric 3, tag 0
1w4d: RIP: sending v2 update to 224.0.0.9 via Serial0/2 (172.16.12.1)
1w4d: RIP: build update entries
1w4d:   192.168.12.0/24 via 0.0.0.0, metric 1, tag 0
1w4d:   192.168.22.0/24 via 0.0.0.0, metric 2, tag 0
1w4d: RIP: received v2 update from 192.168.12.2 on Serial0/0
1w4d:    192.168.22.0/24 via 0.0.0.0 in 1 hops
Corp#un all
I’m sure you can see that the debug command is a very powerful command. Because of this, I’m also sure you realize that before you use any of the debugging commands, you should make sure you check the utilization of your router. This is important because in most cases, you don’t want to negatively impact the device’s ability to process the packets throughput on your internetwork. You can determine a specific router’s utilization information by using the show processes command.
Remember, when you Telnet into a remote device, you will not see console messages by default. For example, you will not see debugging output. To allow console messages to be sent to your Telnet session, use the terminal monitor command.
Using the show processes Command
As mentioned in the previous section, you’ve really got to be careful when using the debug command on your devices. If your router’s CPU utilization is consistently at 50 percent or more, it’s probably not a good idea to type in the debug all command unless you want to see what a router looks like when it crashes.
A feasible alternative is the show processes (or show processes cpu) command, which gives you the following information:
- CPU utilization
- Active processes and the corresponding details:
- Process ID
- Priority
- Scheduler test (status)
- CPU time used
- Number of times invoked
In the following example, the first line shows the CPU utilization output for the last 5 seconds, 1 minute, and 5 minutes. The output provides 2%/0% in front of the CPU utilization for the last 5 seconds. The first number equals the total utilization, and the second one delimits the utilization due to interrupt routines.
Corp#sh processes
CPU utilization for five seconds: 2%/0%; one minute: 0%; five minutes: 0%
 PID QTy       PC Runtime (ms)    Invoked   uSecs    Stacks TTY Process
   1 Cwe 8034470C            0          1       0 5804/6000   0 Chunk Manager
   2 Csp 80369A88            4       1856       2 2616/3000   0 Load Meter
   3 M*         0          112         14    800010656/12000  0 Exec
   5 Lst 8034FD9C       268246      52101    5148 5768/6000   0 Check heaps
   6 Cwe 80355E5C           20          3    6666 5704/6000   0 Pool Manager
   7 Mst 802AC3C4            0          2       0 5580/6000   0 Timers
[output cut]
Basically, the output from the show processes command shows that the router is able to process debugging commands without being overloaded.
Exam Essentials
Remember the difference between the traceroute and tracert commands. The command trace (or traceroute) is used with Cisco routers, switches, and Unix devices. However, the command tracert is used on Windows devices from the DOS prompt.
Remember which command to use before debugging a router. Before using any debug command on a router, you should use the show processes command to verify the CPU utilization.
Implement Basic Router Security
An access list is essentially a list of conditions that categorize packets. This can be really helpful when you need to exercise control over network traffic.
One of the most common and easiest-to-understand uses of access lists is filtering unwanted packets when implementing security policies. For example, you can set up access lists to make very specific decisions about regulating traffic patterns so they’ll allow only certain hosts to access web resources on the Internet while restricting others. With the right combination of access lists, network managers arm themselves with the power to enforce nearly any security policy they can invent.
Access lists can even be used in situations that don’t necessarily involve blocking packets. For example, you can use them to control which networks will or won’t be advertised by dynamic routing protocols. How you configure the access list is the same. The difference here is simply how you apply it—to a routing protocol instead of an interface. When you apply an access list in this way, it’s called a distribute list, and it doesn’t stop routing advertisements—it just controls their content. You can also use access lists to categorize packets for queuing or QoS-type services and for controlling which types of traffic can activate an ISDN link.
Creating access lists is a lot like programming a series of if-then statements—if a given condition is met, then a given action is taken. If the specific condition isn’t met, nothing happens and the next statement is evaluated. Access-list statements are basically packet filters that packets are compared against, categorized by, and acted upon accordingly. Once the lists are built, they can be applied to either inbound or outbound traffic on any interface. Applying an access list causes the router to analyze every packet crossing that interface in the specified direction and then take the appropriate action. Here are a few important rules that a packet follows when it’s being compared with an access list:
- It’s always compared with each line of the access list in sequential order—that is, it will always start with the first line of the access list, then go to line 2, then line 3, and so on.
- It’s compared with lines of the access list only until a match is made. Once the packet matches the condition on a line of the access list, the packet is acted upon and no further comparisons take place.
- There is an implicit deny at the end of each access list, which means that if a packet doesn’t match the condition on any of the lines in the access list, the packet will be discarded.
Each of these rules has some powerful implications when filtering IP packets with access lists, so keep in mind that creating effective access lists takes some practice.
There are two main types of access lists:
Standard Access Lists These use only the source IP address in an IP packet as the condition test. All decisions are made based on the source IP address. This means that standard access lists basically permit or deny an entire suite of protocols. They don’t distinguish among any of the many types of IP traffic such as web, Telnet, UDP, and so on.
Extended Access Lists Extended access lists can evaluate many of the other fields in the layer 3 and layer 4 headers of an IP packet. They can evaluate source and destination IP addresses, the protocol field in the Network layer header, and the port number at the Transport layer header. This gives extended access lists the ability to make much more granular decisions when controlling traffic.
Named Access Lists I said there were two types of access lists but I listed three! Well, technically there really are only two because named access lists are either standard or extended and are not actually a new type. I’m just distinguishing them because they’re created and referred to differently than standard and extended access lists, but they’re functionally the same.
Once you create an access list, it’s not really going to do anything until you apply it. To use an access list as a packet filter, you need to apply it to an interface on the router where you want the traffic filtered—and you need to specify to which direction of traffic you want the access list applied. There’s a good reason for this—you may want different controls in place for traffic leaving your enterprise destined for the Internet than you’d want for traffic coming into your enterprise from the Internet. So, by specifying the direction of traffic, you can—and frequently you’ll need to—use different access lists for inbound and outbound traffic on a single interface.
Inbound Access Lists When an access list is applied to inbound packets on an interface, those packets are processed through the access list before being routed to the outbound interface. Any packets that are denied won’t be routed, because they’re discarded before the routing process is invoked.
Outbound Access Lists When an access list is applied to outbound packets on an interface, those packets are routed to the outbound interface and then processed through the access list before being queued.
Here are some general guidelines that you should follow when you’re creating and implementing access lists on a router:
- You can assign only one access list per interface per protocol per direction. This means that when creating IP access lists, you can have only one inbound access list and one outbound access list per interface.
When you consider the implications of the implicit deny at the end of any access list, it makes sense that you can’t have multiple access lists applied on the same interface in the same direction for the same protocol. That’s because any packets that don’t match some condition in the first access list would be denied, and there wouldn’t be any packets left over to compare against a second access list.
- Organize your access lists so that the more-specific tests are at the top of the access list.
- Anytime a new entry is added to the access list, it will be placed at the bottom of the list. Using a text editor for access lists is highly suggested.
- You cannot remove one line from an access list. If you try to do this, you will remove the entire list. It is best to copy the access list to a text editor before trying to edit the list. The only exception is when you’re using named access lists.
- Unless your access list ends with a permit any command, all packets will be discarded if they do not meet any of the list’s tests. Every list should have at least one permit statement or it will deny all traffic.
- Create access lists and then apply them to an interface. Any access list not applied to an interface will not filter traffic.
- Access lists are designed to filter traffic going through the router. They will not filter traffic that has originated from the router.
- Place IP standard access lists as close to the destination as possible. Standard ACLs can only filter based on source address. If placed too close to the source, the source device will be blocked from everything beyond the point where the ACL is applied.
- Place IP extended access lists as close to the source as possible. Because extended access lists can filter on very specific addresses and protocols, you don’t want your traffic to traverse the entire network and then be denied. By placing this list as close to the source address as possible, you can filter traffic before it uses up your precious bandwidth.
Exam Essentials
Understand the term implicit deny. At the end of every access list is an implicit deny. What this means is that if a packet does not match any of the lines in the access list, it will be discarded. Also, if you have nothing but deny statements in your list, then the list will not permit any packets.
Understand the standard IP access-list configuration command. To configure a standard IP access list, use the access-list numbers 1–99 or 1300–1999 in global configuration mode. Choose permit or deny, and then choose the source IP address you want to filter on using one of the three techniques covered earlier.
Understand the extended IP access-list configuration command. To configure an extended IP access list, use the access-list numbers 100–199 or 2000–2699 in global configuration mode. Choose permit or deny, the Network layer protocol field, the source IP address you want to filter on, the destination address you want to filter on, and the Transport layer port number (if selected).
Understand the logic of ACL processing. All lines are processed in order until a match is found. Once the packet matches the condition on a line of the access list, the packet is acted upon and no further comparisons take place. There is an implicit deny at the end of each access list.
Contrast standard and extended ACLs. Standard ACLs can only filter based on source IP address, while extended ACLs can filter based on source and destination IP addresses and port numbers.
Describe the logic of inbound and outbound ACLs. Inbound ACLs are applied before a packet is routed and outgoing ACLs filter after routing has taken place.
1. Network 206.143.5.0 was assigned to the Acme Company to connect to its ISP. The Acme administrator would like to configure one router with the commands to access the Internet. Which commands could be configured on the Gateway router to allow Internet access to the entire network? (Choose two.)
A. Gateway(config)#ip route 0.0.0.0 0.0.0.0 206.143.5.2
B. Gateway(config)#router rip
C. Gateway(config-router)#network 206.143.5.0
D. Gateway(config)#router rip
E. Gateway(config-router)#network 206.143.5.0 default
F. Gateway(config)#ip route 206.143.5.0 255.255.255.0 default
G. Gateway(config)#ip default-network 206.143.5.0
2. Which statements are true regarding classless routing protocols? (Choose two.)
A. The use of discontiguous networks is not allowed.
B. The use of variable length subnet masks is permitted.
C. RIPv1 is a classless routing protocol.
D. IGRP supports classless routing within the same autonomous system.
E. RIPv2 supports classless routing.
3. Which two of the following are true regarding the distance-vector and link-state routing protocols?
A. Link-state protocols send their complete routing tables out all active interfaces on periodic time intervals.
B. Distance-vector protocols send their complete routing tables out all active interfaces on periodic time intervals.
C. Link-state protocols send updates containing the state of their own links to all routers in the internetwork.
D. Distance-vector protocols send updates containing the state of their own links to all routers in the internetwork.
4. Which command displays RIP routing updates?
A. show ip route
B. debug ip rip
C. show protocols
D. debug ip route
5. Which of the following is true regarding RIPv2?
A. It has a lower administrative distance than RIPv1.
B. It converges faster than RIPv1.
C. It has the same timers as RIPv1.
D. It is harder to configure than RIPv1.
6. Which command will copy the IOS to a backup host on your network?
A. transfer IOS to 172.16.10.1
B. copy run start
C. copy tftp flash
D. copy start tftp
E. copy flash tftp
7. You are troubleshooting a connectivity problem in your corporate network and want to isolate the problem. You suspect that a router on the route to an unreachable network is at fault. What IOS user exec command should you issue?
A. Router>ping
B. Router>trace
C. Router>show ip route
D. Router>show interface
E. Router>show cdp neighbors
8. You copy a configuration from a network host to a router’s RAM. The configuration looks correct, yet it is not working at all. What could the problem be?
A. You copied the wrong configuration into RAM.
B. You copied the configuration into flash memory instead.
C. The copy did not override the shutdown command in running-config.
D. The IOS became corrupted after the copy command was initiated.
9. A network administrator wants to upgrade the IOS of a router without removing the image currently installed. What command will display the amount of memory consumed by the current IOS image and indicate whether enough room is available to hold both the current and new images?
A. show version
B. show flash
C. show memory
D. show buffers
E. show running-config
10. Which command loads a new version of the Cisco IOS into a router?
A. copy flash ftp
B. copy ftp flash
C. copy flash tftp
D. copy tftp flash
1. A, E. There are actually three different ways to configure the same default route, but only two are shown in the answer. First, you can set a default route with the 0.0.0.0 0.0.0.0 mask and then specify the next hop, as in answer A. Or, you can use 0.0.0.0 0.0.0.0 and use the exit interface instead of the next hop. Finally, you can use answer E with the ip default-network command.
2. B, E. Classful routing means that all hosts in the internetwork use the same mask. Classless routing means that you can use Variable Length Subnet Masks (VLSMs) and can also support discontiguous networking.
3. B, C. The distance-vector routing protocol sends its complete routing table out all active interfaces on periodic time intervals. Link-state routing protocols send updates containing the state of their own links to all routers in the internetwork.
4. B. Debug ip rip is used to show the Internet Protocol (IP) Routing Information Protocol (RIP) updates being sent and received on the router.
5. C. RIPv2 is pretty much just like RIPv1. It has the same administrative distance and timers and is configured just like RIPv1.
6. E. To copy the IOS to a backup host, which is stored in flash memory by default, use the copy flash tftp command.
7. B. The command traceroute (trace for short), which can be issued from user mode or privileged mode, is used to find the path a packet takes through an internetwork and will also show you where the packet stops because of an error on a router.
8. C. Because the configuration looks correct, you probably didn’t screw up the copy job. However, when you perform a copy from a network host to a router, the interfaces are automatically shut down and need to be manually enabled with the no shutdown command.
9. B. The show flash command will provide the current IOS name and size and the size of flash memory.
10. D. The command copy tftp flash will allow you to copy a new IOS into flash memory on your router.