Chapter 4. WebVPN and Endpoint Security
Serving as an alternative to traditional IPsec VPN clients, Cisco now offers WebVPN (also known as SSL VPN) solutions to customers. A WebVPN can make use of the client’s web browser alone, or download the AnyConnect client (replacing SSL VPN client) to build a secure connection to company resources. One of the biggest advantages to WebVPN is that the user does not require a software client to build the secure connection. The user can connect using a web browser, and then after successful authentication gain access to certain corporate resources, or possibly download the AnyConnect WebVPN client, which will allow a greater level of access than the browser alone.
WebVPN functionality is provided by the ASA 5500 security appliances. WebVPN is not supported by the PIX 500 series firewalls because of the lack of a Secure Sockets Layer (SSL) crypto processor.
Similar to the function of an IPsec virtual private network (VPN) gateway, an SSL VPN gateway terminates the encrypted session and forwards data into the network in its standard format. For instance, if a user were to initiate a Telnet session through an SSL tunnel, the Telnet traffic would be encrypted between the user and the ASA, and then sent “in the clear” to the corporate LAN. If security within the corporate network is a concern, secure protocols such as Secure Copy (SCP), Secure Shell (SSH), and HTTPS should be used for remote administration.
WebVPN can be implemented with three different client configurations: clientless, thin client, and the AnyConnect VPN client.
The intended application for clientless or thin client SSL VPN is as follows:
• Corporate user at a public kiosk (such as a business center in a hotel)
• Residential workstation
• Partner
• Corporate desktop, if applications are limited
• Appropriate for users when a simplified portal is preferred to full access.
• Users who require remote connectivity occasionally
The intended application for AnyConnect SSL VPN is as follows:
• Network engineers
• Mobile employees who require LAN-like access
• VoIP users
• Company-managed workstations and laptops
• Users with diverse application requirements
• Users who frequently require secure remote access to the corporate LAN
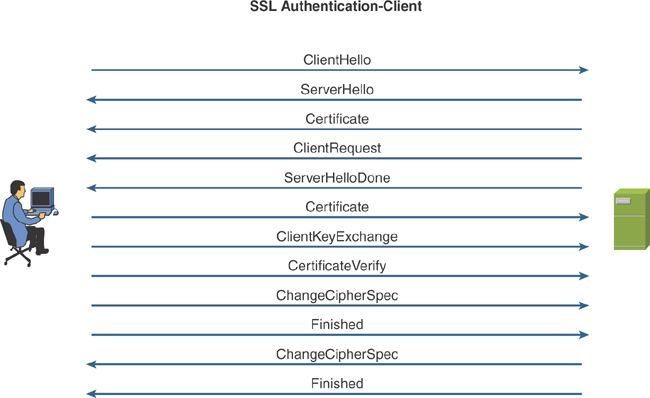
SSL provides a secure means for communication between client and server. A digital certificate is used for server and client authentication. The exchange of the session key is protected by RSA keys. The session key is based on a symmetric cipher such as DES, RC4, 3DES, or AES.

Clientless SSL VPN
The simplest implementation of WebVPN is clientless SSL VPN. In this scenario, a remote user connects to the ASA using only a web browser, and upon successful authentication, is granted access to a web portal. This portal can be configured on a per-group or per-user basis, to include hyperlinks to internal resources using the Common Internet File System (CIFS) or HTTP. Users can also be granted access to a URL Entry field, allowing users to define their own URLs for internal resources.
This is a nice simple solution for certain roles within your organization, such as sales and marketing personnel who require access to only a particular file share or internal website.
Clientless SSL is supported on the following:
• Browsers
Firefox
Internet Explorer
Netscape
Safari
• Operating systems
Apple OS X
Linux
Microsoft Windows
Solaris

Thin Client
The thin client remote-access method refers to the use of tiny applet (typically less than 100 KB) being pushed to the client after authentication. This applet will be ActiveX or Java based and will require permission to run within the browser. Once launched successfully, the thin client allows for port forward applications through the SSL connection. This allows access to internal devices using Telnet and SSH; access to mail servers using IMAP, POP3, and SMTP; and other nonweb applications.
When configuring the thin client, the firewall administrator must define the port that will be used on the client side (TCP port 2323, for example) and the internal resource that this will be forwarded to. When the client establishes an SSL VPN connection, he can then connect to that port to access corporate resources. This is referred to as port forwarding.
Example:
telnet 127.0.0.1 2323
This Telnet connection will then be forwarded through SSL to the ASA, where the SSL encapsulation is removed and the unencrypted Telnet traffic is forwarded to the server that was mapped by the firewall administrator.
One restriction of using the thin client is that it requires administrative privileges to install the client.
Smart Tunnels
Smart tunnels can be thought of as the evolution of the thin client, because they allow the similar access without the need for a local port on the client’s machine, thus removing the requirement for administrative access. This feature was introduced in Version 8.0(2) of the ASA operating system. The only operating systems that currently support this are Windows 2000, XP, and Vista. Similar to the thin client, smart tunnel connections also require access to Java or ActiveX.
AnyConnect
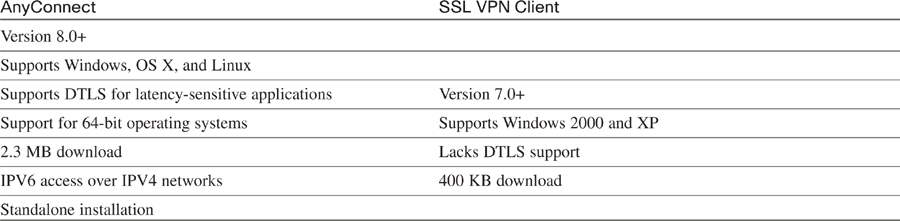
The AnyConnect client was introduced in the 8.0 version of the ASA operating system to replace the SSL VPN client (SVC). AnyConnect provides transparent network access, similar to what is provided by the Cisco IPsec VPN client. Unlike the IPsec client, however, it can be installed dynamically after a user establishes an SSL VPN connection to the ASA.
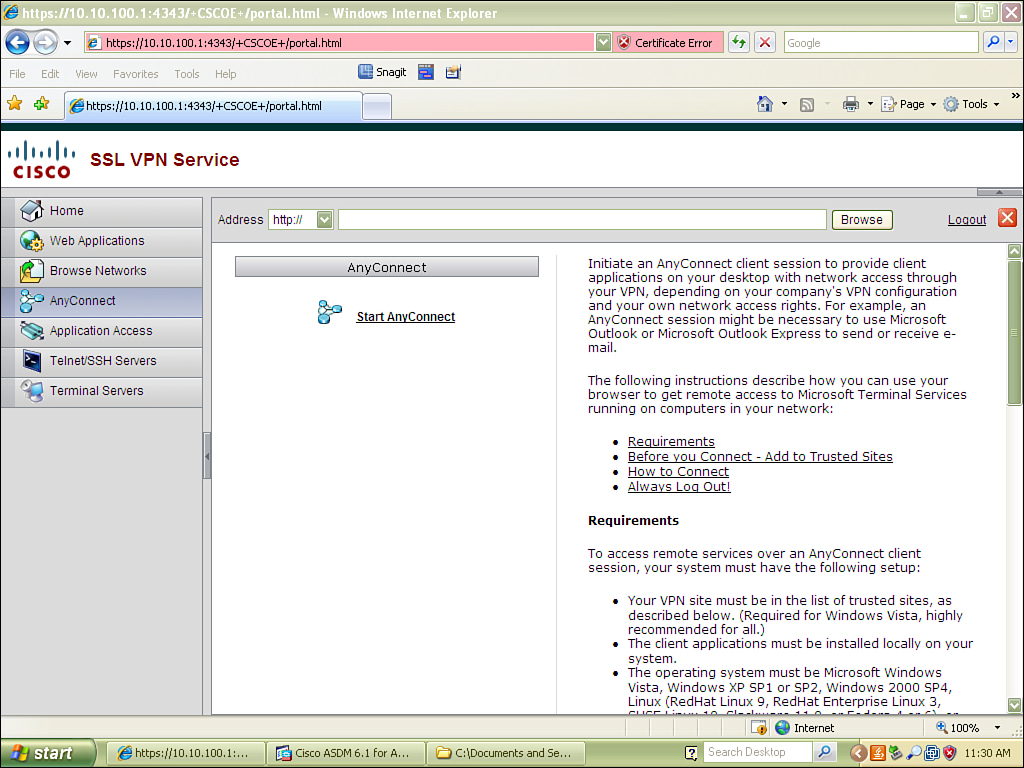
Upon successful connection of a traditional WebVPN connection, the user may be presented with a link within the portal to download and install the AnyConnect client.
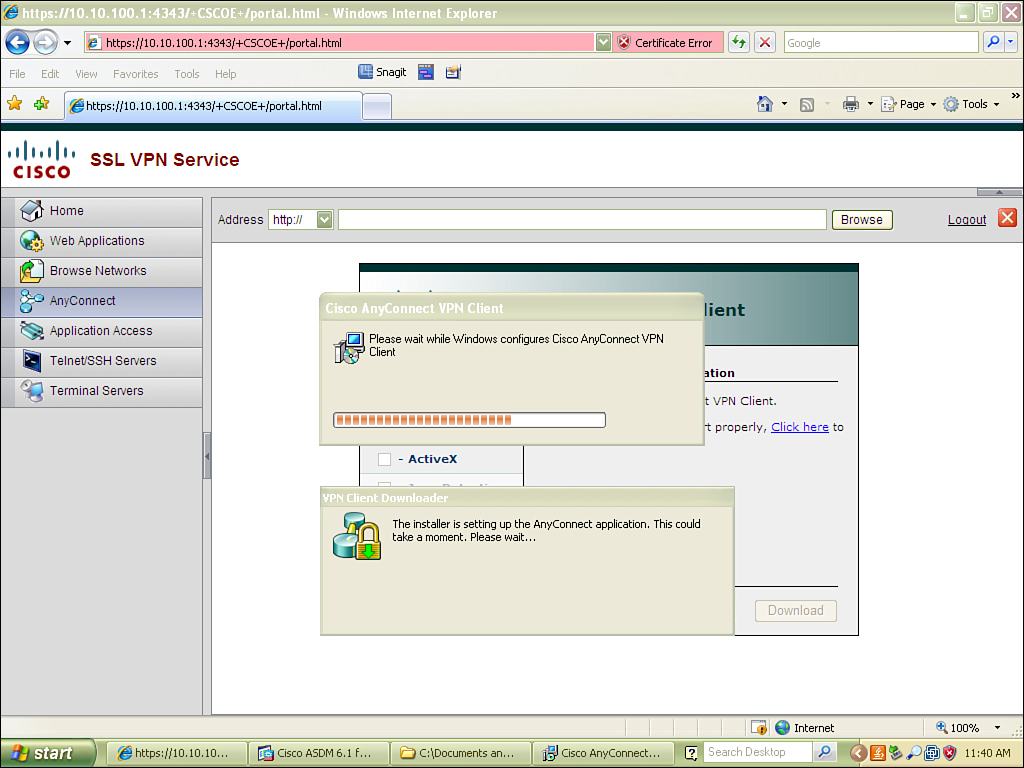
If you click the hyperlink, the Cisco AnyConnect SSL VPN client will be installed on the users workstation.
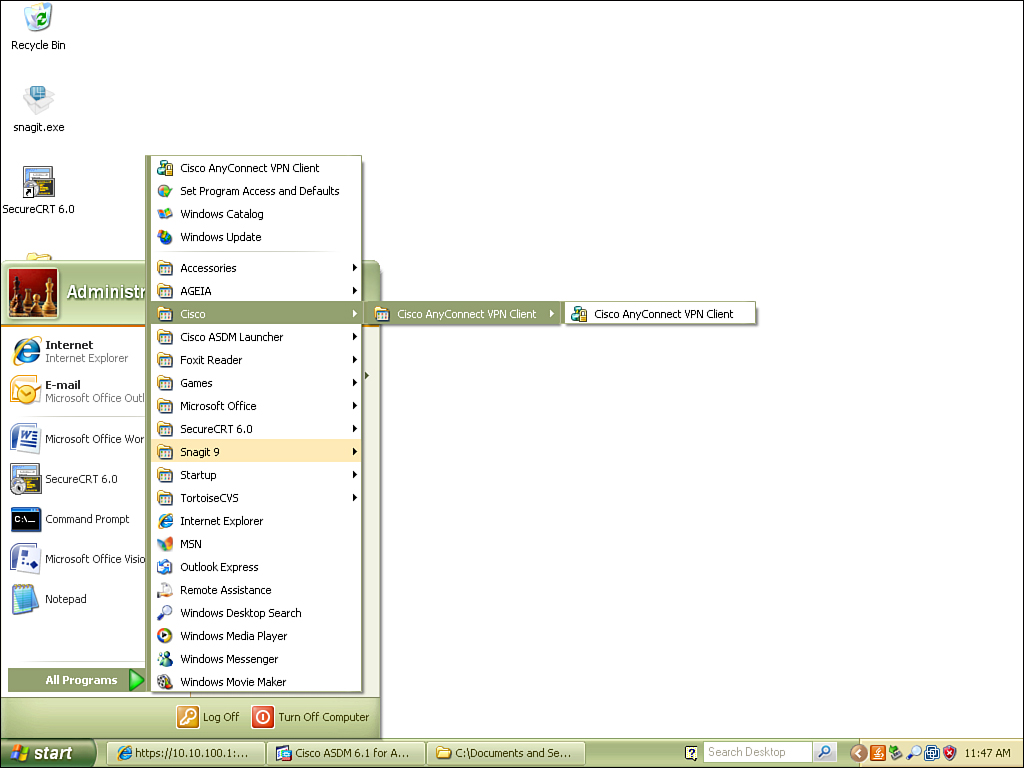
Once installed, the Cisco AnyConnect VPN can be launched from the Start menu.
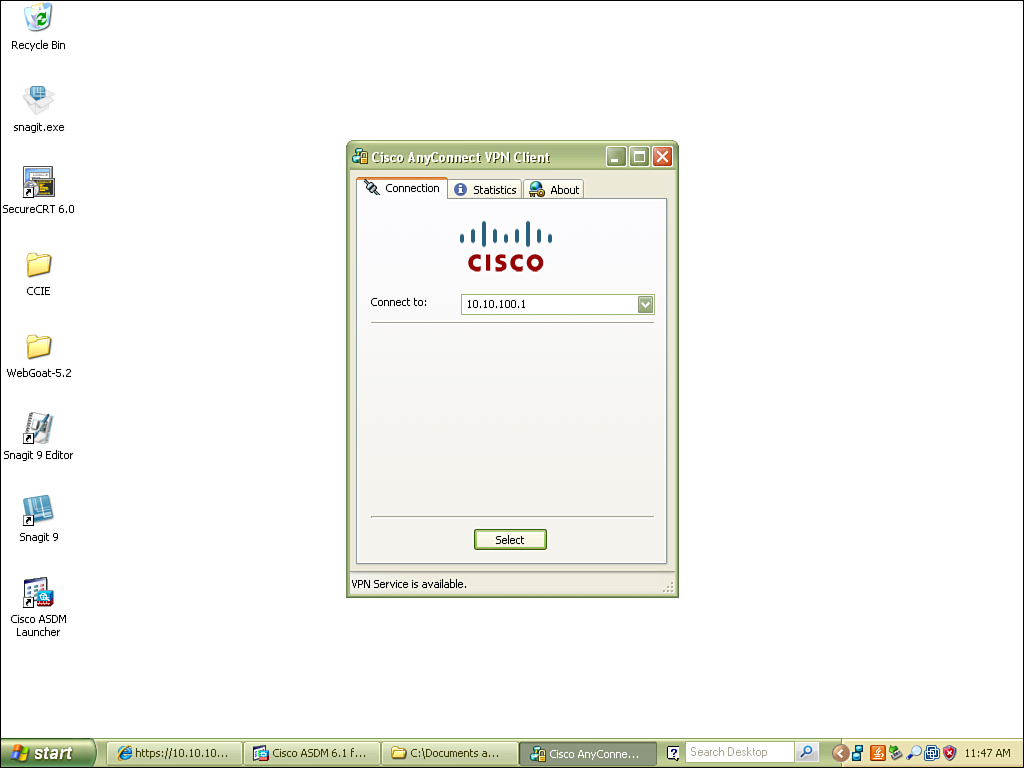
Launching the Cisco AnyConnect VPN client brings you to the interface found here. Just insert the IP address or hostname of the ASA and then click Select.

Finally, add your username and password and click Connect.

Once connected, the user receives a welcome banner.
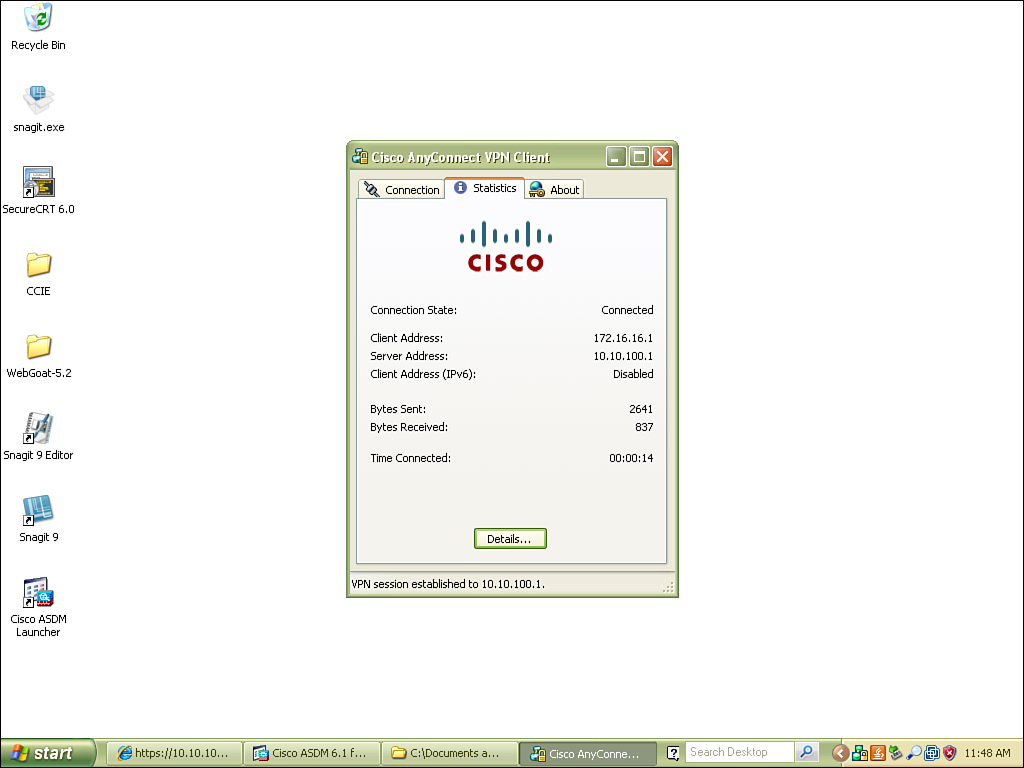
Basic information about the connection can be verified. Notice the IP address that has been assigned, bytes sent, bytes received, and time connected.

If you select Details, you can view additional information, including protocol, cipher, compression, and more.
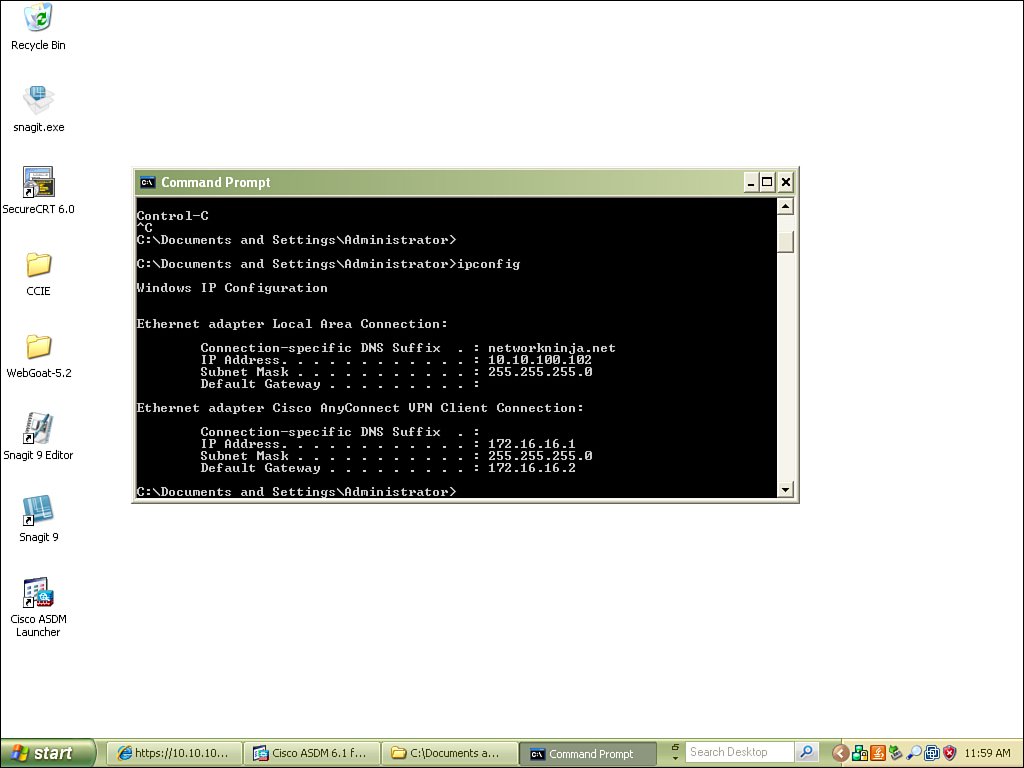
One neat detail that you can find that is similar to the Cisco IPsec VPN client is the additional virtual adapter that is installed. When an IP address is assigned from the server side, you can see that this IP is associated with the virtual interface by using ipconfig from the command prompt.
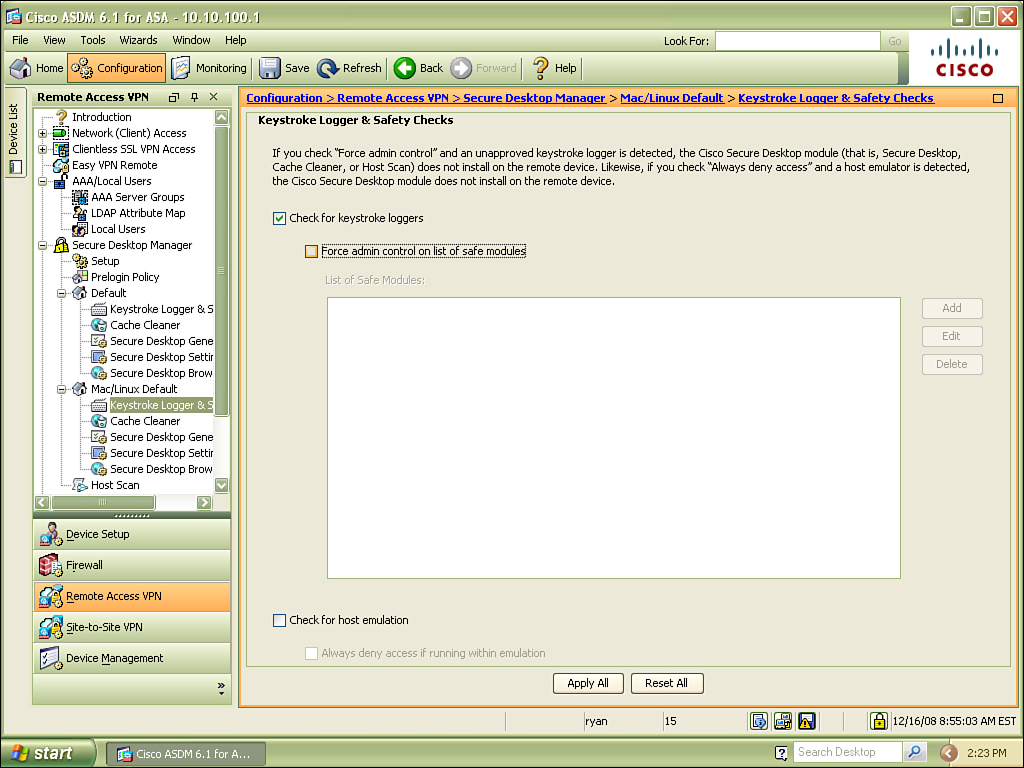
Cisco Secure Desktop
Cisco Secure Desktop (CSD) enables you to secure an endpoint before allowing it to join your network, protect data that is in use during the session, and then clean up after the session is complete. These actions are actually classified as three unique stages:
Check OS.
Check antivirus.
Check firewall.
Check antispyware.
Scan for filenames.
Scan for processes.
Scan for registry entries.
Sandbox is used to protect data during session.
Malware detection.
• Post-session cleanup
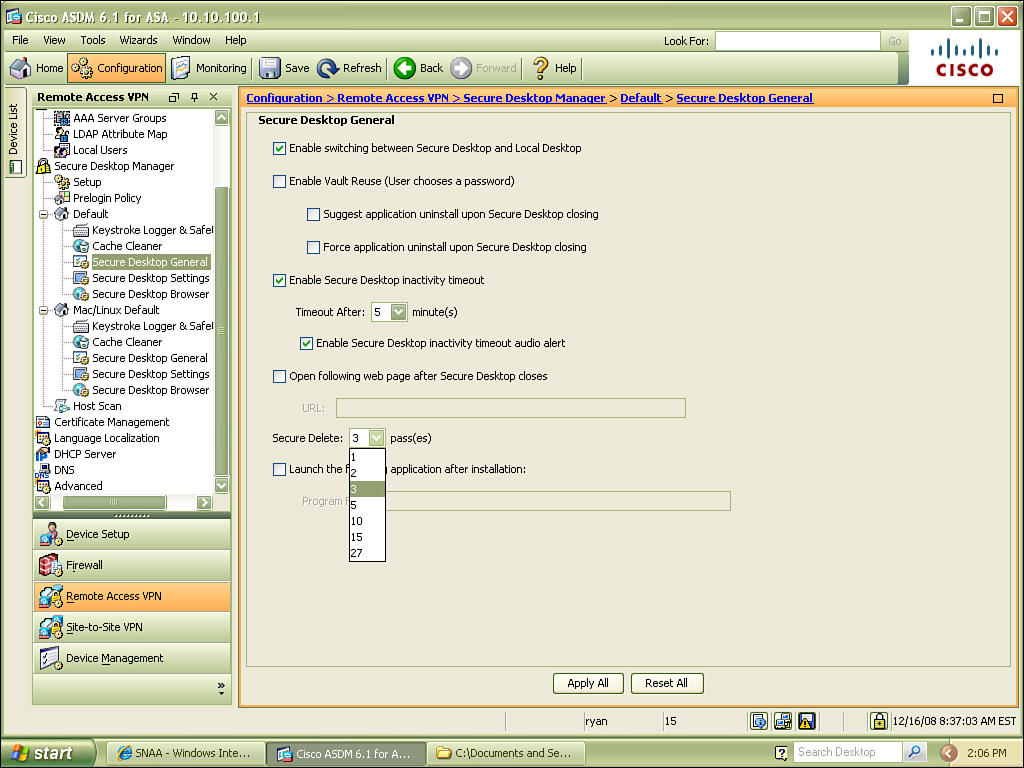
Department of Defense sanitation algorithm used to wipe any files left by session (1 to 27 passes).
Removal of cookies, URL history, page cache, and downloaded files.
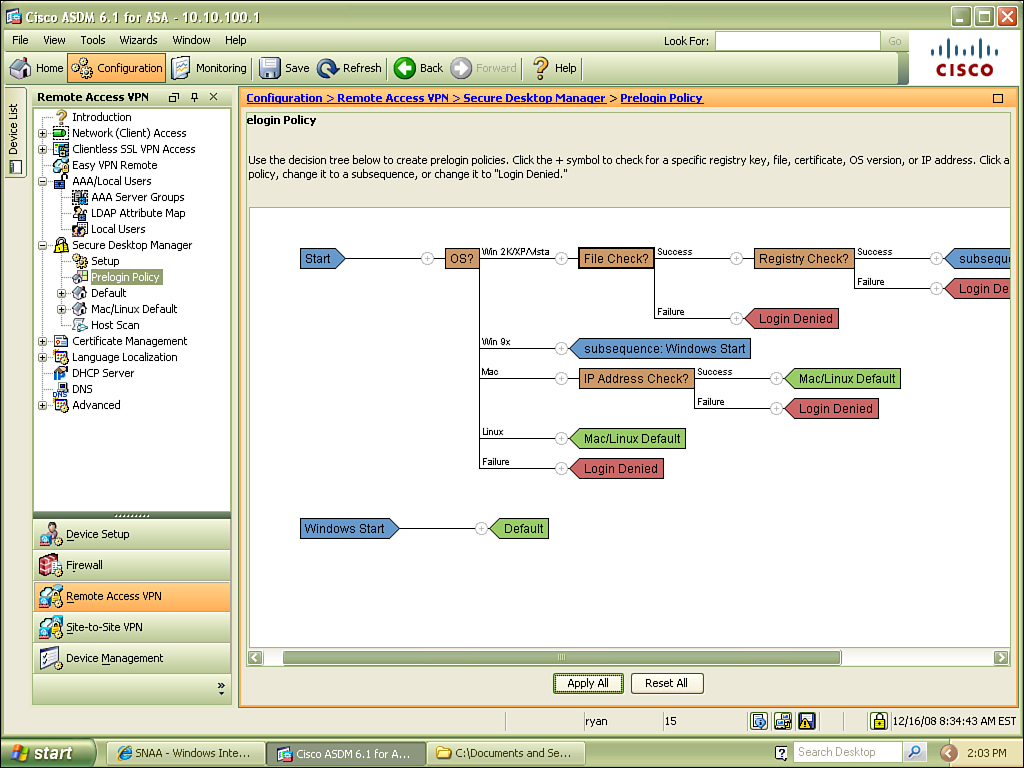
The use of CSD is an excellent precautionary measure if you are considering allowing users to connect from workstations that are not owned and controlled by your organization. When a user establishes a clientless SSL or AnyConnect VPN connection, the CSD can be pushed down. Before the connection is finalized and the user is allowed into the network, CSD scans the host to make sure that it is free of malware, and checks various parameters of the operating system. The results of this scan can then be compared against a profile stored on the ASA, and then access can be granted based on these results. The process of comparing client-generated results to a server-side (ASA) policy is referred to as dynamic access policy (DAP).
Dynamic access policies can be pushed down to the client based on a combination of endpoint attribute values such as operating system, prelogin policies, basic host scan results, and more. Whenever a user connects, a level of access is granted based on these parameters, and should something change qualifying a host for a greater level of access, it is possible to alter the access policy while the user is connected.

Host Scan
Based on the preceding table, you see that Windows, Mac, and Linux support a host scan, which is basically running a check for a specific Window’s Registry value or application that installed on the client’s machine. The attribute that you are checking for is referred to as a watermark, and this watermark can even include a hash to validate the filename that you are checking for.
The host scan is an additional module pushed down to the client after authentication. Operating system support was originally limited to Windows, but Mac and Linux were added in Version 3.2.1. The host scan can be implemented as a basic host scan, endpoint assessment, or advanced endpoint assessment.
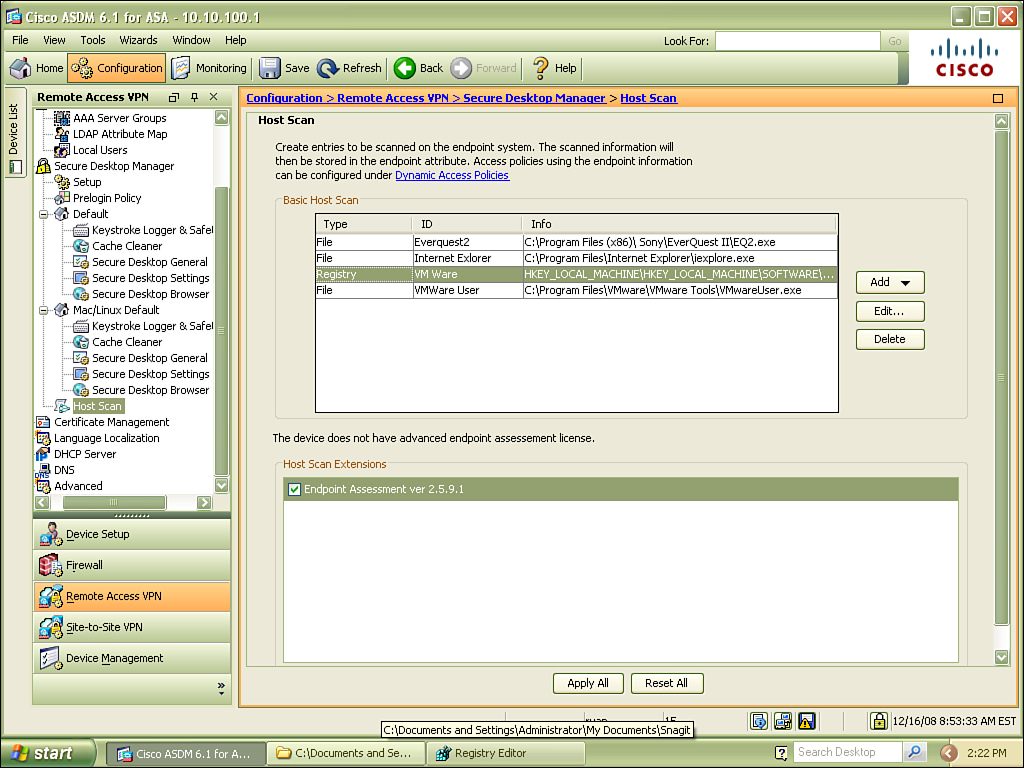
A basic host scan identifies the remote operating system down to the service pack, and performs checks against the Registry and memory for watermarks. The basic host scan could be used to determine a great deal of information about the remote host, and then this information is used to apply a DAP to this user.
Endpoint assessment goes a step beyond the basic host scan, by checking the remote host for antivirus and antispyware applications and their version. Endpoint assessment can also check for the presence of a software firewall. You can use the results returned by endpoint assessment to further enhance DAP.
Advanced endpoint assessment goes a step further than the previously mentioned techniques, by pushing updates to the client based on results of the other scans.
Secure Session
The data accessed by users during their WebVPN sessions can be encrypted upon a secure partition if Windows 2000 or XP are in use. This process is referred to as Secure Session, Secure Desktop, or Vault. That’s three names to define a single technology; furthermore, it would make Secure Desktop a feature of Cisco Secure Desktop, two different things with a very similar name. The technology itself is easy to understand, but the wording may confuse you in the future, so be aware. In a nutshell, the data is stored in a safe place during the session, and then wiped using a Department of Defense (DoD) sanitation algorithm.
Cache Cleaner
Although Secure Session is an extremely powerful feature, it is not supported on all operating systems. As a matter of fact, it works only on certain versions of Windows. If you are supporting Windows Vista-, OS X- and Linux-based clients, you can still perform post-session cleanup with the cache cleaner. The cache cleaner is used to erase all the data that was downloaded from the corporate network, and any data that was input by the user.

Cisco Secure Desktop Onscreen Keyboard
The Cisco Secure Desktop Onscreen Keyboard (OSK) is a great utility that presents an onscreen keyboard when users attempt to type in their password for authentication of a WebVPN session. This feature mitigates the effects of both hardware- and software-based keyloggers. Whereas many software-based keyloggers can be detected by CSD, newer releases of this malware may go undetected, and hardware-based keyloggers can be very difficult to detect. Therefore, the OSK is an excellent mitigation technique.
When a user connects to the ASA WebVPN and enters a username, the user is then prompted for a password. At that point, the OSK launches, and the user will use the mouse to select the appropriate characters.

Clientless SSL Configuration
As mentioned previously, the simplest method of remote access is the clientless SSL VPN. I will walk you through the configuration of this step by step. Fortunately, Cisco offers wizards within Adaptive Security Device Manager (ASDM) that drastically simplify the configuration. As always, it is possible to configure WebVPN from the CLI, but we focus on the GUI-based wizard here:
1. From the Wizards drop-down menu in the toolbar, select SSL VPN Wizard.

2. Once the SSL VPN Wizard launches, select the connection type, which is in this case will be Clientless SSL VPN.

3. Select a name for this connection, and the interface upon which SSL VPN will run. From this screen, we can also select a digital certificate that will be used by the ASA to authenticate itself to clients. By default, this is a self-signed certificate. However, you can also use your own certificate authority (CA) or a purchased certificate from a well-known CA such as Verisign or Thawte.
ASDM and SSL VPN can in fact be used on the same interface, on the same port. This was not possible in earlier versions of code.
The URL used to access SSL VPN is https://hostname.
The URL used to access ASDM is https://hostname/admin.

4. Configure user authentication. When end users connect to the ASA, they will authenticate, and the ASA must check the local user database, or an external AAA server. The wizard enables us to populate the local user database during this step.

5. Select the group policy. You can use an existing group policy or create a new group policy. Policies can be defined at the group level or the user level. If a profile is configured specifically for a user, it overrides the policy defined at the group level.

6. Configure a Bookmark list. The Bookmark list is a collection of URLs that a user is presented within the SSL VPN portal. You can choose an existing URL list, or create a new list during the setup. Bookmarks can be created for resources such HTTP, HTTPS, CIFS, FTP.
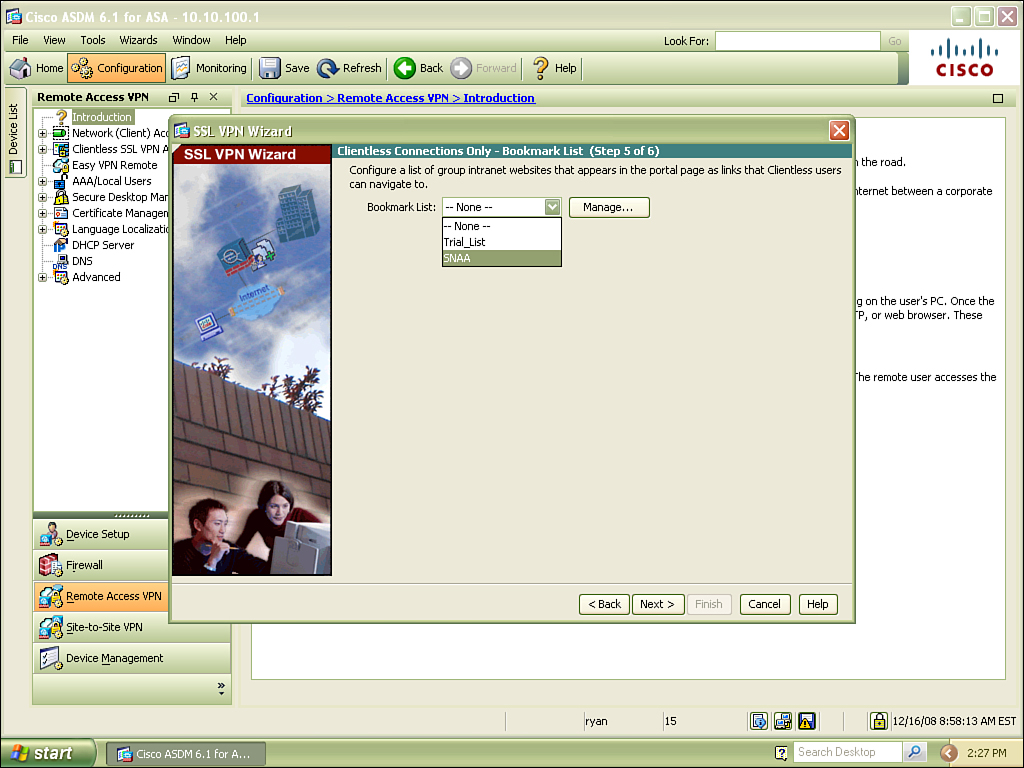
7. The final task is to verify the attributes that you have defined before finishing the wizard. When you click Finish, commands are pushed to the ASA. You can view all the commands that are pushed down; just select the option (under Preferences) within ASDM to preview commands before sending to device.

Additional Features of Clientless SSL VPN
Client/Server Plug-Ins
The ASA supports third-party application support through the WebVPN portal. As an administrator, you can download Java applications from Cisco and put them in flash on your ASA. Once installed, these applications can then be linked to portals of end users, so when they connect they will have access to client applications that are written in Java. The list of applications currently includes VNC, Telnet, Citrix, and Windows Terminal Services.
Users can use the plug-in by selecting predefined URLs. Notice that the URL will begin with the acronym for the application being used. For instance, if you want to create a bookmark for an end user that allows the user to access an internal Linux server using VNC, the URL may look like this:
vnc://10.10.100.32:5900/?width=1024&height=768
When the user click this link, however, he will actually connect to the ASA, which launches an applet that manipulates the packets in such a way that you can use the application without opening ports on the local machine and proxying through them.
User Interface Configuration
The web portal provided by the ASA for clientless WebVPN is greatly improved over the look and feel of the 7.0 implementation. The new version not only looks better, it offers better controls for the administrator. Previously, you could name categories, hyperlinks, and replace the Cisco logo with your company’s logo. Now you can create custom XML and push it to the ASA; generate custom panes; and add Really Simple Syndication (RSS) feeds, Cascading Style Sheets (CSS), and more. This flexibility enables you to create completely customized web portals to cater to your company’s needs. To simplify the creation of the custom portal, there is an SSL VPN Customization Editor.
Caching and Content Rewriting
The ASA can perform caching, or storing frequently reused objects, to enhance the performance and efficiency of WebVPN sessions. Caching is disabled by default but can be enabled from the CLI or GUI, and then configured to store files with a maximum size of up to a maximum of 10 MB.
Another useful feature called content rewriting can be enabled on the ASA. This feature allows users to browse to public websites while a WebVPN tunnel is established. This changes the default behavior, which relays all web browsing through the ASA. Content rewriting functionality is similar to split tunneling in the IPsec VPN configuration. This feature is disabled by default, but can be enabled from the CLI or GUI.
Smart Tunnels
Smart tunnels are a new feature that was introduced in the 8.0.2 version of the ASA operating system. Smart tunnels replace the port forwarding techniques that were used in 7.x code, which required a user to connect to a local port, which would proxy the connection over SSL. One of the disadvantages with the earlier technique is that it required administrative access on the client machine. Smart tunnels circumvent the requirements for administrative rights, while allowing use of applications such as Outlook, Outlook Express, and Lotus Same Time through the SSL VPN.
When configuring smart tunnel access, you can define specific paths to executables that can be used to access internal applications. Beyond specifying a path, you can also perform an integrity check by comparing the hash of the executable with a known-good hash. You can use a utility (fciv.exe) to generate a SHA-1 hash of a file. You can generate the hash, and then import this value into the ASA and make a comparison against the same-name executable file on the client’s machine.
Advanced Features of SSL VPN
AnyConnect SSL VPN Client Installer
After a user successfully establishes an SSL VPN session to an ASA, they may have the ability to install the AnyConnect client. Installation of the AnyConnect requires additional administrative overhead, because the administrator must configure additional software and parameters to allow this download to take place. The AnyConnect VPN client package must be downloaded from http://www.cisco.com, and then must be uploaded to the ASA and configured within the CLI or GUI for download. As an administrator, you can control the end users’ experience, and you have a few options as to how the AnyConnect client can be used. First, you can make it accessible to the user for use, and then beyond that you can allow a user to install the client persistently, meaning that the AnyConnect client will remain installed after tunnel termination, or you can disallow this and the client must download the AnyConnect installer each time it connects.
Dead Peer Detection and Keepalives
Dead Peer Detection (DPD) is a mechanism used between client and headend to detect link failure. The way that DPD works is that if the session goes idle and no traffic passes for a configurable amount of time (defined as a worry timer), an “R-U-There” message is sent across the connection. If the other side receives this message, an acknowledgment (ACK) is sent back to the client.
Besides DPD, you can also configure keepalives to assist in maintaining a session. Occasionally, you will find clients that are behind Network Address Translation (NAT) devices, or firewalls with very strict rules, including exceptionally short idle timers. A simple unidirectional message that passes from the client to the security appliance is enough to keep a session from being terminated by intermediate filtering devices. This keepalive is encapsulated in SSL and appears as part of the user communication to any other devices in the path of transit.
The difference between keepalives and DPD is that DPD waits until a worry timer expires before sending an “R-U-There” message. When configured for keepalives, the client sends a “Hello” message regardless of the amount of traffic on the link.
Dynamic Transport Layer Security
When using Transport Layer Security (TLS) to encapsulate user data, additional overhead is generated that we would like to avoid. If you look at the application that is being used across the SSL VPN, such as Remote Desktop, you will see that TCP is usually the transport protocol. The TCP header provides for synchronization of both parties, and retransmission of lost packets, for reliable delivery. When you are using TLS for tunneling, TCP is used once again for the transfer of encapsulated packets, thus resulting in two TCP connections per flow. There is an encrypted TCP header within the SSL payload, and an unencrypted TCP header, which is used by TLS between the client and the ASA, resulting in unnecessary overhead. Dynamic Transport Layer Security (DTLS) provides a more efficient means of communication.
DTLS is a more efficient way to implement an SSL VPN solution. DTLS establishes two separate TLS tunnels: a standard TLS tunnel, which handles session information (control messages and key exchange); and a DTLS tunnel, which is used for the transport of end user data. The DTLS session actually uses UDP port 443. The advantage with DTLS/UDP is that a smaller header is used during the encapsulation phase (UDP opposed to TCP), and retransmissions only occur once, and that is done by the client application. When you are using WebVPN without DTLS, if a packet is lost in transit, retransmission occurs twice, once by the client application and once again by the SSL VPN client.
Split Tunneling
When users build a connection to the ASA using IPsec or WebVPN, by default all traffic is routed through the tunnel. This logic behind this configuration is that if the user is blocked from communicating with any host outside of the corporate network, there is no way that the user’s machine can be compromised and then serve as a proxy for an attacker to gain access into the network. Currently, there are many browser vulnerabilities, and there have been exploits against browsers that would allow an attacker to relay an attack into the corporate network through the user’s browser if the user were to visit the attacker’s site while connected to the corporate network through VPN.
While forcing all traffic through the VPN tunnel is a good security measure, it is not efficient, and can be frustrating for users. Split tunneling allows for traffic destined to corporate network to pass through the VPN, and all other traffic is routed normally. The end result is that a user can log in to the corporate network using IPsec or WebVPN and still browse the Internet and have access to local resources such as file shares or printers on his personal network.
Additional configuration is required for traffic to pass through the tunnel and then back out to the Internet. First, traffic must be allowed to enter and then leave your outside interface. This is enabled with the same-security-traffic permit intra-interface command, which is also required if the ASA is configured as a hub between two remote offices. You will also need a nat statement for the outside interfaces, grouping it with a global statement that is also on your outside interface, allowing users to come through the tunnel to the ASA and then out to the Internet.
Certificate-Based Authentication
Authentication of remote-access VPNs can be performed using a traditional username and password, a digital certificate, or both methods. When I say both methods, that means you will use both a digital certificate and a username/password combination to authenticate. To perform certificate-based authentication, both the ASA and the remote users must obtain a certificate. After a certificate has been generated for the ASA, you then associate this digital certificate with the interface that is terminating the incoming VPN connections.
To perform certificate-based authentication, the clients must obtain a digital certificate. The ASA can be used for this process, believe it or not, as of the 8.0 operating system. The ASA can serve a CA, issuing and managing certificates.
The CA service is disabled by default, but it can be enabled easily. After the CA has been configured, it can generate certificates for users. These certificates are valid for 365 days by default. You can manage the user database for the local CA server by creating user accounts, and then setting a one-time password (OTP) for the user to obtain the certificate. There is a link within ASDM to email the OTP to the user. When the user collects this key, he can then connect to WebVPN and download his digital certificate. Once installed locally, this certificate can be used for authentication alone or with a username and password.
Before a user or device installs a digital certificate, it must trust the CA server and install the CA’s certificate, also known as the root certificate.
When you introduce time as a factor of authentication, you are likely to experience users who receive an “Invalid Certificate” error because of a time mismatch. The configuration error could be as simple as the wrong time zone, or a date that is off by a few days to a few years. Whenever troubleshooting certificate issues, always be sure that the time and date are correct.