
IP Telephony Options
Introduction
Now that your route plans are configured, turn your attention to a few additional features that you can enable in your IP telephony network. Specifically, this section of the quick reference sheets discusses how to share your media resources among devices in a CCM cluster, how to manipulate an IP phone’s softkeys, what features are available on the Cisco IP phones, and how to create user accounts.
Assigning CCM Media Resources
A CCM environment has two basic types of media resources: hardware media resources and software media resources. Hardware resources can use digital signal processors (DSPs) in a Catalyst 6500 switch, for example, to provide such features as transcoding or conference-calling resources. You also need media resources to provide a media termination point (MTP) and a music on hold (MOH) resource.
To activate your software media resources, use the CCM’s Service Activation screen by selecting the Application, Cisco CallManager Serviceability menu option and then selecting the Tools, Service Activation menu option from the Cisco CallManager Serviceability screen. Select the services that you want to add (for example, Cisco IP Voice Media Streaming App), and click the Update button.
As mentioned earlier, you need media resources to support features such as a conference call. Following are two basic types of conference calls:
• Ad hoc—Occurs when a user dials one or more users into an existing call
• Meet-me—Occurs when all users dial a specific number at a specific time to join a conference
The size of a conference call depends on the resources that are dedicated to that conference call. For example, a CCM server that is acting as a software media resource can support 48 users in a single conference call or up to 16 users in each of three simultaneous conference calls.
You can add modules, such as the WS-X6608-T1/E1 for a Catalyst 6X00 switch or the WS-X4604-GWY for a Catalyst 4000 switch, to those specific Catalyst switches to provide hardware-conferencing resources. However, the WS-X4604-GWY module only supports the G.711 codec and a total of 24 conference resources, whereas the WS-X6608-T1/E1 module supports additional codecs (for example, G.729 and G.723) and up to 32 conferencing resources per port.
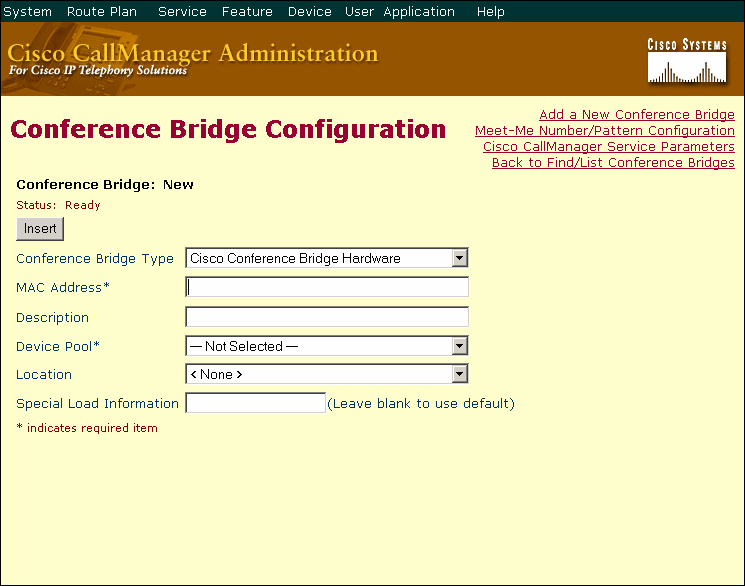
To set up a conference bridge, select the Service, Media Resource, Conference Bridge menu option and select the Add a New Conference Bridge link. Then, select the type of bridge (for example, hardware, software, or IOS bridge) and provide the required information. For example, for a hardware conference bridge, you might need to provide the MAC address for a specific port on the module that contains the DSPs.
When a caller puts a call on hold, transfers a call, parks a call, or holds an ad hoc conference, he needs to terminate the original call temporarily while he, for example, dials in another participant for the call. To support these types of services, you need a media termination point (MTP), which the CCM provides. Specifically, the CCM supports 64 MTP resources.
To add an MTP, select the Service, Media Resource, Media Termination Point menu option and click the Add a New Media Termination Point link. You then enter some basic information about the MTP, including the host server, MTP name, and device pool.
Transcoding is the process of converting from a high-bandwidth codec to low-bandwidth codec, and vice versa. However, the CCM cannot perform transcoding. Hardware resources are required. The WS-X6608-T1/E1 module for the Catalyst 6000 Series switches supports transcoding for a variety of codecs and provides up to 24 transcoding resources per port. However, the WS-X4604-GWY module for the Catalyst 4000 Series switches supports transcoding only between the G.729 and G.711 codecs and a maximum of 16 conferencing resources per module.
When creating a transcoding resource, select the Service, Media Resource, Transcoder menu option and click the Add a New Transcoder link.
The CCM environment allows you to have live or recorded music on hold (MOH) for your users. You can assign an MOH audio source for the following types of holds:
• User hold—Occurs when a user presses the Hold button on a phone
• Network hold—Occurs when the network places a party on hold because the user pressed a key to perform an action, such as transfer, conference, or call park
MOH can be sent through unicast or multicast, which can offer significant bandwidth savings. Specifically, you can have a maximum of 500 unicast MOH streams or a maximum of 204 multicast MOH streams. Realize, however, that a single multicast MOH stream could service thousands of IP phones. To add an MOH audio source file to your CCM environment, you can drop an audio file (for example, an MP3 file) in the following directory on one of your CCM servers:
C:Program FilesCiscoMOHDropMOHAudioSourceFilesHere
Then, the audio file is converted automatically to formats for use by the CCM and deleted from its original location.
After your MOH audio source files are converted for MOH use, you can view them from your Music On Hold (MOH) Audio Source Configuration screen by selecting the Service, Media Resource, Music on Hold Audio Source menu option. From this screen, select the Play continuously (repeat) check box to make your audio files loop. On this screen, you also can enable the multicast of MOH by selecting the Allow Multicasting check box.

Instead of playing recorded music as your MOH, you also have the option of using an external music source. This external source connects to one of your CCM server’s sound cards. You need to know the exact name of the preferred sound-recording device that is known to the CCM server. You can obtain this device name by opening the Sounds and Multimedia Control Panel icon and selecting the Audio tab.
You need the exact name of the audio source from the Control Panel because you need to specify the audio source in the Music On Hold (MOH) Fixed Audio Source Configuration screen. Access this screen by selecting the Service, Media Resource, Music On Hold Audio Source menu selection and clicking the Fixed Audio Source link in the MOH Audio Sources sidebar. Note that this will always be Audio Source #51.
In this screen, enter the audio source name and the audio source device. You also can specify whether you want to allow multicasting, and then finish by clicking the Update button. Now that the sources are defined, you can assign them to actual devices, using the user or network hold options.
You can share media resources such as MTPs, MOH, and transcoding devices by using media resource groups (MRGs) and media resource group lists (MRGLs). For example, you can create an ordered list of MTP resources, and if the first MTP resource is unavailable, you can use the next MTP resource. However, you probably do not want to use an MOH resource that is located across the IP WAN. So, you need to be careful in assigning these resources.
Media resources are configured in a hierarchical fashion, much like route plans. Consider how an IP phone gains access to a media resource. The following steps occur:
1. A device (for example, an IP phone) requests a resource (for example, an MOH resource) from a media resource manager.
2. The media resource manager points to a media resource group list (MRGL), which is a prioritized listing of media resource groups (MRGs).
3. The MRGs point to specific resources.
Consider the following example. You have your CCM cluster spanning two geographical locations: Lexington and Louisville. You create a Lexington MRG, which points to media resources that are located in Lexington, and you create a Louisville MRG, which points to media resources that are located in Louisville. Then, you create an MRGL to be used by each location. For the Lexington location, the MRGL points first to the Lexington MRG and then points to the Louisville MRG as a backup. Conversely, the Louisville MRGL points to the Louisville MRG first and to the Lexington MRG second.
Now consider how to configure MRGs and MRGLs. First, understand that there is a default MRG, and by default, every IP phone in the cluster has access to that group. Therefore, you need to create unique MRGs and MRGLs and then point your IP phones and device pools to specific MRGLs. To create an MRG, select the Service, Media Resource, Group menu option and click the Add a New Media Resource Group link. Then, name the MRG and select the available resources that you want to be part of the MRG.
You create the MRGL by selecting the Service, Media Resource, Media Resource Group List menu option and clicking the Add a New Media Resource Group List link. At that point, name the list and associate your MRGs with the MRGL. Remember that the order is important, because this list determines which MRG is used first.
Then, you can assign MRGLs to an IP phone or a device pool. However, what would happen if you assigned one MRGL to an IP phone’s device pool and another MRGL to the IP phone? Which MRGL would the IP phone use?
An MRGL that is assigned to an IP phone takes precedence over an MRGL that is assigned to the IP phone’s device pool. Therefore, in this example, the IP phone uses only the MRGL that is assigned to the phone.

Configuring Softkeys
Softkeys are buttons on an IP phone that have different functions in different circumstances. For example, while an IP phone is on-hook, one of the softkeys (for example, the buttons that are below the LCD on a Cisco 7940 or 7960 IP phone) is labeled “Redial,” while that same softkey can be labeled “Hold” during a call. You can influence what these keys do by using either standard or nonstandard softkey templates.
By default, the CCM gives you the Standard IPMA Assistant, Standard IPMA Manager, and Standard User softkey templates. To create a new softkey template, make a copy of an existing template and make modifications to that copy. Access the Softkey Template Configuration screen by selecting the Device, Device Settings, Softkey Template menu option. Then, click the Find button to display the existing templates. Click the template that you want to copy, and click the Copy button.
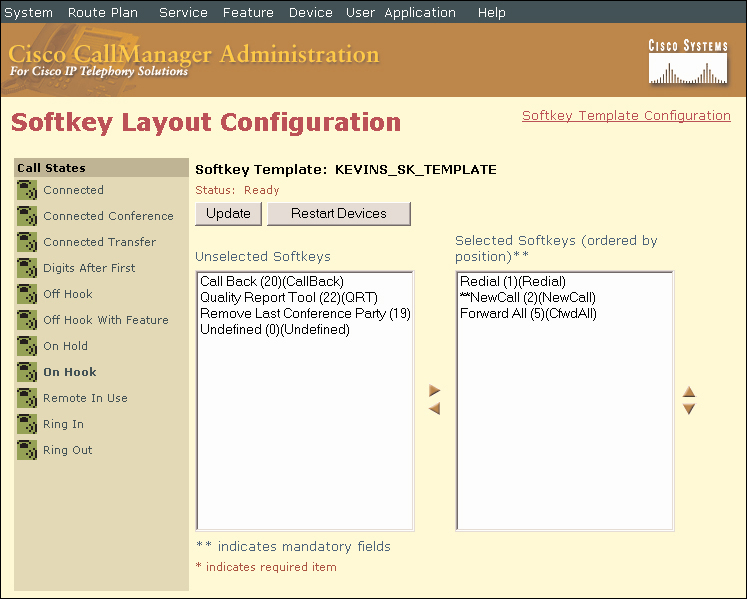
After assigning a new name to your copy, click the Configure Softkey Layout link to specify the softkey functions under various conditions (for example, connected, on-hook, off-hook, and ring in). If you do not want certain IP phones to have access to some of the features that the softkeys provide (for example, conference calling), use this screen to remove those features from the softkey template that you will associate with the IP phones.
When the softkey template is defined, apply it to a device pool, a specific device (for example, an IP phone), or a user device profile (discussed later in these quick reference sheets). Be aware that after assigning a softkey template to a device pool, device, or user device profile, you must remove that assignment before you are allowed to delete a softkey template.
IP Phone Features Overview
Cisco IP Phones have a vast array of features for your users (for example, conference calling, transfer, and speed dial). Consider some of the more commonly used features. First, consider how to change an IP phone’s speed-dial configuration.
Speed Dial
Administrators usually prefer to have users change their own speed-dial settings. For example, you might not want to change someone’s speed-dial configuration every time that he gets a new girlfriend. As discussed later in these quick reference sheets, you can delegate such a task to the user. However, you do have the option of specifying the number and label that are associated with a specific IP phone’s speed-dial configuration by clicking the Add/Update Speed Dials link in the Phone Configuration page.
Auto Answer
The auto answer feature allows a phone to answer a call as soon as it comes in. This type of feature can be useful for customer service agents who are wearing headsets. The auto answer feature is enabled through a drop-down menu in the Directory Number Configuration screen, where you can select between the Auto Answer Off, Auto Answer with Headset, and Auto Answer with Speakerphone options.
Barge
You might have called into a company’s customer service department and heard a message similar to “This call might be monitored for quality assurance.” The message is letting you know that another party can be added to the conversation. You can permit this in your CCM environment by enabling the “barge” feature (also known as “bargein”). For the barge feature to work, however, the line in use must be a shared line appearance, meaning that the line appearance is present on more than one phone. You enable the barge feature on a cluster by selecting the True value for the Barge Enabled Flag parameter that is available on the Service Parameters Configuration screen.
Call Park
The call park feature allows a user to place a call (that is, “park” a call) in a location that is identified by a number. Then, the user can retrieve that parked call from the parked location from another phone. Call park can be configured from the Feature, Call Park menu option.
Call Pickup/Group Call Pickup
You can allow a phone, with a single key press, to pick up a call that currently is ringing on another phone within a defined group. If the phone is in the same defined group that your phone is a member of, you can do a “call pickup.” However, if the phone is in a different group, you can press a group call pickup key and specify a group of the phone that is ringing. To configure call pickup, you need to define a directory number to be used by the call pickup feature. You do that by selecting the Feature, Call Pickup menu option and clicking the Add a New Call Pickup Number link. After you define the call pickup directory number, you can assign it to a specific line by using the Directory Number Configuration page for an IP phone.
Callback
If you call a number that is currently busy, you can use the callback feature to alert you when the originally called line is no longer busy. The callback feature can be assigned to a softkey on the Softkey Layout Configuration screen.
Call Forwarding
You can configure a phone to forward calls to a particular destination (for example, to a voice-mail system) under specific conditions (for example, always forward, forward when a line is busy, or forward when the line has not answered within a certain number of rings). Call forwarding is configured on the Directory Number Configuration page.
Cisco IP Manager Assistant (IPMA)
The IPMA feature improves call handling between managers and assistants. For example, calls coming into a manager’s phone could be redirected to an assistant or to voice mail based on configured rules. You can set up the IPMA feature using the Cisco IPMA Configuration Wizard, which is available under the Service, Cisco IPMA Configuration Wizard menu option.
Shared Line Appearance
The shared line appearance feature allows you to have a directory number on more than one phone. Typically, the first phone to answer an incoming call has control of the line, and other phones with that line appearance cannot access that line for the duration of the call. However, as mentioned earlier, you can allow another phone to access the line, even if it is in use, if you have the barge feature enabled.
XML Services
Cisco IP phones, such as the 7940 and 7960, support eXtensible Markup Language (XML). As a result, you can access a variety of information (for example, stock quotes, news headlines, or weather information) through an XML application. You can point your IP phone to a specific URL that has XML content on the Cisco IP Phone Services Configuration page.
User Configuration
Instead of administering all features (for example, speed dial) for all IP phones in your environment, you can permit users to configure many of their own features through a web page. First, create a user account through the User, Add a New User menu option.
After you add a user, you can associate a device with that user. Note that you can have more than one device (for example, a Cisco 7940 and a Cisco IP SoftPhone) associated with a user.
After you have created the user account and associated it with one or more devices, you can allow the user to log in and configure her own settings by accessing http://CCM_name_or_IP/ccmuser.
After the user logs in, she can select the device for which she want to manipulate settings. For example, she might want to configure her speed-dial buttons, but one of her associated devices is a Cisco 7940 (with only one speed-dial button), and the other associated device is a Cisco 7960 (with a maximum of five speed-dial buttons). From this user interface, a user can configure the following features:
• Services (for example, weather information)
• Speed-dial buttons
• Call forwarding
• Personal address book
• Message-waiting indicator
• Locale (that is, the language that is used on the web interface or on the IP phone)