
Chapter 3. Footprinting, Reconnaissance, and Scanning
This chapter covers the following topics:
• The Footprinting and Reconnaissance Process: The process of accumulating data about a specific network environment, usually for the purpose of completing the footprinting process, mapping the attack surface, and finding ways to intrude into the environment. Fingerprinting can be categorized as either active or passive. Active fingerprinting is more accurate but also more easily detected. Passive fingerprinting is the act of identifying systems without injecting traffic or packets into the network.
• System Scanning: The identification of active machines that is accomplished by means of ping sweeps and port scans. Both aid in an analysis of understanding whether the machine is actively connected to the network and reachable. Fingerprinting can be categorized as either active or passive. Active fingerprinting is more accurate but also more easily detected. Passive fingerprinting is the act of identifying systems without injecting traffic or packets into the network. After all details of a network and its operations have been recorded, the attacker can then identify vulnerabilities that could possibly allow access or act as an entry point.
This chapter introduces you to two of the most important pre-attack phases: footprinting and scanning. Although these steps don’t constitute breaking in, they occur at the point at which a hacker or ethical hacker will start to get information. The goal here is to discover what a hacker or other malicious user can uncover about the organization, its technical infrastructure, locations, employees, policies, security stance, and financial situation. Just as most hardened criminals don’t rob a jewelry store without preplanning, elite hackers and cybercriminals won’t attack a network before they understand what they are up against. Even script kiddies will do some pre-attack reconnaissance as they look for a target of opportunity. For example, think of how a burglar walks around a building to look for entry points.
This chapter begins by looking at a number of general mechanisms individuals can attempt to passively gain information about an organization without alerting the organization. This chapter also discusses interactive scanning techniques and reviews their benefits. Note in this context, the goal of scanning is to discover open ports and applications. This chapter concludes with attack surface mapping techniques.
“Do I Know This Already?” Quiz
The “Do I Know This Already?” quiz enables you to assess whether you should read this entire chapter thoroughly or jump to the “Exam Preparation Tasks” section. If you are in doubt about your answers to these questions or your own assessment of your knowledge of the topics, read the entire chapter. Table 3-1 lists the major headings in this chapter and their corresponding “Do I Know This Already?” quiz questions. You can find the answers in Appendix A, “Answers to the ‘Do I Know This Already?’ Quizzes and Review Questions.”
Table 3-1 “Do I Know This Already?” Section-to-Question Mapping

Caution
The goal of self-assessment is to gauge your mastery of the topics in this chapter. If you do not know the answer to a question or are only partially sure of the answer, you should mark that question as wrong for purposes of the self-assessment. Giving yourself credit for an answer you correctly guess skews your self-assessment results and might provide you with a false sense of security.
1. Where should an ethical hacker start the information-gathering process?
a. Interview with company
b. Dumpster diving
c. Company’s website
d. Interview with employees
2. What common Windows and Linux tool is used for port scanning?
a. Hping
b. Amap
c. Nmap
d. SuperScan
3. What does the Nmap -sT switch do?
a. UDP scan
b. ICMP scan
c. TCP full connect scan
d. TCP ACK scan
4. Which of the following would be considered outside the scope of footprinting and information gathering?
a. Finding physical addresses
b. Attacking targets
c. Identifying potential targets
d. Reviewing a company website
5. During a security assessment, you are asked to help with a footprinting activity. Which of the following might be used to determine network range?
a. ARIN
b. DIG
c. Traceroute
d. Ping host
6. You have been asked to gather some specific information during a penetration test. The “intitle” string is used for what activity?
a. Traceroute
b. Google search
c. Website query
d. Host scanning
7. During a footprinting exercise, you have been asked to gather information from APNIC and LACNIC. What are these examples of?
a. IPv6 options
b. DHCP servers
c. DNS servers
d. RIRs
8. CNAMEs are associated with which of the following?
a. ARP
b. DNS
c. DHCP
d. Google hacking
9. Which of the following TCP scan types is also known as the half-open scan?
a. FIN scan
b. XMAS scan
c. SYN scan
d. Null scan
10. What scan is also known as a zombie scan?
a. IDLE scan
b. SYN scan
c. FIN scan
d. Stealth scan
11. What is the TCP port scan that is used to toggle on the FIN, URG, and PSH TCP flags?
a. XMAS scan
b. Null scan
c. ACK scan
d. None of these answers are correct
12. You were hired to perform penetration testing for a local school. You discovered an FTP server in the network. What type of FTP scan technique would you like to make the scan harder to trace?
a. FTP bounce scan
b. FTP stealth SYN scan
c. FTP null scan
d. Slowloris FTP scan
13. Which of the following tools can be used to enumerate systems that are running NetBIOS?
a. Nmap
b. nbtscan
c. Metasploit
d. All of these answers are correct
14. What type of information can you obtain when successfully enumerating insecure SNMP systems?
a. Network interface configuration
b. The device hostname and current time
c. The device IP routing table
d. All of these answers are correct
15. What SMTP command can be used to verify whether a user’s email mailbox exists in an email server?
a. EXPN
b. VRFY
c. RCPT
d. None of these answers are correct
Foundation Topics
Footprinting
Footprinting is the first step of the hacking methodology, and it is all about gathering information. Most organizations share a tremendous amount of information and data through various channels, including their websites and social media pages, their employees, and even their help desks. Footprinting is about information gathering and is both passive and active. Reviewing the company’s website is an example of passive footprinting, whereas the act of calling the help desk and attempting to social engineer them out of privileged information is an example of active information gathering. Port scanning entails determining network ranges and looking for open ports on individual systems. The EC-Council divides footprinting and scanning into seven basic steps, as illustrated in Figure 3-1.


Figure 3-1 Footprinting and Scanning Steps
Many times, students ask for a step-by-step method of information gathering. Realize that these are just generic steps and that ethical hacking is really the process of discovery. Although the material in this book is covered in an ordered approach, real life sometimes varies. When performing these activities, you might find that you are led in a different direction from what you originally envisioned.
Footprinting Methodology
The information-gathering steps of footprinting and scanning are of utmost importance. Reconnaissance can be active or passive. Active means that you (the pen tester or ethical hacker) are using tools such as scanners to gather information about your targeted system. In other words, you are “actively” sending IP packets and interacting with the targeted system or network. In passive reconnaissance, you do not send any IP packets or interact with your target, but instead leverage publicly available information. This information is also known as open source intelligence (OSINT).
Tip
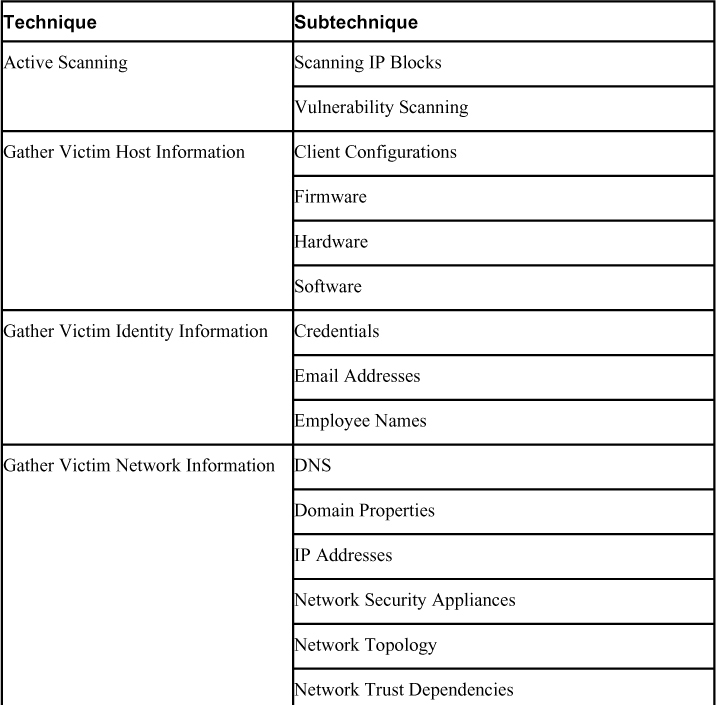
MITRE (a United States government funded research organization) created a set of matrices to describe and document the different tactics and techniques used by attackers from the moment they start reconnaissance until the very last steps of an attack. This framework is called MITRE ATT&CK. We cover more details about the ATT&CK framework throughout this book. However, we would like to draw your attention to the reconnaissance techniques and subtechniques documented at https://attack.mitre.org/tactics/TA0043. Table 3-2 lists all the reconnaissance techniques and subtechniques in the MITRE ATT&CK framework.
Table 3-2 MITRE ATT&CK Reconnaissance Techniques and Sub-Techniques
Good information gathering can make the difference between a successful pen test and one that has failed to provide maximum benefit to the client. This information can be found on the organization’s website, published trade papers, Usenet, financial databases, or even from disgruntled employees. Some potential sources are discussed, but first let’s review documentation.
Documentation
One important aspect of information gathering is documentation. Most people don’t like paperwork, but it’s a requirement that you cannot ignore. The best way to get off to a good start is to develop a systematic method to profile a target and record the results. Create a matrix with fields to record domain name, IP address, DNS servers, employee information, email addresses, IP address range, open ports, and banner details. Figure 3-2 gives an example of what your information matrix might look like when you start the documentation process. You can use simple tables, notes, or mind maps like the one illustrated in Figure 3-2.

Figure 3-2 Documentation Finding
Building this type of information early on will help in mapping the network and planning the best method of attack.
Footprinting Through Search Engines
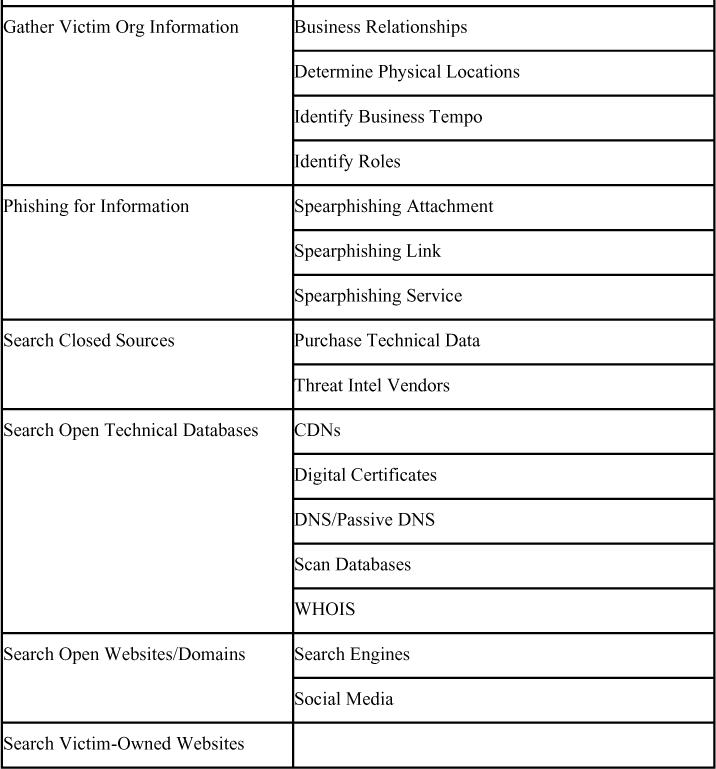
Most people use Google, DuckDuckGo, or other search engines to locate information on the Internet. What you might not know is that search engines, such as Google, can perform much more powerful searches than most people ever dream of. Not only can Google translate documents, perform news searches, and do image searches, but it also can be used by hackers and attackers to do something that has been termed Google hacking.
Through the use of basic search techniques combined with advanced operators, Google can become a powerful vulnerability search tool. Table 3-3 describes some advanced operators.
Table 3-3 Google Search Terms
Note
The CEH exam may ask you about specific Google search term strings.
Through the use of the advanced operators shown in Table 3-3 in combination with key terms, Google can be used to uncover many pieces of sensitive information that shouldn’t be revealed. A term even exists for the people who blindly post this information on the Internet; they are called Google dorks. To see how this works, enter the following phrase into Google:
intext:JSESSIONID OR intext:PHPSESSID inurl:access.log ext:log
This query searches in a URL for the session IDs that could be used to potentially impersonate users. The search found more than 100 sites that store sensitive session IDs in logs that were publicly accessible. If these IDs have not timed out, they could be used to gain access to restricted resources. You can use advanced operators to search for many types of data. Figure 3-3 shows a search where Social Security numbers (SSNs) were queried. Although this type of information should not be listed on the web, it might have been placed there inadvertently or by someone who did not understand the security implications.

Figure 3-3 Google Hacking Social Security Numbers
Finally, don’t forget that finding a vulnerability using Google is not unethical, but using that vulnerability can be unethical unless you have written permission from the domain owner. For example, here is a link to the Google hack for Shellshock (a Bash vulnerability introduced later in the chapter): https://www.exploit-db.com/exploits/34895/. Notice how it took only a few minutes for an attacker to gather this type of information. Security professionals should always be concerned about what kind of information is posted on the web and who can access it.
Now that we have discussed some basic Google search techniques, let’s look at more advanced Google hacking. If you have never visited the Google Hacking Database (GHDB) repositories, we suggest that you visit https://www.exploit-db.com/google-hacking-database/. This site has the following search categories:
• Footholds
• Files containing usernames
• Sensitive directories
• Web server detection
• Vulnerable files
• Vulnerable servers
• Error messages
• Files containing juicy info
• Files containing passwords
• Sensitive online shopping info
• Network or vulnerability data
• Pages containing login portals
• Various online devices
• Advisories and vulnerabilities
A tool such as the GHDB has made using Google easier, but it’s not your only option. Maltego, FOCA, Recon Dog, and Shodan are others worth discussion. Maltego is an open source intelligence and forensics application. It is a tool-based approach to mining and gathering Internet data that can be compiled in an easy-to-understand format. Maltego offers plenty of data on websites and their services. Figure 3-4 shows an example of using Maltego to gather information about a person (in this case, Omar Santos).

Figure 3-4 A Person Search in Maltego
FOCA is another example of an open source information-gathering tool. Similar to FOCA is Recon Dog, which is another example of an all-in-one information-gathering tool.
Shodan offers the ability to search for the servers, webcams, printers, routers, and even SCADA devices connected to the Internet. Shodan is an organization that scans the Internet on a 24/7 basis from numerous locations around the world. The scan results are then stored in a database, and you are able to search those results via the website at https://www.shodan.io or via its API.
Note
SCADA devices are industrial controls with embedded computers that can be connected to the Internet.
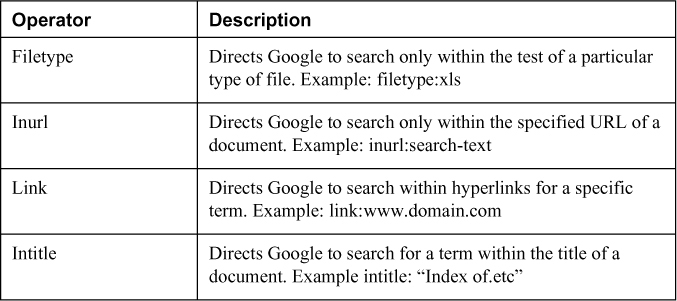
Figure 3-5 shows an example of searching for potentially vulnerable systems in Shodan.
Figure 3-5 The Shodan Search Engine
In Figure 3-5, the user queries for TCP port 502, which is typically used for Modbus communication.
Tip
Modbus is a communications protocol used in industrial control system (ICS) devices such as programmable logic controllers (PLCs).
Tools like Shodan can be used to find network-connected devices, such as routers, servers, IoT devices, printers, databases, and even live webcams. The Shodan search engine is a powerful database of prescanned networked devices connected to the Internet. It consists of banners collected from port scans of public IP addresses, with fingerprints of services like Telnet, FTP, HTTP, and other applications.
Shodan creates risk by providing both attackers and defenders a prescanned inventory of devices connected to public IP addresses on the Internet. For example, when a new vulnerability is discovered and published, an attacker can quickly and easily search Shodan for vulnerable versions and then launch an attack. Attackers can also search the Shodan database for devices with poor configurations or other weaknesses, all without actively scanning.
Using Shodan search filters, you can really narrow down search results, by country code or CIDR netblock, for example. Shodan application programming interfaces (APIs) and some basic scripting can enable many search queries and subsequent actions (for example, a weekly query of newly discovered IPs scanned by Shodan on your CIDR netblock that runs automatically and is emailed to the security team).
Remember that public IP addresses are constantly probed and scanned already; by using Shodan, you are not scanning, because Shodan has already scanned these IPs. Shodan is a tool, and it can be used for good or evil. To mitigate risk, you can take tangible steps like registering for a free Shodan account, searching for your organization’s public IPs, and informing the right network and security people of the risks of your organization’s Shodan exposure. Using a variety of filters, these search engines allow you to query hosts and networks for specific information.
Footprinting Through Social Networking Sites
Social networks are another big target for attackers. Although social media has opened up great channels for communication and is very useful for marketers, it is fraught with potential security problems. Social networking sites are becoming one of the biggest threats to a user’s security and will remain so for the foreseeable future. One reason is that users don’t always think about security when using these sites. There is also the issue that these sites are designed to connect people. Security is not always the primary concern. Some sites that you, as an ethical hacker, might want to check include the following:
• TikTok
Tip
The three primary ways attackers use social networking include using social engineering to gather sensitive information, creating fake profiles, and using public information to gather information about a victim.
Although some organizations might be relatively secure, gaining the names, addresses, and locations of key employees can allow attackers to fly a drone over their homes, guess passwords, or even possibly backdoor the organization through an employee’s unsecure credentials.
Note
As an ethical hacker, you can use tools like InSpy to perform enumeration on LinkedIn profiles and identify people based on company, job title, and email address.
Tip
It’s not just people that hackers are concerned with. Some attackers may scan the web for competitive intelligence. This type of scan can be thought of as identifying, gathering, and analyzing information about a company’s products or services.
Footprinting Through Web Services and Websites
One of the best places to begin footprinting is an organization’s website. Search for the company’s URL with Google, Bing, Dogpile, Shodan, or your search engine of choice. You will want to look for the following:
• Company URL: Domain name.
• Internal URLs: As an example, not only secretcorp.org but also internal.secretcorp.org, mail.secretcorp.org, finance-app.secretcorp.org, etc.
• Restricted URLs: Any domains not accessible to the public.
• Internal pages: Company news, employment opportunities, addresses, and phone numbers. Overall, you want to look for all open source information, which is information freely provided to clients, customers, or the general public.
Note
One great tool to find internal URLs is Netcraft’s “What’s that site running?” tool on its home page. You can find it at https://news.netcraft.com.
Let’s look at an example of a local consulting company called secretcorp (secretcorp.org). A quick review of its site shows it has a news and updates section. Recent news states the following:
We are proud to have just updated all of our servers to Plesk 10.0.1. Anyone logging in to these new servers as admin should use the username of the domain, for example, secretcorp.org. The passwords have been transferred from the old servers, so no password reset should be required. We used the existing domain administrator password. Our continued alliance with Cisco has allowed us to complete our transition from Arista equipment. These upgrades, along with our addition of a third connection to the Internet, give us a high degree of fault tolerance.
You might consider this good marketing information to provide potential clients. The problem is that this information is available to anyone who browses the website. This information allows attackers to know that the new systems are Linux based and that the network equipment is all Extreme Networks. If attackers were planning to launch a denial-of-service (DoS) attack against the organization, they now know that they must knock out three nodes to the Internet. Even a competitor would benefit from this knowledge because the company is telling the competition everything about its infrastructure.
In some cases, information may have been removed from a company website. That is when the Wayback Machine, at https://archive.org, is useful to browse archived web pages that date back to 1996. It’s a useful tool for looking for information that no longer exists on a site.
Note
Although the Wayback Machine is useful for exploring old web pages, keep in mind that websites can be removed or blocked so that they are not listed.
Another big information leakage point is company directories. They usually identify key employees or departments. By combining this information with a little social engineering, an attacker can call the help desk, pretend he works for one of these key employees, and demand that a password is reset or changed. He could also use biographical information about a key employee to perform other types of social engineering trickery. During a pen test, you want to record any such findings and make sure to alert the organization as to what information is available and how it might be used in an attack.
One method to gain additional information about the organization’s email server is to send an email that will bounce from the site. If the site is secretcorp.org, send a mail to [email protected]. It will bounce back to you and give you information in its header, including the email server IP address and email server version. Another great reason for bouncing an email message is to find out whether the organization makes use of mail scrubbers. Whatever you find, you should copy the information from the headers and make a note of it as you continue to gather information.
Finally, keep in mind that it’s not just logical information that you want to gather. Now is a good time to record all physical information about the targeted company. Location information is used to determine the physical location of the targeted company. Bing Maps and Google Earth are two tools that can be used to get physical layout information. Bing Maps is particularly interesting because it offers a 45-degree perspective, which gives a unique view of facilities and physical landmarks. This view enables you to identify objects such as entry points and points of ingress/egress.
If you’re lucky, the company has a job posting board. Look this over carefully; you will be surprised at how much information is given there. If no job listings are posted on the organization’s website, get interactive and check out some of the major Internet job boards. Popular sites include the following:
• Careerbuilder.com
• Monster.com
• ZipRecruiter.com
• Glassdoor.com
• Indeed.com
At the job posting site, query for the organization. Here’s an example of the type of information usually found:
• Primary responsibilities for this position include management of a Windows Active Directory environment, applications running in Azure, Cisco Firepower Threat Defense (FTD) firewalls.
• Interact with the technical support supervisor to resolve issues and evaluate/maintain patch level and security updates.
• Experience necessary in Active Directory, Microsoft Clustering and F5 Network Load Balancing, Cisco Firepower Threat Defense (FTD) firewalls, Azure Cosmos DB, and Azure Kubernetes Service (AKS).
• Maintain, support, and troubleshoot a Windows 10 user environment, Cisco SSL VPNs, firewalls, and legacy F5 load balancers.
Does this organization give away any information that might be valuable to an attacker? It actually tells attackers almost everything about its network.
Note
Discovering unsecured devices or infrastructure could be used to determine if a Bitcoin miner could successfully be placed on the victim’s network without his knowledge.
One way to reduce the information leakage from job postings is to reduce the system-specific information in the job post or to use a company confidential job posting. Company confidential postings hide the true company’s identity and make it harder for attackers to misuse this type of information.
If the organization you are working for is publicly traded, you should review the Security and Exchange Commission’s EDGAR database. It’s located at https://www.sec.gov/edgar/searchedgar/companysearch.html. A ton of information is available at this site. Hackers focus on the 10-Q and 10-K. These two documents contain yearly and quarterly reports.
Note
The financial data found by using the EDGAR database can be used to determine whether a company should be targeted for attack or even ransomware.
Not only do these documents contain earnings and potential revenue, they also contain details about any acquisitions and mergers. Anytime there is a merger, or one firm acquires another, there is a rush to integrate the two networks. Having the networks integrated is more of an immediate concern than security. Therefore, you will be looking for entity names that are different from the parent organization. These findings might help you discover ways to jump from the subsidiary to the more secure parent company. You should record this information and have it ready when you start to research the Internet Assigned Numbers Authority (IANA) and American Registry for Internet Numbers (ARIN) databases. Here are some other sites you can use to gather financial information about an organization:
• Marketwatch: http://www.marketwatch.com
• Experian: http://www.experian.com
• Wall Street Consensus Monitor: http://www.wallstreetconsensusmonitor.com/
• Euromonitor: http://www.euromonitor.com
Email Footprinting
Security is not just about technical and physical controls. It’s also about people. In many modern attacks, people are the initial target. All this really means is that an ethical hacker is also going to want to see what information is available about key personnel. Whereas websites, employee directories, and press releases may provide employee names, third-party sites have the potential to provide sensitive data an attacker might be able to leverage. We can categorize these sites as either data aggregation brokers or social networking.
A staggering number of data aggregation brokerage sites are on the web. It is easy for an attacker to perform online searches about a person. These sites allow attackers to locate key individuals, identify home phone numbers, and even create maps to people’s houses. Attackers can even see the surroundings of the company or the home they are targeting with great quality satellite pictures. Here are some of the sites:
• Pipl: https://pipl.com/
• Spokeo: http://www.spokeo.com/
• BirthdayDatabase.com: http://www.birthdatabase.com/
• Whitepages: http://www.whitepages.com/
• People Search Now: http://www.peoplesearchnow.com/
• Zabasearch: http://www.zabasearch.com/
• Peoplefinders: http://www.peoplefinders.com/
• Justia email finder: http://virtualchase.justia.com/content/finding-email-addresses
Note
Keep in mind that the amount of information you gather will depend on what part of the world you are searching. Some countries have stronger laws regarding privacy than others. For example, the European Union has strict privacy laws. Citizens of the EU have the right to be forgotten.
What’s interesting is that many sites promise everything from criminal background checks to previous addresses to marriage records to names of family members. Figures 3-6 shows an example of a Zabasearch query.
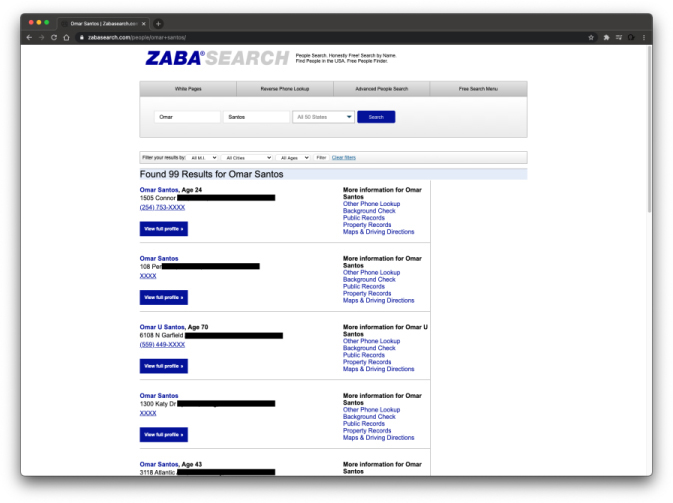
Figure 3-6 Zabasearch
Note
According to the United States Federal Trade Commission, the American public has little rights over the control and dissemination of personal information except for medical records and some credit information. See https://tcf.org/content/report/data-protection-federalism/.
Whois Footprinting
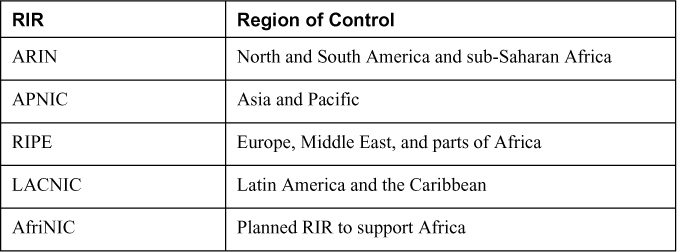
Not long ago, searching for domain name information was much easier. There were only a few places to obtain domain names, and the activities of spammers and hackers had yet to cause the Internet Assigned Numbers Authority (IANA) to restrict the release of this information. Today, the Internet Corporation for Assigned Names and Numbers (ICANN) is the primary body charged with management of IP address space allocation, protocol parameter assignment, and domain name system management. Its role is that of overall management, as domain name registration is handled by a number of competing firms that offer various value-added services. These include firms such as Network Solutions (https://www.networksolutions.com), Register.com (https://www.register.com), GoDaddy (https://www.godaddy.com), and Tucows (http://tucows.com). There is also a series of Regional Internet Registries (RIRs) that manage, distribute, and register public IP addresses within their respective regions. The five RIRs are shown in Table 3-4.
Table 3-4 RIRs and Their Area of Control
Tip
Know the RIR for each region of the world because you could be tested on this information.
The primary tool to navigate these databases is Whois. Whois is a utility that interrogates the Internet domain name administration system and returns the domain ownership, address, location, phone number, and other details about a specified domain name. Whois is the primary tool used to query Domain Name System (DNS). If you’re performing this information gathering from a Linux computer, the good news is that Whois is built in. From the Linux prompt, you can type whois domainname.com or whois? to get a list of various options. Windows users are not as fortunate because Windows does not have a built-in Whois client. If you use Windows, you have to use a third-party tool or website to obtain Whois information.
One tool that a Windows user can use to perform Whois lookups is SmartWhois. You can download it from http://www.tamos.com/products/smartwhois/. SmartWhois is a useful network information utility that allows you to look up all the available information about an IP address, hostname, or domain, including country, state or province, city, name of the network provider, administrator, and technical support contact information. You can also use a variety of other tools to obtain Whois information, including the following:
• BetterWhois: http://www.betterwhois.com
• All NETTOOLS: www.all-nettools.com
• DNSstuff: https://www.dnsstuff.com
• Whois Proxy: http://geektools.com/whois.php
• Whois Lookup Tool: http://www.znetlive.com
• Whois Lookup: http://www.pentest-tools.com
• 3d Traceroute: http://www.d3tr.de/
• Path Analyzer Pro: https://www.pathanalyzer.com/
• LoriotPro: http://www.loriotpro.com/
Regardless of the tool, the goal is to obtain registrar information. As a demonstration, Example 3-1 shows the results of a whois query about pearson.com.
Example 3-1 whois Query Results
   ❯ whois pearson.com
% IANA WHOIS server
% for more information on IANA, visit http://www.iana.org
% This query returned 1 object
refer:        whois.verisign-grs.com
domain:       COM
Domain Name: PEARSON.COM
   Registry Domain ID: 2203864_DOMAIN_COM-VRSN
   Registrar WHOIS Server: whois.corporatedomains.com
   Registrar URL: http://cscdbs.com
   Updated Date: 2017-02-21T19:42:01Z
   Creation Date: 1996-11-25T05:00:00Z
   Registry Expiry Date: 2022-11-24T05:00:00Z
   Registrar: CSC Corporate Domains, Inc.
   Registrar IANA ID: 299
   Registrar Abuse Contact Email: [email protected]
   Registrar Abuse Contact Phone: 8887802723
   Domain Status: clientTransferProhibited
https://icann.org/epp#clientTransferProhibited
   Domain Status: serverDeleteProhibited
https://icann.org/epp#serverDeleteProhibited
   Domain Status: serverTransferProhibited
https://icann.org/epp#serverTransferProhibited
   Domain Status: serverUpdateProhibited
https://icann.org/epp#serverUpdateProhibited
   Name Server: NS01.PEARSON.COM
   Name Server: NS02.PEARSON.COM
   Name Server: NS03.PEARSON.COM
   Name Server: NS04.PEARSON.COM
   DNSSEC: unsigned
   URL of the ICANN Whois Inaccuracy Complaint Form:
https://www.icann.org/wicf/
>>> Last update of whois database: 2021-02-12T03:16:43Z <<<
# whois.corporatedomains.com
Domain Name: pearson.com
Registry Domain ID: 2203864_DOMAIN_COM-VRSN
Registrar WHOIS Server: whois.corporatedomains.com
Registrar URL: www.cscprotectsbrands.com
Updated Date: 2020-10-20T11:53:46Z
Creation Date: 1996-11-25T00:00:00.000-04:00
Registrar Registration Expiration Date: 2022-11-24T00:00:00.000-04:00
Registrar: CSC CORPORATE DOMAINS, INC.
Registrar IANA ID: 299
Registrar Abuse Contact Email: [email protected]
Registrar Abuse Contact Phone: +1.8887802723
Domain Status: clientTransferProhibited
http://www.icann.org/epp#clientTransferProhibited
Domain Status: serverDeleteProhibited
http://www.icann.org/epp#serverDeleteProhibited
Domain Status: serverTransferProhibited
http://www.icann.org/epp#serverTransferProhibited
Domain Status: serverUpdateProhibited
http://www.icann.org/epp#serverUpdateProhibited
Registry Registrant ID:
Registrant Name: Domain Management
Registrant Organization: Pearson plc
Registrant Street: 80 Strand
Registrant City: London
Registrant State/Province: ENG
Registrant Postal Code: WC2R 0RL
Registrant Country: GB
Registrant Phone: +44.2070102000
Registrant Phone Ext:
Registrant Fax: +44.2070106060
Registrant Fax Ext:
Registrant Email: [email protected]
Registry Admin ID:
Admin Name: Domain Management
Admin Organization: Pearson plc
Admin Street: 80 Strand
Admin City: London
Admin State/Province: ENG
Admin Postal Code: WC2R 0RL
Admin Country: GB
Admin Phone: +44.2070102000
Admin Phone Ext:
Admin Fax: +44.2070106060
Admin Fax Ext:
Admin Email: [email protected]
Registry Tech ID:
Tech Name: Domain Management
Tech Organization: Pearson plc
Tech Street: 80 Strand
Tech City: London
Tech State/Province: ENG
Tech Postal Code: WC2R 0RL
Tech Country: GB
Tech Phone: +44.2070102000
Tech Phone Ext:
Tech Fax: +44.2070106060
Tech Fax Ext:
Tech Email: [email protected]
Name Server: ns01.pearson.com
Name Server: ns02.pearson.com
Name Server: ns03.pearson.com
Name Server: ns04.pearson.com
DNSSEC: unsigned
This information provides a contact, address, phone number, and DNS servers. A hacker skilled in the art of social engineering might use this information to call the organization and pretend to be a valid contact.
Tip
A domain proxy is one way that organizations can protect their identity while still complying with laws that require domain ownership to be public information. Domain proxies work by applying anonymous contact information as well an anonymous email address. This information is displayed when someone performs a domain Whois. The proxy then forwards any emails or contact information that might come to those addresses on to you.
DNS Footprinting
If all the previous information has been acquired, the DNS might be targeted for zone transfers. A zone transfer is the mechanism used by DNS servers to update each other by transferring the contents of their database. DNS is structured as a hierarchy so that when you request DNS information, your request is passed up the hierarchy until a DNS server is found that can resolve the domain name request. You can get a better idea of how DNS is structured by examining Figure 3-7, which shows the DNS server hierarchy (structure).

Figure 3-7 DNS Structure
What’s left at this step is to try to gather additional information from the organization’s DNS servers. The primary tool to query DNS servers is Nslookup. Nslookup provides machine name and address information. Both Linux and Windows have Nslookup clients. You use Nslookup by typing nslookup at the command line followed by an IP address or a machine name. Doing so causes Nslookup to return the name, all known IP addresses, and all known CNAMEs for the identified machine. Nslookup queries DNS servers for machine name and address information. Using Nslookup is rather straightforward. Let’s look at an example in which Nslookup is used to find the IP addresses of Google’s web servers. If you enter nslookup google.com, you will see the response in Example 3-2.
Example 3-2 Nslookup google.com Reply
$ nslookup google.com
Server:     208.67.222.222
Address:  208.67.222.222#53
Non-authoritative answer:
Name:     google.com
Address: 172.217.8.14
The first two lines of output say which DNS servers are being queried. In this case, it’s OpenDNS. The nonauthoritative answer lists two IP addresses for the Google’s web servers. Responses from nonauthoritative servers do not contain copies of any domains. They have a cache file that is constructed from all the DNS lookups it has performed in the past for which it has gotten an authoritative response.
Nslookup can also be used in an interactive mode; you just type nslookup at the command prompt in Windows or the Linux or macOS shell. In interactive mode, you will be given a prompt of >; at which point, you can enter a variety of options, including attempts to perform a zone transfer. Table 3-5 shows some common DNS resource record names and types.
Table 3-5 IPv4 DNS Records and Types
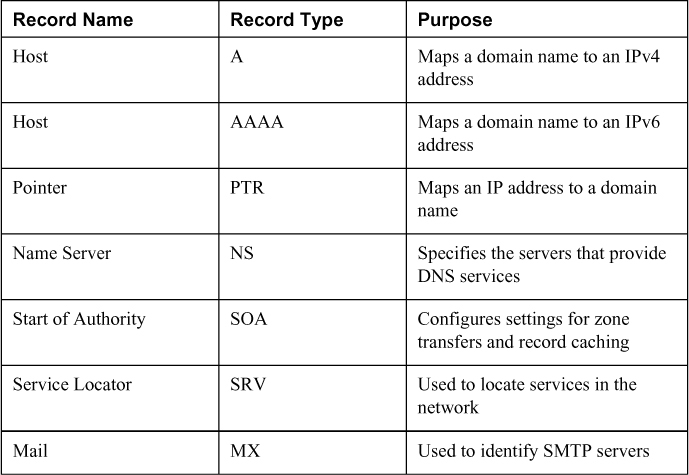
Tip
For the exam, you should know the various record names and types for DNS.
Tip
The SOA contains the timeout value, which a hacker can use to tell how long any DNS poisoning would last. The Time to Live (TTL) value is the last value within the SOA.
DNS normally moves information from one DNS server to another through the DNS zone transfer process. If a domain contains more than one name server, only one of these servers will be the primary. Any other servers in the domain will be secondary servers. Zone transfers are much like the DHCP process in that each is a four-step process. DNS zone transfers function as follows:
1. The secondary name server starts the process by requesting the SOA record from the primary name server.
2. The primary then checks the list of authorized servers, and if the secondary server’s name is on that list, the SOA record is sent.
3. The secondary must then check the SOA record to see whether there is a match against the SOA it already maintains. If the SOA is a match, the process stops here; however, if the SOA has a serial number that is higher, the secondary will need an update. The serial number indicates if changes were made since the last time the secondary server synchronized with the primary server. If an update is required, the secondary name server will send an All Zone Transfer (AXFR) request to the primary server.
4. Upon receipt of the AXFR, the primary server sends the entire zone file to the secondary name server.
A zone transfer is unlike a normal lookup in that the user is attempting to retrieve a copy of the entire zone file for a domain from a DNS server. This can provide a hacker or pen tester with a wealth of information. This is not something that the target organization should be allowing. Unlike lookups that primarily occur on UDP 53, unless the response is greater than 512 bytes, zone transfers use TCP 53. To attempt a zone transfer, you must be connected to a DNS server that is the authoritative server for that zone. Example 3-3 demonstrates a DNS Zone transfer using the ZoneTransfer.me domain:
Example 3-3 Zone Transfer
$ dig axfr @nsztm1.digi.ninja zonetransfer.me
; <<>> DiG 9.16.6-Debian <<>> axfr @nsztm1.digi.ninja zonetransfer.me
; (1 server found)
;; global options: +cmd
zonetransfer.me.   7200      IN        SOA       nsztm1.digi.ninja.
robin.digi.ninja. 2019100801 172800 900 1209600 3600
zonetransfer.me.   300       IN        HINFO     "Casio fx-700G" "Windows XP"
zonetransfer.me.   301       IN        TXT       "google-site-
verification=tyP28J7JAUHA9fw2sHXMgcCC0I6XBmmoVi04VlMewxA"
zonetransfer.me.   7200      IN        MX        0 ASPMX.L.GOOGLE.COM.
zonetransfer.me.   7200      IN        MX        10 ALT1.ASPMX.L.GOOGLE.COM.
zonetransfer.me.   7200      IN        MX        10 ALT2.ASPMX.L.GOOGLE.COM.
zonetransfer.me.   7200      IN        MX        20 ASPMX2.GOOGLEMAIL.COM.
zonetransfer.me.   7200      IN        MX        20 ASPMX3.GOOGLEMAIL.COM.
zonetransfer.me.   7200      IN        MX        20 ASPMX4.GOOGLEMAIL.COM.
zonetransfer.me.   7200      IN        MX        20 ASPMX5.GOOGLEMAIL.COM.
zonetransfer.me.   7200      IN        A         5.196.105.14
zonetransfer.me.   7200      IN        NS        nsztm1.digi.ninja.
zonetransfer.me.   7200      IN        NS        nsztm2.digi.ninja.
_acme-challenge.zonetransfer.me. 301 IN         TXT
      "6Oa05hbUJ9xSsvYy7pApQvwCUSSGgxvrbdizjePEsZI"
_sip._tcp.zonetransfer.me. 14000 IN   SRV       0 0 5060
www.zonetransfer.me.
14.105.196.5.IN-ADDR.ARPA.zonetransfer.me. 7200 IN PTR
www.zonetransfer.me.
asfdbauthdns.zonetransfer.me. 7900 IN AFSDB     1
asfdbbox.zonetransfer.me.
asfdbbox.zonetransfer.me. 7200        IN        A         127.0.0.1
asfdbvolume.zonetransfer.me. 7800 IN  AFSDB     1 asfdbbox.zonetransfer.me.
canberra-office.zonetransfer.me. 7200 IN A      202.14.81.230
cmdexec.zonetransfer.me. 300 IN        TXT       "; ls"
contact.zonetransfer.me. 2592000 IN   TXT       "Remember to call or
email Pippa on +44 123 4567890 or [email protected] when making DNS
changes"
dc-office.zonetransfer.me. 7200       IN        A         143.228.181.132
deadbeef.zonetransfer.me. 7201        IN        AAAA      dead:beaf::
dr.zonetransfer.me.          300       IN        LOC       53 20 56.558 N 1 38
33.526 W 0.00m 1m 10000m 10m
DZC.zonetransfer.me.         7200      IN        TXT       "AbCdEfG"
email.zonetransfer.me.       2222      IN        NAPTR     1 1 "P" "E2U+email" ""
email.zonetransfer.me.zonetransfer.me.
email.zonetransfer.me.       7200      IN        A         74.125.206.26
Hello.zonetransfer.me.       7200      IN        TXT       "Hi to Josh and all his
class"
home.zonetransfer.me.        7200      IN        A         127.0.0.1
Info.zonetransfer.me.        7200      IN        TXT       "ZoneTransfer.me service
provided by Robin Wood - [email protected]. See
http://digi.ninja/projects/zonetransferme.php for more information."
internal.zonetransfer.me. 300         IN        NS        intns1.zonetransfer.me.
internal.zonetransfer.me. 300         IN        NS        intns2.zonetransfer.me.
intns1.zonetransfer.me.      300       IN        A         81.4.108.41
intns2.zonetransfer.me.      300       IN        A         167.88.42.94
office.zonetransfer.me.      7200      IN        A         4.23.39.254
ipv6actnow.org.zonetransfer.me.       7200 IN   AAAA
      2001:67c:2e8:11::c100:1332
owa.zonetransfer.me.         7200      IN        A         207.46.197.32
robinwood.zonetransfer.me. 302        IN        TXT       "Robin Wood"
rp.zonetransfer.me.          321       IN        RP        robin.zonetransfer.me. robinwood.zonetransfer.me.
sip.zonetransfer.me.         3333      IN        NAPTR     2 3 "P" "E2U+sip"
"!^.*$!sip:[email protected]!" .
sqli.zonetransfer.me.        300       IN        TXT       "' or 1=1 --"
sshock.zonetransfer.me.      7200      IN        TXT       "() { :]}; echo
ShellShocked"
staging.zonetransfer.me. 7200         IN        CNAME
     www.sydneyoperahouse.com.
alltcpportsopen.firewall.test.zonetransfer.me. 301 IN A   127.0.0.1
testing.zonetransfer.me. 301 IN        CNAME     www.zonetransfer.me.
vpn.zonetransfer.me.         4000      IN        A         174.36.59.154
www.zonetransfer.me.         7200      IN        A         5.196.105.14
xss.zonetransfer.me.         300       IN        TXT
       "'><script>alert('Boo')</script>"
zonetransfer.me.   7200      IN        SOA       nsztm1.digi.ninja. robin.digi.ninja. 2019100801 172800 900 1209600 3600
;; Query time: 92 msec
;; SERVER: 81.4.108.41#53(81.4.108.41)
;; XFR size: 50 records (messages 1, bytes 1994
Note
You can obtain more information about how to perform a DNS zone transfer with these domains at https://digi.ninja/projects/zonetransferme.php.
One of two things will happen at this point. You will receive an error message indicating that the transfer was unsuccessful, or you will be returned a wealth of information, as shown in the query in Example 3-4 for the domain h4cker.org.
Example 3-4 Using Nslookup to Resolve DNS Names
$ nslookup h4cker.org
Server:     208.67.222.222
Address:  208.67.222.222#53

Non-authoritative answer:
Name:      h4cker.org
Address:  185.199.109.153
Name:      h4cker.org
Address:  185.199.110.153
Name:      h4cker.org
Address:  185.199.111.153
Name:      h4cker.org
Address:  185.199.108.153
Dig is another tool that you can use to provide this type of information. It’s built in to most Linux distributions and can be run from Bash or run from the command prompt when installed in Windows. Dig is a powerful tool that can be used to investigate the DNS system. Example 3-5 demonstrates using dig to obtain information about the domain h4cker.org.
Example 3-5 Using dig to Investigate a DNA System
$ dig h4cker.org

; <<>> DiG 9.10.6 <<>> h4cker.org
;; global options: +cmd
;; Got answer:
;; ->>HEADER<<- opcode: QUERY, status: NOERROR, id: 42293
;; flags: qr rd ra ad; QUERY: 1, ANSWER: 4, AUTHORITY: 0, ADDITIONAL: 1

;; OPT PSEUDOSECTION:
; EDNS: version: 0, flags:; udp: 4096
;; QUESTION SECTION:
;h4cker.org.                                                    IN
A

;; ANSWER SECTION:
h4cker.org.                                    300           IN
A               185.199.110.153
h4cker.org.                                    300           IN
A               185.199.111.153
h4cker.org.                                    300           IN
A               185.199.108.153
h4cker.org.                                    300           IN
A               185.199.109.153

;; Query time: 73 msec
;; SERVER: 208.67.222.222#53(208.67.222.222)
;; WHEN: Thu Feb 11 22:24:36 EST 2021
;; MSG SIZE  rcvd: 103
There is also a range of tools that can be used to interrogate DNS servers, including the following:
• DomainDossier: https://centralops.net/co/domaindossier.aspx
• ViewDNS: https://viewdns.info
• MassDNS: https://github.com/blechschmidt/massdns
• Domain to IP Converter: https://domaintoipconverter.com
• DNSMap: https://code.google.com/archive/p/dnsmap/
Internal DNS information should not be made available to just anyone. Hackers can use this information to find out what other servers are running on the network, and it can help them map the network and formulate what types of attacks to launch. Notice the first line in the previous output that has example.com listed. Observe the final value of 3600 on that line. That is the TTL value discussed previously and would inform a hacker as to how long DNS poisoning would last. Keep in mind that 3,600 seconds is 60 minutes. Zone transfers are intended for use by secondary DNS servers to synchronize with their primary DNS server. You should make sure that only specific IP addresses are allowed to request zone transfers. Most operating systems restrict this by default. All DNS servers should be tested. It is often the case that the primary has tight security but the secondaries may allow zone transfers if misconfigured.
Tip
The CEH exam expects you to understand the Nslookup and Dig tools and functions. Be sure that you know how to get into interactive mode with Nslookup and how to extract specific information. You may be asked to verify a specific NSlookup command.
Network Footprinting
Now that the pen test team has been able to locate names, phone numbers, addresses, some server names, and IP addresses, it’s important to find out what IP addresses are available for scanning and further enumeration. If you take the IP address of a web server discovered earlier and enter it into the Whois lookup at https://www.arin.net, you can determine the network’s range. In the example in Figure 3-8, the IP address 157.245.123.123 was entered into the ARIN Whois, so now you can see the details about who owns that IP block. In this case, the IP block 157.245.0.0/16 was allocated to Digital Ocean (a cloud service provider).
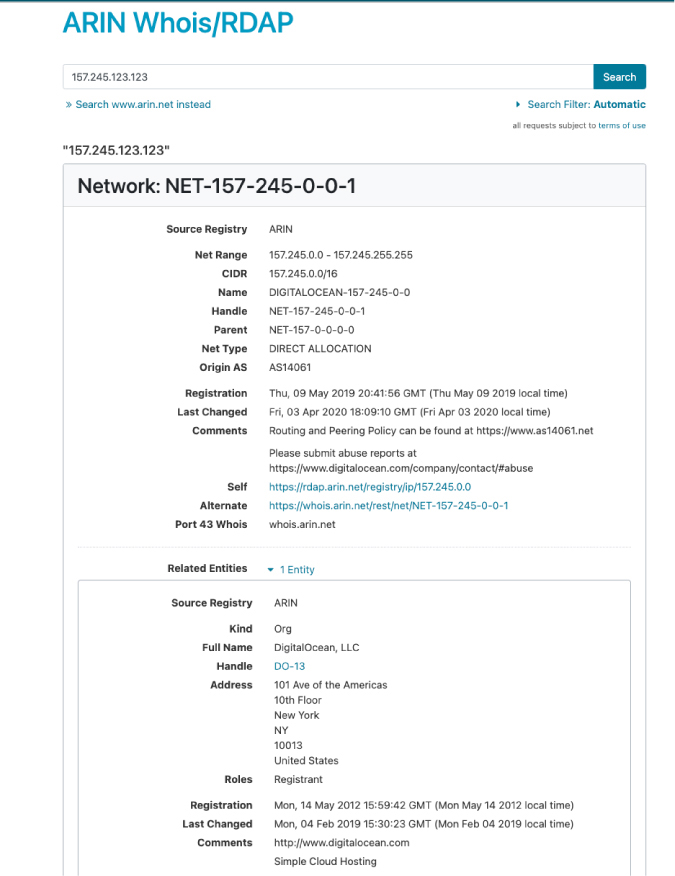
Figure 3-8 ARIN’s Whois Lookup
An attacker can now focus his efforts on the range from 157.245.0.1 to 157.245.255.254. If these results don’t prove satisfactory, the attacker can use traceroute for additional mapping.
Subnetting’s Role in Mapping Networks
Some of the items you might see on the exam but are not included in any of the official courseware include subnetting. Subnetting allows the creation of many logical networks that exist within a single Class A, B, or C network. Subnetting is important in that it helps pen testers identify what systems are part of which specific network.
To subnet a network, you must extend the natural mask with some of the bits from the host ID portion of the address. For example, if you had a Class C network of 192.168.5.0, which has a natural mask of 255.255.255.0, you can create subnets in this manner:
192.168.5.0 -11001100.10101000.00000101.00000000
255.255.255.224 - 11111111.11111111.11111111.11100000
------------------------------------------------|subnet|----
By extending the mask from 255.255.255.0 to 255.255.255.224, you have taken 3 bits from the original host portion of the address and used them to make subnets. When you borrow these 3 bits, it is possible to create eight subnets. The remaining 5 bits can provide for up to 32 host addresses, 30 of which can actually be assigned to a device because host addresses with all zeros and all ones are not assigned to specific devices. Here is a breakdown of the subnets and their address ranges:

The more host bits you use for a subnet mask, the more subnets you have available. However, the more subnets that are available, the fewer host addresses that are available per subnet.
Traceroute
It’s advisable to check out more than one version of traceroute if you don’t get the required results. Some techniques can also be used to try to slip traceroute past a firewall or filtering device. When UDP and ICMP are not allowed on the remote gateway, you can use the Linux tcptraceroute command, which allows you to use TCP packets for traceroute. You can obtain more information about tcptraceroute at https://linux.die.net/man/1/tcptraceroute. Another unique technique was developed by Michael Schiffman, who created a patch called traceroute.diff that allows you to specify the port that traceroute will use. With this handy tool, you could easily direct traceroute to use UDP port 53. Because that port is used for DNS queries, there’s a good chance that it could be used to slip past the firewall. If you’re looking for a graphical user interface (GUI) program to perform traceroute with, several are available, as described here:
• LoriotPro: A professional and scalable SNMP manager and network monitoring solution that enables availability and performance control of your networks, systems, and smart infrastructures. The graphical display shows you the route between you and the remote site, including all intermediate nodes and their registrant information.
• Trout: A visual traceroute and Whois program. What’s great about this program is its speed. Unlike traditional traceroute programs, Trout performs parallel pinging. By sending packets with more than one TTL at a time, it can quickly determine the path to a targeted device.
• VisualRoute: Another graphical traceroute for Windows. VisualRoute not only shows a graphical world map that displays the path that packets are taking but also lists information for each hop, including IP address, node name, and geographic location. This tool is commercial and must be purchased.
Tip
Traceroute and ping are useful tools for identifying active systems, mapping their location, and learning more about their location. Just keep in mind that these tools are limited by what they can see; if these services are blocked by a firewall, you may get no useful data returned.
Footprinting Through Social Engineering
An attacker can also reveal a lot of information about the targeted organization and underlying systems by using social engineering. The reason is that, in many cases, it is even easier to get sensitive information by tricking a human in a conversation or by sending an email instead of using sophisticated scanning and enumeration tools.
You will learn the details about social engineering tactics and techniques in Chapter 5, “Social Engineering, Malware Threats, and Vulnerability Analysis.”
Footprinting Countermeasures
The following are some of the most common countermeasures to protect your organizations and employees from malicious footprinting:
• Provide user education to stay safe online. In the past, many companies restricted employees from accessing social networking sites from their network. However, nowadays social networking sites are used as marketing tools and have become essential for business. This is why user education in some cases is better than completely blocking social networking sites.
• Configure web servers to avoid information leakage.
• Educate employees to use pseudonyms on blogs, groups, and forums.
• Do not reveal critical information in press releases, annual reports, product catalogs, and so on.
• As an ethical hacker, use footprinting techniques to discover and remove any sensitive information about your company and systems that is publicly available.
• Do not allow search engines from caching your websites and use anonymous registration services.
• Enforce security policies to regulate the information that your users can reveal to third parties.
• Configure separate internal and external DNS, or use split DNS and restrict zone transfer to authorized servers.
• Disable directory listings in the web servers.
• Educate users about social engineering risks.
• Subscribe to use privacy services on the Whois Lookup database.
• Prevent domain-level cross-linking for the critical assets.
Scanning
The following sections provide details about the different network scanning concepts and scanning tools. You also learn different techniques for host discovery, port and service discovery, operating system (OS) discovery (banner grabbing/OS fingerprinting), and scanning beyond the intrusion detection system (IDS) and firewall.
Host Discovery
Attackers will want to know whether machines are alive before they attempt to attack. One of the most basic methods of identifying active machines is to perform a ping sweep. Just because ping can be blocked does not mean it is. Although many organizations have restricted ping, you should still check to see if it is available. Ping uses ICMP and works by sending an echo request to a system and waiting for the target to send an echo reply back. If the target device is unreachable, a request timeout is returned. Ping is a useful tool to identify active machines and to measure the speed at which packets are moved from one host to another or to get details like the TTL. Figure 3-9 shows a capture of ping packets from a Linux system using the Wireshark packet capture (sniffer) tool. If you examine the ASCII decode at the bottom, you will notice that the data in the ping packet is composed of different hexadecimal values; in other systems (like Windows), this may be different. The reason is that the RFC that governs ping doesn’t specify what’s carried in the packet as payload. Vendors fill in this padding as they see fit. Unfortunately, this can also serve hackers as a covert channel. Hackers can use a variety of programs to place their own information in place of the normal padding. Tools like Loki and IcmpSendEcho are designed for just this purpose. Then what appear to be normal pings are actually a series of messages entering and leaving the network.
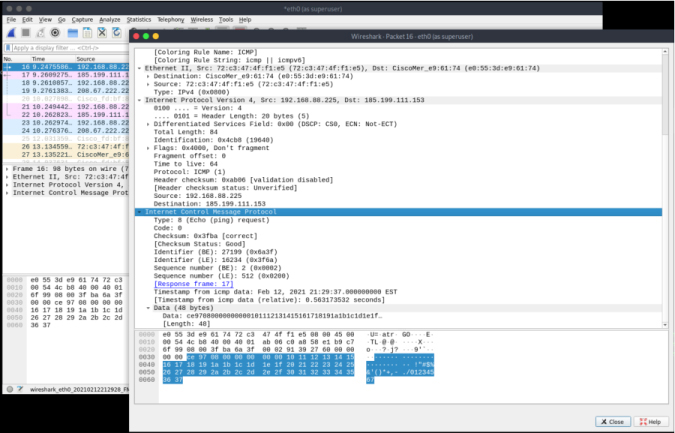
Figure 3-9 Ping Capture
Ping does have a couple of drawbacks: First, only one system at a time is pinged, and second, not all networks allow ping. To ping a large number of hosts, a ping sweep is usually performed. Programs that perform ping sweeps usually sweep through a range of devices to determine which ones are active. Programs that will perform ping sweeps include the following:
• Angry IP Scanner: https://angryip.org
• MASSCAN: https://github.com/robertdavidgraham/masscan
• Hping3: https://tools.kali.org/information-gathering/hping3/
• WS_Ping ProPack: https://ws-ping-propack.en.softonic.com/
• Nmap: https://nmap.org/
Tip
Know the positives and negatives of ping before taking the CEH exam.
Port and Service Discovery
Port scanning is the process of connecting to TCP and UDP ports for the purpose of finding what services and applications are running on the target device. After discovering running applications, open ports, and services, a hacker can then determine the best way to attack the system.
As discussed in Chapter 2, “The Technical Foundations of Hacking,” there are a total of 65,535 TCP and UDP ports. These port numbers are used to identify a specific process that a message is coming from or going to. Table 3-6 lists some common port numbers.
Table 3-6 Common Ports and Protocols

Tip
The exam might ask you about common or not so common ports, such as 514 (syslog) or even 179 (Internet Printing Protocol). If you see these on the test questions, the best approach is to first eliminate known ports and reduce down to the best answer.
As you have probably noticed, some of these applications run on TCP, others on UDP. Although it is certainly possible to scan for all 65,535 TCP and 65,535 UDP ports, many hackers will not. They will concentrate on the first 1,024 ports. These well-known ports are where we find most of the commonly used applications. You can find a list of well-known ports at http://www.iana.org/assignments/port-numbers. This is not to say that high-order ports should be totally ignored, because hackers might break into a system and open a high-order port, such as 31337, to use as a backdoor. So, is one protocol easier to scan for than the other? The answer to that question is yes. TCP offers more opportunity for the hacker to manipulate than UDP. Let’s take a look at why.
TCP offers robust communication and is considered a connection protocol. TCP establishes a connection by using what is called a three-way handshake. Those three steps proceed as follows:
1. The client sends the server a TCP packet with the sequence number flag (SYN flag) set and an initial sequence number (ISN).
2. The server replies by sending a packet with the SYN/ACK flag set to the client. The synchronize sequence number flag informs the client that it would like to communicate with it, and the acknowledgment flag informs the client that it received its initial packet. The acknowledgment number will be one digit higher than the client’s ISN. The server generates an ISN, as well, to keep track of every byte sent to the client.
3. When the client receives the server’s packet, it creates an ACK packet to acknowledge that the data has been received from the server. At this point, communication can begin.
The TCP header contains a 1-byte field for the flags. Table 3-7 describes the six most common flags.
Table 3-7 TCP Flag Types
Tip
One easy way to remember the six most commonly used flags is as follows: Unruly Attackers Pester Real Security Folks.
At the conclusion of communication, TCP terminates the session by using a four-step shutdown:
1. The client sends the server a packet with the FIN/ACK flags set.
2. The server sends a packet ACK flag set to acknowledge the client’s packet.
3. The server then generates another packet with the FIN/ACK flags set to inform the client that it also is ready to conclude the session.
4. The client sends the server a packet with the ACK flag set to conclude the session.
Tip
TCP flags are considered testable topics. You should understand their use and purpose.
The TCP system of communication makes for robust communication but also allows a hacker many ways to craft packets in an attempt to coax a server to respond or to try to avoid detection of an intrusion detection system (IDS). Many of these methods are built in to Nmap and other port-scanning tools. Before we take a look at those tools, though, some of the more popular port-scanning techniques are listed here:
• TCP full connect scan: This type of scan is the most reliable, although it is also the most detectable. It is easily logged and detected because a full connection is established. Open ports reply with a SYN/ACK, and closed ports respond with an RST/ACK.
• TCP SYN scan: This type of scan is known as half open because a full TCP three-way connection is not established. This type of scan was originally developed to be stealthy and evade IDSs, although most now detect it. Open ports reply with a SYN/ACK, and closed ports respond with an RST/ACK.
• TCP FIN scan: Forget trying to set up a connection; this technique jumps straight to the shutdown. This type of scan sends a FIN packet to the target port. An open port should return no response. Closed ports should send back an RST/ACK. This technique is usually effective only on UNIX devices or those compliant to RFC 793.
• TCP NULL scan: Sure, there should be some type of flag in the packet, but a NULL scan sends a packet with no flags set. If the OS has implemented TCP per RFC 793, open ports send no reply, whereas closed ports will return an RST.
• TCP ACK scan: This scan attempts to determine access control list (ACL) rule sets or identify if a firewall or simply stateless inspection is being used. A stateful firewall should return no response. If an ICMP destination is unreachable, and a communication administratively prohibited message is returned, the port is considered to be filtered. If an RST is returned, no firewall is present.
• TCP XMAS scan: Sorry, there are no Christmas presents here, just a port scan that has toggled on the FIN, URG, and PSH flags. Open ports should provide no response. Closed ports should return an RST. Systems must be designed per RFC 793 for this scan to work, as is common for Linux. It does not work against Windows computers.
Tip
You should know common scan types, such as full and stealth, to successfully pass the exam. It’s suggested that you download the Nmap tool and play with it to fully understand the options. The exam might test you over any type of Nmap scan.
Certain operating systems have taken some liberties when applying the TCP/IP RFCs and do things their own way. Because of this, not all scan types work against all systems. Results will vary, but full connect scans and SYN scans should work against all systems.
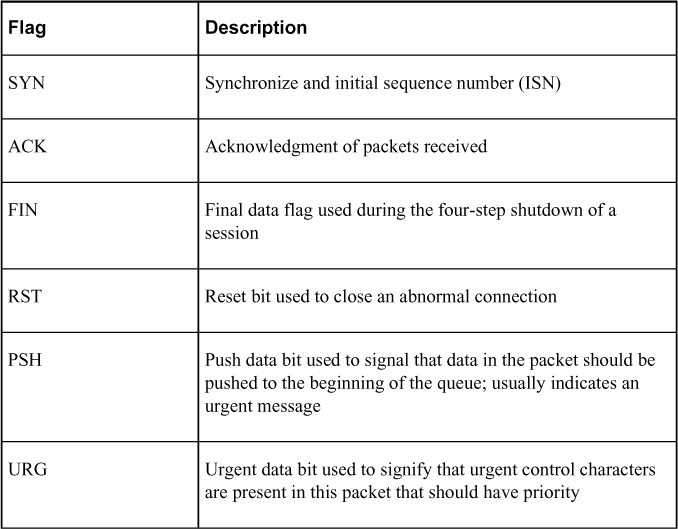
These are not the only types of possible scans; there are other scan types. Some scanning techniques can be used to obscure attackers and help hide their identity. One such technique is the idle or zombie scan. Before we go through an example of idle scanning, let’s look at some basics on how TCP/IP connections operate. IP makes use of an identification number known as an IPID. This counter helps in the reassembly of fragmented traffic. TCP offers reliable service; it must perform a handshake before communication can begin. The initializing party of the handshake sends a SYN packet to which the receiving party returns a SYN/ACK packet if the port is open. For closed ports, the receiving party returns an RST. The RST acts as a notice that something is wrong, and further attempts to communicate should be discontinued. RSTs are not replied to; if they were replied to, we might have a situation in which two systems flood each other with a stream of RSTs. This means that unsolicited RSTs are ignored. When these characteristics are combined with IPID behavior, a successful idle scan is possible.
An open port idle scan works as follows:
Step 1. An attacker sends an IDIP probe to the idle host to solicit a response. Suppose, for example, that the response produces an IPID of 12345.
Step 2. Next, the attacker sends a spoofed packet to the victim. This SYN packet is sent to the victim but is addressed from the idle host. An open port on the victim’s system will then generate a SYN ACK. Because the idle host was not the source of the initial SYN packet and did not at any time want to initiate communication, it responds by sending an RST to terminate communications. This increments the IPID by one to 12346.
Step 3. Finally, the attacker again queries the idle host and is issued an IPID response of 12347. Because the IPID count has now been incremented by two from the initial number of 12345, the attacker can deduce that the scanned port on the victim’s system is open.
Figure 3-10 provides an example of this situation.
Figure 3-10 IPID Open Port
But what if the target system has its port closed? In that situation, the scan starts the same way as previously described:
Step 1. An attacker makes an initial query to determine the idle host’s IPID value. Note that the value returned was 12345.
Step 2. The attacker sends a SYN packet addressed to the victim but spoofs it to appear that it originated from the idle host. Because the victim’s port is closed, it responds to this query by issuing an RST. Because RSTs don’t generate additional RSTs, the communication between the idle host and the victim ends here.
Step 3. The attacker again probes the idle host and examines the response. Because the victim’s port was closed, we can see that the returned IPID was 12346. It was only incremented by one because no communication had taken place since the last IPID probe that determined the initial value.
Figure 3-11 provides an example of this situation.
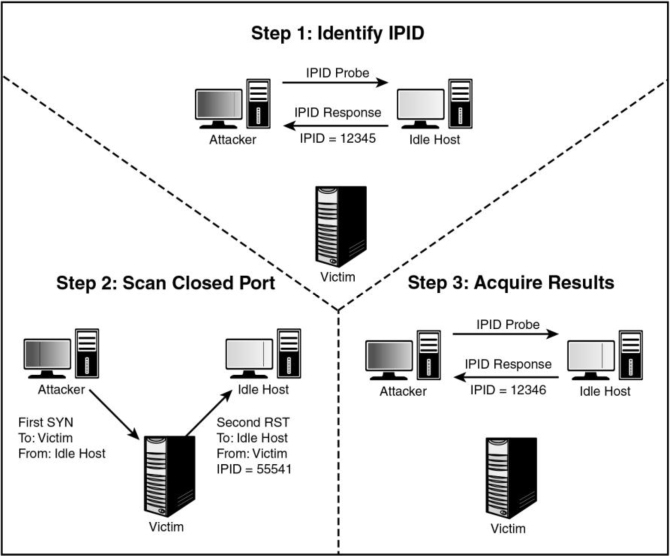
Figure 3-11 IPID Port Closed
Although not perfect, this scanning technique enables attackers to obscure their true address. However, limitations apply to the capability of an idle scan. First, the system designated to play the role of the idle host must truly be idle. A chatty system is of little use because the IPID will increment too much to be useful. There is also the fact that not all operating systems use an incrementing IPID. For example, some versions of Linux set the IPID to zero or generate a random IPID value. Again, these systems are of little use in such an attack. Finally, these results must be measured; by this, we mean that several passes need to be performed to validate the results and be somewhat sure that the attacker’s conclusions are valid. Although the concept of idle scanning is interesting, there are a few other scan types worth briefly noting:
• ACK scan: Sends an ACK probe with random sequence numbers. ICMP type 3 code 13 responses may mean that stateless firewalls are being used, and an RST can mean that the port is not filtered.
• FTP bounce scan: Uses an FTP server to bounce packets off and make the scan harder to trace.
• RPC scan: Attempts to determine whether open ports are RPC ports.
• Window scan: Similar to an ACK scan but can sometimes determine open ports. It does so by examining the TCP window size of returned RST packets. On some systems, open ports return a positive window size and closed ones return a zero window size.
Now let’s look at UDP scans. UDP is unlike TCP. TCP is built on robust connections, but UDP is based on speed. With TCP, the hacker can manipulate flags in an attempt to generate a TCP response or an error message from ICMP. UDP does not have flags, nor does UDP issue responses. It’s a fire-and-forget protocol! The most you can hope for is a response from ICMP.
If the port is closed, ICMP attempts to send an ICMP type 3 code 3 port unreachable message to the source of the UDP scan. But, if the network is blocking ICMP, no error message is returned. Therefore, the response to the scans might simply be no response. If you are planning on doing UDP scans, plan for unreliable results.
Next, we discuss some of the programs that can be used for port scanning.
Nmap
Nmap was developed by a hacker named Fyodor Yarochkin. It is probably the most widely used port scanner ever developed. It can do many types of scans and OS identification. It also enables you to control the speed of the scan from slow to insane. Its popularity can be seen by the fact that it’s incorporated into other products and was even used in the movie The Matrix. Nmap can be installed as a GUI or command-line program in Linux, Windows, and macOS; and it is installed by default in Linux distributions such as Kali Linux, Parrot Security OS, BlackArch, Pentoo, and others. You can download Nmap from https://nmap.org. Example 3-6 shows results from Nmap with the help option so that you can review some of its many switches.
Example 3-6 Displaying Nmap Switches
#nmap -h
Nmap 7.80 ( https://nmap.org )
Usage: nmap [Scan Type(s)] [Options] {target specification}
TARGET SPECIFICATION:
  Can pass hostnames, IP addresses, networks, etc.
  Ex: scanme.nmap.org, microsoft.com/24, 192.168.0.1; 10.0.0-255.1-254
  -iL <inputfilename>: Input from list of hosts/networks
  -iR <num hosts>: Choose random targets
  --exclude <host1[,host2][,host3],...>: Exclude hosts/networks
  --excludefile <exclude_file>: Exclude list from file
HOST DISCOVERY:
  -sL: List Scan - simply list targets to scan
  -sn: Ping Scan - disable port scan
  -Pn: Treat all hosts as online -- skip host discovery
  -PS/PA/PU/PY[portlist]: TCP SYN/ACK, UDP or SCTP discovery to given
ports
  -PE/PP/PM: ICMP echo, timestamp, and netmask request discovery probes
  -PO[protocol list]: IP Protocol Ping
  -n/-R: Never do DNS resolution/Always resolve [default: sometimes]
  --dns-servers <serv1[,serv2],...>: Specify custom DNS servers
  --system-dns: Use OS's DNS resolver
  --traceroute: Trace hop path to each host
SCAN TECHNIQUES:
  -sS/sT/sA/sW/sM: TCP SYN/Connect()/ACK/Window/Maimon scans
  -sU: UDP Scan
  -sN/sF/sX: TCP Null, FIN, and Xmas scans
  --scanflags <flags>: Customize TCP scan flags
  -sI <zombie host[:probeport]>: Idle scan
  -sY/sZ: SCTP INIT/COOKIE-ECHO scans
  -sO: IP protocol scan
  -b <FTP relay host>: FTP bounce scan
PORT SPECIFICATION AND SCAN ORDER:
  -p <port ranges>: Only scan specified ports
    Ex: -p22; -p1-65535; -p U:53,111,137,T:21-25,80,139,8080,S:9
  --exclude-ports <port ranges>: Exclude the specified ports from scanning
  -F: Fast mode - Scan fewer ports than the default scan
  -r: Scan ports consecutively - don't randomize
  --top-ports <number>: Scan <number> most common ports
  --port-ratio <ratio>: Scan ports more common than <ratio>
SERVICE/VERSION DETECTION:
  -sV: Probe open ports to determine service/version info
  --version-intensity <level>: Set from 0 (light) to 9 (try all probes)
  --version-light: Limit to most likely probes (intensity 2)
  --version-all: Try every single probe (intensity 9)
  --version-trace: Show detailed version scan activity (for debugging)
SCRIPT SCAN:
  -sC: equivalent to --script=default
  --script=<Lua scripts>: <Lua scripts> is a comma separated list of
           directories, script-files or script-categories
  --script-args=<n1=v1,[n2=v2,...]>: provide arguments to scripts
  --script-args-file=filename: provide NSE script args in a file
  --script-trace: Show all data sent and received
  --script-updatedb: Update the script database.
  --script-help=<Lua scripts>: Show help about scripts.
           <Lua scripts> is a comma-separated list of script-files or
           script-categories.
OS DETECTION:
  -O: Enable OS detection
  --osscan-limit: Limit OS detection to promising targets
  --osscan-guess: Guess OS more aggressively
TIMING AND PERFORMANCE:
  Options which take <time> are in seconds, or append 'ms' (milliseconds),
  's' (seconds), 'm' (minutes), or 'h' (hours) to the value (e.g. 30m).
  -T<0-5>: Set timing template (higher is faster)
  --min-hostgroup/max-hostgroup <size>: Parallel host scan group sizes
  --min-parallelism/max-parallelism <numprobes>: Probe parallelization
  --min-rtt-timeout/max-rtt-timeout/initial-rtt-timeout <time>: Specifies
      probe round trip time.
  --max-retries <tries>: Caps number of port scan probe retransmissions.
  --host-timeout <time>: Give up on target after this long
  --scan-delay/--max-scan-delay <time>: Adjust delay between probes
  --min-rate <number>: Send packets no slower than <number> per second
  --max-rate <number>: Send packets no faster than <number> per second
FIREWALL/IDS EVASION AND SPOOFING:
  -f; --mtu <val>: fragment packets (optionally w/given MTU)
  -D <decoy1,decoy2[,ME],...>: Cloak a scan with decoys
  -S <IP_Address>: Spoof source address
  -e <iface>: Use specified interface
  -g/--source-port <portnum>: Use given port number
  --proxies <url1,[url2],...>: Relay connections through HTTP/SOCKS4
proxies
  --data <hex string>: Append a custom payload to sent packets
  --data-string <string>: Append a custom ASCII string to sent packets
  --data-length <num>: Append random data to sent packets
  --ip-options <options>: Send packets with specified ip options
  --ttl <val>: Set IP time-to-live field
  --spoof-mac <mac address/prefix/vendor name>: Spoof your MAC address
  --badsum: Send packets with a bogus TCP/UDP/SCTP checksum
OUTPUT:
  -oN/-oX/-oS/-oG <file>: Output scan in normal, XML, s|<rIpt kIddi3,
     and Grepable format, respectively, to the given filename.
  -oA <basename>: Output in the three major formats at once
  -v: Increase verbosity level (use -vv or more for greater effect)
  -d: Increase debugging level (use -dd or more for greater effect)
  --reason: Display the reason a port is in a particular state
  --open: Only show open (or possibly open) ports
  --packet-trace: Show all packets sent and received
  --iflist: Print host interfaces and routes (for debugging)
  --append-output: Append to rather than clobber specified output files
  --resume <filename>: Resume an aborted scan
  --stylesheet <path/URL>: XSL stylesheet to transform XML output to HTML
  --webxml: Reference stylesheet from Nmap.Org for more portable XML
  --no-stylesheet: Prevent associating of XSL stylesheet w/XML output
MISC:
  -6: Enable IPv6 scanning
  -A: Enable OS detection, version detection, script scanning, and
traceroute
  --datadir <dirname>: Specify custom Nmap data file location
  --send-eth/--send-ip: Send using raw ethernet frames or IP packets
  --privileged: Assume that the user is fully privileged
  --unprivileged: Assume the user lacks raw socket privileges
  -V: Print version number
  -h: Print this help summary page.
EXAMPLES:
  nmap -v -A scanme.nmap.org
  nmap -v -sn 192.168.0.0/16 10.0.0.0/8
  nmap -v -iR 10000 -Pn -p 80
SEE THE MAN PAGE (https://nmap.org/book/man.html) FOR MORE OPTIONS AND
EXAMPLES
Tip
To better understand Nmap and fully prepare for the CEH exam, you can visit the Nmap cheat sheet I have created and hosted in my GitHub repository at https://github.com/The-Art-of-Hacking/h4cker/blob/master/cheat_sheets/NMAP_cheat_sheet.md. You can also review the official Nmap documentation at https://nmap.org/book/man.html.
Note
One example of an Nmap switch you should know is decoy. The decoy switch is used to evade an IDS or firewall. The idea is to make it appear to the target that the decoys are the source of the scan, which obscures the real source of the attacker. Decoy can be used two ways. The first is with the RND option so that Nmap generates a random set of source IP addresses. The second is that the attacker can include a specific list of spoofed source addresses.
As shown in the output of the help menu in the previous listing, Nmap can run many types of scans. Nmap is considered a required tool for all ethical hackers.
The Nmap Scripting Engine (NSE) is one of Nmap’s most powerful and flexible features. It allows users to create and use simple scripts to automate a wide variety of networking tasks. You can use the Linux locate command to find where the NSE scripts are located in your system (as demonstrated in Example 3-7). In Parrot Security OS and Kali Linux, the default location is /usr/share/nmap/scripts.
Example 3-7 Locating NSE Scripts
#locate *.nse
/usr/share/nmap/scripts/acarsd-info.nse
/usr/share/nmap/scripts/address-info.nse
/usr/share/nmap/scripts/afp-brute.nse
/usr/share/nmap/scripts/afp-ls.nse
/usr/share/nmap/scripts/afp-path-vuln.nse
/usr/share/nmap/scripts/afp-serverinfo.nse
/usr/share/nmap/scripts/afp-showmount.nse
/usr/share/nmap/scripts/ajp-auth.nse
/usr/share/nmap/scripts/ajp-brute.nse
/usr/share/nmap/scripts/ajp-headers.nse
/usr/share/nmap/scripts/ajp-methods.nse
/usr/share/nmap/scripts/ajp-request.nse
/usr/share/nmap/scripts/allseeingeye-info.nse
/usr/share/nmap/scripts/amqp-info.nse
/usr/share/nmap/scripts/asn-query.nse
/usr/share/nmap/scripts/auth-owners.nse
/usr/share/nmap/scripts/auth-spoof.nse
/usr/share/nmap/scripts/backorifice-brute.nse
/usr/share/nmap/scripts/backorifice-info.nse
/usr/share/nmap/scripts/bacnet-info.nse
/usr/share/nmap/scripts/banner.nse
/usr/share/nmap/scripts/bitcoin-getaddr.nse
/usr/share/nmap/scripts/bitcoin-info.nse
/usr/share/nmap/scripts/bitcoinrpc-info.nse
/usr/share/nmap/scripts/bittorrent-discovery.nse
/usr/share/nmap/scripts/bjnp-discover.nse
/usr/share/nmap/scripts/broadcast-ataoe-discover.nse
/usr/share/nmap/scripts/broadcast-avahi-dos.nse
/usr/share/nmap/scripts/broadcast-bjnp-discover.nse
/usr/share/nmap/scripts/broadcast-db2-discover.nse
/usr/share/nmap/scripts/broadcast-dhcp-discover.nse
/usr/share/nmap/scripts/broadcast-dhcp6-discover.nse
/usr/share/nmap/scripts/broadcast-dns-service-discovery.nse
/usr/share/nmap/scripts/broadcast-dropbox-listener.nse
<output omitted for brevity>
Nmap’s output provides the open port’s well-known service name, number, and protocol. Ports can either be open, closed, or filtered. If a port is open, it means that the target device will accept connections on that port. A closed port is not listening for connections, and a filtered port means that a firewall, filter, or other network device is guarding the port and preventing Nmap from fully probing it or determining its status. If a port is reported as unfiltered, it means that the port is closed, and no firewall or router appears to be interfering with Nmap’s attempts to determine its status.
To run Nmap from the command line, type nmap, followed by the switch, and then enter a single IP address or a range. Example 3-8 shows how the -sT option is used; it performs a full three-step TCP connection.
Example 3-8 Performing a Three-Step Connection with Nmap
#nmap -sT 192.168.78.7
Starting Nmap 7.80 ( https://nmap.org )
Nmap scan report for 192.168.78.7
Host is up (0.0028s latency).
Not shown: 994 closed ports
PORT     STATE SERVICE
22/tcp   open  ssh
111/tcp  open  rpcbind
139/tcp  open  netbios-ssn
445/tcp  open  microsoft-ds
2049/tcp open  nfs
3128/tcp open  squid-http
Nmap done: 1 IP address (1 host up) scanned in 0.18 seconds
The output shows several interesting ports found on this computer, including 80 and 139. Example 3-9 shows the results returned after running a UDP scan performed with the -sU switch.
Example 3-9 UDP Scan with Nmap
#nmap -sU 192.168.78.7
Starting nmap 7.80 (https://nmap.org/ )
Interesting ports on Server (192.168.78.7):
(The 1653 ports scanned but not shown below are in state: filtered)
PORTSTATE SERVICE
69/udpopentftp
Nmap run completed -- 1 IP address (1 host up) scanned in 843.713 seconds
Tip
Regardless of the OS, scanning an IPv6 network is much harder than scanning IPv4 network ranges in that the search space is so much larger. The number of IP addresses that must be scanned in IPv6 makes it difficult to gather valid addresses. Other techniques are typically used to gather valid addresses. IPv6 addresses must be harvested in some way, such as by network traffic, recorded logs, or address received from.
For a quick trick to use the most common NSE scripts that are relevant to the ports that are open, you can use the nmap -sC command, as demonstrated in Example 3-10. Here, you can see additional details about the system (a Linux server running SSH, RPC, Samba, NFS, and a Squid HTTP proxy).
Example 3-10 nmap –sC Results
#nmap -sC 192.168.78.7
Starting Nmap 7.80 ( https://nmap.org )
Nmap scan report for 192.168.78.7
Host is up (0.0017s latency).
Not shown: 994 closed ports
PORT     STATE SERVICE
22/tcp   open  ssh
| ssh-hostkey:
|   2048 79:81:aa:61:d5:bb:9e:35:21:e3:a4:82:9b:3f:a6:49 (RSA)
|   256 ae:72:9b:ee:4d:ee:04:62:af:20:22:f9:06:07:06:8c (ECDSA)
|_  256 8a:c9:d3:dc:a3:57:99:9b:4f:cf:6b:c9:3f:07:59:cf (ED25519)
111/tcp  open  rpcbind
| rpcinfo:
|   program version    port/proto  service
|   100000  2,3,4        111/tcp   rpcbind
|   100000  2,3,4        111/udp   rpcbind
|   100000  3,4          111/tcp6  rpcbind
|   100000  3,4          111/udp6  rpcbind
|   100003  3           2049/udp   nfs
|   100003  3           2049/udp6  nfs
|   100003  3,4         2049/tcp   nfs
|   100003  3,4         2049/tcp6  nfs
|   100005  1,2,3      37524/udp   mountd
|   100005  1,2,3      42643/tcp6  mountd
|   100005  1,2,3      51869/tcp   mountd
|   100005  1,2,3      52545/udp6  mountd
|   100021  1,3,4      36149/tcp6  nlockmgr
|   100021  1,3,4      41338/udp   nlockmgr
|   100021  1,3,4      44907/tcp   nlockmgr
|   100021  1,3,4      48342/udp6  nlockmgr
|   100024  1          40980/udp   status
|   100024  1          50831/udp6  status
|   100024  1          52407/tcp   status
|   100024  1          57769/tcp6  status
|   100227  3           2049/tcp   nfs_acl
|   100227  3           2049/tcp6  nfs_acl
|   100227  3           2049/udp   nfs_acl
|_  100227  3           2049/udp6  nfs_acl
139/tcp  open  netbios-ssn
445/tcp  open  microsoft-ds
2049/tcp open  nfs_acl
3128/tcp open  squid-http
Host script results:
|_clock-skew: mean: 1h39m52s, deviation: 2h53m12s, median: -7s
|_nbstat: NetBIOS name: POSEIDON, NetBIOS user: <unknown>, NetBIOS MAC:
<unknown> (unknown)
| smb-os-discovery:
|   OS: Windows 6.1 (Samba 4.9.5-Debian)
|   Computer name: poseidon
|   NetBIOS computer name: POSEIDONx00
|   Domain name: ohmr.org
|   FQDN: poseidon.ohmr.org
|_  System time: 2021-02-12T21:53:46-05:00
| smb-security-mode:
|   account_used: guest
|   authentication_level: user
|   challenge_response: supported
|_  message_signing: disabled (dangerous, but default)
| smb2-security-mode:
|   2.02:
|_    Message signing enabled but not required
| smb2-time:
|   date: 2021-02-13T02:53:46
|_  start_date: N/A
Nmap done: 1 IP address (1 host up) scanned in 28.64 seconds
SuperScan
SuperScan is written to run on Windows machines. It’s a versatile TCP/UDP port scanner, pinger, and hostname revolver. It can perform ping scans and port scans using a range of IP addresses, or it can scan a single host. It also has the capability to resolve or reverse-lookup IP addresses. It builds an easy-to-use HTML report that contains a complete breakdown of the hosts that were scanned. This includes information on each port and details about any banners that were found. It’s free; therefore, it is another tool that all ethical hackers should have.
THC-Amap
THC-Amap is another example of a tool that is used for scanning and banner grabbing. One problem that traditional scanning programs have is that not all services are ready and eager to give up the appropriate banner. For example, some services, such as Secure Sockets Layer (SSL), expect a handshake. Amap handles this by storing a collection of responses that it can fire off at the port to interactively elicit it to respond. Amap was the first to perform this functionality, but it has been replaced by Nmap. One technique is to use this program by taking the greppable format of Nmap as an input to scan for those open services. Defeating or blocking Amap is not easy, although one technique would be to use a port-knocking technique. Port knocking is similar to a secret handshake or combination. Only after inputting a set order of port connections can a connection be made. For example, you may have to first connect on 80, 22, and 123 before connecting to 443. Otherwise, the port will show as closed.
Hping
Hping is another very useful ethical hacking tool that can perform both ping sweeps and port scans. Hping works on Windows and Linux computers and can function as a packet builder. You can find the Hping tool at http://www.hping.org or download the Linux Backtrack distribution, which also contains Hping. Hping2 and 3 can be used for firewall testing, identifying honeypots, and port scanning. Here are some other Hping3 syntax examples of note:
• ICMP pings: hping3 -C IP_Address
• SYN scan: hping3 -S IP_Address
• ACK scan: hping3 -A IP_Address
• XMAS scan: hping3 -X IP_Address
Tip
Hping is a powerful tool that you can use to bypass filtering devices by injecting crafted or otherwise modified IP packets or to port scan and perform just about any type of scan that Nmap can. Hping syntax could come up on the exam. You can refer to the cheat sheet posted in the GitHub repository at https://github.com/The-Art-of-Hacking/h4cker/blob/master/cheat_sheets/hping3_cheatsheet.pdf.
Port Knocking
Port knocking is a method of establishing a connection to a host that does not initially indicate that it has any open ports. Port knocking works by having the remote device send a series of connection attempts to a specific series of ports. It is somewhat analogous to a secret handshake. After the proper sequence of port knocking has been detected, the required port is opened, and a connection is established. The advantage of using a port-knocking technique is that hackers cannot easily identify open ports. The disadvantages include the fact that the technique does not harden the underlying application. Also, it isn’t useful for publicly accessible services. Finally, anyone who has the ability to sniff the network traffic will be in possession of the appropriate knock sequence.
OS Discovery (Banner Grabbing/OS Fingerprinting) and Scanning Beyond IDS and Firewall
At this point in the information-gathering process, the hacker has made some real headway. IP addresses, active systems, and open ports have been identified. Although the hacker might not yet know the types of systems he is dealing with, he is getting close. Fingerprinting is the primary way to identify a specific system. Fingerprinting works because each vendor implements the TCP/IP stack in different ways. For example, it’s much the same as when you text a specific friend who typically says something like, “Hey, what’s up?” while another friend simply says, “Hi.” There are two ways in which the hacker can attempt to identify the targeted devices. The hacker’s first choice is passive fingerprinting. The hacker’s second choice is to perform active fingerprinting, which basically sends malformed packets to the target in the hope of eliciting a response that will identify it. Although active fingerprinting is more accurate, it is not as stealthy as passive fingerprinting.
Passive fingerprinting is really sniffing, because the hacker is sniffing packets as they come by. These packets are examined for certain characteristics that can be pointed out to determine the OS. The following four commonly examined items are used to fingerprint the OS:
• IP TTL value: Different operating systems set the TTL to unique values on outbound packets.
• TCP window size: OS vendors use different values for the initial window size.
• IP DF option: Not all OS vendors handle fragmentation in the same way. A common size with Ethernet is 1500 bytes.
• IP Type of Service (TOS) option: TOS is a 3-bit field that controls the priority of specific packets. Again, not all vendors implement this option in the same way.
These are just four of many possibilities that can be used to passively fingerprint an OS. Other items that can be examined include IP identification number (IPID), IP options, TCP options, and even ICMP. Ofir Arkin wrote an excellent paper on this, titled “ICMP Usage in Scanning.” An example of a passive fingerprinting tool is the Linux-based tool P0f. P0f attempts to passively fingerprint the source of all incoming connections after the tool is up and running. Because it’s a truly passive tool, it does so without introducing additional traffic on the network. P0fv2 is available at http://lcamtuf.coredump.cx/p0f.tgz.
Note
One of the most common methods used to determine the OS is to examine the TTL. For example, the default TTL of a Linux system is 64, the default TTL of Windows is 128, and the default TTL of routers is typically 254.
Active fingerprinting is more powerful than passive fingerprint scanning because the hacker doesn’t have to wait for random packets, but as with every advantage, there is usually a disadvantage. This disadvantage is that active fingerprinting is not as stealthy as passive fingerprinting. The hacker actually injects the packets into the network. Active fingerprinting has a much higher potential for being discovered or noticed. Like passive OS fingerprinting, active fingerprinting examines the subtle differences that exist between different vendor implementations of the TCP/IP stack. Therefore, if hackers probe for these differences, the version of the OS can most likely be determined. One of the individuals who has been a pioneer in this field of research is Fyodor Yarochkin. He has an excellent chapter on remote OS fingerprinting at https://nmap.org/book/osdetect.html. Listed here are some of the basic methods used in active fingerprinting:
• The FIN probe: A FIN packet is sent to an open port, and the response is recorded. Although RFC 793 states that the required behavior is not to respond, many operating systems such as Windows will respond with an RST.
• Bogus flag probe: As you might remember from Table 3-7, the flag field is only 1 byte in the TCP header. A bogus flag probe sets one of the used flags along with the SYN flag in an initial packet. Linux will respond by setting the same flag in the subsequent packet.
• Initial sequence number (ISN) sampling: This fingerprinting technique works by looking for patterns in the ISN. Although some systems use truly random numbers, others, such as Windows, increment the number by a small fixed amount.
• IPID sampling: Many systems increment a systemwide IPID value for each packet they send. Others, such as older versions of Windows, do not put the IPID in network byte order, so they increment the number by 256 for each packet.
• TCP initial window: This fingerprint technique works by tracking the window size in packets returned from the target device. Many operating systems use exact sizes that can be matched against a database to uniquely identify the OS.
• ACK value: Again, vendors differ in the ways they have implemented the TCP/IP stack. Some operating systems send back the previous value +1, whereas others send back more random values.
• Type of service: This fingerprinting type tweaks ICMP port unreachable messages and examines the value in the TOS field. Whereas some use 0, others return different values.
• TCP options: Here again, different vendors support TCP options in different ways. By sending packets with different options set, the responses will start to reveal the server’s fingerprint.
• Fragmentation handling: This fingerprinting technique takes advantage of the fact that different OS vendors handle fragmented packets differently. RFC 1191 specifies that the maximum transmission unit (MTU) is normally set between 68 and 65535 bytes. This technique was originally discovered by Thomas Ptacek and Tim Newsham.
Active Fingerprinting Tools
One of the first tools to be widely used for active fingerprinting back in the late 1990s was Queso. Although no longer updated, it helped move this genre of tools forward. Nmap is the tool of choice for active fingerprinting and is one of the most feature-rich free fingerprint tools in existence today. Nmap’s database can fingerprint literally hundreds of different operating systems. Fingerprinting with Nmap is initiated by running the tool with the -O option. When started with this command switch, Nmap probes port 80 and then ports in the 20 to 23 range. Nmap needs one open and one closed port to make an accurate determination of what OS a particular system is running.
Example 3-11 demonstrates how fingerprinting works with Nmap.
Example 3-11 Fingerprinting with Nmap
#nmap -O 192.168.78.7
Starting Nmap 7.80 ( https://nmap.org )
Nmap scan report for 192.168.78.7
Host is up (0.0013s latency).
Not shown: 994 closed ports
PORT     STATE SERVICE
22/tcp   open  ssh
111/tcp  open  rpcbind
139/tcp  open  netbios-ssn
445/tcp  open  microsoft-ds
2049/tcp open  nfs
3128/tcp open  squid-http
No exact OS matches for host (If you know what OS is running on it, see
https://nmap.org/submit/ ).
TCP/IP fingerprint:
OS:SCAN(V=7.80%E=4%D=2/12%OT=22%CT=1%CU=41024%PV=Y%DS=2%DC=I%G=Y%TM=602742
C
OS:C%P=x86_64-pc-linux-
gnu)SEQ(SP=106%GCD=1%ISR=109%TI=Z%CI=Z%II=I%TS=A)OPS
OS:(O1=M5B4ST11NW7%O2=M5B4ST11NW7%O3=M5B4NNT11NW7%O4=M5B4ST11NW7%O5=M5B4ST
1
OS:1NW7%O6=M5B4ST11)WIN(W1=FE88%W2=FE88%W3=FE88%W4=FE88%W5=FE88%W6=FE88)EC
N
OS:(R=Y%DF=Y%T=41%W=FAF0%O=M5B4NNSNW7%CC=Y%Q=)T1(R=Y%DF=Y%T=41%S=O%A=S+%F=
A
OS:S%RD=0%Q=)T2(R=N)T3(R=N)T4(R=Y%DF=Y%T=41%W=0%S=A%A=Z%F=R%O=%RD=0%Q=)T5(
R
OS:=Y%DF=Y%T=41%W=0%S=Z%A=S+%F=AR%O=%RD=0%Q=)T6(R=Y%DF=Y%T=41%W=0%S=A%A=Z%
F
OS:=R%O=%RD=0%Q=)T7(R=Y%DF=Y%T=41%W=0%S=Z%A=S+%F=AR%O=%RD=0%Q=)U1(R=Y%DF=N
%
OS:T=41%IPL=164%UN=0%RIPL=G%RID=G%RIPCK=G%RUCK=G%RUD=G)IE(R=Y%DFI=N%T=41%C
D
OS:=S)
Network Distance: 2 hops
OS detection performed. Please report any incorrect results at
https://nmap.org/submit/ .
Nmap done: 1 IP address (1 host up) scanned in 11.79 seconds
You might also want to try Nmap with the -v or -vv switch. There are devices such as F5 Load Balancer that will not identify themselves using a normal -O scan but will reveal their ID with the -vv switch. Just remember that with Nmap or any other active fingerprinting tool, you are injecting packets into the network. This type of activity can be tracked and monitored by an IDS. Active fingerprinting tools, such as Nmap, can be countered by tweaking the OS’s stack. Anything that tampers with this information can affect the prediction of the target’s OS version.
Nmap’s dominance of active fingerprinting is being challenged by a new breed of tools. One such tool is Xprobe2, a Linux-based active OS fingerprinting tool with a different approach to OS fingerprinting. Xprobe is unique in that it uses a mixture of TCP, UDP, and ICMP to slip past firewalls and avoid IDS systems. Xprobe2 relies on fuzzy signature matching. In layman’s terms, this means that targets are run through a variety of tests. These results are totaled, and the user is presented with a score that tells the probability of the targeted machine’s OS—for example, 75 percent Windows 10 and 1 percent Windows Vista.
Because you might actually prefer GUI tools, the final fingerprinting tool for discussion is Winfingerprint. This Windows-based tool can harvest a ton of information about Windows servers. It allows scans on a single host or the entire network neighborhood. You can also input a list of IP addresses or specify a custom IP range to be scanned. After a target is found, Winfingerprint can obtain NetBIOS shares, disk information, services, users, groups, detection of the service pack, and even hotfixes.
Fingerprinting Services
If there is any doubt left as to what a particular system is running, this next step of information gathering should serve to answer those questions. Knowing what services are running on specific ports allows a hacker to formulate and launch application-specific attacks. One way to ensure success at this pre-attack stage is to know the common default ports and services and to use tools such as Telnet and Netcat.
Default Ports and Services
A certain amount of default information and behavior can be gleaned from any system. For example, if a hacker discovers a Windows 2012 server with port 80 open, he can assume that the system is running IIS 8.0, just as a Linux system with port 25 open is likely to be running Sendmail. Although it’s possible that the Windows 2012 machine might be running another version or type of web server, that most likely is not a common occurrence.
Keep in mind that at this point, the attacker is making assumptions. Just because a particular port is active or a known banner is returned, you cannot be certain that information is correct. Ports and banners can be changed, and assumptions by themselves can be dangerous. Additional work will need to be done to verify what services are truly being served up by any open ports.
Finding Open Services
The scanning performed earlier in the chapter might have uncovered other ports that were open. Most scanning programs, such as Nmap and SuperScan, report what common services are associated with those open ports. This easiest way to determine what services are associated with the open ports that were discovered is by banner grabbing.
Banner grabbing takes nothing more than the Telnet and FTP client built in to the Windows and Linux platforms. Banner grabbing provides important information about what type and version of software is running. Many servers can be exploited with just a few simple steps if the web server is not properly patched. Telnet is an easy way to do this banner grabbing for FTP, SMTP, HTTP, and others. The command issued to banner grab with the Linux curl command would contain the following syntax: curl IP_Address port as demonstrated in Example 3-12. This banner-grabbing attempt was targeted against a web server.
Example 3-12 Banner Grabbing with curl
❯ curl -I http://10.6.6.100
HTTP/1.1 200 OK
Server: nginx/1.17.2
Date: 14 Feb 2022 01:10:04 GMT
Content-Type: text/html
Content-Length: 8381
Last-Modified: Mon, 10 May 2021 07:24:47 GMT
Connection: keep-alive
ETag: "5eb8fdbf-20bd"
Accept-Ranges: bytes
After the curl -I http://10.6.6.100 command was entered,, the output (aka “banner”) indicates that the web server is running nginx version 1.17.2.
You can use many other tools to perform banner grabbing. For instance, you can even use the telnet command, as shown in Example 3-13.
Example 3-13 Banner Grabbing with Telnet
❯ telnet 10.6.6.100 80
Trying 10.6.6.100...
Connected to 10.6.6.100.
Escape character is '^]'.
GET
HTTP/1.1 400 Bad Request
Server: nginx/1.17.2
Content-Type: text/html
Content-Length: 157
Connection: close
<html>
<head><title>400 Bad Request</title></head>
<body>
<center><h1>400 Bad Request</h1></center>
<hr><center>nginx/1.17.2</center>
</body>
</html>
Connection closed by foreign host.
In Example 3-13, the telnet command is followed by the IP address of the target host and the port (port 80 in this example). After you press Enter, you can type GET to send an HTTP GET request to the server.
These tools are not your only option for grabbing banners; HTTPrint is another choice. It is available for both Windows and Linux distributions. It is not a typical banner-grabbing application, however, in that it can probe services to determine the version of services running. Its main fingerprinting technique has to do with the semantic differences in how web servers or applications respond to various types of probes. Example 3-14 provides an example of a scan.
Example 3-14 Banner Grabbing with HTTPrint
./httprint -h 192.168.1.175 -s signatures.txt
httprint - web server fingerprinting tool
Finger Printing on http://192.168.1.175:80/
Finger Printing Completed on http://192.168.1.175:80/
--------------------------------------------------
Host: 192.168.1.175
Derived Signature:
Apache/2.2.0 (RedHat)
9E431BC86ED3C295811C9DC5811C9DC5050C5D32505FCFE84276E4BB811C9DC5
0D7645B5811C9DC5811C9DC5CD37187C11DDC7D7811C9DC5811C9DC58A91CF57FCCC5
35B6ED3C295FCCC535B811C9DC5E2CE6927050C5D336ED3C2959E431BC86ED3C295
E2CE69262A200B4C6ED3C2956ED3C2956ED3C2956ED3C295E2CE6923E2CE69236ED
3C295811C9DC5E2CE6927E2CE6923
Banner Reported: Apache/2.2.0 (RedHat)
Banner Deduced: Apache/2.0.x
Score: 140
Confidence: 84.31------------------------
Netcat can also be used for banner grabbing. Netcat is shown here to introduce you to its versatility. It is called the “Swiss-army knife of hacking tools” because of its many uses. To banner grab with Netcat, you issue the following command from the command line:
nc -v -n IP_Address Port
This command gives you the banner of the port you asked to check. Netcat is available for Windows and Linux. If you haven’t downloaded Netcat, don’t feel totally left behind; FTP is another choice for banner grabbing. Just FTP to the target server and review the returned banner.
Another good tool is whatweb. It can enumerate additional information in the target system, as demonstrated in Example 3-15.
Example 3-15 whatweb Enumeration
❯ whatweb http://10.6.6.100
http://10.6.6.100 [200 OK] Country[RESERVED][ZZ], HTML5,
HTTPServer[nginx/1.17.2], IP[10.6.6.100], JQuery, MetaGenerator[Mobirise
v4.10.1, mobirise.com], Script, Title[WebSploit Mayhem], X-UA-
Compatible[IE=edge], nginx[1.17.2]
Most all port scanners, including those discussed in this chapter, also perform banner grabbing. However, the security professional can use lots of tools to analyze open ports and banners. Some of the more notable ones you may want to review include the following:
• ID Serve: https://www.grc.com/id/idserve.htm
• NetworkMiner: https://www.netresec.com/index.ashx?page=NetworkMiner
• Nikto2: https://cirt.net/Nikto2
• Netcraft: https://sitereport.netcraft.com
Note
Nikto is a popular web application vulnerability scanner. To learn more about web application hacking, see Chapter 7, “Web Server Hacking, Web Applications, and Database Attacks.”
Although changing banner information is not an adequate defense by itself, it might help to slow a hacker. In a Linux environment, you can change the ServerSignature line in the httpd.conf file to ServerSignature off. In a Windows environment, you can install the UrlScan security tool. UrlScan contains the RemoveServerHeader feature, which removes or alters the identity of the server from the “Server” response header in response to the client’s request.
Draw Network Diagrams
Once you discover and enumerate the hosts in the targeted network, you should immediately start building your own network diagrams. Doing so allows you to create an “attack plan” to not only potentially exploit any vulnerabilities found but also perform post-exploitation activities such as lateral movement and pivoting. These network diagrams should not be static.
The more devices, hosts, and applications you discover (even after exploitation), the more you should document the findings, including IP addresses, the operating systems running in the hosts, the services and ports open, and any discovered software versions. Figure 3-12 shows a simple network diagram.
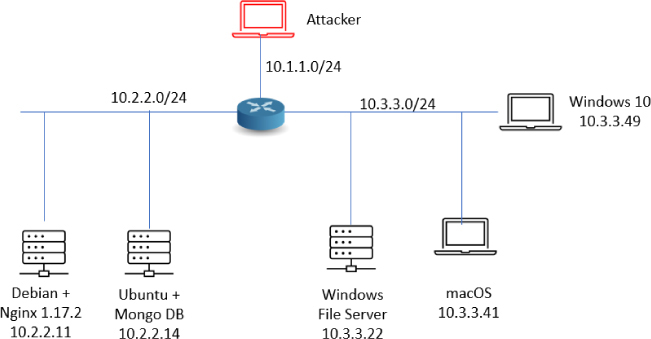
Figure 3-12 A Network Diagram of Discovered Devices and Applications
Mapping the network provides the hacker with a blueprint of the organization. There are manual and automated ways to compile this information. Manual and automated tools are discussed in the following sections.
If you have been documenting findings, the matrix you began at the start of this chapter should be overflowing with information. This matrix should now contain domain name information, IP addresses, DNS servers, employee info, company location, phone numbers, yearly earnings, recently acquired organizations, email addresses, the publicly available IP address range, open ports, wireless access points, modem lines, and banner details.
If you prefer a more automated method of mapping the network, multiple tools are available. Visual traceroute programs, such as the SolarWinds Network Topology Mapper (http://www.solarwinds.com/network-topology-mapper), can help you map out the placement of these servers. You can even use Nmap scripts to trace a route and map the geolocation of a target. As an example, nmap --traceroute --script traceroute-geolocation.nse -p 80 example.com would perform a traceroute and provide geolocation data for each hop along the way. Geolocation allows you to identify information such as country, region, ISP, and the like. Examples of geolocation tools include IP Location Finder (https://tools.keycdn.com) and GeoIP Lookup Tool (https://www.ultratools.com).
Automatic mapping can be faster but might generate errors or sometimes provide erroneous results. Table 3-8 reviews some of the primary steps we have discussed.
Table 3-8 The Seven Steps of the Pre-Attack Phase

NLog is one option to help keep track of your scanning and mapping information. NLog enables you to automate and track the results of your Nmap scans. It allows you to keep all your Nmap scan logs in a database, making it possible to easily search for specific entries. It’s browser based, so you can easily view the scan logs in a highly customizable format. You can add your own extension scripts for different services, so all hosts running a certain service will have a hyperlink to the extension script. NLog is available at http://nlog-project.org/.
CartoReso is another network mapping option. If run from the Internet, the tool will be limited to devices that it can contact. These will most likely be devices within the demilitarized zone (DMZ). Run internally, it will diagram a large portion of the network. In the hands of a hacker, it’s a powerful tool because it uses routines taken from a variety of other tools that permit it to perform OS detection port scans for service detection and network mapping using common traceroute techniques. You can download it from https://sourceforge.net/projects/cartoreso/.
A final item worth discussing is that the attacker will typically attempt to hide her activity while actively probing a victim’s network. This can be attempted via anonymizers and proxies. The concept is to try to obscure the true source address. Examples of tools that are available for this activity include the following:
• Proxy Switcher
• Proxy Workbench
• CyberGhost
• Tor
Tip
Kali Linux (https://kali.org) and Parrot Security OS (https://parrotsec.org) contain many of the tools discussed in this chapter and are used for penetration testing. EC-Council focuses on using Parrot Security OS since the introduction of CEHv11. I have also created a learning environment called WebSploit Labs (https://websploit.org). This learning environment can be set up on top of Kali Linux or Parrot Security OS. It includes multiple intentionally vulnerable applications running in Docker containers, as well as additional tools that do not come by default in Kali Linux or Parrot Security OS. WebSploit Labs also comes with thousands of additional cybersecurity references (a clone of my GitHub repository) and several other resources. It allows you to practice your skills in a safe environment by using only one system or virtual machine (VM).
Summary
In this chapter, you learned the seven steps that compose the pre-attack phase: information gathering, determining the network range, identifying active machines, finding open ports and access points, OS fingerprinting, fingerprinting services, and mapping the network attack surface.
This chapter is an important step for you, as an ethical hacker, because at this point you are gathering information to launch an attack and determine the best path forward. The more information that is gathered here, the better the chance of success. You might find enough information at this point to be able to launch an attack. If not, the information gathered will serve as a foundation for subsequent steps of the attack. An important part of ethical hacking is documentation. That’s why the chapter shows several ways to collect and document your findings. There is no such thing as too much information. You may want to use a proxy or anonymizer to obscure the probes. These notes will prove useful when you prepare your report. Finally, make sure that the organization has given you written permission before beginning any work, even the reconnaissance.
Exam Preparation Tasks
As mentioned in the section “How to Use This Book” in the Introduction, you have several choices for exam preparation: the exercises here, Chapter 12, “Final Preparation,” and the exam simulation questions in the Pearson Test Prep Software Online.
Review All Key Topics
Review the most important topics in this chapter, noted with the Key Topic icon in the outer margin of the page. Table 3-9 lists a reference of these key topics and the page numbers on which each is found.
Table 3-9 Key Topics for Chapter 3
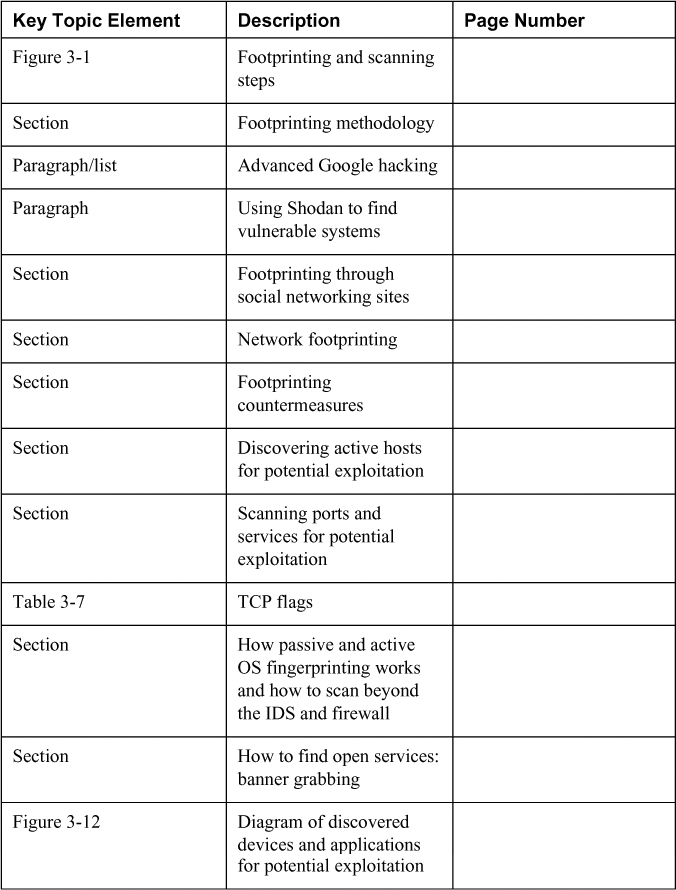
Define Key Terms
Define the following key terms from this chapter and check your answers in the glossary:
Internet Assigned Numbers Authority (IANA)
intrusion detection system (IDS)
Exercises
3-1 Performing Passive Reconnaissance
The best way to learn passive information gathering is to use the tools. In this exercise, you perform reconnaissance on several organizations. Acquire only the information requested.
Estimated Time: 20 minutes.
Step 1. Review Table 3-10 to determine the target of your passive information gathering.
Table 3-10 Passive Information Gathering
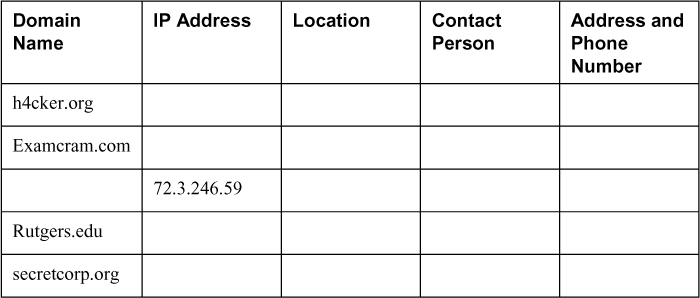
Step 2. Start by resolving the IP address. You can do this by pinging the site.
Step 3. Next, use a tool such as https://www.whois.net or any of the other tools mentioned throughout the chapter. Some of these include
Step 4. To verify the location of the organization, perform a traceroute or a ping with the -r option.
Step 5. Use the ARIN, RIPE, and IANA to fill in any information you have yet to acquire.
Step 6. Compare your results to those found in Appendix A. Results may vary.
3-2 Performing Active Reconnaissance
The best way to learn active information gathering is to use the tools. In this exercise, you perform reconnaissance on your own internal network. If you are not on a test network, make sure that you have permission before scanning it, or your action may be seen as the precursor of an attack.
Estimated Time: 15 minutes.
Step 1. Download the most current version of Nmap from https://nmap.org/download.html. For Windows systems, the most current version is 7.30.
Step 2. Open a command prompt and go to the directory in which you have installed Nmap.
Step 3. Run nmap -h from the command line to see the various options.
Step 4. You’ll notice that Nmap has many options. Review and find the option for a full connect scan. Enter your result here:___
Step 5. Review and find the option for a stealth scan. Enter your result here: ___
Step 6. Review and find the option for a UDP scan. Enter your result here: ___
Step 7. Review and find the option for a fingerprint scan. Enter your result here: ___
Step 8. Perform a full connect scan on one of the local devices you have identified on your network. The syntax is nmap -sT IP_Address.
Step 9. Perform a stealth scan on one of the local devices you have identified on your network. The syntax is nmap -sS IP_Address.
Step 10. Perform a UDP scan on one of the local devices you have identified on your network. The syntax is nmap -sU IP_Address.
Step 11. Perform a fingerprint scan on one of the local devices you have identified on your network. The syntax is nmap -O IP_Address.
Step 12. Observe the results of each scan. Could Nmap successfully identify the system? Were the ports it identified correct?
Review Questions
1. Your client has asked you to run an Nmap scan against the servers it has located in its DMZ. The client would like you to identify the OS. Which of the following switches would be your best option?
a. nmap -P0
b. nmap -sO
c. nmap -sS
d. nmap -O
D. Running nmap -O would execute OS guessing. Answer A is incorrect because nmap -P0 means do not ping before scanning. Answer B is incorrect because nmap -sO would perform an IP scan. Answer C is incorrect because nmap -sS would execute a TCP stealth scan. Keep in mind that scanning IPv4 networks is much easier than scanning IPv6 networks because of the much greater number of IP addresses in IPv6.
2. During an internal pen test, you have gained access to an internal switch. You have been able to SPAN a port and are now monitoring all traffic with Wireshark. While reviewing this traffic, you are able to identify the OS of the devices that are communicating. What best describes this activity?
a. Vulnerability scanning
b. Nmap port scanning
c. Active OS fingerprinting
d. Passive OS fingerprinting
D. Using Wireshark to examine the traffic is considered passive OS fingerprinting. Answer A is incorrect because vulnerability mapping looks for vulnerabilities. Answer B is incorrect because port scanning looks for open ports. Answer C is incorrect because active OS fingerprinting injects traffic to see how a host responds. In this situation, you are simply passively listening.
3. ICMP is a valuable tool for troubleshooting and reconnaissance. What is the correct type for a ping request and a ping response?
a. Ping request type 5, ping reply type 3
b. Ping request type 8, ping reply type 0
c. Ping request type 3, ping reply type 5
d. Ping request type 0, ping reply type 8
B. Ping is the most common ICMP type. A ping request is a type 8, and a ping reply is a type 0. All other answers are incorrect because a request is always a type 8 and a reply is always a type 0. An ICMP type 5 is redirect, and a type 3 is destination unreachable. For a complete listing of ICMP types and codes, see RFC 792.
4. Which of the following is a vulnerability in the Bash shell that was discovered in 2014 and thereafter exploited to launch a range of attacks against Linux and UNIX systems?
a. Shellshock
b. Heartbleed
c. Bashshell
d. Poodle
A. Shellshock is a collection of security bugs in the widely used UNIX Bash shell. Answers B and D are incorrect because they target SSH vulnerabilities. Answer C is a distracter.
5. As part of a pen test, you have port scanned a Linux system. Listed here is the scan you performed: nmap -sX -vv -P0 192.168.1.123 -p 80. If the system had the specific listening port open, what would be returned?
a. RST
b. No response
c. SYN ACK
d. ACK
B. The -sX command means you are running an Xmas tree scan. Per RFC 793, Linux systems will send no response to an open port. Therefore, answers A, C, and D are incorrect.
6. Which of the following Netcat commands could be used to perform a UDP scan of the lower 1024 ports?
a. Nc -sS -O target 1-1024
b. Nc -hU <host(s)>
c. Nc -sU -p 1-1024 <host(s)>
d. Nc -u -v -w2 <host> 1-1024
D. The proper syntax for a UDP scan using Netcat is netcat -u -v -w2 < host > 1-1024. Netcat is considered the Swiss-army knife of hacking tools because it is so versatile. Answers A, B, and C are incorrect because they do not correctly specify the syntax used for UDP scanning with Netcat.
7. You have been assigned a junior pen tester during a pen test. You performed the following scan:
nmap -sL www.example.com
Starting Nmap 6.25 ( http://nmap.org ) at 2016-10-12 18:46
 Central Daylight Time
Host 93.184.216.34 not scanned
Your partner asks you to explain the results. Which of the following best describes the correct answer?
a. The system was offline.
b. The technique only checks DNS and does not scan.
c. The syntax is incorrect.
d. ICMP is blocked, so no scan is performed.
B. Running the -sL switch checks DNS for a list of IP addresses but does not scan the IP addresses. This technique provides a list of valid IP addresses to scan. Answer A is incorrect because the system is not scanned during a list scan. Answer C is incorrect because the syntax is correct. Answer D is incorrect because the scan was not blocked.
8. Which of the following sets all TCP flags to zeros?
a. nmap -sn 192.168.1.1/24
b. nmap -null 192.168.1.1/24
c. nmap -sX 192.168.1.1/24
d. nmap -sI 192.168.1.1/24
A. Running an -sn scan sets all the TCP flags to off (0). Answer B is incorrect because -null is not the correct syntax. Answer C is incorrect because it is an Xmas tree scan. Answer D is incorrect because it is an idle scan.
9. You have captured some packets from a system you would like to passively fingerprint. You noticed that the IP header length is 20 bytes and there is a datagram length of 84 bytes. What do you believe the system to be?
a. Windows XP
b. Linux
c. Windows 7
d. Windows 8
B. Active fingerprinting works by examining the unique characteristics of each OS. One difference between competing platforms is the datagram length. On a Linux computer, this value is usually 84, whereas Microsoft computers default to 60. Therefore, answers A, C, and D are incorrect because they are all Windows operating systems.
10. During the network mapping phase of a pen test, you have discovered the following two IP addresses: 192.168.1.24 and 192.168.1.35. They both have a mask of 255.255.255.224. Which of the following is true?
a. They are on the same network.
b. They both have a default gateway of 192.168.1.63.
c. They both have a default gateway of 192.168.1.254.
d. They are on separate subnets.
10. D. With a network mask of .224, the first three subnets would include the .0 subnet, the .32 subnet, and the .64 subnet. The IP address of .24 and .35 would fall into different subnet ranges. See Table A-1.
Table A-1 Subnet Ranges
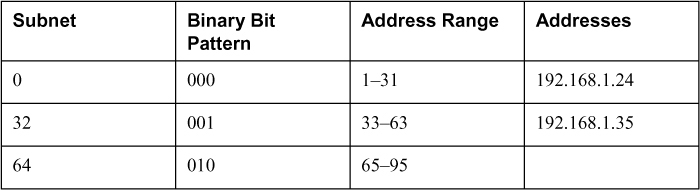
11. What type of scan is harder to perform because of the lack of response from open services and because packets could be lost due to congestion or from firewall blocked ports?
a. Stealth scanning
b. ACK scanning
c. UDP scanning
d. FIN scan
C. UDP scanning is harder to perform because of the lack of response from open services and because packets could be lost due to congestion or a firewall blocking ports. Answer A is incorrect because a stealth scan is a TCP-based scan and is much more responsive than UDP scans. Answer B is incorrect because an ACK scan is again performed against TCP targets to determine firewall settings. Answer D is incorrect because FIN scans also target TCP and seek to elicit an RST from a Windows-based system.
12. You would like to perform a scan that runs a script against SSH and attempts to extract the SSH host key. Which of the following is the correct syntax?
a. nmap -sC -p21, 111, 139 -T3 www.knowthetrade.com
b. nmap -sC -p22, 111, 139 -T4 www.knowthetrade.com
c. nmap -sL -p21, 111, 139 -T3 www.knowthetrade.com
d. nmap -sI -p22, 111, 139 -T4 www.knowthetrade.com
B. The -sC option runs a script, and the correct port would be 22 because that is the default port that SSH runs on. Answer A is incorrect because port 21 is FTP. Answer C is incorrect because the option -sL is a list scan. Answer D is incorrect because the option -sI is an idle scan.
13. You have just performed an ACK scan and have been monitoring a sniffer while the scan was performed. The sniffer captured the result of the scan as an ICMP type 3 code 13. What does this result mean?
a. The firewall is only a router with an ACL.
b. The port is open.
c. Port knocking is used.
d. The port is closed.
A. An ICMP type 3 code 13 is administratively filtered. This type of response is returned from a router when the protocol has been filtered by an ACL. Answer B is incorrect because the ACK scan provides only a filtered or unfiltered response; it never connects to an application to confirm an open state. Answer C is incorrect because port knocking requires you to connect to a certain number of ports in a specific order. Answer D is incorrect because, again, an ACK scan is not designed to report a closed port; its purpose is to determine the router’s or firewall’s rule set. Although this might appear limiting, the ACK scan can characterize the capability of a packet to traverse firewalls or packet-filtered links.
14. One of the members of your security assessment team is trying to find out more information about a client’s website. The Brazilian-based site has a .com extension. She has decided to use some online Whois tools and look in one of the Regional Internet Registries. Which of the following represents the logical starting point?
a. AfriNIC
b. ARIN
c. APNIC
d. RIPE
B. Regional Internet Registries (RIR) maintain records from the areas from which they govern. ARIN is responsible for domains served within North and South America, and therefore, is the logical starting point for that .com domain. Answer A is incorrect because AfriNIC is the RIR for Africa. Answer C is incorrect because APNIC is the RIR for Asia and Pacific Rim countries. Answer D is incorrect because RIPE is the RIR for European-based domains.
15. You have captured the Wireshark scan results shown in Figure 3-13 and are attempting to determine what type of scan was performed against the targeted system. What is your answer?
a. SYN
b. IPID
c. NULL
d. XMAS
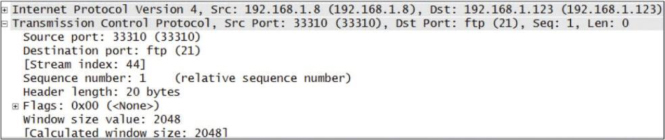
Figure 3-13 Wireshark Scan Capture
C. With no flags set, a NULL scan is being performed. Therefore, answer A is incorrect because it is not a SYN scan. Answer B is incorrect because an IPID scan is used to bounce the scan off a third party. Answer D is incorrect because an XMAS scan has three flags set high.
16. What is the purpose of the following Nmap scan?
Nmap -sn 192.168.123.1-254
a. Ping only on the targets, no port scan
b. A NULL TCP scan
c. A TCP port scan
d. Port scan all targets
A. The -sn option tells Nmap not to do a port scan after host discovery and only print out the available hosts that responded to the host discovery probes. This is often known as a “ping scan,” but you can also request that traceroute and NSE host scripts be run. Answers B, C, and D are all incorrect because they actually perform a scan against the targeted system.
17. You’re starting a port scan of a new network. Which of the following can be used to scan all ports on the 192.168.123.1 network?
a. nmap -p 1,65536 192.168.123.1
b. nmap -p- 192.168.123.1
c. nmap 192.168.123.1 -ports “all”
d. nmap -p 0-65536 192.168.123.1
B. Running -p- scans all 65,535 ports on the targeted systems. Answers A, C, and D are all incorrect syntax.
18. Which of following port-scanning techniques can be used to map out the firewall rules on a router?
a. NULL scan
b. ACK scan
c. Inverse flag scan
d. Firewalk
B. Running an ACK scan attempts to determine access control list (ACL) rule sets or identify whether firewall inspection or simply stateless inspection is being used. A stateful firewall should return no response. If an ICMP destination is unreachable or a communication administratively prohibited message is returned, the port is considered to be filtered. If an RST is returned, no firewall is present. Answer A is incorrect because no flags are set. Answer B is incorrect because malformed TCP flags are used to probe a target. Answer D is incorrect because firewalking is not port scanning but alters TTLs to map what traffic is allowed or blocked.
19. What are the two ICMP codes used with when performing a ping?
a. Type 0 and 8
b. Type 0 and 3
c. Type 3 and 5
d. Type 5 and 11
A. Type 0 is a ping reply and type 8 is a ping request. Answers B, C, and D are incorrect because type 3 is destination unreachable, type 5 is a redirect, and type 11 is time exceeded. Make sure you know the range of ICMP types for the exam.
20. You have successfully scanned a system and identified the following port 80 open. What is the next step you should perform?
a. Attempt to go to the web page and examine the source code.
b. Use FTP to connect to port 80.
c. Telnet to the open port and grab the banner.
d. Attempt to connect to port 443.
C. The pen tester will typically continue to explore the service that has been identified, which means that an attempt to banner grab would be the next step. Answer A is incorrect because your next step would not be to examine the source code of the web page. Answer B is incorrect because you would not next FTP to port 80. Answer D is incorrect because you would not next attempt to connect to port 443.
Suggested Reading and Resources
http://www.quepublishing.com/articles/article.aspx?p=170880&seqNum=2: Demystifying Google hacks
http://www.domaintools.com/: Online Whois query website
https://nmap.org/book/man-port-scanning-techniques.html: Port-scanning techniques
https://www.exploit-db.com/google-hacking-database/: The Google Hacking Database
https://www.greycampus.com/opencampus/ethical-hacking/scanning-methodology: The port scanning process
https://www.hackingloops.com/nmap-cheat-sheet-port-scanning-basics-ethical-hackers/: Nmap Cheat Sheet
http://www.forensicswiki.org/wiki/OS_fingerprinting: OS fingerprinting
http://www.utc.edu/center-information-security-assurance/pdfs/course-paper-5620-attacktcpip.pdf: TCP/IP from a security viewpoint
https://blog.sucuri.net/2014/09/quick-analysis-of-a-ddos-attack-using-ssdp.html: Simple Service Discovery Protocol (SSDP) usage in scanning
https://en.wikipedia.org/wiki/Idle_scan: Idle scan explained