
Chapter 11
Ten More Ways to Customize Your Camera
In This Chapter
![]() Changing the function of the Set button
Changing the function of the Set button
![]() Turning off the beep and AF-Assist beam
Turning off the beep and AF-Assist beam
![]() Creating your own folders and camera menu
Creating your own folders and camera menu
![]() Customizing a few other camera behaviors
Customizing a few other camera behaviors

Have you ever tried to cook dinner in someone else’s house or work from another colleague’s desk? Why is nothing stored in the right place? The coffee cups, for example, should be stowed in the cabinet above the coffee maker, and yet there they are, way across the kitchen, in the cupboard near the fridge. And everyone knows that the highlighter pens belong in the middle top drawer, not the second one on the left. Yeesh.
In the same way, you may find a particular aspect of your camera’s design illogical or maybe a tad inconvenient. If so, check out this chapter, which introduces you to ten customization options not considered in earlier chapters. You can give the Set button a new job, for example, silence the camera’s beeper, and even create your own camera menu.
Changing the Function of the Set Button
Normally, the main role of the Set button is to select items from the camera menus and Quick Settings screens. When you shoot in the P, Tv, Av, or M exposure modes, though, you can set the button to perform the following tasks when no menus are displayed:
- Image Quality: Displays the screen where you can change the Image Quality settings.
- Flash Exposure Compensation: Displays the meter that enables you to manually adjust flash power up or down.
- LCD Monitor On/Off: Toggles the Shooting Settings screen on and off. Note that this function doesn’t work in Live View mode.
- Menu Display: Displays the menu; handy if you like using your thumb.
- ISO Speed: Shows you the ISO speed setting screen.
- Flash Function Settings: Pops up the built-in (or external, should you have one attached) flash function settings.
You establish the button’s purpose via Custom Function 11, as shown in Figure 11-1. Chapter 1 has a primer on navigating the Custom Functions menus if you need help.

Figure 11-1: You can configure the Set button to perform an extra function during shooting.
To go back to the default setting, return to the Custom Functions menu and select option 0 (Normal).
Customizing the AE Lock and Shutter Button
![]() By default, you initiate autofocusing by pressing the shutter button halfway and lock autoexposure by pressing the AE (autoexposure) Lock button. We recommend that you stick with this setup while learning about your camera — otherwise, our instructions won’t work. But after you feel more comfortable, you may want to customize the locking behaviors of the two buttons.
By default, you initiate autofocusing by pressing the shutter button halfway and lock autoexposure by pressing the AE (autoexposure) Lock button. We recommend that you stick with this setup while learning about your camera — otherwise, our instructions won’t work. But after you feel more comfortable, you may want to customize the locking behaviors of the two buttons.
To configure the buttons, set the Mode dial to P, Tv, Av, or M. Then head for Custom Function 10. As shown in Figure 11-2, you can choose from the following configuration options. The part of the option name before the slash indicates the result of pressing the shutter button halfway; the name after the slash indicates the result of pressing the AE Lock button.

Figure 11-2: Adjust autoexposure and autofocus lock behavior via Custom Function 10.
- AF/AE Lock: This is the default setting. Pressing the shutter button halfway initiates autofocus; pressing the AE Lock button locks autoexposure.
- AE Lock/AF: With this option, pressing the shutter button halfway locks autoexposure. To initiate autofocusing, you instead press the AE Lock button. In other words, this mode is the exact opposite of the default setup.
AF/AF Lock, no AE Lock: Pressing the shutter button halfway initiates autofocusing and exposure metering, and pressing the AE Lock button locks focus. Autoexposure lock isn’t possible.
 This option is designed to prevent focusing mishaps when you use AI Servo autofocusing, a viewfinder-shooting option explained in Chapter 5. In AI Servo mode, the autofocus motor continually adjusts focus from the time you press the shutter button halfway until the time you take the image. This feature helps keep moving objects focused. But if something moves in front of your subject, the camera may mistakenly focus on that object instead. To cope with that possibility, this locking option enables you to initiate autofocusing as usual, by pressing the shutter button halfway. But at any time before you take the picture, you can hold down the AE Lock button to stop the autofocusing motor from adjusting focus. Releasing the button restarts autofocusing. Exposure is set at the time you take the picture.
- AE/AF, no AE Lock: In this mode, press the shutter button halfway to initiate autoexposure and press the AE Lock button to autofocus. In AI Servo mode, continuous autofocusing occurs only while you hold down the AE Lock button, which is helpful if your subject repeatedly moves and then stops. Exposure is set at the moment you take the picture.
Disabling the AF-Assist Beam
In dim lighting, your camera may emit an AF (autofocus)-assist beam from the built-in flash when you press the shutter button halfway — assuming that the flash unit is open, of course. This pulse of light helps the camera “see” its target better, improving the performance of the autofocusing system. In situations where the AF-assist beam may be distracting, you can disable it in the P, Tv, Av, or M exposure modes. Make the change via Custom Function 4, as shown in Figure 11-3, which offers these choices:

Figure 11-3: You can disable the autofocus-assist beam.
- Enable: This setting is the default and turns the AF-Assist Beam function on.
- Disable: We know you can figure this one out.
- Enable External Flash Only: Choose this setting to permit an external flash unit to emit the beam but prevent the built-in flash from doing so. (The idea is to save you the time and hassle of revisiting the Custom Functions setting to enable or disable the beam every time you switch from the built-in flash to an external flash — two settings in one, if you will.) The external flash must be a compatible EX-series Speedlite unit, such as the Speedlite 430EX II.
IR AF Assist Beam Only: This setting allows an external Canon EOS Speedlite with infrared (IR) AF-assist to use only the IR beam to aid in focusing instead of pulsing a series of small flashes like the built-in flash does when it tries to play autofocus guide dog. This setting gives you the best of both worlds: an AF assist beam that is invisible to the naked eye. Just don’t activate it next to your garage door or you may open it!
 An external Canon Speedlite has its own provision to disable the AF-assist beam. If you turn off the beam on the flash unit, it won’t light no matter which Custom Functions setting you choose.
Silencing the Camera
By default, your camera beeps after certain operations, such as after it sets focus when you use autofocusing and during the timer-countdown when you use the Self-Timer Drive mode. If you need the camera to hush up, set the Beep option on Shooting Menu 1 to Disable, as shown in Figure 11-4. This option is available in all shooting modes.

Figure 11-4: To quiet the camera’s beeper, set this option to Off.
Note that if the option is set to Enable (which is the default setting), you also hear a tone when you tap touch screen–controlled options. If you don’t want to hear that tone but still want the non–touch screen beeps, set the option to Touch to Silence, as shown on the right in Figure 11-4. (Instead of the word Silence, you see a speaker with a slash through it on the menu.) See Chapter 1 for details about this camera feature.
Preventing Shutter Release without a Memory Card
By default, you can take a picture without any memory card in the camera. But the image you shoot is only temporary, appearing for just a few seconds on the monitor and then dissolving into digital nothingness. During the instant image-review period, your camera warns you that there’s no card in the camera, as shown on the left in Figure 11-5. You also see a warning message on the monitor if no card is installed when you turn on the camera. The same warning is displayed on the monitor if you switch to Live View or Movie mode.

Photo by Robert Correll
Figure 11-5: Pictures taken without a memory card live for only a few seconds.
If you’re wondering about the point of this option, it’s designed for use in camera stores, enabling salespeople to demonstrate cameras without having to keep a memory card in every model. For those of us not in that biz, we recommend disabling it when you get your camera and only turning it back on if you have a specific need to take but not save photos. You find the Release Shutter without Card option on Shooting Menu 1, as shown on the right in Figure 11-5.
Reducing the Number of Exposure Stops
 In photography, the term stop refers to an increment of exposure. To increase exposure by one stop means to adjust the aperture or shutter speed to allow twice as much light into the camera as the current settings permit. To reduce exposure a stop, you use settings that allow half as much light. Doubling or halving the ISO value also adjusts exposure by one stop.
By default, all the major exposure-related settings on your camera are based on one-third stop adjustments. If you prefer, you can tell the camera to present exposure adjustments in half-stop increments so that you don’t have to cycle through as many settings each time you want to make a change. Make your preferences known via Custom Function 1, as shown in Figure 11-6.

Figure 11-6: By default, exposure settings are based on 1/3-stop adjustments; you can change to 1/2-stop adjustments via this Custom Function.
Note that when you use the 1/2-stop setting, the exposure meter appears slightly different in the Shooting Settings display and Live View display than you see it in this book: Only one intermediate notch appears between each number on the meter instead of the usual two. The viewfinder meter doesn’t change, but the exposure indicator bar appears as a double line if you set the Exposure Compensation value to a half-step value (+0.5, +1.5, and so on).
Creating Your Own Camera Menu
Through the My Menu feature, you can create a custom menu containing up to six items from the camera’s other menus, as shown in Figure 11-7. The menu is represented by the green star icon.

Figure 11-7: Group your top six menu items together by using the My Menu feature.
To create your menu, take these steps:
Set the camera Mode dial to P, Tv, Av, or M.
You can create and order from the custom menu only in these exposure modes.
Display the My Menu screen.
Initially, the screen shows only a single item, as shown on the left in Figure 11-8.
Choose My Menu Settings.
To choose a menu item, either tap it or highlight it and press the Set button. Either way, the screen shown on the right in Figure 11-8 appears.
Choose Register to My Menu.
You see a scrolling list that contains every item found on the camera’s menus, as shown on the left in Figure 11-9.
Choose the first item to include on your custom menu.
Again, you choose the item by tapping it and then pressing Set or highlighting it and pressing the Set button. You can scroll the menu screen by using the up/down cross keys or tapping the scroll arrows.
To add a specific Custom Function to your menu, scroll past the item named Custom Functions to find and highlight the individual function. (The item named Custom Functions simply puts the Custom Functions menu item on your menu, and you still have to wade through multiple levels of steps to reach your function.)You see a confirmation screen, as shown on the right in Figure 11-9.
Tap OK or highlight it and press Set.
You return to the list of menu options. The option you just added to your menu is dimmed in the list.
- Repeat Steps 5 and 6 to add up to five additional items to your menu.
- Tap the Menu icon or press the Menu button to return to the My Menu Settings screen.
Tap the Menu icon or press the Menu button again to return to the My Menu screen.
The items you added appear on the menu.

Figure 11-8: Choose Register to My Menu to add an item to your custom menu.
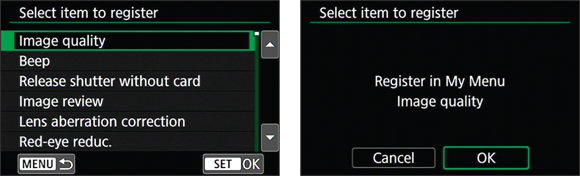
Figure 11-9: Highlight an item to put on your menu and press Set.
After creating your menu, you can manage it as follows:
- Give your menu priority. You can tell the camera that you want it to automatically display your menu anytime you press the Menu button. To do so, choose My Menu Settings on the main My Menu screen to display the screen shown on the right side of Figure 11-8. Then set the Display from My Menu option to Enable.
- Change the order of the list of menu items. Once again, navigate to the right screen in Figure 11-8. This time, choose the Sort option. Choose a menu item and then press the up/down cross keys to move the menu item up or down in the list. Press the Set button to glue the menu item in its new position.
Delete menu items. Display your menu, choose My Menu Settings, and then choose Delete Item/Items (refer to the right screen in Figure 11-8). Choose the menu item that you want to delete; on the resulting confirmation screen, choose OK and then press the Set button.
To remove all items from your custom menu, choose Delete All Items (again, refer to the right side of Figure 11-8), and then highlight OK and press the Set button.
Creating Custom Folders
Normally, your camera automatically creates folders to store your images. The first folder has the name 100Canon; the second, 101Canon; the third, 102Canon; and so on. Each folder can hold 9,999 photos. If you want to create a new folder before the existing one is full, choose Select Folder from Setup Menu 1 and then choose Create Folder, as shown in Figure 11-10. You might take this organizational step so that you can segregate work photos from personal photos, for example.

Figure 11-10: You can create a new image-storage folder at any time.
The camera asks for permission to create the folder; choose OK and press Set. The folder is automatically assigned the next available folder number and is selected as the active folder — the one that will hold any new photos you shoot. Press the Set button to return to Setup Menu 1.
To make a different folder the active folder, choose Select Folder again, choose the folder you want to use, and press Set.
Turning Off the Shooting Settings Screen
When you turn on your camera, the monitor automatically displays the Shooting Settings screen. At least, it does if you stick with the default setting selected for Custom Function 12, which bears the lengthy name LCD Display When Power On and appears in Figure 11-11.
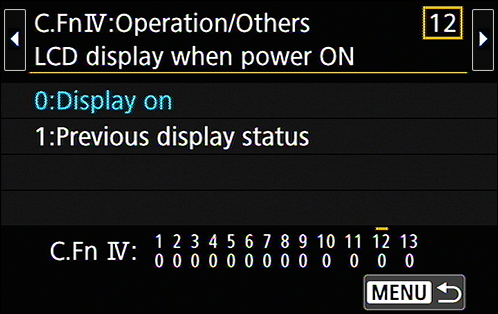
Figure 11-11: This option affects whether the Shooting Settings screen appears when you turn on the camera.
You can prevent the monitor from displaying the screen every time you power up the camera, if you choose. The monitor is one of the biggest drains on the camera battery, so limiting it to displaying information only when you need it can extend the time between battery charges.
 Note the Custom Function setting name: Previous Display Status. It means what the name implies: The camera preserves the monitor status when you turn the camera off and then back on again. If the Shooting Settings screen was displayed when you turned off the camera, it will appear the next time you power up. We don’t know about you, but we leave this option at the default and use the Disp button to turn off the monitor when needed. Julie is already memory-challenged — she doesn’t need to add one more thing to the list of items to remember. Robert doesn’t want to have to enter a PS4 cheat code (up, up, down, down, left, right, left, right, x, circle) every time he wants to change the display. (You didn’t hear it from us, but setting this option to Previous Display Status on someone else’s camera makes for a pretty harmless practical joke.)
As with other Custom Functions, this option works only when the camera is set to one of the advanced exposure modes — in other modes, the screen still appears automatically. Still, any battery savings can be helpful when you’re running low on juice.
To take advantage of this feature, set Custom Function 12 to Previous Display Status, exit the menus, and then press the shutter button halfway and release it. You get a temporary display of the Shooting Settings screen. Press the Disp button to turn off the monitor and then turn off the camera.
When you turn on the camera again, the monitor doesn’t automatically display the Shooting Settings screen — as long as the Mode dial is set to an advanced shooting mode, that is. To view the screen, press the Disp button.
Changing the Color Space from sRGB to Adobe RGB
By default, your camera captures JPEG images using the sRGB color mode, which simply refers to an industry-standard spectrum of colors. (The s is for standard, and the RGB is for red, green, blue, which are the primary colors in the digital color world.) The sRGB color mode was created to help ensure color consistency as an image moves from camera (or scanner) to monitor and printer; the idea was to create a spectrum of colors that all these devices can reproduce.
However, the sRGB color spectrum leaves out some colors that can be reproduced in print and onscreen, at least by some devices. So, as an alternative, your camera also offers the Adobe RGB color mode — which includes a larger spectrum of colors. Figure 11-12 is an illustration of the two spectrums. It’s important to know that some colors in the Adobe RGB spectrum can’t be reproduced in print; the printer just substitutes the closest printable color, if necessary.

Figure 11-12: Adobe RGB includes some colors not found in the sRGB spectrum but requires some color-management savvy to use to its full advantage.
So which option is right for you? Well, if you plan to print and share your photos without making any adjustments in your photo editor, you’re better off sticking with sRGB because most printers and web browsers are designed around that color space. Second, to retain all your original Adobe RGB colors when you work with your photos, your editing software must support that color space — not all programs do. You also must be willing to study the whole topic of digital color a little bit because you need to use some specific settings to avoid really mucking up the color works.
To use Adobe RGB, you must shoot in the advanced exposure modes: P, Tv, Av, and M. After setting the Mode dial to one of those settings, make your decision known via the Color Space option on Shooting Menu 2, shown in Figure 11-13. In other modes, the camera automatically selects sRGB. Additionally, your color space selection is applied to only your JPEG images; with Raw captures, you select the color space as you process the Raw image and convert it to a JPEG or TIFF, not when you capture it. (See Chapter 10 for details about Raw-image processing.)

Figure 11-13: Choose sRGB unless you’re experienced with image-color management.
After you transfer pictures to your computer, you can tell whether you captured an image in the Adobe RGB color space by looking at its filename: Adobe RGB images start with an underscore, as in _MG_0627.jpg. Pictures captured in the sRGB color space start with the letter I, as in IMG_0627.jpg.