

1
Drawing the Figure
My objective in writing this book is to show how to draw figures using a simple and easy drawing method. Specifically, the book is intended to help theatre students improve their drawing skills so that they can give effective design presentations. Most theatre students do not have any solid drawing training, or any human anatomy or figure-drawing courses in their curricula. Drawing requires a lot of practice and knowledge of the proportions of the human body. I believe that with effort, anybody can draw.
Theatre students typically have to do production assignments and work in the shops, helping to build either scenery or costumes for the production. Their time is occupied with those assignments, leaving them little time to improve their drawing skills. That is why I am trying to find a short, easy, and fast way to help them improve their drawing abilities. The methods in this book can be used without a model. However, if theatre students have the opportunity to draw the human figure from live models, they should do so. Drawing live models is a tremendous help in understanding the human body.
PROPORTIONS OF THE BODY
There are many concepts or methods for measuring the divisions of the human body. The eight-headstall figure proportion method is often used by artists or fashion illustrators. Some fashion drawings may use eight-and-a-half- or nine-heads-tall figures to demonstrate the garments, using a slim, sophisticated image. Realism is not the intent of fashion designers or illustrators. Rather, their objective is to create a stylized or exaggerated version of reality, which today is a tall, slim, and athletic figure, with a long neck and long legs. Fashion illustrations emphasize the current ideals or trends of fashion beauty. The thin body and specific poses are designed to enhance the garments. Fashion illustrators are creating the images of fashionable products to stimulate customers to purchase the garments. Beautiful illustrations can impress and influence customers to buy and wear the advertised clothing.
Costume designs for theatrical productions are quite different from fashion illustrations. The costume designer uses the history of fashion as a reference for creating costumes for many varieties of characters or groups of characters in plays. The characters are everyday-life people: young or old, thin or heavy, short or tall, with different nationalities and particular personalities. Costume design for productions requires creating practical garments that are going to be worn on stage by believable characters who have well-defined personalities. Sometimes a well-defined character costume design can inspire the actors and enhance the design presentation for the production team. In my drawings and designs, I try to emphasize a realistic style of body proportions, but I use slightly exaggerated facial features and body language to create characters with personality. The real creative challenge is how to express personalities of characters.
Most of the proportions of the body that I used in this book are based on the theories of proportions used in many other art books. There are fantastic art books from which you can learn about the proportions of the body and about figure drawing techniques, such as Bridgman's Complete Guide to Drawing from Life, by George B. Bridgman (Sterling, 2001); The Complete Book of Fashion Illustration, by Sharon Lee Tate and Mona Shafer Edwards (Prentice Hall, 1995); The Human Figure: An Anatomy for Artists, by David K. Rubins (Penguin, 1975); Drawing the Head and Figure, by Jack Hamm (Perigee, 1982); and Drawing on the Right Side of the Brain, by Betty Edwards (Tarcher, rev. ed. 1999). These books helped me improve my understanding of the human body and taught me how to present the body well. You can study the rules and principles of figure drawing, but you have to learn how to use them through practice.
To give my characters a realistic appearance, I slightly change the size of the head. Compared to the eight-heads-tall proportions, I enlarge the head to extend outside the usual boundary of the first head area. This enlarges the head in proportion to the top half of the body. I keep the feet within the bottom-half portion of the body. When I start the foundation of a figure, however, I still start with the eight-heads-tall method because it is an even number and easier to divide for calculation purposes. My divisions on the body may differ from other books, but the measurements work for my figure drawings. My primary intent is to have a system that is easy to use.
The key for developing a character figure drawing that is in proportion is to keep the top half (from the crotch up to the top of the skull) equal to the bottom half (from the crotch down to the bottom of the feet). The crotch is the main division point. The head can actually be made either a little bigger or smaller. A small head will make the figure look taller or thinner; a bigger head will make the figure look shorter or chubbier. When keeping these measurements in mind, the figure will always look right.
I recommend that you use the following steps to create a figure drawing until you become familiar with body proportions. Refer to Figures 1-1 and 1-2 as you complete these steps:
- Place two marks on the paper—one on the top portion of the page, one on the bottom portion of the page—to indicate the height of the body. Then draw a vertical line from the top mark to the bottom mark. The composition of the figure should be considered; that is, keeping the figure centered or off-centered, more to the left or to the right side, and so on. These guidelines control the figure height.
- Draw a mark at the middle point of the vertical line to find the middle point of the body. This mark is where the crotch is located and is also the half-height of the body. I am going to call the area from this mark up the upper half of the body. To me, this mark is the most critical reference point for good proportions of the body. (See Figure 1-1, mark #5.)
- Divide the upper body from the top mark to the crotch line into four equal parts. This creates five marks but four portions. Number all the marks: The very top mark, mark #1, is the top of the skull; we won't use mark #2; mark #3 is the armpit; mark #4 is the waistline; and mark #5 is the half-body mark (it is also the crotch, pelvis, or hipline). The very bottom mark drawn in step 1 is mark #6. I will refer by numbers to these six marks extensively in the discussion that follows.
- Make the head bigger compared to mark #2 (usually considered the chin in measurement systems used in other drawing books). The head will be increased by adding a distance approximately the size of a chin from mark #2 down (see letter A on the sketch in Figure 1-1). This shortens the neck. Fashion drawings usually are just the opposite, showing a longer neck. The mark at letter A is going to be the bottom of the chin.
- Draw an egg-shaped frame between the top mark and the chin mark, A, to indicate the shape of the head.
- Divide the distance between mark #2 and the armpit line (mark #3) in half and mark it as letter B; this mark is going to be the shoulder line or collarbone. Generally speaking, the width of the shoulders is a measurement about two heads wide for females and two-and-a-half heads wide for males. Measure the width of the shoulders and add two marks (see letter C in Figure 1-1).
- Divide the distance between mark #2 and the shoulder line, B, in half and add another mark. This mark helps to establish the shoulder-slope line (see letter D in Figure 1-1). Look at the sketch and review this in detail.
- Divide the distance between the armpit (mark #3) and the waistline (mark #4) into four equal parts. Now you have drawn three marks to create four parts. The first mark from the top of this group is the bustline (see letter E in Figure 1-1); this mark usually refers to the nipples position or bustline. The third mark from the top is the bottom of the rib cage (see letter F in Figure 1-1). The second mark is not used.
- Divide the distance between the waistline (mark #4) and the crotch or hipline (mark #5) into four equal parts. The first mark is the top of the pelvis (see letter G in Figure 1-1). The male pelvis width is different from the female. The female hip width is usually wider than her shoulders. The male hip width is less wide than the shoulders. For both males and females, the width of the top of the pelvis usually equals the width of the bottom of the rib cage or chest. The bottom of the pelvis/hipline/crotch line is wider than width of the the top of the pelvis
1-1 Proportion of the Body, Marks A through H
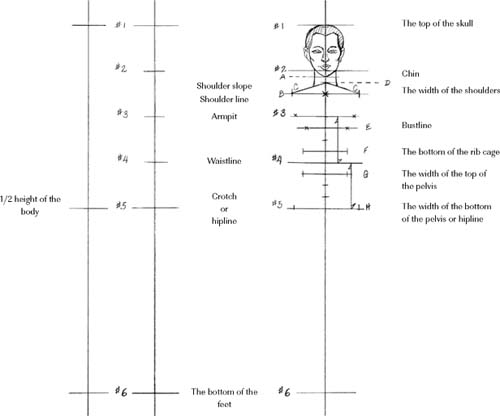
(see letter H in Figure 1-1). The hipline's width will depend on whether you are drawing a female or male. The other two marks are not used.
- Treat the chest/rib cage as a tapered box (refer to Figure 1-2). Connect the shoulder line with the bottom of the rib cage to make a tapered-down box. The shoulder should be wider than the bottom of the rib cage. Keep both sides of the body symmetrical with the body centerline. The pit of the neck is at the middle of the shoulder line—it is the body centerline.
1-2 Proportion of the Body, Marks I through M

- Treat the pelvis as a tapered-up box. Connect the top of the pelvis line with the bottom of the pelvis line (mark #5, also the hipline/crotch line) to draw a tapered-up box. The female hipline is wider than the male hipline.
- The area from the crotch down will be for the legs and feet. The legs join the pelvis at the hipline. Before starting to draw the legs, divide the distance between mark #5 (crotch line) and mark #6 (the bottom of the feet) into four equal parts. Then mark them from the top down (see letters I, J, and K in Figure 1-2).
- Divide the distance between K and mark #6 into three equal parts. The feet are drawn in the bottom third (see letter L in Figure 1-2).
- Draw two lines from both corners of mark #5 (hipline/crotch) down to letter L to indicate the legs. Keep them symmetrical. Then divide these two lines in half; the middle marks on these two lines are the knee positions (see letter M in Figure 1-2). This method of drawing leg length avoids the leggy look of fashion-illustration figures. Our objective is to create a realistic look corresponding to the actors, rather than a fashion ideal.
- The arms join to the chest at the shoulder line. In human anatomy theory, the upper arm from the shoulder to the elbow is longer than the distance from the elbow to wrist. In my method, I treat them as two equal parts in length for an easy calculation ratio. When the arm is hanging down, the elbow usually lines up with the waistline. The measurement from the shoulder to the elbow should equal the measurement from the elbow to the wrist. From the elbow joint, measure down to indicate the placement of the wrist.
- Add hands to the wrists. The fingertips usually stop at letter I (the fifth head in other books). Asian people often have shorter arms, African people usually have longer arms, and Caucasians often have arms that are longer than Asians' but shorter than Africans'. There are many variations and exceptions to any racial generality.
- As shown in Figure 1-3, contour the body according to the basic bone/stick structure (see the section, “Contouring the Stick Figure”). Figures 1-4 and 1-5 show the contouring lines for the male and female body, respectively.
The proportions of the body, either seven or eight heads tall, work only for the body standing in a straight position. When the body is bending or the head is facing up or down, you cannot apply the measurements to the body because of foreshortening.
The body measurement methods used in this book are not the only methods you should follow, but I recommend you use my system as a guide or reference for drawing stage costumes.
1-3 Proportions of the Body, Stick Structure, Front and Back Views

1-4 Contouring Fines for the Male Body, Front and Back Views

1-5 Contouring Fines for the Female Body, Front and Back Views

THE BASIC BONE STRUCTURE OF THE BODY
The bone structure in this book is symbolic and abstract. It is not my intention to copy the real human skeleton. My objective in using a simple and abstract bone structure is to make it easier to draw and understand, and easier to obtain the proper proportions of the figures. The shape of the human body is complex. To draw it well, you need to spend extensive time studying bones and muscles. Unfortunately, in most cases, theatre students don't have a long time to study the human anatomy. The simplified abstract bone structure used here is going to help students to better understand the human body and its movements (see Figure 1-6).
The skeleton dominates and directs all surfaces of the body, and the bone joints determine and dominate all the movements of the body. We must discuss the basic bone structure of the human body to understand body movements. To keep it clear and simple, my discussion is focused on the basic length and width of the outer edges of the skeleton, and on the major joints of the skeleton. The outer edges of the skeleton include the outline of the skull and the outline, or frame, of the chest and pelvis masses. The major joints include the spine, shoulder, elbow, wrist, hip/leg, knee, and ankle. In real life, the chest and pelvis are irregular shapes. In this book, I am going to use either boxes or abstract shapes to demonstrate the body parts. Small circles will be used for each joint. Abstract sticks will be used for the length of the bone. The length of the bones between the forearm and upper arm, and between the lower leg and thigh, may differ in real skeletons, but I will make them equal distances here because it will be easier to calculate the proportion ratio.
1-6 The Abstract Skeleton of the Body and Its Joints

The Joints of the Body
Joints connect or hinge together two things. There are many joints on the human body. The spine joins the head mass, chest mass, and pelvis mass. The collarbone, shoulder blade, and arm are joined together at the shoulder and connected with the chest as a unit. Joints are capable of moving in many directions within their limitations. Each arm has its own joints: shoulder, elbow, wrist, and finger. Each leg also has its joints: hip, knee, ankle, and toe. Each joint directs body movements. In figure drawing, when joints are in the correct positions, they will show comfortable movements and body rhythm with natural expressiveness as a whole. Incorrect positions will make the figures seem stiff or lopsided. Through our experiences during our daily activities, we know how joints work. But showing the joints properly through drawing is critical and requires practice. The bone joints allow us to move our body parts comfortably and also inform us of the limitations of our joints. Consider and study how your own joints work; practice stick figure drawings to analyze the joint functions and limitations in different positions.
The Head, Chest, and Pelvis
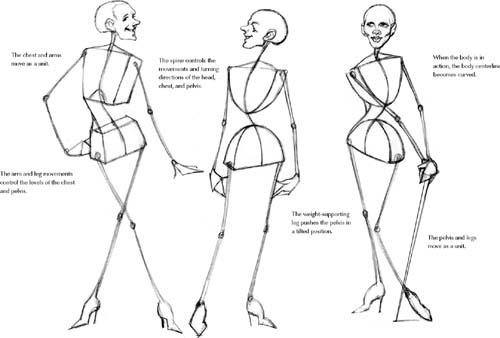
There are three major masses of the human body—the head, chest, and pelvis. They are joined together by the spine, which controls the movements and turning directions of the head, chest, and pelvis. The significant fact here is that these three masses are able to move independently of one another (see Figure 1-7).
Making the three masses move in different directions will add dramatic excitement and personality to the figure. When the body moves, the balance has to be maintained. The proper angles between the body masses maintain this balance. The neck area of the spine usually has more flexibility than the lumbar spine. The flexible spine allows the head, chest, and pelvis to face up, down, or sideways, or to turn around. When each mass faces in different directions, you will see twisting movements.
When the body is in action, the body centerline becomes curved. This line can also be called the action line. When the body bends or twists, it creates angles or curves between each mass. If the body is in standing position, you will see the level of each mass forming a 90-degree right angle to the spine—the centerline of the body. When the body

bends forward, it brings the front of the chest and the front of the pelvis close together to form an angle, while stretching the distance between the back of the chest and pelvis, forming a curved line. When the body bends to either side, it brings one side of the chest and one side of the pelvis close together, forming an angle between them, and stretches the distance between the other side of the chest and pelvis, forming a curved line. You will see the same pattern when the body bends backward. When the body is in a twisting position, the body centerline and the outline of the body become curvy lines rather than sharp angles. The three masses can be turned and twisted in different directions within spine limitations, but the chest and pelvis always move in opposite directions from each other in order to keep the body in balance; otherwise, the body would fall.
A small turn of the body gives some action to the figure. A full or exaggerated turn or twisting of the body increases the dramatic action and attitude of the character, and gives a loud or screaming emotional statement. Try to manipulate these three masses by turning them in different directions, allowing them to speak for your characters' actions. When you make the three masses face different directions (see Figure 1-8), you will immediately see your character alive and active. It is essential in character drawing to establish the relationships of the head to the torso, the head to the neck, the head to the chest, and the chest to the pelvis. These relationships portray a great deal of the personality of the character.
1-8 Turning the Three Body Masses

The Relationships between the Limbs and Body Masses
We have discussed how the arms are joined to the chest, and how the legs are joined to the hipbone/ pelvis. Therefore, when the chest and pelvis move in different directions, the arms should follow the chest as a unit, and the legs should follow the pelvis as a unit. The limbs cannot be considered as separate objects from their units (see Figure 1-9). For example, when the body is in an erect standing position, the chest and pelvis masses are in horizontal lines parallel to each other. The joints of the shoulder, elbow, and wrist as well as the joints of the hip, knee, and ankle will be parallel to their units. But when the chest moves in a direction that makes the right side of the shoulder higher than the left side, the right shoulder and arm will go higher as well. When many students draw this position, they draw the arms at the same level. They forget the arms are connected to the chest mass.
Arm and leg movements also partially control the levels of the chest and pelvis. When one arm rises higher than the other arm, the shoulder of the rising arm will go higher. When one leg supports the weight of the body, this leg will push this side of the pelvis higher and in a tilted position. The pelvis can be pushed up because the flexible lumbar spine allows the pelvis to be tilted. The relaxed-leg side of the pelvis line and hipline will be dropped. The nonsupporting leg usually steps forward, keeping a relaxed or bending position to compensate for the length of the weighted leg and the drop of the pelvis mass.
Most costume designers create their figures for designing costumes without live models. They draw the figures from their heads or from reference books or magazines. Once you understand how the human structure and joints work, you will feel at ease and comfortable with your drawings. You will be able to create your own characters of motion in a variety of positions in order to demonstrate the costumes and personalities of the roles in the play.
THE BALANCE OF THE BODY
The human body is uniquely and symmetrically balanced. The human body also has a natural balance ability. The weight of the body often swings back and forth from one leg to the other when the body is walking. When the body is turning or twisting, it creates angles and curves in order to keep the body balanced. This principle is like the balance in a sculptured object. If the bottom portion of the sculpture leans to one side, then the top portion of the sculpture must lean in the opposite direction to maintain the balance of the whole piece. To create a more sophisticated sense of movements or actions, define the body language by employing twisted angles and curves faced in different directions. To keep the body well-balanced, locate the center of gravity for the figure. These are the important elements in helping us understand and draw human figures. Keep the movement liquid and the balance solid.
Weight on Both Legs
The spine is the centerline of the body, from where all body parts are symmetrically balanced. The joints of the body are lined up and parallel to each other. Due to the force of gravity, no matter how the body moves, there is always a center of gravity line from the pit of the neck directly down to the ground. This gravity line will never change to curved or angled, but the body centerline will change to curved when the body is in action.
When the body is standing straight, all body weight is distributed equally on two legs (see Figure 1-10). The body centerline is straight. The center of gravity line overlaps with the body centerline, starting from the pit of the neck and extending directly down between the middle of the two feet to the ground, whether the feet are in a closed or open position. All the horizontal lines (the shoulder line, bustline, waistline, pelvis line, hipline) are parallel to the ground and form 90-degree angles with the body centerline.
Figures 1-11 through 1-16 are design samples showing weight on both legs.


1-12 Design Sample of Weight on Both Legs—Look Homeward, Angel


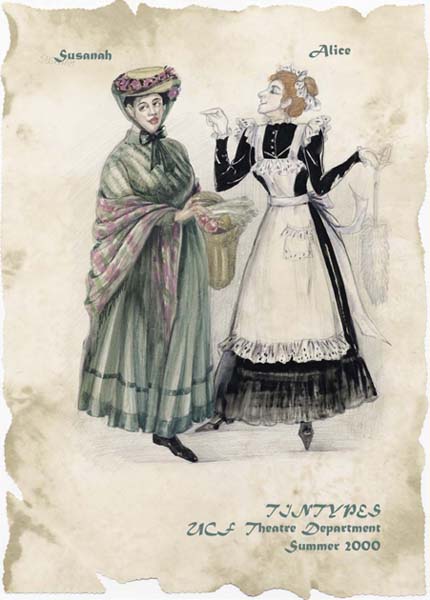
1-14 Design Sample of Weight on Both Legs—Tintypes
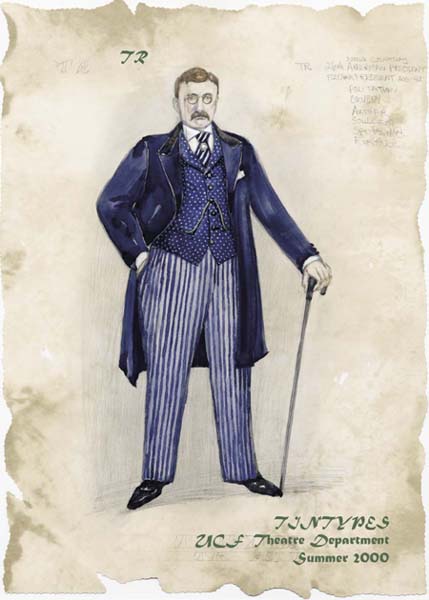

1-16 Design Sample of Weight on Both Legs—Tintypes

Weight on One Leg
Weight on one leg is a common pose for costume design figure drawings (see Figure 1-17). It gives the figure characteristic action and attitude for showing the costumes. There are many designs using one leg support, but the principle of balancing the body is the same. When the body weight shifts to one leg, the pelvis swings out to the side of the weight-supporting leg. The swing causes the body centerline to become curved and separate from the center of gravity line (the center of gravity line overlaps with the body centerline in the two-leg support pose). This curved body centerline is considered an action line as well. The degree of the curve is based on half or full actions/movements. A half action/movement will show a soft or shallow curve at the body centerline; a full action/movement will show a deeper curve at the body centerline. To balance the body so it doesn't fall, the weight-supporting foot will naturally be located where the center of gravity line ends on the ground. We discussed that the center of gravity line goes directly down from the pit of the neck to the ground. Therefore, the weight-supporting foot should be located there. This is a rule for balancing the body in figure drawings. You will read similar information in all art books on figure drawings. The center of gravity line is the key to balancing the body, figuring out a stable-standing figure, and checking if the weight-supporting foot is in the correct location—where the center of gravity line ends on the ground.
1-17 Weight on One Leg
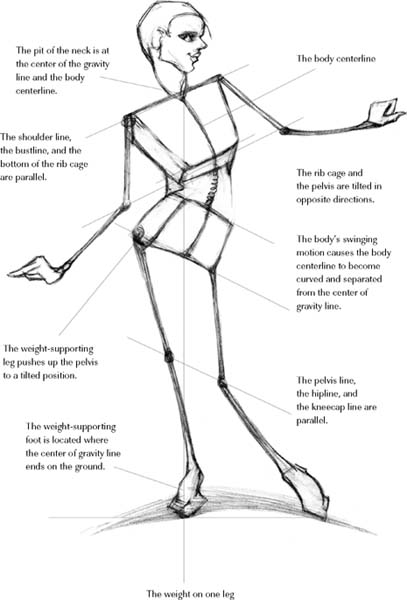
We discussed how the chest and pelvis masses work and the relationship between the limbs and the masses. I will highlight the important points one more time: the head, chest, and pelvis are joined by the spine but move independently to offer us a variety of bodily movements and positions. When body weight is on one leg, this side of the pelvis swings out and tilts toward the relaxed leg because the weight-supporting leg pushes the pelvis up. The relaxed side of the pelvis drops down, and the joined leg follows. The knee and ankle of this leg will be lower than the knee and ankle of the weight-supporting leg. The nonsupporting leg may also be in a bending or relaxed position.
When the pelvis tilts to one side, the chest will tilt in the opposite direction in order to balance the body. This creates an angle between the chest and pelvis and causes the body centerline to be curved. The shoulder line, armpit line, bustline, elbows, wrists, and hands are parallel. In the pelvis unit, the pelvis line, hipline, kneecaps, and ankles are parallel and move in the same directions because the pelvis and legs are a unit, just like the chest and arms are a unit. When they move, they move together as a whole.
Figures 1-18 through 1-24 are design samples showing weight on one leg.
1-18 Design Sample of Weight on One Leg—Tintypes


1-20 Design Sample of Weight on One Leg—Tintypes


1-22 Design Sample of Weight on One Leg—Tintypes

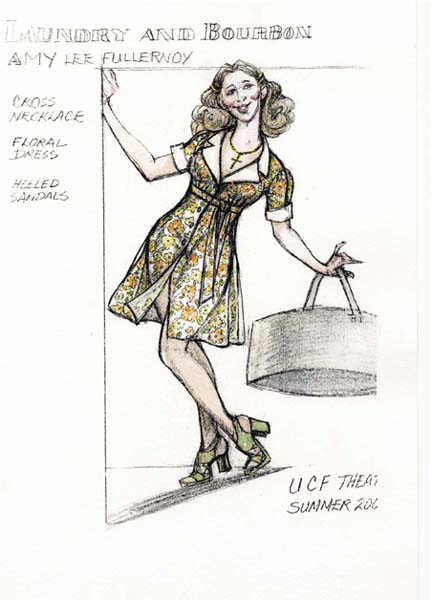
1-24 Design Sample of Weight on One Leg—Laundry and Bourbon

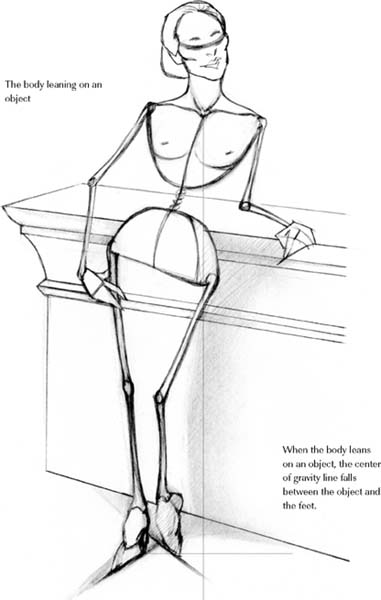
The Body Leaning on an Object
When the body leans on something (see Figure 1-25), the body centerline also changes from straight to curved because part of the body weight is distributed to lean on the object. In this case, the center of the gravity line will fall down somewhere between the object and the body. Where? It really depends on the distance between the leaning body and the object. In general, if the feet of the leaning body are close to the object, the center of gravity line should be near the feet; if the feet of the leaning body are farther away from the object, then the center of gravity line will be located between the feet and object.
In conclusion, when you draw a figure leaning on an object, you should emphasize the action lines, the angles between the body and the object, and the relationships between the three masses and limbs. For a body leaning on an object, drawing the foot or feet at the center of gravity line will not work.
Figures 1-26 through 1-29 show design samples of bodies leaning on an object.
1-25 The Body Leaning on an Object

1-27 Design Sample of the Body Leaning on an Object—Lone Star

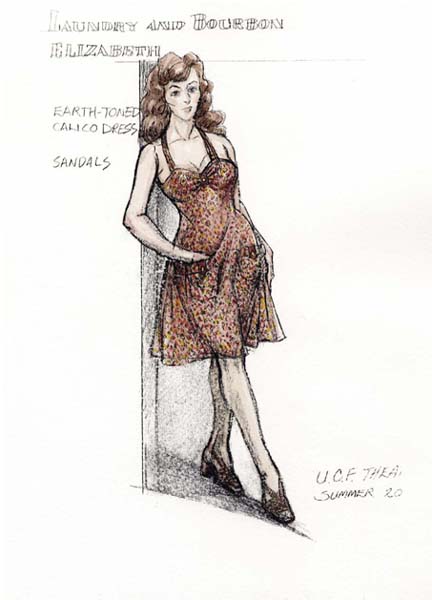
1-29 Design Sample of the Body Leaning on an Object—Laundry and Bourbon
FIGURES IN ACTION
We all know that when we design costumes we should have a concept. For me, the concept involves not only designing garments but also, equally important, creating the figure poses. I apply symmetrical balance to draw body features, but I use asymmetrical balance to design the figure poses. I want my characters to tell stories and possess personalities. However, I never forget that costume design is always the main subject to express. My theory is that characteristic bodies with interesting and perhaps exaggerated features can make the costumes even more interesting, eye-catching, elegant, practical, and meaningful.
Abstract Stick Figures in Action
I often use abstract stick figures to establish the poses for my costume designs (see Figures 1-30 and 1-31). I work without live models, from my own imagination. I use tapered boxes or irregular shapes, sticks, and little circles to indicate the basic bone structure of the figures. That is the way I analyze and explore human body movements. This is always the fundamental thing to do: get correct proportions, design action movements, locate the joints, and balance the weight of the body. This approach helps me to modify the body movements, actions, or attitudes that define the body as being alive. The greatest benefit of using abstract shapes in poses is that doing so will eliminate a lot of meandering lines and shapes that don't say anything about the character. The most important element in drawing a figure is to establish the body frame before proceeding with the details. The tendency to start a figure in detail at one spot and then proceed to the end usually causes incorrect proportions and uncontrolled figure placement on the page.
When the body is in action, the centerline of the body will be curved, as we discussed before. Properly showing the degrees of the angles and what directions the curves point toward are the foundations for creating body movements and actions. Clearly define the locations of the joints, such as the shoulders, elbows, wrists, hip bones, knees, ankles, and feet
1-30 Abstract Stick Figures in Action
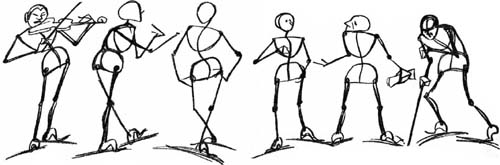
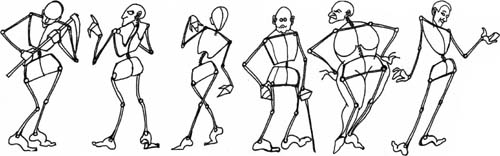
in action. To create dynamic action figures, it is necessary to analyze the body action line, the joints and parts, and to manipulate them by twisting, turning, and bending in order to make them move with exciting and dynamic actions. The twisting of the body and the use of the weight-bearing foot give a definite spirit to figures that entertain. To emphasize strong angles between the head, chest, and pelvis, use straight lines against curved lines, and round shapes against angular shapes. This will put motion and energy into your figure while capturing the spirit and soul of the character.
Contouring the Stick Figure
Studying the terms and functions of muscles may require a full semester or more. My approach for contouring the figure is to just focus on the silhouette of the muscles and simplify them as straight or curved lines, and angular or round shapes. Apply these lines and shapes to the figure as a format pattern. Study and analyze the outlines of the body to perceive the following: which body part outlines are relatively straight or curved, which show angular shapes, which generally stay forward, and which generally stay behind. The outlines of the human body overlap one another in different shapes, angles, and lines, to form the human framework.
The muscle tissue around the joints of the body is thin, allowing the joints to move. They can be seen as angular shapes, or knobs, and indentations. In figure drawing, we must indicate and locate these visible joints and bones to avoid the look of a rubber dummy. The human body is symmetrically and mechanically built. All body actions and movements are directed and controlled by mechanical joints. Inadequately defining the joints, consequently, will not show natural proper movements, and lack a sense of reality and authenticity.
In general, joints appear more noticeable in a thinner or bonier body. If the joints are covered by thick fat tissue, as in a heavier body, this will limit the body movements and the body will show more rounded, curved lines and shapes. When contouring a thin or bony figure, you should emphasize the angular bone structure with firmer, smaller muscles. When drawing a heavy figure, emphasize the roundness and ample flesh more than the bone structures.
1-31 Abstract Stick Figures in Action
Contouring the Stick Figure from Head to Feet
CONTOURING THE HEAD
Contour the head as egg-shaped and the neck as cylinder-shaped (see Figure 1-32). Note that the male's jawline has a more angular shape than the female's. The neck portion is at the top part of the spine. The front and back views of the spine are straight lines; from the profile, the spine creates an S-curved silhouette. The spine curves toward the front, and the head sits on the top end of the spine.
While contouring the neck, follow the direction of the spine and treat the neck as a slanted-forward cylinder. From the profile, notice that the top of the front part of the neck starts just below the chin and ends at the pit of the neck. The top of the back part of the neck starts at the same level as the bottom of the ear and merges with the shoulder slope. Thus, the base of the front of the neck starts lower and ends lower than the back of the neck. From the profile view, the female neck should resemble a diamond shape and the male neck should resemble an elongated diamond shape or parallelogram, due to males having thicker necks. In the front and back views, the outlines of the neck are straight. A pair of prominent muscles, called the sternocleidomastoid muscles, are set symmetrically at each side of the neck. They start from just behind the ear and slant down to the middle of the collarbone. The functions of these muscles are to support the head and turn it in different directions.
1-32 Contouring the Head and Neck

The female neck is thinner with smoother visible neck muscles, whereas the male neck is thicker and more muscular. The collarbone lays flat at the shoulder line, and its two ends meet at the center of the base of the neck. This intersection forms a deep indentation called the pit of the neck, which is used as a pivotal point for figure poses.
There are three common mistakes when drawing the neck: drawing the profile of the neck as a straight cylinder, rather than a slanted cylinder; drawing the neck as a tapered cylinder (funnelshaped), instead of using parallel lines; and using sharp angles as the neck merges into the shoulder, instead of soft curves. The neck is a small part of the whole body, but it plays a very significant role for creating character drawings because it expresses emotions and movements. Therefore, we have to pay considerable attention to contouring the neck. The indentations on the neck should be emphasized in order to depict a graceful, elegant, and healthy neck. The outlines of the side of the neck are straight (in front and back views) and can be drawn in one complete line with the shoulder slope, or with a break where the neck and shoulder slope meet. In this case, the shoulder-slope lines should stay behind the necklines. The slope is slightly curved toward the shoulder bone.
CONTOURING THE TORSO
Referring to Figure 1-33, use round, curved lines to draw female breasts and soft, curved lines for the waist. Use angular and sculpted lines to draw the muscular male chest, and slightly curved lines for the waistline. Define the edge of the pelvis and hipbone. The contouring line for the center-front crotch forms a curved V-shaped line and starts above the crotch line. Rear cheek lines are an upside-down curved V-shaped line and are located a little bit below the crotch line.
CONTOURING THE ARMS
Divide the arm into three sections—the shoulder, biceps, and forearm. When drawing female arms, use one continuous line to emphasize the smoothness. When drawing male arms, use broken lines to emphasize more sculpted muscles. If broken lines are used for the arm, the shoulder and forearm lines should stay in front of (overlap) the biceps lines. The elbow contains wrinkled flesh and shows the elbow joint. The front of the elbow forms a natural bending line at the middle of the arm. The forearm tapers down to the wrist; the outer curve (side) of the forearm starts above the elbow bending line with a somewhat greater curve. The inner side of the forearm starts just below the elbow bending line. (See Figure 1-34.)
CONTOURING THE LEGS AND FEET
When contouring the legs and feet, refer to Figure 1-35. The curved V-shaped line at the front of the crotch is where the leg muscles start. Use curved lines to draw the thigh and the lower leg, and use straight lines for the knee area. The thigh portion is thicker and fuller than the lower leg; the knee area contains less muscle. The lower leg tapers down to the ankle; the calves are full and firm, and the bottom of the calf line ends at the halfway point of the lower leg.
Keep three main curves in focus: the thigh, calf, and ankle. In the front view, the inner outline of the leg is straighter (with soft curves) than the outer outline of the leg. There is an indentation curve at the middle of the inner thigh because that is where the sartorius muscle overlaps the gracilis muscle. The inner thigh line can be drawn with three broken lines: upper thigh, lower thigh, and lower leg. The upper thigh line stops at mid-thigh. Then the lower thigh line starts on top of it and continues and ends just below the knee.
The lower leg line starts behind the lower thigh line and curves down to the ankle. The outer outline of the leg can be done with three broken lines: thigh, knee, and lower leg. The thigh has a big curve, starts from the hips, and stops at the knee level. The outer outline of the knee joint is relatively straight and stays behind both the thigh and lower leg lines; an indentation mark can be used to indicate the kneecap position. Be sure to attentively mold the calf curves and anklebones. The fullest curve point of the outer calf is higher than the fullest curve point of the inner calf. The inner anklebone curve is higher than the outer anklebone curve. If you draw a line at the fullest point of the calf from the inner calf line to the outer calf line and draw another line from the inner ankle to the outer ankle, you will see that the two lines are headed toward opposite directions (see Figure 1-35).
In profile view, the leg is not a straight vertical line. The front of the thigh curved line is the most forward of the leg outlines. The next most prominent curve is the calf. The outlines of the back thigh and shin are straighter with soft curves. The back view of the leg will have the same silhouette as the front view, except the back view will have a bending line in the back of the knee and tendon lines going down to the heel. The back of the heel is a ball-like curve and merges with the tendon lines that continue up to the leg. Contour the arch bone with arch lines, and use small curves for the toes.
Finally, the female leg has smaller, softer calves. Male legs have more muscular calves. Bring to life realistic human legs by shaping and accentuating joints and natural curves.
Figures 1-36 through 1-43 contain design samples of contoured bodies.

1-34 Contouring the Arms

1-35 Contouring the Legs and Feet


1-40 Design Sample of Contoured Bodies—The Dance & The Railroad


FIGURES IN DANCE
Keep the words stretching, flowing, and rhythm in mind to accentuate the image of dancing. Dancers' bodies possess rhythm, balance, strength, distinction, and flexibility. Their powerful shoulders, backs, and elegant limbs are firmly muscled.
Correctly locating the weight-supporting leg in relation to the body is the key to balancing the body. Dance poses can be one-leg support or two-leg support, but keep in mind that the center of gravity line is the guideline for positioning the weight-supporting leg or legs. This principle is also utilized in the action figures we discussed earlier. Again, where a line from the pit of the neck falls directly down to the ground is the center of gravity line, which is the location for the weight-supporting leg/legs. As I mentioned before, this principle cannot be applied to a body leaning on an object. This center of gravity line applies to dance figures as well. The differences are the following: when the dance body bends forward, the center of gravity line shifts in front of the weightsupporting leg; when the dance body bends to the side, the center of gravity line descends to the side of the weight-supporting leg; when the body bends to the back, the center of gravity line moves to the back of the weight-supporting leg. The deeper the bending angle, the farther the distance between the gravity line and the weight-supporting leg.
Use the head, torso, and supporting leg to maintain a firm and active posture. Use the stretching limbs to sustain the body's rhythm and balance. A dancer's body is stronger and more flexible than that of the average person. Keep in mind that the head, chest, and pelvis are three masses that move independently; this allows you to create exaggerated and stretchedout poses by manipulating the three masses. The feet and legs are naturally joined together at nearly a 90-degree angle to support the body weight. In dance, the relaxed leg is commonly stretched either forward or backward and reaches to its full extent. When the leg is in a stretching position, the angle between the foot and leg dramatically changes. This stretching position diminishes the angle degree between the foot and the leg as the lines become straighter. The toes are pointed and curved downward, which causes the heel to be pulled backward. The foot in this pointed position can be seen in many dance poses. The hand positions are opposite from the feet. The angles between the wrists and hands expand. The feet are drawn tense and tight, but the hands are usually more relaxed, graceful, and sophisticated.
Dancing bodies possess sculptured expressions of dynamics. To express sculptured and powerful characteristics, stress the movements of the head and torso and create an impression of powerful limbs. A real dancer controls his or her body's balance, but when you draw, you control the dancer's balance.
Figures 1-44 through 1-52 show abstract figures in dance. Figures 1-53 through 1-60 provide design sketches of figures in dance.
1-44 Abstract Stick Figures in Dance

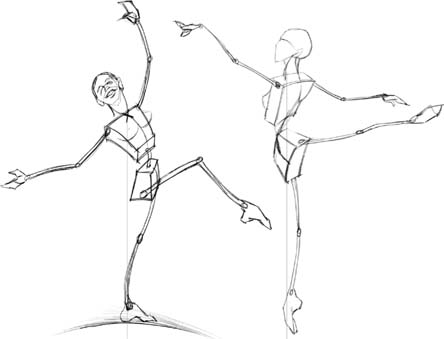
1-46 Abstract Stick Figures in Dance


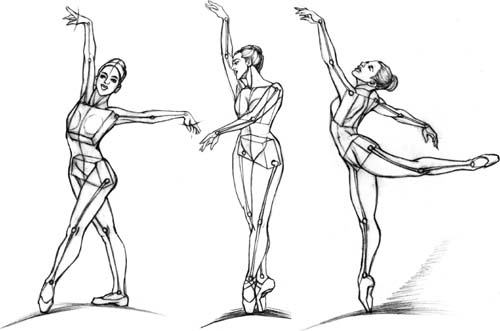
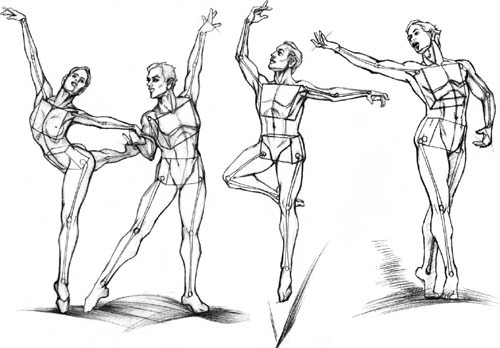
1-48 Figure in Dance


1-50 Figure in Dance

1-51 Figure in Dance


1-52B Figure in Dance

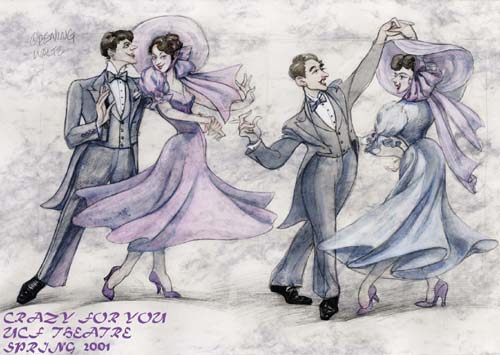


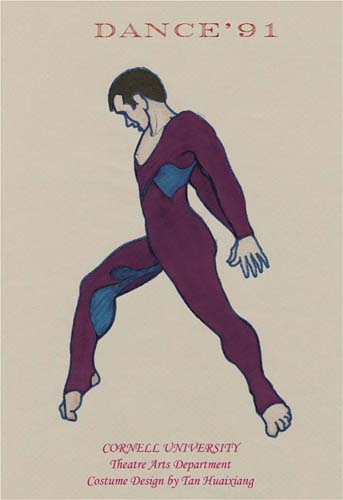
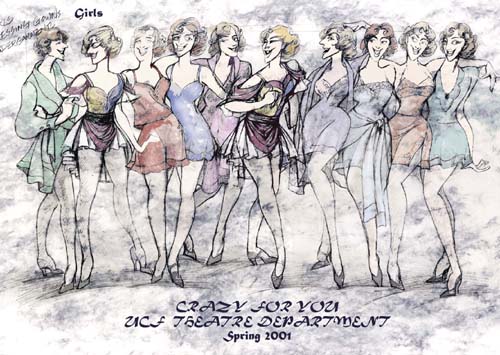
1-58 Design Sample of Figures in Dance—Dance ′91


FIGURE POSES CHANGE THROUGH TIME AND FASHION
Keep two important ideas in mind when creating figure poses: one, use the poses or gestures that will express the character's personality; and two, use the poses or gestures that will show your costume designs at their finest. As costume designers, we must combine costume history and fashion styles in order to develop many different poses. Fashion has changed often and dramatically over thousands of years and involves tastes, opinions, culture, religion, geography, location, and technology. The development of economic societies and technological inventions has influenced clothing styles. The clothing is made for the body, and the body is a frame for supporting the clothing or garment. In my opinion, these two elements cannot be separated. A certain style requires specific poses to carry out and represent the garment's best appearance.
Each time period in fashion holds its own appreciation of the beautiful. Women wore corsets throughout the centuries to flatten or accentuate the breasts, cinch waists, or pad shoulders; today, women get breast implants for a pair of full, large breasts. Trends affect men as well. In the past, men wore corsets, cinched their waists, and padded their shoulders, chests, and calves to achieve aesthetic standards; today, men go to gyms to exercise and gain muscle mass to meet today's standard of beauty—a muscular and healthy appearance.
Performance-major students take period movement and dialogue courses that are designed to allow their bodies and voices to adapt to roles in a period production. Costume designers should create suitable body frames for characters that will accent garments for that period and produce believable characters that will enhance the costume design.
Head-to-toe figures in three-quarter-view poses are usually the best for presenting expressive costumes because they show front, side, and partial-back views. Figures 1-61 through 1-69 are interpretations of my understanding of historical periods. They are based upon historical sources and references to frescoes, paintings, and sculptures. The figures displayed are from the Egyptian period to the present. Figures 1-70 through 1-76 are design samples that show how figure poses change through time and fashion.
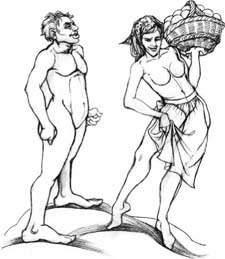
1-61A Egyptian Figures

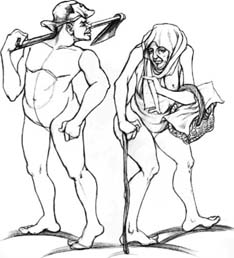
1-61B Egyptian Working-Class Figures


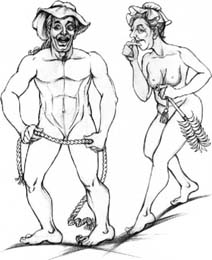
1-62B Greek and Roman Working-Class Figures

1-63A Medieval-Period Figures

1-63B Medieval-Period Working-Class Figures

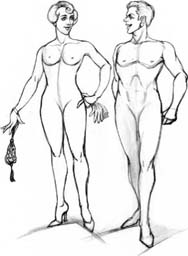
1-64B Renaissance-Period Working-Class Figures

1-65A Elizabethan-Period Figures

1-65B Elizabethan-Period Working-Class Figures


1-66B 18th-Century Working-Class Figures
1-67A 19th-Century Figures

1-67B 19th-Century Working-Class Figures

1-68B 20th-Century Working-Class Figures

1-69A 21st-Century Figures

1-69B 21st-Century Working-Class Figures

1-71 Design Sample—Figure Poses Change through Time and Fashion; Class Work

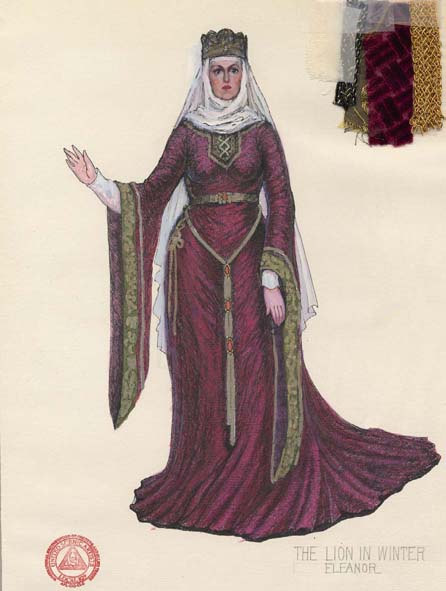
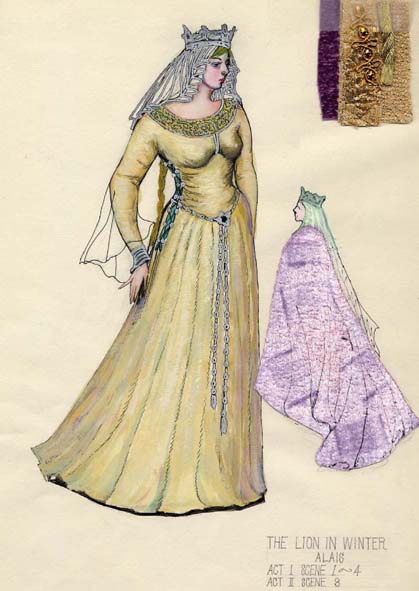
1-73 Design Sample—Figure Poses Change through Time and Fashion; The Lion in Winter


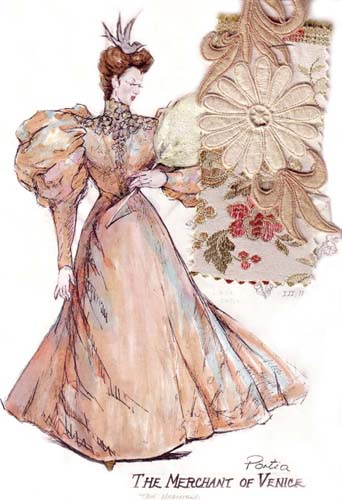
1-76 Design Sample—Figure Poses Change through Time and Fashion; The Merchant of Venice
GARMENTS AND TEXTURES IN RELATION TO THE BODY IN ACTION
The particular actions you decide for your figures should express the characters' personalities, and should communicate and enhance the meaning of the garments to their best advantage. Otherwise, the figure poses will lose their significant purpose. The purpose of defining body joints and contouring body silhouettes is to find what the figure is doing beneath the garment. The wrinkles and folds that appear on the garments are formed from beneath, where body joints are located.
Wrinkles and folds will bring a sense of reality to a body in action. When the body moves, the wrinkles and folds increase and become more visible, and they always follow the body action forms. It is not necessary to indicate all the detailed wrinkles and folds, since there are so many. You should draw just major ones to emphasize the actions. Wrinkles and folds are located where joints move (see Figure 1-77). We see them around armpits, elbow and knee bending areas, under busts, at waistlines, and around crotch areas. When body parts bend, they form folds at the inner bending area and produce pulling wrinkles as they radiate from the outer bending area. When the body is in less action, the garments show fewer folds and wrinkles. In this case, just draw a few strokes at the joint areas to define where the joints are for a more realistic impression.
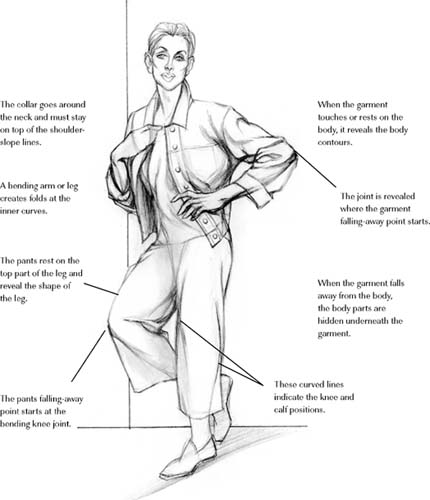
When drawing garments, be aware of several factors. Realize that collars, especially high ones, go around the neck even though the back of the collar is not visible; collars must stay on top of the shoulder-slope lines. Never make straight horizontal lines across the three-dimensional body form, because the human body consists of thick and thin cylinder shapes. For example, when you draw the cuffs of sleeves and pants, skirt hems, or clothing across the chest, waist, and hipline, you should follow the body contour lines to outline the garments. When a garment touches or rests on the body, it reveals the body contours or silhouettes, so show some stresses on the surface of the garment by developing visible wrinkles or folds (see Figure 1-78). When the garment falls away from the body, the body parts are hidden underneath the garment, but joints are revealed where the falling point starts. For example, when the arm stretches out to the side, the sleeve rests on the outer arm contour line while the under arm contour line is hidden inside the sleeve. Some wrinkles will appear on the top of the sleeve, revealing the shape of the arm. If the arm bends, the surface of the sleeve will reveal the elbow knob because the elbow will touch the sleeve. The elbow is where the material will fall away from the body, so it is the fall-away starting point. The inner angle of the elbow will show several folds on the sleeve at the bending area; the angle of the outer bending area may show pulling wrinkles radiating from the elbow. The same principle applies to bending legs and swinging hips. If the garment is a short-sleeved shirt, the shoulder will be the fall-away point. The hip will be the fall-away point for short skirts and shorts.
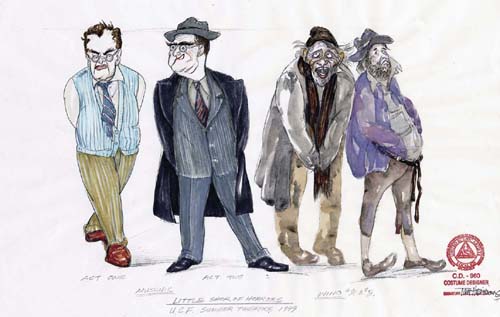
Use different types of lines to express and accent the textures of garments. The wrinkles and folds can be sharp, crisp strokes; soft, fine, flowing strokes; or thick and bold strokes. Crisp strokes express angular folds to give the garment a full silhouette. Soft, fine, flowing strokes reveal more body curves because the material usually clings to the body (see Figure 1-79). The strokes also show the texture of the material. Thick, bold strokes show bulkiness and bluntness, and they give a full and massive silhouette. Longer strokes present cleanliness and sharpness to show a tailored silhouette. Short/broken or multiple strokes create a textured, aged, ragged impression, and show a loose and shapeless silhouette (see Figure 1-80).
Figures 1-81 through 1-87 are design samples of garments with the body in action.

1-78 Garments Touching the Body

1-80 Short/Broken or Multiple Strokes


1-86 Design Sample of Garments with the Body in Action—Look Homeward, Angel

