
5
Character Costume Design Creation
As a costume designer, I want to portray my designs visually and structurally to bring my characters to life. The visual images convey information about the design concept, and the structural elements are the body's active forms and detailed garments. Both are tied together and cannot be parted. Characters in a play may be humans, animals, or spirits. The costume designer portrays them as main characters, supporting characters, or ensembles. The historical accuracy of the costumes, manners of the time period, and elements of style in presentation are crucial. How to develop different types of character figures for diverse types of plays with proper poses and facial expressions is a challenge and requires conscious effort to elegantly and correctly define the character's personalities and attitudes.
In character figure drawings, the designer is confronted by three components: the body, the facial expression, and the style and texture of the garment. A costume designer's task is to combine these three components.
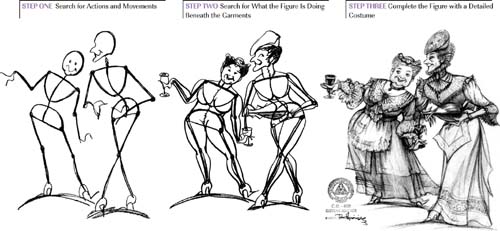
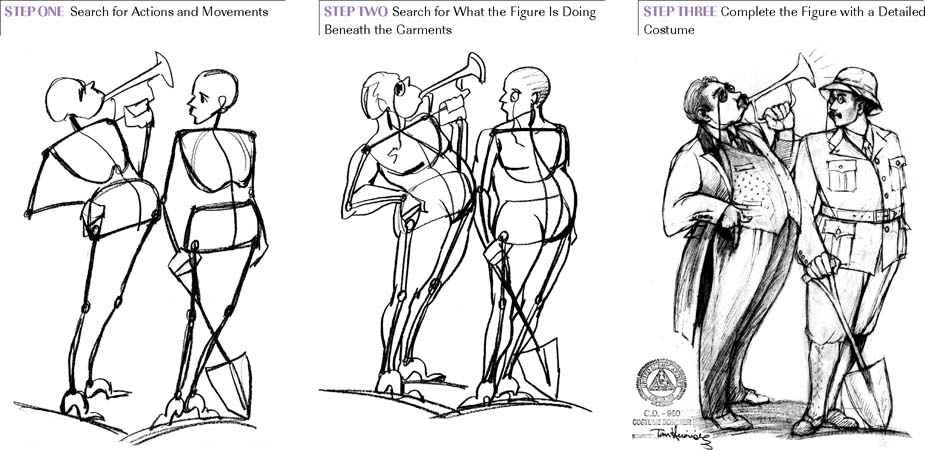
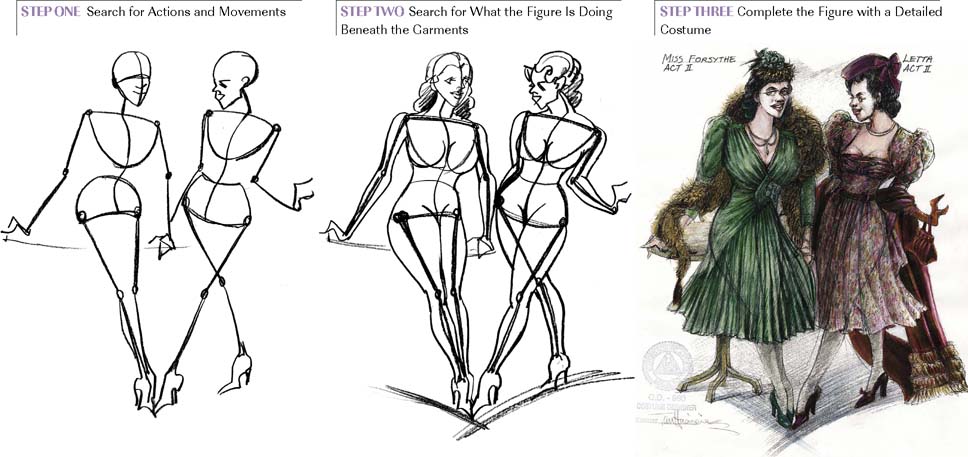
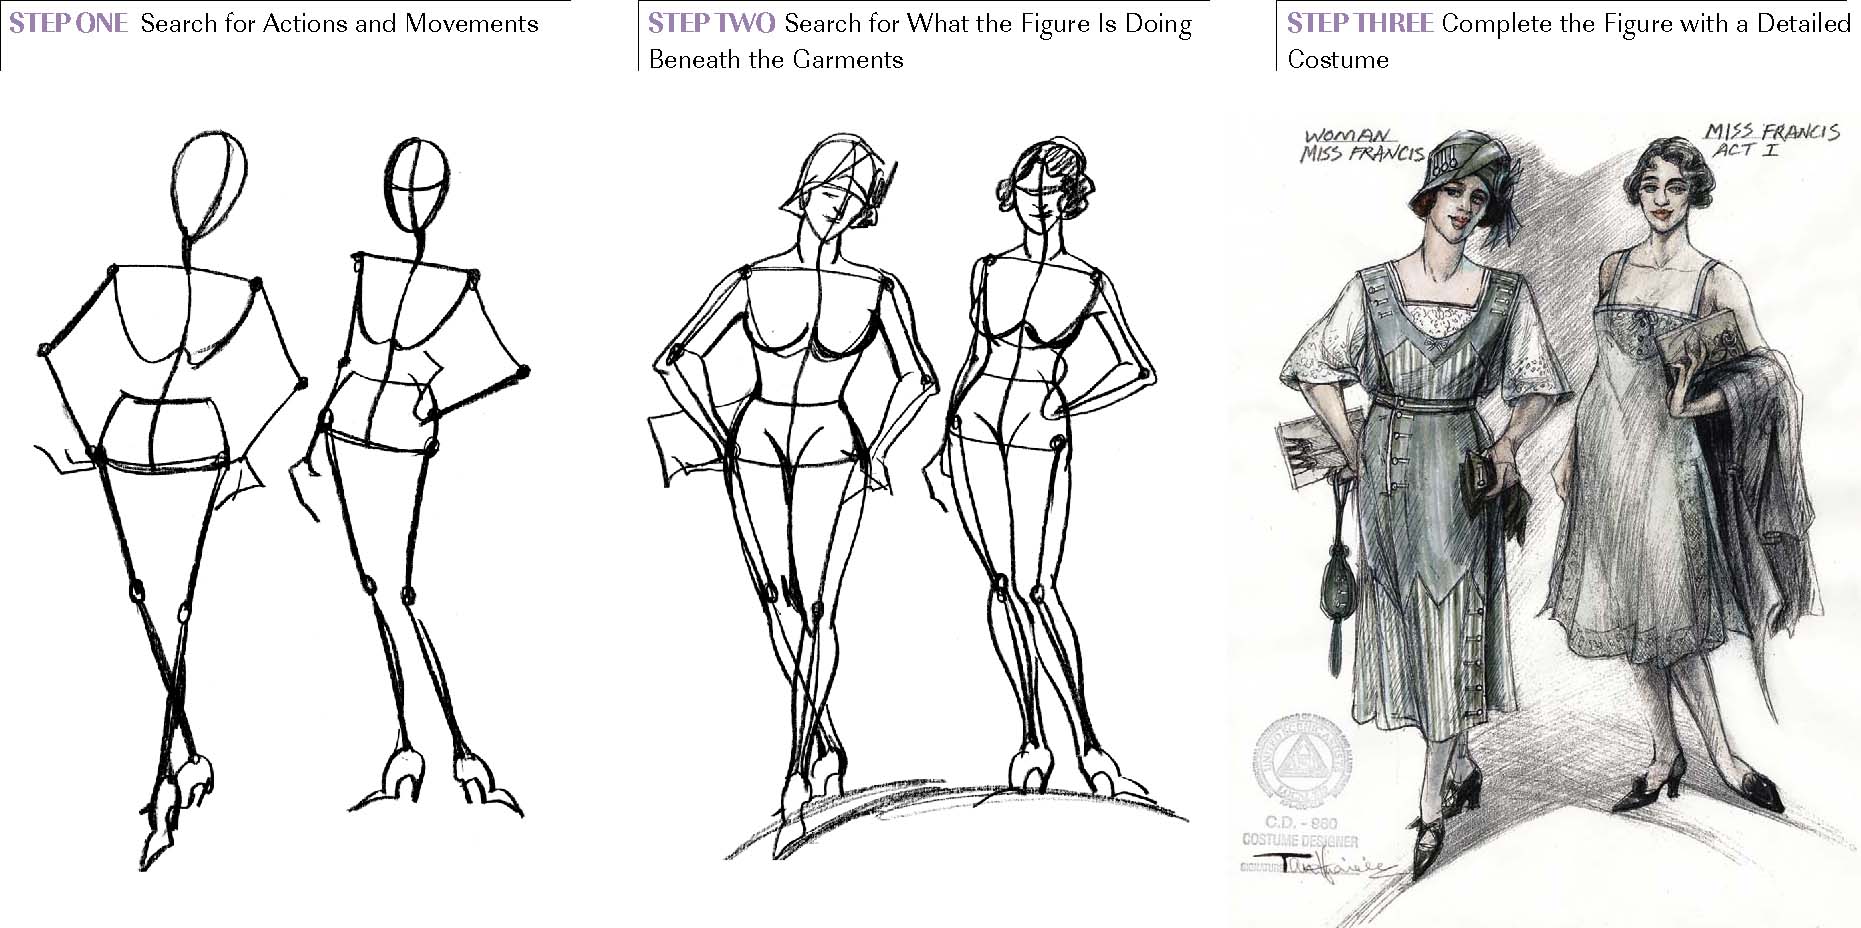
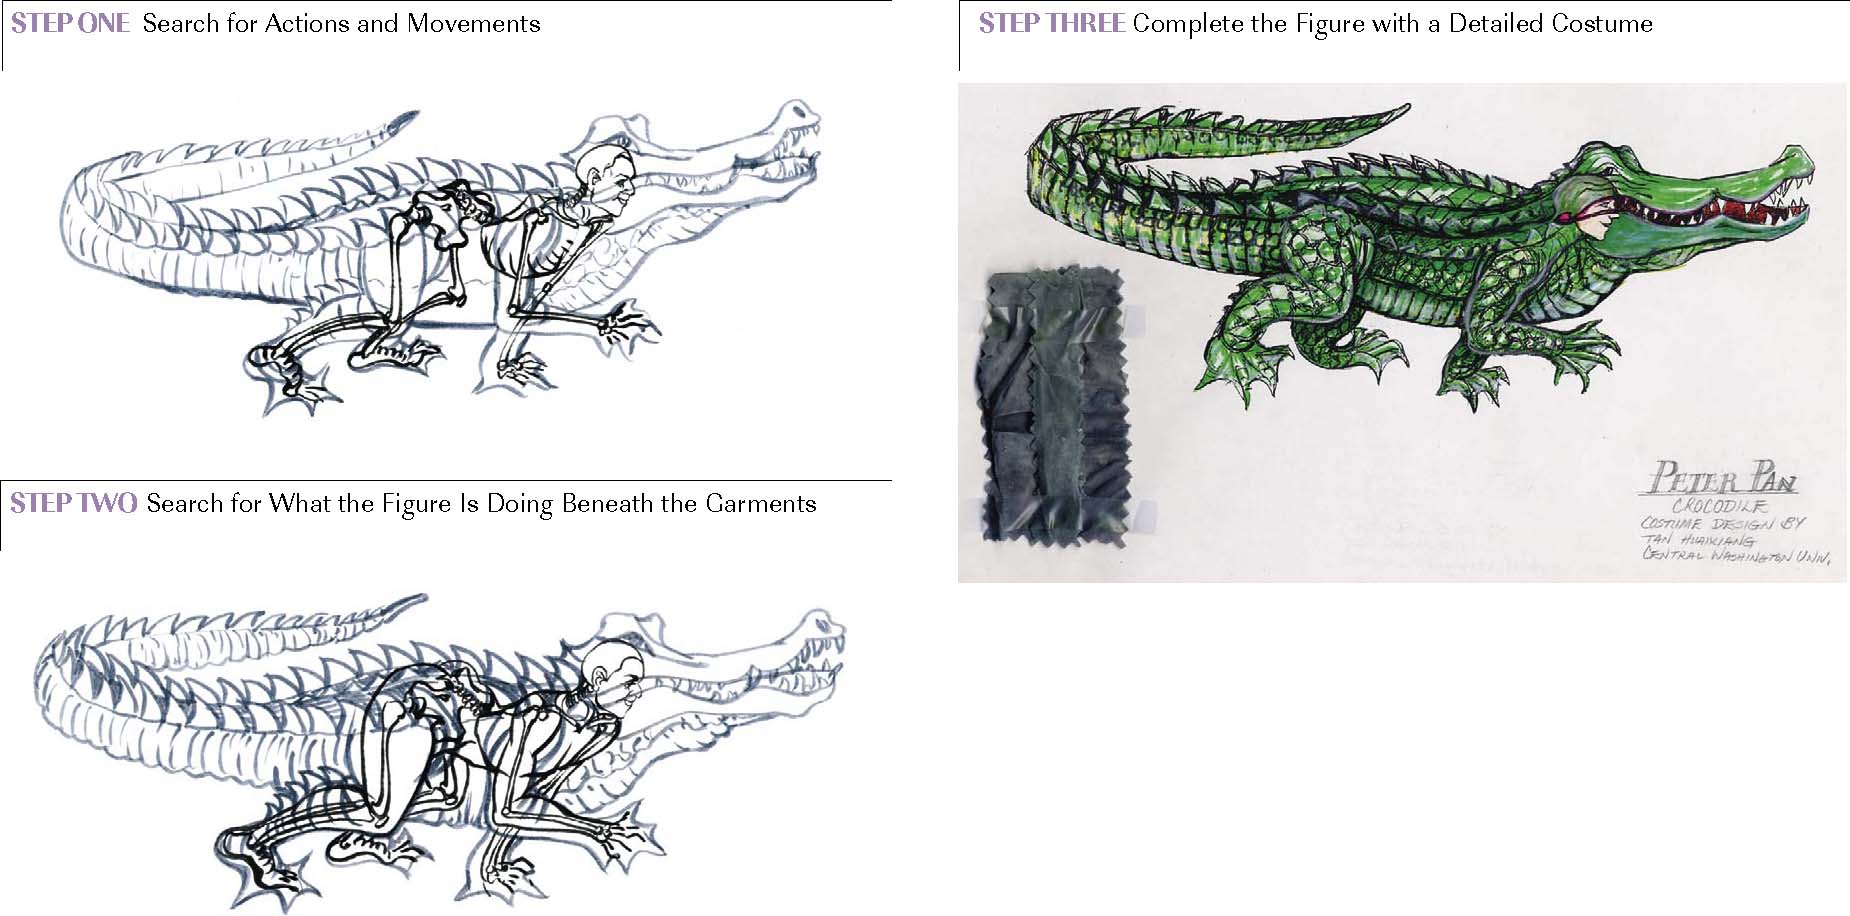
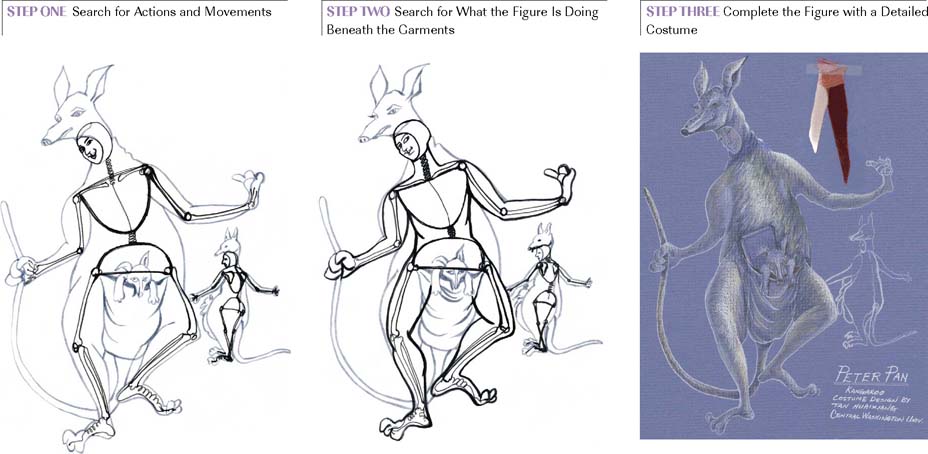
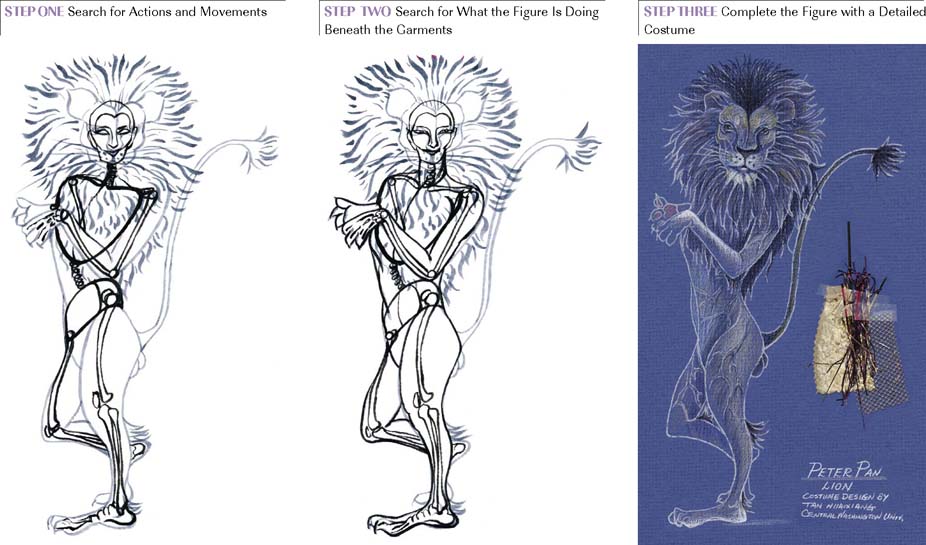
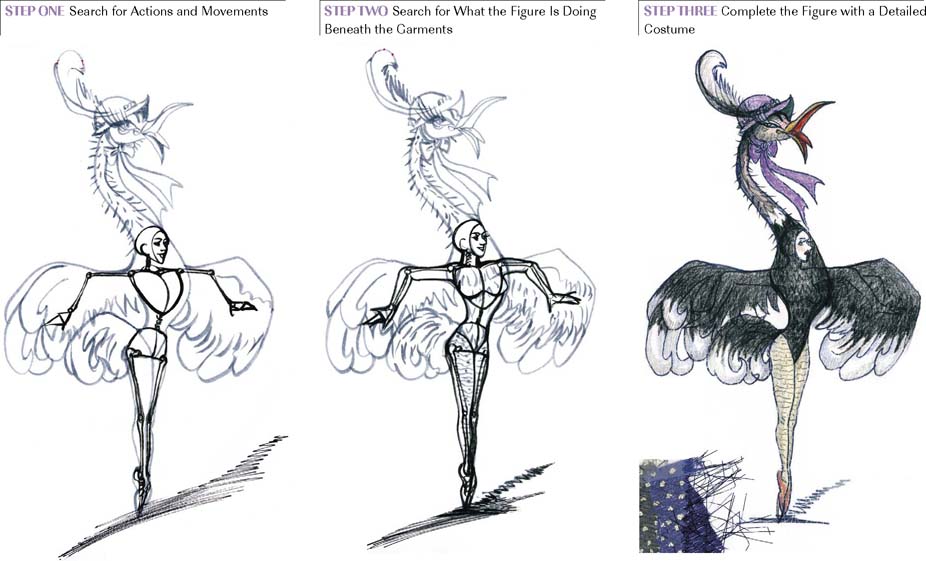
All the figures in this chapter show the three steps involved in creating character figures:
Step One: Search for actions and movements.
Step Two: Search for what the figure is doing beneath the garments.
Step Three: Complete the figure with a detailed costume.
WHAT IS THE BEST WAY TO BEGIN?
Movements and attitudes of characters differ according to the type of production: drama, musical, comedy, dance, children's play, and so on. A vivid character pose presents the spirit of the character and enhances the design concept. Before composing a figure pose, conduct an analysis of the play and character first. Without fully learning everything about the character's appearance and personality and the time period, it is hard to create a proper action or movement for the figure.
Development of a character figure drawing is based on the elements and theme of the play. After reading the play and analyzing the characters, I usually choose some important actions, lines, dialogue, music, or symbolic factors from the play to blend in with my character. The composition of the pose should express and carry out the actions and attitudes of the character from that play. For example, in the development of my costume design for the two sisters in Arsenic and Old Lace—Abby and Martha—the play title is a symbol. Old lace implies an elder, and arsenic is the chemical around which the conflict revolves. The plot of the play focuses on these two lovable yet destructive sisters who poison people with arsenic. In this farcical comedy play, the two old siblings bring laughter and joy to the audience through their absurd actions. The costume figure poses should support and combine the play's theme and the actions and personalities of the characters. They should show the elderly bodies and faces. I composed the two sisters pouring arsenic as the gesture for both of them to indicate their main focus and action and the play's main theme. I consider this action a dramatic moment in the play, and the theme ties in with my illustrations. The sisters' facial features exhibit cartoon expressions rather than realistic expressions to show their comical actions in killing people with indifference and secrecy and without compassion.
Abby has a round and portly body, and Martha has a thin, bony, tall body. This contrast produces more humor. The lace trim on their costumes also emphasizes the title and theme of the play.
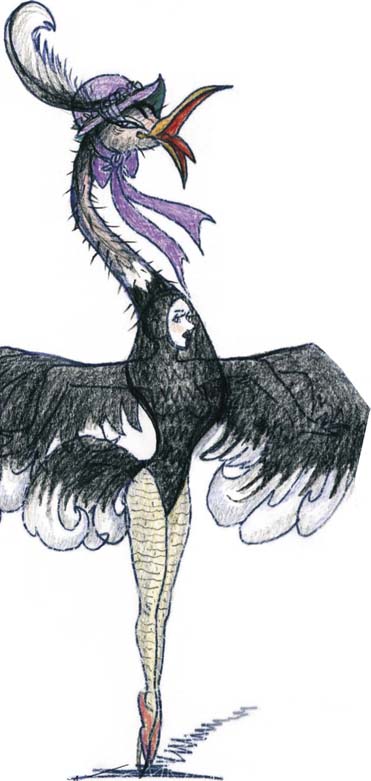
This is the basic way I develop particular figure gestures and poses for all my designs. When designing costumes for musicals or dance plays, I incorporate music and body rhythm to present the movement and flow of the body, and produce a realistic impression of how the costumes fit and work with the body. If the costume design is for an animal character and the actor's body is completely covered by the costume, I try to show the layers of the costume to indicate how the actor moves inside of the costume.
After reading the script and analyzing the characters, I usually make a rough-draft layout to arrange the costume-sequence changes from scene to scene and to find out how many figures I must create. Secondly, I categorize the characters based on their relationships to one another and decide whether to put them on the same page, if needed. You will notice that some of my costume designs in this book are grouped showing either one character in sequence costume changes or related characters together. Advantages to grouping figures on the same page are to clearly show costume-sequence changes between scenes and acts; to provide an easy way to notice contrasts in colors, textures, and styles of the costumes; and to save paper and portfolio storage space. The disadvantages include insufficient space when noting fabric swatches on the page, and that mistakes on one figure on the page will destroy whatever drawings were previously on that paper.
As mentioned before, three-quarter and extreme three-quarter views are used more often than other views. These views are popular choices for many costume designers because they reveal many angles of the body and display adequate representation for the costume. It is sometimes necessary to draw the back view if it is very helpful in displaying the garment style. An appropriate pose will show the garment to its best advantage. It will enhance the design concept and help the director, actors, and construction team visualize the costume as it will appear on stage.
My suggestions for drawing character figures are the following:
![]() Make every line meaningful.
Make every line meaningful.
![]() Visualize the figure in a head-to-toe concept on the page as you draw.
Visualize the figure in a head-to-toe concept on the page as you draw.
![]() Focus on proportion, balance, unity, and action first. Then emphasize the facial expressions.
Focus on proportion, balance, unity, and action first. Then emphasize the facial expressions.
![]() Check your sketch for proportion and balance, and make sure your character's movement looks comfortable by looking at it from the reverse side of the paper, through a mirror, or holding the paper upside down. These checking methods will help you see awkward lines and shapes that aren't as noticeable from the front of the paper. Try this, and it will surprise you.
Check your sketch for proportion and balance, and make sure your character's movement looks comfortable by looking at it from the reverse side of the paper, through a mirror, or holding the paper upside down. These checking methods will help you see awkward lines and shapes that aren't as noticeable from the front of the paper. Try this, and it will surprise you.
PROPORTION, ACTION, AND MOVEMENT
If my figure does not show the movement or emotions I want, I just keep altering and redrawing it over and over again until I am satisfied. My figures must talk to me and communicate a certain vibe, one that impressively portrays the character with a Wow! They must speak, act, and express moods and feelings. I see my characters in action; if you see your characters that way, you will force them to make noises, move, be lifelike, and have attitudes and personalities.
Drawing from head to toe is the principle for all figure drawings. Consider the basic bone structures at the beginning stages. Capture body movement and action, and correctly locate the weight-supporting foot/feet before developing facial expressions and hand gestures. Body movement should collaborate with perfect facial and hand expression as a whole to communicate a beautiful, suitable pose. Make sure all relationships between body parts work and support each other before continuing with details of the three major masses of the body (head, chest, and pelvis), the head and facial features, the head and neck, the head and shoulders, and chest and pelvis with the limbs. Before drawing any features on the head, make sure that the angle between the head, neck, and shoulders is properly showing the action and telling a story. Before starting the arms, make sure the angle between the chest and pelvis shows movement. Most of the time, the arms are drawn before the hands; however, an outlined hand frame can be drawn before the arm (especially bending arms). Then adjust the position of the arm and add individual fingers.
When creating movements or actions, define the action line or the body centerline. The body centerline runs from the pit of the neck to the crotch and down to the weight-supporting foot or feet. Correctly locating the weight-supporting foot or feet is the key to balancing the body (more details are mentioned in Chapter 1). Remember, the centerline is straight when the body is in an erect position and curved when the body is in action. The body centerline/action line shows the flow of the movement and the action.
Joints control all movements (see Chapter 1 for more details). Knowing the locations of the joints, how they work, and their limitations are ways to improve how you draw a figure in motion. Each joint is like a break-point for each part of the body. Use and manipulate these break-points to measure and adjust the proportions of the body and to compose body movements. Using abstract bone structure is the easiest way to start a design figure, especially when drawing from imagination. Keeping the figure well-balanced, well-proportioned, and well-structured with motions is enough to focus on at once during the beginning stages of a drawing. Simplified, abstract bone-structure lines and shapes help to establish proportion and movement at the beginning stage.
Use basic action lines to portray the attitude and movements of the character. This is the foundation for all figure drawings, as costume designers usually start sketches without any human models. The greatest benefit of abstract gestures is that they eliminate a lot of meandering lines and shapes that are messy and meaningless to the character.
Using simple lines and shapes is an essential and fast way to begin with easy control. With the stick figure, all the joints are exposed, so it is easier to manipulate body parts to achieve the desired pose or gesture. Creating a figure pose is like building a house or bridge—the foundation has to be solid. The stick figure will be the foundation and the frame of the body. Without a good foundation, you cannot continue building without failing.
In your design, consider the height of the figure, the direction it is facing, what the arms are doing, where the feet are located, how the feet are positioned, and the bending or twisting angles between the head and shoulders, the chest, pelvis, arms, and legs. These factors should be compared, contrasted, and combined while drawing to achieve the perfect pose most suitable for the character. The easiest way to begin is to establish correct proportions and preferred action. Keep the figure drawing head-to-toe principle in mind as you draw. Do not detail every spot on the figure before outlining the basic shape.
The first five steps in figure drawing follow. It is critical to perform these five steps at the beginning of figure drawing. This helps to quickly establish and prepare a solid and accurate foundation of proportion and movement and avoids getting into details too early. The steps are:
- Start with two marks at the top and bottom of the paper to determine how tall the figure is going to be.
- Quickly draw a middle mark in the center of the two marks to indicate the crotch line. This is the first step in controlling the proportions of the body (see Chapter 1 for more on proportion).
- Indicate the body centerline/action line with either a straight or curved line, according to the pose. An erect body possesses a straight action line, and a body in action possesses a curved one. Defining the action line captures the action and motion of the figure. The action line is considered a head-to-toe concept, establishing the sense of movement of the body.
- Outline the head mass and add two lines to indicate the shoulder and hip. These two lines cross the straight or curved body centerline. These two lines may be tilted or angled, depending on whether the movement is mild or extreme.
- Locate the weight-supporting leg/legs and foot/feet. The weight-supporting legs and foot/feet should be placed where the center of gravity line ends, for solid stabilization of the body. The center of gravity line starts from the pit of the neck and goes directly down to the ground (see Chapter 1 for more on the center of gravity line).
After you complete all five steps, draw the rest of the body parts. Outline the chest and pelvis. Remember that the head, chest, and pelvis are joined by the spine, move independently of each other, and move in opposite directions for balance. Don't forget the units: head and facial features, chest and arms, and pelvis and legs. Each unit works and moves as a whole. All the sketching outlines for establishing the figure pose should be light lines, and shapes should be used as guidelines. Now you are ready for the next step, contouring the body.
WHAT IS THE FIGURE DOING BENEATH THE GARMENTS?
Contouring a figure means following the basic skeleton frame (abstract or stick-bone structures are used as the basic skeleton frame in this book). All body movements are governed by the structure of the skeleton. A good foundation skeleton frames the shape of the surface and silhouette of the body. Contouring the figure is defining muscle curves and forms of the body. The characteristics of body type and movement affect how garments rest on the body. Step one in this chapter is the foundation for contouring the body. Natural curves and shapes of body muscles are what contour the figure. This creates a manner of roundness to the figure and automatically produces guidelines for drawing garments.
Comparison of the lines, shapes, and proportions of body parts is key for contouring. (Blocking in figures and contouring curved lines and shapes of the body were discussed in Chapter 1, and differences in body types were discussed in Chapter 3.) Comparing body-part proportions helps to contour and distinguish curves and shapes of the body. For example, some body-contour lines overlap, one in front of the other, when curved muscles form. Both outlines of the shoulder and forearm muscle overlap the biceps outline. Both contouring lines of the thighs and lower legs overlap the knee lines. The outer lines of the neck overlap the shoulder-slope lines. The cheekbone line overlaps the jawlines. By now, you should notice that the outlines of the prominent or greater parts of the body stay forward, and the nonprominent parts stay behind.
Contouring a figure runs from head to feet with the head-to-toe concept:
- When contouring the head, proportion it to the height of the body and set it at an angle with the shoulder line to create action and motion.
- When contouring facial features, line them up along the centerline of the face.
- The collarbone and the pit of the neck should always be well-defined in both males and females.
- When contouring shoulders, compare them to the hipline to capture the angles between the chest and pelvis, the direction the body is facing, and the hip-swinging motions.
- When contouring the upper arm, define the overlapping shapes of the arm.
- When contouring the female bust, cleavage is emphasized and contour lines should be smooth and fine. A man's chest is muscular and contoured with angular lines.
- When contouring legs, notice that the inner contour line is relatively straighter than the outer contour line, due to the curve of the thigh. Be aware of the level differences of curves on the lower leg. The point at which the outer calf is at its fullest curve is higher and slightly bigger than the fullest point on the inner curve.
- When contouring anklebones, keep the inner anklebone higher than the outer one.
- When contouring hands, compare them with the size of the face, because in most cases, both the hands and the face are exposed. Create an angle between the hand and wrist to add some motion and life to the hand.
- When contouring feet, check their proportions with the forearm. Create an angle between the feet for gracefulness and stability. Double-check the location of the feet with the center of gravity line. Make sure that the weight-supporting legs and foot/feet are placed where the center of gravity line ends, for stability.
Overall, use continuous contour lines for female bodies to show smooth body curves. Broken contour lines are often used on male bodies to emphasize a muscular silhouette. A heavier body possesses thicker fat tissue around the bone structure. Thin bodies have thin muscle tissue. Tall figures have smaller heads, and short figures may have relatively bigger heads and shorter arms and legs. Remember that bones do not stretch, but the muscles can be stretched. Only joints can bend, and bending joints show joint knobs. The muscles around joint areas form creases or wrinkled lines.
Most of the time, costume designers must create figures from their imagination. Having a live model may not be practical, due to the typically tight budgets in theatre. This situation demands that designers be clever and inventive. Concentrate mainly on primary principal muscles for body parts. Keep in mind that the shape of each body part is a three-dimensional form. The human body is an extremely complex entity with structures, movements, and functions that are related and interconnected. Creating realistically styled figure drawings is the aim and goal for designing costumes. However, using an expanding cartoon concept—extreme and simple—to develop character figures is another way of creating character drawings. The “extreme” is the exaggeration of energy, movements, and facial expressions. The “simple” is the stylized, significant, bold, flowing, and firm contour lines and shapes that define the actions and attitudes of the character. The combination of realistic and stylized impressions adds dramatic excitement and personality to the figures.
DETAILED COSTUMES
The silhouette of a garment usually follows the body contour lines (except over hoop skirts) and reflects body contours. The choice of pose is essential to making costumes flattering because it displays important design elements such as style and fabrication, depicts the character's attitude, and shows how the garments move over the body.
A well-stylized and impressive figure body is the foundation for drawing garments. The garments must integrate easily with the body.
Suggestions for defining garments are:
- Follow contour lines and shapes of the body when you contour garments, and treat the body as a cylindrical three-dimensional form.
- Use necessary wrinkles and folds on the garments to define body joints.
- Use the proper lines to define the texture of a garment and to capture the way a garment hangs.
To achieve those three objectives:
![]() Follow body contour lines and shapes to contour the garments. The openings of a jacket include the neckline, sleeve cuffs, and the bottom of the jacket. The openings of a shirt include the neckline, short/long sleeves, and the hemline. The openings of pants are the waist and cuffs. The openings of a skirt are the waist and hem. Defining these openings on the body affects the form of the body. An easy way to envision the openings is to visualize the shape of the openings as a circle; these circles fit over a cylindrical body form. They are not horizontal lines or square shapes. The same principle should be used for drawing the waistline, yoke of the garment, and stripes. Keep in mind that the human body doesn't have flat surfaces; it is a three-dimensional cylindrical form.
Follow body contour lines and shapes to contour the garments. The openings of a jacket include the neckline, sleeve cuffs, and the bottom of the jacket. The openings of a shirt include the neckline, short/long sleeves, and the hemline. The openings of pants are the waist and cuffs. The openings of a skirt are the waist and hem. Defining these openings on the body affects the form of the body. An easy way to envision the openings is to visualize the shape of the openings as a circle; these circles fit over a cylindrical body form. They are not horizontal lines or square shapes. The same principle should be used for drawing the waistline, yoke of the garment, and stripes. Keep in mind that the human body doesn't have flat surfaces; it is a three-dimensional cylindrical form.
![]() Use necessary wrinkles and folds on garments to define body joints. A garment conforms to the structure of the body. Many wrinkles and folds appear on garments when a figure is in action. Try to catch major actions that define movements by emphasizing the wrinkles and folds associated with the movement, in relation to where the body joints bend or twist.
Use necessary wrinkles and folds on garments to define body joints. A garment conforms to the structure of the body. Many wrinkles and folds appear on garments when a figure is in action. Try to catch major actions that define movements by emphasizing the wrinkles and folds associated with the movement, in relation to where the body joints bend or twist.
![]() The folds or wrinkles of the garments reveal the locations of the joints and their associated bones (includes shoulder blades, rib cage, and pelvis) and muscle structures. Common areas where stress wrinkles and folds can be seen are at the crotch, armpit, bust, waistline, and bends of the elbows and knees. Be aware that when the garment rests or touches the body, body forms and joints are revealed. When the garment falls away from the body, the body part is hidden (see Chapter 1 for more information on garments in relation to the body in action).
The folds or wrinkles of the garments reveal the locations of the joints and their associated bones (includes shoulder blades, rib cage, and pelvis) and muscle structures. Common areas where stress wrinkles and folds can be seen are at the crotch, armpit, bust, waistline, and bends of the elbows and knees. Be aware that when the garment rests or touches the body, body forms and joints are revealed. When the garment falls away from the body, the body part is hidden (see Chapter 1 for more information on garments in relation to the body in action).
![]() Use the proper lines to define garment textures and to capture the way a garment hangs or lays on the body. The style of a garment is determined by its silhouette. The silhouette can be slim and boxy, clinging and rigid-fitted, or tight. Fabrics can be light or dark, crisp or soft. Garment details can be large and exaggerated, dramatic, or small and subtle. Using effective lines in drawing these elements can produce extraordinary and exciting work. The necessary costume details will help the director and construction team visualize the actual garment.
Use the proper lines to define garment textures and to capture the way a garment hangs or lays on the body. The style of a garment is determined by its silhouette. The silhouette can be slim and boxy, clinging and rigid-fitted, or tight. Fabrics can be light or dark, crisp or soft. Garment details can be large and exaggerated, dramatic, or small and subtle. Using effective lines in drawing these elements can produce extraordinary and exciting work. The necessary costume details will help the director and construction team visualize the actual garment.
Outlining the Garment
![]() Collars. The collar encircles the neck and frames the face. Pay attention to the collar, because it is the focal point of the garment and shows the style of the garment. Most collars are symmetrically curved around the neck (some collars are asymmetrically cut) and balanced at both sides of the neck. A collar goes around the neck and follows the shape of the neck.
Collars. The collar encircles the neck and frames the face. Pay attention to the collar, because it is the focal point of the garment and shows the style of the garment. Most collars are symmetrically curved around the neck (some collars are asymmetrically cut) and balanced at both sides of the neck. A collar goes around the neck and follows the shape of the neck.
![]() Ties. The tie is another article of clothing that is of central focus. It is a small piece but plays a significant role in showing the personality and status of a character. It accents the design concept. When drawing the tie, show how it is tied or how it hangs if untied. Also show pattern and size—the more details, the better.
Ties. The tie is another article of clothing that is of central focus. It is a small piece but plays a significant role in showing the personality and status of a character. It accents the design concept. When drawing the tie, show how it is tied or how it hangs if untied. Also show pattern and size—the more details, the better.
![]() Sleeves. Sleeves are affected by shoulder treatments. If sleeves are made of soft material, they will reveal the natural shoulder contour line in a soft silhouette. If a garment has shoulder pads, the natural shoulder widens and becomes square-shaped, and the sleeves show a tailored silhouette. Of course, a leg-of-mutton sleeve will be a larger-scaled sleeve. If the arm is bent, wrinkles and folds should be emphasized at the elbow area.
Sleeves. Sleeves are affected by shoulder treatments. If sleeves are made of soft material, they will reveal the natural shoulder contour line in a soft silhouette. If a garment has shoulder pads, the natural shoulder widens and becomes square-shaped, and the sleeves show a tailored silhouette. Of course, a leg-of-mutton sleeve will be a larger-scaled sleeve. If the arm is bent, wrinkles and folds should be emphasized at the elbow area.
![]() Bodices. The bodices can be rigid, fitted, or loosely fitted. The neckline, bustline, and waistline should be defined. Use bold and strong, continuous lines to draw rigid, fitted, or tailored bodices. Use soft, curvy lines to draw the bust and necklines. The waistline is not a horizontal line but follows the body contour shapes.
Bodices. The bodices can be rigid, fitted, or loosely fitted. The neckline, bustline, and waistline should be defined. Use bold and strong, continuous lines to draw rigid, fitted, or tailored bodices. Use soft, curvy lines to draw the bust and necklines. The waistline is not a horizontal line but follows the body contour shapes.
![]() Pockets. Pockets are usually symmetrically sewn on both sides of a garment. They may have square or round corners, flaps or no flaps. They can be welted pockets or patched pockets, and can be topstitched or not. All these structural details affect the style of a garment. Make them clearly stated and well defined.
Pockets. Pockets are usually symmetrically sewn on both sides of a garment. They may have square or round corners, flaps or no flaps. They can be welted pockets or patched pockets, and can be topstitched or not. All these structural details affect the style of a garment. Make them clearly stated and well defined.
![]() Pants. When drawing a pair of dress pants, emphasize crease lines for a tailored look. When the leg bends, it creates wrinkles and folds at the knee area and reveals the shapes of the thigh and kneecap. When the leg is in a straight position, make two breaks on the crease line at the knee and ankle areas (some include the sides of the pants) to indicate joints for a more realistic look. Stress wrinkles at the crotch area occur with any type of pants. Clean and crisp lines give a tailored impression. Soft and smooth lines show the soft silhouette of pants and the smooth-textured material. Broken or short lines show a sagging, ragged look. Jeans are usually fitted to the body and therefore show more leg form and no crease lines, plus they show more wrinkles and folds than dress pants.
Pants. When drawing a pair of dress pants, emphasize crease lines for a tailored look. When the leg bends, it creates wrinkles and folds at the knee area and reveals the shapes of the thigh and kneecap. When the leg is in a straight position, make two breaks on the crease line at the knee and ankle areas (some include the sides of the pants) to indicate joints for a more realistic look. Stress wrinkles at the crotch area occur with any type of pants. Clean and crisp lines give a tailored impression. Soft and smooth lines show the soft silhouette of pants and the smooth-textured material. Broken or short lines show a sagging, ragged look. Jeans are usually fitted to the body and therefore show more leg form and no crease lines, plus they show more wrinkles and folds than dress pants.
![]() Skirts. Skirts are a wide or narrow circular tube. The bottom of the hem is never drawn straight across from one side to the other. Visually, the hemline is a big circular ring hung over the cylindrical body. The hemline is curved due to the perspective aspect. Some skirts may have asymmetrical hemlines. In these cases, hemlines may be treated differently, but keep in mind that the body is a cylindrical form.
Skirts. Skirts are a wide or narrow circular tube. The bottom of the hem is never drawn straight across from one side to the other. Visually, the hemline is a big circular ring hung over the cylindrical body. The hemline is curved due to the perspective aspect. Some skirts may have asymmetrical hemlines. In these cases, hemlines may be treated differently, but keep in mind that the body is a cylindrical form.
![]() Pleats. Pleats can be box or knife pleats and are normally regular in shape. Pleats often use crisp, sharp, and linear lines to give a tailored look. The gatherings usually possess a full and bulky silhouette. Draw gatherings with broken or irregular lines to show fullness and body. The hem outline of the pleated skirt will show angular, sharp corners; the hem outline of the gathered skirt will show curvy, waved lines.
Pleats. Pleats can be box or knife pleats and are normally regular in shape. Pleats often use crisp, sharp, and linear lines to give a tailored look. The gatherings usually possess a full and bulky silhouette. Draw gatherings with broken or irregular lines to show fullness and body. The hem outline of the pleated skirt will show angular, sharp corners; the hem outline of the gathered skirt will show curvy, waved lines.
![]() Ruffles. Ruffles can be straight or circular in cut. Straight ruffles tend to be crisper and fuller than circular ruffles, which show a soft, curved silhouette. When drawing ruffles, always establish the control line first. The top control line will be the stitching line, and the other line is the bottom of the ruffles. The bottom line is curved waves and uneven or irregular. Next, draw uneven gathered lines and connect them to the control line to create an illusion of fullness and shape.
Ruffles. Ruffles can be straight or circular in cut. Straight ruffles tend to be crisper and fuller than circular ruffles, which show a soft, curved silhouette. When drawing ruffles, always establish the control line first. The top control line will be the stitching line, and the other line is the bottom of the ruffles. The bottom line is curved waves and uneven or irregular. Next, draw uneven gathered lines and connect them to the control line to create an illusion of fullness and shape.
The Details
Design costumes in detail, combining emphasis on the face, hairstyle, and accessories. Express the total design concept by drawing in the positions of the pockets, size of lapels and buttons, bold or subtle trims, darts, seams, inserts, specific linings, underwear, and so forth. All details should be proportioned and balanced with the garment as a whole, and the body should display rhythm, harmony, and unity. The final costume should express an overall concept of attitude and flatter the characteristics of the role.
If adding accessories completes the design as a whole, adding props to the figure can enhance the action of the character. Props or accessories are alive and take an active part in the pose. They become part of the costume design, accent the body for a more dramatic effect, and they give the character his/her intended appearance.
- The theory is: The most important element in a drawing is the gesture, and that has to be established before proceeding with the details.
- The twist of the body and the weight-bearing foot give a definite spirit and create drawings that entertain.
- The easy way to think about it is this: Get the proportions right first!
- The tendency to start at one spot on the figure in detail and proceed to finish the drawing without the proportions drawn right usually results in failure.
- Here is a quote from artist Walter Stanchfield: “We search with the pen or pencil, ferreting to modify and enhance the gesture. We're not just copying arms and legs; we are trying to capture the spirit of the gesture, to create the information you seek is not the way a camera would record. You go beyond that to an almost psychic reading of the inner motivation. Draw verbs, not nouns.”
- Get the proportions right first!
- Adding props or accessories to the figure will help show the personality of the character. The props or accessories are alive and are taking an active part in the pose. They become part of the costume design. Use flowing, contrasting action lines to accent the body for a more dramatic effect, to give the “characteristic appearance.”
- Get the proportions right first!
- The most important element in a drawing is the gesture, and that has to be established before proceeding with the details.
- Look for simple, basic action lines of the figure that delineate the story, attitude, or action of the character.
- Block in the figures; contour the curved lines of the body.
- Get the proportions right first!
- Emphasize body language.
- The body shape and the movement qualities help to define the character.
- Give the figures a characteristic appearance.
- Block in the figures; contour the curved lines of the body.
- Get the proportions right first!
- Block in the figures; contour the curved lines of the body.
- The theory is: The most important element in a drawing is the gesture, and that has to be established before proceeding with the details.
- The body shape and the movement qualities help to define the character. Draw verbs, not nouns!
- Look for simple, basic action lines of the figure that delineate the attitude of the character.
- Block in the figures; contour the curved lines of the body.
- The most important element in a drawing is the gesture, and that has to be established before proceeding with the details.
- The twist of the body and the weight-bearing foot give a definite spirit and create drawings that entertain.
- Block in the figure; contour the curved lines of the body.
- The twist of the body and the weight-bearing foot give a definite spirit and create drawings that entertain.
- Contour the curved lines of the body.
- Give the figure a “characteristic appearance”.