
CHAPTER 11
Automated Host Security
One area often overlooked in today's modern DevSecOps world is the underlying host's operating system (OS). For enterprise-ready Cloud Native applications, it is often not enough to simply focus on the updating of the packages on a host. When it comes to securing your Linux servers, there are a surprising number of facets that it is possible to improve upon relative to a default installation.
It should go without saying that even with multiple layers of network protection (from Web Application Firewalls sifting through visitor traffic looking for malicious payloads to Content Devilvery Networks (CDNs) preventing denial-of-service attacks) on a containerized estate, ultimately it is the containers themselves that are actually serving the application. And, having walked through what a container actually is in Chapter 1, “What Is A Container?,” it should be clear that your containers are simply an extension of the underlying host's OS. As a result, without a robust security posture for your hosts, your containers and therefore your applications are at risk.
A popular approach to helping customize the security of your Linux builds is focusing on the correct flavor of CIS Benchmark for your Linux distribution of choice from the CIS site (www.cisecurity.org/cis-benchmarks). Running through the recommendations found in these benchmarks unquestionably helps you achieve a better security posture, and there is little doubt that because the benchmarks are industry-consensus based, they can be relied upon. Be warned, however, that many of the changes recommended will almost definitely cause outages to host-based services or even cause issues for the entire host if applied without fully understanding their implications. You should therefore methodically test any changes for a prolonged period of time before putting them into production. Some alterations to your operating system might only become a problem a few months after a server has gone live when a certain type of network packet is received by a tweaked kernel, for example.
There are some custom-created Ansible playbooks, written to follow CIS benchmarks exactly, that can be downloaded from GitHub such as this example for Red Hat Enterprise Linux 7: github.com/radsec/RHEL7-CIS. However, if you opt to apply such rules verbatim, be warned that you may experience unpredictable results. Using a one-size-fits-all playbook can cause outages and other issues that take a lot of time to diagnose. As such, this approach does not sit well with some admins when they know how onerous middle-of-the-night callouts can be.
Remember that there are various “levels” to meet within CIS benchmarks. They offer differing levels of comfort and compliance. For example, according to CIS (www.cisecurity.org/blog/everything-you-need-to-know-about-cis-hardened-images/), if you configured your hardening settings to meet Level 1, then you might be considered to have taken a “practical and prudent” approach that may not “inhibit the utility of the technology beyond acceptable means.” If, however, you followed Level 2 to the letter, you would have potentially added defense-in-depth improvements to your configuration, but you may “negatively inhibit the utility or performance of the technology” as a result.
For obvious reasons, be certain that you are only applying those rules that you are comfortable with and that you expect a security improvement from.
In the Cloud Native world, the long life of servers is usually not a familiar problem because in cloud environments we should aim to build cattle and not pets. In other words, we are looking to create disposable hosts that can be reproduced almost immediately, with predictable consistency, which are not individual, uniquely configured “pets” that we need to nurture. These pets are also known as snowflakes—they are unique and beautiful. To prevent such hosts from existing, we want to cycle our Linux servers frequently (aiming for the life of a host to be days or weeks, not years), and because we are automating their build, we should be able to programmatically make universal changes to remedy any issues across all hosts once we have identified the root cause of an issue.
In this chapter, we will look at some of the security details that you might focus on when hardening a machine image. We will automate using an Ansible playbook, narrowed down into tasks that you can construct a playbook with later, to ensure that our servers are hardened. We will also look at one-off hardening exercises using a concept called idempotency, a server's ability to be returned to precisely its previous or original state. The contents of the following Ansible tasks can be considered as a mixture of compliance, governance, and hardening.
How you structure the Ansible task content and to what extent you decide to follow the likes of the CIS Benchmarks largely depends on these three factors:
- How much value you put on your online services (remember that a compromise can be exceptionally costly not only in downtime but in brand reputation, too) should you not earn revenue directly from your online presence, for example.
- How much time you have to focus on improving the security posture of your Linux servers.
- Your appetite for risk (if you favor a weaker security posture over usability and/or making changes to the operating system that you do not fully understand or cannot sufficiently test).
Machine Images
A moment ago, we mentioned that the following examples are what Ansible calls tasks. By collecting a number of tasks, it is possible to create a “playbook,” which is how Ansible code is more commonly referred to. How many tasks you include in a playbook, which hosts they will run against, and what the content of the tasks is will depend entirely on your requirements. Let's take the dominant cloud provider AWS as our first example of how you might make use of an Ansible playbook and think about AWS EC2, the service that runs Linux servers on AWS, known as instances.
Using the suggestions within the benchmarks, we can create our Ansible playbook to run over an Amazon Machine Image (AMI) to create a machine image that is used throughout our estate. It might be based on Red Hat Enterprise Linux, CentOS, Debian, or Ubuntu, for example. The flavor of Linux is of no consequence (but the finer details of how you write your playbooks will be OS dependent as they are subtle differences that appear to be designed to trip you up!).
It is also of benefit to encrypt the Elastic Block Storage (EBS) volume that you attach to your instances in AWS EC2. There is a relatively imperceptible cost of latency when accessing your encrypted volumes thankfully. You can also encrypt then with any Key Management Service (KMS) key that you want to use within your AWS account. The result of doing so provides you with “data at rest” encryption, which means that intercepted images cannot be read without your KMS keys. As of May 2019, AWS now permits you to opt into encryption being enabled for all EBS volumes. There are some limitations with this feature as the AWS blog notes (aws.amazon.com/blogs/aws/new-opt-in-to-default-encryption-for-new-ebs-volumes/), such as certain EC2 instance types not being available to use with this feature.
Before opt-in EBS encryption, the workflow required to encrypt an AWS EBS volume for your Linux servers consisted of the following steps:
- Choose a trustworthy, vanilla Amazon Marketplace AMI and create an EC2 instance with it.
- Update all the Linux packages, reboot, and create a snapshot of that running instance to create a new AMI of your own.
- Copy the snapshot and encrypt it using a KMS key of your choice (ideally not the AWS account's default key for good practice but one of your own newly created keys with an expiration set).
- Create a new EBS volume from your encrypted snapshot.
There is more information in the AWS documentation (docs.aws.amazon.com/AWSEC2/latest/UserGuide/AMIEncryption.html) relating to the encryption of EBS volumes.
Idempotency
Rather than securing a machine image once that can be disseminated throughout Amazon Elastic Compute Cloud (Amazon EC2), another way to use the Ansible playbook in this chapter would be to repeatedly execute the playbook over running servers. This is where the term idempotency comes in.
Put simply, it means returning something to its original state, in every sense of the definition, after it has changed in some way. In the case of the Ansible playbooks, that means configuring them to suit our organization's requirements and then rerunning the playbooks every 20 or 30 minutes over the top of existing EC2 instances to destroy any changes to the server that a CI/CD pipeline has made, or, of course, equally an attacker. Clearly, changes occur accidentally or intentionally, and to maintain predictable infrastructure, some form of enforcement is sensible. This offers us a cattle-not-pet model but also, as has been observed, offers a nuanced contradiction at the same time.
Consider that by using idempotency, we are in some ways treating servers more like pets and tweaking them as they run. The obvious solution might be destroying servers and re-creating them, rather than tweaking them. Think, however, that idempotency is actually dealing with running configuration as opposed to static configuration. In other words, when a machine image becomes a server, it behaves differently than the static image file that created it. There are temporary files written to running memory and disk, and in addition various configuration files are populated with data such as an IP address or hostname that previously were just placeholder variables. For this reason, you can think of the benefits of idempotency applying to servers that run for a few weeks and aren't just destroyed within a day or two. After all, although we have disposable servers (worker nodes in the case of Kubernetes), we want their shelf life to meet reasonable expectations, and by doing so we also avoid stressing other components of our infrastructure unnecessarily.
As a result, you can consider the type of Ansible tasks that follow as being geared up to compliance. Our aim is that we want to be able to predict how running machines behave, not only as an afterthought but through enforcement.
The benefits of enforcement include predictable behavior, identically configured and better managed systems, easier patching, a more secure security posture, and predictable lifecycles for your servers. Any attacker trying to take a foothold might be kicked off a server if your security controls reset frequently via compliance enforcement. Therefore, advanced persistent threat (APT) attacks might also be mitigated to a degree, dependent on the quality of your security controls.
If you have not used Ansible much, then fret not because the structure of operating a playbook is straightforward and the syntax is relatively logical. Let's look at the directory structure that we will use to secure our servers. In Figure 11.1 you can see the output of the tree command, which shows how to structure the content.
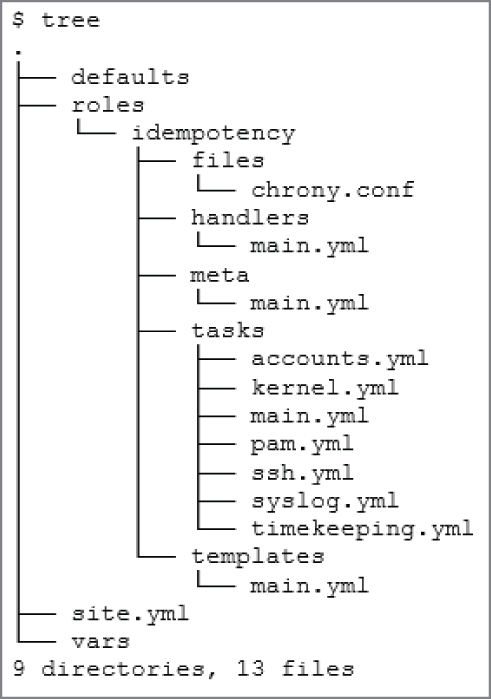
Figure 11.1: The Ansible directory structure, courtesy of the tree command
Within the structure shown in Figure 11.1, we can have multiple templated variables (using variables from the Jinja language) in our configuration files. Under the tasks/ directory, we can have a variety of executable tasks that will make changes to a remote or local server. As an example, we can fill up our network.yml file with a large number of tasks that we want to run through in order to harden our network stack.
For more clarity you should refer to the latest CIS Benchmark and methodically choose which areas you want to harden. There are varying levels of compliance in CIS, and achieving certain levels of compliance is time-consuming; additionally, it may be disruptive to the operation of your hosts. There is more on the CIS levels later in this chapter. As mentioned, before hardening a distribution, it is vitally important to consider your risk appetite when it comes to potentially invasive changes.
The default Linux kernel includes a number of tunable aspects that can be tweaked, but bear in mind that we do not just want to switch on or disable various features. Instead, we want to make sure these features are set precisely as we intend in order that our server configuration is entirely predictable.
Configuration management tools such as Ansible are best suited to this task. Although you can write similar processes in Bash or other languages, Ansible has the inherent functionality available to be able to test whether a setting is currently present or not, without having to write extra logic into your scripts.
A quiet word of warning about Pluggable Authentication Modules (PAMs), which sit with most Linux distributions as a key part of the login process: make sure you have an alternative way into your servers when testing this aspect. With PAM you can set up sophisticated rate limiting login options when passwords are incorrectly entered multiple times. You might also want to secure users in a more subtle way if you are concerned with locking users out of servers during an emergency; carefully consider which options suit your needs.
Probably the most common entry point for modern servers is via the SSH daemon. Hence, there is a good chance that you will benefit from hardening the default options it is shipped with on your Linux distribution. Generally, this is a relatively safe component to harden, but, as with PAM, make sure that you have sufficient out-of-band console access for testing, just in case.
Secure Shell Example
Let's look at an Ansible task relating to hardening your SSH daemon. We will choose the stoic OpenSSH, which runs as sshd, for our example because it's the most popular SSH daemon in use on Linux. Within our ssh.yaml file, you might expect to see changes such as the following:
- An enforced idle logout time being set.
- Prevent empty passwords from being accepted (via PAM).
- A legal warning banner to help with the prosecution of attackers for compliance.
- No remote superuser access to the daemon for the
rootuser. - Enforce one distinct user group of admins access to the server for granular user management.
- Increase the amount of logging that the daemon produces.
Inside our Ansible file, the contents might look like Listing 11.1.
Bundled into all of the task files, along with templated replacement configuration files, it is possible to make subtle changes, numbering into the hundreds, if you have enough time to get it right. There is obviously some ongoing tweaking required if software upgrades deprecate or introduce new features. For such tasks it would be wise to pay attention to the latest releases of CIS benchmarks, if that is what you used to select your changes.
Another area worth considering is your time-keeping and use of the Network Time Protocol (NTP). A question you might ask is: Does each of your workhorse servers need a fully fledged time server running 24/7? If the answer is “no,” then you are reducing the external attack surface, perhaps massively.
Over the years, there have been numerous software bugs found (with security holes) in the standard ntpd implementation due to the significant number of lines of code it contains.
A few years ago AWS improved its internal time service (aws.amazon.com/blogs/aws/keeping-time-with-amazon-time-sync-service) using a “a fleet of redundant satellite-connected and atomic clocks in each region” so that AWS resources could synchronize their clocks more efficiently and, most importantly, more accurately. Within AWS local networks you can access this service via the 169.254.169.123 IP address, if you set it as your upstream time server.
To avoid using the time-honored ntpd time server package, which we might consider a founding father of internet services, the highly recommended lightweight alternative is called chrony. In the timekeeping.yaml file, your Ansible tasks might look like those shown in Listing 11.2.
One caveat with chrony is that there are likely to be subtly differing package names and services between operating systems, so check these precisely if it causes frustration.
Inside the chrony.conf file, customized to our needs, few changes are required, and it would be possible to make some text pattern search-and-replace changes using Ansible rather than copy the whole file over if you wanted. A search and replace entry in Ansible might look like this one:
- name: Generic search and replace in Ansible, similar to sedreplace: path="{{path}}" regexp='^found-text' replace='target'
Inside chrony.conf, it is really only the bottom of the file that you might want to adjust, relative to the default file. Using the cmdport option is sensible, as you will see in a moment. Useful comments that you might want to add to the changes in the default Chrony file can be used to help remind you about what setting cmdport to zero achieves:
# Setting cmdport to zero means no network ports are accessible but# sources still sync# If you don't need to use chronyc at all or you need to run chronyc# only under the root# or chrony user (which can access chronyd through a Unix domain socket# since version 2.2),# you can disable the internet command sockets completely by adding# cmdport 0 to the configuration file.# Taken from here: https://chrony.tuxfamily.org/faq.html
As you can see, Chrony will sit dutifully running in the background, taking up little-to-no system resources, and keep track of your configured time servers. But with cmdport set to zero, it will not open up any network ports for attackers to attempt to compromise.
The other adjustment you might need to make within that file is to add your own preferred NTP servers to synchronize with. What follows are some example time servers that you could place within that file, written in the Chrony format:
pool clock.redhat.com iburstpool 1.debian.pool.ntp.org iburstpool 1.rhel.pool.ntp.org iburstpool 1.uk.pool.ntp.org iburst
In Chapter 4, “Forensic Logging,” we looked at creating the capability to monitor every single action of a running system using the kernel's built-in auditing tool, auditd. We can use Ansible to set this up for us. Listing 11.3 offers some of the Ansible syntax.
The content of Listing 11.3 is quite logical and easy to follow. Be aware that different operating systems may treat auditd slightly differently in terms of the file paths that are mentioned too.
Kernel Changes
Tweaking the kernel is quite possible, but make sure you know what you are affecting. The CIS benchmarks go to great lengths to describe why they recommend changes, using a problem-solution approach, but as with all things related to information technology, there are simply too many scenarios to cover within such a document, so it is quite possible to get caught out if you are not careful.
The Ansible code shown in Listing 11.4 offers some insight into what you might consider fine-tuning in the kernel.yaml file.
As with all the entries in the example tasks in this chapter, in Listing 11.4 there is a mixture of compliance and hardening. In many cases, the action of a task may not be needed as the system defaults to that setting, but if you followed the idempotency route and rewrote these changes using Ansible tasks repeatedly, then you would be certain that these settings were as you intended them to be should something or someone change them. The next example will confirm this more clearly. It pertains to the user account management files on a Linux server as we can see in Listing 11.5. As mentioned, PAM can be a more complex area but can certainly be set up securely using Ansible too.
As a final example, let's make sure that SElinux is set to “enforcing” mode on Red Hat Enterprise Linux. The venerable SElinux package is used in other Linux distributions but is not always installed by default. The snippet for Ansible could look something like Listing 11.6.
Summary
In this chapter, we learned about two ways of securing your underlying Linux servers and discussed why host security should never be an afterthought.
First, we looked at applying such a configuration once on a trusted machine image. Then, we considered the strategy of repeatedly applying rules to potentially help prevent attackers gain a foothold if a minor compromise was successful.
In addition to the suggested approaches, you can of course apply such running-configuration settings just once as the server goes live, as opposed to repeatedly, with the aim of achieving idempotency. There are lots of options and different use cases for how you might harden servers, and you should carefully consider the best operational approach for your needs. It is an extremely worthwhile task, adding further defense in depth to your security model, and with just some effort you can reap the rewards and become much more confident in your infrastructure's security posture as a whole.