
So far, we have simply written the generated code to the screen, but this is hardly the only option. Remember Roslyn is the compiler. When you have a generated SyntaxTree, you are already partway through compilation.
To facilitate taking the process from SyntaxTree to compiled assembly, we will start with a simple solution preloaded with the needed references and an empty project. Only code that you generate will be in this project.
Note
Supporting code like the interfaces used as parameters should be defined in a separate assembly, accessed by both the generated code and the code using the generated code.
Setting Up the Sample Solution
Start by creating a new solution. In this solution, you will need two projects, one we will call EmptyProject and the other called CommonProject. The EmptyProject will be just that, empty. This project should only contain code that is generated. The CommonProject will contain the various interfaces used by the generated code. This is the common project because it will be referenced by both the generated code in the empty project, as well as any project that will call the methods in the generated code. So, EmptyProject will need a reference to CommonProject, as shown in Figure 6-1.
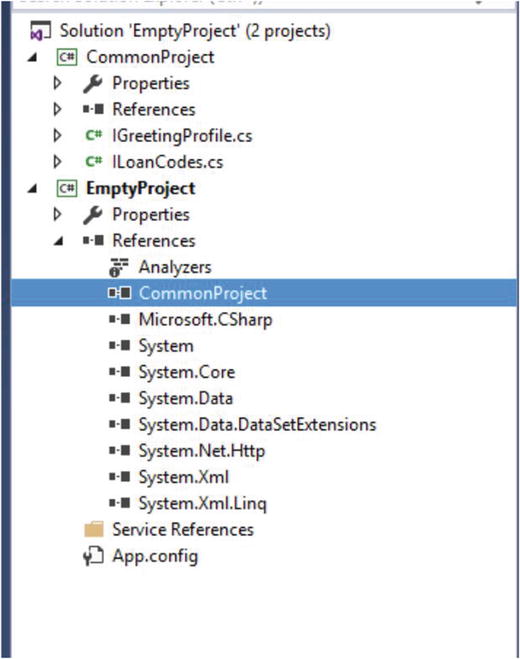
Figure 6-1. Project setup for compiling the generated code
Tip
We want to keep these two projects in a separate solution because the code that you will run will manipulate EmptyProject, which will complicate debugging if it is not in a separate solution.
The Basic Flow
The build process is straightforward:
Load the sample solution into a workspace.
Find the empty project in that solution.
Add the resulting SyntaxTree for the generated code to the project.
Set the compilation options.
Get the compilation.
Review any diagnostic messages.
Emit the compiled assembly.
Sounds simple enough, but there are some details to be worked through. Once you work through these details, this process can be used to compile any generated code.
You can express the flow for compiling generated code as shown in Listing 6-1.
Listing 6-1. Basic Flow for Compiling Generated Code
public static void CompileUnderwritingRules(){var work = MSBuildWorkspace.Create();var project = LoadEmptyProject(work);var generator = new UnderwritingRuleGenerator();var tree = generator.GenerateRules();var doc = SafeAddDocument(project, tree, "UnderwritingRules");if (!work.TryApplyChanges(doc.Project.Solution))Console.WriteLine("Failed to add the generated code to the project");project = doc.Project;project = AddCompilationOptions(project);var compiler = project.GetCompilationAsync().Result;if (ReviewDiagnosticMessages(compiler))compiler.Emit("UnderwritingRules.dll");}
Loading the EmptyProject
Let’s look at these individual pieces one at a time, starting with loading the empty project, as shown in Listing 6-2.
Listing 6-2. Loading the Empty Project
private static Project LoadEmptyProject( MSBuildWorkspace work){var solution = work.OpenSolutionAsync(PATH_TO_SOLUTION).Result;var project = solution.Projects.FirstOrDefault(p => p.Name == "EmptyProject");if (project == null)throw new Exception("Could not find the empty project");return project;}
This method will be standard across most code generation approaches. The only thing likely to change is the name of the project you want to add your code to—not everyone will want to call it EmptyProject—and the path to the solution where this project is located. You may want to even pull this value from a configuration file.
Note
The UnderwritingRuleGenerator with the GenerateRules method is the same object developed in Chapter 5. You will make some changes to it shortly.
Safely Add a New Document
SafeAddDocumenthas a couple of subtle nuances that you need to be aware of. We call it SafeAddDocument because it can safely handle the scenario in which the document being added is already in the project. Without this safety net in place, the same document will be added to the project, which will cause errors when you try to compile the project. Listing 6-3 shows the full implementation of SafeAddDocument.
Caution
You will not get an error when you add the document multiple times; you will get an error when you try to compile that can be confusing. It will also look strange when the same file is listed multiple times in Solution Explorer. You will get an error about the file being specified more than once by the Sources parameter.
Listing 6-3. Safely Adding a New Document to a Project
private static Document SafeAddDocument( Project project,SyntaxTree tree, string documentName){var targetDocument = project.Documents.FirstOrDefault(d => d.Name.StartsWith(documentName));if (targetDocument != null){project = project.RemoveDocument(targetDocument.Id);}var doc = project.AddDocument(documentName, tree.GetRoot().NormalizeWhitespace());return doc;}
You can start by searching for a document matching the name that you are looking for. If you find one, explicitly remove it. Then you can safely add the document. Once the document has been added to the project, you must use the workspace to apply the changes to the project. Remember that Roslyn objects are immutable.
Specifying Compilation Options
With Roslyn, you can specify every compiler option you want. Listing 6-4 shows how to add options to specify a release build for a DLL running on any CPU.
Listing 6-4. Adding the Compilation Options
private static Project AddCompilationOptions(Project project){var options = new CSharpCompilationOptions(OutputKind.DynamicallyLinkedLibrary).WithOptimizationLevel(OptimizationLevel.Release).WithPlatform(Platform.AnyCpu).WithModuleName("GeneratedCode");project = project.WithCompilationOptions(options);return project;}
This will cover most scenarios you are likely to encounter for generating business logic, but the Roslyn libraries are complete with support for every potential scenario. CSharpCompilationOptions has methods to support such obscure scenarios as:
Allowing unsafe code
Concurrent builds
Options for signing the assembly
Disabling overflow checks
Once the compiler options are specified, you are ready to get the compilation results. This is potentially a long running method so it is set up to be run asynchronously, but you don’t really have anything else to run while you are waiting on the method to finish. You can make it run synchronously by immediately accessing the Result property of the resulting task:
var compiler = project.GetCompilationAsync().Result;Note
You can convert an asynchronous process into a synchronous process by immediately accessing the Result property of the task that was returned. The get accessor for this property ensures that the task is complete before returning.
Reviewing the Diagnostic Messages
The result is a compilation that you can use to review any diagnostic messages as well as output the resulting assembly if there were no errors. Listing 6-5 shows a generalized process for reviewing error messages.
Listing 6-5. Reviewing the Diagnostic Messages from the Compiler
private static bool ReviewDiagnosticMessages(Compilation compiler){var results = compiler.GetDiagnostics();var returnValue = true;foreach (var item in results.Where(i => i.Severity == DiagnosticSeverity.Error)){returnValue = false;Console.WriteLine(item.GetMessage() + item.Location);}return returnValue;}
If there are no errors, you can successfully emit an assembly. If there are errors, it shows the diagnostic message as well as the details for the code that caused the problems.
Tip
Depending on your standards, you may want to be stricter and require that all warnings be resolved as well. If so, simply change the conditional in the Where clause that feeds the foreach.
Using the code generator from Chapter 5, you will get some error messages. This is not surprising. Code rarely compiles the first time (see Listing 6-6).
Listing 6-6. Original Compiler Error Messages
The type or namespace name 'ILoanCodes' could not be found (are you missing a using directive or an assembly reference?)SourceFile(UnderwritingRules[161..171))The type or namespace name 'ILoanCodes' could not be found (are you missing a using directive or an assembly reference?)SourceFile(UnderwritingRules[783..793))The type or namespace name 'ILoanCodes' could not be found (are you missing a using directive or an assembly reference?)SourceFile(UnderwritingRules[1337..1347))'int[]' does not contain a definition for 'Contains' and no extension method 'Contains' accepting a first argument of type 'int[]' could be found (are you missing a using directive or an assembly reference?)SourceFile(UnderwritingRules[268..276))'int[]' does not contain a definition for 'Contains' and no extension method 'Contains' accepting a first argument of type 'int[]' could be found (are you missing a using directive or an assembly reference?)SourceFile(UnderwritingRules[376..384))
Note
You can also see these same messages by manually adding the generated code to an existing project and explicitly compiling it. The compiler providing the error messages is the same regardless of whether you are using Visual Studio or Roslyn directly.
The full error messages have been truncated for brevity. It is common to see the same error message repeated dozens or hundreds of times. Don’t let this overwhelm you. In this case, there are only two problems. You need to add a couple of using statements to the beginning of the class declaration.
You can resolve these compiler errors by changing the GenerateRules method in UnderwritingRuleGenerator to reflect the changes shown in Listing 6-7.
Listing 6-7. Revised GenerateRules
public SyntaxTree GenerateRules(){var code = @"using CommonProject;using System.Linq;public class UnderwritingRules{}";var method = @"public bool Rule(ILoanCodes data){var target = new []{0};}";var syntaxTree = CSharpSyntaxTree.ParseText(code).GetRoot();var classDeclaration =syntaxTree.DescendantNodes().OfType<ClassDeclarationSyntax>().FirstOrDefault();var originalClass = classDeclaration;foreach (var rule in GetUnderwritingRules()){var methodSyntaxTree =CSharpSyntaxTree.ParseText(method).GetRoot();var underwritingRule = methodSyntaxTree.DescendantNodes().OfType<MethodDeclarationSyntax>().FirstOrDefault();underwritingRule = RenameRule(rule.RuleName, underwritingRule);underwritingRule = underwritingRule.WithLeadingTrivia(new SyntaxTrivia[] {SyntaxFactory.Comment("// " + rule.ShortDescription) });underwritingRule =underwritingRule.WithBody(ProcessLoanCodes(rule,underwritingRule.Body));var currentBlock = underwritingRule.Body;currentBlock = currentBlock.AddStatements(new StatementSyntax[]{ ReturnTrue() });underwritingRule = underwritingRule.WithBody(currentBlock);classDeclaration =classDeclaration.AddMembers(underwritingRule);}var newNode = syntaxTree.ReplaceNode(originalClass,classDeclaration);return newNode.SyntaxTree;}
Emitting an Assembly
With these code changes in place, you can run the compiler and this time you won’t see any error messages. With no error messages reported, you can emit the assembly from the compiler (see Listing 6-8).
Listing 6-8. Emitting an Assembly
if (ReviewDiagnosticMessages(compiler))compiler.Emit("UnderwritingRules.dll");
Emitting an assembly to a file is not the only option, but it will be the one that we will follow most often. You could also emit it to a stream, as shown in Listing 6-9.
Listing 6-9. Emitting to a Memory Stream
private static Assembly EmitMemoryStream(Compilation compiler){using (var ms = new MemoryStream()){compiler.Emit(ms);ms.Seek(0, SeekOrigin.Begin);return Assembly.Load(ms.ToArray());}}
This can be helpful if you plan to generate the assembly and immediately run it without preserving it to disk. This may be appropriate in some situations where the generated code is extremely volatile or when the overhead of tracking when to regenerate the assembly is cumbersome.
Tip
In most cases, you will regenerate the business logic on a set schedule and redeploy a new assembly as part of that schedule. That way, you don’t incur the overhead of regenerating the code outside of this schedule.
Summary
In this chapter, you saw a general approach for taking generated code and producing an assembly. This process is the same regardless of the type of business logic you are working with. The basic flow is the same and in individual scenarios, you will have minimal changes to accommodate your specific configuration.
Deployment is just a simple matter of copying the resulting assembly to where ever it is needed. Creating the assembly is the same regardless of the business logic and how it will be used, but using the assembly may very well depend on the business logic that was created. In Chapter 7, we turn our attention to using the assembly to call the business logic that we generated.