In this last chapter of the first part, we show examples, tricks, and hints to help you reach the moment of completion. Creative work often aims at being shown, exposed, performed, perceived, reflected, and celebrated. All this happens not only at a creative level but also on the creation itself. The creative process spins extra fast in these moments, and getting work from “80%” to “100%” takes a lot of energy and perseverance (some people might refer to the “80/20” law here1). Although we would really like to present an easy recipe for success, there is none (that we know of). Instead, we will show you things that hopefully make your life easier toward completing your work for production. We start by getting your creative work to production resolution.
5.1 Making things big for print
This book is all about digital art and creation. So far, we have shown you how to create with code, playing with the almost unlimited possibilities of the digital realm. Yet, this is not always where you journey ends or is meant to end. Sometimes we have to physicalize our work for production, for instance, when preparing for print.
When printing, rescaling, or rendering snapshots of your work, this section will show you ways of how to make your work big and solve potential problems.
If you have ever printed something in high quality, for instance, a really nice photo, you will have heard about DPI (“dots per inch”). DPI is a measure for how many printed dots fit into an inch and common values are 72, 150, 200, 300, and 600. For high-quality printing and viewing from a small distance, high DPI values are preferable.
Given a DPI value from your print shop, how to know the number of pixels you need? For this question, we also need to know how big your print will be. For example, if you want to print with 600 DPI on a 10cm by 10cm card, you will need to render a sketch of 2362 by 2362 pixels. This is far more than we have been rendering so far in this book. It’s time to blow it up!
Before we go into that, let’s use Processing to make these pixel calculations for us – it is work for a computer program after all:
With this short program, Processing can calculate the pixel values for you; just fill in your specific printing size and DPI.
5.1.1 High-resolution rendering
How to render in a very high resolution? Printing needs high resolutions and perhaps even specific colors. We will show you here how to make your work large and save rendered images, so they can be printed or produced. Before you start, make a copy of the current version of your work. You will need this “small-scale” version of the sketch later on, for instance, to compare or to find the right moment to take a snapshot. In the previous examples, we have explained how to calculate the pixel size you would need when printing your work at a specific DPI resolution. Let’s say, you want to render the following example sketch in the dimension 1000 by 1000 pixels:
The first thing that you might want to change (and you actually have to change) is the canvas size:
What happened? The canvas increased to 1000 by 1000 pixels, but the white square stayed at the same position and size as before. At this point, we have two different approaches that we can take: scaling the canvas or using size-dependent values. We don’t recommend changing all values manually, because this is a lot of work for a larger sketch and you would have to do it all again, once you need a rendering in a different pixel size.
Scaling the canvas. The first approach is to leave the number as is and to introduce scale before rendering the rectangle:
What we did to determine the scale factor is to divide the new pixel amount (1000) by the previous pixel amount (400). By using 400. (with the extra dot) instead of 400, we can ensure that the division is a floating point division. That means the division can result in a more precise number. For example, we get 1000/400 = 2 with integer division and 1000/400. = 2.5 with floating point division. The latter is a better input for scale. You might have noticed this extra dot earlier in the book examples. The extra dot turns a number into a floating point number, which turns the entire division into a floating point division. We get a higher-precision output which is a good thing for scaling and rendering. The closer the numbers are that we divide (or the larger the number that we divide by), the more precision we need. Note that you need to insert scale before drawing anything, so at the beginning of the draw function.
Size-dependent values . The second approach is to make all values in the sketch depend on the size of the canvas. In our example, this would result in the following changes to the original code:
After this change, you can modify the canvas size as much as you like, and the location and size of the white rectangle will be proportionate.
Now some bad news: it is not easy to mix these two approaches in a single sketch. Mixing might lead to problems that are hard to identify and fix. Therefore, it is best to stick to one approach and make this also very clear in a comment at the beginning of the sketch.
If you try both approaches, did you notice something? Check the border of the white rectangle again. They are thicker in the scaling example. The reason is that scaling influences all drawing operations, not just positioning and sizing. It influences in the same way border thickness (stroke weight) and other scalable properties of visual elements. So, if you use the scaling approach, make sure that you check and adjust the stroke weight and other visual properties before rendering overnight.
5.1.2 Migrating to scalable version
The preceding approaches are quite straightforward when starting out with a new creative work. What do we do if our work is there already in a complex sketch, and we need to scale it? You can pick any example from this book and follow a simple process depending on which approach you choose.
Scaling approach . Use the Processing “search and replace” function and replace “width” and “height” with their values as used in size. Add scale at the beginning of setup and draw (and also if you are drawing in a different function). Test and save this copy.
Size-dependent values . Go through the entire code and replace any value that is relevant for scaling (position, size, stroke weight, etc.) with an expression depending on width or height. We have done this in the earlier example which is copied here again.
Still not sure how to choose for an approach? Ok, here is a rule of thumb: if your code uses few transformations like translate, rotate, and scale, then the scaling approach is the right choice. If you use a lot of transformations, changing the values might be a lot of work, but ultimately less trouble than figuring out transformation problems. Finally, this decision also depends on how well your code is organized and how cleanly you have separated transformations with pushMatrix and popMatrix. This is also the reason why we suggested making copies of your code before: you can always try one approach and move the other approach if that seems to work out better. Even better, consider using a version control system such as “git” which allows you to track fine-grained changes in your code.
Search online for “git version control system”. You will find a lot of technical information, but there are also very easy graphical clients for git available. You might want to visit the sites of popular git-hosting companies such as https://github.com or https://gitlab.com.
When you run your code at a high resolution, please be aware that it might take longer to render and that the frame rate will go down, especially sketches with a lot of rendering operations or loops with many iterations will have this problem. Interaction with the mouse will be more difficult and sometimes become useless, because rendering a single large frame takes several to complete. For these problems, read on, there are ways to solve them.
5.1.3 Rendering snapshots of dynamic work
We have seen how we can get our work to the right resolution (pixel size). High resolutions might take far longer to render than our “working” sketches. That’s ok, because we let the sketches render and then take printable snapshots at the right moment.
What does it mean to “take a snapshot” in Processing? It means that Processing briefly stops the draw loop and saves the current canvas to a file. You can customize the name and type of image file and even ask Processing to count up in the file name, so the order of snapshots is preserved (image-0001.png, image-0002.png, image-0003.png, etc.). The following code shows how this works:
The saveFrame renders the canvas in the state when saveFrame is called, so putting it at the end of the draw function is a good choice. Before you can save frames, make sure that you have saved the sketch in a local folder where you can find it. All saved frames will go to this folder. Now, if you run this code, and wait for a while, you will see lots and lots of image files appearing in the sketch folder. Processing can save images in several formats, basically files ending in “.tif”, “.jpg”, or “.png” (according to the Processing reference). In short, “.tif” files are often uncompressed and quite big, and “.jpg” files use lossy compression, which means smaller files and lower quality (not ideal for printing). Finally, “.png” files use compression without reducing quality (our choice in all examples). You can find more information about these different formats on the Internet. Back to rendering files in Processing: if the file name includes hash marks (“#”), they will be replaced by the current value of frameCount when calling saveFrame. The result is a series of numbered images that show every single rendered frame. We can use this to pick the best frames (this is what we did for illustrating this book), or you can make an animated GIF to share on social media (if that’s your thing).
Unless we want a whole series of rendered frames, rendering and saving all frames is not exactly our goal. With this function, we can render any frame that we would like, so why not be more selective? Our next example shows how to trigger saving a single frame with a key press:
This is almost exactly the same code with the only change that we moved the frame saving part to the new keyPressed function. This sketch will not save every single frame, but instead wait for a key press (any key should work!) and only then save the current frame. This allows us to watch the frames go by and hit the keyboard to save the ones we like.
Frames change too fast? Use frameRate() in setup to adjust the frame rate. Try values of 2, 1, 0.5 or even 0.3.
This approach to selecting a frame works for sketches that still render in a reasonable time (less than a few seconds per frame). If we go really big, then a frame might take tens of seconds or longer to render. Unless we don’t mind a really long wait for the right moment, there is another approach: selecting the frame by its number.
We work in two steps. First, go back to the original (not scaled) copy of your sketch. In this original sketch, you need to insert the following function at the end.
Remember that we suggested that you make a copy before scaling stuff? Always make copies of your work, especially when you plan to make a bigger change.
This handler for key presses will simply print out the frameCount on the Processing console. We can now run the original sketch and hit a key when we see an interesting frame that we would like to render big later on. The printed frameCount values are printed on the console and need to be copied into a text editor or noted down for the second step. Run the sketch as long as you like and collect the frame numbers.
In the second step, we insert a short code snippet in the scaled version of our sketch, at the end of the draw function. Let’s say, we have done the first step and hit the keyboard for an interesting frame, which printed frameCount 108 on the console. Now we can use this number to render and save exactly this frame in the scaled version of the sketch.
When we run this code, the sketch will check the current frameCount after drawing the frame contents, and if it equals “our” frame number 108, Processing will save the canvas to an image file “image-0108.png”. Now we should be ready to run this sketch in a long, very long rendering operation – possibly through the night – and receive a beautiful, large-scale rendered frame for breakfast. The optional extra line System.exit(0) will stop the running sketch after saving the frame. Might be helpful if you are rendering overnight, so your computer can go to sleep mode and you save the earth (a little bit).
This should be a working recipe for sketches that do not require user input. However, we have made avid use of the mouse in this book, so you might have created a sketch that uses mouse input to generate its most beautiful (or most interesting) frames. How to render these when you are sleeping? Let’s go back to what we said earlier in the previous chapter. Any kind of interaction and user input is data. Such data can be recorded and also simulated if necessary. That means we don’t need real-time input if we want to reproduce an interactive sketch. Imagine the following simple example:
This sketch renders 20 random dots per frame, but only left of the mouse position. Clearly, this sketch is highly dependent on the mouse input. How to reproduce a frame with a particular mouse position?
The first step is again to obtain the precise position. We add a simple function to the sketch to record the current mouse position when we click the mouse.
Similar to how we record the frameCount by pressing a key on the keyboard, a mouse click will record x and y position of the mouse. We can take this data and extend the sketch with the following line. For example, our desired horizontal mouse position is recorded as 180 on the Processing console. The following code will render the sketch with that mouse position (unless we move the mouse over the sketch window):
This works for the mouse position, but also other interactive input can be scripted or turned into variables that can then be scripted. We will talk about similar issues in the next section: “backstaging” a sketch with some sort of remote control.
5.2 A backstage for control
It is important that we can easily control different settings of our Processing sketches or that we can easily change values in various places when testing, presenting, and exhibiting our work in different contexts. Here we explain three useful tools for that: (1) using Processing’s Tweak mode, (2) centralizing control with variables, and (3) using keyboard as a backstage.
From the first chapter on, we suggested that you prototype directly in code and try out new ideas and then immediately run the code. This helps you get into the Processing environment and train your code writing and reading skills (also called “code literacy”). It will also make you more fluent in generally expressing your ideas through coding. We hope you have made some big steps so far!
When it comes to fine-tuning your creative work, this often means changing values in various places in the code – not so much working with the general structure or reshaping visual elements.
5.2.1 Tweak mode in Processing
The creators of Processing have probably found this a problem as well, and they introduced the “Tweak” mode in Processing from version 3. Tweak mode adds a layer of sliders and color selectors on top of the source code of your sketch and allows to change most values while the sketch is running. Sounds like magic! To give you a better idea, try the following code:
Before you can use the Tweak mode, you need to save this sketch on your computer. After that, you can select “Tweak” from the “Sketch” menu and run the sketch in Tweak mode. At first sight, everything seems normal, but then you will see small sliders on top of your source code. Move your mouse over one of these sliders and drag it left or right. Observe the changes in your running sketch. For example, try to center the circle on the canvas and to change its colors to a bright yellow or orange. With Processing’s Tweak mode, this should be done in a matter of seconds.
Interesting question here: is this also coding? We think it is, because the Tweak mode lets you program in a highly interactive way.
After you stop a sketch running in Tweak mode, Processing will ask you whether you would like to keep the changes that you made using the sliders and color controls. If you confirm, the new values will be copied into your code for later use. Processing’s Tweak mode works on variables, too. Let’s see what you can do with variables in the next part.
5.2.2 Centralizing control with variables
When changing small things in your code, you sometimes notice that for testing a specific effect or look or behavior, you always need to change several values at the same time. For example, to test how a certain color would look like on a shape in the context of other visual elements. We often have to adjust these other elements as well. Check this example:
Imagine that you look out of the window in your room right now. You see trees and wonder whether the earlier example sketch would perhaps look better in green. If you would want to make this change quickly, you would need to change a color value (because we are HSB mode, it would be the hue directly) in four different places. As it happens, you might forget one and have to go back after spotting the mistake. This is avoidable with a single variable mainColor that drives all color statements.
As we can see in the preceding changed code, we replace the concrete value 175 by the variable mainColor in four lines. In three cases, this is a simple replacement. In the line where the color is used in the random call, we have to add an expression mainColor + 25 to replace 200 as well. Now all colors in this sketch follow the mainColor and can be adjusted with a single change at the top of the draw function. Try this also in Tweak mode.
5.2.3 “Backstaging” with the keyboard
We have seen that we can link values in our code to sliders and control using the Tweak mode. This mode is great for exploring and experimenting with visual elements. Perhaps, we also need some control during showtime, as we want to switch to different scenarios or quickly reset the sketch without having to restart the program.
Let’s try the first one: how to switch between different visuals just using the keyboard?
This example shows a very simple approach for switching between five states: four colorful shapes for keys “1”, “2”, “3”, and “4” and a single default shape for any other key pressed. We don’t use a keyboard handler such as keyPressed. Instead, we simply compare the key variable to different characters on the keyboard. The final else part ensures that we show a default shape in case all comparisons fail (because you may have pressed the letter “s”) or no key is pressed at the moment. You can use any character your keyboard provides, but be especially careful with letters of the alphabet (“a”, “b”, “c”, etc.) because they exist in two versions: uppercase and lowercase. You would not imagine how many panicking students came to us minutes before an important demo just because their CAPS LOCK key had been pressed accidentally. Funny, right? Not in their situation.
Try changing the size of the rectangle at a key press. Using a variable, it is not so difficult; see earlier.
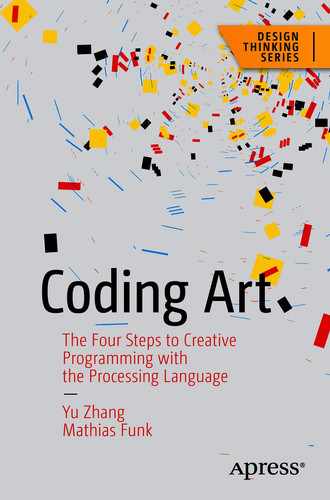
Example of how we can reset the canvas after drawing frame over frame
Try saving a specific frame of this sketch. If you save the same frame multiple times, do they look different? Why?
This sketch uses lots of randomness to generate a green-blue rectangle painting erratically on a black canvas. We can use the keyboard handler keyPressed to redraw the background and thereby clear the canvas.
In this section, we have seen how we can use some sort of backstaging techniques to control different aspects of our Processing sketches. We can use the Tweak mode in Processing to adjust values directly. We use variables as centralized control points to change values all over the Processing sketch, and we use the keyboard to switch and change the behavior of running sketches. We did not touch upon creating graphical user interface (GUI) elements for control on top of our sketch, which is possible with a Processing GUI library like ControlP5.2 And now, let’s make this all better by looking at how to improve stability and reliability of our code.
5.3 More stable and less risky code
We stay with the real-time aspects of creating and running Processing code in this section and give you a few pointers to make your code more stable and reliable under difficult production conditions (that differ from your own setup). While we will not solve or prescribe how to solve every problem that might occur in your journey, we will give you hints what you can do better.
5.3.1 The right things in the right place
Have you seen hiccups, delays in rendering, or that Processing slows down more and more and eventually crashes? All of these symptoms point to things being done at the wrong time (or in the wrong code location). Just take the following code:
Does anything strike your attention here? Although this sketch should run at an ok speed in your computer, it runs far slower than it should. How do we know? Well, we can just print the frame rate on the Processing console to check.
By adding the last line in the draw function, we get a running output of the current frame rate. Keep in mind that this sketch should run at 60 frames per second (fps). It could be easily half that frame rate on your computer. Why is that? If you look closer, you will find the first line of the draw function interesting. This line creates space in memory for a new texture of 1 million pixels (1000 times 1000). That sounds like a lot of work. Let’s move this line from draw to setup and see how the frame rate changes.
This changed sketch runs quite a bit faster as you can see from the frame rate. Apparently, just changing the code location of createGraphics makes a big difference. It is not all good yet, because the frame rate is still less than 60fps, but it is a step. If you would peek in the TaskManager (on Windows) or Activity Monitor (on macOS), you would see a huge difference between the memory consumption of the first and the second version.
How can we generalize this into a rule of thumb? Any Processing command starting with “create...” or “load...” should be considered a bit more intensive because they are about reserving memory or loading resources like images, fonts, or audio files from hard disk. Even in the age of very fast hard disks (SSDs), this is quite slow compared to everything else happening in Processing. So: Move these calls and anything that you do only once to prepare drawing to setup. Don’t run this kind of code in draw or, worse, in a for loop in draw. Again, anything that takes more time; only do it once (not 20, 60, or 1000 times). And double-check by looking at the frame rate (and memory consumption)!
Coming to another related source of potential problems. Did you notice that the change from the first to the second version with createGraphics in setup implies that we create a global variable for texture? What we did is we change the local variable texture in the first version to become a global variable texture in the second version.
Wait a minute, what are global and local variables anyway? This is a question of variable scope, that is, for which part of the code the variable is “visible.” Global variables are globally (= entire program) visible. That means they are always available and can be accessed in every single line of the program. This sounds good at first, but an accessible variable can also be changed at every single line of the code. You can imagine how complex this can get if you are not careful. Next to global variables, there are local variables. As you can guess, local variables are not globally accessible. They have their own scope, a part of the code that they are defined and used in. Usually, we don’t need to be too careful with local variables in functions or for loops. They are not visible outside their scope and therefore cannot cause harm. However, and that is the problem here, what happens if you give a local variable the same name as a global variable? The local variable claims the spot and takes over. When we want to change the global variable, only the local variable receives the change and the global one stays unchanged. This kind of problem happens often when we make changes to code, when we move variables from local to global and accidentally leave the local variable in place. Processing will probably not complain about this, but the results will be strange. So, repeating our earlier message about very carefully modifying the code structure: do this step by step and check afterward that all old artifacts are gone. This is another form of restructuring that we have seen earlier in the book. Handle with care.
5.3.2 Avoiding resource bloat
Even if you do things by the book (this book!) in terms of loading files at the right moment, Processing might still crash and return you a cryptic warning about memory. Sometimes content can be too big to fully load or to render smoothly. This is especially important for media files such as audio, videos, animated GIFs, and large image files. When Processing loads these files, it will often decompress them in memory (for faster access and rendering support). That means the file size on your hard disk might not be the final size in memory. Whenever you see Processing crash or abort while loading files, it is good to check their size and to try loading smaller files or fewer of them. This way you can spot the problematic file and then think of ways to fix it or design around it. For example, image files come in various resolutions, file formats, and compression variants. Try experimenting with different resolution or image format. Perhaps you don’t need full 24 bit color depth because your sketch will draw the image with a tint anyway? There is usually a solution (see also the last part of the book).
5.3.3 Code structure
The question “is my code structured well?” is hard to answer in general. Instead, we would like you to develop your own capabilities to judge this in the context of your creative work. Understandability is often mentioned as an important criterion of code quality; however, this is difficult to assess in the moment of writing the code or just after. The true test comes after a few weeks or months, when you read your code again and the concepts are not that present in your mind anymore. At this moment, you will see whether your code is understandable to yourself (still easier than to others).
A first hint toward writing good code is to use meaningfully named variables and functions in all sketches. Things like 'int a, b, c; float f;' should not happen. Yes, you planned to name everything properly later on. Got it, but no! This moment “later on” usually never happens, because the more code you write and the more you use the variables, the more the required efforts grow to fix them.3 Therefore, make choosing good names a habit. There are only a few cases where very short variables are commonly accepted, for instance, as counters i, j, k in for loops or array indexes in complex algorithms. And x, y, z for space coordinates is fine, too.
Other ways to look at code quality are about the length of functions and their complexity. Researchers have investigated whether long and complex functions negatively affect understanding, and – surprise! – they do. As a rule of thumb, try to split functions up if they cover more than half a screen page, or even ten lines. Still, give them a meaningful name. What about complexity? Mostly this refers to control structures like if ... else and loops such as for. The more they occur in a single function and the more levels they have, the harder it is for human readers to fully understand the control flow in the function. Again, the recommendation is to split things up into properly named functions that do one thing right and not five to six things somehow mixed up. There is also another view of how to divide functions: think about the smallest meaningful task that a function could perform in your work. That’s a good size for a function, and this ensures that you know exactly what this function does and how you can build onto it.
When you look the entire Processing sketch, use the same principles of splitting up into functions, when moving code to additional tabs in Processing. Creating a new tab is very simple, and you can cut/paste the code there and continue working. Give the tab a recognizable name, for instance, name according to functionality: “input_functions,” “data_processing,” or “rendering_output.” Alternatively, name them according to different components: if you use classes like “Particle” or “MemoryDot,” each should get its own tab. Then it will be easier to find your code back at a later moment.
By the way, whenever you ask for help, use “Auto Format” before. Otherwise, it’s just rude to the person you are asking for help. Their job is already hard enough: reading someone else’s code is not easy (especially without comments).
Code structure is also a visual structure. If you look closely at all code examples in this book, you see that we use a visual structure in the code examples that is very consistent. We indent lines in functions, if ... else structures, for loops, and classes. This allows us to quickly scan the code. Reading well-formatted code is much easier for us because our brains can make sense of the shapes and structure long before reading the characters. The best thing is that this code format comes for free in Processing. Just select “Auto Format” from the “Edit” menu or press Ctrl+T (Cmd+T on macOS). This is the programming equivalent to zero-calorie comfort food, really.
Our last hint might be a bit controversial (if you talk to programmers): don’t use classes to combine functions unless there is data that needs encapsulation as well. Treat classes (e.g., class Particle) as containers for data and data-specific functions. It might be tempting to structure your code with classes (especially if you have learned about classes in a programming course), but resist this temptation; your creative process can move faster and freer without a rigid structure that you planned out carefully. If at all, structure will grow with your work as you need it. Especially when thinking about class hierarchies (“class cat is part of class feline, class feline is part of class animal, class lion is part of class feline, etc.” ), stop there. Think of something beautiful and use a Processing tab instead. Almost anything can be better done with additional Processing tabs and properly named functions. Quality code is not about showing how smart you are.
5.3.4 Don’t reinvent the wheel
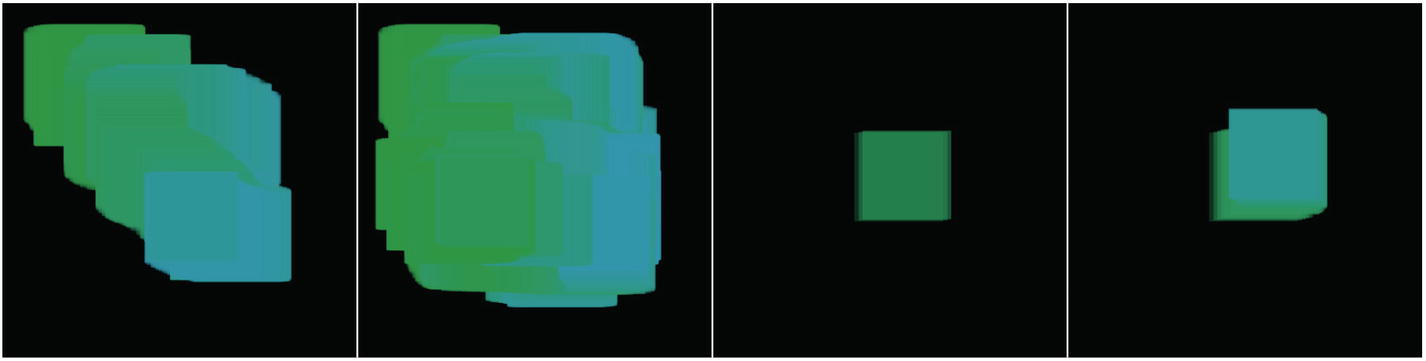
Example of animating a line parallel to a curve point in a loop
What is the lesson here? If you meet a challenge in Processing that seems overwhelmingly hard or at least difficult, and you think you might need some hours to get it sorted out, then think again.
Describe the problem in clear terms and search for them, either in the Processing reference or in a search engine online. Follow the leads, check what people have tried, and change your search terms toward more accurate ones. In the preceding example, the challenge might have been to identify the key term “tangent” if we were just thinking of “a line moving next to a curve.” Still, searching for “curve” will get us to curve in the Processing reference, from which curveTangent is linked or can be found close by.
When you think and describe your problem in new words, and then again, your mind will form new connections, which might even lead to the solution directly. Even if you cannot find the solution by yourself, you will have learned something valuable.
What are the benefits of using code from Processing directly or from a library? First of all, you save time, you don’t need to “reinvent the wheel.” You often get a better function that covers more cases and is more robust than what you would implement. And we don’t mean that you could not do it. We mean that you are trying to solve a very specific problem that might bring you to a very specific implementation of the function, which might not work anymore once your specific problem evolves to something else (it usually does!). Therefore, it is good to rely on a more general implementation of this functionality. Most likely this function has been built by someone who knows how to do it, and it has been reviewed and tested by others. Having more people involved makes a big difference in quality: they all have different problems which the function needs to match, so chances are that the function is quite stable and reliable by now. Finally, by looking at how others approached the problem with the function will teach you something about Processing, about terminology, and about the interface that the function represents. Processing functions and their structure follow a certain philosophy, and getting to know this way of thinking will help you indirectly with future problems.
5.4 Testing before deployment
Producing your work outside of your home and studio setup means preparing your work in advance for a somewhat unknown context. Your code might be run on a different computer, using a different screen or projector. In your planning, please reserve some time for this. Do not run the creative phase till the day of the big event. Stop the creative phase in time, to prepare for development. It is a matter of respect for your audience and for your own creative work. In this section, we will focus on testing and preparation for such a deployment.
5.4.1 Depending on dependencies
The first thing to be aware of is that Processing is one of your dependencies for deployment. What is a dependency really? It is a condition for your work to run, to be performed, or to be produced for an audience. Without this dependency, it will not work. In the case of Processing sketches, Processing itself is a dependency. You need to ensure that the computer available in the venue can run Processing, and not just that: it needs to be the same (or a later) version of Processing and also running with similar hardware (processor speed and memory, graphics card, and sound equipment) and software like the operating system. The more similar the venue’s system is to your own, the better the transition will work.
If you are using Processing libraries to achieve a part of the functionality, these libraries are also dependencies. Without the libraries, your code will not work or produce inferior output. Finally, your sketch might be broken into multiple tabs and resource files (usually in the “data” folder of the sketch folder). Make sure that all these files are transferred to the venue’s system by copying the entire sketch folder.
Processing actually supports in this transition by allowing to “export [an] application” (available from the “File” menu). This tool will create a self-contained bundle of all parts necessary to run your sketch. Self-contained means that all parts are packaged and no dependencies are lost. This is great to “freeze” your project in a state ready for showtime. Try that, but keep in mind that this “frozen” state does not allow you to tweak things in the venue anymore (but just in case, see next section). For that, always keep a source version with you.
5.4.2 Anticipating differences
The transition to a production context means anticipating potential problems beforehand: Your guest account has expired. The Internet may be slow. Your power supply may not work. The computer has no VGA video output anymore. No HDMI video output (yet). Windows decides to install new updates. Your battery is dead. The beamer’s RED color channel does not show. There are no loudspeakers available. And more. This is hard. Only experience (making lots of mistakes) will allow you to do this really well. And still problems will happen. Our advice is to overthink it, but not to worry. Brainstorm about what might go wrong when moving to a different computer or even a different system setup. Would a different screen be trouble? Think about not just different resolutions but also about aspect ratio (“sorry, we only have a square projection area ...”) or lighting conditions (“directly next to the window”).
We can prepare for these challenges, for instance, by using “backstaging” (see beginning of this chapter) to prepare for deployment. We can make changes for aspect ratio and screen resolution quick to solve by introducing scaling and variables (also for adjusting the color to a projection surface). We can even add interactive controls to our work, so we can quickly intervene if something goes wrong during setup or the performance.
When traveling with a computer and aiming to present work somewhere else, there are general hints. Bring sufficiently many USB sticks with a backup of your work. Also, bring your own laptop including charger and power socket adapters. Don’t forget spare cables and connectors, for instance, for connecting and converting HDMI and VGA (for visual output) or different plugs and cables for audio output including audio interfaces and amplifiers.
And yet, all tricks of trade come short to planning and communicating ahead. Communicate clearly with the other side what the expectations are and be aware that details matter. Ask about the room and the technical setup. Visit the space in person, if possible, and check it out for yourself.
Work it out like famous rock stars (well, their production crew) and write a rider. This is a document that details your physical setup on a stage or other venue, your equipment needs, and what kinds of (human) support or expertise you need to have available on site. Again, it will help if you brainstorm what might go wrong or what crazy mistakes could happen (so they don’t, with a bit of luck and good preparation). Finally, think about using similar equipment or a similar location as in the exhibition space to prepare. Every step that you take and every problem that you solve before moving to the exhibition space allow you to spend more time adjusting your work to the venue and fine-tuning the experience.
5.4.3 Preparing for unattended operation
When deploying your work in an exhibition setting, it might be installed there for some time (days, weeks, or even months). There is a chance that you will not be there 24/7 and operate your work. Instead, there are people who are volunteering or employed by the venue to maintain an installation. The best you can do is making it extremely easy for these people to restart or repair your installation in case something goes wrong. In the end, visitors who encounter a broken installation will in some way attribute it negatively to you, the creative, not the support people.
What also looks broken is a screen saver that switches on after one hour and shows “Bob’s computer” in a rotating font or, worse, a slide show of your personal photos from last summer. To avoid these kinds of slightly embarrassing events, switch off energy saving, a screen saver, Wi-Fi (if network access is not needed in your work), and a virus scanner. Move the computer (including mouse and keyboard, unless needed) out of the reach of visitors and secure it. You can test this before quite easily.
It helps when you prepare your work in such a way that it can be started and restarted within minutes and needs very few interactions to activate. Also think about how the installation needs to be shut down at the end of the day. What can be damaged if someone pulls the plug? Don’t think nobody will do that, eventually; there are always cleaners, security people, fire inspectors, and the occasional curious visitor (or their 6-year-old child). The second point is about writing a clear manual for how to restart the installation, such as “start computer, wait for ..., double-click the ..., wait for ..., check that ... is visible, then move mouse pointer out of the screen.” Provide contact details, so people can reach you in case nothing works. Hopefully, your phone stays silent and social media explodes (with positive reactions).
5.5 Moving to mobile
When we say “mobile,” we mean “on the Web” – in a form that mobile devices can access it. There are other ways to address mobile users, for instance, with an app. However, developing apps is really beyond this book. There is an Android plugin for Processing that might work for you, give it a try.
Back to “mobile” and “on the Web.” We include this part in the chapter not to introduce a whole new platform. Instead, the point is broadening your perspective on what it means to bring your work to different screens aligned with a diverse audience. Even installations in a location like a gallery, museum, or art center can benefit from shifting your work to the mobile Web, because it can be presented using tablets flat on the walls, instead of screens connected to computers connected to peripherals connected to a power socket. A tablet can present your work in different ways than a computer, because it allows for (multi-)touch input and a very high resolution. Tablets are available in many venues already. Another way to present your work is to ask local and remote visitors to open it on their personal smart phones or tablets. Exhibitions often provide QR codes that can be scanned with a smart phone camera, and the work opens in the mobile browser instantly.
In this section, we first explain the general structure of mobile Processing content, then dive into making the switch between Processing and p5.js, and finally explain more about the infrastructure necessary for hosting this content online.
5.5.1 Structure of mobile Processing content
When you run a sketch in Processing, Processing will provide your sketch with a runtime environment that gives your sketch access to all functionality of Processing and its libraries, the file system (e.g., the “data” folder), and also computer resources like a screen and audio equipment. When producing a Processing sketch for the (mobile) Web, all this is provided in some way by the local web browser of the visitor (or a tablet hanging on the wall of a gallery). That means your sketch needs to be modified such that it can run in a variety of web browsers (different people have different computers, right?). Also, these browsers have their own language and formats that need to be matched.
The simplest way of moving your work to the Web is by embedding it in a web page. A web page is written in HTML, a markup language that is based on tags like “<html>”, “<div>”, and “<a href="codingart.com">”. Inside the HTML structure, we can often find two other languages, one for styling which is called CSS (search online for more information) and JavaScript, which we will use in the following. Remember that we explained that Processing works with the Java language behind the scenes? P5.js, the web version of Processing, works with JavaScript in the background. As the name suggests, the two languages Java and JavaScript are quite similar. Let’s get started with a simple web page.
The preceding code will be our template for the next examples. This code is the bare minimum that you need to render p5.js code in a web browser. You enter this code in a text editor (not Processing!). You can use either the built-in text editor of your operating system, or download an editor like Sublime Text, Atom, or Visual Studio Code.
After entering the preceding code, save the file as “index.html” in a folder on your computer. Open this folder and double-click the file that you have just saved. On most computers, this should open a web browser and show a blank (still!) page. If nothing opens after double-clicking, try right-clicking the file to choose a browser. Browsers that support p5.js are, for example, Firefox, Chrome, Safari, and Opera.
Let’s try drawing something in p5.js. Use the previous template and enter the following code in the middle (you can replace “function setup ...” with the code). Then save and refresh the browser.
Once you move your mouse in the browser window, ellipses should be drawn. For comparison, this is the same sketch for Processing.
Pretty similar, right? Let’s move to the next part to see where the differences lie and how to move code from Processing to p5.js.
5.5.2 From Processing to p5.js
The basic question is how do you need to change the Processing code, so it can be run on the web with p5.js? We will touch upon four aspects in the following and refer to the browser environment by “Javascript” code. There is more complete information in the p5.js migration tutorial.4
Functions. Functions in Processing start with a data type (of what they return), or void. In JavaScript, we need to use the “function” keyword for that (see earlier).
Variables. Processing variables are declared using their data type such as int position, float rotationDegree, and boolean useSound. In JavaScript, variables are declared with the keyword “var” (or “let” in newest versions), no data type is necessary.
Mouse control. While we are using the mouse to control many sketches in Processing, the mobile environment often supports touch screens instead of a mouse. P5.js provides additional variables and functions to handle touch input and even multi-touch. In addition to mouseX and mouseY, you can use touchX and touchY as well as handlers for touch events.
Different function and variable names. In dealing with the browser environment, the p5.js developers had to implement some functions and global variables with different names. For example, the size function in Processing was renamed to “createCanvas” that works similarly. Another example is Processing’s mousePressed variable that is called “mouseIsPressed” in p5.js.
Again, it is probably a good idea to refer to the information in the p5.js migration tutorial.5
5.5.3 Fine-tuning the presentation
When you open such a sketch in your browser, you will notice that it might not cover the entire browser width and height. P5.js provides two variables “displayWidth” and “displayHeight” to scale the web canvas to the full size of the browser window.
There are further tweaks that you can apply to how the sketch is presented on desktop and mobile browsers. First, you should set the title of the sketch page to something recognizable as it will be displayed on tabs or in the header bar of the browser. The second change is about tuning the page display to the device. Mobile devices allow for switching off parts of the user interface elements or provide different scaling options than desktop browsers. The following example shows a good default setting for mobile experiences.
Finally, don’t forget that mobile devices can be rotated. P5.js gives you a specific handler for this purpose,6 which can be used to trigger a new layout or visual reset depending on your creative content.
5.5.4 How to spot errors?
In Processing, errors are reported in red text in the console, the black area underneath the code. You have probably seen this once or twice (or a lot if you have been experimenting with code). A web browser, in which you would run your sketch with p5.js, does not show its “black area” by default. Still, it is there, just called “web developer” or “web console” (on Firefox), “developer tools” (on Chrome), or “developer console” (on Safari). Use a search engine to find out how to activate them for your operating system, browser, and browser version. This is usually quite easy if you know where to click.
This hidden view shows what is going on behind the scenes of a web page. You open this view on any website and analyze it, change it, or even experiment with its inner workings. For our purposes, we need to switch to the “console” view and check for errors (red) and warnings (yellow). If we print out information from our sketch via print or console.log on a website, this information will show up in the console usually as an “info” (white/blue) message.
Although JavaScript, the language we are using for programming with P5.js, is quite permissive in what it allows, it is good practice to structure code carefully, end lines with a semicolon, and write comments. Do yourself the favor and don’t create code which embarrasses you in four months. Remember: if you can open the developer view, anyone can do that, also on your web page with your sketch. Your future self will thank you.
5.5.5 Deploying for mobile use
To deploy something online, you need a computer that is always running and connected, a server. You don’t need to run this computer yourself (although you could do that from your home). Often there are free resources that give you a tiny slice of a server, which is sufficient for our purpose here. Note that you don’t need to do this when programming for yourself. You only need a web server when you want your creation to be available for others around the clock.
Publishing on a web server is like accessing folder on a different computer and copying a few files to this folder. Once they have arrived, the server will literally “serve” them to any browser that requests them.
Given the minimal example for p5.js that we have used so far, you only need to upload a single file “index.html” to the web server. In case of larger projects with resource files and perhaps other libraries, you would need to make them available via the web server as well. As an example, we want to publish the minimal example on the web server behind “https://codingart-book.com” and upload the file “index.html” to the public folder “chapter5/firstexample”. Then our sketch will be available at “https://codingart-book.com/chapter5/firstexample”. We don’t need to add “index.html” behind “firstexample” because “index.html” is the default file that the web server will serve when accessing a folder. This all reads perhaps difficult (all these files and folders), wait until you try it out. It’s a piece of cake.
5.6 Summary
This chapter was about pushing your work from 80% to 100%. Sometimes, actually most of the time, moving from 80% to 100% may take even more work than going from 0% to 80%. Often an idea can be implemented and is running well on our computer, whereas when moving the work to another computer, or other devices (like projector or a mobile device), things can easily go wrong. Perhaps you didn’t consider such problems during the process of coding the idea. That’s fine and actually a good idea: let your creativity run free of constraints that only emerge during production. Once your project successfully reaches the production phase, some code might need to be rewritten according to the new conditions and contexts. But the concept is good and so is most of your existing code. Have confidence!
When we present our work in different contexts, this demands different levels of reliability than prototyping. We need to consider our idea, code, and production in a bigger picture and not as prototypes anymore. Compared to more traditional arts and design, we can expect more, a lot more, technical difficulties in creating with computation. Throughout the creation process, we need to find a balance between our ideas and the underlying technology. On the one hand, we guard and protect our fragile ideas and concepts; on the other hand, we cannot make the technology too complex and fragile. In this chapter, we explain the production step as a way to make your lives easier and to encourage boldness in taking creative steps. This step is the transition from nurturing to letting our creation blossom and shine.
Most examples, tricks, and hints contained in this chapter are the experiences and lessons learned from previous projects, workshops, and teaching Processing to students of all ages. This chapter covers by far not all topics we could think of, nor will the presented approaches be optimal in all cases. We believe that in design or art, there are no clear recipes or models. You need your own judgment and that comes with familiarity. That’s all, but how will these steps work in practice? Read the coming chapter about the example MOUNTROTHKO. And what if something will not work? Come and visit the last part of this book! Now we continue with an example.