
Phase 2
Maintaining and Documenting Computer Systems
A large part of your day-to-day duties as a PC tech will involve maintaining computer and server systems and documenting your work. In this Phase, you will build on the basic skills you learned in Phase 1, “Installing Hardware and Software.” You will discover how to leverage those elementary tasks and learn how to perform regular maintenance tasks on computers.
Among other tasks, you’ll learn how to identify a motherboard, how to clean and oil cooling fans, how to flash BIOS, and how to roll back device drivers. So take the book over to your lab computer and get ready for the next step.
Task 2.1: Identifying a Motherboard
On occasion, you may have to replace a computer’s motherboard. Most of the time the type of motherboard is easily identified by the documentation that came with the computer. Sometimes, though, you won’t be able to locate any relevant information about the motherboard. In this case, you can use one of a number of handy (and free) utilities that have the ability to extract that information from the system BIOS and other sources on the device.
Objective
This task covers objective 220:801:1.2.
Scenario
You have been assigned to replace the motherboard of an older server that has been providing print services to one of your company’s branch offices. You attempt to locate the computer’s documentation but it can’t be found. You open up the server’s case and examine the motherboard but can’t determine the make and model. You close the server, power it up, and log on. Then you open up a web browser to begin the process of identifying the motherboard.
Scope of Task
Duration
This task should take about 10 to 15 minutes, including download and installation time.
Setup
You’ll need a computer with an Internet connection. This task also requires that you download and install software that can query your computer and gather relevant information.
Caveat
This method isn’t practical if you are trying to identify the motherboard of a computer that is nonfunctional. Also, this task was performed on a Windows 7 Professional 64-bit computer but is applicable to other Windows PCs.
Procedure
This task will teach you the steps to take in identifying a motherboard.
Equipment Used
You won’t need any special equipment for this task, but you will have to download and install a piece of software on your computer to query the motherboard’s BIOS and other resources.
Details
This task will take you through the process of searching for a motherboard’s make and model.
Download, Install, and Run Belarc Advisor

The output of the Belarc Advisor provides a great deal of useful information about your computer, including details about the operating system, system model, processor, any hosted virtual machines present, memory modules, drive volumes, and so forth. In addition, it provides information on security benchmarks for the computer as well as assessing virus-protection software and how up to date Microsoft security updates are for the Windows computer.
Criteria for Completion
You will have successfully completed this assignment when you have located all of the information to identify your computer’s motherboard.
Task 2.2: Identifying a Power Supply
While the utility used in Task 2.1 has the ability to present a report on almost every system that makes up your PC, it can’t do everything. One device it does not identify is the power supply attached to the computer. As you might imagine, if you should ever need to replace the power supply on the PC, you would need to know the make and model required by your computer.
Objective
This task covers objective 220:801:1.8.
Scenario
You have recently replaced the motherboard on a computer that functions as a print server for one of your company’s branch offices. You receive another trouble ticket for the same device stating that the PC is subject to intermittent reboots. You investigate and determine that the power supply may be failing. You will still need to test the power supply to be sure, but you want to identify the proper replacement unit, should it become necessary.
You are unable to locate any documentation identifying the power supply, and there are no identifying markings in the unit itself. You will need to determine the correct power supply to use as a replacement based on the make and model of the computer.
Scope of Task
Duration
This task should take about 10 minutes.
Setup
All you’ll need is a computer with an Internet connection. You will only be identifying the correct power supply to be used for your computer.
Caveat
All you will need to know is the manufacturer, make, and model number of the computer that may require the new power supply. This task is as easy as knowing how to use a search engine.
Procedure
This task will teach you how to determine the correct power supply required by your computer.
Equipment Used
You will need no special equipment for this task.
Details
This task will take you through the process of searching for the correct power supply for a computer.
Locating the Correct Power Supply for Your PC

Criteria for Completion
You will have successfully completed this task when you have identified the power supply most suited to your computer and determined its pricing and availability.
Task 2.3: Performing a Quick Test and Replacing a Power Supply
Now that you have determined the correct model of power supply required for your computer, you will need to know how to verify that the power supply is actually failing and, if it is, how to replace it.
While you are reasonably convinced that the power supply of the computer is failing, you will need to test it to be sure, prior to purchasing and installing a replacement unit. Although you can perform an extensive test on the power supply using a multimeter, there is a quick test that will almost always determine if a power supply is bad, and it takes only a few minutes.
Objective
This task covers objectives 220:801:1.8 and 220:802:4.1.
Scenario
You previously received a trouble ticket (Task 2.2) stating that the computer used for print services at one of your company’s branch offices has been spontaneously rebooting. This is a likely symptom of a failing power supply. You have determined the type of power supply required if the unit needs replacing. You have a replacement unit in your department’s inventory, so you take the replacement unit, along with your tools, to the branch office to test and, if necessary, to replace the power supply.
Scope of Task
Duration
This task should take 30 minutes, which includes performing the quick test and replacing the power supply unit.
Setup
To test the power supply, all you’ll need is a paper clip or other short length of conductive metal. This is a good test if you don’t want to remove the power supply from the computer until you are sure it is bad. For this task, you probably won’t want to remove and replace your lab computer’s power supply, but you can do so for the full effect.
Caveat
When you insert the paper clip into the 20/24-pin motherboard connector from the power supply, do not touch the paper clip while you are applying electrical power to the power supply. It will impart a rather nasty shock if you do. Make sure you follow all instructions for this task carefully for your own safety and the safety of your computer.
While the process of removing and replacing a power supply isn’t complex, it can be cumbersome. Also, the power supply is the largest and heaviest single component in a computer’s case. Proceed slowly and carefully with all the steps in this task.
This task assumes you will be testing a power supply for an ATX motherboard, rather than an AT motherboard, which is an obsolete form factor not covered in the CompTIA A+ exams. The paper clip test works with all ATX power supplies.
Procedure
Equipment Used
You will need to have a paper clip, which you will unfold and bend into a “u” shape. You will also need to have the type or types of screwdrivers needed to remove the screws attaching the access panel to your PC’s case and to remove the attachment screws holding the power supply in place.
Details
This task shows you how to test a potentially failing power supply and then how to replace the power supply with a new unit.
Testing and Replacing a Power Supply
Testing a Power Supply with a Paper Clip
Replacing a Power Supply in a Computer

Criteria for Completion
You will have successfully completed this task when you have replaced the power-supply unit and verified that the computer boots and operates normally. If the original symptom was a periodically rebooting computer, you may have to remain near the computer for 30 minutes or so to make sure the computer runs consistently. Notify the staff at the branch office to monitor the computer after you leave so you can make sure that it continues to run normally.
Task 2.4: Searching for Windows Vista Drivers
Historically, Windows Vista has had a reputation for not supporting various devices. This was expected when it was first released, but after the first service pack was issued, it continued to be a problem. Although device support in Vista today isn’t the issue it was in the past, you may still have some difficulty in locating Vista-compatible drivers. This task will make that job a lot easier.
Objective
This task covers objective 220:802:1.2.
Scenario
You have received a trouble ticket stating that the HR manager is unable to print from her laser printer. You know that she has just had an older Windows Vista computer installed in her office. You receive instructions from your supervisor to search for and install the drivers that will allow her to print. The instructions include the URL www.radarsync.com/vista/. You proceed to the HR manager’s office to respond to her request.
Scope of Task
Duration
This task should take at most about 15 minutes, which includes searching for and downloading the drivers.
Setup
There’s no special setup for this task beyond Internet access and having a Windows Vista computer.
Caveat
If you are trying this task from a computer with an operating system other than Vista, you can select another operating system version, including 32-bit or 64-bit support, on the site. However, since you won’t need to actually install the drivers, this won’t pose a problem.
Procedure
This task will show you how to locate and download device drivers for Windows Vista computers.
Equipment Used
No special equipment is required.
Details
This task will show you the steps required to locate and download device drivers compatible with a Windows Vista computer.
Locating Device Drivers for a Windows Vista PC
Criteria for Completion
You will have successfully completed this task when you have located and downloaded the Vista-compatible drivers for the desired device.
Task 2.5: Listing All of the Drivers Installed on a Windows 7 PC
You may think that using the Device Manager is the only way to find out what drivers are installed on a Windows computer, but Windows XP, Windows Vista, and Windows 7 offer another solution. You can use the DriverQuery command-line utility to show you a comprehensive list.
Most people, except for actual Windows system administrators, don’t associate administering Windows with the command line. However, the command line is a powerful tool for performing a large number of helpful tasks. This task shows you only one small sample. If you go on to administer Windows systems, you will be required to learn a great deal more.
Objective
This task covers objective 220:802:1.2.
Scenario
You have recently installed drivers for a laser printer on the HR manager’s Windows 7 computer. The printer now works flawlessly, but the HR manager is concerned about what her new PC does and doesn’t support in terms of drivers. Your supervisor has directed you to generate a printable list of the drivers currently installed on her computer using the DriverQuery command-line utility. The other requirements for this assignment are that the list be verbose, showing the filename and the size of each driver, along with being “human-readable.” You proceed to the HR manager’s office to fulfill the request.
Scope of Task
Duration
This task should just take a few minutes.
Setup
There’s no special setup for this task. You can perform this task on Windows XP, Windows Vista, and Windows 7 computers.
Caveat
While the task is straightforward, as with many command-line tools, a number of arguments or switches are available to tailor the output of the command. To find out more, go to http://technet.microsoft.com/en-us/library/bb490896.aspx.
Procedure
This task will show you how to generate a printable list of drivers installed on a Windows Vista computer.
Equipment Used
No special equipment is required.
Details
This task will show you the steps required to use the command line to create a drivers list.
Listing All of the Drivers on a Windows Vista Computer
Criteria for Completion
You will have successfully completed this task when you have generated a text file containing a list of all the drivers installed on the Windows 7 computer.
Task 2.6: Cleaning Fans
Dust usually enters a computer case through the cooling and power-supply fans. These fans can also become dusty and eventually will start to spin more slowly, losing effectiveness. You must regularly clean the fans in order to make sure that cooling efficiency inside the computer case remains at optimal levels.
Objective
This task covers objective 220:801:1.6.
Scenario
As part of the process of maintaining the computers in your company, you have been assigned to clean and maintain the cooling fans. You are starting by cleaning the fans in your desktop computer in the IT department.
Scope of Task
Duration
This task should take about 10 minutes or so.
Setup
There is no special setup for this task.
Caveat
Due to the amount of dust that can accumulate inside a PC case, it is recommended that you do the task in an area where you don’t mind making a mess. Also, wear clothing that you don’t mind getting dirty. Before cleaning out the fans, you may want to use your can of compressed air to blow off all of the random dust that has collected inside the computer case.
Procedure
This task will show you how to clean the dust out of a computer’s cooling fan.
Equipment Used
You’ll need a can of compressed air, which can be purchased at any computer repair or supply store, and a small brush such as one used for painting watercolors or for cleaning delicate equipment. You can probably find such a brush at any art store or hardware outlet.
Details
This task will show you the steps necessary to clean the cooling fans in a computer.
Cleaning the Computer Fans Using Compressed Air and Brushes
Criteria for Completion
You will have successfully completed this task when the computer’s fans are clear of built-up dust.
Task 2.7: Oiling Fans
Along with cleaning fans, you occasionally have to oil them. Fans in a computer have lubrication around their bearings, but eventually that runs dry. When this happens, the noise from the fan becomes louder and quite annoying; this is a sign that the fan bearings are starting to wear out. If you let this go on, the fan will become slower and slower and eventually will stop spinning altogether. That usually means disaster for your power supply and CPU.
Objective
This task covers objective 220:801:1.6.
Scenario
As part of your regular maintenance duties, you have been assigned to periodically oil the fans in the company’s computers. Right now, you are about to perform this task on your own PC in the IT department.
Scope of Task
Duration
This task should take about 15 or 20 minutes.
Setup
There is no special setup for this task.
Caveat
Although you can use this procedure to oil all the fans in your computer, this task will focus on oiling the bearing in the power-supply fan. Be careful not to use too much oil.
Procedure
This task will teach you how to oil the bearings of fans in a computer.
Equipment Used
You’ll need a small can of oil and a screwdriver. Either three-in-one oil (the mineral-based version is better than the vegetable-based product) or sewing-machine oil is acceptable. You will need to keep a paper or cloth towel available to soak up excess oil.
Details
This task takes you through each of the steps necessary to oil the power supply fan bearings.
Oiling a Power-Supply Fan
Accessing the Fan Bearings
Verifying That the Fan Functions
Criteria for Completion
You will have successfully completed this task when you have oiled the bearings and verified that the fan is spinning normally.
Task 2.8: Defragging a Hard Drive
Information stored on hard drives using the Windows file systems FAT 32 and NTFS are prone to file fragmentation. As data is added to the drive, it is written sequentially on the drive platters; as information is accessed and edited, however, parts of the files are moved out of sequence. This means that the read/write heads in the drive must zip to and fro locating the different pieces of a single file. Defragmenting the drive improves read performance. This is a regular maintenance task. Desktops should be defragged once every couple of weeks to once a month, depending on how heavily they are used. Servers should be defragged on a weekly basis.
Objective
This task covers objective 220:802:1.7.
Scenario
You have been assigned to defragment the hard drive of a Windows XP machine being used as a print server for a small branch office. You are working after regular business hours, so the end users won’t need to access print services while you’re performing the defrag.
Scope of Task
Duration
Depending on the size of your hard drive, how much data is on board, how badly fragmented the data is, and how full the drive is, this process could take several hours.
Setup
No special setup is required for this task. The example uses Windows XP Professional. Defragging is slightly different on a Windows Vista or Windows 7 computer.
Caveat
This is a pretty straightforward task with very few “gotchas.” It just takes some time.
Procedure
This task shows you the steps to take in defragmenting a Windows XP computer.
Equipment Used
No equipment is required for this task.
Details
This task will take you through the steps to defragment a hard drive/disk running Windows XP.
Performing a Disk Defrag on a Windows Computer
Criteria for Completion
You will have successfully completed this task when the disk-defragmentation utility reports the disk has been defragmented.
Task 2.9: Scheduling Automatic Defragging in Windows 7
One of the things that always bugged me about the Windows XP defragging utility is that there wasn’t an option to schedule the tool to run automatically. After all, defragging is a task that just begs to be done at two in the morning when you’re asleep. I can’t believe that Microsoft waited until Windows Vista to implement this option. Fortunately, they finally got around to it and then continued to make this option available in Windows 7.
Objective
This task covers objective 220:802:1.7.
Scenario
You have received a trouble ticket directing you to report to the Support department for your company and schedule each of their Windows 7 computers to automatically run the defragmentation utility every Tuesday starting at 2 a.m. This specific day and time are required since the help desk staff’s regular hours are from 6 a.m. to 8 p.m. seven days a week and the other automatic tasks are scheduled to be performed on most of the other available days and times when the help desk is not open.
Scope of Task
Duration
This task should take only a few minutes.
Setup
No special setup is needed for this task, but you will need to have a computer running Windows 7 available. You can also perform this task on a Windows Vista computer.
Caveat
While the good news is that the Windows defragmenter utility has the ability to be scheduled, there are a few points of bad news. The first point isn’t bad news as such but could potentially pose a problem. By default, the Windows 7 defrag utility is enabled and scheduled to run every Wednesday, starting at 1 a.m. If you are unaware of this fact, you may have other automatic tasks set to run at the same time. It’s best to have all of your after-hours tasks running at different days and times to prevent any sort of conflict.
Another downside to the Windows 7 defragger is that it runs in the background, providing no visual representation of the defragmentation process. You are not presented with a graphic illustration of the state of the hard drive’s fragmentation before and after the utility runs.
Procedure
This task will instruct you on how to schedule the Windows 7 defragmentation tool to run automatically at a specific time and day of the week.
Equipment Used
No special equipment is needed to complete this task.
Details
This task will show you how to set up the Windows 7 defragger to run automatically on a regular schedule.
Scheduling the Windows Windows 7 Defragmentation Tool to Run Automatically
The defragmentation utility is now scheduled to start the tool every Tuesday at 2 a.m.
Criteria for Completion
You will have successfully completed this task when you have set the defragmentation tool to run each Tuesday at 2 a.m. and have closed the utility.
Task 2.10: Defragmenting a Single File
As you are likely aware, it can take quite some time to defragment an entire hard drive, depending on the extent of the drive’s file fragmentation and the system load on the computer. There may be times when you want to quickly optimize a single file that, due to heavy computer use, has been fragmented extensively across the hard drive. Both Windows Vista and Windows 7 offer the option of defragmenting an individual file on the computer’s hard drive, but not natively.
This scenario requires that you download and install a utility called Contig, which is free from Microsoft. The utility is ideal for defragging a large, often-used file such as a virtual machine image. While downloading and installing Contig is outside the scope of this task, the process is very easy to do. Go to http://technet.microsoft.com/en-us/sysinternals/bb897428.aspx and follow the instructions to install the tool on your Windows computer.
Objective
This task covers objective 220:802:1.7.
Scenario
You have been tasked with performing a defragmentation on a virtual machine in a file called vsrv01.vmx on a test machine in your IT department. The machine is running Windows 7 and has the Contig utility installed and available. You have been given the instructions for using Contig to complete your task. You are in the server room at the keyboard of the Windows 7 computer and are ready to begin.
Scope of Task
Duration
This task should take no more than a few minutes, depending on your degree of comfort in using the command-line utility and the size of the file you choose to defragment.
Setup
No special setup is needed for this task. You can perform this task on either Windows Vista or Windows 7. A Windows 7 machine was used for the purpose of this task.
Caveat
As previously mentioned, the Contig tool requires that you use the command line. One big downer is that you must run Contig from the folder where the Contig.exe file is located. You cannot open the command prompt, navigate to the location of the desired file, and then execute the contig command, even if you run the command prompt as administrator. If you do, you will get an error message stating that contig is not recognized as an internal or external command. However, you could put the file anywhere on the PATH such as C”WindowsSystem32 so that you could use the Contig tool anywhere.
Procedure
This task will tell you how to use the Contig utility to defrag a single file on a Windows 7 computer.
Equipment Used
No special equipment is required, but you will need to be working at a Windows Vista or Windows 7 computer that has Contig installed.
Details
This task will take you through the process of defragmenting a single file on a Windows 7 computer using Contig.
Installing Contig on Windows 7
Executing contig -a returns information about how fragmented the files are in the current directory by analyzing the fragmentation.
Using Contig to Defragment a Single File on a Windows 7 Computer
To run Contig and see a printout in the command-prompt window of the defrag process, use the -v switch after specifying the path, such as C:UsersJMPylesVirtual_Machinesvsrv01.vmx -v.
Criteria for Completion
You will have successfully completed the task when you have executed the command and the file has been defragmented.
Task 2.11: Updating Security Patches
While Windows computers can be set to automatically check for Windows updates occasionally, you may want to perform this process manually, particularly in the event that a computer has not been online for quite some time or has been manually configured to not check for updates. A Windows computer that is online but not updated is a problem looking for a place to happen.
Objective
This task covers objective 220:802:1.7.
Scenario
You have received a trouble ticket stating that one of the managers in your office has been on a sabbatical for several months and not been available to use her computer. She is returning to the office next week and wants her Windows 7 PC serviced and updated before she returns. You have also been told that she had previously set her computer to not automatically check for updates and you have been directed to change this setting on the computer so it will check for Windows updates but still allow the manager to choose whether to download and install them.
You arrive at her office, power up, and log in to her computer as domain administrator. You want to manually update her computer so that it has the latest Windows hotfixes and updates available.
Scope of Task
Duration
This task should take about 10 minutes or so.
Setup
No special setup is required beyond having a Windows 7 computer that is connected to the Internet.
Caveat
This should be a relatively straightforward task.
Procedure
This task will show you how to manually run Windows Update.
Equipment Used
You won’t need any special equipment.
Details
This task will take you through the steps to run Windows Update manually and then change the update settings to let the computer automatically check for Windows updates.
Manually Checking Windows Updates on a Windows 7 Computer
Changing the Settings in Windows 7 for Checking Windows Updates
Criteria for Completion
You will have successfully completed the task when the computer has downloaded and installed all of the latest updates from Microsoft and you have configured the computer to automatically check for Windows updates.
Task 2.12: Checking Internal Connectors
There are quite a number of internal connectors inside a computer, and any connector inside a computer occasionally can work its way loose. Sometimes you have to do a general inspection of the connectors in a PC’s case to make sure they are all linked firmly. Even in a PC that hasn’t been moved lately, subtle motions of the box may have caused a connection to separate just enough to cause a problem.
Objective
This task covers objective 220:801:1.11.
Scenario
A user in the reception area reports that her PC won’t start. She’s made sure it’s plugged in and that the surge protector is turned on, but when she pushes the power button on the PC, nothing happens. You investigate and can find no external cause. You decide to open the case and see if there is a reason for the problem inside.
Scope of Task
Duration
This task should take about 10 minutes.
Setup
No special setup is required to complete this task.
Caveat
Make sure to take ESD precautions before putting your hands inside the box.
Procedure
This task will show you how to verify that internal connectors inside a PC’s case are firmly connected.
Equipment Used
You should need only a screwdriver to successfully complete this task.
Details
This task will walk you through the steps of checking internal connectors in a PC to make sure they are all securely fitted.
Checking Internal Connectors
Verifying That All Internal Connectors in the Computer Are Firmly Seated
Verifying That the PC Functions Normally
Criteria for Completion
You will have successfully completed this task when you can power up the computer and it behaves normally.
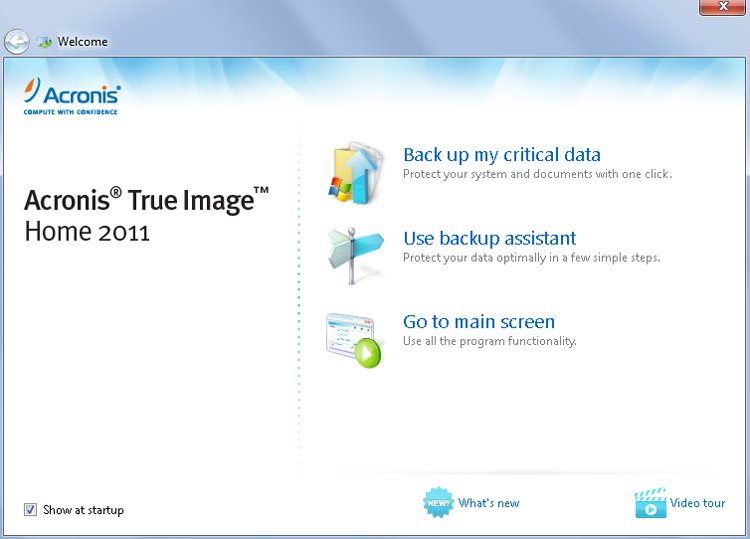
Task 2.13: Backing Up with Acronis True Image Home
Although Windows 7 comes with an excellent built-in Backup and Restore application, it may not have all of the features you desire or offer sufficient ease of use. Acronis True Image can be installed on a Windows 7 computer and provide backup and restore protection for all of your valuable data. Acronis can back up the entire contents of the disk or disks on the computer or only selected directories on a drive.
Objective
This task covers objective 220:802:1.7.
Scenario
You want a quick and easy backup and restore utility for your Windows 7 computer, and you have chosen Acronis True Image Home (Full Version) as the third-party solution that meets your requirements. You have downloaded and installed the application on your computer and are ready to create your first backup.
Scope of Task
Duration
This task should take about 20 to 30 minutes.
Setup
It would be ideal if you had a Windows 7 Professional Desktop to work with, but if not, a Windows XP or Windows Vista computer should do as well. You will need to purchase this software or use the free 30-day trial version from www.acronis.com.
Caveat
For the purpose of this task, only back up something small, unless you really do want to back up all of your data. You do not need to back up applications and you certainly shouldn’t back up your operating system. If your computer is compromised and those programs are damaged, you should have the original installation or recovery discs.
Acronis True Image Home 2011 was used for this task. The steps may be different if you are using a different version of this product or a different third-party backup utility.
Procedure
This task will teach you how to back up a specific folder on a schedule using Acronis True Image Home 2011.
Equipment Used
As previously mentioned, you will have to have Acronis True Image Home 2011 installed on your computer. You will also need a destination drive, such as a second drive in your PC or an external USB drive, for the backed-up data.
Details
This task will take you through the process of selecting a directory or directories to back up, determining a destination for the data to be backed up, and setting a schedule for when backups are to occur.
Scheduling Regular Backups on Windows 7 with Acronis True Image Home

Criteria for Completion
You will have successfully completed this task when the selected file or directory is saved in the My Backups directory as a .tib file. This file cannot be accessed directly and is used only if you need to restore the data.
Task 2.14: Flashing the BIOS
I suppose “flashing” could be taken the wrong way, but this is actually a method of enhancing a computer’s basic functioning. BIOS, or basic input/output system, is a very old element in PC engineering. The BIOS is software on a special chip on the motherboard that dictates the boot process, initializes essential hardware, and determines the abilities and capacities of the computer (such as how big a hard drive it can use).
In the “bad old days,” you were stuck with whatever BIOS your motherboard came with. If newer versions of the BIOS supported larger hard drives and faster CPUs or fixed particular bugs, you needed to get either a new motherboard or a new computer. More modern computer systems make it possible to upgrade the BIOS and keep the motherboard; however, it’s not the same process as updating a program living on your hard drive.
Flashing the BIOS on older computers requires special software tools, and if you make a mistake and damage or destroy the BIOS, you will turn your PC into nothing more than a really big paperweight (short of replacing the BIOS chip). For modern computers, updating the BIOS is as simple as downloading the .exe file from the website of the PC manufacturer, running the file, and rebooting the computer. Let’s take a look at the process.
Objective
This task covers objective 220:801:1.1.
Scenario
A BIOS update has been issued that fixes several bugs and allows your computer to use a faster CPU. You have the computer powered up and connected to the Internet. You are ready to proceed.
Scope of Task
Duration
This task should take anywhere from 15 to 30 minutes, including prep time.
Setup
You will need to identify the current BIOS for your Windows 7 computer and check the website for the company that made your computer for BIOS updates.
Caveat
As previously mentioned, in the “bad old days” if this process went wrong, your computer probably wouldn’t even boot. For current computers, the process is quite streamlined and relatively safe, as long as you make sure you are installing the correct BIOS update for your computer.
You will need to make sure all applications are closed before you update the BIOS.
Procedure
This task will teach you how to flash (update) the BIOS chip on a computer’s motherboard.
Equipment Used
All you need is the computer itself and an Internet connection.
Details
This task will take you step-by-step through the process of downloading and installing a BIOS update for a computer’s motherboard.
Downloading a BIOS Upgrade and Flashing the BIOS
Identifying the Current BIOS on the Computer
Locating and Downloading the Latest BIOS
Installing the BIOS Update
Criteria for Completion
You will have successfully completed this task when you flash the BIOS, reboot the computer, and note on the BIOS screen that the changes show the current BIOS version. You can also enter the CMOS setup itself to verify this and make sure all the configuration settings are correct.
Task 2.15: Changing the CMOS Battery to Correct a Slow PC Clock
The CMOS battery is usually a small lithium manganese dioxide battery similar to the ones that power wristwatches. It is located on your motherboard and provides electricity to hold certain configuration settings, including system time, even when the computer is completely powered down. The lifetime of this battery is roughly 10 years, but how long it actually lasts usually depends on how heavily the computer is used.
Most computers in a corporate environment receive their time from a local or Internet time server. This doesn’t mean that the local system time is unimportant. If the CMOS battery dies, not only will the system time be lost but so will other configuration settings your computer depends on, such as video display type, initial boot drive selection, and so on. A slow system clock is just the first sign of a dying CMOS battery.
Objective
This task covers objective 220:801:1.2.
Scenario
The Shipping department on the main loading dock uses a Windows XP Professional computer as a file and print server for its local computers. It is usually powered down on the weekends and powered up again Monday morning. You have received a trouble ticket from Shipping saying that the computer prompts them to press the F10 key every time the computer is powered up in order to set the date and time. This is the classic sign of a dying CMOS battery. You look up the system information for this computer and find the correct replacement battery in inventory. You take the battery and your tools and report to the main loading dock.
Scope of Task
Duration
This task should take about 30 minutes or less.
Setup
There is no special setup for this task.
Caveat
When you remove the CMOS battery, the BIOS chip will lose power and the information will be lost. Make sure you record all of your configuration information prior to removing the battery. Also, make sure you have the correct replacement battery for your motherboard.
Procedure
This task will teach you the proper method of replacing a dying CMOS battery.
Equipment Used
You will need a Phillips-head screwdriver to open the access panel and a flat-head screwdriver to remove the CMOS battery. You also will need your ESD equipment so you can reach into the computer case safely.
Details
This task takes you through the process of recording your BIOS settings, replacing a CMOS battery, and restoring computer settings.
Replacing a CMOS Battery
Recording the BIOS Settings
Replacing the CMOS Battery
Restoring the BIOS Settings
Criteria for Completion
You will have successfully completed this task when you have replaced the battery and restored the BIOS settings and the computer boots and operates correctly.
Task 2.16: Resetting Passwords
This is one of the most common tasks you will perform as a PC support tech. It seems like end users have a great deal of difficulty remembering their passwords. One reason for this may be that the “strong” passwords typically required in a corporate setting are not always easy to remember.
Objective
This task covers objective 220:802:2.1.
Scenario
You receive a call from one of your home office customers stating that he believes his computer’s password was acquired by a hacker and he doesn’t know how to change it. The computer is currently on and the user is logged in. You had the customer scheduled for a routine maintenance visit for today and when you are at his office, you will perform the task of changing the computer’s password.
Scope of Task
Duration
This task should take about 10 minutes at most.
Setup
This task was created using a Windows 7 computer.
Procedure
This task will show you how to change a user’s password on a Windows 7 computer.
Equipment Used
You will need no special equipment to complete this task.
Details
This task will take you through the necessary steps to change a user’s password on a Windows 7 computer.
Changing a User’s Password
Accessing the Domain User’s Account on a Domain Controller
Verifying That the Password Has Been Changed
Criteria for Completion
You will have successfully completed this task when you have changed the computer user’s password and he is able to login with the new password.
Task 2.17: Creating a New Local User in Windows Vista
Multiple Local Group Policy Objects (MLGPO) is a feature that is included by default in Windows Vista Business, Enterprise, and Ultimate editions. It improves upon the Local Group Policy settings used in Windows XP and allows administrators to apply different Local Group Policy levels to local users on stand-alone computers. While such Group Policy settings are applied by domain controllers (DCs) for computers that are domain members, MLGPO is ideally used for computers used in stand-alone settings, such as in publicly accessible Internet kiosks or other shared computer environments like schools and libraries.
This task will show you only how to create a nonadministrative user account on a Windows Vista computer that would be appropriate for one of these settings. For more information on MLGPO, perform a search for this data at http://technet.microsoft.com/en-us.
Objective
This task covers objective 220-802:1.4.
Scenario
A Windows Vista computer has been installed in the Internet kiosk in the lobby of your company’s main office. You have been assigned to create a nonadministrative user on that computer, so guests in the lobby can use it for accessing the Web without compromising security on the corporate network. It is after business hours, and you are at the keyboard of the computer in the lobby and ready to get to work.
Scope of Task
Duration
The task will take just a few minutes.
Setup
No special setup is required for the task beyond having a Windows Vista Business, Enterprise, or Ultimate edition computer.
Caveat
There are no particular caveats associated with this task; however, you must have the name you want to use for the new user in this task prepared before proceeding, such as “internet01.” Don’t forget to record the password you use for this user’s account.
Procedure
This task will show you how to create a nonadministrative user for a Windows Vista local computer.
Equipment Used
No special equipment is required.
Details
This task will take you through the steps required to create a nonadministrative user for a local Windows Vista computer.
Creating a Nonadministrative User Account on a Windows Vista Computer
Criteria for Completion
You will have successfully completed this task when you have created the new, nonadministrative local user on the Windows Vista machine. You can test the new user account by logging out of your administrative account and logging in as the new user.
Task 2.18: Testing Ports with an Online Scanner
Testing the effectiveness or ineffectiveness of your firewall and other security procedures is vital in order to keep the network safe from outside attack. As an entry-level PC support tech, you will not be expected to configure or monitor network security measures. Depending on the size of your organization, that task will be performed by either a senior staff member or a security specialist.
However, you may occasionally be asked to test an individual computer or server’s security with an online port scanner. This is a utility provided for free by various security organizations, and it can be very effective in detecting which ports of a computer are vulnerable from the Internet.
Objective
This task covers objective 220-802:2.6.
Scenario
A new test server has been set up and you have been asked to use an online port scanner to verify the vulnerability of the port settings on the device and record the results. You are told that the test server has deliberately been left with some vulnerabilities to determine how quickly an attack occurs from the outside.
Scope of Task
Duration
The task will take about 10 to 15 minutes depending on the length of the scan and the speed of your Internet connection.
Setup
No special setup is required for this task.
Caveat
You may be shocked at just how vulnerable your computer is after the scan results are displayed.
Procedure
This task will show you how to use an online port scanner to check a computer’s vulnerability.
Equipment Used
No special equipment is required.
Details
This task will take you through the steps required to use an online scanner to scan the security of various ports on a computer or server.
Locating and Using an Online Port Scanner

Criteria for Completion
You will have successfully completed this task when you can view the results of the port scan. You can perform other specialized scans on this site and obtain a text summary of the results that you can then print.
Task 2.19: Changing Printer Toner
This is another extremely common task you will be performing as a PC tech. It isn’t a particularly difficult task, but you could find yourself doing it on an almost daily basis, if you support a large number of printers. The procedure differs somewhat depending on the make, model, and size of the printer. (Some large and specialized printers use separate and rather large cartridges for the colors black, blue, green, yellow, and red.)
Objective
This task covers objective 220-801:4.3.
Scenario
You receive a trouble ticket stating that the toner is low in the printer used by the Software Development department. You look up in your records the type and model of printer they use, locate the correct replacement cartridge in inventory, and report to the department.
Scope of Task
Duration
This task should take about 5 to 10 minutes at most.
Setup
No special setup is required for this task, outside of access to a printer and the correct toner cartridges.
Caveat
There are a number of different printer types and models in existence as well as different types of printer cartridges and procedures for changing them. The steps in this task may not quite match the ones you’ll need to take to change your printer cartridge.
Procedure
This task will show you how to change the toner cartridge in a printer type that is typically used in a business environment.
Equipment Used
In addition to having access to a printer, you will need an appropriate toner cartridge to use in this task. For this example, it is advisable to have a drop cloth or two handy to put the cartridges on and to wipe up any toner mess. The simplest way for you to complete this task is to remove the toner cartridge in your printer and then replace it.
Details
This task walks you through the steps necessary to remove an empty printer cartridge and replace it with a fresh unit.
Changing a Printer’s Toner Cartridge
Opening the Printer
Replacing the Cartridge
Cleaning Up and Conducting a Test Print
Criteria for Completion
You will have successfully completed this task when the toner cartridge has been replaced and the printer is printing normally.
Task 2.20: Scanning a Document Using Windows 7
Scanning documents and images is a task that users need to perform, sometimes frequently, depending on their job duties, but it isn’t always apparent how to perform this task. For instance, using an HP All-in-One product, should the user perform the scan using an HP utility or from Windows? You may occasionally have to train a user in which option is best, which usually translates into which option is the easiest to perform.
Objective
This task covers objective 220-801:4.3.
Scenario
The chief operations officer (COO) for your company has had a Windows 7 computer installed in his office but complains that he is unable to scan documents from Windows 7 using his HP All-in-One device. You have been assigned the task of instructing the COO as to the method he can use to perform this task.
Scope of Task
Duration
It should take about 10 minutes or so to progress through the steps.
Setup
The only setup that’s required is for an imaging device to be directly attached to a Windows 7 machine, the correct drivers to be installed, and for both machines to be powered up and running. Since scanning documents does not require printing, the document imaging device does not require adequate ink in its print cartridges, but it’s always good to keep a printing machine in good operating order. An original document to scan must be on hand.
Caveat
The steps in these tasks should work with all HP All-in-One imaging devices, but the results cannot be guaranteed for other HP devices for non-HP devices.
Procedure
This task will teach you two simple methods to scan a document using an HP All-in-One imaging device with Windows 7.
Equipment Used
As previously stated, a computer running Windows 7 and an HP All-in-One printer with scanning abilities are required to get the most out of this set of tasks.
Details
This task will walk you through the various workaround methods for scanning a document from Windows 7 using an HP All-in-One device.
Scanning a Document from an HP All-in-One Device Using Windows 7
Loading the Original Document
Scanning a Document Using Windows 7
Scanning a Document Using Paint

Criteria for Completion
You will have successfully completed this task when you have scanned a document using both methods. Remember, though, that your results may not be the same if you are using an imaging device different from the HP All-in-One series used to create this scenario.
Task 2.21: Managing Windows Startup and Recovery Behavior in Windows XP
By default, when Windows XP suffers from an extreme failure such as the dreaded Blue Screen of Death (BSOD), it automatically reboots. Unfortunately, there may be valuable information contained in the BSOD that you will not be able to read before the PC restarts. Of course, Windows XP is much more stable than previous versions of Windows, so the BSOD appearance is rare, but it’s still not completely a thing of the past. You can take control of the reboot process so that it’s not automatic, which will allow you to read valuable troubleshooting messages should the BSOD happen to you.
Objective
This task covers objective 220-802:4.2.
Scenario
You have been assigned to diagnose a Windows XP computer that has suffered a BSOD. The user reports that she started her computer on Monday morning as usual and, after the operating system had fully loaded, double-clicked her web-browser icon in the System Tray. The browser didn’t launch, so she double-clicked again and the system seemed to freeze. The BSOD appeared, but the computer rebooted before she could read any of the information that appeared.
The system seems responsive now and you’d like to try to duplicate the error but be able to read the BSOD message. For that, you will need to disable the automatic reboot under Startup and Recovery.
Scope of Task
Duration
Disabling the automatic reboot feature will just take a few minutes.
Setup
No special setup is required.
Caveat
There are no special issues associated with this task, and you do not need a computer that is malfunctioning to successfully change this setting. A Windows XP Professional computer was used to create this scenario, but the steps are identical for Windows XP Home.
Procedure
This task will teach you how to disable the automatic reboot feature under Startup and Recovery.
Equipment Used
No special equipment is required. This task should work the same on both versions of Windows XP.
Details
This task will walk you through the procedure of disabling the automatic reboot feature under Startup and Recovery.
Disabling Automatic Reboot Under Startup and Recovery
Criteria for Completion
You will have successfully completed this task when you have cleared the Automatically Restart check box and saved your changes by clicking OK. This task does not require that your computer suffer a BSOD event or that you solve such an error.
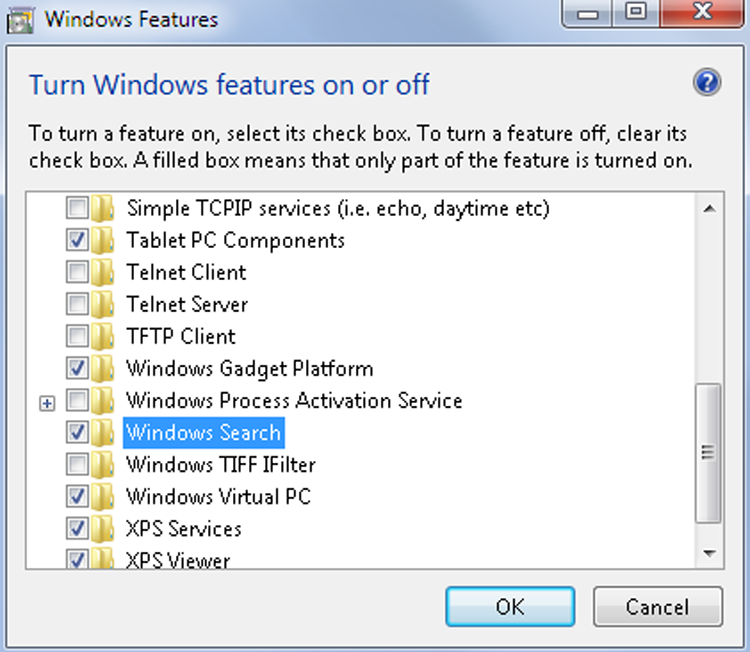
Task 2.22: Turning Windows 7 Features On or Off
There are a large number of services and features in Windows 7 that most people are unaware of. As a computer technician, you must be familiar with these features, what they do, and how to turn them on and off as needed. Windows 7 features are turned on or off by default, but you can enable or disable these features manually in the Control Panel.
Objective
This task covers objective 220-802:1.5.
Scenario
You work for a small city IT department and receive a trouble ticket from a customer stating that she may have turned off the Windows Search feature on her Windows 7 computer. You report to her work area and speak with her. She says she was exploring the Control Panel in her computer and discovered the ability to turn features on and off under Programs and Features. You are aware of how this works in Windows 7 and agree to investigate and restore Windows Search on her computer.
Scope of Task
Duration
This should only take a few minutes.
Setup
No special setup is required. You only need access to a Windows 7 computer. In order to create this scenario, I first turned off the Windows Search feature on my Windows 7 computer and then rebooted. Read through this task to see the entire process; then turn off Windows Search, reboot, work through the task, and turn Windows Search back on.
Caveat
The only real issue here is that turning off one or more features in Windows 7 may affect how it performs in a variety of areas. If you want, you can extend the scope of this task and practice turning on and off different features in Windows 7, but depending on what features you enable or disable, you may experience unanticipated behaviors from your computer.
If you explore the Windows features box, you’ll see that some Windows features are organized together in folders and some of the folders contain subfolders that give you access to additional features. If you see a check box that appears only partly checked or appears dark, this means some of the items inside the folder are turned on and others are turned off.
Procedure
This task will teach you how to turn Windows features in Windows 7 on and off.
Equipment Used
No special equipment is needed.
Details
This task will walk you through the process of turning on the Windows Search feature in Windows 7, which has previously been disabled.
Turning On the Windows Search Feature in Windows 7
Criteria for Completion
Once the computer has rebooted, Windows Search will be turned back on. You will have successfully completed this task when the computer has rebooted.
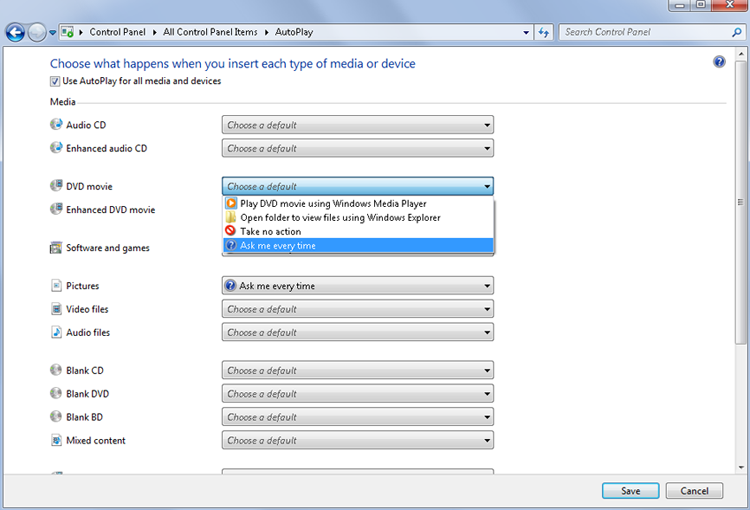
Task 2.23: Controlling AutoPlay Settings in Windows 7
AutoPlay is the feature in a Windows computer that automatically responds to an optical disc placed in the disc player using some predetermined action. For an audio disc, for example, placing the disc in the CD/DVD player may result in the disc being automatically opened using Windows Media Player and the music beginning to play.
There are a large number of AutoPlay options available in Windows 7 that can be configured. Most of them have default settings, but you can override the defaults and select customized behaviors depending on your requirements.
Objective
This task covers objective 220-802:1.5.
Scenario
You have a customer who plays a large number of audio and video files on CDs, DVDs, and other sources. These files are sent to her for review and editing from a number of different artists, and she wants to be presented with a menu of possible actions when she puts a piece of removable media in her optical drive or insert removable storage in a USB port. She wants this behavior to occur when she accesses video files, audio files, mixed content, DVD movies, and DVD audio discs.
You access her computer and prepare to configure the AutoPlay feature to her specifications.
Scope of Task
Duration
This task should only take a few minutes.
Setup
No special setup is required besides having access to a Windows 7 computer.
Caveat
This task will require that you change the default behavior of the AutoPlay feature. You can return the settings you change to their defaults after the task is over if you desire.
Procedure
This task will show you how to configure the AutoPlay feature in Windows 7.
Equipment Used
No special equipment is required.
Details
This task will walk you through the steps of changing the default settings for a number of disc and file types in AutoPlay.
Configuring AutoPlay in Windows 7
Criteria for Completion
You will have successfully completed this task when you have configured and tested your AutoPlay settings changes.
Task 2.24: Setting Up Advanced File Sharing in Windows 7
A Windows 7 Workgroup is configured to use specific sharing settings by default, but you can manually configure advanced file sharing features in Control Panel. This allows you to override the default sharing settings for your Workgroup or for public sharing and increase or decrease the level of security.
Objective
This task covers objective 220-802:1.5.
Scenario
You work for a small city IT department and have been assigned to change the sharing configuration settings on the Windows 7 computer used by the manager of the city’s Accounting office. Specifically, you are to prevent network discovery for the Workgroup so this computer cannot be seen over the network, disable file and print sharing, and disable public folder sharing.
Scope of Task
Duration
This task should take just a few minutes.
Setup
In order to test the effectiveness of your configuration changes, your Windows 7 computer must be connected to a local network, be part of a Workgroup, and there should be another Windows computer that is also connected to the network and part of the Workgroup. The Windows 7 computer should have one or more folders shared, and it would be a bonus if the Windows 7 computer had a directly connected printer that it is sharing on the network.
Caveat
If you change the settings on your Windows 7 computer to a configuration you don’t use in its day-to-day operation, make sure to return the settings to their previous values after you are finished with this task. If necessary, write down the settings you normally use before making the changes recommended in this task.
Procedure
This task will teach you how to change the advanced file-sharing settings in a Windows 7 computer.
Equipment Used
No special equipment is required.
Details
This task will show you the procedure for changing advanced file- and print-sharing settings in Windows 7.
Changing Advanced Sharing Settings in Windows 7
Criteria for Completion
You will have successfully completed this task when you have completed the advanced sharing configuration changes and are unable to connect to the Windows 7 computer from another Windows PC on the same network. If you need to have the Windows 7 computer and its shared files and folders available on your local network, reverse the sharing setting you configured during this task.
Task 2.25: Installing Windows Live Mail
Windows Live Mail is a Microsoft product that can be used on Windows 7 instead of Microsoft Office Outlook. In the original release of Windows Vista, users needed three separate products—Windows Mail, Windows Calendar, and Windows Contacts—to perform all of the functions offered by Windows Live Mail on Windows 7. Windows Live Mail is a free desktop utility that is part of Windows Live Essentials. To use Windows Live Mail, you must first use Live Essentials to download and install Windows Live programs.
Objective
This task covers objective 220-802:1.5.
Scenario
You have a client who has just purchased a Windows 7 computer but would like a low- or no-cost alternative to using Microsoft Windows Outlook for an email client, to organize contacts, and to use a calendar. You suggest Windows Live Mail, and she agrees that it would be a good option. You are then commissioned to download and configure Live Mail for her use.
Scope of Task
Duration
This task should take about 15 minutes, depending on the speed of your Internet connection.
Setup
You will need a Windows 7 computer and Internet access for this task.
Caveat
You may not want to use Windows Live Mail on your lab computer, but after installing it, you can uninstall it to save space. However, Task 2.27 is dependent on the current task, so don’t remove Live Mail until after completing Task 2.27.
Procedure
This task will show you how to download and install Windows Live Mail.
Equipment Used
No special equipment is needed.
Details
This task will outline the steps to take in order to use Windows Live Essentials to download and install Windows Live Mail.
Downloading and Installing Windows Live Mail
Criteria for Completion
You will have successfully completed this assignment when you have installed Windows Live Mail and can open the program on your Windows 7 computer.
Task 2.26: Configuring Mail Accounts in Windows Live
Once you have installed Windows Live Mail (see Task 2.25) you can configure Live Mail with one or more email accounts, setting up Live Mail to use the POP3, IMAP4, and SMTP servers of your choice. The first task you must perform before you can use Windows Live Mail is to add the first email account. If you have ever set up an email account in Outlook, this process is quite similar.
Objective
This task covers objective 220-802:1.5.
Scenario
You have just installed Windows Live Mail on a client’s Windows 7 computer and are now ready to create an email account for her. She has provided you with all of the information necessary to create the email account.
Scope of Task
Duration
This task should take about 15 minutes to set up your first email account.
Setup
You will need a Windows 7 computer and to have Windows Live Mail installed. You will also need to have all of the required information including data on any POP3, IMAP4, and SMTP servers involved. You may also want to connect Live Mail to an online service such as Gmail or Hotmail.
Caveat
You will need to contact your ISP for all of the required email server information in order to complete this task. If this information is missing or inaccurate, you can complete the steps to create an email account, but your email account will not be able to send or receive email. You can use a Yahoo! or Gmail account and, in most cases, Live Mail will automatically configure the server data for the email account once you enter a valid email address and password.
Procedure
This task will show you how to configure a new email account in Windows Live Mail.
Equipment Used
No special equipment is needed.
Details
This task will take you through the steps required to set up an email account in Windows Live Mail.
Creating an Email Account in Windows Live Mail
Criteria for Completion
You will have successfully completed this assignment when you have created a new email account in Windows Live Mail and can send and receive emails using this account.
Task 2.27: Rolling Back Device Drivers
Generally, it’s a good idea to keep the device drivers for all devices installed on a computer up to date, but occasionally, after updating a device driver, a problem can occur. This can include the device no longer functioning properly or even resulting in the computer not being able to boot.
For device driver problems that are severe and that prevent your computer from booting, you’ll need to restore to options such as Last Known Good Configuration or Safe Mode. However, for device driver problems that allow your computer to boot, you can always roll back the device driver to the previous version. This assumes that you know it was a device driver update that caused the problem on the computer.
Objective
This task covers objective 220-802:4.6.
Scenario
You have just updated a device driver for the sound card on your Windows 7 computer, rebooted the PC, and immediately noticed that the sound card no longer works. You open a web browser and search for any issues involving the sound card’s device driver and discover that this is a known issue and the manufacturer recommends rolling the device driver back to the previous version.
Scope of Task
Duration
This task should take about 15 minutes or less.
Setup
This task was performed on a Windows 7 computer but it should work almost the same using Windows Vista or Windows XP. You will need an Internet connection if you want to update the drivers of a device on your computer, but you will only need the computer and to select an appropriate device in order to roll back the driver.
Caveat
It is almost always recommended that you keep the drivers for the devices on your computer updated to the latest version, so rolling back the driver for any device on your computer may have unintended consequences, such as the device no longer functioning. It is recommended that you update the driver for the device you intend to use for this task, such as a sound card, to the latest version (if necessary), and then roll the driver back to a prior version. Once you have finished this task, update the driver for the device to the current version again.
Procedure
This task will show you how to roll back the driver for a device on your PC.
Equipment Used
No special equipment is needed.
Details
This task will take you through the steps you will need to perform to roll back the driver for a device installed on your Windows 7 computer.
Rolling Back a Device Driver
Criteria for Completion
You will have successfully completed this assignment when you have rolled back the device driver for a device on your computer and then restored the current device driver.
Task 2.28: Disabling and Removing Hardware Devices
Chances are you use a lot of portable storage devices with your desktop PC, including digital cameras, external USB drives, MP3 players, and mobile phones. These devices can attach to your computer via eSATA, FireWire, and USB interfaces. They are devices that are meant to be portable and easily detachable from your computer, but that doesn’t mean it’s always safe just to “pull the plug.” You’ll need to follow a set of recommended steps in order to make sure any attached storage device is properly removed.
You may also want to disable an internal device on the computer without physically removing it. There are times when a device, or more likely its drivers, is causing a problem on your computer. You can disable the device in Device Manager, which will prevent the device’s drivers from being loaded.
Objective
This task covers objective 220-802:4.7.
Scenario
You have an external USB drive and a smartphone attached to your Windows 7 computer and you would like to safely remove them. You also are having problems with the DVD drive on your computer and want to disable the device without physically removing it.
Scope of Task
Duration
This task should take about 15 to 20 minutes.
Setup
You’ll need to have a Windows 7 computer, a USB flash drive, and a smartphone. The external devices must be already attached to the computer. You must also select an internal device, such as the computer’s DVD drive, to disable.
Caveat
Although people often just remove an attached device such as a USB thumb drive without taking steps in the software to disable the device first, it isn’t recommended to do so. Although the devices themselves may not be harmed, the data integrity can be compromised. When in doubt, always play by the rules.
Procedure
This task will show you how to safely disable and remove portable and internal hardware devices.
Equipment Used
No special equipment is needed besides the equipment already described in the “Setup” section for this task.
Details
This task will take you through the steps for removing a portable device from a Windows 7 computer and disabling an internal device.
Disabling or Removing a Portable Storage Device and Internal Devices
Removing Portable Storage Devices
Disabling an Internal Device Without Removing It
Criteria for Completion
You will have successfully completed this task when you have safely removed the portable USB drive and smartphone and when you have disabled the internal DVD drive on the computer.