


Installation and configuration
Chapter 1, “Implementing VMware Virtual Volumes for systems powered by IBM Spectrum Virtualize” on page 1 described the three key components involved in implementing the VMware Virtual Volumes (VVols) management framework. You might find it helpful to refer to Figure 1-1 on page 2 from time to time while you familiarize yourself with the new terminology and how it fits your current environment.
For the sake of simplicity, we approach the installation and configuration of our VVols environment by singling out each of these components. This chapter starts with the storage system, then moves onto IBM Spectrum Control Base Edition (SCB), and finally touches on adding a VVols Datastore to your vSphere environment.
This chapter provides information about the following topics:
4.1 Configuring the storage system
During this chapter, you perform several steps required to enable VVols on your storage system. See the prerequisites in Chapter 2, “Prerequisites” on page 5 to ensure that your environment meets the minimum requirements.
|
Requirement: Parent pools must already be configured on the storage system before attempting to enable VVols.
|
4.1.1 Enabling VVols
To enable VVols, complete the following steps:
1. In the management GUI for your storage system, go to Settings → System and select VVols, as depicted in Figure 4-1.
Figure 4-1 shows you where to find the control to enable VVols on your storage system.

Figure 4-1 Storage system toggle the VVols management GUI to On
|
Tip: If you are unable to toggle VVols to ON, ensure that you have at lease one parent pool configured on your storage system.
|
2. Start the Virtual Volumes configuration by clicking the toggle switch. You are then presented with a short wizard that walks you through the steps required to complete the setup of VVols on your storage system.
Figure 4-2 shows the Enable VVols dialog. Here we select the parent pool on which to locate our utility volume, and create our user for SCB.

Figure 4-2 Storage system Enable VVols dialog box
3. Select an available parent pool on your storage system for your utility volume. As an optional task, select an additional parent pool where you want your utility volume to be mirrored, as illustrated in Figure 4-3.

Figure 4-3 Storage system parent pool selection box
|
Note: The utility volume contains a database that’s critical to your VVols environment. We suggest mirroring your utility volume to a second parent pool that is in a separate failure domain for redundancy. For example, use a parent pool that is made from managed disks (MDisks) that are presented from different storage systems or a different input/output (I/O) group.
|
4. Create a user for IBM Spectrum Control Base Edition to communicate with the storage system. In this step, you are creating a user account that is automatically added to the security role VASAProvider, as shown in Figure 4-4.

Figure 4-4 Storage system SCB user creation dialog
|
Tip: You will later require the SCB user information when setting up IBM Spectrum Control Base Edition.
|
5. Click Enable to continue to the next step where you will receive confirmation that VVols has been enabled, as shown in Figure 4-5.

Figure 4-5 VVols enabled message
|
Important: The vSphere APIs for Storage Awareness (VASA) Provider role is strictly reserved for use by the IBM Spectrum Control Base Edition server. Users should not log in to the graphical user interface (GUI) or command-line interface (CLI) as a user with VASAProvider privileges. Users must not perform any manual tasks as the VASAProvider user, unless specifically advised to by IBM Support.
|
4.1.2 Enabling VMware ESXi hosts for VVols
Existing ESXi hosts on your storage system need to be enabled for VVols before you can use Virtual Volumes in the vSphere Web Client. If you are adding new ESXi hosts to your storage system, the same VVols enablement steps apply. See 5.2.1, “Managing VMware ESXi hosts” on page 53 for more information about adding hosts.
To enable ESXi hosts, complete the following steps:
1. Enable VVols on your existing hosts by selecting the ESXi host object from the Hosts view and then select Action → Properties → Edit. Here you can change the host type to VVols, as depicted in Figure 4-6. You need to repeat these steps for each ESXi host you want to enable for VVols.
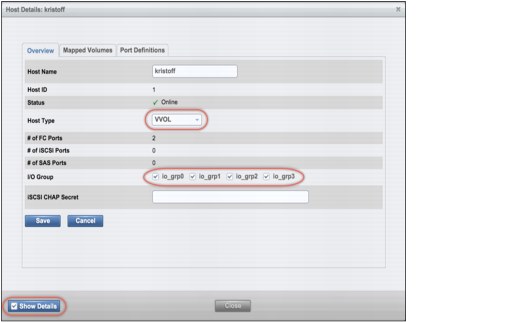
Figure 4-6 Storage system enable host type VVols
|
Tip: Existing hostmap configurations are unaffected by enabling your ESXi hosts for VVols. However, you might need to enable host access to all I/O groups if not already configured.
|
2. To add an ESXi host to the system (optional), select the Hosts view and select Add Host to start the Add Host dialog, as pictured in Figure 4-7 on page 22. Perform the following steps to complete the configuration:
a. Select the connectivity type for the host.
b. Enter a name for the host.
c. Input the port details.
d. Click Advanced to show more options.
e. Open the Host Type menu. Select VVol.
f. Select Add to complete the task.
Figure 4-7 shows the Add Host dialog.

Figure 4-7 Storage system Add Host dialog
The steps required for setting up your storage system have now been completed. Move onto the next section to configure the IBM Spectrum Control Base Edition instance.
4.2 Configuring IBM Spectrum Control Base Edition
IBM Spectrum Control Base Edition plays a pivotal role in the communication between your vSphere environment and the storage system. This section guides you through the installation and configuration options for installing IBM Spectrum Control Base Edition.
|
Note: It is assumed that you already have a virtual machine (VM) provisioned for the installation of IBM Spectrum Control Base Edition. For more information about the configuration of this VM, see 2.2.3, “Server configuration for IBM Spectrum Control Base Edition” on page 7.
|
4.2.1 Downloading the IBM Spectrum Control Base Edition installation files
Obtain the current IBM Spectrum Control Base Edition installation files from IBM Fix Central:
Extract them to a temporary folder, for example, /scb_install, on your IBM Spectrum Control Base Edition virtual machine, hereafter referred to as SCB. Example 4-1 shows the typical installation files for SCB after they have been extracted.
|
Note: Downloading the installation package from a trusted, Secure Sockets Layer (SSL)-protected resource, such as Fix Central, ensures authenticity and integrity. If you are in any doubt as to the authenticity of the package, see the IBM Spectrum Control Base Edition User Guide for instructions about using the Signing Key to validate the package. You can obtain the user guide from the previous link to Fix Central.
|
Example 4-1 SCB installation files
ibm_spectrum_control-2.2.1-xxxx-x86_64.bin
nginx-1.6.2-1.el6.ngx.x86_64.rpm
postgresql92-9.2.10-1PGDG.rhel6.x86_64.rpm
postgresql92-contrib-9.2.10-1PGDG.rhel6.x86_64.rpm
postgresql92-libs-9.2.10-1PGDG.rhel6.x86_64.rpm
postgresql92-server-9.2.10-1PGDG.rhel6.x86_64.rpm
4.2.2 Installing IBM Spectrum Control Base Edition
|
Tip: Now would be a great time to ask your vSphere administrator to clone your SCB VM to a template. You can later use the template to deploy further instances of SCB server as part of a high availability (HA) group.
|
To install SCB, complete the following steps:
1. Change to the folder on your SCB server where you previously extracted the installation files and start the installation of SCB.
Example 4-2 Example output of command rpm -iv *.rpm
warning: nginx-1.6.2-1.el6.ngx.x86_64.rpm: Header V4 RSA/SHA1 Signature, key ID 7bd9bf62: NOKEY
warning: postgresql92-9.2.10-1PGDG.rhel6.x86_64.rpm: Header V4 DSA/SHA1 Signature, key ID 442df0f8: NOKEY
warning: uuid-1.6.1-10.el6.x86_64.rpm: Header V3 RSA/SHA256 Signature, key ID fd431d51: NOKEY
Preparing packages for installation...
postgresql92-libs-9.2.10-1PGDG.rhel6
postgresql92-9.2.10-1PGDG.rhel6
uuid-1.6.1-10.el6
postgresql92-contrib-9.2.10-1PGDG.rhel6
postgresql92-server-9.2.10-1PGDG.rhel6
nginx-1.6.2-1.el6.ngx
3. Next, we turn our attention to installing the .bin file. At the command line, type ./ibm_spectrum_control-2.2.1-xxxx-x86_64.bin (note that you may have a later file version).
4. When prompted, enter 1 to accept the agreement. After a minute or two, you receive a Installation completed successfully message, and you can move on to the next step.
4.2.3 Changing the IBMSC administration account
As part of the installation process, a user account named IBMSC is created for administration purposes. To avoid unauthorized access to the SCB server, it is strongly advised to change the default password. To modify the IBMSC user account, type passwd ibmsc on the command line and enter a new password.
This is the last task we need to run at the command line. All further steps are run from the SCB server web interface.
|
Suggestion: Configuring a second SCB instance is required for redundancy (advised). This is described in more detail in 4.4, “Configuring additional SCB servers for high availability” on page 39.
|
4.2.4 Accessing the IBM Spectrum Control Base Edition web interface
To access the SCB web interface, complete the following steps:
1. Open a web browser and connect to your SCB server’s web interface using the following URL: https://<SCB Server Name>:8443. You might need to trust the certificate before continuing to the logon page, as shown in Figure 4-8.

Figure 4-8 IBM Spectrum Control Base Edition web interface logon
2. Log in to the SCB web interface with the following default credentials:
– User Name: admin
– Password: admin1!
4.2.5 An overview of the SCB web interface
The first time you log in to the SCB web interface you are presented with the Welcome window. Click past this and you are presented with the SCB home window, as shown in Figure 4-9. Take some time to familiarize yourself with the necessary components and views to continue the configuration of SCB.

Figure 4-9 IBM Spectrum Control Base Edition Home window
The SCB web interface consists of four management panes. In the default Home view, you are presented with the Default Space and Services pane on the left and the Storage Systems pane on the right, as pictured in Figure 4-9 on page 24. For clarity, we have indicated the locations of the Settings and Add Storage buttons.
|
Note: The remaining two panes for Applications and Monitoring are not required for configuring Virtual Volumes, and are outside the intended scope of this book.
|
Table 4-1 summarizes the functionality of the SCB GUI elements.
Table 4-1 IBM Spectrum Control Base Edition GUI Elements
|
GUI Element
|
Description
|
|
|
This is the Settings button. Use this button to access the Settings menu.
|
|
|
This is the Home button. Click this button to display the Home window (Spaces, Services, and Storage Systems view).
|
|
|
This is the Add button. Click this button to add new objects, such as storage systems and storage services.
|
|
|
This is the Edit button, which is displayed when selecting or highlighting an object. Click this button to configure the object (system, pool, server, and so on) or remove it.
|
|
|
This is the Remove button. Click this button to remove a storage element or delete a user from the User list.
|
|
|
This is the Help button. Click this button to display the Welcome page, which is also available after login.
|
|
|
These are the right and left navigation pointers. They indicate if additional panes are available to the right or to the left of the current pane.
|
|
|
This is the Resource Attach button. It is available when an unattached storage resource is selected in a Storage Resources table. Click this button to attach the storage resource to a previously selected storage service.
|
|
|
This is the Resource Detach button. It is available when an attached storage resource is selected in a Storage Resources table. Click this button to detach the storage resource from a previously selected storage service.
|
During this chapter, we configure the following items, in order, using the SCB web interface:
4.2.6 Changing the default administrator password
One of the first steps you want to take is to change the default password for the administrator account:
1. Click the Settings button and select Users in the menu. You are presented with the Users section box. Highlight the admin user account by clicking it. Two small buttons, Edit User and Delete User, appear to the right, as shown in Figure 4-10.

Figure 4-10 SCB Users selection box

Figure 4-11 SCB User dialog
3. Enter the existing password of admin1! and then enter a new password for your admin user. Click APPLY → Close.
4.2.7 Storage credentials
Earlier in this chapter (Figure 4-4 on page 20), we created a user on our storage system for use by SCB. By setting these credentials in SCB, we enable communication to the storage system in order to perform various tasks, one of which is adding the storage system into SCB:

Figure 4-12 SCB Storage Credentials dialog
2. Enter the User Name and Password of the SCB user account created on the storage system.
3. Click APPLY.
|
Note: The storage credentials must exist on all of the storage systems that you intend to connect to your IBM Spectrum Control Base Edition server.
|
4.2.8 VASA credentials
The VASA credentials are defined in SCB and used by the VMware vSphere Web Client to connect to the SCB server. To configure VASA, complete the following steps:

Figure 4-13 SCB VASA Credentials dialog
2. Enter the Username and Password, then click APPLY.
|
Tip: The VASA user credentials are required later when adding the SCB storage provider in the vSphere Web Client.
|
4.2.9 General settings
This step is of particular importance to the configuration of high availability for our VVols environment. To enter the general settings, complete the following steps:
1. Click the Settings button and select General Settings on the Settings menu, as shown in Figure 4-14.

Figure 4-14 SCB General Settings
2. Enter the fully qualified domain name (FQDN) of your IBM Spectrum Control Base Edition server.
3. Enter the name for the HA Group. In this example, we have called it vvol_db.
4. Click APPLY.
|
Remember: High availability (HA) of SCB relies on the HA Group. See 6.2.1, “High availability” on page 77 for further details about HA groups and the use of multiple SCB servers for redundancy.
|
4.2.10 Server certificate
During the installation of IBM Spectrum Control Base Edition, an SSL certificate is generated with generic information. To provide secure communication between your SCB server and the vSphere Web Client, you need to generate a new certificate with the FQDN of your SCB server. Figure 4-15 shows the Server Certificate dialog for the test SCB server.

Figure 4-15 SCB Server Certificate dialog
1. Click the Settings button and select Server certificate on the Settings menu.
2. Enter the FQDN of your SCB server.
3. Enter a Common Name for your SCB server.
4. Enter the IP Address of your SCB server.
5. Choose a certificate Validity period.
6. Click GENERATE.
7. You receive an alert asking you to refresh your browser, as shown in Figure 4-16.

Figure 4-16 SCB reload web page
|
Tip: If you’ve already been issued with a trusted certificate that you want to use, you can replace the self-signed certificate with an existing trusted certificate. For more information, on this process, see the IBM Knowledge Center for IBM Spectrum Control Base Edition:
|
4.2.11 Adding a storage system
Adding a storage system to IBM Spectrum Control Base Edition relies on having correctly entered the storage credentials. If you have not yet configured your storage credentials, see 4.2.7, “Storage credentials” on page 27. To add a storage system, complete the following steps:
1. Click the Add button on the Storage Systems pane, as shown in Figure 4-17. See 4.2.5, “An overview of the SCB web interface” on page 24 if you are unsure as to the location of the Add button.

Figure 4-17 SCB Add New Array dialog
2. Enter the Management IP address or Hostname of the storage system and select the storage system Type. In our example, we are using an IBM Storwize V7000 storage system with a Hostname of cheech-cl.
3. Click ADD. If the credentials are correct, the storage system is added to the Storage Systems pane, as depicted in Figure 4-18 on page 31.
|
Note: If you receive an Unable to connect to the storage array due to a credentials error, verify the user name and password entered earlier in step 4.2.7, “Storage credentials” on page 27. Remember that both the user name and password are case-sensitive.
|

Figure 4-18 IBM Spectrum Control Base Edition: Storage Systems pane with a storage system
4.2.12 Adding a storage space
Creating a storage space in IBM Spectrum Control Base Edition enables you to present storage resources to the vSphere Web Client. For more information about storage spaces, see 6.2.2, “Defining storage spaces” on page 78.
To add a storage space, complete the following steps:
1. In the Spaces and Services pane, click the Spaces drop-down and select Add New Space, as shown in Figure 4-19.
|
Note: The drop-down list for storage space selection shows the name of the currently selected storage space, and the default is Default Space.
|

Figure 4-19 SCB adding a storage space
2. Enter a name and description for the new storage space and click APPLY. In our example, we chose to name it SC01 (storage container). See Figure 4-20.

Figure 4-20 SCB configure New Space
3. You can confirm that you have successfully added your new storage space by again clicking the drop-down Spaces list and selecting your new storage space, as shown in Figure 4-21.

Figure 4-21 SCB spaces list
4.2.13 Adding a storage service
Now that you have created a storage space, the next step is to define the service or services that the space will be offering up to the vSphere Web Client. Essentially, a storage service advertises the capabilities of our storage resources, such as encryption, to the vSphere Web Client through the storage space. More information about the configuration and use of storage services is provided in 6.2.2, “Defining storage spaces” on page 78.
To add a storage service, complete the following steps:

Figure 4-22 SCB Add service button
3. Enter a name and description for your new service. In the following example, we called the storage service SC01_Service. Ensure that you have selected the box for VVol Service (Figure 4-23).

Figure 4-23 SCB New storage service configuration
4. Click APPLY. You should now have a storage space with a storage service configured much like that shown in Figure 4-24.

Figure 4-24 SCB Storage and Services view
|
Note: In our example, we create a simple VVols-enabled storage service. With Storage Policy-Based Management (SPBM), we look at configuring the storage services to provide a more granular and automated VVols environment. See Chapter 7, “Storage Policy-Based Management” on page 83 for more information.
|
4.2.14 Defining and attaching storage resources
Now that we have a storage space (SC01) with a storage service (SC01_Service) defined, you can add storage resources (child pools) to your storage space:
1. Click the drop-down Spaces list and select the storage space that you want to add storage resources to. In this example, we are using SC01. The VVols-enabled storage service that you previously configured for the storage space is displayed in the pane directly below the Spaces drop-down.
2. Click the storage service. The storage service becomes highlighted to indicate selection. See step 1 in Figure 4-25.
3. On the Storage Systems pane, hover over the storage system to display the Edit button, as depicted in step 2 in Figure 4-25.
4. Click the Edit → Modify, as shown in step 3 of Figure 4-25. The Array Settings dialog box is displayed.
Figure 4-25 shows the steps involved in adding a storage resource to a storage service.

Figure 4-25 SCB adding a storage resource
5. In the Add New Resource section of the Array Settings dialog, select a parent pool and specify a size in gibibytes (GiB) for the new storage resource (child pool).
6. Click Add to complete the Add New Resource task. The storage resource is created on the storage system (as a child pool) and attached to the service.
|
Summary: In our example, we have created a 2500 GiB storage resource (child pool) on storage space SC01 with the associated storage service SC01_Service. This resource has been taken from ParentPool01. This, in turn, creates a child pool on our storage system with an automatically generated name, as shown in Figure 4-26 on page 35.
|
Figure 4-26 shows the storage resource added to storage space SC01 with an auto generated name cp_SC01_Service_xxxx. On the right, you can see the same storage resource shown as the child pool created on the storage system.

Figure 4-26 SCB storage resource and child pool on the storage system
4.3 Configuring VMware vSphere Web Client
The configuration of Virtual Volumes is now complete for our storage system and IBM Spectrum Control Base Edition. As such, the tasks required of the storage administrator have been completed. Finally, we move our attention to configuring the vSphere environment. Before we can use VVols, the following tasks should be performed by the vSphere administrator.
4.3.1 Adding a storage provider
Adding a storage provider to the vSphere Web Client provides the last, but pivotal step in configuring the VVols environment. The storage provider is the IBM Spectrum Control Base Edition instance that we configured earlier in the chapter.
To add the SCB instance as a storage provider in the vSphere Web Client, complete the following steps:
1. In your vSphere Web Client Home window, click vCenter Inventory Lists.
2. From the Inventory list on the left, click vCenter Servers under the Resources twistie.
3. Select your vCenter Server from the pane on the left.
4. Click the Manage tab in the right pane.
5. Click Storage Providers in the right pane.
6. Click the green Plus sign (+) button.
You should now have arrived at the same dialog as that shown in Figure 4-27.

Figure 4-27 The vSphere Web Client adding a New Storage Provider
7. In the New Storage Provider dialog, complete the following fields:
a. Enter a friendly Name.
b. Enter the URL of your SCB instance with the required port and path details, for example, https://<host.domain>.com:8443/services/vasa.
8. Click OK and, when prompted, select Yes to accept the security alert. This process can take a few minutes to complete.
The SCB instance should now have established a secure SSL connection to the vCenter Web Client as an Active Storage Provider. See Figure 4-28 for reference.

Figure 4-28 The vSphere Web Client Storage Providers pane
4.3.2 Adding a VVol datastore in VMware vSphere Web Client
To use the storage space that you defined earlier in your IBM Spectrum Control Base Edition instance, you need to add a VVol datastore to the vSphere Web Client.
To add a datastore, complete the following steps:
1. In your vSphere Web Client Home window, click vCenter Inventory Lists and select Datastores.
2. Click the Create a New Datastore icon in the pane to the right, as shown in Figure 4-29. This starts the New Datastore wizard.

Figure 4-29 In vSphere Web Client, creating a new datastore
3. In the New Datastore wizard, select the placement location for the datastore (the cluster or hosts that you want to share the VVols datastore with).
4. Select VVol as the datastore type.
5. Select a backing storage container. Any storage spaces defined in IBM Spectrum Control Base Edition should be available to select as a storage container. The storage space names, as configured in SCB, are displayed in the Backing Storage Container field, as shown in Figure 4-30.

Figure 4-30 The vSphere Web Client New Datastore dialog
6. Select the hosts that require access to the VVol datastore.
7. Review the configuration options and click Finish. Figure 4-31 shows the settings used in our example configuration.

Figure 4-31 The vSphere Web Client new VVol datastore settings
Figure 4-32 shows our newly created VVol datastore.

Figure 4-32 The vSphere Web Client VVols datastore
4.3.3 Setup complete
The vSphere administrator now has the essentials that are required to start using Virtual Volumes. At this point, we suggest deploying a standby instance of IBM Spectrum Control Base Edition, for redundancy of virtual machine management. If you want to follow this suggestion, you can find instructions in 4.4, “Configuring additional SCB servers for high availability” on page 39.
For a more detailed explanation of the key tasks involved in managing and maintaining your VVols environment now that it is successfully configured, see Chapter 5, “Managing and maintaining a Virtual Volumes environment” on page 49.
To maximize the potential for Virtual Volumes in driving automation with storage-based policies, see Chapter 7, “Storage Policy-Based Management” on page 83.
If you want a deeper understanding of the storage system concepts and operations involved in an active Virtual Volumes environment, more details are provided in Chapter 8, “Advanced concepts, operations, and functions in the Virtual Volumes environment” on page 93.
4.4 Configuring additional SCB servers for high availability
Multiple IBM Spectrum Control Base Edition instances can be configured to manage the same storage system. By doing so, we ensure the high availability (HA) of the management of VMs specific to our VVols environment. The steps involved in setting up an additional standby instance are essentially the same as configuring your initial active instance.
The installation and configuration notes can be followed from 4.2, “Configuring IBM Spectrum Control Base Edition” on page 22 through 4.2.12, “Adding a storage space” on page 31, inclusive. For completeness, we cover the required steps again in this section.
|
Tip: If you created a template of your SCB VM, now would be a great time to ask your vSphere administrator to deploy a second instance for use as your standby SCB server.
|
4.4.1 Downloading the IBM Spectrum Control Base Edition installation files
Obtain the current SCB installation files:
Extract them to a temporary folder (for example, /scb_install) on your SCB VM, hereafter referred to as SCB and the SCB server. Example 4-3 shows the typical installation files for SCB after they have been extracted.
Example 4-3 IBM Spectrum Control Base Edition - installation files
ibm_spectrum_control-2.2.1-xxxx-x86_64.bin
nginx-1.6.2-1.el6.ngx.x86_64.rpm
postgresql92-9.2.10-1PGDG.rhel6.x86_64.rpm
postgresql92-contrib-9.2.10-1PGDG.rhel6.x86_64.rpm
postgresql92-libs-9.2.10-1PGDG.rhel6.x86_64.rpm
postgresql92-server-9.2.10-1PGDG.rhel6.x86_64.rpm
4.4.2 Installing IBM Spectrum Control Base Edition
To install SCB, complete the following steps:
1. Change to the folder on your SCB server where you previously extracted the installation files and start the installation of SCB.
Example 4-4 Example output of command rpm -iv *.rpm
warning: nginx-1.6.2-1.el6.ngx.x86_64.rpm: Header V4 RSA/SHA1 Signature, key ID 7bd9bf62: NOKEY
warning: postgresql92-9.2.10-1PGDG.rhel6.x86_64.rpm: Header V4 DSA/SHA1 Signature, key ID 442df0f8: NOKEY
warning: uuid-1.6.1-10.el6.x86_64.rpm: Header V3 RSA/SHA256 Signature, key ID fd431d51: NOKEY
Preparing packages for installation...
postgresql92-libs-9.2.10-1PGDG.rhel6
postgresql92-9.2.10-1PGDG.rhel6
uuid-1.6.1-10.el6
postgresql92-contrib-9.2.10-1PGDG.rhel6
postgresql92-server-9.2.10-1PGDG.rhel6
nginx-1.6.2-1.el6.ngx
3. Next, we turn our attention to installing the .bin file. At the command line, type ./ibm_spectrum_control-2.2.1-xxxx-x86_64.bin (note that you may have a later file version).
4. When prompted, enter 1 to accept the agreement. After a minute or two, you will receive an Installation completed successfully message, and you can go to the next step.
4.4.3 Changing the IBMSC administration account
To modify the IBMSC user account, on the command line, type passwd ibmsc and enter a new password.
4.4.4 Accessing the IBM Spectrum Control Base Edition web interface
To access the SCB web interface, complete the following steps:
1. Open a web browser and connect to your standby SCB server’s web interface with the following URL https://<SCB Server Name>:8443. You might need to trust the certificate before continuing to the logon page, as shown in Figure 4-33.

Figure 4-33 SCB web interface logon
2. Log in to the standby SCB web interface with the following default credentials:
– Username: admin
– Password: admin1!
4.4.5 Changing the default administrator password
To change the password, complete the following steps:
1. Click the Settings button and select Users in the drop-down menu. You are presented with the Users pane. Highlight the admin user account by clicking it. Two small buttons, Edit User and Delete User, appear to the right, as shown in Figure 4-34.

Figure 4-34 SCB Users selection box

Figure 4-35 SCB CHANGE PASSWORD box
3. Enter the existing password of admin1! and then enter a new password for your admin user. Click APPLY → Close.
4.4.6 Storage Credentials
Earlier in this chapter (Figure 4-4 on page 20), you created a user on the storage system for use by SCB. Recall those details for use in completing the Storage Credentials:

Figure 4-36 SCB Storage Credentials dialog
2. Enter the User Name and Password of the SCB user account created on the storage system.
3. Click Apply.
4.4.7 VASA credentials
The VASA credentials are defined in SCB and used by the VMware vSphere Web Client to connect to the SCB server. To configure VASA credentials, complete the following steps:
1. Click the Settings button and select VASA credentials on the Settings menu. Figure 4-37 shows the VASA Credentials dialog.

Figure 4-37 SCB VASA Credentials dialog
2. Enter a Username and Password, then click Apply.
|
Tip: The VASA user credentials will be required later when adding the standby SCB storage provider in the vSphere Web Client.
|
4.4.8 General settings
This step is of particular importance to the configuration of high availability for your VVols environment.
|
Important: The HA Group name provided to the standby SCB instance must be identical to the HA Group name that was set when registering the first, active SCB instance.
|
To configure the general settings, complete the following steps:
1. Click the Settings button and select General Settings on the Settings menu, as shown in Figure 4-38.

Figure 4-38 SCB General Settings
2. Enter the FQDN of your standby SCB server.
3. Enter the name for the HA Group. This must match the HA Group set on the first, active SCB instance.
4. Click APPLY.
4.4.9 Server certificate
Figure 4-39 shows the Server Certificate dialog for your standby SCB server.

Figure 4-39 SCB Server Certificate dialog
To configure the server certificate, complete the following steps:
1. Click the Settings button and select Server certificate on the Settings menu.
2. Enter the FQDN of your standby SCB server.
3. Enter a Common Name for your standby SCB server.
4. Enter the IP Address of your standby SCB server.
5. Choose a certificate Validity period.
6. Click GENERATE.
4.4.10 Adding a storage system
To add a storage system, complete the following steps:
1. Click the Add button on the Storage Systems pane.
2. Enter the Management IP address or Hostname of the storage system, as shown in Figure 4-40. This is the same storage system added to the active SCB instance.

Figure 4-40 SCB Add New Array dialog

Figure 4-41 SCB Storage Systems
|
Note: Do not configure the storage spaces or storage services on your standby SCB instance. This information is populated from the database stored on the storage system if there is a failover.
|
4.4.11 Configuring the VMware vSphere Web Client
Adding a standby storage provider to the vSphere Web Client provides the last, but pivotal step in configuring your storage provider HA Group.
To add the standby SCB instance as a storage provider in the vSphere Web Client, complete the following steps:
1. In your vSphere Web Client home window, click vCenter Inventory Lists.
2. From the Inventory list on the left, click vCenter Servers under the Resources twistie.
3. Select your vCenter Server from the pane on the left.
4. Click the Manage tab in the right pane.
5. Click Storage Providers in the right pane.
6. Click the green Plus sign (+) button.
7. You should now have arrived at the window depicted in Figure 4-42.

Figure 4-42 vSphere Web Client adding a standby Storage Provider
8. In the New Storage Provider dialog, complete the following steps:
a. Enter a friendly Name.
b. Enter the URL of the standby IBM Spectrum Control Base Edition instance.
9. Click OK and, when prompted, select Yes to accept the security alert.
The SCB instance should now have established a secure SSL connection to the vCenter Web Client as a standby storage provider. See Figure 4-43 for reference.
vCenter continuously monitors the availability of the active storage provider. Should an issue arise with the active storage provider where the VASA services have stopped responding, a failover to the standby storage provider is initiated.

Figure 4-43 vSphere Web Client Storage Providers list
..................Content has been hidden....................
You can't read the all page of ebook, please click here login for view all page.