
The official definition of a bean, as given in the JavaBeans specification, is: “A bean is a reusable software component based on Sun’s JavaBeans specification that can be manipulated visually in a builder tool.”
Once you implement a bean, others can use it in a builder environment (such as NetBeans). Instead of having to write tedious code, they can simply drop your bean into a GUI form and customize it with dialog boxes.
This chapter explains how you can implement beans so that other developers can use them easily.
Note
We’d like to address a common confusion before going any further: The JavaBeans that we discuss in this chapter have little in common with Enterprise JavaBeans (EJB). Enterprise JavaBeans are server-side components with support for transactions, persistence, replication, and security. At a very basic level, they too are components that can be manipulated in builder tools. However, the Enterprise JavaBeans technology is quite a bit more complex than the “Standard Edition” JavaBeans technology.
That does not mean that standard JavaBeans components are limited to client-side programming. Web technologies such as JavaServer Faces (JSF) and JavaServer Pages (JSP) rely heavily on the JavaBeans component model.
Programmers with experience in Visual Basic will immediately know why beans are so important. Programmers coming from an environment in which the tradition is to “roll your own” for everything often find it hard to believe that Visual Basic is one of the most successful examples of reusable object technology. For those who have never worked with Visual Basic, here, in a nutshell, is how you build a Visual Basic application:
You build the interface by dropping components (called controls in Visual Basic) onto a form window.
Through property inspectors, you set properties of the components such as height, color, or other behavior.
The property inspectors also list the events to which components can react. Some events can be hooked up through dialog boxes. For other events, you write short snippets of event handling code.
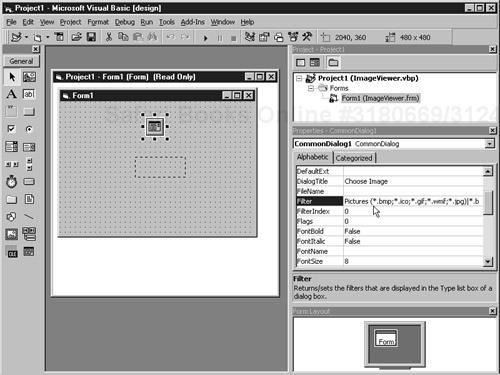
For example, in Volume I, Chapter 2, we wrote a program that displays an image in a frame. It took over a page of code. Here’s what you would do in Visual Basic to create a program with pretty much the same functionality:
Add two controls to a window: an Image control for displaying graphics and a Common Dialog control for selecting a file.
Set the Filter properties of the CommonDialog control so that only files that the Image control can handle will show up, as shown in Figure 8-1.
Write four lines of Visual Basic code that will be activated when the project first starts running. All the code you need for this sequence looks like this:
Private Sub Form_Load()
  CommonDialog1.ShowOpen
  Image1.Picture = LoadPicture(CommonDialog1.FileName)
End Sub
The code pops up the file dialog box—but only files with the right extension are shown because of how we set the filter property. After the user selects an image file, the code then tells the Image control to display it.
That’s it. The layout activity, combined with these statements, gives essentially the same functionality as a page of Java code. Clearly, it is a lot easier to learn how to drop down components and set properties than it is to write a page of code.
We do not want to imply that Visual Basic is a good solution for every problem. It is clearly optimized for a particular kind of problem—UI-intensive Windows programs. The JavaBeans technology was invented to make Java technology competitive in this arena. It enables vendors to create Visual Basic-style development environments. These environments make it possible to build user interfaces with a minimum of programming.
Writing a bean is not technically difficult—there are only a few new classes and interfaces for you to master. In particular, the simplest kind of bean is nothing more than a Java class that follows some fairly strict naming conventions for its methods.
Note
Some authors claim that a bean must have a default constructor. The JavaBeans specification is actually silent on this issue. However, most builder tools require a default constructor for each bean, so that they can instantiate beans without construction parameters.
Listing 8-1 at the end of this section shows the code for an ImageViewer bean that could give a Java builder environment the same functionality as the Visual Basic image control we mentioned in the previous section. When you look at this code, notice that the ImageViewerBean class really doesn’t look any different from any other class. For example, all accessor methods begin with get, and all mutator methods begin with set. As you will soon see, builder tools use this standard naming convention to discover properties. For example, fileName is a property of this bean because it has get and set methods.
Note that a property is not the same as an instance field. In this particular example, the fileName property is computed from the file instance field. Properties are conceptually at a higher level than instance fields—they are features of the interface, whereas instance fields belong to the implementation of the class.
One point that you need to keep in mind when you read through the examples in this chapter is that real-world beans are much more elaborate and tedious to code than our brief examples, for two reasons.
Beans must be usable by less-than-expert programmers. You need to expose lots of properties so that your users can access most of the functionality of your bean with a visual design tool and without programming.
The same bean must be usable in a wide variety of contexts. Both the behavior and the appearance of your bean must be customizable. Again, this means exposing lots of properties.
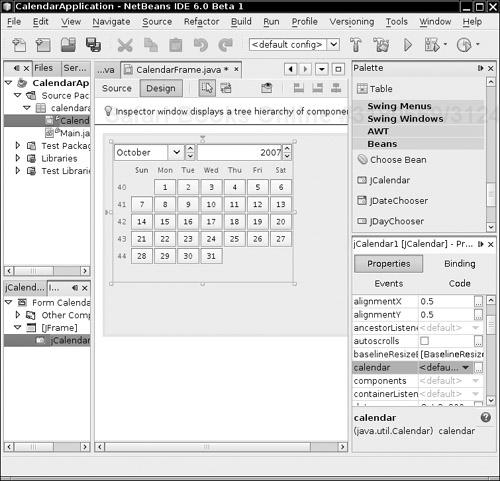
A good example of a bean with rich behavior is CalendarBean by Kai Tödter (see Figure 8-2). The bean and its source code are freely available from http://www.toedter.com/en/jcalendar. This bean gives users a convenient way of entering dates, by locating them in a calendar display. This is obviously pretty complex and not something one would want to program from scratch. By using a bean such as this one, you can take advantage of the work of others, simply by dropping the bean into a builder tool.
Fortunately, you need to master only a small number of concepts to write beans with a rich set of behaviors. The example beans in this chapter, although not trivial, are kept simple enough to illustrate the necessary concepts.
Example 8-1. ImageViewerBean.java
 1. package com.horstmann.corejava;
 2.
 3. import java.awt.*;
 4. import java.io.*;
 5. import javax.imageio.*;
 6. import javax.swing.*;
 7.
 8. /**
 9.  * A bean for viewing an image.
10.  * @version 1.21 2001-08-15
11.  * @author Cay Horstmann
12.  */
13. public class ImageViewerBean extends JLabel
14. {
15.
16.    public ImageViewerBean()
17.    {
18.       setBorder(BorderFactory.createEtchedBorder());
19.    }
20.
21.    /**
22.     * Sets the fileName property.
23.     * @param fileName the image file name
24.     */
25.    public void setFileName(String fileName)
26.    {
27.       try
28.       {
29.          file = new File(fileName);
30.          setIcon(new ImageIcon(ImageIO.read(file)));
31.       }
32.       catch (IOException e)
33.       {
34.          file = null;
35.          setIcon(null);
36.       }
37.    }
38.
39.    /**
40.     * Gets the fileName property.
41.     * @return the image file name
42.     */
43.    public String getFileName()
44.    {
45.       if (file == null) return "";
46.       else return file.getPath();
47.    }
48.
49.    public Dimension getPreferredSize()
50.    {
51.       return new Dimension(XPREFSIZE, YPREFSIZE);
52.    }
53.
54.    private File file = null;
55.    private static final int XPREFSIZE = 200;
56.    private static final int YPREFSIZE = 200;
57. }
Before we get into the mechanics of writing beans, we want you to see how you might use or test them. ImageViewerBean is a perfectly usable bean, but outside a builder environment it can’t show off its special features.
Each builder environment uses its own set of strategies to ease the programmer’s life. We cover one environment, the NetBeans integrated development environment, available from http://netbeans.org.
In this example, we use two beans, ImageViewerBean and FileNameBean. You have already seen the code for ImageViewerBean. We will analyze the code for FileNameBean later in this chapter. For now, all you have to know is that clicking the button with the “. . .” label opens a file chooser.
To make any bean usable in a builder tool, package into a JAR file all class files that are used by the bean code. Unlike the JAR files for an applet, a JAR file for a bean needs a manifest file that specifies which class files in the archive are beans and should be included in the builder’s toolbox. For example, here is the manifest file ImageViewerBean.mf for ImageViewerBean.
Manifest-Version: 1.0

Name: com/horstmann/corejava/ImageViewerBean.class
Java-Bean: True
Note the blank line between the manifest version and bean name.
Note
We place our example beans into the package com.horstmann.corejava because some builder environments have problems loading beans from the default package.
If your bean contains multiple class files, you just mention in the manifest those class files that are beans and that you want to have displayed in the toolbox. For example, you could place ImageViewerBean and FileNameBean into the same JAR file and use the manifest
Manifest-Version: 1.0

Name: com/horstmann/corejava/ImageViewerBean.class
Java-Bean: True

Name: com/horstmann/corejava/FileNameBean.class
Java-Bean: True
Caution
Some builder tools are extremely fussy about manifests. Make sure that there are no spaces after the ends of each line, that there are blank lines after the version and between bean entries, and that the last line ends in a newline.
To make the JAR file, follow these steps:
Edit the manifest file.
Gather all needed class files in a directory.
Run the
jartool as follows:jar cvfm JarFile ManifestFile ClassFilesFor example,
jar cvfm ImageViewerBean.jar ImageViewerBean.mf com/horstmann/corejava/*.class
You can also add other items, such as icon images, to the JAR file. We discuss bean icons later in this chapter.
Caution
Make sure to include all files that your bean needs in the JAR file. In particular, pay attention to inner class files such as FileNameBean$1.class.
Builder environments have a mechanism for adding new beans, typically by loading JAR files. Here is what you do to import beans into NetBeans version 6.
Compile the ImageViewerBean and FileNameBean classes and package them into JAR files. Then start NetBeans and follow these steps.
Select Tools -> Palette -> Swing/AWT Components from the menu.
Click the Add from JAR button.
In the file dialog box, move to the
ImageViewerBeandirectory and selectImageViewerBean.jar.Now a dialog box pops up that lists all the beans that were found in the JAR file. Select
ImageViewerBean.Finally, you are asked into which palette you want to place the beans. Select Beans. (There are other palettes for Swing components, AWT components, and so on.)
Have a look at the Beans palette. It now contains an icon representing the new bean However, the icon is just a default icon—you will see later how to add icons to a bean.
Repeat these steps with FileNameBean. Now you are ready to compose these beans into an application.
The promise of component-based development is to compose your application from prefabricated components, with a minimum of programming. In this section, you will see how to compose an application from the ImageViewerBean and FileNameBean components.
In NetBeans 6, select File -> New Project from the menu. A dialog box pops up. Select Java, then Java Application (see Figure 8-3).
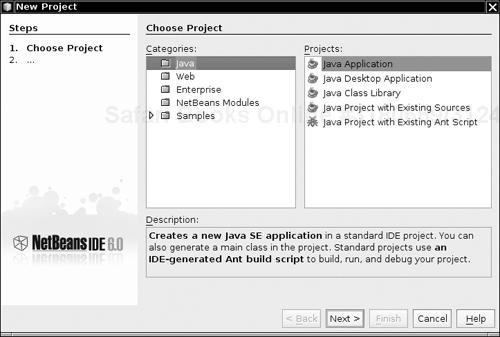
Click the Next button. On the following screen, set a name for your application (such as ImageViewer), and click the Finish button. Now you see a project viewer on the left and the source code editor in the middle.
Right-click the project name in the project viewer and select New -> JFrame Form from the menu (see Figure 8-4).
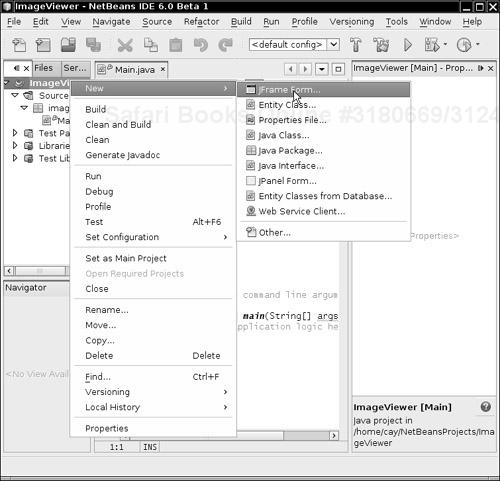
A dialog box pops up. Enter a name for the frame class (such as ImageViewerFrame), and click the Finish button. You now get a form editor with a blank frame. To add a bean to the form, select the bean in the palette that is located to the right of the form editor. Then click the frame.
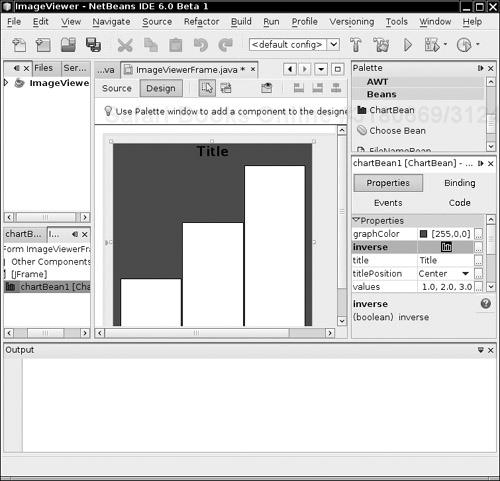
Figure 8-5 shows the result of adding an ImageViewerBean onto the frame.
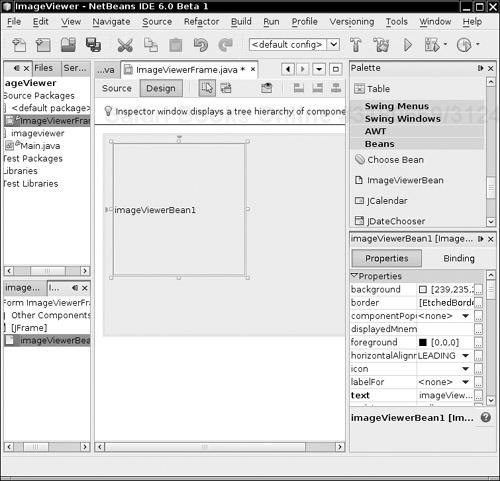
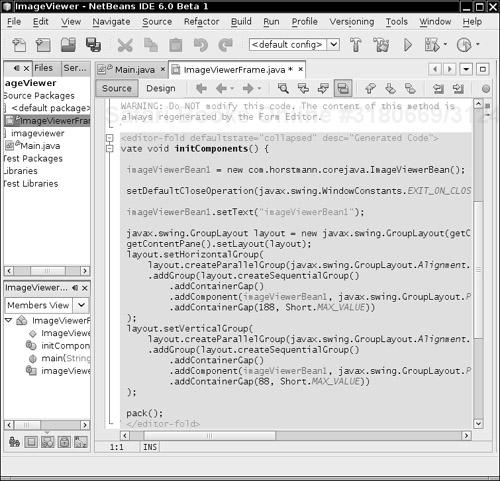
If you look into the source window, you will find that the source code now contains the Java instructions to add the bean objects to the frame (see Figure 8-6). The source code is bracketed by dire warnings that you should not edit it. Any edits would be lost when the builder environment updates the code as you modify the form.
Note
A builder environment is not required to update source code as you build an application. A builder environment can generate source code when you are done editing, serialize the beans you customized, or perhaps produce an entirely different description of your building activity.
For example, the experimental Bean Builder at http://bean-builder.dev.java.net lets you design GUI applications without writing any source code at all.
The JavaBeans mechanism doesn’t attempt to force an implementation strategy on a builder tool. Instead, it aims to supply information about beans to builder tools that can choose to take advantage of the information in one way or another.
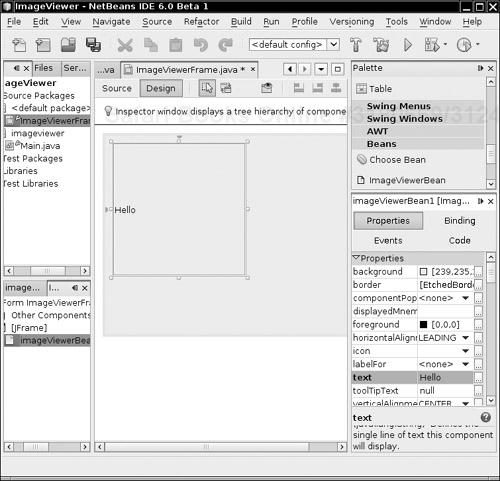
Now go back to the design view and click ImageViewerBean in the form. On the right-hand side is a property inspector that lists the bean property names and their current values. This is a vital part of component-based development tools because setting properties at design time is how you set the initial state of a component.
For example, you can modify the text property of the label used for the image bean by simply typing a new name into the property inspector. Changing the text property is simple—you just edit a string in a text field. Try it out—set the label text to "Hello". The form is immediately updated to reflect your change (see Figure 8-7).
Note
When you change the setting of a property, the NetBeans environment updates the source code to reflect your action. For example, if you set the text field to Hello, the instruction
imageViewerBean.setText("Hello");is added to the initComponents method. As already mentioned, other builder tools might have different strategies for recording property settings.
Properties don’t have to be strings; they can be values of any Java type. To make it possible for users to set values for properties of any type, builder tools use specialized property editors. (Property editors either come with the builder or are supplied by the bean developer. You see how to write your own property editors later in this chapter.)
To see a simple property editor at work, look at the foreground property. The property type is Color. You can see the color editor, with a text field containing a string [0,0,0] and a button labeled “. . .” that brings up a color chooser. Go ahead and change the foreground color. Notice that you’ll immediately see the change to the property value—the label text changes color.
More interestingly, choose a file name for an image file in the property inspector. Once you do so, ImageViewerBean automatically displays the image.
Note
If you look closely at the property inspector in NetBeans, you will find a large number of mysterious properties such as focusCycleRoot and paintingForPrint. These are inherited from the JLabel superclass. You will see later in this chapter how you can suppress them from the property inspector.
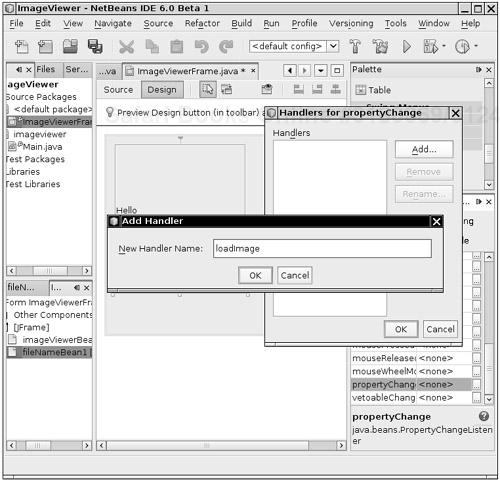
To complete our application, place a FileNameBean object into the frame. Now we want the image to be loaded when the fileName property of FileNameBean is changed. This happens through a PropertyChange event; we discuss these kinds of events later in this chapter.
To react to the event, select FileNameBean and select the Events tab from its property inspector. Then click the “...” button next to the propertyChange entry. A dialog box appears that shows that no handlers are currently associated with this event. Click the Add button in the dialog box. You are prompted for a method name (see Figure 8-8). Type loadImage.
Now look at the code editor. Event handling code has been added, and there is a new method:
private void loadImage(java.beans.PropertyChange evt)
{
   // TODO add your handling code here
}
Add the following line of code to that method:
imageViewerBean1.setFileName(fileNameBean1.getFileName());
Then compile and execute the frame class. You now have a complete image viewer application. Click the button with the “. . .” label and select an image file. The image is displayed in the image viewer (see Figure 8-9).

This process demonstrates that you can create a Java application from beans by setting properties and providing a small amount of code for event handlers.
In this section, we cover the basic rules for designing your own beans. First, we want to stress there is no cosmic beans class that you extend to build your beans. Visual beans directly or indirectly extend the Component class, but nonvisual beans don’t have to extend any particular superclass. Remember, a bean is simply any class that can be manipulated in a builder tool. The builder tool does not look at the superclass to determine the bean nature of a class, but it analyzes the names of its methods. To enable this analysis, the method names for beans must follow certain patterns.
Note
There is a java.beans.Beans class, but all methods in it are static. Extending it would, therefore, be rather pointless, even though you will see it done occasionally, supposedly for greater “clarity.” Clearly, because a bean can’t extend both Beans and Component, this approach can’t work for visual beans. In fact, the Beans class contains methods that are designed to be called by builder tools, for example, to check whether the tool is operating at design time or run time.
Other languages for visual design environments, such as Visual Basic and C#, have special keywords such as “Property” and “Event” to express these concepts directly. The designers of the Java specification decided not to add keywords to the language to support visual programming. Therefore, they needed an alternative so that a builder tool could analyze a bean to learn its properties or events. Actually, there are two alternative mechanisms. If the bean writer uses standard naming patterns for properties and events, then the builder tool can use the reflection mechanism to understand what properties and events the bean is supposed to expose. Alternatively, the bean writer can supply a bean information class that tells the builder tool about the properties and events of the bean. We start out using the naming patterns because they are easy to use. You’ll see later in this chapter how to supply a bean information class.
Note
Although the documentation calls these standard naming patterns “design patterns,” these are really only naming conventions and have nothing to do with the design patterns that are used in object-oriented programming.
The naming pattern for properties is simple: Any pair of methods
public Type getPropertyName()
public void setPropertyName(Type newValue)
corresponds to a read/write property.
For example, in our ImageViewerBean, there is only one read/write property (for the file name to be viewed), with the following methods:
public String getFileName()
public void setFileName(String newValue)
If you have a get method but not an associated set method, you define a read-only property. Conversely, a set method without an associated get method defines a write-only property.
Note
The get and set methods you create can do more than simply get and set a private data field. Like any Java method, they can carry out arbitrary actions. For example, the setFileName method of the ImageViewerBean class not only sets the value of the fileName data field, but also opens the file and loads the image.
Note
In Visual Basic and C#, properties also come from get and set methods. However, in both these languages, you explicitly define properties rather than having builder tools second-guess the programmer’s intentions by analyzing method names. In those languages, properties have another advantage: Using a property name on the left side of an assignment automatically calls the set method. Using a property name in an expression automatically calls the get method. For example, in Visual Basic you can write
imageBean.fileName = "corejava.gif"
instead of
imageBean.setFileName("corejava.gif");This syntax was considered for Java, but the language designers felt that it was a poor idea to hide a method call behind syntax that looks like field access.
There is one exception to the get/set naming pattern. Properties that have boolean values should use an is/set naming pattern, as in the following examples:
public boolean isPropertyName()
public void setPropertyName(boolean b)
For example, an animation might have a property running, with two methods
public boolean isRunning()
public void setRunning(boolean b)
The setRunning method would start and stop the animation. The isRunning method would report its current status.
Note
It is legal to use a get prefix for a boolean property accessor (such as getRunning), but the is prefix is preferred.
Be careful with the capitalization pattern you use for your method names. The designers of the JavaBeans specification decided that the name of the property in our example would be fileName, with a lowercase f, even though the get and set methods contain an uppercase F (getFileName, setFileName). The bean analyzer performs a process called decapitalization to derive the property name. (That is, the first character after get or set is converted to lower case.) The rationale is that this process results in method and property names that are more natural to programmers.
However, if the first two letters are upper case (such as in getURL), then the first letter of the property is not changed to lower case. After all, a property name of uRL would look ridiculous.
Note
What do you do if your class has a pair of get and set methods that doesn’t correspond to a property that you want users to manipulate in a property inspector? In your own classes, you can of course avoid that situation by renaming your methods. However, if you extend another class, then you inherit the method names from the superclass. This happens, for example, when your bean extends JPanel or JLabel—a large number of uninteresting properties show up in the property inspector. You will see later in this chapter how you can override the automatic property discovery process by supplying bean information. In the bean information, you can specify exactly which properties your bean should expose.
For events, the naming patterns are equally simple. A bean builder environment will infer that your bean generates events when you supply methods to add and remove event listeners. All event class names must end in Event, and the classes must extend the EventObject class.
Suppose your bean generates events of type EventNameEvent. The listener interface must be called EventNameListener, and the methods to manage the listeners must be called
public void addEventNameListener(EventNameListener e)
public void removeEventNameListener(EventNameListener e)
public EventNameListener getEventNameListeners()
If you look at the code for ImageViewerBean, you’ll see that it has no events to expose. However, many Swing components generate events, and they follow this pattern. For example, the AbstractButton class generates ActionEvent objects, and it has the following methods to manage ActionListener objects:
public void addActionListener(ActionListener e)
public void removeActionListener(ActionListener e)
ActionListener[] getActionListeners()
A sophisticated bean will expose lots of different properties and events. Properties can be as simple as the fileName property that you saw in ImageViewerBean and FileNameBean or as sophisticated as a color value or even an array of data points—we encounter both of these cases later in this chapter. The JavaBeans specification allows four types of properties, which we illustrate by various examples.
A simple property is one that takes a single value such as a string or a number. The fileName property of the ImageViewer is an example of a simple property. Simple properties are easy to program: Just use the set/get naming convention we indicated earlier. For example, if you look at the code in Listing 8-1, you can see that all it took to implement a simple string property is the following:
public void setFileName(String f)
{
   fileName = f;
   image = . . .
   repaint();
}

public String getFileName()
{
   if (file == null) return "";
   else return file.getPath();
}An indexed property specifies an array. With an indexed property, you supply two pairs of get and set methods: one for the array and one for individual entries. They must follow this pattern:
Type[] getPropertyName()
void setPropertyName(Type[] newValue)
Type getPropertyName(int i)
void setPropertyName(int i, Type newValue)
For example, the FileNameBean uses an indexed property for the file extensions. It provides these four methods:
public String[] getExtensions() { return extensions; }
public void setExtensions(String[] newValue) { extensions = newValue; }
public String getExtensions(int i)
{
   if (0 <= i && i < extensions.length) return extensions[i];
   else return "";
}
public void setExtensions(int i, String newValue)
{
   if (0 <= i && i < extensions.length) extensions[i] = value;
}
. . .
private String[] extensions;
The setPropertyName(int, Type) method cannot be used to grow the array. To grow the array, you must manually build a new array and then pass it to the setPropertyName(Type[]) method.
Bound properties tell interested listeners that their value has changed. For example, the fileName property in FileNameBean is a bound property. When the file name changes, then ImageViewerBean is automatically notified and it loads the new file.
To implement a bound property, you must implement two mechanisms:
Whenever the value of the property changes, the bean must send a
PropertyChangeevent to all registered listeners. This change can occur when thesetmethod is called or when some other method (such as the action listener of the “...” button) changes the value.To enable interested listeners to register themselves, the bean has to implement the following two methods:
void addPropertyChangeListener(PropertyChangeListener listener)
void removePropertyChangeListener(PropertyChangeListener listener)
It is also recommended (but not required) to provide the method
PropertyChangeListener[] getPropertyChangeListeners()
The java.beans package has a convenience class, called PropertyChangeSupport, that manages the listeners for you. To use this convenience class, add an instance field of this class:
private PropertyChangeSupport changeSupport = new PropertyChangeSupport(this);
Delegate the task of adding and removing property change listeners to that object.
public void addPropertyChangeListener(PropertyChangeListener listener)
{
   changeSupport.addPropertyChangeListener(listener);
}

public void removePropertyChangeListener(PropertyChangeListener listener)
{
   changeSupport.removePropertyChangeListener(listener);
}

public PropertyChangeListener[] getPropertyChangeListeners()
{
   return changeSupport.getPropertyChangeListeners();
}
Whenever the value of the property changes, use the firePropertyChange method of the PropertyChangeSupport object to deliver an event to all the registered listeners. That method has three parameters: the name of the property, the old value, and the new value. Here is the boilerplate code for a typical setter of a bound property:
public void setValue(Type newValue)
{
   Type oldValue = getValue();
   value = newValue;
   changeSupport.firePropertyChange("propertyName", oldValue, newValue);
}
To fire a change of an indexed property, you call
changeSupport.fireIndexedPropertyChange("propertyName", index, oldValue, newValue);Tip
If your bean extends any class that ultimately extends the Component class, then you do not need to implement the addPropertyChangeListener, removePropertyChangeListener, and getPropertyChangeListeners methods. These methods are already implemented in the Component superclass. To notify the listeners of a property change, simply call the firePropertyChange method of the JComponent superclass. Unfortunately, firing of indexed property changes is not supported.
Other beans that want to be notified when the property value changes must add a PropertyChangeListener. That interface contains only one method:
void propertyChange(PropertyChangeEvent event)
The PropertyChangeEvent object holds the name of the property and the old and new values, obtainable with the getPropertyName, getOldValue, and getNewValue methods.
If the property type is not a class type, then the property value objects are instances of the usual wrapper classes.
A constrained property is constrained by the fact that any listener can “veto” proposed changes, forcing it to revert to the old setting. The Java library contains only a few examples of constrained properties. One of them is the closed property of the JInternalFrame class. If someone tries to call setClosed(true) on an internal frame, then all of its VetoableChangeListeners are notified. If any of them throws a PropertyVetoException, then the closed property is not changed, and the setClosed method throws the same exception. In particular, a VetoableChangeListener may veto closing the frame if its contents have not been saved.
To build a constrained property, your bean must have the following two methods to manage VetoableChangeListener objects:
public void addVetoableChangeListener(VetoableChangeListener listener);
public void removeVetoableChangeListener(VetoableChangeListener listener);
It also should have a method for getting all listeners:
VetoableChangeListener[] getVetoableChangeListeners()
Just as there is a convenience class to manage property change listeners, there is a convenience class, called VetoableChangeSupport, that manages vetoable change listeners. Your bean should contain an object of this class.
private VetoableChangeSupport vetoSupport = new VetoableChangeSupport(this);
Adding and removing listeners should be delegated to this object. For example:
public void addVetoableChangeListener(VetoableChangeListener listener)
{
   vetoSupport.addVetoableChangeListener(listener);
}
public void removeVetoableChangeListener(VetoableChangeListener listener)
{
   vetoSupport.removeVetoableChangeListener(listener);
}
To update a constrained property value, a bean uses the following three-phase approach:
Notify all vetoable change listeners of the intent to change the property value. (Use the
fireVetoableChangemethod of theVetoableChangeSupportclass.)If none of the vetoable change listeners has thrown a
PropertyVetoException, then update the value of the property.Notify all property change listeners to confirm that a change has occurred.
For example,
public void setValue(Type newValue) throws PropertyVetoException
{
   Type oldValue = getValue();
   vetoSupport.fireVetoableChange("value", oldValue, newValue);
   // survived, therefore no veto
   value = newValue;
   changeSupport.firePropertyChange("value", oldValue, newValue);
}
It is important that you don’t change the property value until all the registered vetoable change listeners have agreed to the proposed change. Conversely, a vetoable change listener should never assume that a change that it agrees to is actually happening. The only reliable way to get notified when a change is actually happening is through a property change listener.
Note
If your bean extends the JComponent class, you do not need a separate VetoableChangeSupport object. Simply call the fireVetoableChange method of the JComponent superclass. Note that you cannot install a vetoable change listener for a specific property into a JComponent. You need to listen to all vetoable changes.
We end our discussion of JavaBeans properties by showing the full code for FileNameBean (see Listing 8-2). The FileNameBean has an indexed extensions property and a constrained filename property. Because FileNameBean extends the JPanel class, we did not have to explicitly use a PropertyChangeSupport object. Instead, we rely on the ability of the JPanel class to manage property change listeners.
Example 8-2. FileNameBean.java
  1. package com.horstmann.corejava;
  2.
  3. import java.awt.*;
  4. import java.awt.event.*;
  5. import java.io.*;
  6. import java.util.*;
  7. import javax.swing.*;
  8. import javax.swing.filechooser.*;
  9.
 10. /**
 11.  * A bean for specifying file names.
 12.  * @version 1.30 2007-10-03
 13.  * @author Cay Horstmann
 14.  */
 15. public class FileNameBean extends JPanel
 16. {
 17.    public FileNameBean()
 18.    {
 19.       dialogButton = new JButton("...");
 20.       nameField = new JTextField(30);
 21.
 22.       chooser = new JFileChooser();
 23.       setPreferredSize(new Dimension(XPREFSIZE, YPREFSIZE));
 24.
 25.       setLayout(new GridBagLayout());
 26.       GridBagConstraints gbc = new GridBagConstraints();
 27.       gbc.weightx = 100;
 28.       gbc.weighty = 100;
 29.       gbc.anchor = GridBagConstraints.WEST;
 30.       gbc.fill = GridBagConstraints.BOTH;
 31.       gbc.gridwidth = 1;
 32.       gbc.gridheight = 1;
 33.       add(nameField, gbc);
 34.
 35.       dialogButton.addActionListener(new ActionListener()
 36.          {
 37.             public void actionPerformed(ActionEvent event)
 38.             {
 39.                chooser.setFileFilter(new FileNameExtensionFilter(Arrays.toString(extensions),
 40.                      extensions));
 41.                int r = chooser.showOpenDialog(null);
 42.                if (r == JFileChooser.APPROVE_OPTION)
 43.                {
 44.                   File f = chooser.getSelectedFile();
 45.                   String name = f.getAbsolutePath();
 46.                   setFileName(name);
 47.               }
 48.             }
 49.          });
 50.       nameField.setEditable(false);
 51.
 52.       gbc.weightx = 0;
 53.       gbc.anchor = GridBagConstraints.EAST;
 54.       gbc.fill = GridBagConstraints.NONE;
 55.       gbc.gridx = 1;
 56.       add(dialogButton, gbc);
 57.    }
 58.
 59.    /**
 60.     * Sets the fileName property.
 61.     * @param newValue the new file name
 62.     */
 63.    public void setFileName(String newValue)
 64.    {
 65.       String oldValue = nameField.getText();
 66.       nameField.setText(newValue);
 67.       firePropertyChange("fileName", oldValue, newValue);
 68.    }
 69.
 70.    /**
 71.     * Gets the fileName property.
 72.     * @return the name of the selected file
 73.     */
 74.    public String getFileName()
 75.    {
 76.       return nameField.getText();
 77.    }
 78.
 79.    /**
 80.     * Gets the extensions property.
 81.     * @return the default extensions in the file chooser
 82.     */
 83.    public String[] getExtensions()
 84.    {
 85.       return extensions;
 86.    }
 87.
 88.    /**
 89.     * Sets the extensions property.
 90.     * @param newValue the new default extensions
 91.     */
 92.    public void setExtensions(String[] newValue)
 93.    {
 94.       extensions = newValue;
 95.    }
 96.
 97.    /**
 98.     * Gets one of the extensions property values.
 99.     * @param i the index of the property value
100.     * @return the value at the given index
101.     */
102.    public String getExtensions(int i)
103.    {
104.       if (0 <= i && i < extensions.length) return extensions[i];
105.       else return "";
106.    }
107.
108.    /**
109.     * Sets one of the extensions property values.
110.     * @param i the index of the property value
111.     * @param newValue the new value at the given index
112.     */
113.    public void setExtensions(int i, String newValue)
114.    {
115.       if (0 <= i && i < extensions.length) extensions[i] = newValue;
116.    }
117.
118.    private static final int XPREFSIZE = 200;
119.    private static final int YPREFSIZE = 20;
120.    private JButton dialogButton;
121.    private JTextField nameField;
122.    private JFileChooser chooser;
123.    private String[] extensions = { "gif", "png" };
124. }
java.beans.PropertyChangeSupport 1.1
PropertyChangeSupport(Object sourceBean)constructs a
PropertyChangeSupportobject that manages listeners for bound property changes of the given bean.void addPropertyChangeListener(PropertyChangeListener listener)void addPropertyChangeListener(String propertyName, PropertyChangeListener listener)1.2registers an interested listener for changes in all bound properties, or only the named bound property.
void removePropertyChangeListener(PropertyChangeListener listener)void removePropertyChangeListener(String propertyName, PropertyChangeListener listener)1.2removes a previously registered property change listener.
void firePropertyChange(String propertyName, Object oldValue, Object newValue)void firePropertyChange(String propertyName, int oldValue, int newValue)1.2void firePropertyChange(String propertyName, boolean oldValue, boolean newValue)1.2sends a
PropertyChangeEventto registered listeners.void fireIndexedPropertyChange(String propertyName, int index, Object oldValue, Object newValue)5.0void fireIndexedPropertyChange(String propertyName, int index, int oldValue, int newValue)5.0void fireIndexedPropertyChange(String propertyName, int index, boolean oldValue, boolean newValue)5.0sends an
IndexedPropertyChangeEventto registered listeners.PropertyChangeListener[] getPropertyChangeListeners()1.4PropertyChangeListener[] getPropertyChangeListeners(String propertyName)1.4gets the listeners for changes in all bound properties, or only the named bound property.
java.beans.PropertyChangeEvent 1.1
PropertyChangeEvent(Object sourceBean, String propertyName, Object oldValue, Object newValue)constructs a new
PropertyChangeEventobject, describing that the given property has changed fromoldValuetonewValue.String getPropertyName()returns the name of the property.
Object getOldValue();Object getNewValue()returns the old and new value of the property.
java.beans.IndexedPropertyChangeEvent 5.0
IndexedPropertyChangeEvent(Object sourceBean, String propertyName, int index, Object oldValue, Object newValue)constructs a new
IndexedPropertyChangeEventobject, describing that the given property has changed fromoldValuetonewValueat the given index.int getIndex()returns the index at which the change occurred.
java.beans.VetoableChangeListener 1.1
void vetoableChange(PropertyChangeEvent event)is called when a property is about to be changed. It should throw a
PropertyVetoExceptionif the change is not acceptable.
java.beans.VetoableChangeSupport 1.1
VetoableChangeSupport(Object sourceBean)constructs a
PropertyChangeSupportobject that manages listeners for constrained property changes of the given bean.void addVetoableChangeListener(VetoableChangeListener listener)void addVetoableChangeListener(String propertyName, VetoableChangeListener listener)1.2registers an interested listener for changes in all constrained properties, or only the named constrained property.
void removeVetoableChangeListener(VetoableChangeListener listener)void removeVetoableChangeListener(String propertyName, VetoableChangeListener listener)1.2removes a previously registered vetoable change listener.
void fireVetoableChange(String propertyName, Object oldValue, Object newValue)void fireVetoableChange(String propertyName, int oldValue, int newValue)1.2void fireVetoableChange(String propertyName, boolean oldValue, boolean newValue)1.2sends a
VetoableChangeEventto registered listeners.VetoableChangeListener[] getVetoableChangeListeners()1.4VetoableChangeListener[] getVetoableChangeListeners(String propertyName)1.4gets the listeners for changes in all constrained properties, or only the named bound property.
java.awt.Component 1.0
void addPropertyChangeListener(PropertyChangeListener listener)1.2void addPropertyChangeListener(String propertyName, PropertyChangeListener listener)1.2registers an interested listener for changes in all bound properties, or only the named bound property.
void removePropertyChangeListener(PropertyChangeListener listener)1.2void removePropertyChangeListener(String propertyName, PropertyChangeListener listener)1.2removes a previously registered property change listener.
void firePropertyChange(String propertyName, Object oldValue, Object newValue)1.2sends a
PropertyChangeEventto registered listeners.
javax.swing.JComponent 1.2
void addVetoableChangeListener(VetoableChangeListener listener)registers an interested listener for changes in all constrained properties, or only the named constrained property.
void removeVetoableChangeListener(VetoableChangeListener listener)removes a previously registered vetoable change listener.
void fireVetoableChange(String propertyName, Object oldValue, Object newValue)sends a
VetoableChangeEventto registered listeners.
If you use the standard naming patterns for the methods of your bean class, then a builder tool can use reflection to determine features such as properties and events. This process makes it simple to get started with bean programming, but naming patterns are rather limiting. As your beans become complex, there might be features of your bean that naming patterns will not reveal. Moreover, as we already mentioned, many beans have get/set method pairs that should not correspond to bean properties.
If you need a more flexible mechanism for describing information about your bean, define an object that implements the BeanInfo interface. When you provide such an object, a builder tool will consult it about the features that your bean supports.
The name of the bean info class must be formed by adding BeanInfo to the name of the bean. For example, the bean info class associated to the class ImageViewerBean must be named ImageViewerBeanBeanInfo. The bean info class must be part of the same package as the bean itself.
You won’t normally write a class that implements all methods of the BeanInfo interface. Instead, you should extend the SimpleBeanInfo convenience class that has default implementations for all the methods in the BeanInfo interface.
The most common reason for supplying a BeanInfo class is to gain control of the bean properties. You construct a PropertyDescriptor for each property by supplying the name of the property and the class of the bean that contains it.
PropertyDescriptor descriptor = new PropertyDescriptor("fileName", ImageViewerBean.class);Then implement the getPropertyDescriptors method of your BeanInfo class to return an array of all property descriptors.
For example, suppose ImageViewerBean wants to hide all properties that it inherits from the JLabel superclass and expose only the fileName property. The following BeanInfo class does just that:
// bean info class for ImageViewerBean
class ImageViewerBeanBeanInfo extends SimpleBeanInfo
{
   public PropertyDescriptor[] getPropertyDescriptors()
   {
      return propertyDescriptors;
   }
   private PropertyDescriptor[] propertyDescriptors =  new PropertyDescriptor[]
      {
         new PropertyDescriptor("fileName", ImageViewerBean.class);
      };
}
Other methods also return EventSetDescriptor and MethodDescriptor arrays, but they are less commonly used. If one of these methods returns null (as is the case for the SimpleBeanInfo methods), then the standard naming patterns apply. However, if you override a method to return a non-null array, then you must include all properties, events, or methods in your array.
Note
Sometimes, you might want to write generic code that discovers properties or events of an arbitrary bean. Call the static getBeanInfo method of the Introspector class. The Introspector constructs a BeanInfo class that completely describes the bean, taking into account the information in BeanInfo companion classes.
Another useful method in the BeanInfo interface is the getIcon method that lets you give your bean a custom icon. Builder tools will display the icon in a palette. Actually, you can specify four separate icon bitmaps. The BeanInfo interface has four constants that cover the standard sizes:
ICON_COLOR_16×16
ICON_COLOR_32×32
ICON_MONO_16×16
ICON_MONO_32×32
In the following class, we use the loadImage convenience method in the SimpleBeanInfo class to load the icon images:
public class ImageViewerBeanBeanInfo extends SimpleBeanInfo
{
   public ImageViewerBeanBeanInfo()
   {
      iconColor16 = loadImage("ImageViewerBean_COLOR_16×16.gif");
      iconColor32 = loadImage("ImageViewerBean_COLOR_32×32.gif");
      iconMono16 = loadImage("ImageViewerBean_MONO_16×16.gif");
      iconMono32 = loadImage("ImageViewerBean_MONO_32×32.gif");
   }

   public Image getIcon(int iconType)
   {
      if (iconType == BeanInfo.ICON_COLOR_16×16) return iconColor16;
      else if (iconType == BeanInfo.ICON_COLOR_32×32) return iconColor32;
      else if (iconType == BeanInfo.ICON_MONO_16×16) return iconMono16;
      else if (iconType == BeanInfo.ICON_MONO_32×32) return iconMono32;
      else return null;
   }

   private Image iconColor16;
   private Image iconColor32;
   private Image iconMono16;
   private Image iconMono32;
}
java.beans.Introspector 1.1
static BeanInfo getBeanInfo(Class<?> beanClass)gets the bean information of the given class.
java.beans.BeanInfo 1.1
PropertyDescriptor[] getPropertyDescriptors()returns the descriptors for the bean properties. A return of
nullindicates that the naming conventions should be used to find the properties.Image getIcon(int iconType)returns an image object that can represent the bean in toolboxes, tool bars, and the like. There are four constants, as described earlier, for the standard types of icons.
java.beans.SimpleBeanInfo 1.1
Image loadImage(String resourceName)returns an image object file associated to the resource. The resource name is a path name, taken relative to the directory containing the bean info class.
java.beans.FeatureDescriptor 1.1
String getName()void setName(String name)gets or sets the programmatic name for the feature.
String getDisplayName()void setDisplayName(String displayName)gets or sets a display name for the feature. The default value is the value returned by
getName. However, currently there is no explicit support for supplying feature names in multiple locales.String getShortDescription()void setShortDescription(String text)gets or sets a string that a builder tool can use to provide a short description for this feature. The default value is the return value of
getDisplayName.boolean isExpert()void setExpert(boolean b)gets or sets an expert flag that a builder tool can use to determine whether to hide the feature from a naive user.
boolean isHidden()void setHidden(boolean b)gets or sets a flag that a builder tool should hide this feature.
java.beans.PropertyDescriptor 1.1
PropertyDescriptor(String propertyName, Class<?> beanClass)PropertyDescriptor(String propertyName, Class<?> beanClass, String getMethod, String setMethod)constructs a
PropertyDescriptorobject. The methods throw anIntrospectionExceptionif an error occurred during introspection. The first constructor assumes that you follow the standard convention for the names of thegetandsetmethods.Class<?> getPropertyType()returns a
Classobject for the property type.Method getWriteMethod()returns the method to get or set the property.
java.beans.IndexedPropertyDescriptor 1.1
IndexedPropertyDescriptor(String propertyName, Class<?> beanClass)IndexedPropertyDescriptor(String propertyName, Class<?> beanClass, String getMethod, String setMethod, String indexedGetMethod, String indexedSetMethod)constructs an
IndexedPropertyDescriptorfor the index property. The first constructor assumes that you follow the standard convention for the names of thegetandsetmethods.Method getIndexedReadMethod()Method getIndexedWriteMethod()returns the method to get or set an indexed value in the property.
If you add an integer or string property to a bean, then that property is automatically displayed in the bean’s property inspector. But what happens if you add a property whose values cannot easily be edited in a text field, for example, a Date or a Color? Then, you need to provide a separate component by which the user can specify the property value. Such components are called property editors. For example, a property editor for a date object might be a calendar that lets the user scroll through the months and pick a date. A property editor for a Color object would let the user select the red, green, and blue components of the color.
Actually, NetBeans already has a property editor for colors. Also, of course, there are property editors for basic types such as String (a text field) and boolean (a checkbox).
The process for supplying a new property editor is slightly involved. First, you create a bean info class to accompany your bean. Override the getPropertyDescriptors method. That method returns an array of PropertyDescriptor objects. You create one object for each property that should be displayed on a property editor, even those for which you just want the default editor.
You construct a PropertyDescriptor by supplying the name of the property and the class of the bean that contains it.
PropertyDescriptor descriptor = new PropertyDescriptor("titlePosition", ChartBean.class);Then you call the setPropertyEditorClass method of the PropertyDescriptor class.
descriptor.setPropertyEditorClass(TitlePositionEditor.class);
Next, you build an array of descriptors for properties of your bean. For example, the chart bean that we discuss in this section has five properties:
A
Colorproperty,graphColorA
Stringproperty,titleAn
intproperty,titlePositionA
double[]property,valuesA
booleanproperty,inverse
The code in Listing 8-3 shows the ChartBeanBeanInfo class that specifies the property editors for these properties. It achieves the following:
The
getPropertyDescriptorsmethod returns a descriptor for each property. ThetitleandgraphColorproperties are used with the default editors; that is, the string and color editors that come with the builder tool.The
titlePosition,values, andinverseproperties use special editors of typeTitlePositionEditor,DoubleArrayEditor, andInverseEditor, respectively.
Figure 8-10 shows the chart bean. You can see the title on the top. Its position can be set to left, center, or right. The values property specifies the graph values. If the inverse property is true, then the background is colored and the bars of the chart are white. You can find the code for the chart bean with the book’s companion code; the bean is simply a modification of the chart applet in Volume I, Chapter 10.
Example 8-3. ChartBeanBeanInfo.java
 1. package com.horstmann.corejava;
 2.
 3. import java.awt.*;
 4. import java.beans.*;
 5.
 6. /**
 7.  * The bean info for the chart bean, specifying the property editors.
 8.  * @version 1.20 2007-10-05
 9.  * @author Cay Horstmann
10.  */
11. public class ChartBeanBeanInfo extends SimpleBeanInfo
12. {
13.    public ChartBeanBeanInfo()
14.    {
15.       iconColor16 = loadImage("ChartBean_COLOR_16×16.gif");
16.       iconColor32 = loadImage("ChartBean_COLOR_32×32.gif");
17.       iconMono16 = loadImage("ChartBean_MONO_16×16.gif");
18.       iconMono32 = loadImage("ChartBean_MONO_32×32.gif");
19.
20.       try
21.       {
22.          PropertyDescriptor titlePositionDescriptor = new PropertyDescriptor("titlePosition",
23.                ChartBean.class);
24.          titlePositionDescriptor.setPropertyEditorClass(TitlePositionEditor.class);
25.          PropertyDescriptor inverseDescriptor = new PropertyDescriptor("inverse", ChartBean.class);
26.          inverseDescriptor.setPropertyEditorClass(InverseEditor.class);
27.          PropertyDescriptor valuesDescriptor = new PropertyDescriptor("values", ChartBean.class);
28.          valuesDescriptor.setPropertyEditorClass(DoubleArrayEditor.class);
29.          propertyDescriptors = new PropertyDescriptor[] {
30.                new PropertyDescriptor("title", ChartBean.class), titlePositionDescriptor,
31.                valuesDescriptor, new PropertyDescriptor("graphColor", ChartBean.class),
32.                inverseDescriptor };
33.        }
34.        catch (IntrospectionException e)
35.        {
36.           e.printStackTrace();
37.        }
38.    }
39.
40.    public PropertyDescriptor[] getPropertyDescriptors()
41.    {
42.       return propertyDescriptors;
43.    }
44.
45.    public Image getIcon(int iconType)
46.    {
47.       if (iconType == BeanInfo.ICON_COLOR_16×16) return iconColor16;
48.       else if (iconType == BeanInfo.ICON_COLOR_32×32) return iconColor32;
49.       else if (iconType == BeanInfo.ICON_MONO_16×16) return iconMono16;
50.       else if (iconType == BeanInfo.ICON_MONO_32×32) return iconMono32;
51.       else return null;
52.    }
53.
54.    private PropertyDescriptor[] propertyDescriptors;
55.    private Image iconColor16;
56.    private Image iconColor32;
57.    private Image iconMono16;
58.    private Image iconMono32;
59. }
java.beans.PropertyDescriptor 1.1
PropertyDescriptor(String name, Class<?> beanClass)constructs a
PropertyDescriptorobject.Parameters:
nameThe name of the property
beanClassThe class of the bean to which the property belongs
void setPropertyEditorClass(Class<?> editorClass)sets the class of the property editor to be used with this property.
java.beans.BeanInfo 1.1
PropertyDescriptor[] getPropertyDescriptors()returns a descriptor for each property that should be displayed in the property inspector for the bean.
Before we get into the mechanics of writing property editors, we should point out that a editor is under the control of the builder, not the bean. When the builder displays the property inspector, it carries out the following steps for each bean property.
It instantiates a property editor.
It asks the bean to tell it the current value of the property.
It then asks the property editor to display the value.
A property editor must supply a default constructor, and it must implement the PropertyEditor interface. You will usually want to extend the convenience PropertyEditorSupport class that provides default versions of these methods.
For every property editor you write, you choose one of three ways to display and edit the property value:
As a text string (define
getAsTextandsetAsText)As a choice field (define
getAsText,setAsText, andgetTags)Graphically, by painting it (define
isPaintable,paintValue,supportsCustomEditor, andgetCustomEditor)
We have a closer look at these choices in the following sections.
Simple property editors work with text strings. You override the setAsText and getAsText methods. For example, our chart bean has a property that lets you choose where the title should be displayed: Left, Center, or Right. These choices are implemented as an enumeration
public enum Position { LEFT, CENTER, RIGHT };But of course, we don’t want them to appear as uppercase strings LEFT, CENTER, RIGHT—unless we are trying to enter the User Interface Hall of Horrors. Instead, we define a property editor whose getAsText method picks a string that looks pleasing to the developer:
class TitlePositionEditor extends PropertyEditorSupport
{
   public String getAsText()
   {
      int index = ((ChartBean.Position) getValue()).ordinal();
      return tags[index];
   }
   . . .
   private String[] tags = { "Left", "Center", "Right" };
}
Ideally, these strings should appear in the current locale, not necessarily in English, but we leave that as an exercise to the reader.
Conversely, we need to supply a method that converts a text string back to the property value:
public void setAsText(String s)
{
   int index = Arrays.asList(tags).indexOf(s);
   if (index >= 0) setValue(ChartBean.Position.values()[index]);
}
If we simply supply these two methods, the property inspector will provide a text field. It is initialized by a call to getAsText, and the setAsText method is called when we are done editing. Of course, in our situation, this is not a good choice for the titlePosition property, unless, of course, we are also competing for entry into the User Interface Hall of Shame. It is better to display all valid settings in a combo box (see Figure 8-11). The PropertyEditorSupport class gives a simple mechanism for indicating that a combo box is appropriate. Simply write a getTags method that returns an array of strings.
public String[] getTags() { return tags; }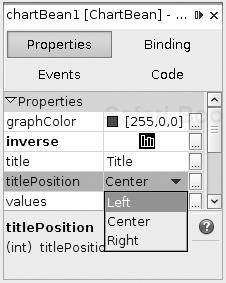
The default getTags method returns null, indicating that a text field is appropriate for editing the property value.
When supplying the getTags method, you still need to supply the getAsText and setAsText methods. The getTags method simply specifies the strings that should be offered to the user. The getAsText/setAsText methods translate between the strings and the data type of the property (which can be a string, an integer, an enumeration, or a completely different type).
Finally, property editors should implement the getJavaInitializationString method.With this method, you can give the builder tool the Java code that sets a property to its current value. The builder tool uses this string for automatic code generation. Here is the method for the TitlePositionEditor:
public String getJavaInitializationString()
{
   return ChartBean.Position.class.getName().replace('$', '.') + "." + getValue();
}
This method returns a string such as "com.horstmann.corejava.ChartBean.Position.LEFT". Try it out in NetBeans: If you edit the titlePosition property, NetBeans inserts code such as
chartBean1.setTitlePosition(com.horstmann.corejava.ChartBean.Position.LEFT);
In our situation, the code is a bit cumbersome because ChartBean.Position.class.getName() is the string "com.horstmann.corejava.ChartBean$Position". We replace the $ with a period, and add the result of invoking toString on the enumeration value.
Note
If a property has a custom editor that does not implement the getJavaInitializationString method, NetBeans does not know how to generate code and produces a setter with parameter ???.
Listing 8-4 shows the code for this property editor.
Example 8-4. TitlePositionEditor.java
 1. package com.horstmann.corejava;
 2.
 3. import java.beans.*;
 4. import java.util.*;
 5.
 6. /**
 7.  * A custom editor for the titlePosition property of the ChartBean. The editor lets the user
 8.  * choose between Left, Center, and Right
 9.  * @version 1.20 2007-12-14
10.  * @author Cay Horstmann
11.  */
12. public class TitlePositionEditor extends PropertyEditorSupport
13. {
14.    public String[] getTags()
15.    {
16.       return tags;
17.    }
18.
19.    public String getJavaInitializationString()
20.    {
21.       return ChartBean.Position.class.getName().replace('$', '.') + "." + getValue();
22.    }
23.
24.    public String getAsText()
25.    {
26.       int index = ((ChartBean.Position) getValue()).ordinal();
27.       return tags[index];
28.    }
29.
30.    public void setAsText(String s)
31.    {
32.       int index = Arrays.asList(tags).indexOf(s);
33.       if (index >= 0) setValue(ChartBean.Position.values()[index]);
34.    }
35.
36.    private String[] tags = { "Left", "Center", "Right" };
37. }
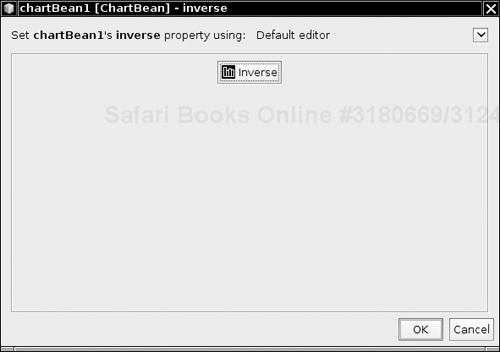
A sophisticated property should not be edited as text. Instead, a graphical representation is displayed in the property inspector, in the small area that would otherwise hold a text field or combo box. When the user clicks on that area, a custom editor dialog box pops up (see Figure 8-12). The dialog box contains a component to edit the property values, supplied by the property editor, and various buttons, supplied by the builder environment. In our example, the customizer is rather spare, containing a single button. The book’s companion code contains a more elaborate editor for editing the chart values.
To build a GUI-based property editor, you first tell the property inspector that you will paint the value and not use a string.
Override the getAsText method in the PropertyEditor interface to return null and the isPaintable method to return true.
Then, you implement the paintValue method. It receives a Graphics context and the coordinates of the rectangle inside which you can paint. Note that this rectangle is typically small, so you can’t have a very elaborate representation. We simply draw one of two icons (which you can see in Figure 8-11 on page 717).
public void paintValue(Graphics g, Rectangle box)
{
   ImageIcon icon = (Boolean) getValue() ? inverseIcon : normalIcon;
   int x = bounds.x + (bounds.width - icon.getIconWidth()) / 2;
   int y = bounds.y + (bounds.height - icon.getIconHeight()) / 2;
   g.drawImage(icon.getImage(), x, y, null);
}
This graphical representation is not editable. The user must click on it to pop up a custom editor.
You indicate that you will have a custom editor by overriding the supportsCustomEditor in the PropertyEditor interface to return true.
Next, the getCustomEditor method of the PropertyEditor interface constructs and returns an object of the custom editor class.
Listing 8-5 shows the code for the InverseEditor that displays the current property value in the property inspector. Listing 8-6 shows the code for the custom editor panel for changing the value.
Example 8-5. InverseEditor.java
 1. package com.horstmann.corejava;
 2.
 3. import java.awt.*;
 4. import java.beans.*;
 5. import javax.swing.*;
 6.
 7. /**
 8.  * The property editor for the inverse property of the ChartBean. The inverse property toggles
 9.  * between colored graph bars and colored background.
10.  * @version 1.30 2007-10-03
11.  * @author Cay Horstmann
12.  */
13. public class InverseEditor extends PropertyEditorSupport
14. {
15.    public Component getCustomEditor()
16.    {
17.       return new InverseEditorPanel(this);
18.    }
19.
20.    public boolean supportsCustomEditor()
21.    {
22.       return true;
23.    }
24.
25.    public boolean isPaintable()
26.    {
27.       return true;
28.    }
29.
30.    public String getAsText()
31.    {
32.       return null;
33.    }
34.
35.    public String getJavaInitializationString()
36.    {
37.       return "" + getValue();
38.    }
39.
40.    public void paintValue(Graphics g, Rectangle bounds)
41.    {
42.       ImageIcon icon = (Boolean) getValue() ? inverseIcon : normalIcon;
43.       int x = bounds.x + (bounds.width - icon.getIconWidth()) / 2;
44.       int y = bounds.y + (bounds.height - icon.getIconHeight()) / 2;
45.       g.drawImage(icon.getImage(), x, y, null);
46.    }
47.
48.    private ImageIcon inverseIcon = new ImageIcon(getClass().getResource(
49.          "ChartBean_INVERSE_16×16.gif"));
50.    private ImageIcon normalIcon =
51.          new ImageIcon(getClass().getResource("ChartBean_MONO_16×16.gif"));
52. }
Example 8-6. InverseEditorPanel.java
 1. package com.horstmann.corejava;
 2.
 3. import java.awt.event.*;
 4. import java.beans.*;
 5. import javax.swing.*;
 6.
 7. /**
 8.  * The panel for setting the inverse property. It contains a button to toggle between normal
 9.  * and inverse coloring.
10.  * @version 1.30 2007-10-03
11.  * @author Cay Horstmann
12.  */
13. public class InverseEditorPanel extends JPanel
14. {
15.    public InverseEditorPanel(PropertyEditorSupport ed)
16.    {
17.       editor = ed;
18.       button = new JButton();
19.       updateButton();
20.       button.addActionListener(new ActionListener()
21.          {
22.             public void actionPerformed(ActionEvent event)
23.             {
24.                editor.setValue(!(Boolean) editor.getValue());
25.                updateButton();
26.             }
27.          });
28.       add(button);
29.    }
30.
31.    private void updateButton()
32.    {
33.       if ((Boolean) editor.getValue())
34.       {
35.          button.setIcon(inverseIcon);
36.          button.setText("Inverse");
37.       }
38.       else
39.       {
40.          button.setIcon(normalIcon);
41.          button.setText("Normal");
42.       }
43.    }
44.
45.    private JButton button;
46.    private PropertyEditorSupport editor;
47.    private ImageIcon inverseIcon = new ImageIcon(getClass().getResource(
48.          "ChartBean_INVERSE_16×16.gif"));
49.    private ImageIcon normalIcon =
50.          new ImageIcon(getClass().getResource("ChartBean_MONO_16×16.gif"));
51. }
java.beans.PropertyEditor 1.1
returns the current value of the property. Basic types are wrapped into object wrappers.
void setValue(Object newValue)sets the property to a new value. Basic types must be wrapped into object wrappers.
Parameters:
newValueThe new value of the object; should be a newly created object that the property can own
override this method to return a string representation of the current value of the property. The default returns
nullto indicate that the property cannot be represented as a string.void setAsText(String text)override this method to set the property to a new value that is obtained by parsing the text. May throw an
IllegalArgumentExceptionif the text does not represent a legal value or if this property cannot be represented as a string.String[] getTags()override this method to return an array of all possible string representations of the property values so they can be displayed in a Choice box. The default returns
nullto indicate that there is not a finite set of string values.boolean isPaintable()override this method to return
trueif the class uses thepaintValuemethod to display the property.void paintValue(Graphics g, Rectangle bounds)override this method to represent the value by drawing into a graphics context in the specified place on the component used for the property inspector.
boolean supportsCustomEditor()override this method to return
trueif the property editor has a custom editor.Component getCustomEditor()override this method to return the component that contains a customized GUI for editing the property value.
String getJavaInitializationString()override this method to return a Java code string that can be used to generate code that initializes the property value. Examples are
"0","new Color(64, 64, 64)".
A property editor is responsible for allowing the user to set one property at a time. Especially if certain properties of a bean relate to each other, it might be more user friendly to give users a way to edit multiple properties at the same time. To enable this feature, you supply a customizer instead of (or in addition to) multiple property editors.
Moreover, some beans might have features that are not exposed as properties and that therefore cannot be edited through the property inspector. For those beans, a customizer is essential.
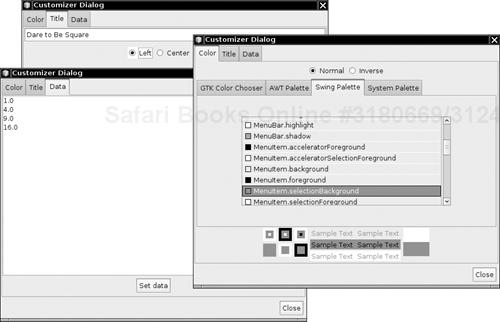
In the example program for this section, we develop a customizer for the chart bean. The customizer lets you set several properties of the chart bean in one dialog box, as shown in Figure 8-13.
To add a customizer to your bean, you must supply a BeanInfo class and override the getBeanDescriptor method, as shown in the following example.
public ChartBean2BeanInfo extends SimpleBeanInfo
{
   public BeanDescriptor getBeanDescriptor()
   {
      return beanDescriptor;
   }
   . . .
   private BeanDescriptor beanDescriptor
      = new BeanDescriptor(ChartBean2.class, ChartBean2Customizer.class);
}
Note that you need not follow any naming pattern for the customizer class. (Nevertheless, it is customary to name the customizer as BeanNameCustomizer.)
You will see in the next section how to implement a customizer.
java.beans.BeanInfo 1.1
BeanDescriptor getBeanDescriptor()returns a
BeanDescriptorobject that describes features of the bean.
java.beans.BeanDescriptor 1.1
BeanDescriptor(Class<?> beanClass, Class<?> customizerClass)constructs a
BeanDescriptorobject for a bean that has a customizer.Parameters:
beanClassThe
Classobject for the beancustomizerClassThe
Classobject for the bean’s customizer
Any customizer class you write must have a default constructor, extend the Component class, and implement the Customizer interface. That interface has only three methods:
The
setObjectmethod, which takes a parameter that specifies the bean being customizedThe
addPropertyChangeListenerandremovePropertyChangeListenermethods, which manage the collection of listeners that are notified when a property is changed in the customizer
It is a good idea to update the visual appearance of the target bean by broadcasting a PropertyChangeEvent whenever the user changes any of the property values, not just when the user is at the end of the customization process.
Unlike property editors, customizers are not automatically displayed. In NetBeans, you must right-click on the bean and select the Customize menu option to pop up the customizer. At that point, the builder calls the setObject method of the customizer. Notice that your customizer is created before it is actually linked to an instance of your bean. Therefore, you cannot assume any information about the state of a bean in the constructor.
Because customizers typically present the user with many options, it is often handy to use the tabbed pane user interface. We use this approach and have the customizer extend the JTabbedPane class.
The customizer gathers the following information in three panes:
Graph color and inverse mode
Title and title position
Data points
Of course, developing this kind of user interface can be tedious to code—our example devotes over 100 lines just to set it up in the constructor. However, this task requires only the usual Swing programming skills, and we don’t dwell on the details here.
One trick is worth keeping in mind. You often need to edit property values in a customizer. Rather than implementing a new interface for setting the property value of a particular class, you can simply locate an existing property editor and add it to your user interface! For example, in our ChartBean2 customizer, we need to set the graph color. Because we know that NetBeans has a perfectly good property editor for colors, we locate it as follows:
PropertyEditor colorEditor = PropertyEditorManager.findEditor(Color.Class);
Component colorEditorComponent = colorEditor.getCustomEditor();
Once we have all components laid out, we initialize their values in the setObject method. The setObject method is called when the customizer is displayed. Its parameter is the bean that is being customized. To proceed, we store that bean reference—we’ll need it later to notify the bean of property changes. Then, we initialize each user interface component. Here is a part of the setObject method of the chart bean customizer that does this initialization:
public void setObject(Object obj)
{
   bean = (ChartBean2) obj;
   titleField.setText(bean.getTitle());
   colorEditor.setValue(bean.getGraphColor());
   . . .
}
Finally, we hook up event handlers to track the user’s activities. Whenever the user changes the value of a component, the component fires an event that our customizer must handle. The event handler must update the value of the property in the bean and must also fire a PropertyChangeEvent so that other listeners (such as the property inspector) can be updated. Let us follow that process with a couple of user interface elements in the chart bean customizer.
When the user types a new title, we want to update the title property. We attach a DocumentListener to the text field into which the user types the title.
titleField.getDocument().addDocumentListener(new
   DocumentListener()
   {
      public void changedUpdate(DocumentEvent event)
      {
         setTitle(titleField.getText());
      }
      public void insertUpdate(DocumentEvent event)
      {
         setTitle(titleField.getText());
      }
      public void removeUpdate(DocumentEvent event)
      {
         setTitle(titleField.getText());
      }
   });
The three listener methods call the setTitle method of the customizer. That method calls the bean to update the property value and then fires a property change event. (This update is necessary only for properties that are not bound.) Here is the code for the setTitle method.
public void setTitle(String newValue)
{
   if (bean == null) return;
   String oldValue = bean.getTitle();
   bean.setTitle(newValue);
   firePropertyChange("title", oldValue, newValue);
}
When the color value changes in the color property editor, we want to update the graph color of the bean. We track the color changes by attaching a listener to the property editor. Perhaps confusingly, that editor also sends out property change events.
colorEditor.addPropertyChangeListener(new
   PropertyChangeListener()
   {
      public void propertyChange(PropertyChangeEvent event)
      {
         setGraphColor((Color) colorEditor.getValue());
      }
   });
Listing 8-7 provides the full code of the chart bean customizer.
Example 8-7. ChartBean2Customizer.java
  1. package com.horstmann.corejava;
  2.
  3. import java.awt.*;
  4. import java.awt.event.*;
  5. import java.beans.*;
  6. import java.util.*;
  7. import javax.swing.*;
  8. import javax.swing.event.*;
  9.
 10. /**
 11.  * A customizer for the chart bean that allows the user to edit all chart properties in a
 12.  * single tabbed dialog.
 13.  * @version 1.12 2007-10-03
 14.  * @author Cay Horstmann
 15.  */
 16. public class ChartBean2Customizer extends JTabbedPane implements Customizer
 17. {
 18.    public ChartBean2Customizer()
 19.    {
 20.       data = new JTextArea();
 21.       JPanel dataPane = new JPanel();
 22.       dataPane.setLayout(new BorderLayout());
 23.       dataPane.add(new JScrollPane(data), BorderLayout.CENTER);
 24.       JButton dataButton = new JButton("Set data");
 25.       dataButton.addActionListener(new ActionListener()
 26.          {
 27.             public void actionPerformed(ActionEvent event)
 28.             {
 29.                setData(data.getText());
 30.             }
 31.          });
 32.       JPanel panel = new JPanel();
 33.       panel.add(dataButton);
 34.       dataPane.add(panel, BorderLayout.SOUTH);
 35.
 36.       JPanel colorPane = new JPanel();
 37.       colorPane.setLayout(new BorderLayout());
 38.
 39.       normal = new JRadioButton("Normal", true);
 40.       inverse = new JRadioButton("Inverse", false);
 41.       panel = new JPanel();
 42.       panel.add(normal);
 43.       panel.add(inverse);
 44.       ButtonGroup group = new ButtonGroup();
 45.       group.add(normal);
 46.       group.add(inverse);
 47.       normal.addActionListener(new ActionListener()
 48.          {
 49.             public void actionPerformed(ActionEvent event)
 50.             {
 51.                setInverse(false);
 52.             }
 53.          });
 54.
 55.       inverse.addActionListener(new ActionListener()
 56.          {
 57.             public void actionPerformed(ActionEvent event)
 58.             {
 59.                setInverse(true);
 60.             }
 61.          });
 62.
 63.       colorEditor = PropertyEditorManager.findEditor(Color.class);
 64.       colorEditor.addPropertyChangeListener(new PropertyChangeListener()
 65.          {
 66.             public void propertyChange(PropertyChangeEvent event)
 67.             {
 68.                setGraphColor((Color) colorEditor.getValue());
 69.             }
 70.          });
 71.
 72.       colorPane.add(panel, BorderLayout.NORTH);
 73.       colorPane.add(colorEditor.getCustomEditor(), BorderLayout.CENTER);
 74.
 75.       JPanel titlePane = new JPanel();
 76.       titlePane.setLayout(new BorderLayout());
 77.
 78.       group = new ButtonGroup();
 79.       position = new JRadioButton[3];
 80.       position[0] = new JRadioButton("Left");
 81.       position[1] = new JRadioButton("Center");
 82.       position[2] = new JRadioButton("Right");
 83.
 84.       panel = new JPanel();
 85.       for (int i = 0; i < position.length; i++)
 86.       {
 87.          final ChartBean2.Position pos = ChartBean2.Position.values()[i];
 88.          panel.add(position[i]);
 89.          group.add(position[i]);
 90.          position[i].addActionListener(new ActionListener()
 91.             {
 92.                public void actionPerformed(ActionEvent event)
 93.                {
 94.                   setTitlePosition(pos);
 95.                }
 96.             });
 97.       }
 98.
 99.       titleField = new JTextField();
100.       titleField.getDocument().addDocumentListener(new DocumentListener()
101.          {
102.             public void changedUpdate(DocumentEvent evt)
103.             {
104.                setTitle(titleField.getText());
105.             }
106.
107.             public void insertUpdate(DocumentEvent evt)
108.             {
109.                setTitle(titleField.getText());
110.             }
111.
112.             public void removeUpdate(DocumentEvent evt)
113.             {
114.                setTitle(titleField.getText());
115.             }
116.          });
117.
118.       titlePane.add(titleField, BorderLayout.NORTH);
119.       JPanel panel2 = new JPanel();
120.       panel2.add(panel);
121.       titlePane.add(panel2, BorderLayout.CENTER);
122.       addTab("Color", colorPane);
123.       addTab("Title", titlePane);
124.       addTab("Data", dataPane);
125.
126.    }
127.
128.    /**
129.     * Sets the data to be shown in the chart.
130.     * @param s a string containing the numbers to be displayed, separated by white space
131.     */
132.    public void setData(String s)
133.    {
134.       StringTokenizer tokenizer = new StringTokenizer(s);
135.
136.       int i = 0;
137.       double[] values = new double[tokenizer.countTokens()];
138.       while (tokenizer.hasMoreTokens())
139.       {
140.          String token = tokenizer.nextToken();
141.          try
142.          {
143.             values[i] = Double.parseDouble(token);
144.             i++;
145.          }
146.          catch (NumberFormatException e)
147.          {
148.          }
149.       }
150.       setValues(values);
151.    }
152.
153.    /**
154.     * Sets the title of the chart.
155.     * @param newValue the new title
156.     */
157.    public void setTitle(String newValue)
158.    {
159.       if (bean == null) return;
160.       String oldValue = bean.getTitle();
161.       bean.setTitle(newValue);
162.       firePropertyChange("title", oldValue, newValue);
163.    }
164.
165.    /**
166.     * Sets the title position of the chart.
167.     * @param i the new title position (ChartBean2.LEFT, ChartBean2.CENTER, or ChartBean2.RIGHT)
168.     */
169.    public void setTitlePosition(ChartBean2.Position pos)
170.    {
171.       if (bean == null) return;
172.       ChartBean2.Position oldValue = bean.getTitlePosition();
173.       bean.setTitlePosition(pos);
174.       firePropertyChange("titlePosition", oldValue, pos);
175.    }
176.
177.    /**
178.     * Sets the inverse setting of the chart.
179.     * @param b true if graph and background color are inverted
180.     */
181.    public void setInverse(boolean b)
182.    {
183.       if (bean == null) return;
184.       boolean oldValue = bean.isInverse();
185.       bean.setInverse(b);
186.       firePropertyChange("inverse", oldValue, b);
187.    }
188.
189.    /**
190.     * Sets the values to be shown in the chart.
191.     * @param newValue the new value array
192.     */
193.    public void setValues(double[] newValue)
194.    {
195.       if (bean == null) return;
196.       double[] oldValue = bean.getValues();
197.       bean.setValues(newValue);
198.       firePropertyChange("values", oldValue, newValue);
199.    }
200.
201.    /**
202.     * Sets the color of the chart
203.     * @param newValue the new color
204.     */
205.    public void setGraphColor(Color newValue)
206.    {
207.       if (bean == null) return;
208.       Color oldValue = bean.getGraphColor();
209.       bean.setGraphColor(newValue);
210.       firePropertyChange("graphColor", oldValue, newValue);
211.    }
212.
213.    public void setObject(Object obj)
214.    {
215.       bean = (ChartBean2) obj;
216.
217.       data.setText("");
218.       for (double value : bean.getValues())
219.          data.append(value + "
");
220.
221.       normal.setSelected(!bean.isInverse());
222.       inverse.setSelected(bean.isInverse());
223.
224.       titleField.setText(bean.getTitle());
225.
226.       for (int i = 0; i < position.length; i++)
227.          position[i].setSelected(i == bean.getTitlePosition().ordinal());
228.
229.       colorEditor.setValue(bean.getGraphColor());
230.    }
231.
232.    private ChartBean2 bean;
233.    private PropertyEditor colorEditor;
234.
235.    private JTextArea data;
236.    private JRadioButton normal;
237.    private JRadioButton inverse;
238.    private JRadioButton[] position;
239.    private JTextField titleField;
240. }
JavaBeans persistence uses JavaBeans properties to save beans to a stream and to read them back at a later time or in a different virtual machine. In this regard, JavaBeans persistence is similar to object serialization. (See Chapter 1 for more information on serialization.) However, there is an important difference: JavaBeans persistence is suitable for long-term storage.
When an object is serialized, its instance fields are written to a stream. If the implementation of a class changes, then its instance fields can change. You cannot simply read files that contain serialized objects of older versions. It is possible to detect version differences and translate between old and new data representations. However, the process is extremely tedious and should only be applied in desperate situations. Plainly, serialization is unsuitable for long-term storage. For that reason, all Swing components have the following message in their documentation: “Warning: Serialized objects of this class will not be compatible with future Swing releases. The current serialization support is appropriate for short term storage or RMI between applications.”
The long-term persistence mechanism was invented as a solution for this problem. It was originally intended for drag-and-drop GUI design tools. The design tool saves the result of mouse clicks—a collection of frames, panels, buttons, and other Swing components—in a file, using the long-term persistence format. The running program simply opens that file. This approach cuts out the tedious source code for laying out and wiring up Swing components. Sadly, it has not been widely implemented.
Note
The Bean Builder at http://bean-builder.dev.java.net is an experimental GUI builder with support for long-term persistence.
The basic idea behind JavaBeans persistence is simple. Suppose you want to save a JFrame object to a file so that you can retrieve it later. If you look into the source code of the JFrame class and its superclasses, then you see dozens of instance fields. If the frame were to be serialized, all of the field values would need to be written. But think about how a frame is constructed:
JFrame frame = new JFrame();
frame.setTitle("My Application");
frame.setVisible(true);
The default constructor initializes all instance fields, and a couple of properties are set. If you archive the frame object, the JavaBeans persistence mechanism saves exactly these statements in XML format:
<object class="javax.swing.JFrame">
   <void property="title">
     <string>My Application</string>
   </void>
   <void property="visible">
     <boolean>true</boolean>
   </void>
</object>
When the object is read back, the statements are executed: A JFrame object is constructed, and its title and visible properties are set to the given values. It does not matter if the internal representation of the JFrame has changed in the meantime. All that matters is that you can restore the object by setting properties.
Note that only those properties that are different from the default are archived. The XMLEncoder makes a default JFrame and compares its property with the frame that is being archived. Property setter statements are generated only for properties that are different from the default. This process is called redundancy elimination. As a result, the archives are generally smaller than the result of serialization. (When serializing Swing components, the difference is particularly dramatic because Swing objects have a lot of state, most of which is never changed from the default.)
Of course, there are minor technical hurdles with this approach. For example, the call
frame.setSize(600, 400);
is not a property setter. However, the XMLEncoder can cope with this: It writes the statement
<void property="bounds">
   <object class="java.awt.Rectangle">
       <int>0</int>
       <int>0</int>
       <int>600</int>
       <int>400</int>
   </object>
</void>
To save an object to a stream, use an XMLEncoder:
XMLEncoder out = new XMLEncoder(new FileOutputStream(. . .));
out.writeObject(frame);
out.close();
To read it back, use an XMLDecoder:
XMLDecoder in = new XMLDecoder(new FileInputStream(. . .));
JFrame newFrame = (JFrame) in.readObject();
in.close();
The program in Listing 8-8 shows how a frame can load and save itself (see Figure 8-14). When you run the program, first click the Save button and save the frame to a file. Then move the original frame to a different position and click Load to see another frame pop up at the original location. Have a look inside the XML file that the program produces.
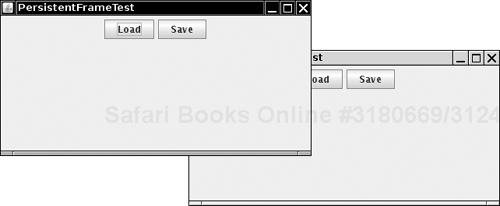
If you look closely at the XML output, you will find that the XMLEncoder carries out an amazing amount of work when it saves the frame. The XMLEncoder produces statements that carry out the following actions:
Set various frame properties:
size,layout,defaultCloseOperation,title, and so on.Add buttons to the frame.
Add action listeners to the buttons.
Here, we had to construct the action listers with the EventHandler class. The XMLEncoder cannot archive arbitrary inner classes, but it knows how to handle EventHandler objects.
Example 8-8. PersistentFrameTest.java
 1. import java.awt.*;
 2. import java.awt.event.*;
 3. import java.beans.*;
 4. import java.io.*;
 5. import javax.swing.*;
 6.
 7. /**
 8.  * This program demonstrates the use of an XML encoder and decoder to save and restore a frame.
 9.  * @version 1.01 2007-10-03
10.  * @author Cay Horstmann
11.  */
12. public class PersistentFrameTest
13. {
14.    public static void main(String[] args)
15.    {
16.       chooser = new JFileChooser();
17.       chooser.setCurrentDirectory(new File("."));
18.       PersistentFrameTest test = new PersistentFrameTest();
19.       test.init();
20.    }
21.
22.    public void init()
23.    {
24.       frame = new JFrame();
25.       frame.setLayout(new FlowLayout());
26.       frame.setDefaultCloseOperation(JFrame.EXIT_ON_CLOSE);
27.       frame.setTitle("PersistentFrameTest");
28.       frame.setSize(400, 200);
29.
30.       JButton loadButton = new JButton("Load");
31.       frame.add(loadButton);
32.       loadButton.addActionListener(EventHandler.create(ActionListener.class, this, "load"));
33.
34.       JButton saveButton = new JButton("Save");
35.       frame.add(saveButton);
36.       saveButton.addActionListener(EventHandler.create(ActionListener.class, this, "save"));
37.
38.       frame.setVisible(true);
39.    }
40.
41.    public void load()
42.    {
43.       // show file chooser dialog
44.       int r = chooser.showOpenDialog(null);
45.
46.       // if file selected, open
47.       if(r == JFileChooser.APPROVE_OPTION)
48.       {
49.          try
50.          {
51.             File file = chooser.getSelectedFile();
52.             XMLDecoder decoder = new XMLDecoder(new FileInputStream(file));
53.             decoder.readObject();
54.             decoder.close();
55.          }
56.          catch (IOException e)
57.          {
58.             JOptionPane.showMessageDialog(null, e);
59.          }
60.       }
61.    }
62.
63.    public void save()
64.    {
65.       if (chooser.showSaveDialog(null) == JFileChooser.APPROVE_OPTION)
66.       {
67.          try
68.          {
69.             File file = chooser.getSelectedFile();
70.             XMLEncoder encoder = new XMLEncoder(new FileOutputStream(file));
71.             encoder.writeObject(frame);
72.             encoder.close();
73.          }
74.          catch (IOException e)
75.          {
76.             JOptionPane.showMessageDialog(null, e);
77.          }
78.       }
79.    }
80.
81.    private static JFileChooser chooser;
82.    private JFrame frame;
83. }
JavaBeans persistence is not limited to the storage of Swing components. You can use the mechanism to store any collection of objects, provided you follow a few simple rules. In the following sections, you learn how you can use JavaBeans persistence as a long-term storage format for your own data.
The XMLEncoder has built-in support for the following types:
nullAll primitive types and their wrappers
Enumerations (since Java SE 6)
StringArrays
Collections and maps
The reflection types
Class,Field,Method, andProxyThe AWT types
Color,Cursor,Dimension,Font,Insets,Point,Rectangle, andImageIconAWT and Swing components, borders, layout managers, and models
Event handlers
Using JavaBeans persistence is trivial if one can obtain the state of every object by setting properties. But in real programs, there are always a few classes that don’t work that way. Consider, for example, the Employee class of Volume I, Chapter 4. Employee isn’t a well-behaved bean. It doesn’t have a default constructor, and it doesn’t have methods setName, setSalary, setHireDay. To overcome this problem, you define a persistence delegate. Such a delegate is responsible for generating an XML encoding of an object.
The persistence delegate for the Employee class overrides the instantiate method to produce an expression that constructs an object.
   PersistenceDelegate delegate = new
       DefaultPersistenceDelegate()
       {
          protected Expression instantiate(Object oldInstance, Encoder out)
          {
             Employee e = (Employee) oldInstance;
             GregorianCalendar c = new GregorianCalendar();
             c.setTime(e.getHireDay());
             return new Expression(oldInstance, Employee.class, "new",
                new Object[]
                {
                   e.getName(),
                   e.getSalary(),
                   c.get(Calendar.YEAR),
                   c.get(Calendar.MONTH),
                   c.get(Calendar.DATE)
                });
          }
       };
This means: “To re-create oldInstance, call the new method (i.e., the constructor) on the Employee.class object, and supply the given parameters.” The parameter name oldInstance is a bit misleading—this is simply the instance that is being saved.
To install the persistence delegate, you have two choices. You can associate it with a specific XMLWriter:
out.setPersistenceDelegate(Employee.class, delegate);
Alternatively, you can set the persistenceDelegate attribute of the bean descriptor of the BeanInfo:
BeanInfo info = Introspector.getBeanInfo(GregorianCalendar.class);
info.getBeanDescriptor().setValue("persistenceDelegate", delegate);
Once the delegate is installed, you can save Employee objects. For example, the statements
Object myData = new Employee("Harry Hacker", 50000, 1989, 10, 1);
out.writeObject(myData);
generate the following output:
<object class="Employee">
   <string>Harry Hacker</string>
   <double>50000.0</double>
   <int>1989</int>
   <int>10</int>
   <int>1</int>
</object>
If all constructor parameters can be obtained by accessing properties of oldInstance, then you need not write the instantiate method yourself. Instead, simply construct a DefaultPersistenceDelegate and supply the property names.
For example, the following statement sets the persistence delegate for the Rectangle2D.Double class:
out.setPersistenceDelegate(Rectangle2D.Double.class,
   new DefaultPersistenceDelegate(new String[] { "x", "y", "width", "height" }));
This tells the encoder: “To encode a Rectangle2D.Double object, get its x, y, width, and height properties and call the constructor with those four values.” As a result, the output contains an element such as the following:
<object class="java.awt.geom.Rectangle2D$Double">
   <double>5.0</double>
   <double>10.0</double>
   <double>20.0</double>
   <double>30.0</double>
</object>
If you are the author of the class, you can do even better. Annotate the constructor with the @ConstructorProperties annotation. Suppose, for example, the Employee class had a constructor with three parameters (name, salary, and hire day). Then we could have annotated the constructor as follows:
@ConstructorProperties({"name", "salary", "hireDay"})
public Employee(String n, double s, Date d)
This tells the encoder to call the getName, getSalary, and getHireDay property getters and write the resulting values into the object expression.
The @ConstructorProperties annotation was introduced in Java SE 6, and has so far only been used for classes in the Java Management Extensions (JMX) API.
Sometimes, you need to save objects that are obtained from factory methods, not constructors. Consider, for example, how you get an InetAddress object:
byte[] bytes = new byte[] { 127, 0, 0, 1};
InetAddress address = InetAddress.getByAddress(bytes);
The instantiate method of the PersistenceDelegate produces a call to the factory method.
protected Expression instantiate(Object oldInstance, Encoder out)
{
   return new Expression(oldInstance, InetAddress.class, "getByAddress",
      new Object[] { ((InetAddress) oldInstance).getAddress() });
}
A sample output is
<object class="java.net.Inet4Address" method="getByAddress">
   <array class="byte" length="4">
      <void index="0">
         <byte>127</byte>
      </void>
      <void index="3">
         <byte>1</byte>
      </void>
   </array>
</object>The state of some classes is built up by calls to methods that are not property setters. You can cope with that situation by overriding the initialize method of the DefaultPersistenceDelegate. The initialize method is called after the instantiate method. You can generate a sequence of statements that are recorded in the archive.
For example, consider the BitSet class. To re-create a BitSet object, you set all the bits that were present in the original. The following initialize method generates the necessary statements:
protected void initialize(Class<?> type, Object oldInstance, Object newInstance, Encoder out)
{
   super.initialize(type, oldInstance, newInstance, out);
   BitSet bs = (BitSet) oldInstance;
   for (int i = bs.nextSetBit(0); i >= 0; i = bs.nextSetBit(i + 1))
   out.writeStatement(new Statement(bs, "set", new Object[] { i, i + 1, true } ));
}<object class="java.util.BitSet">
<void method="set">
<int>1</int>
<int>2</int>
<boolean>true</boolean>
</void>
<void method="set">
<int>4</int>
<int>5</int>
<boolean>true</boolean>
</void>
</object>Occasionally, a class has a property with a getter and setter that the XMLDecoder discovers, but you don’t want to include the property value in the archive. To suppress archiving of a property, mark it as transient in the property descriptor. For example, the following statement marks the removeMode property of the DamageReporter class (which you will see in detail in the next section) as transient.
BeanInfo info = Introspector.getBeanInfo(DamageReport.class);
for (PropertyDescriptor desc : info.getPropertyDescriptors())
   if (desc.getName().equals("removeMode"))
      desc.setValue("transient", Boolean.TRUE);
The program in Listing 8-9 shows the various persistence delegates at work. Keep in mind that this program shows a worst-case scenario—in actual applications, many classes can be archived without the use of delegates.
Example 8-9. PersistenceDelegateTest.java
 1. import java.awt.geom.*;
 2. import java.beans.*;
 3. import java.net.*;
 4. import java.util.*;
 5.
 6. /**
 7.  * This program demonstrates various persistence delegates.
 8.  * @version 1.01 2007-10-03
 9.  * @author Cay Horstmann
10.  */
11. public class PersistenceDelegateTest
12. {
13.    public static class Point
14.    {
15.       @ConstructorProperties( { "x", "y" })
16.       public Point(int x, int y)
17.       {
18.          this.x = x;
19.          this.y = y;
20.       }
21.
22.       public int getX()
23.       {
24.          return x;
25.       }
26.
27.       public int getY()
28.       {
29.          return y;
30.       }
31.
32.       private final int x, y;
33.    }
34.
35.    public static void main(String[] args) throws Exception
36.    {
37.       PersistenceDelegate delegate = new PersistenceDelegate()
38.          {
39.             protected Expression instantiate(Object oldInstance, Encoder out)
40.             {
41.                Employee e = (Employee) oldInstance;
42.                GregorianCalendar c = new GregorianCalendar();
43.                c.setTime(e.getHireDay());
44.                return new Expression(oldInstance, Employee.class, "new", new Object[] {
45.                      e.getName(), e.getSalary(), c.get(Calendar.YEAR), c.get(Calendar.MONTH),
46.                      c.get(Calendar.DATE) });
47.             }
48.          };
49.       BeanInfo info = Introspector.getBeanInfo(Employee.class);
50.       info.getBeanDescriptor().setValue("persistenceDelegate", delegate);
51.
52.       XMLEncoder out = new XMLEncoder(System.out);
53.       out.setExceptionListener(new ExceptionListener()
54.          {
55.             public void exceptionThrown(Exception e)
56.             {
57.                e.printStackTrace();
58.             }
59.          });
60.
61.       out.setPersistenceDelegate(Rectangle2D.Double.class, new DefaultPersistenceDelegate(
62.             new String[] { "x", "y", "width", "height" }));
63.
64.       out.setPersistenceDelegate(Inet4Address.class, new DefaultPersistenceDelegate()
65.          {
66.             protected Expression instantiate(Object oldInstance, Encoder out)
67.             {
68.                return new Expression(oldInstance, InetAddress.class, "getByAddress",
69.                      new Object[] { ((InetAddress) oldInstance).getAddress() });
70.             }
71.          });
72.
73.       out.setPersistenceDelegate(BitSet.class, new DefaultPersistenceDelegate()
74.          {
75.             protected void initialize(Class<?> type, Object oldInstance, Object newInstance,
76.                   Encoder out)
77.             {
78.                super.initialize(type, oldInstance, newInstance, out);
79.                BitSet bs = (BitSet) oldInstance;
80.                for (int i = bs.nextSetBit(0); i >= 0; i = bs.nextSetBit(i + 1))
81.                   out.writeStatement(new Statement(bs, "set",
82.                                                    new Object[] { i, i + 1, true }));
83.             }
84.          });
85.
86.       out.writeObject(new Employee("Harry Hacker", 50000, 1989, 10, 1));
87.       out.writeObject(new Point(17, 29));
88.       out.writeObject(new java.awt.geom.Rectangle2D.Double(5, 10, 20, 30));
89.       out.writeObject(InetAddress.getLocalHost());
90.       BitSet bs = new BitSet();
91.       bs.set(1, 4);
92.       bs.clear(2, 3);
93.       out.writeObject(bs);
94.       out.close();
95.    }
96. }
We end the description of JavaBeans persistence with a complete example (see Figure 8-15). This application writes a damage report for a rental car. The rental car agent enters the rental record, selects the car type, uses the mouse to click on damaged areas on the car, and saves the report. The application can also load existing damage reports. Listing 8-10 contains the code for the program.

The application uses JavaBeans persistence to save and load DamageReport objects (see Listing 8-11). It illustrates the following aspects of the persistence technology:
Properties are automatically saved and restored. Nothing needs to be done for the
rentalRecordandcarTypeproperties.Postconstruction work is required to restore the damage locations. The persistence delegate generates statements that call the
clickmethod.The
Point2D.Doubleclass needs aDefaultPersistenceDelegatethat constructs a point from itsxandyproperties.The
removeModeproperty (which specifies whether mouse clicks add or remove damage marks) is transient because it should not be saved in damage reports.
Here is a sample damage report:
<?xml version="1.0" encoding="UTF-8"?>
<java version="1.5.0" class="java.beans.XMLDecoder">
   <object class="DamageReport">
      <object class="java.lang.Enum" method="valueOf">
         <class>DamageReport$CarType</class>
         <string>SEDAN</string>
      </object>
      <void property="rentalRecord">
         <string>12443-19</string>
      </void>
      <void method="click">
         <object class="java.awt.geom.Point2D$Double">
            <double>181.0</double>
            <double>84.0</double>
         </object>
      </void>
      <void method="click">
         <object class="java.awt.geom.Point2D$Double">
            <double>162.0</double>
            <double>66.0</double>
         </object>
      </void>
   </object>
</java>
Note
The sample application does not use JavaBeans persistence to save the GUI of the application. That might be of interest to creators of development tools, but here we are focusing on how to use the persistence mechanism to store application data.
This example ends our discussion of JavaBeans persistence. In summary, JavaBeans persistence archives are
Suitable for long-term storage.
Small and fast.
Easy to create.
Human editable.
A part of standard Java.
Example 8-10. DamageReporter.java
  1. import java.awt.*;
  2. import java.awt.event.*;
  3. import java.awt.geom.*;
  4. import java.beans.*;
  5. import java.io.*;
  6. import java.util.*;
  7. import javax.swing.*;
  8.
  9. /**
 10.  * This program demonstrates the use of an XML encoder and decoder. All GUI and drawing
 11.  * code is collected in this class. The only interesting pieces are the action listeners for
 12.  * openItem and saveItem. Look inside the DamageReport class for encoder customizations.
 13.  * @version 1.01 2004-10-03
 14.  * @author Cay Horstmann
 15.  */
 16. public class DamageReporter extends JFrame
 17. {
 18.    public static void main(String[] args)
 19.    {
 20.       JFrame frame = new DamageReporter();
 21.       frame.setDefaultCloseOperation(JFrame.EXIT_ON_CLOSE);
 22.       frame.setVisible(true);
 23.    }
 24.
 25.    public DamageReporter()
 26.    {
 27.       setTitle("DamageReporter");
 28.       setSize(DEFAULT_WIDTH, DEFAULT_HEIGHT);
 29.
 30.       chooser = new JFileChooser();
 31.       chooser.setCurrentDirectory(new File("."));
 32.
 33.       report = new DamageReport();
 34.       report.setCarType(DamageReport.CarType.SEDAN);
 35.
 36.       // set up the menu bar
 37.       JMenuBar menuBar = new JMenuBar();
 38.       setJMenuBar(menuBar);
 39.
 40.       JMenu menu = new JMenu("File");
 41.       menuBar.add(menu);
 42.
 43.       JMenuItem openItem = new JMenuItem("Open");
 44.       menu.add(openItem);
 45.       openItem.addActionListener(new ActionListener()
 46.          {
 47.             public void actionPerformed(ActionEvent evt)
 48.             {
 49.                // show file chooser dialog
 50.                int r = chooser.showOpenDialog(null);
 51.
 52.                // if file selected, open
 53.                if (r == JFileChooser.APPROVE_OPTION)
 54.                {
 55.                   try
 56.                   {
 57.                      File file = chooser.getSelectedFile();
 58.                      XMLDecoder decoder = new XMLDecoder(new FileInputStream(file));
 59.                      report = (DamageReport) decoder.readObject();
 60.                      decoder.close();
 61.                      rentalRecord.setText(report.getRentalRecord());
 62.                      carType.setSelectedItem(report.getCarType());
 63.                      repaint();
 64.                   }
 65.                   catch (IOException e)
 66.                   {
 67.                      JOptionPane.showMessageDialog(null, e);
 68.                   }
 69.                }
 70.             }
 71.          });
 72.
 73.       JMenuItem saveItem = new JMenuItem("Save");
 74.       menu.add(saveItem);
 75.       saveItem.addActionListener(new ActionListener()
 76.          {
 77.             public void actionPerformed(ActionEvent evt)
 78.             {
 79.                report.setRentalRecord(rentalRecord.getText());
 80.                chooser.setSelectedFile(new File(rentalRecord.getText() + ".xml"));
 81.
 82.                // show file chooser dialog
 83.                int r = chooser.showSaveDialog(null);
 84.
 85.                // if file selected, save
 86.                if (r == JFileChooser.APPROVE_OPTION)
 87.                {
 88.                   try
 89.                   {
 90.                      File file = chooser.getSelectedFile();
 91.                      XMLEncoder encoder = new XMLEncoder(new FileOutputStream(file));
 92.                      report.configureEncoder(encoder);
 93.                      encoder.writeObject(report);
 94.                      encoder.close();
 95.                   }
 96.                   catch (IOException e)
 97.                   {
 98.                      JOptionPane.showMessageDialog(null, e);
 99.                   }
100.                }
101.             }
102.          });
103.
104.       JMenuItem exitItem = new JMenuItem("Exit");
105.       menu.add(exitItem);
106.       exitItem.addActionListener(new ActionListener()
107.          {
108.             public void actionPerformed(ActionEvent event)
109.             {
110.                System.exit(0);
111.             }
112.          });
113.
114.       // combo box for car type
115.       rentalRecord = new JTextField();
116.       carType = new JComboBox();
117.       carType.addItem(DamageReport.CarType.SEDAN);
118.       carType.addItem(DamageReport.CarType.WAGON);
119.       carType.addItem(DamageReport.CarType.SUV);
120.
121.       carType.addActionListener(new ActionListener()
122.          {
123.             public void actionPerformed(ActionEvent event)
124.             {
125.                DamageReport.CarType item = (DamageReport.CarType) carType.getSelectedItem();
126.                report.setCarType(item);
127.                repaint();
128.             }
129.          });
130.
131.       // component for showing car shape and damage locations
132.       carComponent = new JComponent()
133.          {
134.             public void paintComponent(Graphics g)
135.             {
136.                Graphics2D g2 = (Graphics2D) g;
137.                g2.setColor(new Color(0.9f, 0.9f, 0.45f));
138.                g2.fillRect(0, 0, getWidth(), getHeight());
139.                g2.setColor(Color.BLACK);
140.                g2.draw(shapes.get(report.getCarType()));
141.                report.drawDamage(g2);
142.             }
143.          };
144.       carComponent.addMouseListener(new MouseAdapter()
145.          {
146.             public void mousePressed(MouseEvent event)
147.             {
148.                report.click(new Point2D.Double(event.getX(), event.getY()));
149.                repaint();
150.             }
151.          });
152.
153.       // radio buttons for click action
154.       addButton = new JRadioButton("Add");
155.       removeButton = new JRadioButton("Remove");
156.       ButtonGroup group = new ButtonGroup();
157.       JPanel buttonPanel = new JPanel();
158.       group.add(addButton);
159.       buttonPanel.add(addButton);
160.       group.add(removeButton);
161.       buttonPanel.add(removeButton);
162.       addButton.setSelected(!report.getRemoveMode());
163.       removeButton.setSelected(report.getRemoveMode());
164.       addButton.addActionListener(new ActionListener()
165.          {
166.             public void actionPerformed(ActionEvent event)
167.             {
168.                report.setRemoveMode(false);
169.             }
170.          });
171.       removeButton.addActionListener(new ActionListener()
172.          {
173.             public void actionPerformed(ActionEvent event)
174.             {
175.                report.setRemoveMode(true);
176.             }
177.          });
178.
179.       // layout components
180.       JPanel gridPanel = new JPanel();
181.       gridPanel.setLayout(new GridLayout(0, 2));
182.       gridPanel.add(new JLabel("Rental Record"));
183.       gridPanel.add(rentalRecord);
184.       gridPanel.add(new JLabel("Type of Car"));
185.       gridPanel.add(carType);
186.       gridPanel.add(new JLabel("Operation"));
187.       gridPanel.add(buttonPanel);
188.
189.       add(gridPanel, BorderLayout.NORTH);
190.       add(carComponent, BorderLayout.CENTER);
191.    }
192.
193.    private JTextField rentalRecord;
194.    private JComboBox carType;
195.    private JComponent carComponent;
196.    private JRadioButton addButton;
197.    private JRadioButton removeButton;
198.    private DamageReport report;
199.    private JFileChooser chooser;
200.
201.    private static final int DEFAULT_WIDTH = 400;
202.    private static final int DEFAULT_HEIGHT = 400;
203.
204.    private static Map<DamageReport.CarType, Shape> shapes =
205.         new EnumMap<DamageReport.CarType, Shape>(DamageReport.CarType.class);
206.
207.    static
208.    {
209.       int width = 200;
210.       int x = 50;
211.       int y = 50;
212.       Rectangle2D.Double body = new Rectangle2D.Double(x, y + width / 6, width - 1, width / 6);
213.       Ellipse2D.Double frontTire = new Ellipse2D.Double(x + width / 6, y + width / 3,
214.             width / 6, width / 6);
215.       Ellipse2D.Double rearTire = new Ellipse2D.Double(x + width * 2 / 3, y + width / 3,
216.             width / 6, width / 6);
217.
218.       Point2D.Double p1 = new Point2D.Double(x + width / 6, y + width / 6);
219.       Point2D.Double p2 = new Point2D.Double(x + width / 3, y);
220.       Point2D.Double p3 = new Point2D.Double(x + width * 2 / 3, y);
221.       Point2D.Double p4 = new Point2D.Double(x + width * 5 / 6, y + width / 6);
222.
223.       Line2D.Double frontWindshield = new Line2D.Double(p1, p2);
224.       Line2D.Double roofTop = new Line2D.Double(p2, p3);
225.       Line2D.Double rearWindshield = new Line2D.Double(p3, p4);
226.
227.       GeneralPath sedanPath = new GeneralPath();
228.       sedanPath.append(frontTire, false);
229.       sedanPath.append(rearTire, false);
230.       sedanPath.append(body, false);
231.       sedanPath.append(frontWindshield, false);
232.       sedanPath.append(roofTop, false);
233.       sedanPath.append(rearWindshield, false);
234.       shapes.put(DamageReport.CarType.SEDAN, sedanPath);
235.
236.       Point2D.Double p5 = new Point2D.Double(x + width * 11 / 12, y);
237.       Point2D.Double p6 = new Point2D.Double(x + width, y + width / 6);
238.       roofTop = new Line2D.Double(p2, p5);
239.       rearWindshield = new Line2D.Double(p5, p6);
240.
241.       GeneralPath wagonPath = new GeneralPath();
242.       wagonPath.append(frontTire, false);
243.       wagonPath.append(rearTire, false);
244.       wagonPath.append(body, false);
245.       wagonPath.append(frontWindshield, false);
246.       wagonPath.append(roofTop, false);
247.       wagonPath.append(rearWindshield, false);
248.       shapes.put(DamageReport.CarType.WAGON, wagonPath);
249.
250.       Point2D.Double p7 = new Point2D.Double(x + width / 3, y - width / 6);
251.       Point2D.Double p8 = new Point2D.Double(x + width * 11 / 12, y - width / 6);
252.       frontWindshield = new Line2D.Double(p1, p7);
253.       roofTop = new Line2D.Double(p7, p8);
254.       rearWindshield = new Line2D.Double(p8, p6);
255.
256.       GeneralPath suvPath = new GeneralPath();
257.       suvPath.append(frontTire, false);
258.       suvPath.append(rearTire, false);
259.       suvPath.append(body, false);
260.       suvPath.append(frontWindshield, false);
261.       suvPath.append(roofTop, false);
262.       suvPath.append(rearWindshield, false);
263.       shapes.put(DamageReport.CarType.SUV, suvPath);
264.    }
265. }
Example 8-11. DamageReport.java
  1. import java.awt.*;
  2. import java.awt.geom.*;
  3. import java.beans.*;
  4. import java.util.*;
  5.
  6. /**
  7.  * This class describes a vehicle damage report that will be saved and loaded with the
  8.  * long-term persistence mechanism.
  9.  * @version 1.21 2004-08-30
 10.  * @author Cay Horstmann
 11.  */
 12. public class DamageReport
 13. {
 14.    public enum CarType
 15.    {
 16.       SEDAN, WAGON, SUV
 17.    }
 18.
 19.    // this property is saved automatically
 20.    public void setRentalRecord(String newValue)
 21.    {
 22.       rentalRecord = newValue;
 23.    }
 24.
 25.    public String getRentalRecord()
 26.    {
 27.       return rentalRecord;
 28.    }
 29.
 30.    // this property is saved automatically
 31.    public void setCarType(CarType newValue)
 32.    {
 33.       carType = newValue;
 34.    }
 35.
 36.    public CarType getCarType()
 37.    {
 38.       return carType;
 39.    }
 40.
 41.    // this property is set to be transient
 42.    public void setRemoveMode(boolean newValue)
 43.    {
 44.       removeMode = newValue;
 45.    }
 46.
 47.    public boolean getRemoveMode()
 48.    {
 49.       return removeMode;
 50.    }
 51.
 52.    public void click(Point2D p)
 53.    {
 54.       if (removeMode)
 55.       {
 56.          for (Point2D center : points)
 57.          {
 58.             Ellipse2D circle = new Ellipse2D.Double(center.getX() - MARK_SIZE, center.getY()
 59.                   - MARK_SIZE, 2 * MARK_SIZE, 2 * MARK_SIZE);
 60.             if (circle.contains(p))
 61.             {
 62.                points.remove(center);
 63.                return;
 64.             }
 65.          }
 66.       }
 67.       else points.add(p);
 68.    }
 69.
 70.    public void drawDamage(Graphics2D g2)
 71.    {
 72.       g2.setPaint(Color.RED);
 73.       for (Point2D center : points)
 74.       {
 75.          Ellipse2D circle = new Ellipse2D.Double(center.getX() - MARK_SIZE, center.getY()
 76.                - MARK_SIZE, 2 * MARK_SIZE, 2 * MARK_SIZE);
 77.          g2.draw(circle);
 78.       }
 79.    }
 80.
 81.    public void configureEncoder(XMLEncoder encoder)
 82.    {
 83.       // this step is necessary to save Point2D.Double objects
 84.       encoder.setPersistenceDelegate(Point2D.Double.class, new DefaultPersistenceDelegate(
 85.             new String[] { "x", "y" }));
 86.
 87.       // this step is necessary because the array list of points is not
 88.       // (and should not be) exposed as a property
 89.       encoder.setPersistenceDelegate(DamageReport.class, new DefaultPersistenceDelegate()
 90.          {
 91.             protected void initialize(Class<?> type, Object oldInstance, Object newInstance,
 92.                   Encoder out)
 93.             {
 94.                super.initialize(type, oldInstance, newInstance, out);
 95.                DamageReport r = (DamageReport) oldInstance;
 96.
 97.                for (Point2D p : r.points)
 98.                  out.writeStatement(new Statement(oldInstance, "click", new Object[] { p }));
 99.             }
100.          });
101.
102.    }
103.
104.    // this step is necessary to make the removeMode property transient
105.    static
106.    {
107.       try
108.       {
109.          BeanInfo info = Introspector.getBeanInfo(DamageReport.class);
110.          for (PropertyDescriptor desc : info.getPropertyDescriptors())
111.            if (desc.getName().equals("removeMode")) desc.setValue("transient", Boolean.TRUE);
112.       }
113.       catch (IntrospectionException e)
114.       {
115.          e.printStackTrace();
116.       }
117.    }
118.
119.    private String rentalRecord;
120.    private CarType carType;
121.    private boolean removeMode;
122.    private ArrayList<Point2D> points = new ArrayList<Point2D>();
123.
124.    private static final int MARK_SIZE = 5;
125. }
java.beans.Encoder 1.4
void setPersistenceDelegate(Class<?> type, PersistenceDelegate delegate)PersistenceDelegate getPersistenceDelegate(Class<?> type)sets or gets the delegate for archiving objects of the given type.
void setExceptionListener(ExceptionListener listener)ExceptionListener getExceptionListener()sets or gets the exception listener that is notified if an exception occurs during the encoding process.
java.beans.ExceptionListener 1.4
void exceptionThrown(Exception e)is called when an exception was thrown during the encoding or decoding process.
java.beans.XMLDecoder 1.4
XMLDecoder(InputStream in)constructs an
XMLDecoderthat reads an archive from the given input stream.Object readObject()reads the next object from the archive.
void setExceptionListener(ExceptionListener listener)ExceptionListener getExceptionListener()sets or gets the exception listener that is notified if an exception occurs during the encoding process.
java.beans.PersistenceDelegate 1.4
protected abstract Expression instantiate(Object oldInstance, Encoder out)returns an expression for instantiating an object that is equivalent to
oldInstance.protected void initialize(Class<?> type, Object oldInstance, Object newInstance, Encoder out)writes statements to
outthat turnnewInstanceinto an object that is equivalent tooldInstance.
java.beans.DefaultPersistenceDelegate 1.4
constructs a persistence delegate for a class with a zero-parameter constructor.
DefaultPersistenceDelegate(String[] propertyNames)constructs a persistence delegate for a class whose construction parameters are the values of the given properties.
protected Expression instantiate(Object oldInstance, Encoder out)returns an expression for invoking the constructor with either no parameters or the values of the properties specified in the constructor.
protected void initialize(Class<?> type, Object oldInstance, Object newInstance, Encoder out)writes statements to
outthat apply property setters tonewInstance, attempting to turn it into an object that is equivalent tooldInstance.
java.beans.Expression 1.4
Expression(Object value, Object target, String methodName, Object[] parameters)constructs an expression that calls the given method on
target, with the given parameters. The result of the expression is assumed to bevalue. To call a constructor,targetshould be aClassobject andmethodNameshould be"new".
java.beans.Statement 1.4
Statement(Object target, String methodName, Object[] parameters)constructs a statement that calls the given method on
target, with the given parameters.
You have now worked your way through three long chapters on GUI programming with Swing, AWT, and JavaBeans. In the next chapter, we move on to an entirely different topic: security. Security has always been a core feature of the Java platform. As the world in which we live and compute gets more dangerous, a thorough understanding of Java security will be of increasing importance for many developers.