
When Java technology first appeared on the scene, the excitement was not about a well-crafted programming language but about the possibility of safely executing applets that are delivered over the Internet (see Volume I, Chapter 10 for more information about applets). Obviously, delivering executable applets is practical only when the recipients are sure that the code can’t wreak havoc on their machines. For this reason, security was and is a major concern of both the designers and the users of Java technology. This means that unlike other languages and systems, where security was implemented as an afterthought or a reaction to break-ins, security mechanisms are an integral part of Java technology.
Three mechanisms help ensure safety:
Language design features (bounds checking on arrays, no unchecked type conversions, no pointer arithmetic, and so on).
An access control mechanism that controls what the code can do (such as file access, network access, and so on).
Code signing, whereby code authors can use standard cryptographic algorithms to authenticate Java code. Then, the users of the code can determine exactly who created the code and whether the code has been altered after it was signed.
We will first discuss class loaders that check class files for integrity when they are loaded into the virtual machine. We will demonstrate how that mechanism can detect tampering with class files.
For maximum security, both the default mechanism for loading a class and a custom class loader need to work with a security manager class that controls what actions code can perform. You’ll see in detail how to configure Java platform security.
Finally, you’ll see the cryptographic algorithms supplied in the java.security package, which allow for code signing and user authentication.
As always, we focus on those topics that are of greatest interest to application programmers. For an in-depth view, we recommend the book Inside Java 2 Platform Security: Architecture, API Design, and Implementation, 2nd ed., by Li Gong, Gary Ellison, and Mary Dageforde (Prentice Hall PTR 2003).
A Java compiler converts source instructions for the Java virtual machine. The virtual machine code is stored in a class file with a .class extension. Each class file contains the definition and implementation code for one class or interface. These class files must be interpreted by a program that can translate the instruction set of the virtual machine into the machine language of the target machine.
Note that the virtual machine loads only those class files that are needed for the execution of a program. For example, suppose program execution starts with MyProgram.class. Here are the steps that the virtual machine carries out.
The virtual machine has a mechanism for loading class files, for example, by reading the files from disk or by requesting them from the Web; it uses this mechanism to load the contents of the
MyProgramclass file.If the
MyProgramclass has fields or superclasses of another class type, their class files are loaded as well. (The process of loading all the classes that a given class depends on is called resolving the class.)The virtual machine then executes the
mainmethod inMyProgram(which is static, so no instance of a class needs to be created).If the
mainmethod or a method thatmaincalls requires additional classes, these are loaded next.
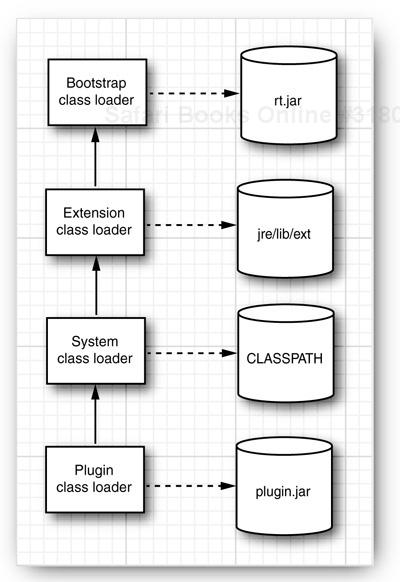
The class loading mechanism doesn’t just use a single class loader, however. Every Java program has at least three class loaders:
The bootstrap class loader
The extension class loader
The system class loader (also sometimes called the application class loader)
The bootstrap class loader loads the system classes (typically, from the JAR file rt.jar). It is an integral part of the virtual machine and is usually implemented in C. There is no ClassLoader object corresponding to the bootstrap class loader. For example,
String.class.getClassLoader()
returns null.
The extension class loader loads “standard extensions” from the jre/lib/ext directory. You can drop JAR files into that directory, and the extension class loader will find the classes in them, even without any class path. (Some people recommend this mechanism to avoid the “class path from hell,” but see the next cautionary note.)
The system class loader loads the application classes. It locates classes in the directories and JAR/ZIP files on the class path, as set by the CLASSPATH environment variable or the -classpath command-line option.
In Sun’s Java implementation, the extension and system class loaders are implemented in Java. Both are instances of the URLClassLoader class.
Caution
You can run into grief if you drop a JAR file into the jre/lib/ext directory and one of its classes needs to load a class that is not a system or extension class. The extension class loader does not use the class path. Keep that in mind before you use the extension directory as a way to manage your class file hassles.
Note
In addition to all the places already mentioned, classes can be loaded from the jre/lib/endorsed directory. This mechanism can only be used to replace certain standard Java libraries (such as those for XML and CORBA support) with newer versions. See http://java.sun.com/javase/6/docs/technotes/guides/standards/index.html for details.
Class loaders have a parent/child relationship. Every class loader except for the bootstrap class loader has a parent class loader. A class loader is supposed to give its parent a chance to load any given class and only load it if the parent has failed. For example, when the system class loader is asked to load a system class (say, java.util.ArrayList), then it first asks the extension class loader. That class loader first asks the bootstrap class loader. The bootstrap class loader finds and loads the class in rt.jar, and neither of the other class loaders searches any further.
Some programs have a plugin architecture in which certain parts of the code are packaged as optional plugins. If the plugins are packaged as JAR files, you can simply load the plugin classes with an instance of URLClassLoader.
URL url = new URL("file:///path/to/plugin.jar");
URLClassLoader pluginLoader = new URLClassLoader(new URL[] { url });
Class<?> cl = pluginLoader.loadClass("mypackage.MyClass");
Because no parent was specified in the URLClassLoader constructor, the parent of the pluginLoader is the system class loader. Figure 9-1 shows the hierarchy.
Most of the time, you don’t have to worry about the class loader hierarchy. Generally, classes are loaded because they are required by other classes, and that process is transparent to you.
Occasionally, you need to intervene and specify a class loader. Consider this example.
The author of the plugin has the reasonable expectation that the class should be loaded. However, the helper method’s class was loaded by the system class loader, and that is the class loader used by Class.forName. The classes in the plugin JAR are not visible. This phenomenon is called classloader inversion.
To overcome this problem, the helper method needs to use the correct class loader. It can require the class loader as a parameter. Alternatively, it can require that the correct class loader is set as the context class loader of the current thread. This strategy is used by many frameworks (such as the JAXP and JNDI frameworks that we discussed in Chapters 2 and 4).
Each thread has a reference to a class loader, called the context class loader. The main thread’s context class loader is the system class loader. When a new thread is created, its context class loader is set to the creating thread’s context class loader. Thus, if you don’t do anything, then all threads have their context class loader set to the system class loader.
However, you can set any class loader by calling
Thread t = Thread.currentThread();
t.setContextClassLoader(loader);
The helper method can then retrieve the context class loader:
Thread t = Thread.currentThread();
ClassLoader loader = t.getContextClassLoader();
Class cl = loader.loadClass(className);
The question remains when the context class loader is set to the plugin class loader. The application designer must make this decision. Generally, it is a good idea to set the context class loader when invoking a method of a plugin class that was loaded with a different class loader. Alternatively, the caller of the helper method can set the context class loader.
Every Java programmer knows that package names are used to eliminate name conflicts. There are two classes called Date in the standard library, but of course their real names are java.util.Date and java.sql.Date. The simple name is only a programmer convenience and requires the inclusion of appropriate import statements. In a running program, all class names contain their package name.
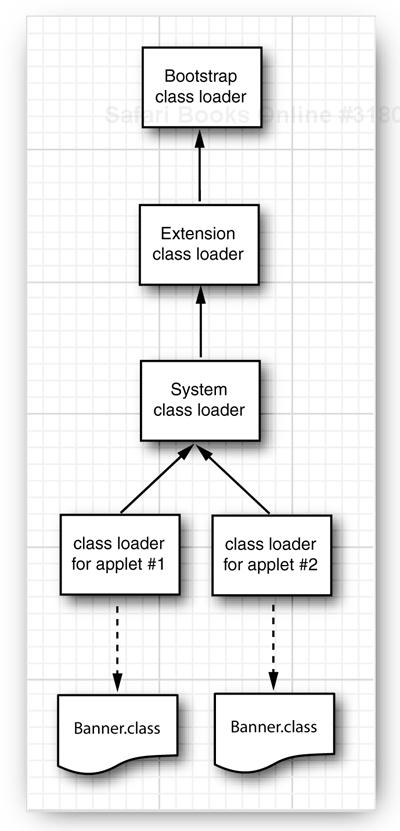
It might surprise you, however, that you can have two classes in the same virtual machine that have the same class and package name. A class is determined by its full name and the class loader. This technique is useful for loading code from multiple sources. For example, a browser uses separate instances of the applet class loader class for each web page. This allows the virtual machine to separate classes from different web pages, no matter what they are named. Figure 9-2 shows an example. Suppose a web page contains two applets, provided by different advertisers, and each applet has a class called Banner. Because each applet is loaded by a separate class loader, these classes are entirely distinct and do not conflict with each other.
Note
This technique has other uses as well, such as “hot deployment” of servlets and Enterprise JavaBeans. See http://java.sun.com/developer/TechTips/2000/tt1027.html for more information.
You can write your own class loader for specialized purposes. That lets you carry out custom checks before you pass the bytecodes to the virtual machine. For example, you can write a class loader that can refuse to load a class that has not been marked as “paid for.”
To write your own class loader, you simply extend the ClassLoader class and override the method.
findClass(String className)
The loadClass method of the ClassLoader superclass takes care of the delegation to the parent and calls findClass only if the class hasn’t already been loaded and if the parent class loader was unable to load the class.
Your implementation of this method must do the following:
Load the bytecodes for the class from the local file system or from some other source.
Call the
defineClassmethod of theClassLoadersuperclass to present the bytecodes to the virtual machine.
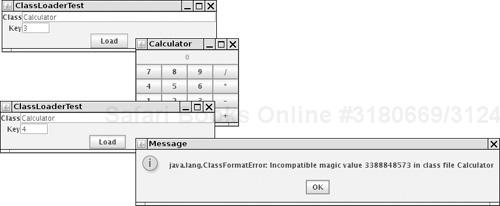
In the program of Listing 9-1, we implement a class loader that loads encrypted class files. The program asks the user for the name of the first class to load (that is, the class containing main) and the decryption key. It then uses a special class loader to load the specified class and calls the main method. The class loader decrypts the specified class and all nonsystem classes that are referenced by it. Finally, the program calls the main method of the loaded class (see Figure 9-3).
For simplicity, we ignore 2,000 years of progress in the field of cryptography and use the venerable Caesar cipher for encrypting the class files.
Note
David Kahn’s wonderful book The Codebreakers (Macmillan, 1967, p. 84) refers to Suetonius as a historical source for the Caesar cipher. Caesar shifted the 24 letters of the Roman alphabet by 3 letters, which at the time baffled his adversaries.
When this chapter was first written, the U.S. government restricted the export of strong encryption methods. Therefore, we used Caesar’s method for our example because it was clearly legal for export.
Our version of the Caesar cipher has as a key a number between 1 and 255. To decrypt, simply add that key to every byte and reduce modulo 256. The Caesar.java program of Listing 9-2 carries out the encryption.
So that we do not confuse the regular class loader, we use a different extension, .caesar, for the encrypted class files.
To decrypt, the class loader simply subtracts the key from every byte. In the companion code for this book, you will find four class files, encrypted with a key value of 3—the traditional choice. To run the encrypted program, you need the custom class loader defined in our ClassLoaderTest program.
Encrypting class files has a number of practical uses (provided, of course, that you use a cipher stronger than the Caesar cipher). Without the decryption key, the class files are useless. They can neither be executed by a standard virtual machine nor readily disassembled.
This means that you can use a custom class loader to authenticate the user of the class or to ensure that a program has been paid for before it will be allowed to run. Of course, encryption is only one application of a custom class loader. You can use other types of class loaders to solve other problems, for example, storing class files in a database.
Example 9-1. ClassLoaderTest.java
  1. import java.io.*;
  2. import java.lang.reflect.*;
  3. import java.awt.*;
  4. import java.awt.event.*;
  5. import javax.swing.*;
  6.
  7. /**
  8.  * This program demonstrates a custom class loader that decrypts class files.
  9.  * @version 1.22 2007-10-05
 10.  * @author Cay Horstmann
 11.  */
 12. public class ClassLoaderTest
 13. {
 14.    public static void main(String[] args)
 15.    {
 16.       EventQueue.invokeLater(new Runnable()
 17.          {
 18.             public void run()
 19.             {
 20.
 21.                JFrame frame = new ClassLoaderFrame();
 22.                frame.setDefaultCloseOperation(JFrame.EXIT_ON_CLOSE);
 23.                frame.setVisible(true);
 24.             }
 25.          });
 26.    }
 27. }
 28.
 29. /**
 30.  * This frame contains two text fields for the name of the class to load and the decryption key.
 31.  */
 32. class ClassLoaderFrame extends JFrame
 33. {
 34.    public ClassLoaderFrame()
 35.    {
 36.       setTitle("ClassLoaderTest");
 37.       setSize(DEFAULT_WIDTH, DEFAULT_HEIGHT);
 38.       setLayout(new GridBagLayout());
 39.       add(new JLabel("Class"), new GBC(0, 0).setAnchor(GBC.EAST));
 40.       add(nameField, new GBC(1, 0).setWeight(100, 0).setAnchor(GBC.WEST));
 41.       add(new JLabel("Key"), new GBC(0, 1).setAnchor(GBC.EAST));
 42.       add(keyField, new GBC(1, 1).setWeight(100, 0).setAnchor(GBC.WEST));
 43.       JButton loadButton = new JButton("Load");
 44.       add(loadButton, new GBC(0, 2, 2, 1));
 45.       loadButton.addActionListener(new ActionListener()
 46.          {
 47.             public void actionPerformed(ActionEvent event)
 48.             {
 49.                runClass(nameField.getText(), keyField.getText());
 50.             }
 51.          });
 52.       pack();
 53.    }
 54.
 55.    /**
 56.     * Runs the main method of a given class.
 57.     * @param name the class name
 58.     * @param key the decryption key for the class files
 59.     */
 60.    public void runClass(String name, String key)
 61.    {
 62.       try
 63.       {
 64.          ClassLoader loader = new CryptoClassLoader(Integer.parseInt(key));
 65.          Class<?> c = loader.loadClass(name);
 66.          Method m = c.getMethod("main", String[].class);
 67.          m.invoke(null, (Object) new String[] {});
 68.       }
 69.       catch (Throwable e)
 70.       {
 71.          JOptionPane.showMessageDialog(this, e);
 72.       }
 73.    }
 74.
 75.    private JTextField keyField = new JTextField("3", 4);
 76.    private JTextField nameField = new JTextField("Calculator", 30);
 77.    private static final int DEFAULT_WIDTH = 300;
 78.    private static final int DEFAULT_HEIGHT = 200;
 79. }
 80.
 81. /**
 82.  * This class loader loads encrypted class files.
 83.  */
 84. class CryptoClassLoader extends ClassLoader
 85. {
 86.    /**
 87.     * Constructs a crypto class loader.
 88.     * @param k the decryption key
 89.     */
 90.    public CryptoClassLoader(int k)
 91.    {
 92.       key = k;
 93.    }
 94.
 95.    protected Class<?> findClass(String name) throws ClassNotFoundException
 96.    {
 97.       byte[] classBytes = null;
 98.       try
 99.       {
100.          classBytes = loadClassBytes(name);
101.       }
102.       catch (IOException e)
103.       {
104.          throw new ClassNotFoundException(name);
105.       }
106.
107.       Class<?> cl = defineClass(name, classBytes, 0, classBytes.length);
108.       if (cl == null) throw new ClassNotFoundException(name);
109.       return cl;
110.    }
111.
112.    /**
113.     * Loads and decrypt the class file bytes.
114.     * @param name the class name
115.     * @return an array with the class file bytes
116.     */
117.    private byte[] loadClassBytes(String name) throws IOException
118.    {
119.       String cname = name.replace('.', '/') + ".caesar";
120.       FileInputStream in = null;
121.       in = new FileInputStream(cname);
122.       try
123.       {
124.          ByteArrayOutputStream buffer = new ByteArrayOutputStream();
125.          int ch;
126.          while ((ch = in.read()) != -1)
127.          {
128.             byte b = (byte) (ch - key);
129.             buffer.write(b);
130.          }
131.          in.close();
132.          return buffer.toByteArray();
133.       }
134.       finally
135.       {
136.          in.close();
137.       }
138.    }
139.
140.    private int key;
141. }
Example 9-2. Caesar.java
 1. import java.io.*;
 2.
 3. /**
 4.  * Encrypts a file using the Caesar cipher.
 5.  * @version 1.00 1997-09-10
 6.  * @author Cay Horstmann
 7.  */
 8. public class Caesar
 9. {
10.    public static void main(String[] args)
11.    {
12.       if (args.length != 3)
13.       {
14.          System.out.println("USAGE: java Caesar in out key");
15.          return;
16.       }
17.
18.       try
19.       {
20.          FileInputStream in = new FileInputStream(args[0]);
21.          FileOutputStream out = new FileOutputStream(args[1]);
22.          int key = Integer.parseInt(args[2]);
23.          int ch;
24.          while ((ch = in.read()) != -1)
25.          {
26.             byte c = (byte) (ch + key);
27.             out.write(c);
28.          }
29.          in.close();
30.          out.close();
31.       }
32.       catch (IOException exception)
33.       {
34.          exception.printStackTrace();
35.       }
36.    }
37. }
java.lang.ClassLoader 1.0
ClassLoader getParent()1.2returns the parent class loader, or
nullif the parent class loader is the bootstrap class loader.static ClassLoader getSystemClassLoader()1.2gets the system class loader; that is, the class loader that was used to load the first application class.
protected Class findClass(String name)1.2should be overridden by a class loader to find the bytecodes for a class and present them to the virtual machine by calling the
defineClassmethod. In the name of the class, use.as package name separator, and don’t use a.classsuffix.Class defineClass(String name, byte[] byteCodeData, int offset, int length)adds a new class to the virtual machine whose bytecodes are provided in the given data range.
java.net.URLClassLoader 1.2
URLClassLoader(URL[] urls)URLClassLoader(URL[] urls, ClassLoader parent)constructs a class loader that loads classes from the given URLs. If a URL ends in a
/, it is assumed to be a directory, otherwise it is assumed to be a JAR file.
java.lang.Thread 1.0
ClassLoader getContextClassLoader()1.2gets the class loader that the creator of this thread has designated as the most reasonable class loader to use when executing this thread.
void setContextClassLoader(ClassLoader loader)1.2sets a class loader for code in this thread to retrieve for loading classes. If no context class loader is set explicitly when a thread is started, the parent’s context class loader is used.
When a class loader presents the bytecodes of a newly loaded Java platform class to the virtual machine, these bytecodes are first inspected by a verifier. The verifier checks that the instructions cannot perform actions that are obviously damaging. All classes except for system classes are verified. You can, however, deactivate verification with the undocumented -noverify option.
For example,
java -noverify Hello
Here are some of the checks that the verifier carries out:
Variables are initialized before they are used.
Method calls match the types of object references.
Rules for accessing private data and methods are not violated.
Local variable accesses fall within the runtime stack.
The runtime stack does not overflow.
If any of these checks fails, then the class is considered corrupted and will not be loaded.
Note
If you are familiar with Gödel’s theorem, you might wonder how the verifier can prove that a class file is free from type mismatches, uninitialized variables, and stack overflows. Gödel’s theorem states that it is impossible to design algorithms that process program files and decide whether the input programs have a particular property (such as being free from stack overflows). Is this a conflict between the public relations department at Sun Microsystems and the laws of logic? No—in fact, the verifier is not a decision algorithm in the sense of Gödel. If the verifier accepts a program, it is indeed safe. However, the verifier might reject virtual machine instructions even though they would actually be safe. (You might have run into this issue when you were forced to initialize a variable with a dummy value because the compiler couldn’t tell that it was going to be properly initialized.)
This strict verification is an important security consideration. Accidental errors, such as uninitialized variables, can easily wreak havoc if they are not caught. More important, in the wide open world of the Internet, you must be protected against malicious programmers who create evil effects on purpose. For example, by modifying values on the runtime stack or by writing to the private data fields of system objects, a program can break through the security system of a browser.
You might wonder, however, why a special verifier checks all these features. After all, the compiler would never allow you to generate a class file in which an uninitialized variable is used or in which a private data field is accessed from another class. Indeed, a class file generated by a compiler for the Java programming language always passes verification. However, the bytecode format used in the class files is well documented, and it is an easy matter for someone with some experience in assembly programming and a hex editor to manually produce a class file that contains valid but unsafe instructions for the Java virtual machine. Once again, keep in mind that the verifier is always guarding against maliciously altered class files, not just checking the class files produced by a compiler.
Here’s an example of how to construct such an altered class file. We start with the program VerifierTest.java of Listing 9-3. This is a simple program that calls a method and displays the method result. The program can be run both as a console program and as an applet. The fun method itself just computes 1 + 2.
static int fun()
{
   int m;
   int n;
   m = 1;
   n = 2;
   int r = m + n;
   return r;
}
As an experiment, try to compile the following modification of this program:
static int fun()
{
   int m = 1;
   int n;
   m = 1;
   m = 2;
   int r = m + n;
   return r;
}
In this case, n is not initialized, and it could have any random value. Of course, the compiler detects that problem and refuses to compile the program. To create a bad class file, we have to work a little harder. First, run the javap program to find out how the compiler translates the fun method. The command
javap -c VerifierTest
shows the bytecodes in the class file in mnemonic form.
Method int fun()
   0 iconst_1
   1 istore_0
   2 iconst_2
   3 istore_1
   4 iload_0
   5 iload_1
   6 iadd
   7 istore_2
   8 iload_2
   9 ireturn
We use a hex editor to change instruction 3 from istore_1 to istore_0. That is, local variable 0 (which is m) is initialized twice, and local variable 1 (which is n) is not initialized at all. We need to know the hexadecimal values for these instructions. These values are readily available from The Java Virtual Machine Specification, 2nd ed., by Tim Lindholm and Frank Yellin (Prentice Hall PTR 1999).
   0 iconst_1 04
   1 istore_0 3B
   2 iconst_2 05
   3 istore_1 3C
   4 iload_0  1A
   5 iload_1  1B
   6 iadd     60
   7 istore_2 3D
   8 iload_2  1C
   9 ireturn  AC
You can use any hex editor to carry out the modification. In Figure 9-4, you see the class file VerifierTest.class loaded into the Gnome hex editor, with the bytecodes of the fun method highlighted.
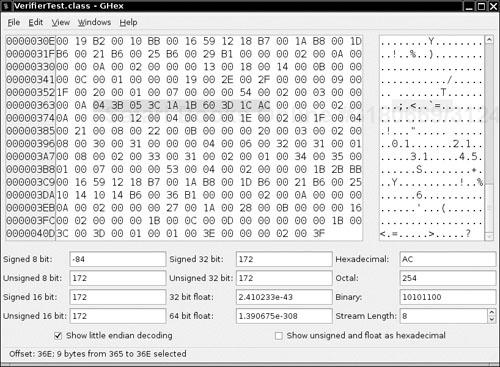
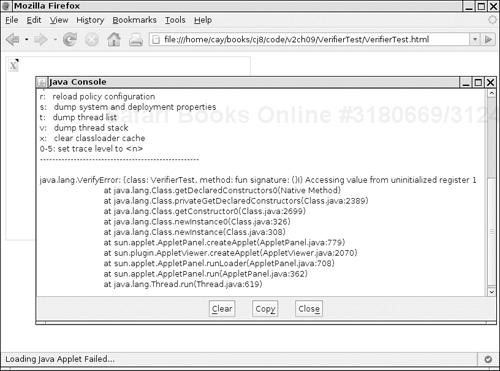
Change 3C to 3B and save the class file. Then try running the VerifierTest program. You get an error message:
Exception in thread "main" java.lang.VerifyError: (class: VerifierTest, method:fun signature:
()I) Accessing value from uninitialized register 1
That is good—the virtual machine detected our modification.
Now run the program with the -noverify (or -Xverify:none) option.
java -noverify VerifierTest
The fun method returns a seemingly random value. This is actually 2 plus the value that happened to be stored in the variable n, which never was initialized. Here is a typical printout:
1 + 2 == 15102330
To see how browsers handle verification, we wrote this program to run either as an application or an applet. Load the applet into a browser, using a file URL such as
file:///C:/CoreJavaBook/v2ch9/VerifierTest/VerifierTest.html
You then see an error message displayed indicating that verification has failed (see Figure 9-5).
Example 9-3. VerifierTest.java
 1. import java.applet.*;
 2. import java.awt.*;
 3.
 4. /**
 5.  * This application demonstrates the bytecode verifier of the virtual machine. If you use a
 6.  * hex editor to modify the class file, then the virtual machine should detect the tampering.
 7.  * @version 1.00 1997-09-10
 8.  * @author Cay Horstmann
 9.  */
10. public class VerifierTest extends Applet
11. {
12.    public static void main(String[] args)
13.    {
14.       System.out.println("1 + 2 == " + fun());
15.    }
16.
17.    /**
18.     * A function that computes 1 + 2
19.     * @return 3, if the code has not been corrupted
20.     */
21.    public static int fun()
22.    {
23.       int m;
24.       int n;
25.       m = 1;
26.       n = 2;
27.       // use hex editor to change to "m = 2" in class file
28.       int r = m + n;
29.       return r;
30.    }
31.
32.    public void paint(Graphics g)
33.    {
34.       g.drawString("1 + 2 == " + fun(), 20, 20);
35.    }
36. }
Once a class has been loaded into the virtual machine and checked by the verifier, the second security mechanism of the Java platform springs into action: the security manager. The security manager is a class that controls whether a specific operation is permitted. Operations checked by the security manager include the following:
Creating a new class loader
Exiting the virtual machine
Accessing a field of another class by using reflection
Accessing a file
Opening a socket connection
Starting a print job
Accessing the system clipboard
Accessing the AWT event queue
Bringing up a top-level window
There are many other checks such as these throughout the Java library.
The default behavior when running Java applications is that no security manager is installed, so all these operations are permitted. The applet viewer, on the other hand, enforces a security policy that is quite restrictive.
For example, applets are not allowed to exit the virtual machine. If they try calling the exit method, then a security exception is thrown. Here is what happens in detail. The exit method of the Runtime class calls the checkExit method of the security manager. Here is the entire code of the exit method:
public void exit(int status)
{
   SecurityManager security = System.getSecurityManager();
   if (security != null)
       security.checkExit(status);
   exitInternal(status);
}
The security manager now checks if the exit request came from the browser or an individual applet. If the security manager agrees with the exit request, then the checkExit method simply returns and normal processing continues. However, if the security manager doesn’t want to grant the request, the checkExit method throws a SecurityException.
The exit method continues only if no exception occurred. It then calls the private native exitInternal method that actually terminates the virtual machine. There is no other way of terminating the virtual machine, and because the exitInternal method is private, it cannot be called from any other class. Thus, any code that attempts to exit the virtual machine must go through the exit method and thus through the checkExit security check without triggering a security exception.
Clearly, the integrity of the security policy depends on careful coding. The providers of system services in the standard library must always consult the security manager before attempting any sensitive operation.
The security manager of the Java platform allows both programmers and system administrators fine-grained control over individual security permissions. We describe these features in the following section. First, we summarize the Java 2 platform security model. We then show how you can control permissions with policy files. Finally, we explain how you can define your own permission types.
Note
It is possible to implement and install your own security manager, but you should not attempt this unless you are an expert in computer security. It is much safer to configure the standard security manager.
JDK 1.0 had a very simple security model: Local classes had full permissions, and remote classes were confined to the sandbox. Just like a child that can only play in a sandbox, remote code was only allowed to paint on the screen and interact with the user. The applet security manager denied all access to local resources. JDK 1.1 implemented a slight modification: Remote code that was signed by a trusted entity was granted the same permissions as local classes. However, both versions of the JDK provided an all-or-nothing approach. Programs either had full access or they had to play in the sandbox.
Starting with Java SE 1.2, the Java platform has a much more flexible mechanism. A security policy maps code sources to permission sets (see Figure 9-6).
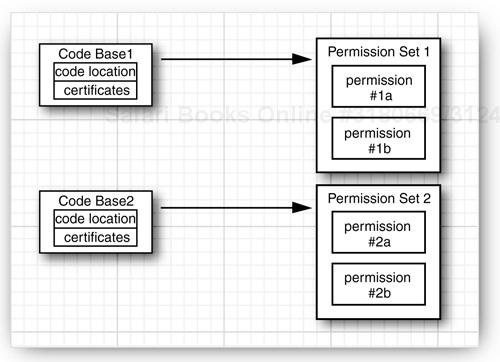
A code source is specified by a code base and a set of certificates. The code base specifies the origin of the code. For example, the code base of remote applet code is the HTTP URL from which the applet is loaded. The code base of code in a JAR file is a file URL. A certificate, if present, is an assurance by some party that the code has not been tampered with. We cover certificates later in this chapter.
A permission is any property that is checked by a security manager. The Java platform supports a number of permission classes, each of which encapsulates the details of a particular permission. For example, the following instance of the FilePermission class states that it is okay to read and write any file in the /tmp directory.
FilePermission p = new FilePermission("/tmp/*", "read,write");More important, the default implementation of the Policy class reads permissions from a permission file. Inside a permission file, the same read permission is expressed as
permission java.io.FilePermission "/tmp/*", "read,write";
We discuss permission files in the next section.
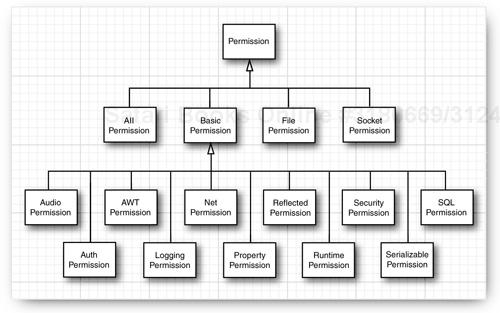
Figure 9-7 shows the hierarchy of the permission classes that were supplied with Java SE 1.2. Many more permission classes have been added in subsequent Java releases.
In the preceding section, you saw that the SecurityManager class has security check methods such as checkExit. These methods exist only for the convenience of the programmer and for backward compatibility. They all map into standard permission checks. For example, here is the source code for the checkExit method:
public void checkExit()
{
   checkPermission(new RuntimePermission("exitVM"));
}
Each class has a protection domain, an object that encapsulates both the code source and the collection of permissions of the class. When the SecurityManager needs to check a permission, it looks at the classes of all methods currently on the call stack. It then gets the protection domains of all classes and asks each protection domain if its permission collection allows the operation that is currently being checked. If all domains agree, then the check passes. Otherwise, a SecurityException is thrown.
Why do all methods on the call stack need to allow a particular operation? Let us work through an example. Suppose the init method of an applet wants to open a file. It might call
Reader in = new FileReader(name);
The FileReader constructor calls the FileInputStream constructor, which calls the checkRead method of the security manager, which finally calls checkPermission with a FilePermission(name, "read" object. Table 9-1 shows the call stack.
Table 9-1. Call Stack During Permission Checking
Class | Method | Code Source | Permissions |
|---|---|---|---|
|
|
|
|
|
|
|
|
| constructor |
|
|
| constructor |
|
|
applet |
| applet code source | applet permissions |
. . . |
The FileInputStream and SecurityManager classes are system classes for which CodeSource is null and permissions consist of an instance of the AllPermission class, which allows all operations. Clearly, their permissions alone can’t determine the outcome of the check. As you can see, the checkPermission method must take into account the restricted permissions of the applet class. By checking the entire call stack, the security mechanism ensures that one class can never ask another class to carry out a sensitive operation on its behalf.
Note
This brief discussion of permission checking explains the basic concepts. However, we omit a number of technical details here. With security, the devil lies in the details, and we encourage you to read the book by Li Gong for more information. For a more critical view of the Java platform security model, see the book Securing Java: Getting Down to Business with Mobile Code, 2nd ed., by Gary McGraw and Ed W. Felten (Wiley 1999). You can find an online version of that book at http://www.securingjava.com.
java.lang.SecurityManager 1.0
void checkPermission(Permission p)1.2checks whether this security manager grants the given permission. The method throws a
SecurityExceptionif the permission is not granted.
java.lang.Class 1.0
ProtectionDomain getProtectionDomain()1.2gets the protection domain for this class, or
nullif this class was loaded without a protection domain.
java.security.ProtectionDomain 1.2
ProtectionDomain(CodeSource source, PermissionCollection permissions)constructs a protection domain with the given code source and permissions.
CodeSource getCodeSource()gets the code source of this protection domain.
boolean implies(Permission p)returns
trueif the given permission is allowed by this protection domain.
The policy manager reads policy files that contain instructions for mapping code sources to permissions. Here is a typical policy file:
grant codeBase "http://www.horstmann.com/classes"
{
   permission java.io.FilePermission "/tmp/*", "read,write";
};
This file grants permission to read and write files in the /tmp directory to all code that was downloaded from http://www.horstmann.com/classes.
You can install policy files in standard locations. By default, there are two locations:
The file
java.policyin the Java platform home directoryThe file
.java.policy(notice the period at the beginning of the file name) in the user home directory
Note
You can change the locations of these files in the java.security configuration file in the jre/lib/security. The defaults are specified as
policy.url.1=file:${java.home}/lib/security/java.policy
policy.url.2=file:${user.home}/.java.policy
A system administrator can modify the java.security file and specify policy URLs that reside on another server and that cannot be edited by users. There can be any number of policy URLs (with consecutive numbers) in the policy file. The permissions of all files are combined.
If you want to store policies outside the file system, you can implement a subclass of the Policy class that gathers the permissions. Then change the line
policy.provider=sun.security.provider.PolicyFile
in the java.security configuration file.
During testing, we don’t like to constantly modify the standard policy files. Therefore, we prefer to explicitly name the policy file that is required for each application. Place the permissions into a separate file, say, MyApp.policy. To apply the policy, you have two choices. You can set a system property inside your applications’ main method:
System.setProperty("java.security.policy", "MyApp.policy");Alternatively, you can start the virtual machine as
java -Djava.security.policy=MyApp.policy MyApp
For applets, you instead use
appletviewer -J-Djava.security.policy=MyApplet.policy MyApplet.html
(You can use the -J option of the appletviewer to pass any command-line argument to the virtual machine.)
In these examples, the MyApp.policy file is added to the other policies in effect. If you add a second equal sign, such as
java -Djava.security.policy==MyApp.policy MyApp
then your application uses only the specified policy file, and the standard policy files are ignored.
Caution
An easy mistake during testing is to accidentally leave a .java.policy file that grants a lot of permissions, perhaps even AllPermission, in the current directory. If you find that your application doesn’t seem to pay attention to the restrictions in your policy file, check for a left-behind .java.policy file in your current directory. If you use a UNIX system, this is a particularly easy mistake to make because files with names that start with a period are not displayed by default.
As you saw previously, Java applications by default do not install a security manager. Therefore, you won’t see the effect of policy files until you install one. You can, of course, add a line
System.setSecurityManager(new SecurityManager());
into your main method. Or you can add the command-line option -Djava.security.manager when starting the virtual machine.
java -Djava.security.manager -Djava.security.policy=MyApp.policy MyApp
In the remainder of this section, we show you in detail how to describe permissions in the policy file. We describe the entire policy file format, except for code certificates, which we cover later in this chapter.
A policy file contains a sequence of grant entries. Each entry has the following form:
grant codesource
{
   permission1;
   permission2;
   . . .
};
The code source contains a code base (which can be omitted if the entry applies to code from all sources) and the names of trusted principals and certificate signers (which can be omitted if signatures are not required for this entry).
The code base is specified as
codeBase "url"
If the URL ends in a /, then it refers to a directory. Otherwise, it is taken to be the name of a JAR file. For example,
grant codeBase "www.horstmann.com/classes/" { . . . };
grant codeBase "www.horstmann.com/classes/MyApp.jar" { . . . };
The code base is a URL and should always contain forward slashes as file separators, even for file URLs in Windows. For example,
grant codeBase "file:C:/myapps/classes/" { . . . };Note
Everyone knows that http URLs start with two slashes (http://). But there seems sufficient confusion about file URLs that the policy file reader accepts two forms of file URLs, namely, file://localFile and file:localFile. Furthermore, a slash before a Windows drive letter is optional. That is, all of the following are acceptable:
file:C:/dir/filename.ext
file:/C:/dir/filename.ext
file://C:/dir/filename.ext
file:///C:/dir/filename.ext
Actually, in our tests, the file:////C:/dir/filename.ext is acceptable as well, and we have no explanation for that.
The permissions have the following structure:
permission className targetName, actionList;
The class name is the fully qualified class name of the permission class (such as java.io.FilePermission). The target name is a permission-specific value, for example, a file or directory name for the file permission, or a host and port for a socket permission. The actionList is also permission specific. It is a list of actions, such as read or connect, separated by commas. Some permission classes don’t need target names and action lists. Table 9-2 lists the commonly used permission classes and their actions.
Table 9-2. Permissions and Their Associated Targets and Actions
Permission | Target | Action |
|---|---|---|
java.io.FilePermission | file target (see text) | read, write, execute, delete |
java.net.SocketPermission | socket target (see text) | accept, connect, listen, resolve |
java.util.PropertyPermission | property target (see text) |
|
| createClassLoader getClassLoader setContextClassLoader enableContextClassLoaderOverride createSecurityManager setSecurityManager exitVM getenv.variableName shutdownHooks setFactory setIO modifyThread stopThread modifyThreadGroup getProtectionDomain readFileDescriptor writeFileDescriptor loadLibrary.libraryName accessClassInPackage.packageName defineClassInPackage.packageName accessDeclaredMembers.className queuePrintJob getStackTrace setDefaultUncaughtExceptionHandler preferences usePolicy | (none) |
java.awt.AWTPermission | showWindowWithoutWarningBanner accessClipboard accessEventQueue createRobot fullScreenExclusive listenToAllAWTEvents readDisplayPixels replaceKeyboardFocusManager watchMousePointer setWindowAlwaysOnTop setAppletStub | (none) |
java.net.NetPermission | setDefaultAuthenticator specifyStreamHandler requestPasswordAuthentication setProxySelector getProxySelector setCookieHandler getCookieHandler setResponseCache getResponseCache | (none) |
| suppressAccessChecks | (none) |
java.io.SerializablePermission | enableSubclassImplementation enableSubstitution | (none) |
java.security.SecurityPermission | createAccessControlContext getDomainCombiner getPolicy setPolicy getProperty.keyName setProperty.keyName insertProvider.providerName removeProvider.providerName setSystemScope setIdentityPublicKey setIdentityInfo addIdentityCertificate removeIdentityCertificate printIdentity clearProviderProperties.providerName putProviderProperty.providerName removeProviderProperty.providerName getSignerPrivateKey setSignerKeyPair | (none) |
java.security.AllPermission | (none) | (none) |
javax.audio.AudioPermission | play record | (none) |
javax.security.auth.AuthPermission | doAs
doAsPrivileged
getSubject
getSubjectFromDomainCombiner
setReadOnly
modifyPrincipals
modifyPublicCredentials
modifyPrivateCredentials
refreshCredential
destroyCredential
createLoginContext.contextName
getLoginConfiguration
setLoginConfiguration
refreshLoginConfiguration | (none) |
java.util.logging.LoggingPermission | control | (none) |
java.sql.SQLPermission | setLog | (none) |
As you can see from Table 9-2, most permissions simply permit a particular operation. You can think of the operation as the target with an implied action "permit". These permission classes all extend the BasicPermission class (see Figure 9-7 on page 774). However, the targets for the file, socket, and property permissions are more complex, and we need to investigate them in detail.
File permission targets can have the following form:
file | a file |
directory | a directory |
directory | all files in the directory |
| all files in the current directory |
directory | all files in the directory or one of its subdirectories |
- | all files in the current directory or one of its subdirectories |
| all files in the file system |
For example, the following permission entry gives access to all files in the directory /myapp and any of its subdirectories.
permission java.io.FilePermission "/myapp/-", "read,write,delete";
You must use the \ escape sequence to denote a backslash in a Windows file name.
permission java.io.FilePermission "c:\myapp\-", "read,write,delete";
Socket permission targets consist of a host and a port range. Host specifications have the following form:
hostname or IPaddress | a single host |
| the local host |
| any host whose domain ends with the given suffix |
| all hosts |
Port ranges are optional and have the form:
| a single port |
| all ports numbered n and above |
| all ports numbered n and below |
| all ports in the given range |
Here is an example:
permission java.net.SocketPermission "*.horstmann.com:8000-8999", "connect";
Finally, property permission targets can have one of two forms:
property | a specific property |
propertyPrefix | all properties with the given prefix |
Examples are "java.home" and "java.vm.*".
For example, the following permission entry allows a program to read all properties that start with java.vm.
permission java.util.PropertyPermission "java.vm.*", "read";
You can use system properties in policy files. The token ${property} is replaced by the property value. For example, ${user.home} is replaced by the home directory of the user. Here is a typical use of this system property in a permission entry.
permission java.io.FilePermission "${user.home}", "read,write";To create platform-independent policy files, it is a good idea to use the file.separator property instead of explicit / or \ separators. To make this simpler, the special notation ${/} is a shortcut for ${file.separator}. For example,
permission java.io.FilePermission "${user.home}${/}-", "read,write";is a portable entry for granting permission to read and write in the user’s home directory and any of its subdirectories.
Note
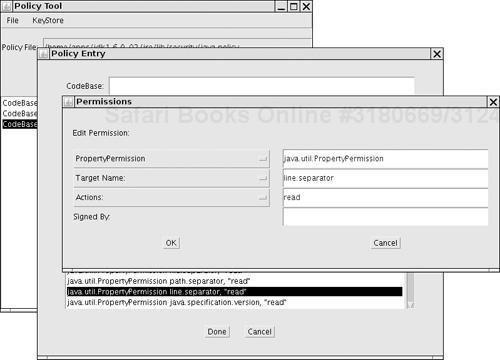
The JDK comes with a rudimentary tool, called policytool, that you can use to edit policy files (see Figure 9-8). Of course, this tool is not suitable for end users who would be completely mystified by most of the settings. We view it as a proof of concept for an administration tool that might be used by system administrators who prefer point-and-click over syntax. Still, what’s missing is a sensible set of categories (such as low, medium, or high security) that is meaningful to nonexperts. As a general observation, we believe that the Java platform certainly contains all the pieces for a fine-grained security model but that it could benefit from some polish in delivering these pieces to end users and system administrators.
In this section, you see how you can supply your own permission class that users can refer to in their policy files.
To implement your permission class, you extend the Permission class and supply the following methods:
A constructor with two
Stringparameters, for the target and the action listString getActions()boolean equals()int hashCode()boolean implies(Permission other)
The last method is the most important. Permissions have an ordering, in which more general permissions imply more specific ones. Consider the file permission
p1 = new FilePermission("/tmp/-", "read, write");This permission allows reading and writing of any file in the /tmp directory and any of its subdirectories.
This permission implies other, more specific permissions:
p2 = new FilePermission("/tmp/-", "read");
p3 = new FilePermission("/tmp/aFile", "read, write");
p4 = new FilePermission("/tmp/aDirectory/-", "write");
In other words, a file permission p1 implies another file permission p2 if
The target file set of
p1contains the target file set ofp2.The action set of
p1contains the action set ofp2.
Consider the following example of the use of the implies method. When the FileInputStream constructor wants to open a file for reading, it checks whether it has permission to do so. For that check, a specific file permission object is passed to the checkPermission method:
checkPermission(new FilePermission(fileName, "read"));
The security manager now asks all applicable permissions whether they imply this permission. If any one of them implies it, then the check passes.
In particular, the AllPermission implies all other permissions.
If you define your own permission classes, then you need to define a suitable notion of implication for your permission objects. Suppose, for example, that you define a TVPermission for a set-top box powered by Java technology. A permission
new TVPermission("Tommy:2-12:1900-2200", "watch,record")might allow Tommy to watch and record television channels 2−12 between 19:00 and 22:00. You need to implement the implies method so that this permission implies a more specific one, such as
new TVPermission("Tommy:4:2000-2100", "watch")In the next sample program, we implement a new permission for monitoring the insertion of text into a text area. The program ensures that you cannot add “bad words” such as sex, drugs, and C++ into a text area. We use a custom permission class so that the list of bad words can be supplied in a policy file.
The following subclass of JTextArea asks the security manager whether it is okay to add new text:
class WordCheckTextArea extends JTextArea
{
   public void append(String text)
   {
      WordCheckPermission p = new WordCheckPermission(text, "insert");
      SecurityManager manager = System.getSecurityManager();
      if (manager != null) manager.checkPermission(p);
      super.append(text);
   }
}
If the security manager grants the WordCheckPermission, then the text is appended. Otherwise, the checkPermission method throws an exception.
Word check permissions have two possible actions: insert (the permission to insert a specific text) and avoid (the permission to add any text that avoids certain bad words). You should run this program with the following policy file:
grant
{
   permission WordCheckPermission "sex,drugs,C++", "avoid";
};
This policy file grants the permission to insert any text that avoids the bad words sex, drugs, and C++.
When designing the WordCheckPermission class, we must pay particular attention to the implies method. Here are the rules that control whether permission p1 implies permission p2.
If
p1has actionavoidandp2has actioninsert, then the target ofp2must avoid all words inp1. For example, the permissionWordCheckPermission "sex,drugs,C++", "avoid"
implies the permission
WordCheckPermission "Mary had a little lamb", "insert"
If
p1andp2both have actionavoid, then the word set ofp2must contain all words in the word set ofp1. For example, the permissionWordCheckPermission "sex,drugs", "avoid"
implies the permission
WordCheckPermission "sex,drugs,C++", "avoid"
If
p1andp2both have actioninsert, then the text ofp1must contain the text ofp2. For example, the permissionWordCheckPermission "Mary had a little lamb", "insert"
implies the permission
WordCheckPermission "a little lamb", "insert"
You can find the implementation of this class in Listing 9-4.
Note that you retrieve the permission target with the confusingly named getName method of the Permission class.
Because permissions are described by a pair of strings in policy files, permission classes need to be prepared to parse these strings. In particular, we use the following method to transform the comma-separated list of bad words of an avoid permission into a genuine Set.
public Set<String> badWordSet()
{
   Set<String> set = new HashSet<String>();
   set.addAll(Arrays.asList(getName().split(",")));
   return set;
}
This code allows us to use the equals and containsAll methods to compare sets. As you saw in Chapter 2, the equals method of a set class finds two sets to be equal if they contain the same elements in any order. For example, the sets resulting from "sex,drugs,C++" and "C++,drugs,sex" are equal.
Caution
Make sure that your permission class is a public class. The policy file loader cannot load classes with package visibility outside the boot class path, and it silently ignores any classes that it cannot find.
The program in Listing 9-5 shows how the WordCheckPermission class works. Type any text into the text field and click the Insert button. If the security check passes, the text is appended to the text area. If not, an error message is displayed (see Figure 9-9).
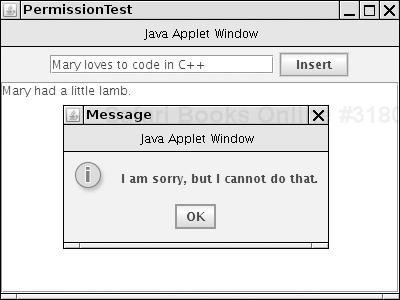
Caution
If you carefully look at Figure 9-9, you will see that the frame window has a warning border with the misleading caption "Java Applet Window." The window caption is determined by the showWindowWithoutWarningBanner target of the java.awt.AWTPermission. If you like, you can edit the policy file to grant that permission.
You have now seen how to configure Java platform security. Most commonly, you will simply tweak the standard permissions. For additional control, you can define custom permissions that can be configured in the same way as the standard permissions.
Example 9-4. WordCheckPermission.java
 1. import java.security.*;
 2. import java.util.*;
 3.
 4. /**
 5.  * A permission that checks for bad words.
 6.  * @version 1.00 1999-10-23
 7.  * @author Cay Horstmann
 8.  */
 9. public class WordCheckPermission extends Permission
10. {
11.    /**
12.     * Constructs a word check permission
13.     * @param target a comma separated word list
14.     * @param anAction "insert" or "avoid"
15.     */
16.    public WordCheckPermission(String target, String anAction)
17.    {
18.       super(target);
19.       action = anAction;
20.    }
21.
22.    public String getActions()
23.    {
24.       return action;
25.    }
26.
27.    public boolean equals(Object other)
28.    {
29.       if (other == null) return false;
30.       if (!getClass().equals(other.getClass())) return false;
31.       WordCheckPermission b = (WordCheckPermission) other;
32.       if (!action.equals(b.action)) return false;
33.       if (action.equals("insert")) return getName().equals(b.getName());
34.       else if (action.equals("avoid")) return badWordSet().equals(b.badWordSet());
35.       else return false;
36.    }
37.
38.    public int hashCode()
39.    {
40.       return getName().hashCode() + action.hashCode();
41.    }
42.
43.    public boolean implies(Permission other)
44.    {
45.       if (!(other instanceof WordCheckPermission)) return false;
46.       WordCheckPermission b = (WordCheckPermission) other;
47.       if (action.equals("insert"))
48.       {
49.          return b.action.equals("insert") && getName().indexOf(b.getName()) >= 0;
50.       }
51.       else if (action.equals("avoid"))
52.       {
53.          if (b.action.equals("avoid")) return b.badWordSet().containsAll(badWordSet());
54.          else if (b.action.equals("insert"))
55.          {
56.             for (String badWord : badWordSet())
57.                if (b.getName().indexOf(badWord) >= 0) return false;
58.             return true;
59.          }
60.          else return false;
61.       }
62.       else return false;
63.    }
64.
65.    /**
66.     * Gets the bad words that this permission rule describes.
67.     * @return a set of the bad words
68.     */
69.    public Set<String> badWordSet()
70.    {
71.       Set<String> set = new HashSet<String>();
72.       set.addAll(Arrays.asList(getName().split(",")));
73.       return set;
74.    }
75.
76.    private String action;
77. }
Example 9-5. PermissionTest.java
 1. import java.awt.*;
 2. import java.awt.event.*;
 3. import javax.swing.*;
 4.
 5. /**
 6.  * This class demonstrates the custom WordCheckPermission.
 7.  * @version 1.03 2007-10-06
 8.  * @author Cay Horstmann
 9.  */
10. public class PermissionTest
11. {
12.    public static void main(String[] args)
13.    {
14.       System.setProperty("java.security.policy", "PermissionTest.policy");
15.       System.setSecurityManager(new SecurityManager());
16.       EventQueue.invokeLater(new Runnable()
17.          {
18.             public void run()
19.             {
20.                JFrame frame = new PermissionTestFrame();
21.                frame.setDefaultCloseOperation(JFrame.EXIT_ON_CLOSE);
22.                frame.setVisible(true);
23.             }
24.          });
25.    }
26. }
27.
28. /**
29.  * This frame contains a text field for inserting words into a text area that is protected
30.  * from "bad words".
31.  */
32. class PermissionTestFrame extends JFrame
33. {
34.    public PermissionTestFrame()
35.    {
36.       setTitle("PermissionTest");
37.       setSize(DEFAULT_WIDTH, DEFAULT_HEIGHT);
38.
39.       textField = new JTextField(20);
40.       JPanel panel = new JPanel();
41.       panel.add(textField);
42.       JButton openButton = new JButton("Insert");
43.       panel.add(openButton);
44.       openButton.addActionListener(new ActionListener()
45.          {
46.             public void actionPerformed(ActionEvent event)
47.             {
48.                insertWords(textField.getText());
49.             }
50.          });
51.
52.       add(panel, BorderLayout.NORTH);
53.
54.       textArea = new WordCheckTextArea();
55.       add(new JScrollPane(textArea), BorderLayout.CENTER);
56.    }
57.
58.    /**
59.     * Tries to insert words into the text area. Displays a dialog if the attempt fails.
60.     * @param words the words to insert
61.     */
62.    public void insertWords(String words)
63.    {
64.       try
65.       {
66.          textArea.append(words + "
");
67.       }
68.       catch (SecurityException e)
69.       {
70.          JOptionPane.showMessageDialog(this, "I am sorry, but I cannot do that.");
71.       }
72.    }
73.
74.    private JTextField textField;
75.    private WordCheckTextArea textArea;
76.    private static final int DEFAULT_WIDTH = 400;
77.    private static final int DEFAULT_HEIGHT = 300;
78. }
79.
80. /**
81.  * A text area whose append method makes a security check to see that no bad words are added.
82.  */
83. class WordCheckTextArea extends JTextArea
84. {
85.    public void append(String text)
86.    {
87.       WordCheckPermission p = new WordCheckPermission(text, "insert");
88.       SecurityManager manager = System.getSecurityManager();
89.       if (manager != null) manager.checkPermission(p);
90.       super.append(text);
91.    }
92. }
java.security.Permission 1.2
Permission(String name)constructs a permission with the given target name.
String getName()returns the target name of this permission.
boolean implies(Permission other)checks whether this permission implies the other permission. That is the case if the other permission describes a more specific condition that is a consequence of the condition described by this permission.
The Java Authentication and Authorization Service (JAAS) is a part of Java SE 1.4 and beyond. The “authentication” part is concerned with ascertaining the identity of a program user. The “authorization” part maps users to permissions.
JAAS is a “pluggable” API that isolates Java applications from the particular technology used to implement authentication. It supports, among others, UNIX logins, NT logins, Kerberos authentication, and certificate-based authentication.
Once a user has been authenticated, you can attach a set of permissions. For example, here we grant Harry a particular set of permissions that other users do not have:
grant principal com.sun.security.auth.UnixPrincipal "harry"
{
   permission java.util.PropertyPermission "user.*", "read";
   . . .
};
The com.sun.security.auth.UnixPrincipal class checks the name of the UNIX user who is running this program. Its getName method returns the UNIX login name, and we check whether that name equals "harry".
You use a LoginContext to allow the security manager to check such a grant statement. Here is the basic outline of the login code:
try
{
   System.setSecurityManager(new SecurityManager());
   LoginContext context = new LoginContext("Login1"); // defined in JAAS configuration file
   context.login();
   // get the authenticated Subject
   Subject subject = context.getSubject();
   . . .
   context.logout();
}
catch (LoginException exception) // thrown if login was not successful
{
   exception.printStackTrace();
}
Now the subject denotes the individual who has been authenticated.
The string parameter "Login1" in the LoginContext constructor refers to an entry with the same name in the JAAS configuration file. Here is a sample configuration file:
Login1
{
   com.sun.security.auth.module.UnixLoginModule required;
   com.whizzbang.auth.module.RetinaScanModule sufficient;
};

Login2
{
   . . .
};
Of course, the JDK contains no biometric login modules. The following modules are supplied in the com.sun.security.auth.module package:
UnixLoginModule
NTLoginModule
Krb5LoginModule
JndiLoginModule
KeyStoreLoginModule
A login policy consists of a sequence of login modules, each of which is labeled required, sufficient, requisite, or optional. The meaning of these keywords is given by the following algorithm:
The modules are executed in turn, until a
sufficientmodule succeeds, arequisitemodule fails, or the end of the module list is reached.Authentication is successful if all
requiredandrequisitemodules succeed, or if none of them were executed, if at least onesufficientoroptionalmodule succeeds.
A login authenticates a subject, which can have multiple principals. A principal describes some property of the subject, such as the user name, group ID, or role. As you saw in the grant statement, principals govern permissions. The com.sun.security.auth.UnixPrincipal describes the UNIX login name, and the UnixNumericGroupPrincipal can test for membership in a UNIX group.
A grant clause can test for a principal, with the syntax
grant principalClass "principalName"
For example:
grant com.sun.security.auth.UnixPrincipal "harry"
When a user has logged in, you then run, in a separate access control context, the code that requires checking of principals. Use the static doAs or doAsPrivileged method to start a new PrivilegedAction whose run method executes the code.
Both of those methods execute an action by calling the run method of an object that implements the PrivilegedAction interface, using the permissions of the subject’s principals:
PrivilegedAction<T> action = new
   PrivilegedAction()
   {
      public T run()
      {
        // run with permissions of subject principals
         . . .
      }
   };
T result = Subject.doAs(subject, action); // or Subject.doAsPrivileged(subject, action, null)
If the actions can throw checked exceptions, then you implement the PrivilegedExceptionAction interface instead.
The difference between the doAs and doAsPrivileged methods is subtle. The doAs method starts out with the current access control context, whereas the doAsPrivileged method starts out with a new context. The latter method allows you to separate the permissions for the login code and the “business logic.” In our example application, the login code has permissions
permission javax.security.auth.AuthPermission "createLoginContext.Login1";
permission javax.security.auth.AuthPermission "doAsPrivileged";
The authenticated user has a permission
permission java.util.PropertyPermission "user.*", "read";
If we had used doAs instead of doAsPrivileged, then the login code would have also needed that permission!
The program in Listing 9-6 and Listing 9-7 demonstrates how to restrict permissions to certain users. The AuthTest program authenticates a user and then runs a simple action that retrieves a system property.
To make this example work, package the code for the login and the action into two separate JAR files:
javac *.java
jar cvf login.jar AuthTest.class
jar cvf action.jar SysPropAction.class
If you look at the policy file in Listing 9-8, you will see that the UNIX user with the name harry has the permission to read all files. Change harry to your login name. Then run the command
java -classpath login.jar:action.jar
   -Djava.security.policy=AuthTest.policy
   -Djava.security.auth.login.config=jaas.config
   AuthTest
Listing 9-12 shows the login configuration.
On Windows, change Unix to NT in both AuthTest.policy and jaas.config, and use a semicolon to separate the JAR files:
java -classpath login.jar;action.jar . . .
The AuthTest program should now display the value of the user.home property. However, if you change the login name in the AuthTest.policy file, then a security exception should be thrown because you no longer have the required permission.
Caution
Be careful to follow these instructions exactly. It is very easy to get the setup wrong by making seemingly innocuous changes.
Example 9-6. AuthTest.java
 1. import java.security.*;
 2. import javax.security.auth.*;
 3. import javax.security.auth.login.*;
 4.
 5. /**
 6.  * This program authenticates a user via a custom login and then executes the SysPropAction
 7.  * with the user's privileges.
 8.  * @version 1.01 2007-10-06
 9.  * @author Cay Horstmann
10.  */
11. public class AuthTest
12. {
13.    public static void main(final String[] args)
14.    {
15.       System.setSecurityManager(new SecurityManager());
16.       try
17.       {
18.          LoginContext context = new LoginContext("Login1");
19.          context.login();
20.          System.out.println("Authentication successful.");
21.          Subject subject = context.getSubject();
22.          System.out.println("subject=" + subject);
23.          PrivilegedAction<String> action = new SysPropAction("user.home");
24.          String result = Subject.doAsPrivileged(subject, action, null);
25.          System.out.println(result);
26.          context.logout();
27.       }
28.       catch (LoginException e)
29.       {
30.          e.printStackTrace();
31.       }
32.    }
33. }
Example 9-7. SysPropAction.java
 1. import java.security.*;
 2.
 3. /**
 4.    This action looks up a system property.
 5.  * @version 1.01 2007-10-06
 6.  * @author Cay Horstmann
 7. */
 8. public class SysPropAction implements PrivilegedAction<String>
 9. {
10.    /**
11.       Constructs an action for looking up a given property.
12.       @param propertyName the property name (such as "user.home")
13.    */
14.    public SysPropAction(String propertyName) { this.propertyName = propertyName; }
15.
16.    public String run()
17.    {
18.       return System.getProperty(propertyName);
19.    }
20.
21.    private String propertyName;
22. }
Example 9-8. AuthTest.policy
 1. grant codebase "file:login.jar"
 2. {
 3.    permission javax.security.auth.AuthPermission "createLoginContext.Login1";
 4.    permission javax.security.auth.AuthPermission "doAsPrivileged";
 5. };
 6.
 7. grant principal com.sun.security.auth.UnixPrincipal "harry"
 8. {
 9.    permission java.util.PropertyPermission "user.*", "read";
10. };
javax.security.auth.login.LoginContext 1.4
constructs a login context. The
namecorresponds to the login descriptor in the JAAS configuration file.void login()establishes a login or throws
LoginExceptionif the login failed. Invokes theloginmethod on the managers in the JAAS configuration file.void logout()logs out the subject. Invokes the
logoutmethod on the managers in the JAAS configuration file.Subject getSubject()returns the authenticated subject.
javax.security.auth.Subject 1.4
Set<Principal> getPrincipals()gets the principals of this subject.
static Object doAs(Subject subject, PrivilegedAction action)static Object doAs(Subject subject, PrivilegedExceptionAction action)static Object doAsPrivileged(Subject subject, PrivilegedAction action, AccessControlContext context)static Object doAsPrivileged(Subject subject, PrivilegedExceptionAction action, AccessControlContext context)executes the privileged action on behalf of the subject. Returns the return value of the
runmethod. ThedoAsPrivilegedmethods execute the action in the given access control context. You can supply a “context snapshot” that you obtained earlier by calling the static methodAccessController.getContext(), or you can supplynullto execute the code in a new context.
java.security.PrivilegedAction 1.4
Object run()You must define this method to execute the code that you want to have executed on behalf of a subject.
In this section, we look at a JAAS example that shows you
How to implement your own login module.
How to implement role-based authentication.
Supplying your own login module is useful if you store login information in a database. Even if you are happy with the default module, studying a custom module will help you understand the JAAS configuration file options.
Role-based authentication is essential if you manage a large number of users. It would be impractical to put the names of all legitimate users into a policy file. Instead, the login module should map users to roles such as “admin” or “HR,” and the permissions should be based on these roles.
One job of the login module is to populate the principal set of the subject that is being authenticated. If a login module supports roles, it adds Principal objects that describe roles. The Java library does not provide a class for this purpose, so we wrote our own (see Listing 9-9). The class simply stores a description/value pair, such as role=admin. Its getName method returns that pair, so we can add role-based permissions into a policy file:
grant principal SimplePrincipal "role=admin" { . . . }Our login module looks up users, passwords, and roles in a text file that contains lines like this:
harry|secret|admin
carl|guessme|HR
Of course, in a realistic login module, you would store this information in a database or directory.
You can find the code for the SimpleLoginModule in Listing 9-10. The checkLogin method checks whether the user name and password match a user record in the password file. If so, we add two SimplePrincipal objects to the subject’s principal set:
Set<Principal> principals = subject.getPrincipals();
principals.add(new SimplePrincipal("username", username));
principals.add(new SimplePrincipal("role", role));
The remainder of SimpleLoginModule is straightforward plumbing. The initialize method receives
For example, we configure our module as follows:
SimpleLoginModule required pwfile="password.txt";
The login module retrieves the pwfile settings from the options map.
The login module does not gather the user name and password; that is the job of a separate handler. This separation allows you to use the same login module without worrying whether the login information comes from a GUI dialog box, a console prompt, or a configuration file.
The handler is specified when you construct the LoginContext, for example,
LoginContext context = new LoginContext("Login1",
   new com.sun.security.auth.callback.DialogCallbackHandler());
The DialogCallbackHandler pops up a simple GUI dialog box to retrieve the user name and password. com.sun.security.auth.callback.TextCallbackHandler gets the information from the console.
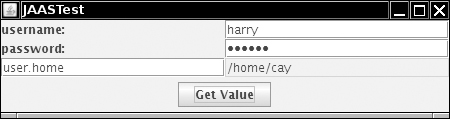
However, in our application, we have our own GUI for collecting the user name and password (see Figure 9-10). We produce a simple handler that merely stores and returns that information (see Listing 9-11).
The handler has a single method, handle, that processes an array of Callback objects. A number of predefined classes, such as NameCallback and PasswordCallback, implement the Callback interface. You could also add your own class, such as RetinaScanCallback. The handler code is a bit unsightly because it needs to analyze the types of the callback objects:
public void handle(Callback[] callbacks)
{
   for (Callback callback : callbacks)
   {
      if (callback instanceof NameCallback) . . .
      else if (callback instanceof PasswordCallback) . . .
      else . . .
   }
}
The login module prepares an array of the callbacks that it needs for authentication:
NameCallback nameCall = new NameCallback("username: ");
PasswordCallback passCall = new PasswordCallback("password: ", false);
callbackHandler.handle(new Callback[] { nameCall, passCall });
Then it retrieves the information from the callbacks.
The program in Listing 9-12 displays a form for entering the login information and the name of a system property. If the user is authenticated, the property value is retrieved in a PrivilegedAction. As you can see from the policy file in Listing 9-13, only users with the admin role have permission to read properties.
As in the preceding section, you must separate the login and action code. Create two JAR files:
javac *.java
jar cvf login.jar JAAS*.class Simple*.class
jar cvf action.jar SysPropAction.class
Then run the program as
java -classpath login.jar:action.jar
   -Djava.security.policy=JAASTest.policy
   -Djava.security.auth.login.config=jaas.config
   JAASTest
Listing 9-14 shows the login configuration.
Note
It is possible to support a more complex two-phase protocol, whereby a login is committed if all modules in the login configuration were successful. For more information, see the login module developer’s guide at http://java.sun.com/javase/6/docs/technotes/guides/security/jaas/JAASLMDevGuide.html.
Example 9-9. SimplePrincipal.java
 1. import java.security.*;
 2.
 3. /**
 4.  * A principal with a named value (such as "role=HR" or "username=harry").
 5.  * @version 1.0 2004-09-14
 6.  * @author Cay Horstmann
 7.  */
 8. public class SimplePrincipal implements Principal
 9. {
10.    /**
11.     * Constructs a SimplePrincipal to hold a description and a value.
12.     * @param roleName the role name
13.     */
14.    public SimplePrincipal(String descr, String value)
15.    {
16.       this.descr = descr;
17.       this.value = value;
18.    }
19.
20.    /**
21.     * Returns the role name of this principal
22.     * @return the role name
23.     */
24.    public String getName()
25.    {
26.       return descr + "=" + value;
27.    }
28.
29.    public boolean equals(Object otherObject)
30.    {
31.       if (this == otherObject) return true;
32.       if (otherObject == null) return false;
33.       if (getClass() != otherObject.getClass()) return false;
34.       SimplePrincipal other = (SimplePrincipal) otherObject;
35.       return getName().equals(other.getName());
36.    }
37.
38.    public int hashCode()
39.    {
40.       return getName().hashCode();
41.    }
42.
43.    private String descr;
44.    private String value;
45. }
Example 9-10. SimpleLoginModule.java
  1. import java.io.*;
  2. import java.security.*;
  3. import java.util.*;
  4. import javax.security.auth.*;
  5. import javax.security.auth.callback.*;
  6. import javax.security.auth.login.*;
  7. import javax.security.auth.spi.*;
  8.
  9. /**
 10.  * This login module authenticates users by reading usernames, passwords, and roles from a
 11.  * text file.
 12.  * @version 1.0 2004-09-14
 13.  * @author Cay Horstmann
 14.  */
 15. public class SimpleLoginModule implements LoginModule
 16. {
 17.    public void initialize(Subject subject, CallbackHandler callbackHandler,
 18.          Map<String, ?> sharedState, Map<String, ?> options)
 19.    {
 20.       this.subject = subject;
 21.       this.callbackHandler = callbackHandler;
 22.       this.options = options;
 23.    }
 24.
 25.    public boolean login() throws LoginException
 26.    {
 27.       if (callbackHandler == null) throw new LoginException("no handler");
 28.
 29.       NameCallback nameCall = new NameCallback("username: ");
 30.       PasswordCallback passCall = new PasswordCallback("password: ", false);
 31.       try
 32.       {
 33.          callbackHandler.handle(new Callback[] { nameCall, passCall });
 34.       }
 35.       catch (UnsupportedCallbackException e)
 36.       {
 37.          LoginException e2 = new LoginException("Unsupported callback");
 38.          e2.initCause(e);
 39.          throw e2;
 40.       }
 41.       catch (IOException e)
 42.       {
 43.          LoginException e2 = new LoginException("I/O exception in callback");
 44.          e2.initCause(e);
 45.          throw e2;
 46.       }
 47.
 48.       return checkLogin(nameCall.getName(), passCall.getPassword());
 49.    }
 50.
 51.    /**
 52.     * Checks whether the authentication information is valid. If it is, the subject acquires
 53.     * principals for the user name and role.
 54.     * @param username the user name
 55.     * @param password a character array containing the password
 56.     * @return true if the authentication information is valid
 57.     */
 58.    private boolean checkLogin(String username, char[] password) throws LoginException
 59.    {
 60.       try
 61.       {
 62.          Scanner in = new Scanner(new FileReader("" + options.get("pwfile")));
 63.          while (in.hasNextLine())
 64.          {
 65.             String[] inputs = in.nextLine().split("\|");
 66.            if (inputs[0].equals(username) && Arrays.equals(inputs[1].toCharArray(), password))
 67.             {
 68.                String role = inputs[2];
 69.                Set<Principal> principals = subject.getPrincipals();
 70.                principals.add(new SimplePrincipal("username", username));
 71.                principals.add(new SimplePrincipal("role", role));
 72.                return true;
 73.             }
 74.          }
 75.          in.close();
 76.          return false;
 77.       }
 78.       catch (IOException e)
 79.       {
 80.          LoginException e2 = new LoginException("Can't open password file");
 81.          e2.initCause(e);
 82.          throw e2;
 83.       }
 84.    }
 85.
 86.    public boolean logout()
 87.    {
 88.       return true;
 89.    }
 90.
 91.    public boolean abort()
 92.    {
 93.       return true;
 94.    }
 95.
 96.    public boolean commit()
 97.    {
 98.       return true;
 99.    }
100.
101.    private Subject subject;
102.    private CallbackHandler callbackHandler;
103.    private Map<String, ?> options;
104. }
Example 9-11. SimpleCallbackHandler.java
 1. import javax.security.auth.callback.*;
 2.
 3. /**
 4.  * This simple callback handler presents the given user name and password.
 5.  * @version 1.0 2004-09-14
 6.  * @author Cay Horstmann
 7.  */
 8. public class SimpleCallbackHandler implements CallbackHandler
 9. {
10.    /**
11.     * Constructs the callback handler.
12.     * @param username the user name
13.     * @param password a character array containing the password
14.     */
15.    public SimpleCallbackHandler(String username, char[] password)
16.    {
17.       this.username = username;
18.       this.password = password;
19.    }
20.
21.    public void handle(Callback[] callbacks)
22.    {
23.       for (Callback callback : callbacks)
24.       {
25.          if (callback instanceof NameCallback)
26.          {
27.             ((NameCallback) callback).setName(username);
28.          }
29.          else if (callback instanceof PasswordCallback)
30.          {
31.            ((PasswordCallback) callback).setPassword(password);
32.          }
33.       }
34.    }
35.
36.    private String username;
37.    private char[] password;
38. }
Example 9-12. JAASTest.java
 1. import java.awt.*;
 2. import java.awt.event.*;
 3. import javax.security.auth.*;
 4. import javax.security.auth.login.*;
 5. import javax.swing.*;
 6.
 7. /**
 8.  * This program authenticates a user via a custom login and then executes the SysPropAction
 9.  * with the user's privileges.
10.  * @version 1.0 2004-09-14
11.  * @author Cay Horstmann
12.  */
13. public class JAASTest
14. {
15.    public static void main(final String[] args)
16.    {
17.       System.setSecurityManager(new SecurityManager());
18.       EventQueue.invokeLater(new Runnable()
19.          {
20.             public void run()
21.             {
22.                JFrame frame = new JAASFrame();
23.                frame.setDefaultCloseOperation(JFrame.EXIT_ON_CLOSE);
24.                frame.setVisible(true);
25.             }
26.          });
27.    }
28. }
29.
30. /**
31.  * This frame has text fields for user name and password, a field for the name of the requested
32.  * system property, and a field to show the property value.
33.  */
34. class JAASFrame extends JFrame
35. {
36.    public JAASFrame()
37.    {
38.       setTitle("JAASTest");
39.
40.       username = new JTextField(20);
41.       password = new JPasswordField(20);
42.       propertyName = new JTextField(20);
43.       propertyValue = new JTextField(20);
44.       propertyValue.setEditable(false);
45.
46.       JPanel panel = new JPanel();
47.       panel.setLayout(new GridLayout(0, 2));
48.       panel.add(new JLabel("username:"));
49.       panel.add(username);
50.       panel.add(new JLabel("password:"));
51.       panel.add(password);
52.       panel.add(propertyName);
53.       panel.add(propertyValue);
54.       add(panel, BorderLayout.CENTER);
55.
56.       JButton getValueButton = new JButton("Get Value");
57.       getValueButton.addActionListener(new ActionListener()
58.          {
59.             public void actionPerformed(ActionEvent event)
60.             {
61.                getValue();
62.             }
63.          });
64.       JPanel buttonPanel = new JPanel();
65.       buttonPanel.add(getValueButton);
66.       add(buttonPanel, BorderLayout.SOUTH);
67.       pack();
68.    }
69.
70.    public void getValue()
71.    {
72.       try
73.       {
74.          LoginContext context = new LoginContext("Login1", new SimpleCallbackHandler(username
75.             .getText(), password.getPassword()));
76.          context.login();
77.          Subject subject = context.getSubject();
78.          propertyValue.setText(""
79.            + Subject.doAsPrivileged(subject, new SysPropAction(propertyName.getText()), null));
80.          context.logout();
81.       }
82.       catch (LoginException e)
83.       {
84.          JOptionPane.showMessageDialog(this, e);
85.       }
86.    }
87.
88.    private JTextField username;
89.    private JPasswordField password;
90.    private JTextField propertyName;
91.    private JTextField propertyValue;
92. }
Example 9-13. JAASTest.policy
 1. grant codebase "file:login.jar"
 2. {
 3.    permission java.awt.AWTPermission "showWindowWithoutWarningBanner";
 4.    permission javax.security.auth.AuthPermission "createLoginContext.Login1";
 5.    permission javax.security.auth.AuthPermission "doAsPrivileged";
 6.    permission javax.security.auth.AuthPermission "modifyPrincipals";
 7.    permission java.io.FilePermission "password.txt", "read";
 8. };
 9.
10. grant principal SimplePrincipal "role=admin"
11. {
12.    permission java.util.PropertyPermission "*", "read";
13. };
javax.security.auth.callback.NameCallback 1.4
NameCallback(String prompt)NameCallback(String prompt, String defaultName)constructs a
NameCallbackwith the given prompt and default name.void setName(String name)String getName()sets or gets the name gathered by this callback.
String getPrompt()gets the prompt to use when querying this name.
String getDefaultName()gets the default name to use when querying this name.
javax.security.auth.callback.PasswordCallback 1.4
PasswordCallback(String prompt, boolean echoOn)constructs a
PasswordCallbackwith the given prompt and echo flag.void setPassword(char[] password)char[] getPassword()sets or gets the password gathered by this callback.
String getPrompt()gets the prompt to use when querying this password.
boolean isEchoOn()gets the echo flag to use when querying this password.
javax.security.auth.spi.LoginModule 1.4
void initialize(Subject subject, CallbackHandler handler, Map<String,?> sharedState, Map<String,?> options)initializes this
LoginModulefor authenticating the givensubject. During login processing, uses the given handler to gather login information. Use thesharedStatemap for communication with other login modules. Theoptionsmap contains the name/value pairs specified in the login configuration for this module instance.carries out the authentication process and populates the subject’s principals. Returns
trueif the login was successful.boolean commit()is called after all login modules were successful, for login scenarios that require a two-phase commit. Returns
trueif the operation was successful.boolean abort()is called if the failure of another login module caused the login process to abort. Returns
trueif the operation was successful.boolean logout()logs out this subject. Returns
trueif the operation was successful.
As we said earlier, applets were what started the craze over the Java platform. In practice, people discovered that although they could write animated applets like the famous “nervous text” applet, applets could not do a whole lot of useful stuff in the JDK 1.0 security model. For example, because applets under JDK 1.0 were so closely supervised, they couldn’t do much good on a corporate intranet, even though relatively little risk attaches to executing an applet from your company’s secure intranet. It quickly became clear to Sun that for applets to become truly useful, it was important for users to be able to assign different levels of security, depending on where the applet originated. If an applet comes from a trusted supplier and it has not been tampered with, the user of that applet can then decide whether to give the applet more privileges.
To give more trust to an applet, we need to know two things:
Where did the applet come from?
Was the code corrupted in transit?
In the past 50 years, mathematicians and computer scientists have developed sophisticated algorithms for ensuring the integrity of data and for electronic signatures. The java.security package contains implementations of many of these algorithms. Fortunately, you don’t need to understand the underlying mathematics to use the algorithms in the java.security package. In the next sections, we show you how message digests can detect changes in data files and how digital signatures can prove the identity of the signer.
A message digest is a digital fingerprint of a block of data. For example, the so-called SHA1 (secure hash algorithm #1) condenses any data block, no matter how long, into a sequence of 160 bits (20 bytes). As with real fingerprints, one hopes that no two messages have the same SHA1 fingerprint. Of course, that cannot be true—there are only 2160 SHA1 fingerprints, so there must be some messages with the same fingerprint. But 2160 is so large that the probability of duplication occurring is negligible. How negligible? According to James Walsh in True Odds: How Risks Affect Your Everyday Life (Merritt Publishing 1996), the chance that you will die from being struck by lightning is about one in 30,000. Now, think of nine other people, for example, your nine least favorite managers or professors. The chance that you and all of them will die from lightning strikes is higher than that of a forged message having the same SHA1 fingerprint as the original. (Of course, more than ten people, none of whom you are likely to know, will die from lightning strikes. However, we are talking about the far slimmer chance that your particular choice of people will be wiped out.)
A message digest has two essential properties:
If one bit or several bits of the data are changed, then the message digest also changes.
A forger who is in possession of a given message cannot construct a fake message that has the same message digest as the original.
The second property is again a matter of probabilities, of course. Consider the following message by the billionaire father:
“Upon my death, my property shall be divided equally among my children; however, my son George shall receive nothing.”
That message has an SHA1 fingerprint of
2D 8B 35 F3 BF 49 CD B1 94 04 E0 66 21 2B 5E 57 70 49 E1 7E
The distrustful father has deposited the message with one attorney and the fingerprint with another. Now, suppose George can bribe the lawyer holding the message. He wants to change the message so that Bill gets nothing. Of course, that changes the fingerprint to a completely different bit pattern:
2A 33 0B 4B B3 FE CC 1C 9D 5C 01 A7 09 51 0B 49 AC 8F 98 92
Can George find some other wording that matches the fingerprint? If he had been the proud owner of a billion computers from the time the Earth was formed, each computing a million messages a second, he would not yet have found a message he could substitute.
A number of algorithms have been designed to compute these message digests. The two best-known are SHA1, the secure hash algorithm developed by the National Institute of Standards and Technology, and MD5, an algorithm invented by Ronald Rivest of MIT. Both algorithms scramble the bits of a message in ingenious ways. For details about these algorithms, see, for example, Cryptography and Network Security, 4th ed., by William Stallings (Prentice Hall 2005). Note that recently, subtle regularities have been discovered in both algorithms. At this point, most cryptographers recommend avoiding MD5 and using SHA1 until a stronger alternative becomes available. (See http://www.rsa.com/rsalabs/node.asp?id=2834 for more information.)
The Java programming language implements both SHA1 and MD5. The MessageDigest class is a factory for creating objects that encapsulate the fingerprinting algorithms. It has a static method, called getInstance, that returns an object of a class that extends the MessageDigest class. This means the MessageDigest class serves double duty:
As a factory class
As the superclass for all message digest algorithms
For example, here is how you obtain an object that can compute SHA fingerprints:
MessageDigest alg = MessageDigest.getInstance("SHA-1");(To get an object that can compute MD5, use the string "MD5" as the argument to getInstance.)
After you have obtained a MessageDigest object, you feed it all the bytes in the message by repeatedly calling the update method. For example, the following code passes all bytes in a file to the alg object just created to do the fingerprinting:
InputStream in = . . .
int ch;
while ((ch = in.read()) != -1)
   alg.update((byte) ch);
Alternatively, if you have the bytes in an array, you can update the entire array at once:
byte[] bytes = . . .;
alg.update(bytes);
When you are done, call the digest method. This method pads the input—as required by the fingerprinting algorithm—does the computation, and returns the digest as an array of bytes.
byte[] hash = alg.digest();
The program in Listing 9-15 computes a message digest, using either SHA or MD5. You can load the data to be digested from a file, or you can type a message in the text area. Figure 9-11 shows the application.
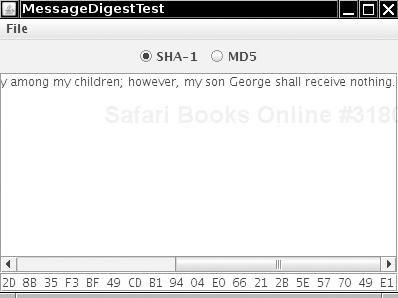
Example 9-15. MessageDigestTest.java
  1. import java.io.*;
  2. import java.security.*;
  3. import java.awt.*;
  4. import java.awt.event.*;
  5. import javax.swing.*;
  6.
  7. /**
  8.  * This program computes the message digest of a file or the contents of a text area.
  9.  * @version 1.13 2007-10-06
 10.  * @author Cay Horstmann
 11.  */
 12. public class MessageDigestTest
 13. {
 14.    public static void main(String[] args)
 15.    {
 16.       EventQueue.invokeLater(new Runnable()
 17.          {
 18.             public void run()
 19.             {
 20.                JFrame frame = new MessageDigestFrame();
 21.                frame.setDefaultCloseOperation(JFrame.EXIT_ON_CLOSE);
 22.                frame.setVisible(true);
 23.             }
 24.          });
 25.    }
 26. }
 27.
 28. /**
 29.  * This frame contains a menu for computing the message digest of a file or text area, radio
 30.  * buttons to toggle between SHA-1 and MD5, a text area, and a text field to show the
 31.  * messge digest.
 32.  */
 33. class MessageDigestFrame extends JFrame
 34. {
 35.    public MessageDigestFrame()
 36.    {
 37.       setTitle("MessageDigestTest");
 38.       setSize(DEFAULT_WIDTH, DEFAULT_HEIGHT);
 39.
 40.       JPanel panel = new JPanel();
 41.       ButtonGroup group = new ButtonGroup();
 42.       addRadioButton(panel, "SHA-1", group);
 43.       addRadioButton(panel, "MD5", group);
 44.
 45.       add(panel, BorderLayout.NORTH);
 46.       add(new JScrollPane(message), BorderLayout.CENTER);
 47.       add(digest, BorderLayout.SOUTH);
 48.       digest.setFont(new Font("Monospaced", Font.PLAIN, 12));
 49.
 50.       setAlgorithm("SHA-1");
 51.
 52.       JMenuBar menuBar = new JMenuBar();
 53.       JMenu menu = new JMenu("File");
 54.       JMenuItem fileDigestItem = new JMenuItem("File digest");
 55.       fileDigestItem.addActionListener(new ActionListener()
 56.          {
 57.             public void actionPerformed(ActionEvent event)
 58.             {
 59.                loadFile();
 60.             }
 61.          });
 62.       menu.add(fileDigestItem);
 63.       JMenuItem textDigestItem = new JMenuItem("Text area digest");
 64.       textDigestItem.addActionListener(new ActionListener()
 65.          {
 66.             public void actionPerformed(ActionEvent event)
 67.             {
 68.                String m = message.getText();
 69.                computeDigest(m.getBytes());
 70.             }
 71.          });
 72.       menu.add(textDigestItem);
 73.       menuBar.add(menu);
 74.       setJMenuBar(menuBar);
 75.    }
 76.
 77.    /**
 78.     * Adds a radio button to select an algorithm.
 79.     * @param c the container into which to place the button
 80.     * @param name the algorithm name
 81.     * @param g the button group
 82.     */
 83.    public void addRadioButton(Container c, final String name, ButtonGroup g)
 84.    {
 85.       ActionListener listener = new ActionListener()
 86.          {
 87.             public void actionPerformed(ActionEvent event)
 88.             {
 89.                setAlgorithm(name);
 90.             }
 91.          };
 92.       JRadioButton b = new JRadioButton(name, g.getButtonCount() == 0);
 93.       c.add(b);
 94.       g.add(b);
 95.       b.addActionListener(listener);
 96.    }
 97.
 98.    /**
 99.     * Sets the algorithm used for computing the digest.
100.     * @param alg the algorithm name
101.     */
102.    public void setAlgorithm(String alg)
103.    {
104.       try
105.       {
106.          currentAlgorithm = MessageDigest.getInstance(alg);
107.          digest.setText("");
108.       }
109.       catch (NoSuchAlgorithmException e)
110.       {
111.          digest.setText("" + e);
112.       }
113.    }
114.
115.    /**
116.     * Loads a file and computes its message digest.
117.     */
118.    public void loadFile()
119.    {
120.       JFileChooser chooser = new JFileChooser();
121.       chooser.setCurrentDirectory(new File("."));
122.
123.       int r = chooser.showOpenDialog(this);
124.       if (r == JFileChooser.APPROVE_OPTION)
125.       {
126.          try
127.          {
128.             String name = chooser.getSelectedFile().getAbsolutePath();
129.             computeDigest(loadBytes(name));
130.          }
131.          catch (IOException e)
132.          {
133.             JOptionPane.showMessageDialog(null, e);
134.          }
135.       }
136.    }
137.
138.    /**
139.     * Loads the bytes in a file.
140.     * @param name the file name
141.     * @return an array with the bytes in the file
142.     */
143.    public byte[] loadBytes(String name) throws IOException
144.    {
145.       FileInputStream in = null;
146.
147.       in = new FileInputStream(name);
148.       try
149.       {
150.          ByteArrayOutputStream buffer = new ByteArrayOutputStream();
151.          int ch;
152.          while ((ch = in.read()) != -1)
153.             buffer.write(ch);
154.          return buffer.toByteArray();
155.       }
156.       finally
157.       {
158.          in.close();
159.       }
160.    }
161.
162.    /**
163.     * Computes the message digest of an array of bytes and displays it in the text field.
164.     * @param b the bytes for which the message digest should be computed.
165.     */
166.    public void computeDigest(byte[] b)
167.    {
168.       currentAlgorithm.reset();
169.       currentAlgorithm.update(b);
170.       byte[] hash = currentAlgorithm.digest();
171.       String d = "";
172.       for (int i = 0; i < hash.length; i++)
173.       {
174.          int v = hash[i] & 0xFF;
175.          if (v < 16) d += "0";
176.          d += Integer.toString(v, 16).toUpperCase() + " ";
177.       }
178.       digest.setText(d);
179.    }
180.
181.    private JTextArea message = new JTextArea();
182.    private JTextField digest = new JTextField();
183.    private MessageDigest currentAlgorithm;
184.    private static final int DEFAULT_WIDTH = 400;
185.    private static final int DEFAULT_HEIGHT = 300;
186. }
java.security.MessageDigest 1.1
static MessageDigest getInstance(String algorithmName)returns a
MessageDigestobject that implements the specified algorithm. ThrowsNoSuchAlgorithmExceptionif the algorithm is not provided.void update(byte input)void update(byte[] input)void update(byte[] input, int offset, int len)updates the digest, using the specified bytes.
byte[] digest()completes the hash computation, returns the computed digest, and resets the algorithm object.
void reset()resets the digest.
In the last section, you saw how to compute a message digest, a fingerprint for the original message. If the message is altered, then the fingerprint of the altered message will not match the fingerprint of the original. If the message and its fingerprint are delivered separately, then the recipient can check whether the message has been tampered with. However, if both the message and the fingerprint were intercepted, it is an easy matter to modify the message and then recompute the fingerprint. After all, the message digest algorithms are publicly known, and they don’t require secret keys. In that case, the recipient of the forged message and the recomputed fingerprint would never know that the message has been altered. Digital signatures solve this problem.
To help you understand how digital signatures work, we explain a few concepts from the field called public key cryptography. Public key cryptography is based on the notion of a public key and private key. The idea is that you tell everyone in the world your public key. However, only you hold the private key, and it is important that you safeguard it and don’t release it to anyone else. The keys are matched by mathematical relationships, but the exact nature of these relationships is not important for us. (If you are interested, you can look it up in The Handbook of Applied Cryptography at http://www.cacr.math.uwaterloo.ca/hac/.)
The keys are quite long and complex. For example, here is a matching pair of public and private Digital Signature Algorithm (DSA) keys.
Public key:
p:
fca682ce8e12caba26efccf7110e526db078b05edecbcd1eb4a208f3ae1617ae01f35b91a47e6df63413c5e12ed0899
bcd132acd50d99151bdc43ee737592e17

q: 962eddcc369cba8ebb260ee6b6a126d9346e38c5
g:678471b27a9cf44ee91a49c5147db1a9aaf244f05a434d6486931d2d14271b9e35030b71fd73da179069b32e29356
30e
1c2062354d0da20a6c416e50be794ca4

y:
c0b6e67b4ac098eb1a32c5f8c4c1f0e7e6fb9d832532e27d0bdab9ca2d2a8123ce5a8018b8161a760480fadd040b927
281ddb22cb9bc4df596d7de4d1b977d50
Private key:
p:
fca682ce8e12caba26efccf7110e526db078b05edecbcd1eb4a208f3ae1617ae01f35b91a47e6df63413c5e12ed0899
bcd132acd50d99151bdc43ee737592e17

q: 962eddcc369cba8ebb260ee6b6a126d9346e38c5

g:
678471b27a9cf44ee91a49c5147db1a9aaf244f05a434d6486931d2d14271b9e35030b71fd73da179069b32e2935630
e1c2062354d0da20a6c416e50be794ca4

x: 146c09f881656cc6c51f27ea6c3a91b85ed1d70a
It is believed to be practically impossible to compute one key from the other. That is, even though everyone knows your public key, they can’t compute your private key in your lifetime, no matter how many computing resources they have available.
It might seem difficult to believe that nobody can compute the private key from the public keys, but nobody has ever found an algorithm to do this for the encryption algorithms that are in common use today. If the keys are sufficiently long, brute force—simply trying all possible keys—would require more computers than can be built from all the atoms in the solar system, crunching away for thousands of years. Of course, it is possible that someone could come up with algorithms for computing keys that are much more clever than brute force. For example, the RSA algorithm (the encryption algorithm invented by Rivest, Shamir, and Adleman) depends on the difficulty of factoring large numbers. For the last 20 years, many of the best mathematicians have tried to come up with good factoring algorithms, but so far with no success. For that reason, most cryptographers believe that keys with a “modulus” of 2,000 bits or more are currently completely safe from any attack. DSA is believed to be similarly secure.
Figure 9-12 illustrates how the process works in practice.
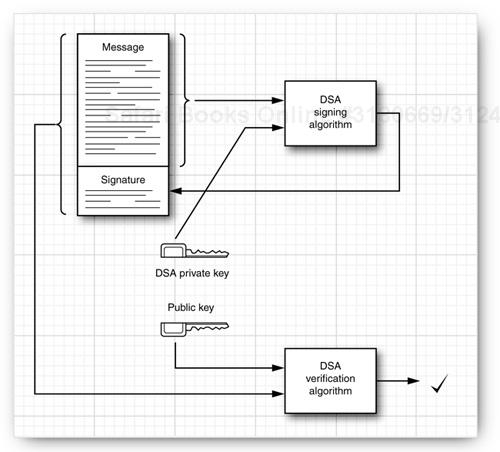
Suppose Alice wants to send Bob a message, and Bob wants to know this message came from Alice and not an impostor. Alice writes the message and then signs the message digest with her private key. Bob gets a copy of her public key. Bob then applies the public key to verify the signature. If the verification passes, then Bob can be assured of two facts:
The original message has not been altered.
The message was signed by Alice, the holder of the private key that matches the public key that Bob used for verification.
You can see why security for private keys is all-important. If someone steals Alice’s private key or if a government can require her to turn it over, then she is in trouble. The thief or a government agent can impersonate her by sending messages, money transfer instructions, and so on, that others will believe came from Alice.
To take advantage of public key cryptography, the public keys must be distributed. One of the most common distribution formats is called X.509. Certificates in the X.509 format are widely used by VeriSign, Microsoft, Netscape, and many other companies, for signing e-mail messages, authenticating program code, and certifying many other kinds of data. The X.509 standard is part of the X.500 series of recommendations for a directory service by the international telephone standards body, the CCITT.
The precise structure of X.509 certificates is described in a formal notation, called “abstract syntax notation #1” or ASN.1. Figure 9-13 shows the ASN.1 definition of version 3 of the X.509 format. The exact syntax is not important for us, but, as you can see, ASN.1 gives a precise definition of the structure of a certificate file. The basic encoding rules, or BER, and a variation, called distinguished encoding rules (DER) describe precisely how to save this structure in a binary file. That is, BER and DER describe how to encode integers, character strings, bit strings, and constructs such as SEQUENCE, CHOICE, and OPTIONAL.
Example 9-13. ASN.1 definition of X.509v3
[Certificate  ::=  SEQUENCE  {
        tbsCertificate        TBSCertificate,
        signatureAlgorithm    AlgorithmIdentifier,
        signature             BIT STRING  }

   TBSCertificate  ::=  SEQUENCE  {
        version         [0]   EXPLICIT Version DEFAULT v1,
        serialNumber          CertificateSerialNumber,
        signature             AlgorithmIdentifier,
        issuer                Name,
        validity              Validity,
        subject               Name,
        subjectPublicKeyInfo  SubjectPublicKeyInfo,
        issuerUniqueID  [1]  IMPLICIT UniqueIdentifier OPTIONAL,
                              -- If present, version must be v2 or v3
        subjectUniqueID [2]  IMPLICIT UniqueIdentifier OPTIONAL,
                             -- If present, version must be v2 or v3
        extensions      [3]  EXPLICIT Extensions OPTIONAL
                             -- If present, version must be v3
        }

   Version  ::=  INTEGER  {  v1(0), v2(1), v3(2)  }

   CertificateSerialNumber  ::=  INTEGER

   Validity ::= SEQUENCE {
        notBefore      CertificateValidityDate,
        notAfter       CertificateValidityDate }

   CertificateValidityDate ::= CHOICE {
        utcTime        UTCTime,
        generalTime    GeneralizedTime }

   UniqueIdentifier  ::=  BIT STRING

   SubjectPublicKeyInfo  ::=  SEQUENCE  {
        algorithm             AlgorithmIdentifier,
        subjectPublicKey      BIT STRING  }

   Extensions  ::=  SEQUENCE OF Extension

   Extension  ::=  SEQUENCE  {
        extnID      OBJECT IDENTIFIER,
        critical    BOOLEAN DEFAULT FALSE,
        extnValue   OCTET STRING  }
Note
You can find more information on ASN.1 in A Layman’s Guide to a Subset of ASN.1, BER, and DER by Burton S. Kaliski, Jr. (ftp://ftp.rsa.com/pub/pkcs/ps/layman.ps), ASN.1—Communication Between Heterogeneous Systems by Olivier Dubuisson (Academic Press 2000) (http://www.oss.com/asn1/dubuisson.html) and ASN.1 Complete by John Larmouth (Morgan Kaufmann Publishers 1999) (http://www.oss.com/asn1/larmouth.html).
The JDK comes with the keytool program, which is a command-line tool to generate and manage a set of certificates. We expect that ultimately the functionality of this tool will be embedded in other, more user-friendly programs. But right now, we use keytool to show how Alice can sign a document and send it to Bob, and how Bob can verify that the document really was signed by Alice and not an imposter.
The keytool program manages keystores, databases of certificates and private/public key pairs. Each entry in the keystore has an alias. Here is how Alice creates a keystore, alice.certs, and generates a key pair with alias alice.
keytool -genkeypair -keystore alice.certs -alias alice
When creating or opening a keystore, you are prompted for a keystore password. For this example, just use secret. If you were to use the keytool-generated keystore for any serious purpose, you would need to choose a good password and safeguard this file.
When generating a key, you are prompted for the following information:
Enter keystore password:  secret
Reenter new password:  secret
What is your first and last name?
  [Unknown]:  Alice Lee
What is the name of your organizational unit?
  [Unknown]:  Engineering Department
What is the name of your organization?
  [Unknown]:  ACME Software
What is the name of your City or Locality?
  [Unknown]:  San Francisco
What is the name of your State or Province?
  [Unknown]:  CA
What is the two-letter country code for this unit?
  [Unknown]:  US
Is <CN=Alice Lee, OU=Engineering Department, O=ACME Software, L=San Francisco, ST=CA, C=US> cor-
rect?
  [no]:  yes
The keytool uses X.500 distinguished names, with components Common Name (CN), Organizational Unit (OU), Organization (O), Location (L), State (ST), and Country (C) to identify key owners and certificate issuers.
Finally, specify a key password, or press ENTER to use the keystore password as the key password.
Suppose Alice wants to give her public key to Bob. She needs to export a certificate file:
keytool -exportcert -keystore alice.certs -alias alice -file alice.cer
Now Alice can send the certificate to Bob. When Bob receives the certificate, he can print it:
keytool -printcert -file alice.cer
The printout looks like this:
Owner: CN=Alice Lee, OU=Engineering Department, O=ACME Software, L=San Francisco, ST=CA, C=US
Issuer: CN=Alice Lee, OU=Engineering Department, O=ACME Software, L=San Francisco, ST=CA, C=US
Serial number: 470835ce
Valid from: Sat Oct 06 18:26:38 PDT 2007 until: Fri Jan 04 17:26:38 PST 2008
Certificate fingerprints:
         MD5:  BC:18:15:27:85:69:48:B1:5A:C3:0B:1C:C6:11:B7:81
         SHA1: 31:0A:A0:B8:C2:8B:3B:B6:85:7C:EF:C0:57:E5:94:95:61:47:6D:34
         Signature algorithm name: SHA1withDSA
         Version: 3
If Bob wants to check that he got the right certificate, he can call Alice and verify the certificate fingerprint over the phone.
Note
Some certificate issuers publish certificate fingerprints on their web sites. For example, to check the VeriSign certificate in the keystore jre/lib/security/cacerts directory, use the -list option:
keytool -list -v -keystore jre/lib/security/cacertsThe password for this keystore is changeit. One of the certificates in this keystore is
Owner: OU=VeriSign Trust Network, OU="(c) 1998 VeriSign, Inc. - For authorized use only",
OU=Class 1 Public Primary Certification Authority - G2, O="VeriSign, Inc.", C=US
Issuer: OU=VeriSign Trust Network, OU="(c) 1998 VeriSign, Inc. - For authorized
use only", OU=Class 1 Public Primary Certification Authority - G2, O="VeriSign, Inc.",
C=US
Serial number: 4cc7eaaa983e71d39310f83d3a899192
Valid from: Sun May 17 17:00:00 PDT 1998 until: Tue Aug 01 16:59:59 PDT 2028
Certificate fingerprints:
         MD5:  DB:23:3D:F9:69:FA:4B:B9:95:80:44:73:5E:7D:41:83
         SHA1: 27:3E:E1:24:57:FD:C4:F9:0C:55:E8:2B:56:16:7F:62:F5:32:E5:47
You can check that your certificate is valid by visiting the web site http://www.verisign.com/repository/root.html.
Once Bob trusts the certificate, he can import it into his keystore.
keytool -importcert -keystore bob.certs -alias alice -file alice.cer
Caution
Never import into a keystore a certificate that you don’t fully trust. Once a certificate is added to the keystore, any program that uses the keystore assumes that the certificate can be used to verify signatures.
Now Alice can start sending signed documents to Bob. The jarsigner tool signs and verifies JAR files. Alice simply adds the document to be signed into a JAR file.
jar cvf document.jar document.txt
Then she uses the jarsigner tool to add the signature to the file. She needs to specify the keystore, the JAR file, and the alias of the key to use.
jarsigner -keystore alice.certs document.jar alice
When Bob receives the file, he uses the -verify option of the jarsigner program.
jarsigner -verify -keystore bob.certs document.jar
Bob does not need to specify the key alias. The jarsigner program finds the X.500 name of the key owner in the digital signature and looks for matching certificates in the keystore.
If the JAR file is not corrupted and the signature matches, then the jarsigner program prints
jar verified.
Otherwise, the program displays an error message.
Suppose you get a message from your friend Alice, signed with her private key, using the method we just showed you. You might already have her public key, or you can easily get it by asking her for a copy or by getting it from her web page. Then, you can verify that the message was in fact authored by Alice and has not been tampered with. Now, suppose you get a message from a stranger who claims to represent a famous software company, urging you to run the program that is attached to the message. The stranger even sends you a copy of his public key so you can verify that he authored the message. You check that the signature is valid. This proves that the message was signed with the matching private key and that it has not been corrupted.
Be careful: You still have no idea who wrote the message. Anyone could have generated a pair of public and private keys, signed the message with the private key, and sent the signed message and the public key to you. The problem of determining the identity of the sender is called the authentication problem.
The usual way to solve the authentication problem is simple. Suppose the stranger and you have a common acquaintance you both trust. Suppose the stranger meets your acquaintance in person and hands over a disk with the public key. Your acquaintance later meets you, assures you that he met the stranger and that the stranger indeed works for the famous software company, and then gives you the disk (see Figure 9-14). That way, your acquaintance vouches for the authenticity of the stranger.
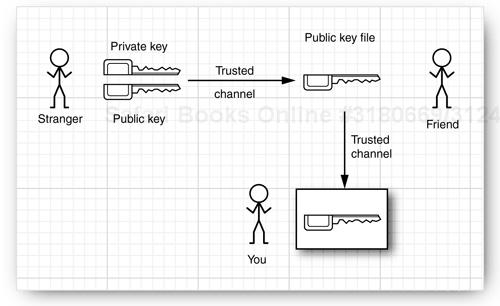
In fact, your acquaintance does not actually need to meet you. Instead, he can use his private key to sign the stranger’s public key file (see Figure 9-15).
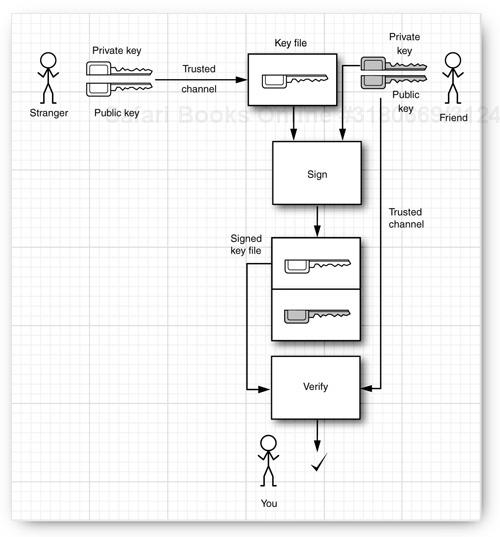
When you get the public key file, you verify the signature of your friend, and because you trust him, you are confident that he did check the stranger’s credentials before applying his signature.
However, you might not have a common acquaintance. Some trust models assume that there is always a “chain of trust”—a chain of mutual acquaintances—so that you trust every member of that chain. In practice, of course, that isn’t always true. You might trust your friend, Alice, and you know that Alice trusts Bob, but you don’t know Bob and aren’t sure that you trust him. Other trust models assume that there is a benevolent big brother in whom we all trust. The best known of these companies is VeriSign, Inc. (http://www.verisign.com).
You will often encounter digital signatures that are signed by one or more entities who will vouch for the authenticity, and you will need to evaluate to what degree you trust the authenticators. You might place a great deal of trust in VeriSign, perhaps because you saw their logo on many web pages or because you heard that they require multiple people with black attaché cases to come together into a secure chamber whenever new master keys are to be minted.
However, you should have realistic expectations about what is actually being authenticated. The CEO of VeriSign does not personally meet every individual or company representative when authenticating a public key. You can get a “class 1” ID simply by filling out a web form and paying a small fee. The key is mailed to the e-mail address included in the certificate. Thus, you can be reasonably assured that the e-mail address is genuine, but the requestor could have filled in any name and organization. There are more stringent classes of IDs. For example, with a “class 3” ID, VeriSign will require an individual requestor to appear before a notary public, and it will check the financial rating of a corporate requestor. Other authenticators will have different procedures. Thus, when you receive an authenticated message, it is important that you understand what, in fact, is being authenticated.
In the section “Verifying a Signature” on page 814, you saw how Alice used a selfsigned certificate to distribute a public key to Bob. However, Bob needed to ensure that the certificate was valid by verifying the fingerprint with Alice.
Suppose Alice wants to send her colleague Cindy a signed message, but Cindy doesn’t want to bother with verifying lots of signature fingerprints. Now suppose that there is an entity that Cindy trusts to verify signatures. In this example, Cindy trusts the Information Resources Department at ACME Software.
That department operates a certificate authority (CA). Everyone at ACME has the CA’s public key in their keystore, installed by a system administrator who carefully checked the key fingerprint. The CA signs the keys of ACME employees. When they install each other’s keys, then the keystore will trust them implicitly because they are signed by a trusted key.
Here is how you can simulate this process. Create a keystore acmesoft.certs. Generate a key par and export the public key:
keytool -genkeypair -keystore acmesoft.certs -alias acmeroot
keytool -exportcert -keystore acmesoft.certs -alias acmeroot -file acmeroot.cer
The public key is exported into a “self-signed” certificate. Then add it to every employee’s keystore.
keytool -importcert -keystore cindy.certs -alias acmeroot -file acmeroot.cer
For Alice to send messages to Cindy and to everyone else at ACME Software, she needs to bring her certificate to the Information Resources Department and have it signed. Unfortunately, this functionality is missing in the keytool program. In the book’s companion code, we supply a CertificateSigner class to fill the gap. An authorized staff member at ACME Software would verify Alice’s identity and generate a signed certificate as follows:
java CertificateSigner -keystore acmesoft.certs -alias acmeroot
   -infile alice.cer -outfile alice_signedby_acmeroot.cer
The certificate signer program must have access to the ACME Software keystore, and the staff member must know the keystore password. Clearly, this is a sensitive operation.
Alice gives the file alice_signedby_acmeroot.cer file to Cindy and to anyone else in ACME Software. Alternatively, ACME Software can simply store the file in a company directory. Remember, this file contains Alice’s public key and an assertion by ACME Software that this key really belongs to Alice.
Now Cindy imports the signed certificate into her keystore:
keytool -importcert -keystore cindy.certs -alias alice -file alice_signedby_acmeroot.cer
The keystore verifies that the key was signed by a trusted root key that is already present in the keystore. Cindy is not asked to verify the certificate fingerprint.
Once Cindy has added the root certificate and the certificates of the people who regularly send her documents, she never has to worry about the keystore again.
In the preceding section, we simulated a CA with a keystore and the CertificateSigner tool. However, most CAs run more sophisticated software to manage certificates, and they use slightly different formats for certificates. This section shows the added steps that are required to interact with those software packages.
We will use the OpenSSL software package as an example. The software is preinstalled for many Linux systems and Mac OS X, and a Cygwin port is also available. Alternatively, you can download the software at http://www.openssl.org.
To create a CA, run the CA script. The exact location depends on your operating system. On Ubuntu, run
/usr/lib/ssl/misc/CA.pl -newca
This script creates a subdirectory called demoCA in the current directory. The directory contains a root key pair and storage for certificates and certificate revocation lists.
You will want to import the public key into the Java keystore of all employees, but it is in the Privacy Enhanced Mail (PEM) format, not the DER format that the keystore accepts easily. Copy the file demoCA/cacert.pem to a file acmeroot.pem and open that file in a text editor. Remove everything before the line
-----BEGIN CERTIFICATE-----
and after the line
-----END CERTIFICATE-----
Now you can import acmeroot.pem into each keystore in the usual way:
keytool -importcert -keystore cindy.certs -alias alice -file acmeroot.pem
It seems quite incredible that the keytool cannot carry out this editing operation itself.
To sign Alice’s public key, you start by generating a certificate request that contains the certificate in the PEM format:
keytool -certreq -keystore alice.store -alias alice -file alice.pem
To sign the certificate, run
openssl ca -in alice.pem -out alice_signedby_acmeroot.pem
As before, cut out everything outside the BEGIN CERTIFICATE/END CERTIFICATE markers from alice_signedby_acmeroot.pem. Then import it into the keystore:
keytool -importcert -keystore cindy.certs -alias alice -file alice_signedby_acmeroot.pem
You use the same steps to have a certificate signed by a public certificate authority such as VeriSign.
One of the most important uses of authentication technology is signing executable programs. If you download a program, you are naturally concerned about damage that a program can do. For example, the program could have been infected by a virus. If you know where the code comes from and that it has not been tampered with since it left its origin, then your comfort level will be a lot higher than without this knowledge. In fact, if the program was also written in the Java programming language, you can then use this information to make a rational decision about what privileges you will allow that program to have. You might want it to run just in a sandbox as a regular applet, or you might want to grant it a different set of rights and restrictions. For example, if you download a word processing program, you might want to grant it access to your printer and to files in a certain subdirectory. However, you might not want to give it the right to make network connections, so that the program can’t try to send your files to a third party without your knowledge.
You now know how to implement this sophisticated scheme.
Use authentication to verify where the code came from.
Run the code with a security policy that enforces the permissions that you want to grant the program, depending on its origin.
In this section, we show you how to sign applets and web start applications for use with the Java Plug-in software. There are two scenarios:
Delivery in an intranet.
Delivery over the public Internet.
In the first scenario, a system administrator installs policy files and certificates on local machines. Whenever the Java Plug-in tool loads signed code, it consults the policy file for the permissions and the keystore for signatures. Installing the policies and certificates is straightforward and can be done once per desktop. End users can then run signed corporate code outside the sandbox. Whenever a new program is created or an existing one is updated, it must be signed and deployed on the web server. However, no desktops need to be touched as the programs evolve. We think this is a reasonable scenario that can be an attractive alternative to deploying corporate applications on every desktop.
In the second scenario, software vendors obtain certificates that are signed by CAs such as VeriSign. When an end user visits a web site that contains a signed applet, a pop-up dialog box identifies the software vendor and gives the end user two choices: to run the applet with full privileges or to confine it to the sandbox. We discuss this less desirable scenario in detail in the section “Software Developer Certificates” on page 827.
For the remainder of this section, we describe how you can build policy files that grant specific permissions to code from known sources. Building and deploying these policy files is not for casual end users. However, system administrators can carry out these tasks in preparation for distributing intranet programs.
Suppose ACME Software wants its users to run certain programs that require local file access, and it wants to deploy the programs through a browser, as applets or Web Start applications. Because these programs cannot run inside the sandbox, ACME Software needs to install policy files on employee machines.
As you saw earlier in this chapter, ACME could identify the programs by their code base. But that means that ACME would need to update the policy files each time the programs are moved to a different web server. Instead, ACME decides to sign the JAR files that contain the program code.
First, ACME generates a root certificate:
keytool -genkeypair -keystore acmesoft.certs -alias acmeroot
Of course, the keystore containing the private root key must be kept at a safe place. Therefore, we create a second keystore client.certs for the public certificates and add the public acmeroot certificate into it.
keytool -exportcert -keystore acmesoft.certs -alias acmeroot -file acmeroot.cer
keytool -importcert -keystore client.certs -alias acmeroot -file acmeroot.cer
To make a signed JAR file, programmers add their class files to a JAR file in the usual way. For example,
javac FileReadApplet.java
jar cvf FileReadApplet.jar *.class
Then a trusted person at ACME runs the jarsigner tool, specifying the JAR file and the alias of the private key:
jarsigner -keystore acmesoft.certs FileReadApplet.jar acmeroot
The signed applet is now ready to be deployed on a web server.
Next, let us turn to the client machine configuration. A policy file must be distributed to each client machine.
To reference a keystore, a policy file starts with the line
keystore "keystoreURL", "keystoreType";
The URL can be absolute or relative. Relative URLs are relative to the location of the policy file. The type is JKS if the keystore was generated by keytool. For example,
keystore "client.certs", "JKS";
Then grant clauses can have suffixes signedBy "alias", such as this one:
grant signedBy "acmeroot"
{
   . . .
};
Any signed code that can be verified with the public key associated with the alias is now granted the permissions inside the grant clause.
You can try out the code signing process with the applet in Listing 9-16. The applet tries to read from a local file. The default security policy only lets the applet read files from its code base and any subdirectories. Use appletviewer to run the applet and verify that you can view files from the code base directory, but not from other directories.
Now create a policy file applet.policy with the contents:
keystore "client.certs", "JKS";
grant signedBy "acmeroot"
{
   permission java.lang.RuntimePermission "usePolicy";
   permission java.io.FilePermission "/etc/*", "read";
};
The usePolicy permission overrides the default “all or nothing” permission for signed applets. Here, we say that any applets signed by acmeroot are allowed to read files in the /etc directory. (Windows users: Substitute another directory such as C:Windows.)
Tell the applet viewer to use the policy file:
appletviewer -J-Djava.security.policy=applet.policy FileReadApplet.html
Now the applet can read files from the /etc directory, thus demonstrating that the signing mechanism works.
As a final test, you can run your applet inside the browser (see Figure 9-16). You need to copy the permission file and keystore inside the Java deployment directory. If you run UNIX or Linux, that directory is the .java/deployment subdirectory of your home directory. In Windows Vista, it is the C:UsersyourLoginNameAppDataSunJavaDeployment directory. In the following, we refer to that directory as deploydir.
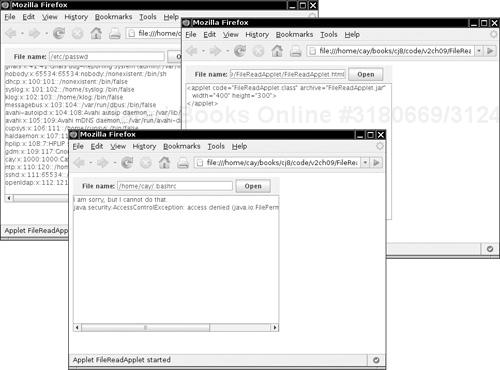
Copy applet.policy and client.certs to the deploydir/security directory. In that directory, rename applets.policy to java.policy. (Double-check that you are not wiping out an existing java.policy file. If there is one, add the applet.policy contents to it.)
Tip
For more details on configuring client Java security, read the sections “Deployment Configuration File and Properties” and “Java Control Panel” in the Java deployment guide at http://java.sun.com/javase/6/docs/technotes/guides/deployment/deployment-guide/overview.html.
Restart your browser and load the FileReadApplet.html. You should not be prompted to accept any certificate. Check that you can load any file in the /etc directory and the directory from which the applet was loaded, but not from other directories.
When you are done, remember to clean up your deploydir/security directory. Remove the files java.policy and client.certs. Restart your browser. If you load the applet again after cleaning up, you should no longer be able to read files from the local file system. Instead, you will be prompted for a certificate. We discuss security certificates in the next section.
Example 9-16. FileReadApplet.java
 1. import java.awt.*;
 2. import java.awt.event.*;
 3. import java.io.*;
 4. import java.util.*;
 5. import javax.swing.*;
 6.
 7. /**
 8.  * This applet can run "outside the sandbox" and read local files when it is given the right
 9.  * permissions.
10.  * @version 1.11 2007-10-06
11.  * @author Cay Horstmann
12.  */
13. public class FileReadApplet extends JApplet
14. {
15.    public void init()
16.    {
17.       EventQueue.invokeLater(new Runnable()
18.          {
19.             public void run()
20.             {
21.                fileNameField = new JTextField(20);
22.                JPanel panel = new JPanel();
23.                panel.add(new JLabel("File name:"));
24.                panel.add(fileNameField);
25.                JButton openButton = new JButton("Open");
26.                panel.add(openButton);
27.                ActionListener listener = new ActionListener()
28.                {
29.                   public void actionPerformed(ActionEvent event)
30.                   {
31.                      loadFile(fileNameField.getText());
32.                   }
33.                };
34.                fileNameField.addActionListener(listener);
35.                openButton.addActionListener(listener);
36.
37.                add(panel, "North");
38.
39.                fileText = new JTextArea();
40.                add(new JScrollPane(fileText), "Center");
41.             }
42.          });
43.    }
44.
45.    /**
46.     * Loads the contents of a file into the text area.
47.     * @param filename the file name
48.     */
49.    public void loadFile(String filename)
50.    {
51.       try
52.       {
53.          fileText.setText("");
54.          Scanner in = new Scanner(new FileReader(filename));
55.          while (in.hasNextLine())
56.             fileText.append(in.nextLine() + "
");
57.          in.close();
58.       }
59.       catch (IOException e)
60.       {
61.          fileText.append(e + "
");
62.       }
63.       catch (SecurityException e)
64.       {
65.          fileText.append("I am sorry, but I cannot do that.
");
66.          fileText.append(e + "
");
67.       }
68.    }
69.    private JTextField fileNameField;
70.    private JTextArea fileText;
71. }
Up to now, we discussed scenarios in which programs are delivered in an intranet and for which a system administrator configures a security policy that controls the privileges of the programs. However, that strategy only works with programs from known sources.
Suppose while surfing the Internet, you encounter a web site that offers to run an applet or web start application from an unfamiliar vendor, provided you grant it the permission to do so (see Figure 9-17). Such a program is signed with a software developer certificate that is issued by a CA. The pop-up dialog box identifies the software developer and the certificate issuer. You now have two choices:
Run the program with full privileges.
Confine the program to the sandbox. (The Cancel button in the dialog box is misleading. If you click that button, the applet is not canceled. Instead, it runs in the sandbox.)
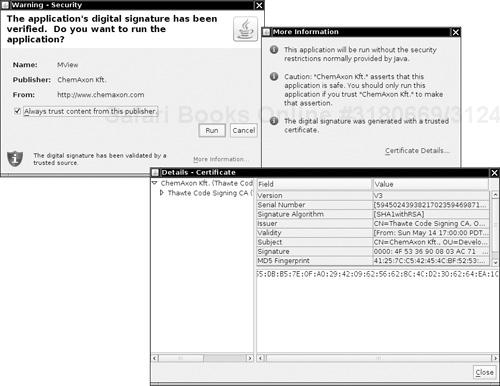
What facts do you have at your disposal that might influence your decision? Here is what you know:
Thawte sold a certificate to the software developer.
The program really was signed with that certificate, and it hasn’t been modified in transit.
The certificate really was signed by Thawte—it was verified by the public key in the local
cacertsfile.
Does that tell you whether the code is safe to run? Do you trust the vendor if all you know is the vendor name and the fact that Thawte sold them a software developer certificate? Presumably Thawte went to some degree of trouble to assure itself that ChemAxon Kft. is not an outright cracker. However, no certificate issuer carries out a comprehensive audit of the honesty and competence of software vendors.
In the situation of an unknown vendor, an end user is ill-equipped to make an intelligent decision whether to let this program run outside the sandbox, with all permissions of a local application. If the vendor is a well-known company, then the user can at least take the past track record of the company into account.
Note
It is possible to use very weak certificates to sign code—see http://www.dallaway.com/acad/webstart for a sobering example. Some developers even instruct users to add untrusted certificates into their certificate store—for example, http://www.agsrhichome.bnl.gov/Controls/doc/javaws/javaws_howto.html. From a security standpoint, this seems very bad.
We don’t like situations in which a program demands “give me all rights, or I won’t run at all.” Naive users are too often cowed into granting access that can put them in danger.
Would it help if each program explained what rights it needs and requested specific permission for those rights? Unfortunately, as you have seen, that can get pretty technical. It doesn’t seem reasonable for an end user to have to ponder whether a program should really have the right to inspect the AWT event queue.
We remain unenthusiastic about software developer certificates. It would be better if applets and web start applications on the public Internet tried harder to stay within their respective sandboxes, and if those sandboxes were improved. The Web Start API that we discussed in Volume I, Chapter 10 is a step in the right direction.
So far, we have discussed one important cryptographic technique that is implemented in the Java security API, namely, authentication through digital signatures. A second important aspect of security is encryption. When information is authenticated, the information itself is plainly visible. The digital signature merely verifies that the information has not been changed. In contrast, when information is encrypted, it is not visible. It can only be decrypted with a matching key.
Authentication is sufficient for code signing—there is no need for hiding the code. However, encryption is necessary when applets or applications transfer confidential information, such as credit card numbers and other personal data.
Until recently, patents and export controls have prevented many companies, including Sun, from offering strong encryption. Fortunately, export controls are now much less stringent, and the patent for an important algorithm has expired. As of Java SE 1.4, good encryption support has been part of the standard library.
The Java cryptographic extensions contain a class Cipher that is the superclass for all encryption algorithms. You get a cipher object by calling the getInstance method:
Cipher cipher = Cipher.getInstance(algorithName);
Cipher cipher = Cipher.getInstance(algorithName, providerName);
The JDK comes with ciphers by the provider named "SunJCE". It is the default provider that is used if you don’t specify another provider name. You might want another provider if you need specialized algorithms that Sun does not support.
The algorithm name is a string such as "AES" or "DES/CBC/PKCS5Padding".
The Data Encryption Standard (DES) is a venerable block cipher with a key length of 56 bits. Nowadays, the DES algorithm is considered obsolete because it can be cracked with brute force (see, for example, http://www.eff.org/Privacy/Crypto/Crypto_misc/DESCracker/). A far better alternative is its successor, the Advanced Encryption Standard (AES). See http://www.csrc.nist.gov/publications/fips/fips197/fips-197.pdf for a detailed description of the AES algorithm. We use AES for our example.
Once you have a cipher object, you initialize it by setting the mode and the key:
int mode = . . .;
Key key = . . .;
cipher.init(mode, key);
The mode is one of
Cipher.ENCRYPT_MODE
Cipher.DECRYPT_MODE
Cipher.WRAP_MODE
Cipher.UNWRAP_MODE
The wrap and unwrap modes encrypt one key with another—see the next section for an example.
Now you can repeatedly call the update method to encrypt blocks of data:
int blockSize = cipher.getBlockSize();
byte[] inBytes = new byte[blockSize];
. . . // read inBytes
int outputSize= cipher.getOutputSize(blockSize);
byte[] outBytes = new byte[outputSize];
int outLength = cipher.update(inBytes, 0, outputSize, outBytes);
. . . // write outBytes
When you are done, you must call the doFinal method once. If a final block of input data is available (with fewer than blockSize bytes), then call
outBytes = cipher.doFinal(inBytes, 0, inLength);
If all input data have been encrypted, instead call
outBytes = cipher.doFinal();
The call to doFinal is necessary to carry out padding of the final block. Consider the DES cipher. It has a block size of 8 bytes. Suppose the last block of the input data has fewer than 8 bytes. Of course, we can fill the remaining bytes with 0, to obtain one final block of 8 bytes, and encrypt it. But when the blocks are decrypted, the result will have several trailing 0 bytes appended to it, and therefore it will be slightly different from the original input file. That could be a problem, and, to avoid it, we need a padding scheme. A commonly used padding scheme is the one described in the Public Key Cryptography Standard (PKCS) #5 by RSA Security Inc. (ftp://ftp.rsasecurity.com/pub/pkcs/pkcs-5v2/pkcs5v2-0.pdf). In this scheme, the last block is not padded with a pad value of zero, but with a pad value that equals the number of pad bytes. In other words, if L is the last (incomplete) block, then it is padded as follows:
L 01                                if length(L) = 7
L 02 02                             if length(L) = 6
L 03 03 03                          if length(L) = 5
. . .
L 07 07 07 07 07 07 07              if length(L) = 1
Finally, if the length of the input is actually divisible by 8, then one block
08 08 08 08 08 08 08 08
is appended to the input and encrypted. For decryption, the very last byte of the plaintext is a count of the padding characters to discard.
To encrypt, you need to generate a key. Each cipher has a different format for keys, and you need to make sure that the key generation is random. Follow these steps:
Get a
KeyGeneratorfor your algorithm.Initialize the generator with a source for randomness. If the block length of the cipher is variable, also specify the desired block length.
Call the
generateKeymethod.
For example, here is how you generate an AES key.
KeyGenerator keygen = KeyGenerator.getInstance("AES");
SecureRandom random = new SecureRandom(); // see below
keygen.init(random);
Key key = keygen.generateKey();
Alternatively, you can produce a key from a fixed set of raw data (perhaps derived from a password or the timing of keystrokes). Then use a SecretKeyFactory, like this:
SecretKeyFactory keyFactory = SecretKeyFactory.getInstance("AES");
byte[] keyData = . . .; // 16 bytes for AES
SecretKeySpec keySpec = new SecretKeySpec(keyData, "AES");
Key key = keyFactory.generateSecret(keySpec);
When generating keys, make sure you use truly random numbers. For example, the regular random number generator in the Random class, seeded by the current date and time, is not random enough. Suppose the computer clock is accurate to 1/10 of a second. Then there are at most 864,000 seeds per day. If an attacker knows the day a key was issued (as can often be deduced from a message date or certificate expiration date), then it is an easy matter to generate all possible seeds for that day.
The SecureRandom class generates random numbers that are far more secure than those produced by the Random class. You still need to provide a seed to start the number sequence at a random spot. The best method for doing this is to obtain random input from a hardware device such as a white-noise generator. Another reasonable source for random input is to ask the user to type away aimlessly on the keyboard, but each keystroke should contribute only one or two bits to the random seed. Once you gather such random bits in an array of bytes, you pass it to the setSeed method.
SecureRandom secrand = new SecureRandom();
byte[] b = new byte[20];
// fill with truly random bits
secrand.setSeed(b);
If you don’t seed the random number generator, then it will compute its own 20-byte seed by launching threads, putting them to sleep, and measuring the exact time when they are awakened.
Note
This algorithm is not known to be safe. In the past, algorithms that relied on timing other components of the computer, such as hard disk access time, were later shown not to be completely random.
The sample program at the end of this section puts the AES cipher to work (see Listing 9-17). To use the program, you first generate a secret key. Run
java AESTest -genkey secret.key
The secret key is saved in the file secret.key.
Now you can encrypt with the command
java AESTest -encrypt plaintextFile encryptedFile secret.key
Decrypt with the command
java AESTest -decrypt encryptedFile decryptedFile secret.key
The program is straightforward. The -genkey option produces a new secret key and serializes it in the given file. That operation takes a long time because the initialization of the secure random generator is time consuming. The -encrypt and -decrypt options both call into the same crypt method that calls the update and doFinal methods of the cipher. Note how the update method is called as long as the input blocks have the full length, and the doFinal method is either called with a partial input block (which is then padded) or with no additional data (to generate one pad block).
Example 9-17. AESTest.java
 1. import java.io.*;
 2. import java.security.*;
 3. import javax.crypto.*;
 4.
 5. /**
 6.  * This program tests the AES cipher. Usage:<br>
 7.  * java AESTest -genkey keyfile<br>
 8.  * java AESTest -encrypt plaintext encrypted keyfile<br>
 9.  * java AESTest -decrypt encrypted decrypted keyfile<br>
10.  * @author Cay Horstmann
11.  * @version 1.0 2004-09-14
12.  */
13. public class AESTest
14. {
15.    public static void main(String[] args)
16.    {
17.       try
18.       {
19.          if (args[0].equals("-genkey"))
20.          {
21.             KeyGenerator keygen = KeyGenerator.getInstance("AES");
22.             SecureRandom random = new SecureRandom();
23.             keygen.init(random);
24.             SecretKey key = keygen.generateKey();
25.             ObjectOutputStream out = new ObjectOutputStream(new FileOutputStream(args[1]));
26.             out.writeObject(key);
27.             out.close();
28.          }
29.          else
30.          {
31.             int mode;
32.             if (args[0].equals("-encrypt")) mode = Cipher.ENCRYPT_MODE;
33.             else mode = Cipher.DECRYPT_MODE;
34.
35.             ObjectInputStream keyIn = new ObjectInputStream(new FileInputStream(args[3]));
36.             Key key = (Key) keyIn.readObject();
37.             keyIn.close();
38.
39.             InputStream in = new FileInputStream(args[1]);
40.             OutputStream out = new FileOutputStream(args[2]);
41.             Cipher cipher = Cipher.getInstance("AES");
42.             cipher.init(mode, key);
43.
44.             crypt(in, out, cipher);
45.             in.close();
46.             out.close();
47.          }
48.       }
49.       catch (IOException e)
50.       {
51.          e.printStackTrace();
52.       }
53.       catch (GeneralSecurityException e)
54.       {
55.          e.printStackTrace();
56.       }
57.       catch (ClassNotFoundException e)
58.       {
59.          e.printStackTrace();
60.       }
61.    }
62.
63.    /**
64.     * Uses a cipher to transform the bytes in an input stream and sends the transformed bytes
65.     * to an output stream.
66.     * @param in the input stream
67.     * @param out the output stream
68.     * @param cipher the cipher that transforms the bytes
69.     */
70.    public static void crypt(InputStream in, OutputStream out, Cipher cipher)
71.          throws IOException, GeneralSecurityException
72.    {
73.       int blockSize = cipher.getBlockSize();
74.       int outputSize = cipher.getOutputSize(blockSize);
75.       byte[] inBytes = new byte[blockSize];
76.       byte[] outBytes = new byte[outputSize];
77.
78.       int inLength = 0;
79.       boolean more = true;
80.       while (more)
81.       {
82.          inLength = in.read(inBytes);
83.          if (inLength == blockSize)
84.          {
85.             int outLength = cipher.update(inBytes, 0, blockSize, outBytes);
86.             out.write(outBytes, 0, outLength);
87.          }
88.          else more = false;
89.       }
90.       if (inLength > 0) outBytes = cipher.doFinal(inBytes, 0, inLength);
91.       else outBytes = cipher.doFinal();
92.       out.write(outBytes);
93.    }
94. }
javax.crypto.Cipher 1.4
static Cipher getInstance(String algorithmName, String providerName)returns a
Cipherobject that implements the specified algorithm. Throws aNoSuchAlgorithmExceptionif the algorithm is not provided.int getBlockSize()returns the size (in bytes) of a cipher block, or 0 if the cipher is not a block cipher.
int getOutputSize(int inputLength)returns the size of an output buffer that is needed if the next input has the given number of bytes. This method takes into account any buffered bytes in the cipher object.
initializes the cipher algorithm object. The mode is one of
ENCRYPT_MODE,DECRYPT_MODE,WRAP_MODE, orUNWRAP_MODE.byte[] update(byte[] in)byte[] update(byte[] in, int offset, int length)int update(byte[] in, int offset, int length, byte[] out)transforms one block of input data. The first two methods return the output. The third method returns the number of bytes placed into
out.byte[] doFinal()byte[] doFinal(byte[] in)byte[] doFinal(byte[] in, int offset, int length)int doFinal(byte[] in, int offset, int length, byte[] out)transforms the last block of input data and flushes the buffer of this algorithm object. The first three methods return the output. The fourth method returns the number of bytes placed into
out.
javax.crypto.KeyGenerator 1.4
static KeyGenerator getInstance(String algorithmName)returns a
KeyGeneratorobject that implements the specified algorithm. Throws aNoSuchAlgorithmExceptionif the algorithm is not provided.void init(SecureRandom random)void init(int keySize, SecureRandom random)initializes the key generator.
SecretKey generateKey()generates a new key.
javax.crypto.SecretKeyFactory 1.4
static SecretKeyFactory getInstance(String algorithmName)static SecretKeyFactory getInstance(String algorithmName, String providerName)returns a
SecretKeyFactoryobject for the specified algorithm.SecretKey generateSecret(KeySpec spec)generates a new secret key from the given specification.
The JCE library provides a convenient set of stream classes that automatically encrypt or decrypt stream data. For example, here is how you can encrypt data to a file:
Cipher cipher = . . .;
cipher.init(Cipher.ENCRYPT_MODE, key);
CipherOutputStream out = new CipherOutputStream(new FileOutputStream(outputFileName), cipher);
byte[] bytes = new byte[BLOCKSIZE];
int inLength = getData(bytes); // get data from data source
while (inLength != -1)
{
   out.write(bytes, 0, inLength);
   inLength = getData(bytes); // get more data from data source
}
out.flush();
Similarly, you can use a CipherInputStream to read and decrypt data from a file:
Cipher cipher = . . .;
cipher.init(Cipher.DECRYPT_MODE, key);
CipherInputStream in = new CipherInputStream(new FileInputStream(inputFileName), cipher);
byte[] bytes = new byte[BLOCKSIZE];
int inLength = in.read(bytes);
while (inLength != -1)
{
   putData(bytes, inLength); // put data to destination
   inLength = in.read(bytes);
}
The cipher stream classes transparently handle the calls to update and doFinal, which is clearly a convenience.
javax.crypto.CipherInputStream 1.4
CipherInputStream(InputStream in, Cipher cipher)constructs an input stream that reads data from
inand decrypts or encrypts them by using the given cipher.int read()int read(byte[] b, int off, int len)reads data from the input stream, which is automatically decrypted or encrypted.
javax.crypto.CipherOutputStream 1.4
CipherOutputStream(OutputStream out, Cipher cipher)constructs an output stream that writes data to
outand encrypts or decrypts them using the given cipher.void write(int ch)void write(byte[] b, int off, int len)writes data to the output stream, which is automatically encrypted or decrypted.
void flush()flushes the cipher buffer and carries out padding if necessary.
The AES cipher that you have seen in the preceding section is a symmetric cipher. The same key is used for encryption and for decryption. The Achilles heel of symmetric ciphers is key distribution. If Alice sends Bob an encrypted method, then Bob needs the same key that Alice used. If Alice changes the key, then she needs to send Bob both the message and, through a secure channel, the new key. But perhaps she has no secure channel to Bob, which is why she encrypts her messages to him in the first place.
Public key cryptography solves that problem. In a public key cipher, Bob has a key pair consisting of a public key and a matching private key. Bob can publish the public key anywhere, but he must closely guard the private key. Alice simply uses the public key to encrypt her messages to Bob.
Actually, it’s not quite that simple. All known public key algorithms are much slower than symmetric key algorithms such as DES or AES. It would not be practical to use a public key algorithm to encrypt large amounts of information. However, that problem can easily be overcome by combining a public key cipher with a fast symmetric cipher, like this:
Alice generates a random symmetric encryption key. She uses it to encrypt her plaintext.
Alice encrypts the symmetric key with Bob’s public key.
Alice sends Bob both the encrypted symmetric key and the encrypted plaintext.
Bob uses his private key to decrypt the symmetric key.
Bob uses the decrypted symmetric key to decrypt the message.
Nobody but Bob can decrypt the symmetric key because only Bob has the private key for decryption. Thus, the expensive public key encryption is only applied to a small amount of key data.
The most commonly used public key algorithm is the RSA algorithm invented by Rivest, Shamir, and Adleman. Until October 2000, the algorithm was protected by a patent assigned to RSA Security Inc. Licenses were not cheap—typically a 3% royalty, with a minimum payment of $50,000 per year. Now the algorithm is in the public domain. The RSA algorithm is supported in Java SE 5.0 and above.
Note
If you still use an older version of the JDK, check out the Legion of Bouncy Castle (http://www.bouncycastle.org). It supplies a cryptography provider that includes RSA as well as a number of algorithms that are not part of the SunJCE provider. The Legion of Bouncy Castle provider has been signed by Sun Microsystems so that you can combine it with the JDK.
To use the RSA algorithm, you need a public/private key pair. You use a KeyPairGenerator like this:
KeyPairGenerator pairgen = KeyPairGenerator.getInstance("RSA");
SecureRandom random = new SecureRandom();
pairgen.initialize(KEYSIZE, random);
KeyPair keyPair = pairgen.generateKeyPair();
Key publicKey = keyPair.getPublic();
Key privateKey = keyPair.getPrivate();
The program in Listing 9-18 has three options. The -genkey option produces a key pair. The -encrypt option generates an AES key and wraps it with the public key.
Key key = . . .; // an AES key
Key publicKey = . . .; // a public RSA key
Cipher cipher = Cipher.getInstance("RSA");
cipher.init(Cipher.WRAP_MODE, publicKey);
byte[] wrappedKey = cipher.wrap(key);
It then produces a file that contains
The length of the wrapped key.
The wrapped key bytes.
The plaintext encrypted with the AES key.
The -decrypt option decrypts such a file. To try the program, first generate the RSA keys:
java RSATest -genkey public.key private.key
Then encrypt a file:
java RSATest -encrypt plaintextFile encryptedFile public.key
Finally, decrypt it and verify that the decrypted file matches the plaintext:
java RSATest -decrypt encryptedFile decryptedFile private.key
Example 9-18. RSATest.java
  1. import java.io.*;
  2. import java.security.*;
  3. import javax.crypto.*;
  4.
  5. /**
  6.  * This program tests the RSA cipher. Usage:<br>
  7.  * java RSATest -genkey public private<br>
  8.  * java RSATest -encrypt plaintext encrypted public<br>
  9.  * java RSATest -decrypt encrypted decrypted private<br>
 10.  * @author Cay Horstmann
 11.  * @version 1.0 2004-09-14
 12.  */
 13. public class RSATest
 14. {
 15.    public static void main(String[] args)
 16.    {
 17.       try
 18.       {
 19.          if (args[0].equals("-genkey"))
 20.          {
 21.              KeyPairGenerator pairgen = KeyPairGenerator.getInstance("RSA");
 22.              SecureRandom random = new SecureRandom();
 23.              pairgen.initialize(KEYSIZE, random);
 24.              KeyPair keyPair = pairgen.generateKeyPair();
 25.              ObjectOutputStream out = new ObjectOutputStream(new FileOutputStream(args[1]));
 26.              out.writeObject(keyPair.getPublic());
 27.              out.close();
 28.              out = new ObjectOutputStream(new FileOutputStream(args[2]));
 29.              out.writeObject(keyPair.getPrivate());
 30.              out.close();
 31.          }
 32.          else if (args[0].equals("-encrypt"))
 33.          {
 34.             KeyGenerator keygen = KeyGenerator.getInstance("AES");
 35.             SecureRandom random = new SecureRandom();
 36.             keygen.init(random);
 37.             SecretKey key = keygen.generateKey();
 38.
 39.             // wrap with RSA public key
 40.             ObjectInputStream keyIn = new ObjectInputStream(new FileInputStream(args[3]));
 41.             Key publicKey = (Key) keyIn.readObject();
 42.             keyIn.close();
 43.
 44.             Cipher cipher = Cipher.getInstance("RSA");
 45.             cipher.init(Cipher.WRAP_MODE, publicKey);
 46.             byte[] wrappedKey = cipher.wrap(key);
 47.             DataOutputStream out = new DataOutputStream(new FileOutputStream(args[2]));
 48.             out.writeInt(wrappedKey.length);
 49.             out.write(wrappedKey);
 50.
 51.             InputStream in = new FileInputStream(args[1]);
 52.             cipher = Cipher.getInstance("AES");
 53.             cipher.init(Cipher.ENCRYPT_MODE, key);
 54.             crypt(in, out, cipher);
 55.             in.close();
 56.             out.close();
 57.          }
 58.          else
 59.          {
 60.             DataInputStream in = new DataInputStream(new FileInputStream(args[1]));
 61.             int length = in.readInt();
 62.             byte[] wrappedKey = new byte[length];
 63.             in.read(wrappedKey, 0, length);
 64.
 65.             // unwrap with RSA private key
 66.             ObjectInputStream keyIn = new ObjectInputStream(new FileInputStream(args[3]));
 67.             Key privateKey = (Key) keyIn.readObject();
 68.             keyIn.close();
 69.
 70.             Cipher cipher = Cipher.getInstance("RSA");
 71.             cipher.init(Cipher.UNWRAP_MODE, privateKey);
 72.             Key key = cipher.unwrap(wrappedKey, "AES", Cipher.SECRET_KEY);
 73.
 74.             OutputStream out = new FileOutputStream(args[2]);
 75.             cipher = Cipher.getInstance("AES");
 76.             cipher.init(Cipher.DECRYPT_MODE, key);
 77.
 78.             crypt(in, out, cipher);
 79.             in.close();
 80.             out.close();
 81.          }
 82.       }
 83.       catch (IOException e)
 84.       {
 85.          e.printStackTrace();
 86.       }
 87.       catch (GeneralSecurityException e)
 88.       {
 89.          e.printStackTrace();
 90.       }
 91.       catch (ClassNotFoundException e)
 92.       {
 93.          e.printStackTrace();
 94.       }
 95.    }
 96.
 97.    /**
 98.     * Uses a cipher to transform the bytes in an input stream and sends the transformed bytes
 99.     * to an output stream.
100.     * @param in the input stream
101.     * @param out the output stream
102.     * @param cipher the cipher that transforms the bytes
103.     */
104.    public static void crypt(InputStream in, OutputStream out, Cipher cipher)
105.          throws IOException, GeneralSecurityException
106.    {
107.       int blockSize = cipher.getBlockSize();
108.       int outputSize = cipher.getOutputSize(blockSize);
109.       byte[] inBytes = new byte[blockSize];
110.       byte[] outBytes = new byte[outputSize];
111.
112.       int inLength = 0;
113.       ;
114.       boolean more = true;
115.       while (more)
116.       {
117.          inLength = in.read(inBytes);
118.          if (inLength == blockSize)
119.          {
120.             int outLength = cipher.update(inBytes, 0, blockSize, outBytes);
121.             out.write(outBytes, 0, outLength);
122.          }
123.          else more = false;
124.       }
125.       if (inLength > 0) outBytes = cipher.doFinal(inBytes, 0, inLength);
126.       else outBytes = cipher.doFinal();
127.       out.write(outBytes);
128.    }
129.
130.    private static final int KEYSIZE = 512;
131. }
You have now seen how the Java security model allows the controlled execution of code, which is a unique and increasingly important aspect of the Java platform. You have also seen the services for authentication and encryption that the Java library provides. We did not cover a number of advanced and specialized issues, among them:
The GSS-API for “generic security services” that provides support for the Kerberos protocol (and, in principle, other protocols for secure message exchange). There is a tutorial at http://java.sun.com/javase/6/docs/technotes/guides/security/jgss/tutorials/index.html.
Support for the Simple Authentication and Security Layer (SASL), used by the Lightweight Directory Access Protocol (LDAP) and Internet Message Access Protocol (IMAP). If you need to implement SASL in your own application, look at http://java.sun.com/javase/6/docs/technotes/guides/security/sasl/sasl-refguide.html.
Support for SSL. Using SSL over HTTP is transparent to application programmers; simply use URLs that start with
https. If you want to add SSL to your own application, see the Java Secure Socket Extension (JSEE) reference at http://java.sun.com/javase/6/docs/technotes/guides/security/jsse/JSSERefGuide.html.
Now that we have completed our overview of Java security, we turn to distributed computing in Chapter 10.