
Topics in this Chapter
Table Editing Overview
How the Editing Process Works
Using Buttons and Combo Boxes as Editors
Tabbing Between Editable Cells
All the tables that you have seen so far in this book have displayed static data. However, JTable allows the user to edit the table data if the underlying table model permits it. In this chapter, you'll see how to turn a read-only table into an editable one by using the editors that are installed by default in every table. You'll also see how to enhance your tables beyond the capabilities of the default editors by creating editors of your own and how to add useful mechanisms like the ability to use the tab key to move between cells while editing.
So far, you've seen several changes to the currency table that we've been using in this book that have enhanced its appearance and usability. The table as it stands now is useful for showing exchange rate changes for reference only, but suppose you wanted to allow the user to enter more recent values than the table currently contains. With this capability, you could use the same table to allow privileged users to update whatever information source lies behind the table's data model (perhaps a database). You can add this facility by making use of the editors that are built into the JTable control.
Making a table editable involves two steps:
Deciding which columns contain data that could be modified and enhancing the table model to allow those columns to be edited.
Choosing and installing the editors that will control the editing of information in the table.
In our first implementation of an editable table, we'll look mainly at what is involved in the first of these two steps. You'll learn about table editors later in this section— for now, we'll rely entirely on the default editors that every table has available to allow the user to make changes to the data.
Ultimately, the table model controls which cells, if any, of a table are editable. There are two TableModel methods that work together to control cell editability:
public boolean isCellEditable (int row, int column);
public void setValueAt (Object value, int row, int column);
When the user tries to change the value in a table cell (by means that you'll see later), the JTable user interface (UI) class calls the JTable isCellEditable method, passing it the cell's row and column number. If this method returns true, an appropriate editor is assigned to the cell and the user is allowed to change the value displayed in the cell. When the user has updated the cell, the new value is stored in the model by passing it to the setValueAt method, which is also given the cell's row and column number, together with the new value in the form of an Object. If isCellEditable returns false, the data cannot be edited and the user won't be able to type anything into the cell.
All of the examples you have seen so far have used the CurrencyTableModel shown in Listing 7-1, which didn't directly implement either isCellEditable or setValueAt. Instead, it inherited these methods from AbstractTableModel, which implements them as follows:
public boolean isCellEditable (int row, int column) {
   return false;
}
public void setValueAt (Object value, int row, int column) {
}
As implemented here, the isCellEditable method ensures that none of the table's cells can have their values changed, which is why all the tables in the previous chapter were not editable. When is CellEditable returns false for a cell, the table will not attempt to change the cell's value, so the default implementation of setValueAt just does nothing because, of course, it will never be called.
To make the CurrencyTableModel editable, suitable implementations of is CellEditable and setValueAt need to be added. Because CurrencyTableModel is useful as a read-only currency model, instead of changing it, the new methods will be implemented in a derived class called EditableCurrencyTableModel, the implementation of which is shown in Listing 7-1.
Example 7-1. An Editable Table Model
package AdvancedSwing.Chapter7;

import javax.swing.*;
import AdvancedSwing.Chapters6.*;

// An editable version of the currency table model
public class EditableCurrencyTableModel
                             extends CurrencyTableModel {
   public boolean isCellEditable (int row, int column) {
      return column == OLD_RATE_COLUMN ||
                        column == NEW_RATE_COLUMN;
   }

   public void setValueAt (Object value, int row, int column) {
   try {
         if (column == OLD_RATE_COLUMN ||
                        column == NEW_RATE_COLUMN) {
            Double newObjectValue; // New value as an Object
            double newValue; // double, for validity checking
            if (value instanceof Number) {
               // Convert Number to Double
               newValue = ((Number)value).doubleValue();
               newObjectValue = new Double(newValue);
            } else if (value instanceof String) {
               // Convert a String to a Double
               newObjectValue = new Double ((String)value);
               newValue = newObjectValue.doubleValue();
            } else {
               // Unrecognized - ignore
               return;
            }

            if (newValue > (double)0.0) {
               // Store new value, but reject zero or
               // negative values
               data [row] [column] = newObjectValue;
               data [row] [DIFF_COLUMN] =
new Double(((Double) data [row] [NEW_RATE_COLUMN]). doubleValue()
        - ((Double) data [row] [OLD_RATE_COLUMN]). doubleValue ());

               fireTableRowsUpdated (row, row);
            }
         }
      } catch (NumberFormatException e) {
         // Ignore a badly formatted number
      }
   }
}
As you can see, this class inherits most of its behavior from the existing CurrencyTableModel, as well as the initial currency values. The isCellEditable method is very simple: The editable version of the currency table will allow only today's or yesterday's exchange rates to be edited. Obviously, it makes no sense to allow the user to edit the difference between the two rates, while changing the currency name really implies the need to change all the values in the affected row, which is really a delete operation followed by the insertion of a new row, rather than an edit. These constraints are applied by arranging for isCellEditable to return true if, and only if, the cell being edited is in column 1 or 2, which were symbolically defined (by CurrencyTableModel) as OLD_RATE_COLUMN and NEW_RATE_COLUMN respectively. In this case, the decision as to whether a cell's contents can be modified is based entirely on which column it is in, but you can, if you need to, control editability on a cell-by-cell basis by using the row number as well as the column index.
The setValueAt method is slightly more complex. This method is given the new value (as an object) and the row and column index of the cell to be updated. In terms of the actual implementation of the CurrencyTable- Model, the new value needs to be assigned to the element data [row] [column] of the two-dimensional array that holds the data. There are, however, a few other things that need to be taken into account.
First, setvalueAt checks again that the cell to be changed is in columns 1 or 2. Of course, this repeats the same test made by isCellEditable and it may appear to be redundant. In terms of direct table editing, this check is, indeed, superfluous because the table will never attempt to update a cell for which isCellEditable returns false. However, other software can get direct access to the TableModel by calling the JTable getModel method and attempt to modify parts of the data that should be read-only. This check prevents such unauthorized access.
Next, the actual value needs to be stored in the table model. The value argument to setvalueAt is defined as an Object, so exactly what is its actual data type? As you'll see in the next section, the type of the value passed to setValueAt depends on the editor being used to modify the table. Ideally, because the table model holds Doubles, the editor would supply the new value as a Double (or at least as a Number). However, none of the editors installed in the table by default do this— in fact, the editor that would be used for both of the editable columns in this table supplies the modified value as a string.
The implementation of setvalueAt used here accepts either a string or a Number as the new value. If the value is supplied as a Number, it is converted directly to a Double by extracting the double value from the Number and then passing it to the constructor of Double. When a string is supplied, it is passed directly to the Double constructor that accepts a String argument and the result is stored in the data array.
Once the new value has been stored, there is one final item of business to be attended to. The last column of the table always contains the difference between the old and new currency rates, so when either of these values is changed, it is necessary to calculate a new value for this column. The same code is used to perform this calculation as that used in the constructor of CurrencyTableModel shown in Listing 7-1 in the previous chapter. Once the new difference has been stored, the table is self-consistent again.
Once the editor has completed its job and setvalueAt has been called, the table will update the cell with the new value automatically, as you'll see shortly. However, using an editor is not the only way to change the table model. If the setvalueAt method is called from elsewhere, any changes to the model that it makes will not automatically be reflected in the table's on-screen appearance. To make sure that the table updates itself, the fireTableRowsUpdated method of AbstractTableModel is called. This sends a TableModelEvent to any listeners registered to receive events from the model, one of which is the JTable. On receipt of this event, the table repaints itself as necessary.
That's all there is to the implementation of the editable table model. There is, however, one small point that was glossed over in this description. Suppose the user types an illegal value into one of the editable cells. For example, suppose the user tries to store the value ABCDEF as an exchange rate. Obviously, this can't be allowed. The default cell editor won't perform any validity checking on the value that the user types— it will just pass it directly to the setValueAt method. The validity checking is, in fact, performed by the constructor of the Double class when the string is given to it for conversion. If the String does not represent a valid Double, this constructor throws a NumberFormatException. As you can see, this exception is caught and the setValueAt method will return without storing a new value. The table editor framework doesn't provide any way to propagate back to the editor that an attempt was made to store an illegal value, so there is no other reasonable course to take. You might wish to display an error message to the user (using the JOptionPane class, for example), but for simplicity we have chosen to ignore illegal values, with the result that the user will simply see the cell revert to its old content on completion of the edit. The same action is taken if the new exchange rate converts to a value Double, but is negative or zero.
Having implemented an editable version of the CurrencyTableModel, it is very simple to change the example programs that we have been using so that they provide an editable table. You can experiment with such a table using the command
java AdvancedSwing.Chapter7.EditableHighlightCurrencyTable
This table is the same as the one that was shown in Figure 7-6 and, at first, will appear indistinguishable from it. The only line of code that was changed to make this table editable is this one:
JTable tbl = new JTable (new EditableCurrencyTableModel());
which replaces the original
JTable tbl = new JTable (new CurrencyTableModel ());
The code that modifies the data model is, of course, in the modified data model, while the editors and the editing capability were always available in the table but were deactivated by the isCellEditable method of CurrencyTableModel.
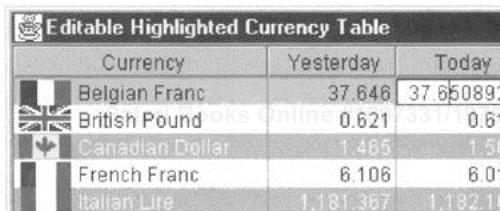
To change the value of a cell, double-click with the mouse in one of the editable columns (the middle two columns). A text editor will appear in the cell and you'll find that you can change the cell's content. Figure 7-1 shows how the table appears when the third column of the top row is being edited. To make the change permanent, click in another cell or press the RETURN key. Notice when you do so that the cell that has been edited is updated and the currency change is also recalculated. Furthermore, you should also see that, if the currency difference becomes negative, the corresponding cell in the third column is highlighted by the renderer installed in that column, demonstrating that the table view is being properly updated (you will, in fact, need to move the row selection away from the row containing the modified cell to see that the difference value has changed color).
In the last section, you saw that double-clicking in an editable cell activates an editor that allows you to change the cell's contents and that to take advantage of this you only need to implement a suitable table data model. In many cases, the default editors that the table installs are sufficient for your needs, but having an understanding of the table editing process will help you to create custom editors that let you go beyond the basic capabilities that you've seen so far. In this section, you'll see how the editing process works; later in this chapter, you'll use this information to create a custom editor and to control the editing mechanism in such a way as to make it easier for the user to quickly make a large number of changes to a table.
As with renderers, the table chooses the appropriate editor for each editable cell. The mechanism used to choose an editor is, in fact, the same as that used for renderers. At the top level, the following JTable method is invoked to select the editor for a given cell:
public TableCellEditor getCellEditor (int row, int column);
As was the case with renderers, you can subclass JTable and override this method to select a cell-specific editor if you need to. If you use the default implementation, the table first looks in the TableColumn object for the column containing the cell to be edited. If there is no specific renderer configured here, a default class-based editor is used instead. Because TableColumns do not have editors associated with them by default, a class-based editor will be used in any table that has not been specifically tailored. This is exactly the same process as the one used to select a cell's renderer.
Core Note
Should you choose to override the getCellEditor method, be sure to take into account that the column number refers to the TableColumnModel column index and not to the number of the column in the TableModel. If you need to refer to the TableModel data, you can map the column index passed to the getCellEditor method to the one needed to access the data using the JTable convertColumnIndexToModel method.
When it is instantiated, the table creates default editors for the following object types:
BooleansNumbersObjects
The editor for a column containing Boolean values is a JCheckBox, initialized as selected or not depending on whether the cell being edited contains true or false. When you click in an editable cell containing a Boolean value, the state of the checkbox is toggled and the new value is written back.
Numbers and Objects have a JTextField as their default editor. Both of these editors have a thin black border to clearly show the outline of the cell being edited, as you can see in Figure 7-1. The only difference between these two is that the Number editor shows its contents right-justified, while the Object editor is left-justified. By default, the object editor is used for any cell in columns for which the table model's getColumnClass method returns something other than Boolean.class or Number.class.
If you want to create a custom editor for specific classes, you can use the JTable setDefaultEditor method to associate the editor with the class of object it can handle; similarly, the getDefaultEditor method retrieves the editor for a given class:
public void setDefaultEditor (Class objectClass,
                              TableCellEditor editor);
public TableCellEditor getDefaultEditor (Class objectClass);
As with renderers, if the getDefaultEditor method does not find an exact match for a given class, it looks for an editor for the superclass and so on, until it finds a match. Because every class is ultimately derived from Object, as a last resort the editor for Object will be used to edit a cell whose content type does not have a specific editor configured for it.
Core Note
You can, in fact, remove a default editor by passing a null editor reference to setDefaultEditor.If you remove the default editor for object, cells containing data types that would otherwise select the object editor will no longer be editable. This course of action is not recommended because there are clearer ways to arrange for a cell to be read-only, as you have already seen.
Similarly, you can set or get an editor for a specific column using the following TableColumn methods:
public void setCellEditor (TableCellEditor editor);
public TableCellEditor getCellEditor ();
In the example shown in Listing 7-1, no column editors were configured so clicking in either of the editable columns caused a default editor to be invoked. The table model's getColumnClass method shown in Listing 7-1 returns java.lang. Double for both of these columns (because the data held in the first row of the table is always of type Double). Because there is no default editor for Double, the editor for its superclass, java.lang.Number, is used instead. This means that the editing of currency values is performed using a right-justified JTextField, as you can verify by running the last example again.
All the methods that configure editors or obtain references to them deal with the type TableCellEditor, which is an interface that must be implemented by any class used as a table editor. TableCellEditor is derived from a more primitive interface called CellEditor that contains methods that are common to table editors and to the cell editors for trees (which implement the TreeCellEditor interface). This is how the CellEditor and TableCellEditor interfaces are defined:
public interface CellEditor {
  public Object getCellEditorValue();
  public boolean isCellEditable(EventObject evt);
  public boolean shouldSelectCell(EventObject evt);
  public boolean stopCellEditing();
  public void cancelCellEditing();
  public void addCellEditorListener(CellEditorListener 1);
  public void removeCellEditorListener(CellEditorListener 1);
}

public interface TableCellEditor extends CellEditor {
  Component getTableCellEditorComponent(JTable table,
                             Object value,
                             boolean isSelected,
                             int row, int column);
}
The TableCellEditor interface on its own is very similar to the TableCellRenderer interface used by renderers. Fundamentally, an editor manages an editing component that is used in much the same way as the component returned to the table by a renderer. The editing component is obtained by calling the getTableCellEditorComponent method, which may choose to configure the editing component using the parameters that are supplied to it.
Core Note
Be careful to distinguish between the editor and the editing component The editor is an instance of whichever class is implementing the TableCellEditor interface and is the object with which the table deals directly. The editing component is the component returned by the editor's getTableCellEditorComponent method and that will be visible to the user (the JTextField, JCheckBox, JcomboBox, and so forth). Throughout this chapter, the distinction between these two is made by careful use of terminology.
You'll see exactly how the table uses the editor and editing component in the discussion of the mechanics of the editing process next, in which the methods of the CellEditor interface, which are used to control the editing process rather than to manipulate the editing component, will also be described.
You've already seen that the table configures default editors that are implemented as check boxes and text fields and that all table editors must implement the TableCellEditor interface. You also know, however, that no Swing component implements TableCellEditor, which means that you can't directly install a JComponent as a table editor. Instead, the tables default editors are instances of the DefaultCellEditor class, which implements the TableCellEditor interface (and the similar TreeCellEditor interface). The job of the DefaultCellEditor class is to delegate control of the actual editing to a Swing component, while providing the common code that interacts with the table to start and end the editing process. DefaultCellEditor provides all the methods of the TableCellEditor interface and a few more that can be used to configure its exact behavior.
DefaultCellEditor has three constructors, each of which takes a different Swing component:
public DefaultCellEditor (JTextField editor);
public DefaultCellEditor (JComboBox editor);
public DefaultCellEditor (JCheckBox editor);
Each of these takes the component that you give it and arranges for that component to be returned when the getTableCellEditorComponent method is invoked by the table. If you are creating a custom editor by subclassing DefaultCellEditor, you can, if you wish, perform specific customization of these components before passing them to the DefaultCellEditor constructor. Indeed, the standard table editors are instances of DefaultCellEditor, with either a JCheckBox or a JTextField configured with left-or right-aligned text depending on which class of data is to be edited.
The rest of the methods provided by DefaultCellEditor, excluding those required to implement the TableCellEditor interface, are shown here:
public Component getComponent();
public void setClickCountToStart();
public int getClickCountToStart();
protected void fireEditingStopped();
protected void fireEditingCanceled();
Because these methods are not in the TableCellEditor interface, none of them are used by the table. Instead, the first three methods are intended for use either when setting up the editor or, during the editing process, by software that is aware that it is dealing with a DefaultCellEditor. The most important of these methods is setClickCountToStart, which determines how many clicks are required before the editing component starts editing. In the case of a text field editor, for example, the user needs to double-click in a cell to activate the editing process— a single click simply selects the cell (if cell selection is enabled). By contrast, the other two default editors are activated by a single mouse click. It is important to note that it is DefaultCellEditor that determines when the edit will start, using the mouse click count and the value set by setClickCountToStart, rather than the table, or the editing component.
The last two methods are used internally by DefaultCellEditor to generate the events that are required when the editing process is completed or is canceled. More will be said about all of these methods in the next section.
If you want to create a custom editor that uses a JTextField, JcomboBox, or JCheckBox as the basic editing component, the simplest way to do it is to subclass DefaultCellEditor. You'll see a simple example of this later in this chapter. However, if your editor needs to use a different Swing component, you'll soon notice some shortcomings in the implementation of DefaultCellEditor that make subclassing it in this case slightly artificial. There is an example that demonstrates the problems and looks at the options available for working around them in "Using Table Editors". One of these options is to avoid using DefaultCellEditor and instead create a new class that directly implements the TableCellEditor interface for itself. Keep in mind, therefore, when reading the rest of this chapter that while many of the editors that the table uses will be based on DefaultCellEditor (and all the default ones are), this will not always be the case. When the editor directly implements the TableCellEditor interface, you cannot assume that it also supplies the DefaultCellEditor methods listed above.
The editing process has three distinct phases:
Detecting that the user wants to edit a cell and installing the correct editor.
Editing the data in the cell.
Completing the edit, updating the table's data model, and removing the editor.
In this section, you'll see exactly what happens in each of these phases and which pieces of the table are involved at each point.
You've seen that the first phase can be initiated by the appropriate number of mouse clicks (two for a text editor, one for a combo box or a check box) in an editable cell, but there are two additional ways to begin editing. The most obvious way, which you can try by running the EditableHighlightCurrencyTable example that was shown earlier, is to move the focus to the cell to be edited using the cursor keys or with a single click and then just start typing a new value into the cell. The table UI class registers listeners that detect mouse presses and key presses and react to either by checking whether an edit should be initiated as a result. The other way to start an edit is for an application program to call one of the JTable editCellAt methods:
public boolean editCellAt (int row, int column);
public boolean editCellAt (int row, int column, EventObject evt);
The EventObject argument is used to allow the editCellAt method to decide whether an edit should be started based on some aspect of the event that caused it to be invoked. Application programs that want to programmatically start an edit will usually want to do so unconditionally and will therefore call the first variant of this method.
Let's first consider what happens when the user clicks somewhere in the table. When this happens, the mouse listener registered by the table UI class receives a MOUSE_PRESSED event. If the left mouse button is pressed, the listener uses the mouse coordinates to work out which cell has been clicked; right and middle button clicks are ignored and are usually used by application code to post pop-up menus. If the click occurred inside a cell (as opposed to in the inter-cell gaps), the mouse handler calls the JTable editCellAt method, passing it the row and column indices of the cell and the MouseEvent. This method decides whether the click should start an edit and, if so, returns true. If false is returned, the click does not cause editing to begin but it may instead cause the cell or its containing row and/or column to be selected, depending on the selection criteria in use.
So, how does the JTable editCellAt method determine whether a click should actually cause editing to start? First, it calls the JTable isCellEditable method using the row and column indices that it has been passed to find out whether the user has clicked in a cell that can be modified. This call simply maps the column index, which is in terms of the column order displayed on the screen, to the TableModel column index and then calls the TableModel isCellEditable method to find out whether the model considers the cell to be editable.
Assuming that the cell is inherently editable, the next step is to get the appropriate editor for the cell, following the procedure described earlier in "Selecting an Editor". If there is a suitable editor (which there always will be unless the default editor for java.lang.Object has been deliberately removed), the table then calls the editor's isCellEditable method. Don't confuse the CellEditor isCellEditable method with the isCellEditable method of TableModel, which determines editability based only on the nature of the data model and may use the cell's row and column index as part of the decision-making process. The CellEditor isCellEditable method is defined as follows:
public void isCellEditable (EventObject evt);
In other words, this method can base its decision only on the event that caused the table to consider editing the cell and on criteria specific to the editor; it does not have direct access to the table data, unless a reference was stored with the editor when it was created. The default editors (and all these created using DefaultCellEditor) allow the edit to start if the event they are passed is not a mouse event or if the number of mouse clicks is at least the number required for the type of component that the editor will use. The actual number of clicks required is configured when the editor is created using the setClickCountToStart method of DefaultCellEditor; as you know, by default this number defaults to two clicks for a text editor and one click for others. Editors that are not derived from DefaultCellEditor use their own criteria to determine whether to allow editing to begin, as you'll see later when we look at the implementation of a custom editor.
Core Note
For now, it is being assumed that editing is triggered by a mouse event. Later, you'll see how this process changes if editing is being started for other reasons.
When it is determined that both the TableModel and the editor agree that editing is going to performed, the editors getTableCellEditorComponent method is called to get a suitably configured editing component, and then the editing component is sized to match the size of the cell being edited and moved to that cell's location. The editor component is then added to the JTable, so becomes a child component of the table. This, of course, is different from renderers, which are used to draw table cells but are never added to the table.
When the edit is initiated from a mouse click (and only in this case), the last step in attaching the editor to the table is to call the CellEditor shouldSelectCell method, which also receives the initiating event as its argument. If this method returns true, the cell being edited is selected— that is, it becomes the selected cell if the CTRL and SHIFT keys are not pressed, or is added to the selection in the usual way if either of these keys is pressed.
Core Warning
The editing sequence described here is slightly different from that used in Swing 1.0, where the
shouldSelectCell
method was always called when the editor was added to the table and it was convenient to use it as a common point at which to initialize the editor. This is no longer possible because this method is not invoked when the edit is started either from the keyboard or programmatically and, when it is invoked now, it happens much later in the sequence. The only point at which the editor can be initialized in the new editing sequence is in its
isCellEditable
method, which, unfortunately, does not receive any information about the row and column to which the cell is being assigned. If you need this information, you will have to defer its use to the invocation of the
getTableCellEditorComponent method.
During the process of installing the editor, the table stores useful information that can be retrieved using the methods shown in Table 7-1.
Table 7-1. Editor-Related Information Available from JTable
| Information | Method |
|---|---|
| Row being edited | public int getEditingRow ( );
|
| Column being edited | public int getEditingColumn ( )
|
| Current editor | public TableCellEditor getCellEditor ( )
|
| Editor Component | public Component getEditorComponent ( )
|
| Is table edit active? | Public boolean isEditing ()
|
Note that most of this information is only valid once editing has started and becomes invalid when editing completes. After the editor has done its job, the editor and editor component will be returned as null and the row and column values will both be -1. However, the isEditing method always returns the correct result— true if there is an edit in progress, false if not.
Finally, the table registers itself with the editor as a CellEditorListener to receive notification when editing is completed. You'll see how this works (and the definition of the CellEditorListener interface) in "Ending the Edit".
When editing is initiated by typing into an editable cell that has the focus, the same steps as just described are performed with some slight differences. In this case, the initial event will be KeyEvent, caught by a KeyListener registered on the JTable by its UI class. When starting an edit from a mouse click, the table UI class passes the mouse event to editCellAt. However, in response to a key click, the table UI class invokes the variant of editCellAt that takes only two arguments (the cell's row and column index). This causes a null event to be given to the three-argument variant of editCellAt. As a result, the TableCellEditor method isCellEditable receives a null event parameter, so it has no information at all on which to base a decision about whether to start editing, except the knowledge that editing was not initiated by a mouse click. The DefaultCellEditor implementations of this method returns true in this case, meaning that editing will be allowed to begin.
Core Note
This behavior is reasonable, because the editors created using DefaultcellEditor use the MouseEvent only to compare the mouse click count with the number of clicks need to start editing. When a mouse is not in use, the concept of clicks does not apply, so there is no need for DefaultcellEditor to inspect on event.
As noted earlier, when editing is initiated using a keystroke, the should-SelectCell method is not called. However, the editing information listed above is still set up and the table registers itself with the editor as a CellEditorListener.
The final case to consider is starting an edit from an application program. Usually, an application will invoke the two-argument form of editCellAt, which is the same as starting the edit from a keystroke. However, an application may also choose to supply an arbitrary event and call the three-argument editCellAt, in which case the action taken will depend on the event passed and the cell editor in use. Unless the application programmer is in complete control of the table editors in use, it is recommended that the two-argument editCellAt method is used to programmatically initiate an edit. This case is otherwise the same as starting an edit using the keyboard— in other words, the shouldSelectCell method is not called. You'll see an example that programmatically starts an edit in "Tabbing Between Editable Cells".
Once the editor has been installed, the user interacts directly with it to edit the cell's data content. When the data has been modified, the new content will be written to the table model and the editing process terminates; the latter part of the editing mechanism will be discussed later.
The only interesting part of the editing phase is how the events that the editing component needs actually get to it. The events that are of most interest to editing components are keyboard and mouse events. Let's look first at keyboard events. As you know, keyboard events always go to whichever (single) component has the input focus. Usually, a table consists of only one component— the JTable. Therefore, at any give time, the input focus will be on the JTable or elsewhere in the application. If you are driving the JTable using the keyboard, you would give the table the focus by clicking somewhere inside its boundary with the mouse (which the table reacts to by grabbing the focus using the JComponent requestFocus method), so all keyboard events go to the JTable.
When the table is being edited, however, there are two components to be considered— the JTable and the editing component. If the editor is a text component, it needs to receive the user's keystrokes, so it would appear that the table should pass the focus to the editing component when it is installed. In fact, though, the JTable does not pass the focus to the editing component. As a result of this, keystrokes intended for the editing component will actually go to the JTable, not to the editing component, so you would not expect the user to be able to type anything into the text component, which is clearly not what happens.
However, this is not the end of the story. The table UI class registers itself as a KeyListener of the JTable and so receives notification of all keys pressed while the table has the focus. When editing is in progress, this listener takes all KEY_PRESSED events and performs special handling that works only if the editing component is a JTextField (or a class derived from JTextField). The result of this processing is that the key event will be redirected to the editor kit behind the text field, thus achieving the same effect as if the key press had been passed directly to the editor.
Keystrokes, therefore, get to the editing component only if it is a JTextField. Other editors, including the standard JComboBox and JCheckBox editors, do not receive keystrokes at all— for these editors, only the initial keystroke that activates editing is processed and even then it is not passed to the editing component. This means that it is not always possible to drive an editing component to its full potential using the keyboard.
Core Note
At least this is the case at the time of writing. The situation may improve in the future.
Mouse events are, however, potentially a different matter. Mouse events are not controlled by where the input focus is directed— instead, they usually go directly to whichever component the mouse is over, the exception being when the mouse is being dragged, in which case the MOUSE_DRAGGED and MOUSE_RELEASED events go to the component that received the MOUSE_PRESSED event at the start of the drag operation. Therefore, once the editor is installed, clicking it with the mouse will cause the event generated to go directly to the editing component, not to the JTable. There is, however, a subtlety involved here.
The mouse click that starts the edit generates a MOUSE_PRESSED event that is passed to the JTable. This event, and subsequent mouse events, need to be delivered to whichever editing component is finally installed in the table. To make this possible, the table UI class remembers the component that is under the mouse when editing starts and redirects all mouse events it receives to that component, until editing is completed. This is necessary because all events after the MOUSE_PRESSED and up to the matching MOUSE_RELEASED (including MOUSE_CLICKED and MOUSE_DRAGGED, if any) will go to the JTable, not the newly installed editing component. As a result of this special handling, if you highlight the content of the editor by dragging the mouse over it, the events that this generates are passed to the editing component. This means that editor components behave normally with respect to mouse events and you can do anything with these components when they are installed inside a table that you can do when they are used on their own.
Once editing has started, there are only two ways to terminate it:
Performing some gesture that the editing component can interpret as marking the end of the editing operation.
Clicking with the mouse somewhere inside the table but outside the editing component.
Let's first look at what happens when the conditions for ending the edit have been satisfied; later, we'll describe how these two conditions are detected.
No matter why the edit is being completed, the cleanup operation is begun by invoking the stopCellEditing method of the current cell editor; this method is part of the CellEditor interface, so it is implemented by every editor. This method is defined as follows:
public boolean stopCellEditing ();
The fact that this method returns a boolean means that it can, in theory, refuse to stop editing at any given time by returning false. If this happens, the table ignores whatever caused it to attempt to terminate the edit. The standard editors (all created using DefaultCellEditor) always return true from this method, which means that the editing operation will be terminated. The stopCellEditing method can do whatever it needs to do to clean up the editing component, but it must not lose the new value that the user selected for the cell. If this method is going to return true, it must also notify all CellEditorListeners that editing is complete. For editors derived from DefaultCellEditor, this obligation can be discharged by calling its fireEditingStopped method. Here is the definition of the CellEditorListener interface:
public interface CellEditorListener
                           extends java.util.EventListener {
   public void editingStopped (ChangeEvent e);
   public void editingCanceled (ChangeEvent e);
}
Any class can register as a CellEditorListener by implementing this interface and calling the addCellEditorListener method of CellEditor. Because all editors implement the CellEditor interface, they all support registration of CellEditorListeners. Editors derived from DefaultCellEditor inherit its addCellEditorListener and removeCellEditorListener methods and do not need to provide their own implementation.
Notice there appear to be two ways to report to a listener that editing has terminated; either the edit has stopped, or been canceled. The distinction between these two is what should happen to the table data model. When the editingStopped method is called, the edit has been ended cleanly and it is expected that the new value will be stored in the table data model. By contrast, if editingCanceled is called, any changes that the user made should be discarded. In fact, the default table editors never call the editingCanceled method, so there is no way to abandon a table edit. This interface is also used by JTree, which does call the editingCanceled method under some circumstances.
Core Note
If you implement a custom table editor, you can define a key sequence for that editor that would cancel the edit The appropriate way to implement this is just to call the editingCanceled method of all registered CellEditorListeners, which can be done using the cancelcellEditing method of DefaultcellEditor if your editor is derived from it
JTable implements the CellEditorListener interface and, as you saw in "Starting the Edit", registers itself to receive these events with the editor when it starts the edit. Therefore, its editingstopped method will be invoked. You'll note from the definition of the editingstopped method that its only argument is a ChangeEvent, which carries no information at all other than a reference to its source. The meaning of the source for these events is not formally defined in the Swing API. Although the editors derived from DefaultCellEditor all supply the editor as the source, JTable cannot rely on this when a custom editor is installed, so it uses its own getCellEditor method to retrieve the current editor. It then invokes the CellEditor getEditorValue method on the editor to get the new value of the table cell. The editor itself, of course, does not know what the new cell value is; to get this value, it extracts it from the actual editing component. In the case of a JTextField, for example, this involves calling the getText method. DefaultCellEditor has the appropriate code to get the new value for the three component types that it supports.
With the new value available, JTable uses the TableModel setValueAt method to update the table model. At this point, no validation of the data has been performed (unless a custom editor has performed some kind of validity checking— the default editors do not do this). It is up to the TableModel to reject values that are not legal, according to its own criteria. As you saw earlier in the discussion of the code in Listing 7-1, there is no way for the TableModel to provide feedback when it receives an illegal value— it just discards the data and leaves the cell unchanged.
The last step is to disconnect the editor from the table. This job is performed by the JTable removeEditor method, which does the following:
Deregisters the table as a
CellEditorListenerof the editor.Removes the editing component from its parent container, the
JTable.Returns the input focus to the
JTableif the editing component had grabbed it.Schedules a
repaintof the cell that has just been edited.
The repaint is limited to the area of the table occupied by the edited cell. Because all table painting is handled by renderers, this operation will actually be performed by the cell's usual renderer. While the table is editing, the editor component is responsible for drawing the content of the cell. It is possible that the renderer and the editor will display the same data in different ways, so there will be an obvious difference between the cell's appearance when it is editing. This is certainly the case for data that is edited by the standard text editors, which show a lined border when an edit is active. The default renderers for the same data types do not have a border.
Finally, having seen what happens when editing is complete, let's return to the two ways in which the table detects that the current edit should be stopped. The most obvious way is for the user to directly signal the fact as part of the editing process. If the cell editor is a JTextField, for example, the user can press RETURN to complete the edit. This will generate an ActionEvent, which must be caught and the cell editors stopCellEditing method called in response. The DefaultCellEditor implementation includes the code to register an ActionListener on the JTextField and calls stopCellEditing in its actionPerformed method. The same arrangement works if the editor is a JCheckBox: or a JComboBox: because these components also generate an ActionEvent when their state is changed.
The other way in which the user can signal the end of an edit is to click somewhere else in the table. This generates a mouse event that is caught by the table UI class. This event is actually treated in the same way as mouse events that start an edit— in fact, the same code is used. This means that the tables editCellAt method will be called, this time to determine whether to start an edit in a different cell. The description of this method that you saw earlier omitted one important fact: before deciding whether a new edit should be started, it checks whether a cell is currently being edited (using the JTable isEditing method). If so, it is immediately stopped by calling the editor's stopCellEditing method directly. When this method returns, the current edit will have been stopped and the editor removed. Any value typed into the cell will have been saved in the table's data model (assuming it was valid).
Core Note
Actually, as you know, stopCeliEditing could return false, in which case the active edit continues.
There are actually several other ways to cause the current edit to be stopped, all of which do not save the current value in the table (but nevertheless do not invoke the editingCanceled method of CellEditorListeners). These are:
Adding a column to the table model.
Removing a column from the table model.
Changing the margin of a table column.
Moving a column.
Of these, only the last can be performed directly by the user. This is the only way for the user to abandon a table edit without changing the data in the table model and without having to retype the previous content.
Now that you've seen how the table manages the editing process, it's time to look at a couple of examples. The first example you'll see is a very straightforward demonstration of a JComboBox as a table cell editor. Because the table component includes support for combo box editors, this example is little more than a demonstration of how to make straightforward use of existing features. The second example, however, is more complex. Here, you'll see how to give the appearance of adding a button to a table. As you know, the table cells are not actually individual components, so you can't just add a button to a table and have it behave like a fully functioning button. Using the knowledge gained in the last section, however, you'll see how to create the illusion that your table has an embedded JButton. This technique can also be applied to "add" more sophisticated controls to your table.
Using a JComboBox as a table editing component is very simple— all you need to do is create and populate the combo box and wrap it with an instance of DefaultCellEditor, and then assign the editor to the appropriate table column or install it as the default editor for a specific data type. The table and DefaultCellEditor jointly provide the code to arrange for the combo box to appear when necessary and for the selected item to be written back to the table model. You can see an example of a combo box being used to edit a table cell in Figure 7-2. To try this example for yourself, use the command:

java AdvancedSwing.Chapter7.ComboBoxTable
Example 7-2. A Table with a Combo Box Editor Installed
package AdvancedSwing.Chapter7;

import javax.swing.*;
import javax.swing.table.*;
import java.awt.event.*;

public class ComboBoxTable {
   public static void main(String[] args) {
      JFrame f = new JFrame("Combo Box Table");
      JTable tbl = new JTable(new ComboBoxTableModel());

      // Create the combo box editor
      JComboBox comboBox = new JComboBox(
                         ComboBoxTableModel.getValidStates());
      comboBox.setEditable(true);
      DefaultCellEditor editor =
                      new DefaultCellEditor(comboBox);

      // Assign the editor to the second column
      TableColumnModel tcm=tbl.getColumnModel();
      tcm.getColumn(1).setCellEditor(editor);

      // Set column widths
      tcm.getColumn(0).setPreferredWidth(200);
      tcm.getColumn(1).setPreferredWidth(100);

      // Set row height
      tbl.setRowHeight(20);

      tbl.setAutoResizeMode(JTable.AUTO_RESIZE_OFF);
      tbl.setPreferredScrollableViewportSize(
                           tbl.getPreferredSize());
      f.getContentPane().add(new JScrollPane(tbl), "Center");
      f.pack();
      f.addWindowListener(new WindowAdapter() {
         public void windowClosing(WindowEvent evt) {
            System.exit(0);
         }
      });
      f.setVisible(true);
   }
}

class ComboBoxTableModel extends AbstractTableModel {
   // Implementation of TableModel interface
   public int getRowCount() {
      return data.length;
   }

   public int getColumnCount() {
      return COLUMN_COUNT;
   }

   public Object getValueAt(int row, int column) {
      return data[row][column];
   }

   public Class getColumnClass(int column) {
      return (data[0][column]).getClass();
   }

   public String getColumnName(int column) {
      return columnNames[column];
   }

   public boolean isCellEditable(int row, int column) {
      return column == 1;
   }

   public void setValueAt(Object value, int row, int column) {
      if (isValidValue(value)) {
         data[row][column] = value;
         fireTableRowsUpdated(row, row);
      }
   }

   // Extra public methods
   public static String[] getValidStates() {
      return validStates;
   }

   // Protected methods
   protected boolean isValidValue(Object value) {
      if (value instanceof String) {
         String sValue = (String)value;

         for (int i = 0; i < validStates.length; i++) {
            if (sValue.equals(validStates[i])) {
               return true;
            }
         }
      }

      return false;
   }

   protected static final int COLUMN_COUNT = 2;

   protected static final String[] validStates = {
      "On order", "In stock", "Out of print"
   };

   protected Object[][] data = new Object[][] {
      { "Core Java Volume 1", validStates[0] },
      { "Core Java Volume 2", validStates[0] },
      { "Core Web Programming", validStates[0] },
      { "Core Visual Basic 5", validStates[0] },
      { "Core Java Foundation Classes", validStates[0] }
   };

   protected static final String[] columnNames = {
      "Book Name", "Status"
   };
}
The implementation of this example is shown in Listing 7-2, which combines the table and its data model. Let's look first at the data model, which is provided by the ComboBoxTableModel class. Like the other data models that have been used in this chapter, this one is derived from AbstractTableModel and stores its data in a two-dimensional array, each entry of which is a string. This table lists some of the more popular Java books and their current stock state in an imaginary bookstore. The second column of the table can have one of three values:
On order
In stock
Out of print
The table model must be able to supply a book's current state and allow the user to change the state of any book to one of the three legal values (but no other). Most of the table model implementation should be familiar from previous examples. The isCellEditable method allows only the second column to be edited. Editable tables also require a suitable setValueAt method; here, setValueAt makes use of the protected method isValidValue to make sure that the book's state can only be assigned a legal value— an attempt to supply a value that is not a string or not from the list shown previously is ignored. The only other method of any interest is getvalidstates, which returns an array of strings that represent the valid book states. These are the only values that will be acceptable to setValueAt.
Now let's look at the ComboBoxTable class, which sets up the table. Most of this code deals with creating the table, fixing its column sizes, and mounting it in a JScrollPane within the main JFrame of the application. Here is the most important part of this setup:
// Create the combo box editor
JComboBox comboBox = new JComboBox (
                     ComboBoxTableModel.getvalidstates ());
comboBox.setEditable (true);
DefaultCellEditor editor = new DefaultCellEditor (comboBox);

// Assign the editor to the second column
TableColumnModel tcm = tbl.getColumnModel();
tcm.getColumn (1).setCellEditor (editor);
The JComboBox will be used in the second column and initialized with its set of legal state values. To avoid hard-wiring these states outside the table model itself, the table model's getvalidstates method is used to get the set of possible stock states. The next step is to create a DefaultCellEditor and associate the combo box with it. As you saw in the last section, this causes the DefaultCellEditor to register an ItemListener to receive notification when the combo box's selection is changed. Lastly, the editor is installed in the table's second column.
Core Note
This is, of course, a highly simplified example. In a real-world application, the table model would probably be populated from a database, using an SQL SELECT statement that would generate one row of two columns for each book in the imaginary bookstore. The values returned by the getvalidstates method would most likely be obtained on demand using another SQL SELECT statement the first time they were required and cached for subsequent calls of getvalidstates. Keeping the data in a table model and providing an interfacing method like getvalidstates allows details like this to be kept out of the graphical user interface (GUI) implementation.
The last thing to note about the ComboBoxTable class is the following line of code:
tbl.setRowHeight(20);
The rows in a JTable are all the same height. In this case, each row will be 20 pixels high. Using a JTable is not the same as using a container with a layout manager— you cannot rely on the table to choose the correct height for its rows based on the data that its model contains and the renderers that will be used to displays its contents. If you don't set an explicit row height, you get a default value, which may or may not be suitable for your application. In this case, because a JComboBox is being used, it is necessary to add some vertical space to account for the selection window of the combo box.
If you run this example and click the mouse over a cell in the second column, you'll find that the cell content is replaced by the combo box and its drop-down menu appears, as shown in Figure 7-2. You can use the mouse to select one of the three legal book states and install it by clicking. When you do this, the new value is written to the table and the editing process ends, because the JComboBox generates an event that is caught by the DefaultCellEditor and causes the editing process to terminate, as described in "The Mechanics of the Editing Process".
Another way to end the edit is to click in another cell of the table. This also causes the drop-down menu to disappear and the cell's usual renderer will redraw the cell with the original value installed.
Core Note
For the sake of illustration, the combo box in this example has been made editable, which means that you can edit the selected value in the combo box selection window. If you do this, you could attempt to install a value that is not one of the legal stock states for books in this bookstore. However, you'll find that the table won't allow you to select an illegal state, because the setValueAt method accepts only the values in the combo box drop-down list
Having seen how to use a standard editor, let's now look at a more complex problem that requires a proper understanding of how table editing works to produce a working solution. A common misconception among developers using JTable for the first time is that the table's cells are components that are added to a container. Because of this, there is an expectation that you can use a JButton as a cell renderer and have the button behave like a real button. Unfortunately, this is not the case. If you use a renderer that draws a button, all you get is a static image of the button— the button is not actually present and can't be clicked. However, with a little ingenuity, you can give the illusion of a working button.
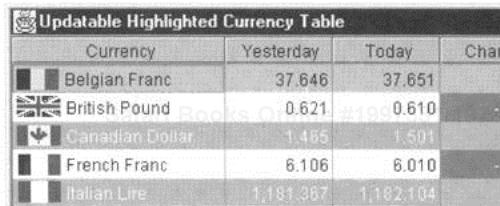
To see how this is done, let's return to our currency table example. The last version of this example changed the original read-only table model to an editable one. Changing the data is not of any use, of course, unless you can save the changes somewhere. Assuming that this data was loaded into the table model from a database server, it would be a good idea to write back any updated values. One way to do this might be to have a single button outside the table that would trigger the update process. Implementing that solution would not, of course, show us any new JTable features, so we'll adopt a slightly different solution here: each row of the table will be given its own button. The intent of this is that the person performing updates would press the button to commit the change on a particular line to the original data source. You can see what this arrangement looks like in Figure 7-3. To keep this example as simple as possible, the code that would, in real application, load the table model from the database and commit the updates when the buttons are pressed will not be shown. Instead, we'll just print a message when an update is requested.
To create this table, three enhancements need to be made to the editable version of the currency table:
A column needs to be added for the "Update" button.
A renderer must be written to draw the button.
The code that handles the user's button "press" must be written.
Lets look at these changes one by one.
The simplest way to add a column for the Update button is just to add a column to the table's TableColumnModel. However, every column in the TableColumnModel must correspond to a column in the TableModel, so that the data for the column can be obtained. At first, this seems like an unnatural and clumsy arrangement— after all, the button is not really part of the table data. In fact, though, as you'll see when we look at how to implement the button in "Activating the Button", having a TableModel column for it simplifies the implementation and also allows the action taken when it is pressed to be dependent on the model, which is exactly as it should be. Aside from this as yet unexplained advantage, the most direct benefit of having a column for the button is that the button's label can be held in the data model.
Core Note
You might not consider this last point to be such a worthwhile gain, and you would probably be right. It does, however, avoid the need to hard-code the button label in the source code and allows you, if you wish, to use a different button label for each row. While this flexibility doesn't really fit very well for the currency table, it might be useful in other contexts. In any cose, there really is no choice about adding an extra column to the TableModel, so it might as well be put to some use.
Fortunately, adding a column to the TableModel is a very simple matter. The existing functionality can be preserved by deriving the new model from EditableCurrencyTableModel, as shown in Listing 7-3.
Example 7-3. An Updatable Currency Table Model
package AdvancedSwing.Chapter7;

import javax.swing.*;

//An updatable version of the currency table model
public abstract class UpdatableCurrencyTableModel
                 extends EditableCurrencyTableModel {
   public int getColumnCount() {
      return super.getColumnCount() + 1;
   }

   public Object getValueAt(int row, int column) {
      if (column == BUTTON_COLUMN) {
         return "Update";
      }
      return super.getValueAt(row, column);
   }

   public Class getColumnClass(int column) {
      if (column == BUTTON_COLUMN) {
         return String.class;
      }
      return super.getColumnClass(column);
   }
   public String getColumnName(int column) {
      if (column == BUTTON_COLUMN) {
         return "";
      }
      return super.getColumnName(column);
   }

   public boolean isCellEditable(int row, int column) {
      return column == BUTTON_COLUMN ||
                    super.isCellEditable(row, column);
   }

   public void setValueAt(Object value, int row, int column) {
      if (column == BUTTON_COLUMN) {
         // Button press - do whatever is needed to update
         // the table source
         updateTable(value, row, column);
         return;
      }

      // Other columns - use superclass
      super.setValueAt (value, row, column);
   }

   // Used to implement the table update
   protected abstract void updateTable (
                           Object value, int row, int column);

   protected static final int BUTTON_COLUMN = 4;
}
Most of this code should be self-explanatory. This table model creates the extra column while preserving the existing data by delegating anything that concerns the first four columns of the table to EditableCurrencyTableModel and handling the last column itself. The getColumnCount method returns the correct number of columns by invoking the same method in its superclass and then adding 1 to account for the button column. The getvalueAt method is enhanced to return the string Update for any row in the button column. The value returned from this method will actually be used to set the buttons label; as noted above you can, if you wish, make the label dependent on the row number. For example, you might do this:
public Object getValueAt (int row, int column) {
   if (column == BUTTON_COLUMN) {
      return "Update row " + row;
   }
   return super.getValueAt(row, column);
}
As you can see, data for the other columns in the table is obtained directly from the EditableCurrencyTableModel.
There is a similar pattern in the getColumnClass, getColumnName, and isCellEditable methods, which directly handle requests for the last column and delegate others to the superclass. The getColumnClass method returns String. class for the button's column, because the data used to supply the buttons label is a string. In this example, a column-based renderer will be used to draw the button, so the exact class returned by this method is not critically important. The getColumnName method returns an empty string for the last column, so the column heading will be empty as you can see in Figure 7-3. Finally, the isCellEditable method returns true for the column occupied by the buttons data and whatever the superclass returns for the other columns. It might seem strange to return true for the button's column, but there is a good reason for this, as you'll see shortly.
The most important methods in this class are the last two. The setvalueAt method is called when the table content is being updated. Updates for most columns go directly to the EditableCurrencyTableModel setValueAt method. What does it mean to update the button column's data and why does isCellEditable return true for this column? The reason for making this column editable is tied to the implementation of the button, which you'll see in "Activating the Button". For now, notice that calling the setValueAt method to change the button column's content does not affect the button label— this much is obvious anyway, because getValueAt returns a constant value for that column. Instead, attempting to update this column results in a call to the abstract updateTable method. This method can be implemented in a concrete subclass of updatableCurrencyTableModel to provide the code needed to save the affected row's contents back to its original source.
The second thing you need for this table is a cell renderer that can draw a button. This is the simplest part, because everything you need to know to create this renderer was covered in the previous chapter. Because the renderer will draw a button, the simplest implementation is just to implement it as a subclass of JButton and return this from getTableCellRendererComponent. The code is shown in Listing 7-4.
Example 7-4. A Button Renderer
package AdvancedSwing.Chapter7;

import javax.swing.*;
import javax.swing.border.*;
import javax.swing.table.*;
import java.awt.*;
import AdvancedSwing.Chapter6.DataWithIcon;

//A holder for data and an associated icon
public class ButtonRenderer extends JButton
               implements TableCellRenderer {
   public ButtonRenderer() {
      this.border = getBorder();
      this.setOpaque(true);
   }

   public void setForeground(Color foreground) {
      this.foreground = foreground;
      super.setForeground(foreground);
   }

   public void setBackground(Color background) {
      this.background = background;
      super.setBackground(background);
   }

   public void setFont(Font font) {
      this.font = font;
      super.setFont(font);
   }

   public Component getTableCellRendererComponent(
                   JTable table, Object value,
                   boolean isSelected,
                   boolean hasFocus,
                   int row, int column) {
      Color cellForeground = foreground !=
                 null ? foreground : table.getForeground();
      Color cellBackground = background !=
                 null ? background : table.getBackground();
      setFont(font != null ? font : table.getFont());
      if (hasFocus) {
          setBorder(UIManager.getBorder(
                         "Table.focusCellHighlightBorder"));
          if(table.isCellEditable (row, column)) {
          cellForeground = UIManager.getColor(
                          "Table.focusCellForeground");
          cellBackground = UIManager.getColor(
                          "Table.focusCellBackground");
          }
      } else {
         setBorder(border);
      }

      super.setForeground (cellForeground);
      super.setBackground(cellBackground);

      // Customize the component's appearance
      setValue(value);

      return this;
   }

   protected void setValue(Object value) {
      if (value == null) {
         setText("");
         setIcon (null);
      } else if (value instanceof Icon) {
         setText ("");
         setIcon ((Icon)value);
      } else if (value instanceof DataWithIcon) {
         DataWithIcon d = (DataWithIcon)value;
         setText(d.toString());
         setIcon(d.getIcon());
      } else {
         setText(value.toString());
         setIcon(null);
      }
   }

   protected Color foreground;
   protected Color background;
   protected Font font;
   protected Border border;
}
Because you should by now be thoroughly familiar with writing renderers, not much needs to be said about this code. The only points worth noting are the border and label handling. Every button is created with a border that depends on the current look-and-feel. The table, however, uses its own border (also look-and-feel specific) to indicate the cell that currently has the focus. To preserve this mechanism for the button renderer, a reference to the buttons original border is saved by the constructor. In the getTableCellRendererComponent method, this original border is installed unless the button cell has the focus, when the same border as that used by the other table cells is used instead. The label is controlled by the setvalue method, which is called from getTableCellRendererComponent.
Core Note
Here, as with the other renderers that you have seen in this book, a setvalue method is implemented for the benefit of potential subclasses of ButtonRenderer, avoiding the need for them to re-implement the entire getTableCellRendererComponent method to make a small change to the way the button looks.
The value argument passed to getTableCellRendererComponent method (and hence to setvalue) comes from the button's column in the table model. Using the UpdatableCurrencyTableModel, this value will always be a string. As you can see, string values are simply used to set the buttons label. The setValueAt implementation is, however, more powerful. If you wish, you can subclass UpdatableCurrencyTableModel and have its getValueAt method return an Imagelcon or a DataWithIcon object to get a button with an icon or a button with an icon and accompanying text. Using Java's compact inner class notation, you can even embed this kind of extension directly into the code that creates the table. For example:
JTable tbl = new JTable (new UpdatableCurrencyTableModel() {
   public void updateTable (Object value, int row, int column) {
      // Code not shown
   };

   public Object getValueAt(int row, int column) {
      if (column == BUTTON_COLUMN) {
         return new DataWithIcon("Save",
                    new ImageIcon(getClass().
                    getResource("images/save.gif")));
      }
      return super.getValueAt (row, column);
   }
});
This modified table would display buttons with the label Save and whatever the icon in the file images/save.gif represents.
Now we come to the tricky part. If you created a new version of the EditableHighlightCurrencyTable example with the changes made so far, you would see a table with five columns, the rightmost of which contained a button with the label Update in every row. However, if you click any of these buttons with the mouse or tab over to one of them using the keyboard and press space or return, you wouldn't get a very useful response.
Core Note
Actually, the table would respond if you double-click the button or if you start typing into it, because a text editor would be used for the button column. This happens because the UpdatableCurrencyTableModel returns the type string and isCellEditable returns true for this column, so the default editor for object, a text editor, will be used. If you committed the edit by pressing RETURN, the table model setvalueAt method would be called and the table update would actually occur. This would, of course, be very confusing for the user, who would expect the button to click, not offer its label to be edited!
The question is, how to get the button to click? When you click the button's drawn image with the mouse, the table will consider starting an editor. If you implement an editor that looks like a button, with the same label as the one shown by the renderer and that activates itself on the first mouse click, you could give the illusion that the table contains a real button and, for the short period of time during which the button is active, there really would be a button in the table cell. To make this work, you need to implement an editor that returns a JButton as its editing component.
It would be nice to be able to implement this editor by extending DefaultCellEditor. This would make it possible to reuse existing code that registers CellEditorListeners and fires events when editing is stopped or abandoned. However, DefaultCellEditor has three constructors that require as arguments a JTextField, a JComboBox, or a JCheckBox. There is no default constructor and no way to supply a JButton, not even as a Component. This leaves three choices:
Extend
DefaultCellEditorand supply a dummyJTextField, JcomboBox,orJCheckBoxjust to satisfy its constructors.Implement a class that provides the
cellEditorinterface with a constructor that accepts aJButtonand add the logic required for a button editor to that class.Implement a new base class that provides the
CellEditorinterface but which accepts an arbitrary component passed to its constructor.
The first of these would be the cheapest and fastest in implementation terms. Its drawbacks are that it requires more resource (in the shape of an addition component that is never used) and that it is not a neat and tidy solution. The difference between the second and third options is largely one of code reuse. The second option is undoubtedly faster to implement, but it would be very difficult to reuse, for the same reasons as DefaultCellEditor is hard to use in this case. The approach adopted here is to take the third alternative and implement a new base class called BasicCellEditor that is more flexible than DefaultCellEditor.
The code for the new custom editor base class, which will be the basis for our button editor, is shown in Listing 7-5.
There is little to say about most of this code, because much of it will be overridden by derived classes. There are two constructors, one of which accepts any Component as its argument and a default constructor that doesn't require you to supply a Component. If a Component is supplied, its reference is simply stored as a convenience for derived classes. In most cases, a derived class will create a suitable Component and pass it to the constructor. However, if this is not possible because, for example, the Component's attributes need to be explicitly set, the default constructor can be used and the setcomponent method used to register the editing component later.
Example 7-5. A Cell Editor Base Class
package AdvancedSwing.Chapter7;

import javax.swing.*;
import javax.swing.table.*;
import javax,swing.event.*;
import java.awt.*;
import java.beans.*;
import java.util.*;

public class BasicCellEditor implements CellEditor,
            PropertyChangeListener {
   public BasicCellEditor() {
      this.editor = null;
   }

   public BasicCellEditor(Component editor) {
      this.editor = editor;
      editor.addPropertyChangeListener(this);
   }

   public Object getCellEditorValue() {
      return null;
   }

   public boolean isCellEditable(EventObject evt) {
      editingEvent = evt;
      return true;
   }

   public boolean shouldSelectCell(EventObject evt) {
      return true;
   }

   public boolean stopCellEditing() {
      fireEditingStopped();
      return true;
   }

   public void cancelCellEditing() {
      fireEditingCanceled();
   }

   public void addCellEditorListener(CellEditorListener 1) {
      listeners.add(CellEditorListener.class, 1);
   }
   public void removeCellEditorListener(CellEditorListener 1) {
      listeners.remove(CellEditorListener.class, 1);
   }

   // Returns the editing component
   public Component getComponent() {
      return editor;
   }

   // Sets the editing component
   public void setComponent(Component comp) {
      editor = comp;
   }

   // Returns the event that triggered the edit
   public EventObject getEditingEvent() {
      return editingEvent;
   }

   // Method invoked when the editor is installed in the table.
   // Overridden in derived classes to take any convenient
   // action.
   public void editingStarted(EventObject event) {
   }

   protected void fireEditingStopped() {
      Object[] 1 = listeners .getListenerList ();
      for (int i = 1.length -2; i >= 0; i -= 2) {
         if (l[i] == CellEditorListener.class) {
            if (changeEvent == null) {
               changeEvent = new ChangeEvent(this);
            }
            ((CellEditorListener)l [i+1]).
                    editingStopped(changeEvent);
         }
      }
   }

   protected void fireEditingCanceled() {
       Object[] 1 = listeners.getListenerList();
       for (int i = 1.length - 2; i >= 0; i -= 2) {
          if (l[i] == CellEditorListener.class) {
             if (changeEvent == null) {
                changeEvent = new ChangeEvent(this);
            }
            ((CellEditorListener)1[i+1]).
                    editingCanceled(changeEvent);
         }
      }
   }

   // Implementation of the PropertyChangeListener interface
   public void propertyChange(PropertyChangeEvent evt) {
      if (evt.getPropertyName().equals("ancestor") &&
            evt.getNewValue() != null) {
         // Added to table - notify the editor
         editingStarted(editingEvent);
      }
   }

   protected static JCheckBox checkBox = new JCheckBox();
   protected static ChangeEvent changeEvent;
   protected Component editor;
   protected EventListenerList listeners =
                                      new EventListenerList();
   protected EventObject editingEvent;
}
The other CellEditor methods of interest are addCellEditorListener, removeCellEditorListener, fireEditingStopped, and fireEditingCanceled, all of which provide the event handling for the editor; the code used in these methods is taken almost directly from DefaultCellEditor. All CellEditorListeners for an instance of an editor are registered with an instance of the EventListenerList class, which is part of the javax.swing.event package. When registering a listener, you supply the listener's reference (that is, the CellEditorListener reference in this case) and the class that represents the listener, which, in this case, will always be CellEditorListener.class. The same arguments are used to remove a listener. This calling interface makes the implementation of the addCellEditorListener and removeCellEditorListener methods trivial.
Internally, the EventListenerList maintains its state as an array of Objects that are manipulated in pairs. The first item in each pair is the type of listener (for example, CellEditorListener. class) and the second is the listener's reference (that is, the reference passed to addCellEditorListener). Storing the type and reference together allows objects that support multiple event types to use a single EventListenerList to hold all listener details in one place.
Although EventListenerList provides the means for storing listeners, it doesn't have any code that can be used to deliver the events. This code is provided here in the editors fireEditingStopped and fireEditingCanceled methods, which process the array returned by the EventListenerList getListenerList method. Because this list could (theoretically) contain multiple listener types, the first item of each pair is checked to see whether it represents a CellEditorListener and, if so, the second item is used as the listener reference (after appropriate casting). Notice that only a single changeEvent is created, no matter how many listeners there are and how many events actually occur. This is possible because a ChangeEvent only holds the event source, which is constant for a given CellEditor.
The implementations of fireEditingStopped and fireEditingCanceled process the listener list from the end to the front, because DefaultCellEditor does it that way. This is done for compatibility. It does, however, cause a problem for our button editor, as you'll see shortly. Changing the listener invocation order would make it difficult to migrate to an improved version of DefaultCellEditor if one is ever produced, so we choose to live with some slightly odd behavior to avoid potential problems in the future.
In addition to implementing the methods required by the CellEditor interface, this class also supplies a little extra functionality that we'll use to implement our button editor. Although the table calls the editor's isCellEditable method to determine whether an edit should start and its getTableCellEditorComponent method to obtain the editing component, the editor is not actually notified that the editing process has started. In Swing 1.0, the editor could rely on the table to call its shouldSelectCell method after the editor had been assigned to the table, which constituted notification that an edit was in progress. However, later versions changed this, so that now shouldSelectCell is only called if the editing process is started in response to a mouse click; if the user begins editing using the keyboard or if the application calls editCellAt, then shouldSelectCell will not be called. It is often useful to be able to arrange for some work to be done once it is known that editing is in progress, so to make this possible the BasicCellEditor class includes the following method:
public void editingStarted (EventObject evt);
This method is invoked after the editing component has been added to the table. It is called no matter how the editing process was started. If you need to know what caused the edit to be initiated, you need to override the editingStarted method in your custom edit and use the evt argument, which is a copy of the originating event, or null if the edit was caused by the application invoking the two-argument form of editCellAt. We'll see shortly how to make use of this method. As an alternative, BasicCellEditor also provides the method
public EventObject getEditingEvent ()
which returns the same event. This method can be used at any time during the editing process.
The implementation of this feature is simple. To invoke the editingStarted method, the editor needs to know that the editing component has been added to the table. To do this, it listens to PropertyChangeEvents generated by the editing component. When a JComponent is added to a container, it sends a PropertyChangeEvent for a property called ancestor in which the new value is a reference to its new parent. BasicCellEditor registers itself as a PropertyChangeListener of the editing component and monitors these events, calling editingstarted when the ancestor property changes to a non-null value. Because the editingstarted method needs the event that started the edit, a reference to it is saved by BasicCellEditor's isCellEditable method for use in the PropertyChangeListener propertyChange method. As a result, if you subclass BasicCellEditor and override its isCellEditable method, you must remember to invoke super.isCellEditable so that the edit event will be saved.
Having implemented a base class, the next task is to subclass it to create the button editor. The real problem to solve here is how to actually make the button work. To see what needs to be done, let's recap on what the table will do for us.
First, when the user clicks the button image, the JTable editCellAt method will be called. Because the button column in the UpdatableCurrencyTableModel is editable, it will allow editing to commence and the getTableCellEditorComponent method of the button editor will be called. This method will return a suitably configured JButton, which will subsequently be added to the table. If nothing else were done, the button would appear in the table and, if the user started the "edit" using a mouse, the mouse event would be passed to the button, causing it to click— its appearance will change as the user expects and an ActionEvent will be generated. Unfortunately, this would not happen if the user attempts to activate the button using the keyboard by pressing the space key, for example, which is the usual shortcut for activating a focused button.
Having arranged for the button to click, at least when using the mouse, we now need to stop the editing phase immediately because there is nothing more for the user to do with the button— it should be removed and the usual renderer restored. Also, the action implied by the button press, which is actually implemented by the table model, needs to be performed. To stop the edit, the editors stopCellEditing method needs to be called. This can be done by arranging for the button editor to be an ActionListener of the button and invoking stopCellEditing from its actionPerformed method, which will be called when the button is clicked.
The stopCellEditing method of BasicCellEditor calls fireEditingStopped, which in turn invokes the editingStopped method of all registered CellEditorListeners. In this case, only the JTable is registered. As you saw in "Stopping the Edit" earlier in this chapter, when the edit terminates it removes the editing component from the table and stores the value from the component in the table's data model. What does this mean for the button editor? There really is no "value" to store, but the editors getEditorValue method will still be called to get whatever the value might be. Fortunately, when the editor component is obtained using getTableCellEditorComponent, it is given an initial value from the table model. As you know, this will usually be the button's label. Whatever it might be, the button editor just returns it when getEditorValue is called. The JTable then calls the setvalueAt method of the table model with this value, which results in no change.
The table model that we'll use in our example will be derived from UpdatableCurrencyTableModel. You know that the setValueAt method of this class calls the abstract updateTable method, which will be implemented in the model subclass. This is how the row content would be written back to the database, or whatever persistent storage it was loaded from.
You can see the implementation of the button editor in Listing 7-6
Example 7-6. A Button Cell Editor
package AdvancedSwing.Chapter7;

import javax.swing.*;
import javax.swing.table.*;
import java.awt.*;
import java.awt.event.*;
import java.util.*;
import AdvancedSwing.Chapter6.DataWithIcon;
public class ButtonEditor extends BasicCellEditor
                  implements ActionListener,
                  TableCellEditor {
   public ButtonEditor(JButton button) {
      super(button);
      button.addActionListener(this);
   }

   public void setForeground(Color foreground) {
      this.foreground = foreground;
      editor.setForeground(foreground);
   }

   public void setBackground(Color background) {
      this.background = background;
      editor.setBackground(background);
   }

   public void setFont(Font font) {
      this.font = font;
      editor.setFont(font);
   }

   public Object getCellEditorValue() {
      return value;
   }

   public void editingStarted(EventObject event) {
      // Edit starting - click the button if necessary
      if (!(event instanceof MouseEvent)) {
         // Keyboard event - click the button
         SwingUtilities.invokeLater(new Runnable() {
            public void run() {
               ((JButton)editor).doClick();
            }
         });
      }
   }

   public Component getTableCellEditorComponent(
            JTable tbl,
            Object value, boolean isSelected,
            int row, int column) {
      editor.setForeground(foreground != null ? foreground :
                                      tbl.getForeground());
      editor.setBackground(background != null ? background :
                                      tbl.getBackground());
      editor.setFont(font != null ? font : tbl.getFont());

      this.value = value;
      setValue(value);
      return editor;
   }

   protected void setValue(Object value) {
      JButton button = (JButton)editor;
      if (value == null) {
         button.setText("");
         button.setIcon(null);
      } else if (value instanceof Icon) {
         button.setText("");
         button.setIcon((Icon)value);
      } else if (value instanceof DataWithIcon) {
         DataWithIcon d = (DataWithIcon)value;
         button.setText(d.toString());
         button.setIcon(d.getIcon());
      } else {
         button.setText(value.toString() ) ;
         button.setIcon(null);
      }
   }

   public void actionPerformed(ActionEvent evt) {
      // Button pressed - stop the edit
      stopCellEditing();
   }

   protected Object value;
   protected Color foreground;
   protected Color background;
   protected Font font;
}
Creating a table that uses this editor is a simple matter of installing the editor in the column occupied by the buttons and creating a subclass of UpdatableCurrencyTableModel with a suitable implementation of the updateTable method. The code for the application is shown in Listing 7-7 and for the table model in Listing 7-8.
Example 7-7. An Updatable Currency Table
package AdvancedSwing.Chapter7;

import javax.swing.*;
import javax.swing.table.*;
import javax.swing.event.*;
import java.awt.*;
import java.awt.event.*;
import AdvancedSwing.Chapter6.*;

public class UpdatableHighlightCurrencyTable {
   public static void main(String[] args) {
      JFrame f = new JFrame("Updatable Highlighted Currency
                                                      Table");

      JTable tbl = new JTable (
                      new TestUpdatableCurrencyTableModel());
      tbl.setDefaultRenderer(java.lang.Number.class,
            new FractionCellRenderer(10, 3,
            SwingConstants.RIGHT));

      TableColumnModel tcm=tbl.getColumnModel();
      tcm.getColumn(0).setPreferredWidth(150);
      tcm.getColumn(0).setMinWidth(150);
      TextWithIconCellRenderer renderer =
                               new TextWithIconCellRenderer();
      tcm.getColumn(0).setCellRenderer(renderer) ;
      tbl.setShowHorizontalLines(false);
      tbl.setIntercellSpacing(new Dimension(1, 0));

      // Add the stripe renderer in the leftmost four columns.
      StripedTableCellRenderer.installInColumn(tbl, 0,
                  Color.lightGray, Color.white,
                  null, null);
      StripedTableCellRenderer.installInColumn(tbl, 1,
                  Color.lightGray, Color.white,
                  null, null);
      StripedTableCellRenderer.installInColumn(tbl, 2,
                  Color.lightGray, Color.white,
                  null, null);
      StripedTableCellRenderer.installInColumn(tbl, 3,
                  Color.lightGray, Color.white,
                  null, null);
      // Add the highlight renderer to the difference column.
      // The following comparator makes it highlight
      // cells with negative numeric values.
      Comparator cmp = new Comparator() {
         public boolean shouldHighlight(JTable tbl, Object
                                 value, int row, int column) {
            if (value instanceof Number) {
               double columnValue =
                            ((Number)value).doubleValue();
               return columnValue < (double)0.0;
            }
            return false;
         }
      };
      tcm.getColumn(3).setCellRenderer(
                            new HighlightRenderer(cmp,
                            null, Color.pink,
                            Color.black, Color.pink.darker(),
                            Color.white));

      // Install a button renderer in the last column
      ButtonRenderer buttonRenderer = new ButtonRenderer();
      buttonRenderer.setForeground(Color.blue);
      buttonRenderer.setBackground(Color.lightGray);
      tcm.getColumn(4).setCellRenderer(buttonRenderer);

      // Install a button editor in the last column
      TableCellEditor editor = new ButtonEditor(new JButton());
      tcm.getColumn(4).setCellEditor(editor);

      // Make the rows wide enough to take the buttons
      tbl.setRowHeight(20);

      tbl.setAutoResizeMode(JTable.AUTO_RESIZE_OFF);
      tbl.setPreferredScrollableViewportSize(
             tbl.getPreferredSize());

      JScrollPane sp = new JScrollPane(tbl);
      f.getContentPane().add(sp, "Center");
      f.pack();
      f.addWindowListener(new WindowAdapter() {
         public void windowClosing(WindowEvent evt) {
            System.exit(0);
         }
      });
      f.setVisible(true);
   }
}
Example 7-8. An Updatable Currency Table Model
package AdvancedSwing.Chapter7;

import AdvancedSwing.Chapter7.UpdatableCurrencyTableModel;

public class TestUpdatableCurrencyTableModel
               extends UpdatableCurrencyTableModel {
   public void updateTable(Object value, int row, int column) {
      System.out.println("Update for row " + row + "
                                                   required.");
      System.out.println("Values are " +
              getValueAt(row, 1} +
              ", " + getValueAt(row, 2) +
              "; diff is " + getValueAt(row, 3));
   }
}
For this simple application, the updateTable method simply records that it has been called and shows the value, row, and column numbers passed from the table. Typically, in a real application, the row number might be used to extract all the data for that row and write it back to a database using Java Database Connectivity (JDBC).
That almost completes the implementation of the button editor and its sample application, but there is one small catch. As we said earlier, when the button editor is activated, the button will be automatically clicked by the mouse event that caused the table to start the edit. However, what happens if the user navigates to the button using the keyboard and presses a key? Here, the editor will be installed correctly, but the key press will not be passed to it, as you saw in "Editing the Cell Data". As a result, the button won't click if you try to activate it with a key press and the edit will not end until you move the focus to another cell and activate that instead. Fortunately, there is a simple way to solve this problem. It is possible to programmatically click a button by calling its doClick method, which causes the button's appearance to change as the user would expect and generates the ActionEvent. When can the doClick method be called? It must be called some time after the button has been added to the table. Fortunately, the button editor is subclassed from our BasicCellEditor class, which calls its editingStarted method when the editing component has been added to the JTable. As you can see from Listing 7-6, the button cell editor overrides this method to get control at this point and calls the button's doClick method to simulate pressing the button. Note, however, the following two points:
The call is not unconditional— it happens only if the event passed to it is not a
MouseEvent.The call is not made inline— it is deferred using the
SwingUtilities invokeLatermethod.
The reason for the event check is simple— there is no need to programmatically click the button if the edit was started by a mouse click because the MouseEvent will be passed directly to the button by the JTable and cause the button to clock of its own accord. This check ensures that button will be clicked if the edit is started from the keyboard or (for some reason) as a result of an application calling editCellAt directly on a cell in the button column.
The reason for deferring doClick is slightly more subtle. If doClick were called inline, it would immediately call the actionPerformed method of the editor, which, in turn, would call the editingStopped method of BasicCellEditor. This would result in the table trying to remove the button from the table and clean up the entire edit, while it was still setting that edit up in editCellAt! Not surprisingly, this just doesn't work. Deferring the button click allows the edit setup to complete before starting the cleanup process. This is a technique that is generally useful and you'll see another example of it in the next section.
Now that the currency table has the ability to be edited and updated, there is one more usability feature you might want to add to it. Suppose you wanted the user to be able to quickly update several of the exchange rates in the body of the table. As the table currently stands, the user would have to click with the mouse in each cell to be changed, type the new value, and then click in the next cell and so on. Alternatively, the user could use the arrow keys to move between the cells whose values need to be changed. While this would work, it would be more convenient if it were possible to use the tab key to jump around between the editable cells, skipping over those which are not editable. This would be faster than using the mouse and much better than using the cursor keys because it avoids the need to manually move the focus over cells that cannot be edited. The table does not directly support the use of the tab key in this way, but with a little work this feature can be implemented.
Let's first look at how you might want this to work. In terms of the currency table, the old and new exchange rate values are both directly editable. Typically, you might want the user to update the old rate and then the new rate for one currency, followed by the old rate for the next and so on. The user would start by editing the previous exchange rate. Pressing the tab key should then cause that edit to be complete, and the new value written to the table model, and then the cell holding the new currency value should automatically get the focus and install its editor. The next tab key press should take the focus to the old exchange rate for the next currency, and so on.
This description highlights the fact that there are two separate (but related) parts to this problem:
Determining which cells should be involved in the
taborder for automatic editing.Arranging for the
tabkey to be detected and cause the termination of the current edit, followed by starting the next one.
Let's tackle these issues separately. Assume first that the mechanism to change the editing cell has been implemented and the tab key is detected. Where should the edit focus be moved? In the currency table data model used in the last example, there are three editable columns in each data row:
The old exchange rate column.
The new exchange rate column.
The column containing the update button.
The simplest approach would be to define the tabbing order to be left to right across each row, moving between cells for which the data model isCellEditable method returns true. This would be simple to implement— given the row and column number of the cell being edited, the next one would be found by repeatedly incrementing the column number and calling the JTable isCellEditable with the same row and the new column number until an editable cell was found.
Core Note
As ever, when dealing with table column indices, you need to be careful because the user can reorder the table columns, or because there may be columns in the TableModel that are not displayed. In general, the column indices used by view-related operations are not the same as those in the model. In this case, to determine whether the cell to be edited is editable, we need to use the column number, which is view-based and call the TableModel isCellEditable method, which uses model-based column indices. Fortunately, JTable has its own isCellEditable method that maps between the two sets of column indices. Alternatively, you can use the JTable convertColumnlndexToModel and convertColumnIndexToView methods to perform these mappings. You'll see how these methods are used when we look at the implementation of this example.
If the end of the row is reached, the algorithm would continue by incrementing the row number and resetting the column number to 0. This simple approach would suffice for many tables, but it is not always good enough.
In many cases, you would want to be able to limit the editable cells reachable using the tab key as an accelerator. In the case of the table in the last example, the tab order generated by this simple algorithm would be from the old exchange rate to the new one and then to the update button. The problem with this is that you want the tab key to move the focus to each cell and start its editor. As you know, starting the editor in the table's update button column actually causes the content of that row to be updated in the database (if there is one) without further intervention from the user. This might not always be appropriate. To give yourself the chance to avoid this side effect, you need some way to specify which of the editable columns should be included in the automatic tabbing mechanism.
Now let's move on to the second issue— how to detect the tab key during an edit and arrange for it to move to the next editable cell. For the table to be in edit mode, the user must first start an edit by double-clicking or directly typing a new value in an editable cell. Once the table is in this state, you need to be able to catch the TAB key and react to it in the proper way. This implies that you need to get key events from the editing component. However, as you already know, by default the input focus during editing is directed to the table not to the editing component, so the TAB key would actually be handled by the JTable, not by the editor. To be notified of a TAB key event, then, it is necessary to register a KeyListener on the JTable. Even this is not sufficient, however, because it is possible for custom editors to grab the focus for themselves, so it is necessary to register a KeyListener on the editor component as well. The intent of this design is that the KeyListener would grab TAB keys and do whatever is necessary to stop the current edit and start editing in the next editable column. There is, however, one more step that needs to be taken.
TAB key presses are special because they are used to move the keyboard focus between components. In fact, Swing components filter out TAB key presses at a very low level and pass them to the Swing focus manager, where they are consumed. Because of this, our KeyListener would never actually be notified of TAB keys. Also, pressing TAB would actually move focus away from the table, which is not the desired effect. To avoid both problems, it is necessary to disable the Swing focus manager when editing a cell in a table that supports movement between cells using the TAB key. You'll see exactly how this is done shortly.
Now it's time to look at the actual implementation. As noted earlier, you need to be able to configure which columns of the table will be editable and react to the TAB key. Because this information needs to be stored in the table object, the simplest way to do this is to subclass JTable and provide a method that allows the programmer to specify the list of tabbable columns. The implementation shown in Listing 7-9 creates a subclass of JTable called TabEditTable that contains all the logic for handling TAB traversal between editable cells.
Example 7-9. A Table with TAB Edit Traversal
package AdvancedSwing.Chapter7;

import javax.swing.*;
import javax.swing.FocusManager;
import javax.swing.table.*;
import javax.swing.event.*;
import java.awt.*;
import java.awt.event.*;
import java.util.*;
import AdvancedSwing.Chapter6.TableUtilities;
public class TabEditTable extends JTable {
   public TabEditTable() {
      super();
   }

   public TabEditTable(TableModel dm) {
      super(dm);
   }

   public TabEditTable(TableModel dm,
                       TableColumnModel cm) {
      super(dm, cm);
   }

   public TabEditTable(TableModel dm,
                       TableColumnModel cm,
                       ListSelectionModel sm){
      super(dm, cm, sm);
   }

   public TabEditTable(int numRows, int numColumns) {
      super(numRows, numColumns);
   }

   public TabEditTable(final Vector rowData, final Vector
                                                 columnNames) {
      super(rowData, columnNames);
   }

    public TabEditTable(final Object[][] rowData, final
                                        Object[] columnNames) {
      super(rowData, columnNames);
   }

   // Set the columns that contain tabbable editors
   public void setEditingColumns(int[] columns) {
      editingColumns = columns;
      convertEditableColumnsToView();
   }

   public int[] getEditingColumns() {
      return editingColumns;
   }
   // Overrides of JTable methods
   public boolean editCellAt(int row, int column,
                                        EventObject evt) {
      if (super.editCellAt(row, column, evt) == false) {
         return false;
      }

      if (viewEditingColumns != null) {
         // Note: column is specified in terms
         // of the column model
         int length = viewEditingColumns.length;
         for (int i = 0; i < length; i++) {
            if (column == viewEditingColumns[i]) {
               Component comp = getEditorComponent();
               comp.addKeyListener(tabKeyListener);
               this.addKeyListener(tabKeyListener);
               focusManager =FocusManager.getCurrentManager();
               FocusManager.disableSwingFocusManager();
               inTabbingEditor = true;
               comp.requestFocus();
               break;
            }
         }
      }
      return true;
   }

   public void editingStopped(ChangeEvent evt) {
      if (inTabbingEditor == true) {
         Component comp = getEditorComponent();
         comp.removeKeyListener(tabKeyListener);
         this.removeKeyListener(tabKeyListener);
         FocusManager.setCurrentManager(focusManager);

         inTabbingEditor = false;
      }

      super.editingStopped(evt);
   }

   protected void convertEditableColumnsToView() {
      // Convert the editable columns to view column numbers
      if (editingColumns == null) {
         viewEditingColumns = null;
         return;
      }

      // Create a set of editable columns in terms of view
      // column numbers in ascending order. Note that not all
      // editable columns in the data model need be visible.
      int length = editingColumns.length;
      viewEditingColumns = new int[length];
      int nextSlot = 0;

      for (int i = 0; i < length; i++)
         { int viewIndex =
                  convertColumnIndexToView(editingColumns[i]);
         if (viewIndex != -1) {
            viewEditingColumns[nextSlot++] = viewIndex;
         }
      }

      // Now create an array of the right length
      // to hold the view indices
      if (nextSlot < length) {
         int[] tempArray = new int[nextSlot];
         System.arraycopy(viewEditingColumns, 0,
                          tempArray, 0, nextSlot);
         viewEditingColumns = tempArray;
      }

      // Finally, sort the view columns into order
      TableUtilities.sort(viewEditingColumns);
   }

   protected void moveToNextEditor(int row, int column,
                                             boolean forward) {
      // Column is specified in terms of the column model
      if (viewEditingColumns != null) {
         int length = viewEditingColumns.length;

         // Move left-to-right or right-to-left
         // across the table
         for (int i = 0; i < length; i++) {
            if (viewEditingColumns[i] == column) {
               // Select the next column to edit
               if (forward == true) {
                  if (++i == length) {
                     // Reached end of row - wrap
                     i = 0;
                     row++;
                     if (row == getRowCount()) {
                        // End of table - wrap
                        row = 0;
                     }
                  }
               } else {
                  if (--i < 0) {
                     i = length - 1;
                     row--;
                     if (row < 0) {
                        row = getRowCount() - 1;
                     }
                  }
               }
               final int newRow = row;
               final int newColumn = viewEditingColumns[i];

               // Start editing at new location
               SwingUtilities.invokeLater(new Runnable() {
                  public void run() {
                     editCellAt(newRow, newColumn);
                     ListSelectionModel rowSel =
                          getSelectionModel();
                     ListSelectionModel columnSel =
                          getColumnModel().getSelectionModel();
                     rowSel.setSelectionlnterval(
                          newRow, newRow);
                     columnSel.setSelectionInterval(
                          newColumn, newColumn);
                  }
               });
               break;
            }
         }
      }
   }

   // Catch changes to the table column model
   public void columnAdded(TableColumnModelEvent e) {
      super.columnAdded(e);
      convertEditableColumnsToView();
   }
   public void columnRemoved(TableColumnModelEvent e) {
      super.columnRemoved(e);
      convertEditableColumnsToView();
   }

   public void columnMoved(TableColumnModelEvent e) {
      super.columnMoved(e);
      convertEditableColumnsToView();
   }

   public class TabKeyListener extends KeyAdapter {
      public void keyPressed(KeyEvent evt) {
         if (evt.getKeyCode() == KeyEvent.VK_TAB) {
            if (inTabbingEditor == true) {
               TableCellEditor editor = getCellEditor();
               int editRow = getEditingRow();
               int editColumn = getEditingColumn();
               if (editor != null) {
                  boolean stopped = editor.stopCellEditing();
                  if (stopped == true) {
                     boolean forward = (evt.isShiftDown() ==
                                                        false);
                     moveToNextEditor(editRow, editColumn,
                                                      forward);
                  }
               }
            }
         }
      }
   }

   protected boolean inTabbingEditor;
   protected FocusManager focusManager;
   protected int [] editingColumns;        // Model columns
   protected int [] viewEditingColumns;    // View columns
   protected TabKeyListener tabKeyListener =
                                          new TabKeyListener();
}
Although there seems to be quite a lot of code, it is easy to see how this table works by breaking the implementation into pieces that mirror the design aspects that were covered earlier. Notice that this class has a set of constructors that mirros those of JTable, so that the programmer can create a TabEditTable in exactly the same way as creating an ordinary table. Having created the table, the only extra step needed is to specify which table columns participate in the tab traversal mechanism by calling the setEditingColumns method. The other public methods of this class are actually part of the logic that controls the tab traversal; they don't need to be directly called by the programmer. In most cases, then, the programmer can convert a table without tab support by simply replacing the construction of JTable by construction of a TabEditTable and then invoking setEditingColumns.
The setEditingColumns method is supplied with an array of integers that specifies the column numbers of the columns that participate in tab traversal editing. Relating this to the currency table in which the two exchange rate columns should support tab traversal, you might invoke this method as follows:
int[] tabColumns = { 1, 2 };
tbl.setEditingColumns (tabColumns);
However, this code hides a subtlety that we've mentioned already in this chapter in different contexts. Are the column numbers specified in terms of the column order in the data model or as indices in the tables TableColumnModel? Initially, columns 1 and 2 in the data model might actually be displayed in columns 1 and 2 of the table, but this needn't always be the case and, even if it is, the user could reorder the table columns at any time. From the programmers point of view, the most sensible option is to specify the column indices in terms of the columns in the data model, because these indices are invariant— the exchange rates are always in columns 1 and 2 of the data model. This is, in fact, how the setEditingColumns model method in Listing 7-9 is implemented. As you can see, it stores the column list in an instance variable called editingColumns, which can be retrieved at any time using the getEditingColumns method.
The problem with saving data column model indices is that the table methods that deal with editing and use a column number (such as editCellAt) all work in terms of the TableColumnModel indices. As you'll see, this means that when the tab key is being used to move the edit focus around the table you'll have the TableColumnModel index to work from, not the data model index. For this reason, it is necessary to map from data model indices to TableColumnModel indices, which can be done using the JTable convertColumnIndexToView method.
The most natural way for the tabbing operation to work is for the tab key to move the editing focus across each row from left to right and to wrap back to the leftmost participating column at the end of the row. If tab is used with shift, this order would be reversed. When the decision is being made as to which cell to edit next, it would be useful to have an array of column indices in TableColumnModel order. Then, to move the edit focus to the right, you would just move to the next element in the array from the one currently in use and to move to the left you move back by one entry. Thus, when setEditingColumns is called, the array of column numbers is converted to an array of TableColumnModel indices and stored in the instance variable viewEditingColumns for use when the TAB key is being processed. The conversion is performed by using the convertEditableColumnsToView method.
The convertEditableColumnsToView method is fairly simple. It first creates a new array of the same size as the one passed to setEditingColumns and walks down the array of data model indices converting each to the corresponding TableColumnModel index and storing it in the next slot in the new array. Because not all the data model columns need be included in the table column model for a particular table, it is possible that one or more of the columns designated as participating in tabbing might not have a corresponding TableColumnModel index. In this case, convertColumnIndexToView returns -1 and that column is ignored. As a result, the final array may be shorter than the one initially passed to setEditingColumns and, if it is, it is truncated by copying it to a new array of the appropriate size. Finally, the new array is sorted into ascending order, so that the leftmost participating column comes first, followed by the next one to its right and so on. This makes it possible to see the tabbing order in terms of the indices of the table columns as they are displayed by reading the array from the start to the end.
Core Note
The sort method used by convertEditableColumnsToView is a simple-minded sort whose implementation is not interesting and which is not shown here. If you are using Java 2, you could instead use the sort method of the java.lang.Arrays class, which would almost certainly be more efficient.
When setEditingColumns returns, then, the viewEditingColumns variable contains the tabbing columns in sorted order. However, this is not quite the end of the story. Suppose the user reorders the table columns. If this happens, the mapping created by setEditingColumns might become incorrect.
For example, in the initial configuration of the currency table, the data model column indices map directly to the TableColumnModel indices, so the viewEditingColumns array would initially contain the values {1, 2}. Now, if the leftmost exchange rate column were dragged to the left of the table, its TableColumnModel index would become 0 instead of 1 and it would be necessary to change viewEditingColumns to {0, 2} instead. Furthermore, if the rightmost exchange rate column were now dragged to the left to occupy position 0, the correct value of viewEditingColumns would now be {0, 1} and the tab order between the two exchange rate columns would be reversed in terms of their column headings, but would still be left to right across the table. To recompute the array values it is necessary to gain control whenever the order of columns in the TableColumnModel changes.
To be notified of changes to the TableColumnModel, it is necessary to implement a TableColumnModelListener. Fortunately, JTable already implements this interface and registers itself as a TableColumnModelListenerof its own TableColumnModel. To receive notification of column order changes, TabEditTable simply overrides the following TableColumnModelListener methods of JTable:
columnAddedcolumnRemovedcolumnMoved
Each of these methods simply calls the JTable implementation and then invokes convertEditableColumnsToView to convert the data column model indices (stored in editingColumns) to the TableColumnModel indices that are correct for the new column order.
It remains to actually implement the code that will capture the tab key and move the edit focus elsewhere. As noted above, it is necessary to gain control when editing is started and add a listener to receive the tab key. Because editing is always begun by calling the JTable editCellAt method, the natural thing to do is to override this method in TabEditTable. If you look at the implementation of editCellAt in Listing 7-9, you'll see that it first checks whether the edit is actually going to start. If so, it then verifies that the cell about to be edited is in the list of columns for which tabbing should be active. Note that, because editCellAt receives a column number expressed in terms of the TableColumnModel ordering, this check is made by looking at the viewEditingColumns array, not the original array of data model indices supplied to setEditingColumns. If the cell is in this list, the following steps are taken:
The editor component installed by the superclass
editCellAtmethod is obtained usinggetEditorComponent.A
KeyListeneris added to this component and to the table.The Swing focus manager is disabled so that
tabkeys are not lost.A flag is set indicating that the current editor should have special actions when the
tabkey is detected.The input focus is passed to the editing component.
The last step attempts to ensure that keys are passed directly to the editing component, but it is not sufficient because the table sometimes grabs the focus back. Hence, it is still necessary to install a KeyListener on the table as well.
As each key is passed to the editor component, the KeyListener implemented by the inner class TabKeyListener is notified. The keyPressed method of this class checks whether the key is a tab key and if it is, the current edit is stopped by invoking the editor's stopCellEditing method. If this works, the editor has been removed and the edit focus is moved to the next eligible cell by calling the TabEditTable moveToNextEditor method.
The moveToNextEditor method is given the row and column number of the cell last edited and a flag indicating whether it should move forward or backward in the tabbing order; this flag is set to indicate backward movement if the shift key was pressed together with tab. This method can be overridden to provide any kind of tabbing behavior that you want. The default implementation provides the natural left-to-right or right-to-left tabbing order described earlier in this section. It does this by using the editing column number, which is a TableColumnModel index, to locate its current place in the viewEditingColumns array. If it is moving forward, it selects the column in the next entry of the array; otherwise, it selects the previous entry. If this would involve moving off the end of the array in either direction, the row number is incremented or decremented as necessary and the next column is taken as the one in the first or last entry of the viewEditingColumns array. Either way, the last step is to call editCellAt to start an edit in the new cell. However, this is not done directly— instead, the operation is deferred using the Swingutilities invokeLater method, which allows key processing to complete before the new edit starts. Notice also that the new cell being edited is made the currently selected cell by manipulating the table's row and column selection models.
You can see how this works in practice using the following command:
java AdvancedSwing.Chapter7.TabbableCurrencyTable
First, start an edit by double-clicking somewhere in the column headed Yesterday, make a change, and then press tab. When you do this, you'll find that the new value is written to the table and the cell in the Today column to its right starts editing. As you continue to press tab, you'll find that you can access all the exchange rate values in turn, but not any of the other cells. Also, you'll find that you can use shift and tab to traverse the table in the other direction and that the operation wraps when you reach the top or bottom of the table.
To verify that this mechanism is resilient to column order changes, try dragging the currency rate columns to various locations within the table and then start an edit and press the tab key. You'll find that tabbing still works, that it still allows you to access only the exchange rate columns, and that tab continues to move you from left to right and top to bottom, even if you swap the order of the two editable columns.
In this chapter we examined closely the JTable cell editing mechanism. As with rendering, there is default editing support built into JTable that is adequate for the most common types of data that you might include in a table. However, as we showed, if you know how the table controls the editing process, you can extend its capabilities.
After looking at the basic editing support and using it to create an editable version of the currency table that we first saw in the last chapter, we went on to examine how the editing process starts, what editing involves, and how a cell editing session is ended. Armed with this knowledge, we saw how to give the illusion that a table contains an active component such as a combo box or a button, even though the component is not actually there until an editing session starts. Finally, you saw how to take control during and at the ends of an editing session to allow the user to edit a cell and then move to the next editable cell by pressing the tab key, and have the table automatically complete the editing process for the first cell before initiating an edit on the target cell. This example is typical what you can achieve once you understand the internals of the tables editing support.