We have a pretty good understanding of our initial test, but there's so much more we can learn by writing new tests! We'll start off by testing the absolute simplest component that we've written so far: our Todo component! You'll notice a pattern with how we have to name our tests to have Jest pick them up appropriately: we'll create a test for our Todo component (in src/Todo.js) as src/Todo.test.js! We'll almost always want to start off our tests by mimicking the structure in App.test.js, so we'll start off by doing almost the same things:
import React from "react";
import ReactDOM from "react-dom";
import Todo from "./Todo";

it("renders without crashing", () => {
 const div = document.createElement("div");
 ReactDOM.render(<Todo />, div);
 ReactDOM.unmountComponentAtNode(div);
});
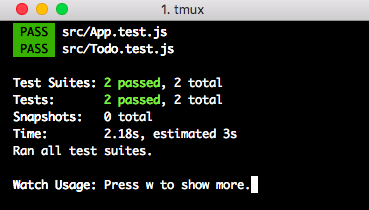
After rerunning our Test Suite (you may have to exit out of the test watcher with Q and rerun yarn test), you should get the following output:

So it ran our src/Todo.test.js test that we just added, and it's a new test suite as well! Let's expand out our tests since right now they're not really doing anything. To do that, however, we'll need to add a few more libraries to our test suite! We'll want to add enzyme (for shallow rendering); enzyme is a React v16.x adapter, and React's test renderer to our application. We can do so with one quick yarn command:
$ yarn add --dev react-test-renderer enzyme enzyme enzyme-adapter-react-16
enzyme adds a lot to our test suite and makes it that much easier to work with, so it's honestly worth it to include enzyme as a baseline to our test suite! In fact, it's so helpful that it's included on some of the default React/Jest test documentation! Now, just including these by themselves won't do everything we need, so we'll also need to create a test setup file to initialize Enzyme. Create src/setupTests.js and give it the following body:
// setup file
import { configure } from 'enzyme';
import Adapter from 'enzyme-adapter-react-16';

configure({ adapter: new Adapter() });
Having done that, we can start tackling some real test code! We'll need to open up src/Todo.test.js, where we can add some code at the top which will give us the ability to take advantage of the enzyme shallow renderer! We'll also need react-test-renderer of the renderer() function, since we'll use that to create snapshots:
import React from "react";
import ReactDOM from "react-dom";
import { shallow } from "enzyme";
import renderer from "react-test-renderer";

import Todo from "./Todo";
Now we have everything we need to begin writing our tests. Before we start writing our tests, I generally begin by throwing all of our tests into a big describe function, so let's start off there by moving the test that we already wrote inside of our describe block:
describe(Todo, () => {
  it("renders without crashing", () => {
    const div = document.createElement("div");
    ReactDOM.render(<Todo />, div);
    ReactDOM.unmountComponentAtNode(div);
  });
});
Rerun the tests and we should be back to green and two suites and two tests:
Describe is a way of blocking together related tests, whether by functionality, concept, or otherwise. You have a few ways to declare a describe block. You can either use a string to specify the name of a test, or you can use a valid Class or Component name.
Now, if we want to start making our tests a little more complicated, we'll also need to do some basic setup stuff, since if you remember from our Todo component, we have a few functions that need to get passed down into our child component. Let's take a look at the default props of our Todo:
    this.state = {
      done: false
    };
And the function body of the removeTodo prop:
  removeTodo() {
    this.props.removeTodo(this.props.description);
  }
Description is easy; that's just a string that we need to pass in. removeTodo(...), on the other hand, is more complicated. It's a function that doesn't live as part of this component; instead, it lives inside of the parent and is passed in! So, how do we deal with that?
Simple, we can mock a function with Jest! Mocking a function basically makes a fake function that keeps track of when it's called. We'll also need to perform a shallow render of our component to verify how the component appears in the DOM overall. We'll talk a little more about this in a minute, but for right now add the following at the top of the describe block:
  const description = "New Todo";
  const mockRemoveTodo = jest.fn();
  const component = shallow(
    <Todo description={description} removeTodo={mockRemoveTodo} />
  );
As you can see from the previous example, jest.fn() allows us to create a mocked function. Mocking a function, as mentioned previously, doesn't do anything in particular. It pretends to be a function, sees who is trying to use that function, and also keeps track of things, such as fake arguments or sets up fake return values for the function. This is good if we want to verify that the removeTodo in our props actually does anything at all but we don't care that it performs a specific behavior.