
Chapter 5: Making Your App Ready for the Real World
In the last chapter, we covered writing your first mobile app using Uno Platform that was targeted toward employees of UnoBookRail. We will also write a mobile app in this chapter; however, we will focus on making it ready for customers. In this chapter, you will write an app that persists user preferences and larger sets of data on a device. In addition, you will also learn how to make your app more visually appealing to users with a custom app icon and how to write apps that can be used by people using assistive technology.
To do that, we'll cover the following topics in this chapter:
- Introducing the app
- Persisting data locally using the ApplicationData API and SQLite
- Making your app ready for customers
- Localizing your app
- Using a custom app icon and splash screen
- Making your app accessible for all users
By the end of this chapter, you'll have created a mobile app running on iOS and Android that is ready for customers and is also localized and accessible.
Technical requirements
This chapter assumes that you already have your development environment set up, including installing the project templates, as was covered in Chapter 1, Introducing Uno Platform. The source code for this chapter is at https://github.com/PacktPublishing/Creating-Cross-Platform-C-Sharp-Applications-with-Uno-Platform/tree/main/Chapter05.
The code in this chapter makes use of the library from https://github.com/PacktPublishing/Creating-Cross-Platform-C-Sharp-Applications-with-Uno-Platform/tree/main/SharedLibrary.
Check out the following video to see the code in action: https://bit.ly/3AywuqQ
Introducing the app
In this chapter, we will build the UnoBookRail DigitalTicket app, an app targeting UnoBookRail's customers that want to get from A to B using UnoBookRail. While the real version of this app would have a lot of features, in this chapter, we will only develop the following features:
- Booking tickets for journeys between two stations of the UnoBookRail network
- Viewing all booked tickets as well as QR codes for the ticket
- Localization of the app and letting users choose the language being used for the app
As part of this, we will also ensure that our app is accessible and allow more people of different levels of ability to use our app. Let's start now by creating the app and adding the first bit of content.
Creating the app
First of all, we need to set up the solution for our app:
- Start by creating a new app using the Multi-Platform App (Uno Platform) template.
- Name the project DigitalTicket. Of course, you can use a different name; however, in this chapter, we will assume the app is named DigitalTicket and uses the respective namespace.
- Remove all platform heads except the Android, iOS, and UWP ones. Note that we also remove the WASM head even if there might be a benefit to providing this functionality on the web. While WASM works reasonably well on mobile devices, it is not ideal, and for simplicity, we will continue without the WASM version of the app.
- Add the UnoBookRail shared library to the solution since we will need its functionality later. To do this, right-click on the solution file, select Add | Existing Project…, navigate to the UnoBookRail.Common.csproj file, and click Open.
- Reference the shared library project in every head project. To do this, right-click on the head project, select Add | Reference… | Projects, check UnoBookRail.Common, and click OK. Since we need a reference to the library in every head, repeat this process for every head, that is, Android, iOS, and UWP.
Since our app will also follow the Model-View-Viewmodel (MVVM) pattern and we want to avoid having to write boilerplate code for this, we will also use the Microsoft.Toolkit.MVVM package, which you will also need to add a reference to:
- Right-click the solution node in the solution view and select Manage NuGet Packages for solution….
- Search for Microsoft.Toolkit.MVVM and select the NuGet package.
- Select the Android, iOS, and UWP heads in the project list and click Install.
Similar to the previous chapter, we will also need to modify our app to leave space for camera notches to avoid the content of our app being occluded:
- For this, add the following namespace to the MainPage.xaml file: xmlns:toolkit="using:Uno.UI.Toolkit".
- After this, add toolkit:VisibleBoundsPadding.PaddingMask="All" to the grid inside our MainPage.xaml file.
Creating the main navigation and booking process
Since our app will contain different features, we will split up the functionality of our app into different pages that we will navigate to. Inside MainPage, we will have our navigation and the code related to that:
- First, start by creating a views folder by right-clicking DigitalTicket.Shared and clicking Add | New Folder, naming it Views.
- Now, add the following three pages inside the Views folder by right-clicking the folder, clicking Add | New Item…, and selecting Blank Page: JourneyBookingPage.xaml, OwnedTicketsPage.xaml, and SettingsPage.xaml.
- Since we will need it later, create a Utils folder and add a LocalizedResources class to it with the following code:
public static class LocalizedResources
{
public static string GetString(string key) {
return key;
}
}
For now, this class will just return the string so we can reference the class and not have to update the code later. Later in this chapter, though, we will update the implementation to return the localized version for the keys provided.
- After that, create a ViewModels folder in your shared project and create a NavigationViewModel class.
- Add the following to your NavigationViewModel class:
using DigitalTicket.Views;
using Microsoft.Toolkit.Mvvm.ComponentModel;
using Microsoft.UI.Xaml.Controls;
using System;
namespace DigitalTicket.ViewModels
{
public class NavigationViewModel :
ObservableObject
{
private Type pageType;
public Type PageType
{
get
{
return pageType;
}
set
{
SetProperty(ref pageType, value);
}
}
public void NavigationView_SelectionChanged(
NavigationView navigationView,
NavigationViewSelectionChangedEventArgs
args)
{
if (args.IsSettingsSelected)
{
PageType = typeof(SettingsPage);
}
else
{
switch ((args.SelectedItem as
NavigationViewItem).Tag.ToString())
{
case "JourneyPlanner":
PageType =
typeof(JourneyBookingPage);
break;
case "OwnedTickets":
PageType =
typeof(OwnedTicketsPage);
break;
}
}
}
}
}
This code will expose the type of page MainPage should navigate to and provide a selection changed listener to update that whenever the selection of the app's navigation changes. To determine the correct page type, we will use the Tag property of the selected item.
- Now, replace the content of MainPage with this:
...
xmlns:muxc="using:Microsoft.UI.Xaml.Controls">
<Grid toolkit:VisibleBoundsPadding.PaddingMask=
"All">
<muxc:NavigationView x:Name="AppNavigation"
PaneDisplayMode="LeftMinimal"
IsBackButtonVisible="Collapsed"
Background="{ThemeResource
ApplicationPageBackgroundThemeBrush}"
SelectionChanged="{x:Bind
navigationVM.NavigationView_
SelectionChanged, Mode=OneTime}">
<muxc:NavigationView.MenuItems>
<muxc:NavigationViewItem
x:Name="JourneyBookingItem"
Content="Journey Booking"
Tag="JourneyPlanner"/>
<muxc:NavigationViewItem
Content="Owned tickets"
Tag="OwnedTickets"/>
<muxc:NavigationViewItem Content="All
day tickets - soon"
Tag="AllDayTickets"
IsEnabled="False"/>
<muxc:NavigationViewItem
Content="Network plan - soon"
IsEnabled="False"/>
<muxc:NavigationViewItem
Content="Line overview - soon"
IsEnabled="False"/>
</muxc:NavigationView.MenuItems>
<Frame x:Name="ContentFrame"
Padding="0,40,0,0"/>
</muxc:NavigationView>
</Grid>
This is the main navigation of our app. We use the NavigationView control for this, which allows us to easily have a side pane that can be opened using a hamburger button. Inside that, we provide the different navigation options and set the Tag property to be used by NavigationViewModel. Since we only allow the journey booking and the list of owned tickets in this chapter, we disable the other options for now.
- Replace your MainPage class with the following:
using DigitalTicket.ViewModels;
using DigitalTicket.Views;
using System;
using Windows.UI.Xaml.Controls;
using Windows.UI.Xaml.Navigation;
namespace DigitalTicket
{
public sealed partial class MainPage : Page
{
public NavigationViewModel navigationVM = new
NavigationViewModel();
public MainPage()
{
InitializeComponent();
if (navigationVM.PageType is null)
{
AppNavigation.SelectedItem =
JourneyBookingItem;
navigationVM.PageType =
typeof(JourneyBookingPage);
navigationVM.PageTypeChanged +=
NavigationVM_PageTypeChanged;
}
}
protected override void OnNavigatedTo(
NavigationEventArgs e)
{
base.OnNavigatedTo(e);
if (e.Parameter is Type navigateToType)
{
if (navigateToType ==
typeof(SettingsPage))
{
AppNavigation.SelectedItem =
AppNavigation.SettingsItem;
}
navigationVM.PageType =
navigateToType;
ContentFrame.Navigate(navigateToType);
}
}
private void NavigationVM_PageTypeChanged(
object sender, EventArgs e)
{
ContentFrame.Navigate(
navigationVM.PageType);
}
}
}
With this, MainPage will create the necessary view models once it is created and update the displayed content based on that. MainPage also listens to the OnNavigatedTo event to update the displayed item based on the arguments passed to it. Lastly, we also listen to the NavigationViewModels property changed event.
Note that we are overriding the OnNavigatedTo function to be able to allow navigating to MainPage and, within MainPage, to a specific page. While we don't need this right now, we will use this later. Let's continue by filling the journey booking page with some content:
- Create the JourneyBookingOption class inside the ViewModels folder.
- Add the following code to the JourneyBookingOption class:
using DigitalTicket.Utils;
using UnoBookRail.Common.Tickets;
namespace DigitalTicket.ViewModels
{
public class JourneyBookingOption
{
public readonly string Title;
public readonly string Price;
public readonly PricingOption Option;
public JourneyBookingOption(PricingOption
option)
{
Title = LocalizedResources.GetString(
option.OptionType.ToString() + "Label");
Price = option.Price;
Option = option;
}
}
}
Since this is a data object that will be used to display the options, it only contains properties. Since the title will be displayed inside the app and needs to be localized, we use the LocalizedResources.GetString function to determine the correct value.
- Now create the JourneyBookingViewModel class inside the ViewModels folder and add the code as seen on GitHub (https://github.com/PacktPublishing/Creating-Cross-Platform-C-Sharp-Applications-with-Uno-Platform/blob/main/Chapter05/DigitalTicket.Shared/ViewModels/JourneyBookingViewModel.cs). Note that a few lines are commented out, and that's because we will need those lines later; however, right now we haven't added the necessary code yet.
- Update JourneyBookingPage.xaml.cs and JourneyBookingPage.xaml so they are as seen on GitHub.
- Copy the following entries into the Strings.resw file inside the Strings/en folder. Note that you don't have to copy the Comments column word by word, as it is only there to provide guidance and context for the other two columns:
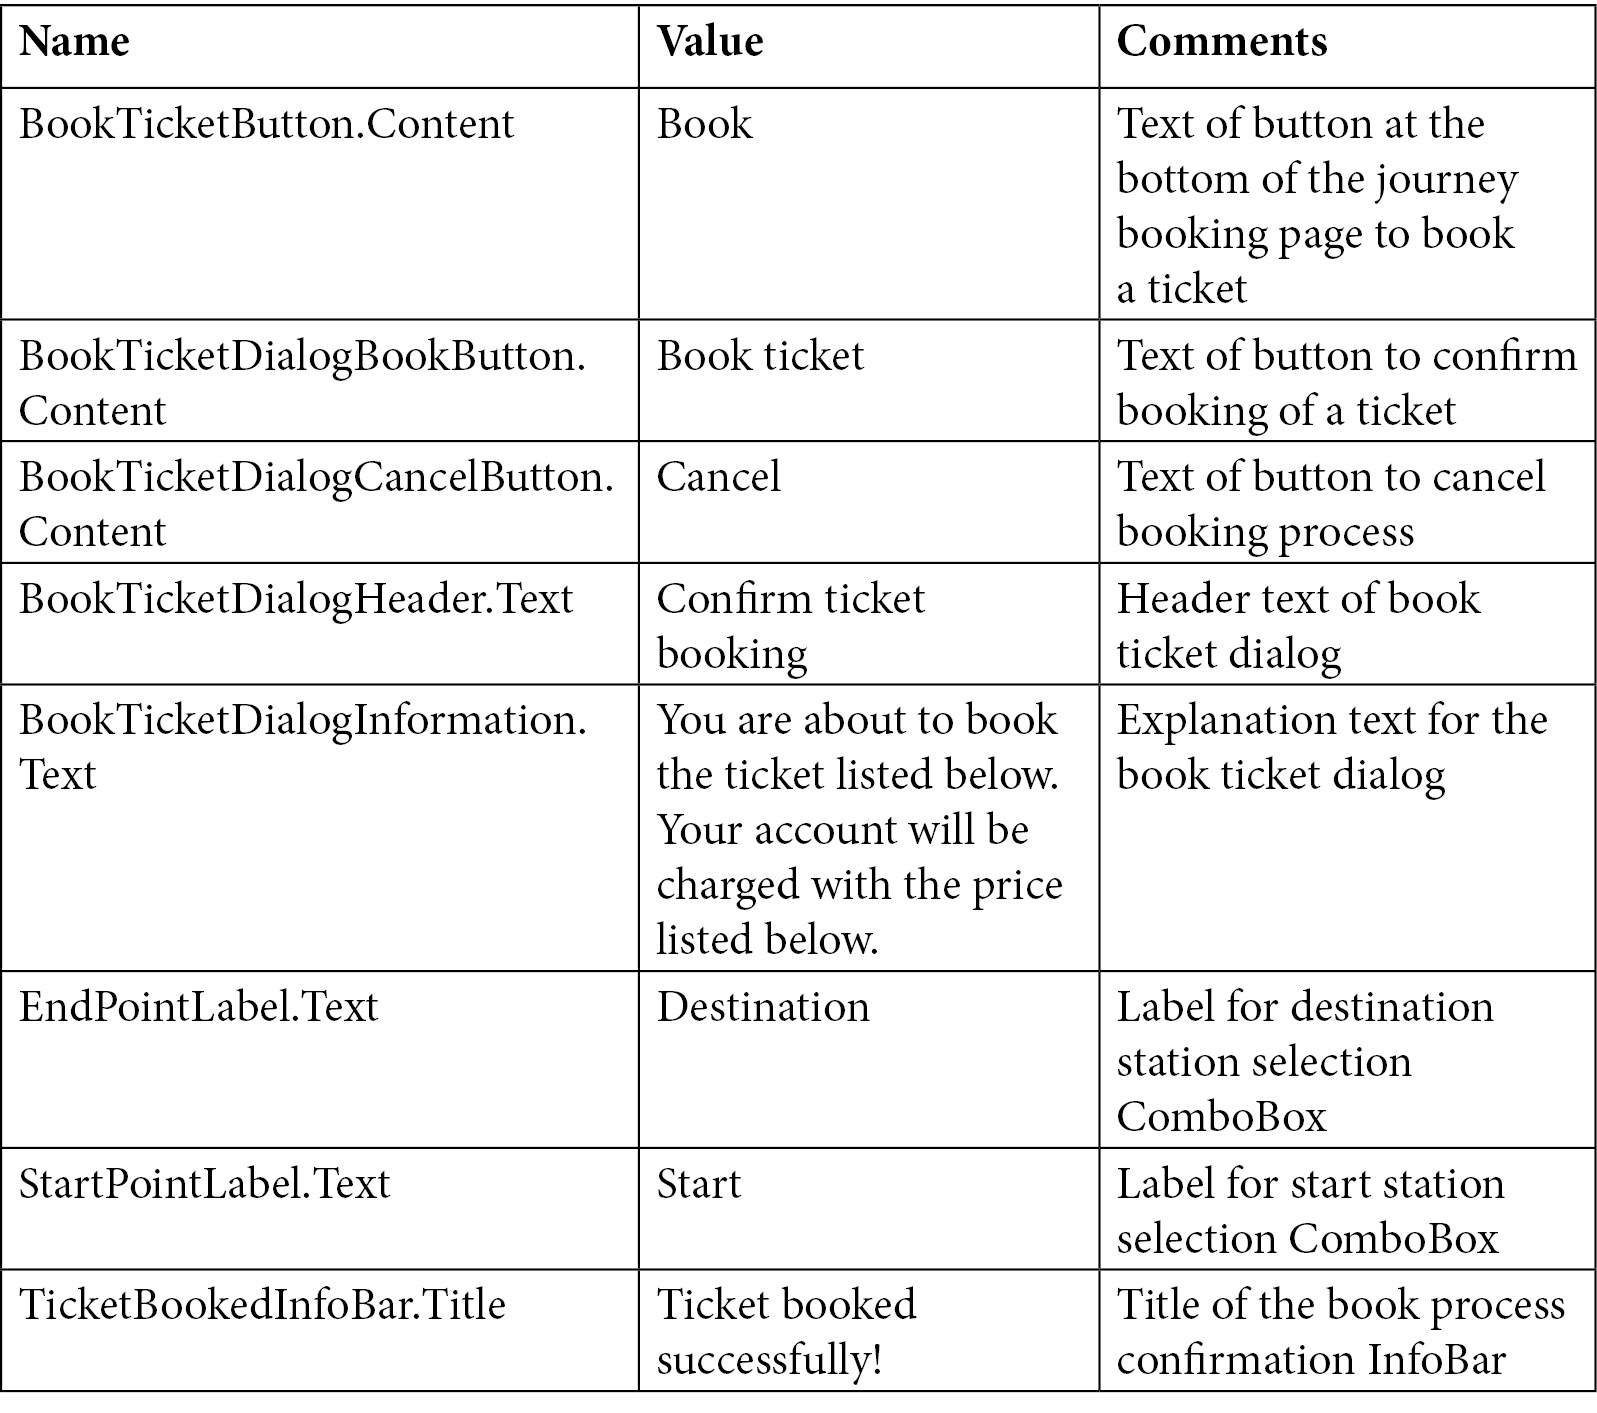
As you might notice, some controls have the x:Uid property set, which is why the entries inside the Strings.resw file are needed. We will cover how these things work in the Localizing your app section; for now, we will only add the code and corresponding entries to our resources file. Now, if you start the app, you should be greeted by something as shown in Figure 5.1:
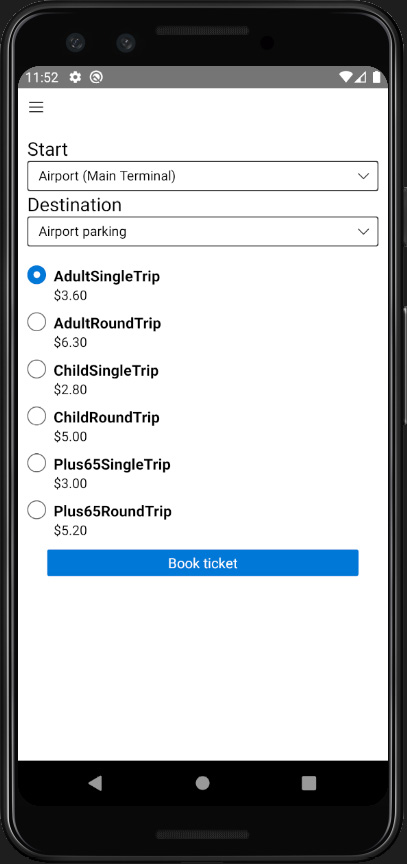
Figure 5.1 – Journey booking page on Android
Now your users are able to configure their journey, select the ticket, and book it, albeit with less-than-ideal ticket names. We will fix this in the Localizing your app section. For simplicity, we will not deal with the actual payment and assume that payment information is associated with the user's account.
In this section, we added the initial code and navigation of our app. We also added the journey booking page, even though it currently doesn't actually book the tickets, which we will change later. In the next section, we will cover how to persist data locally on the user's device using two different methods, the ApplicationData API and SQLite.
Persisting data locally using the ApplicationData API and SQLite
While in a lot of cases data can be fetched from the internet, as we have seen in Chapter 4, Mobilizing Your App, there is often a need to persist data on users' devices. This might be the case for data that needs to be available even when there is no internet connection or data that is device-specific such as settings. We will start by persisting small chunks of data using the ApplicationData API.
Storing data using the ApplicationData API
Since we will localize our app, we also want to give the users the possibility to choose the language of the app. To do this, first create a Models folder inside our shared project and add a SettingsStore class. Now, add the following code to the SettingsStore class:
using Windows.Storage;
public static class SettingsStore
{
private const string AppLanguageKey =
"Settings.AppLanguage";
public static void StoreAppLanguageOption(string
appTheme)
{
ApplicationData.Current.LocalSettings.Values[
AppLanguageKey] = appTheme.ToString();
}
public static string GetAppLanguageOption()
{
if (ApplicationData.Current.LocalSettings.Values.
Keys.Contains(AppLanguageKey))
{
return ApplicationData.Current.LocalSettings.
Values[AppLanguageKey].ToString();
}
return "SystemDefault";
}
}
To access the app's default local application storage, we use the ApplicationData.Current.LocalSettings object. The ApplicationData API also allows you to access different ways of storing data, for example, you can use it to access the app's local folder using ApplicationData.Current.LocalFolder. In our case, though, we will use ApplicationData.Current.LocalSettings to persist data. The LocalSettings object is an ApplicationDataContainer object, which you can use just like a dictionary. Note, though, that the LocalSettings object only supports simple data types such as strings and numbers. Now that we have added a way to store which language to display the app in, we will need to let users change the language:
- First, create a new class named SettingsViewModel inside our ViewModels folder. You can find the code for this class here: https://github.com/PacktPublishing/Creating-Cross-Platform-C-Sharp-Applications-with-Uno-Platform/blob/main/Chapter05/DigitalTicket.Shared/ViewModels/SettingsViewModel.cs.
- Now, we update our settings page to include the UI to change the app's language. To do this, replace the Grid element inside SettingsPage.xaml with the following:
<StackPanel Padding="10,0,10,10">
<ComboBox x:Name="LanguagesComboBox"
Header="Choose the app's language"
SelectedIndex="{x:Bind
settingsVM.SelectedLanguageIndex,
Mode=TwoWay}"/>
</StackPanel>
- In addition to this, we will also need to update SettingsPage.xaml.cs. Note that we will set the ItemsSource of ComboBox in code-behind to ensure that ItemsSource will be set after the ComboBox has been created and is ready so that the ComboBox will update correctly. To do this, add the following code:
using DigitalTicket.ViewModels;
...
private SettingsViewModel settingsVM = new SettingsViewModel();
public SettingsPage()
{
InitializeComponent();
LanguagesComboBox.ItemsSource =
settingsVM.LanguageOptions;
}
- Finally, to ensure that the selected language will be respected on the app's start, add the following code inside the OnLaunched function of App.xaml.cs and add imports for DigitalTicket.Models and DigitalTicket.ViewModels:
ApplicationLanguages.PrimaryLanguageOverride =
SettingsViewModel.GetPrimaryLanguageOverrideFromLanguage(
SettingsStore.GetAppLanguageOption());
Now that we have added the language option, let's try it out. If you start the app now and navigate to the settings page using the navigation on the left, you should see something like on the left side of Figure 5.2. Now, if you select the Deutsch option (German) and open the navigation, you will notice that the first item is now Reise buchen, as shown on the right side of Figure 5.2. This is because SettingsViewModel reloads MainPage and all other pages after setting the ApplicationLanguages.PrimaryLanguageOverride property. We will talk more about this property in the Localizing your app section and also update the app so that all text currently visible also updates based on the language chosen:

Figure 5.2 – Left: Settings page; Right: Navigation after switching language to German
Using SQLite to store data
While the ApplicationData API is good for storing small chunks of data, if you want to persist larger datasets of data, the ApplicationData API is not ideal since there are space limitations for the entries stored using the ApplicationData.Current.LocalSettings object. Namely, object keys can only be 255 characters in length and the entries can only be 8 kilobytes in size on UWP. Of course, this doesn't mean that you can't store larger or more complex datasets in your app. This is where SQLite comes in. Of course, SQLite is not the only way to store data; there are plenty of alternatives. For example, you could write your data to files and parse them yourself. In this chapter, however, we will use SQLite due to its ease of use and integration. There are different C# libraries available to include SQLite in your app and interact with SQLite databases. Since we want to store the SQLite database on mobile Android and iOS devices (and UWP), we will use the sqlite-net-pcl library as this library works on every platform supported by our app. sqlite-net-pcl includes a platform-independent implementation of SQLite and allows us to easily serialize objects into SQLite databases.
Let's start by adding a reference to sqlite-net-pcl to our app. To do this, right-click the solution in the solution view, click Manage NuGet packages for Solution…, and search for sqlite-net-pcl. Since at the time of writing this book the latest stable release is version 1.7.335, select that version and select the Android, iOS, and UWP heads in the project list. Then, click Install. Now we need to add code to create, load, and write the SQLite database:
- First of all, we need to add a class whose objects we want to persist using SQLite. For this, add a new class called OwnedTicket inside the ViewModels folder. You can find the source code for this class on GitHub here: https://github.com/PacktPublishing/Creating-Cross-Platform-C-Sharp-Applications-with-Uno-Platform/blob/main/Chapter05/DigitalTicket.Shared/ViewModels/OwnedTicket.cs.
There are two important things to know:
Since every SQLite table needs a primary key, we added the DBId property with the PrimaryKey and AutoIncrement attributes. Using these properties, we let sqlite-net-pcl manage the primary keys for us and we don't have to deal with this.
When passing objects to sqlite-net-pcl to persist them into a SQLite database, only properties will be persisted. Since we don't want to persist ShowQRCodeCommand (and actually can't), this is only a field, not a property.
- Now create the OwnedTicketsRepository class inside the Models folder and add the following code to it:
using DigitalTicket.ViewModel;
using SQLite;
using System;
using System.IO;
using System.Threading.Tasks;
using Windows.Storage;
namespace DigitalTicket.Models
{
public class OwnedTicketsRepository
{
const string DBFileName = "ownedTickets.db";
private static SQLiteAsyncConnection database;
public async static Task InitializeDatabase()
{
if(database != null)
{
return;
}
await ApplicationData.Current.LocalFolder.
CreateFileAsync(DBFileName,
CreationCollisionOption.OpenIfExists);
string dbPath = Path.Combine(
ApplicationData.Current.LocalFolder
.Path, DBFileName);
database =
new SQLiteAsyncConnection(dbPath);
database.CreateTableAsync<
OwnedTicket>().Wait();
}
public static Task<int> SaveTicketAsync(
OwnedTicket ticket)
{
if (ticket.DBId != 0)
{
// Update an existing ticket.
return database.UpdateAsync(ticket);
}
else
{
// Save a new ticket.
return database.InsertAsync(ticket);
}
}
}
}
The InitializeDatabase function handles creating the file for our SQLite database and creating the table if it does not exist, but also loads the existing database if the file already exists. Inside the SaveTicketsAsync function, we update and save the passed ticket to the database or update the ticket if it already existed in the database.
- Update App.xaml.cs to include the following code at the start of the OnLaunched function and change the OnLaunched function to be async:
await OwnedTicketsRepository.InitializeDatabase();
This will initialize the SQLite connection when the app starts since creating the connection on demand is not ideal, especially when loading the owned tickets page.
- Now update JourneyBookingViewModel to save the ticket to OwnedTicketsRepository. To do this, remove the current creation of BookJourney and uncomment the using statements at the top of the file and the code inside the JourneyBookingViewModel constructor.
Now let's talk about the steps we just did. First of all, we created our OwnedTicket object, which we will write to SQLite and also load from SQLite in the next section.
We then added OwnedTicketsRepository, which we use to interact with our SQLite database. Before any requests can be made to the SQLite database, we first need to initialize it, for which we will need a file to write the SQLite database into. Using the following code, we ensure that the file we want to write our database to exists:
await ApplicationData.Current.LocalFolder.CreateFileAsync(DBFileName, CreationCollisionOption.OpenIfExists);
After that, we create a SQLiteAsyncConnection object for our database. The SQLiteAsyncConnection object will handle all communication to SQLite, including creating tables and saving and loading data. Since we also need a table to write our data to, we use SQLiteAsyncConnection to create a table for our OwnedTickets objects if the table doesn't already exist within our SQLite database. To ensure that those steps will be done before any request to our database has been made, we call OwnedTicketsRepository.InitializeDatabase() inside our app constructor.
The last step was to update our JourneyBookingViewModel class to also persist data to the SQLite database. While we only add new items to our database, we still need to watch whether you are updating existing entries or adding a new entry, which is why the SavedTicketAsync function ensures we are only creating items if there is no ID present.
Loading data from SQLite
Now that we have covered how to persist data, of course, we also need to load the data; otherwise, we wouldn't need to persist the data in the first place. Let's change this by adding an overview of all the tickets booked by the user. Since UnoBookRail customers will need to present their tickets when boarding a train or when tickets are checked, we also want to be able to display a QR code for every ticket. Since we will use ZXing.Net.Mobile for this, please add that NuGet package to your solution now, namely the Android, iOS, and UWP heads. Note that at the time of writing, version 2.4.1 was the latest stable release and we will use that version for this chapter.
Before we want to display all tickets, we first need to load them from our SQLite database. To do this, add the following method to our OwnedTicketsRepository class:
using System.Collections.Generic;
...
static Task<List<OwnedTicket>> LoadTicketsAsync()
{
//Get all tickets.
return database.Table<OwnedTicket>().ToListAsync();
}
Thanks to sqlite-net-pcl, this is all we need to do. The library handles the rest for us, including reading the table and converting the rows into OwnedTicket objects.
Now that we can also load tickets, we can update the OwnedTicketsPage class we created at the beginning of this chapter to display all the tickets booked by the user. In our app, this means that we will only display the tickets that have been booked on this device. In a real app, we would also access the tickets from a remote server and download them to the device; however, we won't do this since it is out of scope for this chapter:
- Before we update our owned tickets page, first add an OwnedTicketsViewModel class inside the ViewModels folder. The source code for the class is available here: https://github.com/PacktPublishing/Creating-Cross-Platform-C-Sharp-Applications-with-Uno-Platform/blob/main/Chapter05/DigitalTicket.Shared/ViewModels/OwnedTicketsViewModel.cs.
- Now, update OwnedTicketsPage.xaml and OwnedTicketsPage.xaml.cs. You can find the source code for those two files on GitHub: https://github.com/PacktPublishing/Creating-Cross-Platform-C-Sharp-Applications-with-Uno-Platform/tree/main/Chapter05/DigitalTicket.Shared/Views.
Now, if you start the app and navigate to the owned tickets page, you should see an empty page. If you have already booked a ticket, you should see something like on the left side of Figure 5.3. If you click on the small, wide, gray box below the ticket, you should see something like on the right side of Figure 5.3:
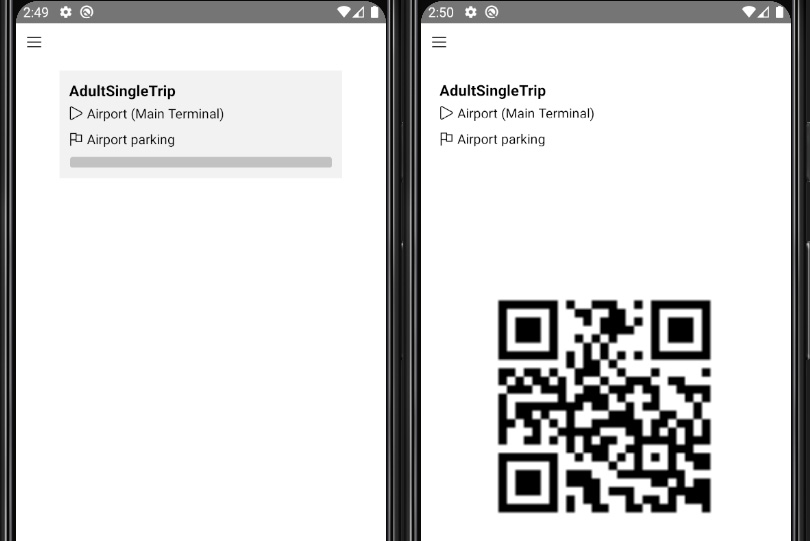
Figure 5.3 – Left: List of owned tickets with a single ticket; Right: Owned ticket and the QR code of the booked ticket
Of course, this is not the final UI yet; users should see text indicating that they haven't booked a ticket yet instead of a blank screen. Right now, though, it is expected that the text is missing and buttons don't have labels either since they are using x:Uid instead of having the Text or Content property set. In the next section, we will look at what x:Uid is and update our app so that all the labels are being displayed correctly.
Making your app ready for customers
In this section, we will update our app to be ready for our customers, including localization support to make the app easier to use for our customers. After adding localization support, we will update the icon and splash screen of our app so it is more easily recognizable for our users.
Localizing your app
If you are developing an app targeting customers, being able to provide translations for customers in their native tongue is very important, especially for apps that are targeted toward customers from different countries. In the previous section, we already added the x:Uid property and added entries to the Strings.resw file; however, there are also other ways to localize resources, which we will cover later. We will start localizing text with x:Uid.
Using x:Uid to localize your UI
Using x:Uid and resource files (.resw files) is the easiest way to localize your app, especially since adding new translations, for example, for a new language, is very easy. But how do you localize your app using x:Uid and .resw files?
The x:Uid property can be added to any elements of your XAML code. In addition to setting the x:Uid property on controls you would like to provide translations for, you also need to add those translations. This is where the .resw files come in. In a nutshell, resw files are XML documents that contain the necessary entries. The easiest way of thinking about them, though, is as a list of entries with three properties that is often represented as a table. Those properties (or columns) are as follows:
- Name: The name you can use to find the resource. This path will also be used to determine which property on which control to set.
- Value: The text being set or the text being returned when looking up this resource.
- Comment: You can use this column to provide comments explaining the row. This is especially useful when translating the app into a new language since you can use the comment to find out what the best translation would be. See the Comment column in Figure 5.4 for how they might be used.
When opening a .resw file in Visual Studio, the representation will look as in Figure 5.4:
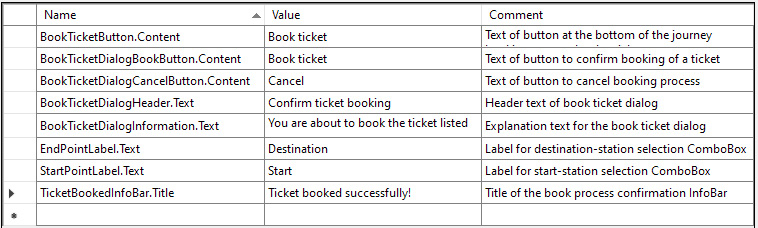
Figure 5.4 – View of the .resw file in Visual Studio
When using the x:Uid property in combination with .resw files, you need to watch how you write the name entries for the resources. The name entry needs to start with the x:Uid value of the control followed by a dot (.) and the name of the property that should be set. So, in the preceding example, if we wanted to localize the text of the TextBlock element, we would add an entry with the name value being ButtonTextBlock.Text since we want to set the Text property of the TextBlock element.
"But how does localization work with this?" you might ask. After all, we have only added a single entry; how would it know which language to pick? This is why the folder in which you place your .resw files is important. Inside your project, you need to have a Strings folder. In that folder, for every language you want to localize your app to, you need to have a folder with the IETF BCP 47 tag of the language. So, for example, for British English, you would create a folder named en-GB while for German (Germany), you would create a folder called de-DE. Inside the folders that you create for every language you want to support, you need to place your .resw files for the localization to work properly. Note that if a certain language is not available, the resource lookup will try to find the next best match. You can learn more about this procedure here since your Uno Platform app will behave the same on every platform: https://docs.microsoft.com/windows/uwp/app-resources/how-rms-matches-lang-tags.
Important note
Be careful how you name those folders. The resource lookup will be done based on the folder's name. If the folder's name has a typo or does not adhere to the IETF BCP 47 standard, the resource lookup might fail and your users will be greeted with missing labels and texts or a mix of languages as resource lookup will fall back to languages where the texts have been translated.
We already have a folder for the English text resources; however, we also want to support German translations. To do this, create a new folder inside the Strings folder named de-DE. Now, add a new .resw file with the name Resources.resw and add the following entries:

If you start the app now and switch to German as the app's language, you will see that the journey booking page is now localized. If your device's language was already set to German, instead of showing the page in English, it should now be displayed in German, even if you don't switch to the German option now.
Accessing resources from code-behind
Using x:Uid is not the only way to localize your app, though; we will now see how you can access a resource from code-behind. This is useful, for example, when you want to localize the items in a collection, for example, the list of owned tickets in our app. To access string resources, you can use the ResourceLoader class. We added the LocalizedResources class at the start of the chapter; however, until now, it hasn't accessed any resources. Update LocalizedResources now by adding the following import and replacing the GetString function with the following code:
using Windows.ApplicationModel.Resources;
...
private static ResourceLoader cachedResourceLoader;
public static string GetString(string name)
{
if (cachedResourceLoader == null)
{
cachedResourceLoader =
ResourceLoader.GetForViewIndependentUse();
}
if (cachedResourceLoader != null)
{
return cachedResourceLoader.GetString(name);
}
return null;
}
Since we will be using the loaded resource often, we are caching the value to avoid having to call GetForViewIndependentUse as it is expensive.
Now that we have covered how x:Uid works and how you can access localized resources from code-behind, let's update the rest of our app to be localized. Start by adding the necessary entries to our .resw files. The following is the table of entries you need for the MainPage.xaml file and their English and German entries:
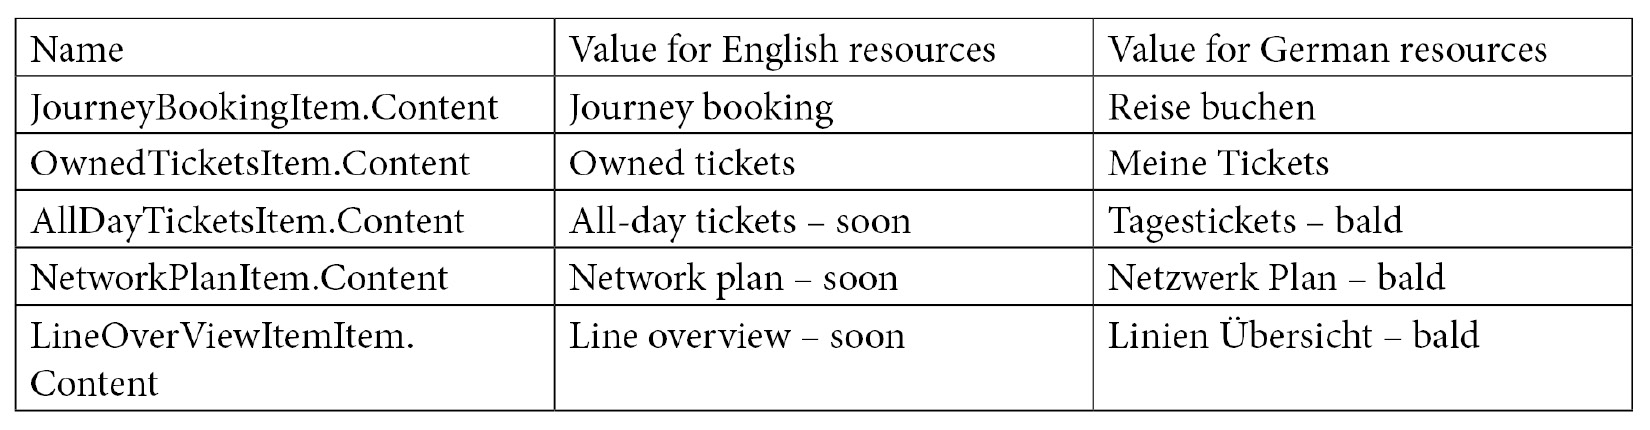
Now, replace the NavigationViewItems property inside the MainPage.xaml file with the following:
<muxc:NavigationViewItem x:Name="JourneyBookingItem" x:Uid="JourneyBookingItem" Tag="JourneyPlanner"/>
<muxc:NavigationViewItem x:Uid="OwnedTicketsItem" Tag="OwnedTickets"/>
<muxc:NavigationViewItem x:Uid="AllDayTicketsItem" Tag="AllDayTickets" IsEnabled="False"/>
<muxc:NavigationViewItem x:Uid="NetworkPlanItem" IsEnabled="False"/>
<muxc:NavigationViewItem x:Uid="LineOverViewItemItem" IsEnabled="False"/>
To update the rest of the app to be localized, please view the source code on GitHub. You can also find the updated Resources.resw files for English and German there. Note that we chose to not localize the station names as localizing street and place names might lead to confusion for customers.
Important note
You can also localize other resources such as images or audio files. To do that, you need to put them inside correctly named folders. For example, if you want to localize an image called Recipe.png, you need to put the localized version of the image for a language inside the Assets/[language identifier] folder, where language identifier is the IETF BCP 47 identifier of the language the image is for. You can learn more about customizing and localizing resources here: https://docs.microsoft.com/windows/uwp/app-resources/images-tailored-for-scale-theme-contrast.
In this section, we covered how to localize your app using x:Uid and resources file. As your app becomes larger and more languages are provided, using the multilingual app toolkit might be helpful. It allows you to check more easily which language keys are not translated and integrates into Visual Studio. You can learn more about this here: https://developer.microsoft.com/en-us/windows/downloads/multilingual-app-toolkit/.
Customizing your app's appearance
When publishing an app to the store, you want your app to be recognizable to users and convey your brand. However, so far, all the apps we developed have used the standard Uno Platform app icon. Luckily, Uno Platform allows us to change our app's icon and lets us set the splash image for our app.
Updating your app's icon
One of the most important things to make your app recognizable by users is having an icon for your app. Updating the icon for your app is easy. You can find the image we will use here: https://github.com/PacktPublishing/Creating-Cross-Platform-C-Sharp-Applications-with-Uno-Platform/blob/main/Chapter05/DigitalTicket.Shared/Assets/AppIcon.png.
Updating the Android app's icon
To update the app icon for the Android app, you just need to replace the Icon.png file inside the drawable folder of the Android project with your desired app logo. Note that you also need to select the correct image in the project properties. For this, double-click the Properties node inside the Android project. Inside the Android Manifest section, from the Application icon dropdown, select the icon you desire; for example, if you named your icon Appicon, you would select the @drawable/Appicon option. Alternatively, you can update the android:icon entry in the AndroidManifest.xml file inside the Properties node.
Updating the iOS app's icon
Updating the icon of our iOS app requires a bit more work. For the iOS app, you will need your app's icon in different sizes depending on the device the app is installed on. To see the list of dimensions and to update the app icon of the iOS app, simply expand the Assets Catalog node of the iOS project and double-click on the Media entry inside there. Inside the AppIcons tab, you select the images for the different devices and categories, and dimensions. It is not required to provide an image for every single dimension; however, you should provide at least one icon for every category.
Updating the icon of the UWP app
The easiest way to update the app icon of the UWP head is using the Visual Assets tab of the Package.appxmanifest file. For this, double-click Package.appxmanifest and select the App icon option inside the Visual Assets tab. To update the app's icon, choose the source image, select the destination folder, and click Generate. This will generate the app's icon in different sizes and as such, update your app's icon to the image specified.
Updating the icon of the other projects
While our app won't be available on other platforms and we removed the heads for the respective platforms, you might want to update the icon for the other platforms in other projects:
- macOS: Replace the images inside the Assets/xcassets/AppIcon.appiconset folder. If you rename the images, be sure to also update the Contents.json file.
- Skia-based projects: Right-click the project in Visual Studio and select Properties. Inside the Application tab, you can select a new icon using the Browse button in the Resources section.
- WASM: To update the icon being displayed in a browser, add your icon as favicon.ico inside the project's Assets folder.
Customizing your app's splash screen
Updating your app's icon is not the only way to make your app more recognizable. In addition to the app's icon, you can also customize the splash screen of your app. Note that at the time of writing this, only Android, iOS, UWP, and WASM apps support setting a splash screen. As with the icon, you can find the image resources for this on GitHub.
Updating the Android splash screen
To add a splash screen to the Android app, you will first need to add your splash screen image. In our case, we will name it SplashScreen.png. After this, add the following entry to the Resource/values/Styles.xml file:
<item name="android:windowBackground">@drawable/splash</item>
Then, you need to add the splash.xml file inside Resources/drawable and add the following code:
<?xml version="1.0" encoding="utf-8"?>
<layer-list xmlns:android=
"http://schemas.android.com/apk/res/android">
<item>
<!-- background color -->
<color android:color="#008cff"/>
</item>
<item>
<!-- splash image -->
<bitmap android:src="@drawable/splashscreen"
android:tileMode="disabled"
android:gravity="center" />
</item>
</layer-list>
Updating the iOS app's splash screen
As with any iOS app, the launch screen needs to be a storyboard. Uno Platform makes it easy to have a single image displayed as a launch screen. All it takes are these simple steps:
- In Solution Explorer, select the iOS project and press the Show All Files button.
- You'll now be able to see a file called LaunchScreeen.storyboard. Right-click on this and select Include In Project. This will now automatically be used when you launch the app.
If you run the app, you'll see the Uno Platform logo displayed when you launch the app. You can easily change this by replacing the images.
- In the Resources folder, you'll find files named [email protected] and [email protected]. These are the files used by the storyboard. Replace their contents with the images you want.
- To change the color used for the background, you can open the storyboard in the Xcode Interface Builder and change the color. Alternatively, you can open the storyboard file in an XML editor and change the red, green, and blue properties of the color with the backgroundColor key.
It's possible to use a storyboard file with any content you wish as your launch screen. To do this, you will need to use the Xcode Interface Builder. Prior to version 16.9, Visual Studio included an iOS storyboard editor but this is no longer available. To edit a storyboard now, you need to open the project in Visual Studio for Mac, right-click on the file, and select Open With | Xcode interface Builder.
Updating the UWP app's splash screen
Similar to updating the app icon of your UWP app, use the Package.appxmanifest file and the Visual Assets tab. Select the Splash Screen tab and select the image you want to use for your splash screen. After this, uncheck Apply recommended padding and set Splash screen background to the background color you would like to use. In our case, this will be #008CFF. Now, click Generate to generate the splash screen images for the UWP app.
Updating the splash screen of the WASM app
To update the splash screen of your WASM head, add your new splash screen image inside the WASM project's Assets folder. After that, you only need to update the AppManifest.js file inside the WasmScripts folder to reference that image and update the splash screen color if necessary.
If you have followed the steps for our app successfully, you should be able to see the app in the app list on Android as seen on the left side of Figure 5.5. Once you start the app, your app should look as on the right side of Figure 5.5 before showing the journey booking page. Note that the icon and splash screen provided are just examples here. In a real app, you would ensure that your app's icon looks good even this small:
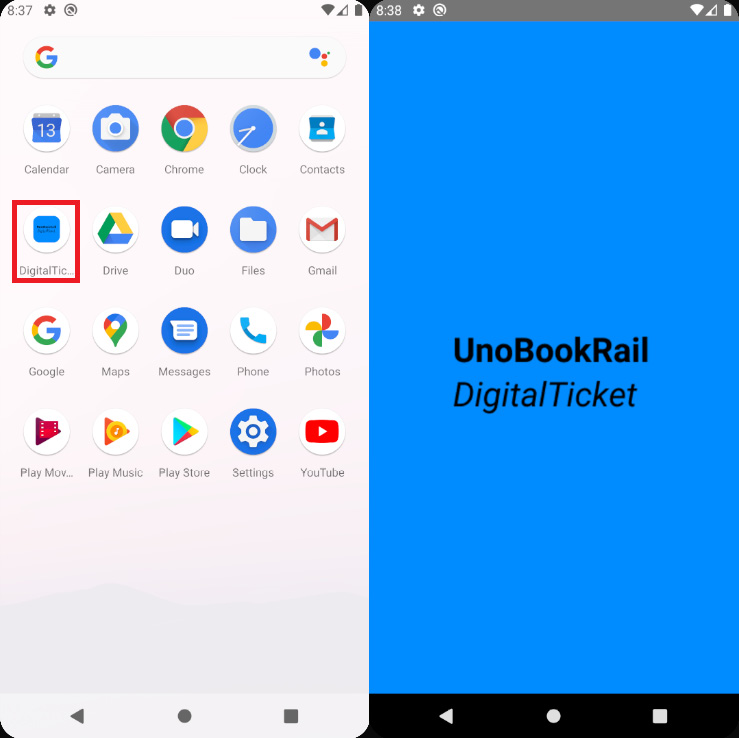
Figure 5.5 – Left: DigitalTicket in the list of apps; Right: Splash screen of DigitalTicket
Ensuring everyone can use your app
To make sure everyone can use your app, you need to make it accessible. Accessibility is key when developing apps. People with all levels of ability will use your app; your app not being accessible will make the life of your customers harder or might even make it impossible for them to use your app.
When thinking about accessibility, what comes to mind to most people is making your app accessible for blind people by adding labels and alt text for screen readers. However, accessibility is about so much more. For example, someone who has low vision but is not blind might not use a screen reader but instead might choose to use the high-contrast theme to make apps easier to use or might choose to increase the font size to make the text easier to read. Providing a dark theme is often seen as a purely aesthetic aspect; however, it is also important with regard to accessibility. Some people might be able to read text better while people with certain disabilities will have a harder time using your app.
If you are already familiar with the APIs available in UWP to make your app, there are a few things that are different when making your Uno Platform accessible. Since your app will run on different platforms and those platforms all have different APIs to provide accessible apps, Uno Platform only has a subset of properties available with regard to accessibility. At the time of writing, only the following properties are supported and work on every platform:
- AutomationProperties.AutomationId: You can set this property to allow easier navigation to controls with assistive technology.
- AutomationProperties.Name: Assistive technology will use this property to announce controls to users.
- AutomationProperties.LabeledBy: When setting this property, the control you are setting this on will be announced using the control specified by this property.
- AutomationProperties.AccessibilityView: Using this property, you can indicate that a control should not be read out to users by assistive technology or that you want to include controls that would commonly not be announced.
In addition to the properties listed previously, Uno Platform also supports the high-contrast theme on every platform. Since we are using the standard controls provided by Uno Platform, we won't need to watch out for this as Uno Platform already provides the right high-contrast look for our app. However, if you write your own controls, you should also check the high-contrast version of your app to ensure it is acceptable.
Important note
You should always localize the resources that will be used by assistive technology. Not doing this will potentially make your app inaccessible since users might encounter a language barrier, especially if assistive technology expects to read out words from a language and finds words from a different one.
To be able to ensure your app is accessible to people using assistive technology, you need to test your app using assistive technology. In the following section, you can find instructions to start a platform's default screen reader.
Starting the screen reader on different platforms
Since the steps to activate a system's assistive technology vary depending on the platform, we will go through them one by one, starting with Android.
TalkBack on Android
Launch the Settings app and open the Accessibility page. Press TalkBack and tap on the switch to enable TalkBack. Finally, press OK to close the dialog.
VoiceOver on iOS
Open the Settings app and open the Accessibility options under General. Then, tap on VoiceOver in the Vision category and tap on the switch to enable it.
VoiceOver on macOS
Launch System Preferences and click on Accessibility. Then, click on VoiceOver in the Vision category. Check Enable VoiceOver to use VoiceOver.
Narrator on Windows (for UWP and WASM)
To start the Narrator screen reader on Windows, you just need to press the Windows logo key, Ctrl, and Enter at the same time.
Updating our app to be accessible
In this chapter, we haven't ensured that our app is accessible. While a lot of controls are already accessible on their own, for example, the button control that will announce its content, there are still controls that we need to improve accessibility-wise. If a user were to use the app with assistive technology, not everything will be announced in a meaningful manner. Let's change this now by updating our app's UI to have all the necessary properties set. To do this, we will first update our journey booking page.
Both ComboBox control on our journey booking page currently will just be announced as ComboBox control, and as such, users with assistive technology have no idea what the ComboBox control is actually for. Since we have already added TextBlock element that describes their purpose, we will update them to use the AutomationProperties.LabeledBy property:
<TextBlock x:Name="StartPointLabel" x:Uid="StartPointLabel" FontSize="20"/>
<ComboBox ItemsSource="{x:Bind journeyBookingVM.AllStations}" x:Uid="StartPointComboBox"
AutomationProperties.LabeledBy="{x:Bind
StartPointLabel}"
SelectedItem="{x:Bind
journeyBookingVM.SelectedStartpoint,Mode=TwoWay}"
HorizontalAlignment="Stretch"
DisplayMemberPath="Name"/>
<TextBlock x:Name="EndPointLabel" x:Uid="EndPointLabel" FontSize="20"/>
<ComboBox ItemsSource="{x:Bind journeyBookingVM.AvailableDestinations, Mode=OneWay}" x:Uid="EndPointComboBox"
AutomationProperties.LabeledBy="{x:Bind EndPointLabel}"
SelectedItem="{x:Bind
journeyBookingVM.SelectedEndpoint,Mode=TwoWay}"
HorizontalAlignment="Stretch"
DisplayMemberPath="Name"/>
Now, when a user navigates to the ComboBox control using assistive technology, the ComboBox control will be announced using the text of the TextBlock element referenced by AutomationProperties.LabeledBy. Since the rest of the controls on that page are already taking care of accessibility for us, let's move on to the owned tickets page.
On the owned tickets page, there are two potential problems:
- The icons beside the station names will be announced as a blank icon.
- The QR code will only be announced as an image.
Since the icons are only for visual representation, we indicated to assistive technologies that the icons should not be announced using the AutomationProperties.AccessibilityView property and setting it to Raw. If you want to include a control for assistive technologies, you can set that property to Content.
To ensure that the QR code image will be announced in a meaningful way, we will add a descriptive name to it. For simplicity, we will just announce that it is the QR for the currently selected ticket. First, you need to update the image element as follows:
<Image x:Name="QRCodeDisplay" x:Uid="QRCodeDisplay"
Source="{x:Bind ownedTicketsVM.CurrentQRCode,
Mode=OneWay}"
Grid.Row="4" MaxWidth="300" MaxHeight="300"
Grid.ColumnSpan="2"/>
After this, add the following entries to the Resources.resw files:
English:

German:

By adding these entries, we have now provided a descriptive name for the QR code being displayed while also ensuring that this text will be localized.
Lastly, we also need to update the settings page. Since it only contains a single ComboBox control, which is missing a name, add the following entries to the Resources.resw files:
English:

German:

In this section, we briefly covered accessibility in Uno Platform; however, there are also certain limitations and things to watch out for that we did not mention. You can read more about these limitations in the official documentation: https://platform.uno/docs/articles/features/working-with-accessibility.html. If you wish to learn more about accessibility in general, you can take a look at the following resources:
- https://docs.microsoft.com/en-us/learn/paths/accessibility-fundamentals/
- https://developer.mozilla.org/en-US/docs/Learn/Accessibility/What_is_accessibility
- https://developers.google.com/web/fundamentals/accessibility
Summary
In this chapter, we built a customer-facing app that runs on iOS and Android. We covered how to store data using SQLite, how to make your app accessible, and making it ready for customers. As part of this, we covered how to localize your app, letting users choose the language of the app, and providing a custom splash screen for your app.
In the next chapter, we will write an information dashboard for UnoBookRail. The app will be targeted at employees of UnoBookRail and run on desktop and the web.