
Chapter 3: Working with Forms and Data
In this chapter, we will write our first app for the fictional company UnoBookRail, which will be targeting desktops and the web. We will write a typical line of business (LOB) app that allows us to view, enter, and edit data. In addition to that, we will also cover how to export data in PDF format since this is a common requirement for LOB apps.
In this chapter, we'll cover the following topics:
- Writing a desktop-focused Uno Platform app
- Writing forms and validating user input
- Using the Windows Community Toolkit in your Uno Platform app
- Generating PDF files programmatically
By the end of this chapter, you'll have created a desktop-focused app that can also run on the web that displays data, allows you to edit the data, and also export the data in PDF format.
Technical requirements
This chapter assumes that you already have your development environment set up, as well as the project templates installed, as we covered in Chapter 1, Introducing Uno Platform. The source code for this chapter can be found at https://github.com/PacktPublishing/Creating-Cross-Platform-C-Sharp-Applications-with-Uno-Platform/tree/main/Chapter03.
The code in this chapter makes use of the following library: https://github.com/PacktPublishing/Creating-Cross-Platform-C-Sharp-Applications-with-Uno-Platform/tree/main/SharedLibrary.
Check out the following video to see the code in action: https://bit.ly/3fWYRai
Introducing the app
In this chapter, we will build the UnoBookRail ResourcePlanner app, which will be used internally, inside UnoBookRail. UnoBookRail employees will be able to use this app to manage any resources within UnoBookRail, such as trains and stations. In this chapter, we will develop the issue-managing part of the app. While a real version of this app would have a lot more features, in this chapter, we will only develop the following features:
- Creating a new issue
- Displaying a list of issues
- Exporting issues in PDF format
Since this application is a typical line of business app, the app will be targeting UWP, macOS, and WASM. Let's continue by creating the app.
Creating the app
Let's start by creating the solution for the app:
- In Visual Studio, create a new project using the Multi-Platform App (Uno Platform) template.
- Name the project ResourcePlanner. You can use a different name if you want, but in this chapter, we will assume the project is named ResourcePlanner.
- Remove all the project heads except those for UWP, macOS, and WASM.
- To avoid having to write more code than we need, download the shared library project from https://github.com/PacktPublishing/Creating-Cross-Platform-C-Sharp-Applications-with-Uno-Platform/tree/main/SharedLibrary and add a reference to it. To do this, right-click on the solution node in the Solution Explorer window, select Add > Existing Project..., navigate to the UnoBookRail.Common.csproj file, and click Open.
- Now that we've added the project to the solution, we need to add a reference to the library in the platform-specific projects. For this, right-click the UWP project node in Solution Explorer, select Add > Reference... > Projects, check the UnoBookRail.Common entry, and click OK. Repeat this process for the macOS and WASM projects.
- Lastly, add the following code before the closing linker tag in the LinkerConfig.xml file, inside the ResourcePlanner.Wasm project:
<assembly fullname="UnoBookRail.Common" />
This code is needed to bind objects from the UnoBookRail.Common library so that they work properly on WASM. The LinkerConfig.xml file tells the WebAssembly Linker to include the types in the compiled source code, even though the classes are not currently being used. If we don't specify these entries, the types that are defined in the assembly will not be included as the linker removes the code. This is because it doesn't find a direct reference to it. When using other packages or libraries, you may also need to specify entries for those libraries. For this chapter, though, the preceding entry is enough.
For our app, we will use the Model-View-ViewModel (MVVM) pattern. This means that our app will mostly be split into three areas:
- Model: The Model contains the data of your app and the business logic. For example, this would handle loading data from a database or running specific business logic.
- ViewModel: The ViewModel acts as the layer between the View and Model. It presents the app's data in a suitable way for the View, provides ways for the View to interact with the Model, and notifies the View of changes to the Model.
- View: The View represents data to the user and is responsible for what is being represented on the screen.
To make development easier, we will use the Microsoft.Toolkit.MVVM package, which we will add now. This package helps us write our ViewModels and takes care of the boilerplate code that is needed to support bindings with XAML:
- First, right-click the solution node in the Solution view and select Manage NuGet Packages for solution….
- Now, search for Microsoft.Toolkit.MVVM and select the package from the list.
- Select the macOS, UWP, and WASM projects from the project list and click Install.
- Since we will use them later, also create three folders called Models, ViewModels, and Views. For this, right-click the ResourcePlanner.Shared shared project, select Add > New Folder, and name it Models. Repeat this process for ViewModels and Views.
Now that we've set up the project, let's start by adding the first pieces of code to our app. As is typical with line of business apps, we will be using the MenuBar control as the main way of switching views inside our app:
- Start by creating a new class inside the ViewModels folder called NavigationViewModel.
- Now, replace the code inside the NavigationViewModel.cs file with the following:
using Microsoft.Toolkit.Mvvm.ComponentModel;
using Microsoft.Toolkit.Mvvm.Input;
using System.Windows.Input;
using Windows.UI.Xaml;
namespace ResourcePlanner.ViewModels
{
public class NavigationViewModel :
ObservableObject
{
private FrameworkElement content;
public FrameworkElement Content
{
Get
{
return content;
}
Set
{
SetProperty(ref content, value);
}
}
public ICommand Issues_OpenNewIssueViewCommand
{ get; }
public ICommand Issues_ExportIssueViewCommand
{ get; }
public ICommand Issues_OpenAllIssuesCommand {
get; }
public ICommand Issues_OpenTrainIssuesCommand
{ get; }
public ICommand
Issues_OpenStationIssuesCommand { get; }
public ICommand Issues_Open OtherIssuesCommand
{ get; }
public NavigationViewModel()
{
Issues_OpenNewIssueViewCommand =
new RelayCommand(() => { });
Issues_ExportIssueViewCommand =
new RelayCommand(() => { });
Issues_OpenAllIssuesCommand =
new RelayCommand(() => { });
Issues_OpenAllTrainIssuesCommand =
new RelayCommand(() => { });
Issues_OpenAllStationIssuesCommand =
new RelayCommand(() =>{ });
Issues_OpenAllOtherIssuesCommand =
new RelayCommand(() =>{ });
}
}
}
This is the class that will handle navigating to different controls. As we implement more views later in this chapter, we will update the Command objects so that they point to the correct views.
- Now, add the following code to the MainPage class:
using ResourcePlanner.ViewModels;
...
private NavigationViewModel navigationVM = new NavigationViewModel();
This will add a NavigationViewModel object to the MainPage class that we can bind to in our XAML.
- Finally, replace the content of your MainPage.xaml file with the following:
...
xmlns:muxc="using:Microsoft.UI.Xaml.Controls">
<Grid Background="{ThemeResource
ApplicationPageBackgroundThemeBrush}">
<Grid.RowDefinitions>
<RowDefinition Height="Auto"/>
<RowDefinition Height="*"/>
</Grid.RowDefinitions>
<muxc:MenuBar>
<muxc:MenuBar.Items>
<muxc:MenuBarItem Title="Issues">
<MenuFlyoutItem Text="New"
Command="{x:Bind
navigationVM.Issues_
OpenNewIssueViewCommand}"/>
<MenuFlyoutItem Text="Export to
PDF" Command="{x:Bind
navigationVM.Issues_
ExportIssueViewCommand}"/>
<MenuFlyoutSeparator/>
<MenuFlyoutItem Text="All"
Command="{x:Bind
navigationVM.Issues_
OpenAllIssuesCommand}"/>
<MenuFlyoutItem Text="Train
issues" Command="{x:Bind
navigationVM.Issues_
OpenTrainIssuesCommand}"/>
<MenuFlyoutItem Text="Station
issues" Command="{x:Bind
navigationVM.Issues_
OpenStationIssuesCommand}"/>
<MenuFlyoutItem Text="Other
issues" Command="{x:Bind
navigationVM.Issues_
OpenOtherIssuesCommand}"/>
</muxc:MenuBarItem>
<muxc:MenuBarItem Title="Trains"
IsEnabled="False"/>
<muxc:MenuBarItem Title="Staff"
IsEnabled="False"/>
<muxc:MenuBarItem Title="Depots"
IsEnabled="False"/>
<muxc:MenuBarItem Title="Stations"
IsEnabled="False"/>
</muxc:MenuBar.Items>
</muxc:MenuBar>
<ContentPresenter Grid.Row="1"
Content="{x:Bind navigationVM.Content,
Mode=OneWay}"/>
</Grid>
This code adds MenuBar, which users can use to navigate to different views. ContentPresenter, at the bottom, is used to display the content that was navigated to.
Now, if you start the app, you will see something similar to the following:
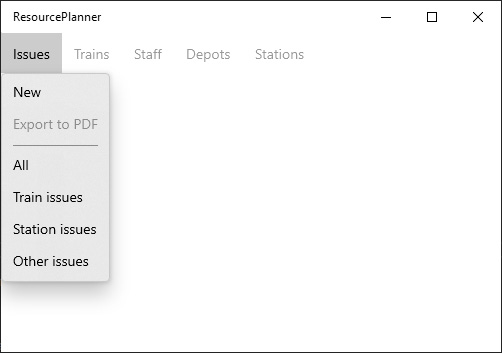
Figure 3.1 – Running the ResourcePlanner app with MenuBar navigation
In the next section, we will add our first view to the app, which will allow users to create new issues.
Entering and validating data
A typical requirement for line of business apps is to enter data and also provide input validation for said data. Uno Platform provides a variety of different controls to allow users to enter data, in addition to dozens of libraries that support Uno Platform.
Note
While at the time of writing, there is no built-in support for input validation, input validation is planned to be supported by Uno Platform. This is because neither UWP nor WinUI 3 fully support input validation right now. To learn more about the upcoming input validation support, take a look at the following issue in the WinUI repository: https://github.com/microsoft/microsoft-ui-xaml/issues/179. The progress that's being made on this as part of Uno Platform is being tracked through this issue: https://github.com/unoplatform/uno/issues/4839.
To make our development process easier, first, let's add a reference to the Windows Community Toolkit controls:
- First, right-click the solution node in the Solution view and select Manage NuGet Packages for solution….
- Search for Microsoft.Toolkit.UI.Controls and select the package.
- In the project list, select the UWP head and click Install.
- Repeat steps 2 and 3 for the Microsoft.Toolkit.UI.Controls.DataGrid package.
- Now, search for Uno.Microsoft.Toolkit.UI.Controls and select the package.
Note
While the Windows Community Toolkit only supports UWP, thanks to the effort of the Uno Platform team, we can also use the Windows Community Toolkit inside our Uno Platform app on all the supported platforms. The Uno Platform team maintains Uno Platform-compatible versions of the Windows Community Toolkit packages based on the original packages and updates them accordingly.
- From the project list, select the macOS and WASM heads and click Install.
- Finally, repeat steps 5 and 6 with the Uno.Microsoft.Toolkit.UI.Controls.DataGrid package.
This allows us to use the Windows Community Toolkit controls inside our app. Since we also want to use these controls on macOS and WASM, we also installed the Uno Platform versions of those two packages. Since we added the Windows Community Toolkit control packages, we can start creating the Create Issue view:
- First of all, create the IssueRepository.cs class inside the Models folder and add the following code to it:
using System.Collections.Generic;
using UnoBookRail.Common.Issues;
namespace ResourcePlanner.Models
{
public class IssuesRepository
{
private static List<Issue> issues = new
List<Issue>();
public static List<Issue> GetAllIssues()
{
return issues;
}
public static void AddIssue(Issue issue)
{
issues.Add(issue);
}
}
}
This is the model that will collect issues. In a real-world app, this code would communicate with a database or API to persist issues, but for simplicity, we will only save them in a list.
- Next, create the CreateIssueViewModel.cs class inside the ViewModels folder and use the following code from GitHub: https://github.com/PacktPublishing/Creating-Cross-Platform-C-Sharp-Applications-with-Uno-Platform/blob/main/Chapter03/ResourcePlanner.Shared/ViewModels/CreateIssueViewModel.cs
Now that we've created the necessary Model and ViewModel, we will continue by adding the user interface to create a new issue.
For the user interface, we will implement input validation as this is typical for data entry forms in a line of business app. For this, we will implement the following behavior: if the user clicks on the Create Issue button, we will validate the data using a function in code behind. If we determine that the data is valid, we will create a new issue; otherwise, we will show an error message below every field that failed our custom validation using code behind. In addition to that, we will validate an input field every time the entered input changes.
Let's continue by creating the user interface:
- Create a new UserControl inside the Views folder named CreateIssueView.xaml and replace the XAML with the following:
<UserControl
x:Class="ResourcePlanner.Views.CreateIssueView"
xmlns="http://schemas.microsoft.com/winfx/2006
/xaml/presentation"
xmlns:x="http://schemas.microsoft.com/
winfx/2006/xaml"
xmlns:local="using:ResourcePlanner.Views"
xmlns:d="http://schemas.microsoft.com/
expression/blend/2008"
xmlns:mc="http://schemas.openxmlformats.org/
markup-compatibility/2006"
xmlns:wctcontrols="using:Microsoft.Toolkit.
Uwp.UI.Controls"
xmlns:wctui="using:Microsoft.Toolkit.Uwp.UI"
xmlns:ubrcissues="using:UnoBookRail.Common.Issues"
mc:Ignorable="d"
d:DesignHeight="300"
d:DesignWidth="400">
<StackPanel Orientation="Vertical" Padding="20">
<TextBlock Text="Create new issue"
FontSize="24"/>
<Grid ColumnSpacing="10">
<Grid.ColumnDefinitions>
<ColumnDefinition Width="200"/>
<ColumnDefinition Width="200"/>
</Grid.ColumnDefinitions>
<Grid.RowDefinitions>
<RowDefinition />
<RowDefinition />
</Grid.RowDefinitions>
<TextBox x:Name="TitleTextBox"
Header="Title"
Text="{x:Bind createIssueVM.Title,
Mode=TwoWay}"
HorizontalAlignment="Stretch"
TextChanged="FormInput_TextChanged"/>
<TextBlock x:Name="titleErrorNotification"
Grid.Row="1"Foreground="{ThemeResource
SystemErrorTextColor}"/>
<ComboBox Header="Type" Grid.Column="1"
ItemsSource="{wctui:EnumValues
Type=ubrcissues:IssueType}"
HorizontalAlignment="Stretch"
SelectedItem="{x:Bind
createIssueVM.IssueType,
Mode=TwoWay}"/>
</Grid>
<TextBox Header="Description"
Text="{x:Bind createIssueVM.Description,
Mode=TwoWay}"
MinWidth="410" MaxWidth="800"
HorizontalAlignment="Left"/>
<Button Content="Create new issue"
Margin="0,20,0,0" Width="410"
HorizontalAlignment="Left"
Click="CreateIssueButton_Click"/>
</StackPanel>
</UserControl>
This is a basic UI that allows users to enter a title and description and lets the user choose the issue's type. Note that we have a TextBlock control below the text inputs so that we can show error messages to the user if the provided input is not valid. In addition to that, we have also added a TextChanged listener to Title to be able to update the error message when the text changes.
- Now, replace the content of the CreateIssueView.xaml.cs file with the following code:
using ResourcePlanner.ViewModels;
using Windows.UI.Xaml;
using Windows.UI.Xaml.Controls;
namespace ResourcePlanner.Views
{
public sealed partial class CreateIssueView :
UserControl
{
private CreateIssueViewModel createIssueVM;
public CreateIssueView(CreateIssueViewModel
viewModel)
{
this.createIssueVM = viewModel;
this.InitializeComponent();
}
private void FormInput_TextChanged(object
sender, TextChangedEventArgs args)
{
EvaluateFieldsValid(sender);
}
private bool EvaluateFieldsValid(object
sender)
{
bool allValid = true;
if(sender == TitleTextBox || sender ==
null)
{
if (TitleTextBox.Text.Length == 0)
{
allValid = false;
titleErrorNotification.Text =
"Title must not be empty.";
}
Else
{
titleErrorNotification.Text = "";
}
}
return allValid;
}
private void CreateIssueButton_Click(object
sender, RoutedEventArgs args)
{
if (EvaluateFieldsValid(null))
{
createIssueVM.CreateIssueCommand.
Execute(null);
}
}
}
}
With this code, we now have input validation that's run when the text of an input field changes or when the user clicks on the Create Issue button. Only if all the input fields (right now, this is only the Title input field) are valid will we create an issue and execute CreateIssueCommand on our ViewModel.
- Finally, inside the NavigationViewModel.cs file, replace the creation of the Issues_OpenNewIssueViewCommand object with the following code and add the necessary using statement. That way, when the command is invoked, CreateIssueView will be displayed:
Issues_OpenNewIssueViewCommand = new RelayCommand(() =>
{
Content = new CreateIssueView(new
CreateIssueViewModel(this));
});
Now, if you start the app and click on the New Issue option from the Issue dropdown, you will see something similar to the following Figure 3.2:

Figure 3.2 – Create new issue interface
If you try to click on the Create new issue button, you will see a short message below the title input field that states "Title must not be empty". Upon entering text into the Title field, the message will disappear. While we have added simple inputs, we will now add more input options using the Windows Community Toolkit.
Using Windows Community Toolkit controls
So far, users can only enter a title and description and choose the issue's type. However, we also want to allow users to input specific data based on the issue's. For this, we will use one of the controls the Windows Community Toolkit provides: SwitchPresenter. The SwitchPresenter control allows us to render a certain part of the UI based on a property that's been set, similar to how a switch case in C# works.
Of course, SwitchPresenter is not the only control that's available from the Windows Community Toolkit; there are many more, such as GridSplitter, MarkdownTextBlock, and DataGrid, which we will use in the Displaying data using DataGrid section. Since we've already installed the necessary packages earlier in this chapter, we will add the controls to our user interface. Let's get started:
- Add the following XAML code below the description TextBox control inside CreateIssueView.xaml:
<wctcontrols:SwitchPresenter Value="{x:Bind createIssueVM.IssueType, Mode=OneWay}">
<wctcontrols:SwitchPresenter.SwitchCases>
<wctcontrols:Case Value="{x:Bind
ubrcissues:IssueType.Train}">
<StackPanel Orientation="Horizontal"
Spacing="10">
<StackPanel MinWidth="410"
MaxWidth="800">
<TextBox x:Name=
"TrainNumberTextBox"
Header="Train number"
Text="{x:Bind
createIssueVM.TrainNumber,
Mode=TwoWay}"
HorizontalAlignment="Stretch"
TextChanged=
"FormInput_TextChanged"/>
<TextBlock x:Name=
"trainNumberErrorNotification"
Foreground="{ThemeResource
SystemErrorTextColor}"/>
</StackPanel>
</StackPanel>
</wctcontrols:Case>
<wctcontrols:Case Value="{x:Bind
ubrcissues:IssueType.Station}">
<StackPanel MinWidth="410" MaxWidth="800"
HorizontalAlignment="Left">
<TextBox x:Name="StationNameTextBox"
Header="Station name" Text="{x:Bind
createIssueVM.StationName,
Mode=TwoWay}"
HorizontalAlignment="Stretch"
TextChanged=
"FormInput_TextChanged"/>
<TextBlock x:Name=
"stationNameErrorNotification"
Foreground="{ThemeResource
SystemErrorTextColor}"/>
</StackPanel>
</wctcontrols:Case>
<wctcontrols:Case Value="{x:Bind
ubrcissues:IssueType.Other}">
<StackPanel MinWidth="410" MaxWidth="800"
HorizontalAlignment="Left">
<TextBox x:Name="LocationTextBox"
Header="Location" Text="{x:Bind
createIssueVM.Location,
Mode=TwoWay}"
HorizontalAlignment="Stretch"
TextChanged=
"FormInput_TextChanged"/>
<TextBlock x:Name=
"locationErrorNotification"
Foreground="{ThemeResource
SystemErrorTextColor}"/>
</StackPanel>
</wctcontrols:Case>
</wctcontrols:SwitchPresenter.SwitchCases>
</wctcontrols:SwitchPresenter>
This allows us to display specific input fields, depending on the issue type that's selected by the user. This is because SwitchPresenter renders a specific Case based on the Value property that's been set. Since we bind it to the IssueType property of our ViewModel, any time the user changes the issue type, it will update accordingly. Note that this binding only works if we specify the mode to be OneWay since the default binding mode of x:Bind is OneTime and, as such, wouldn't update.
- Now, add the following code before the return statement of the EvaluateFields function inside CreateIssueViewModel.xaml.cs:
if (sender == TrainNumberTextBox || sender == null)
{
if (TrainNumberTextBox.Text.Length == 0)
{
if (createIssueVM.IssueType ==
UnoBookRail.Common.Issues.IssueType.Train)
{
allValid = false;
}
trainNumberErrorNotification.Text =
"Train number must not be empty.";
}
else
{
trainNumberErrorNotification.Text = "";
}
}
if (sender == StationNameTextBox || sender == null)
{
if (StationNameTextBox.Text.Length == 0)
{
if (createIssueVM.IssueType ==
UnoBookRail.Common.Issues.IssueType.Station)
{
allValid = false;
}
stationNameErrorNotification.Text =
"Station name must not be empty.";
}
else
{
stationNameErrorNotification.Text = "";
}
}
if (sender == LocationTextBox || sender == null)
{
if (LocationTextBox.Text.Length == 0)
{
if (createIssueVM.IssueType ==
UnoBookRail.Common.Issues.IssueType.Other)
{
allValid = false;
}
locationErrorNotification.Text =
"Location must not be empty.";
}
else
{
locationErrorNotification.Text = "";
}
}
Now, our input validation will also take the newly added input fields into account. Note that we will only block the creation of an issue if input that does not meet the validation process is relevant to the issue. For example, if the issue type is Train, we will ignore whether the location text is passing validation or not and users can create a new issue, regardless of whether the location input passes the validation stage.
Now, if you start the app and navigate to the Create new issue view, you will see something similar to the following Figure 3.3:

Figure 3.3 – Updated issue creation view. Left: Issue Train type selected; right: Issue Station type selected
When you change the issue type, you will notice that the form will change and show the correct input field, depending on the issue type. While we allow users to create a new issue, we currently have no way of displaying them. In the next section, we will change this by adding a new view to show the list of issues.
Displaying data using DataGrid
Since UnoBookRail employees will use this app to manage existing issues, it is important for them to view all the issues to easily get an overview of their current status. While there is no built-in UWP and Uno Platform control that makes this easy to implement, luckily, the Windows Community Toolkit contains the right control for this case: DataGrid.
The DataGrid control allows us to render data as a table, specify which columns to display, and allows users to sort the table based on a column. Before we start using the DataGrid control, though, we need to create the ViewModel and prepare the views:
- First, create a new class named IssueListViewModel.cs inside the ViewModels Solution folder and add the following code to it:
using System.Collections.Generic;
using UnoBookRail.Common.Issues;
namespace ResourcePlanner.ViewModels
{
public class IssueListViewModel
{
public readonly IList<Issue> Issues;
public IssueListViewModel(IList<Issue> issues)
{
this.Issues = issues;
}
}
}
Since we only want to show a subset of issues, such as when navigating to the train issues list, the list of issues to display will be passed as a constructor parameter.
- Now, create a new UserControl inside the Views folder named IssueListView.xaml.
- Finally, inside the NavigationViewModel class constructor, replace the creation of the Issues_OpenAllIssuesCommand, Issues_OpenTrainIssuesCommand, Issues_OpenTrainIssuesCommand, and Issues_OpenTrainIssuesCommand objects with the following code:
Issues_OpenAllIssuesCommand = new RelayCommand(() =>
{
Content = new IssueListView(new IssueListViewModel
(IssuesRepository.GetAllIssues()), this);
});
Issues_OpenTrainIssuesCommand = new RelayCommand(() =>
{
Content = new IssueListView(new IssueListViewModel
(IssuesRepository.GetAllIssues().Where(issue
=> issue.IssueType ==
IssueType.Train).ToList()), this);
});
Issues_OpenStationIssuesCommand = new RelayCommand(() =>
{
Content = new IssueListView(new IssueListViewModel
(IssuesRepository.GetAllIssues().Where(issue
=> issue.IssueType ==
IssueType.Station).ToList()), this);
});
Issues_OpenOtherIssuesCommand = new RelayCommand(() =>
{
Content = new IssueListView(new IssueListViewModel
(IssuesRepository.GetAllIssues().Where(issue
=> issue.IssueType ==
IssueType.Other).ToList()), this);
});
This allows the user to navigate to the issue list when the user clicks on the corresponding elements from the navigation, while also ensuring that we only show the issues in the list that are relevant to the navigation option. Note that we have chosen to create the commands using inline lambdas. However, you can also declare functions and use them to create the RelayCommand objects.
Now that we've added the necessary ViewModel and updated NavigationViewModel to allow us to navigate to the issue list view, we can continue writing the UI of our issue list view.
Displaying data with the DataGrid control
Before we implement the issue list view, let's quickly cover the basic features of DataGrid that we will use. There are two ways to get started with DataGrid:
- Let DataGrid auto-generate the columns. This has the disadvantage that the column headers will use the property names unless you change them inside AutoGeneratingColumn. While they are good to get started with the DataGrid control, they are often not the best choice. Also, using this method, you can't choose which columns to show; instead, it will show all columns.
- Specify which properties to include by manually specifying the columns you want. This option has the advantage that we can control which properties to include and also specify the column name. Of course, this also means that we have to ensure that our bindings are correct, which is a potential cause of bugs.
Specifying the columns of a DataGrid can be done by setting the DataGrid's Columns property and providing a collection of DataGridColumn objects. For certain data types, there are already built-in columns you can use, such as DataGridTextColumn for text-based data. Every column allows you to customize the header being displayed by specifying the Header property and whether users can sort the column through the CanUserSort property. For more complex data where there is no built-in DataGridColumn type, you can also implement your own DataGridColumn object. Alternatively, you can also use DataGridTemplateColumn, which allows you to render cells based on a specified template. For this, you can specify a CellTemplate object, which will be used to render cells, and a CellEditTemplate object, which will be used to let users edit the current cell's value.
In addition to specifying columns, the DataGrid controls also have more features you can customize. For example, the DataGrid allows you to select rows and customize the row and cell backgrounds. Now, let's continue by writing our issue list.
Now that we've covered the basics of DataGrid, let's continue by writing our issue list display interface:
- For this, add the following code to the IssueListView.xaml.cs file:
using Microsoft.Toolkit.Uwp.UI.Controls;
using ResourcePlanner.ViewModels;
using UnoBookRail.Common.Issues;
using Windows.UI.Xaml.Controls;
namespace ResourcePlanner.Views
{
public sealed partial class IssueListView :
UserControl
{
private IssueListViewModel issueListVM;
private NavigationViewModel navigationVM;
public IssueListView(IssueListViewModel
viewModel, NavigationViewModel
navigationViewModel)
{
this.issueListVM = viewModel;
this.navigationVM = navigationViewModel;
this.InitializeComponent();
}
private void IssueList_SelectionChanged(object
sender, SelectionChangedEventArgs e)
{
navigationVM.SetSelectedIssue((sender as
DataGrid).SelectedItem as Issue);
}
}
}
This allows us to create a binding from the DataGrid to the list issues. Note that we will also add a SelectionChanged handler function so that we can notify NavigationViewModel whether an issue has been selected. We're doing this since some options only make sense if an issue is selected. One of these options is the Export to PDF option, which we will implement in the Exporting issues in PDF format section.
- Add the following XAML namespace definition to the IssueListView.xaml file:
xmlns:wct="using:Microsoft.Toolkit.Uwp.UI.Controls"
- Now, replace Grid inside the IssueListView.xaml file with the following XAML:
<wct:DataGrid
SelectionChanged="IssueList_SelectionChanged"
SelectionMode="Single"
AutoGenerateColumns="False"
ItemsSource="{x:Bind
issueListVM.Issues,Mode=OneWay}">
<wct:DataGrid.Columns>
<wct:DataGridTextColumn Header="Title"
Binding="{Binding Title}"
IsReadOnly="True" CanUserSort="True"/>
<wct:DataGridTextColumn Header="Type"
Binding="{Binding IssueType}"
IsReadOnly="True" CanUserSort="True"/>
<wct:DataGridTextColumn Header="Creator"
Binding="{Binding OpenedBy.FormattedName}"
IsReadOnly="True" CanUserSort="True"/>
<wct:DataGridTextColumn Header="Created on"
Binding="{Binding OpenDate}"
IsReadOnly="True" CanUserSort="True"/>
<wct:DataGridCheckBoxColumn Header="Open"
Binding="{Binding IsOpen}"
IsReadOnly="True" CanUserSort="True"/>
<wct:DataGridTextColumn Header="Closed by"
Binding="{Binding ClosedBy.FormattedName}"
IsReadOnly="True" CanUserSort="True"/>
<wct:DataGridTextColumn Header="Closed on"
Binding="{Binding CloseDateReadable}"
IsReadOnly="True" CanUserSort="True"/>
</wct:DataGrid.Columns>
</wct:DataGrid>
Here, we added columns for the most important fields of our issue. Note that we only allow the title to be changed since the other fields would require more logic than what can easily be displayed as part of the DataGrid table layout. Since x:Bind is not supported in this case, we are using Binding to bind the properties to the columns.
Now, if you start the app and create an issue, you will see something similar to the following Figure 3.4:
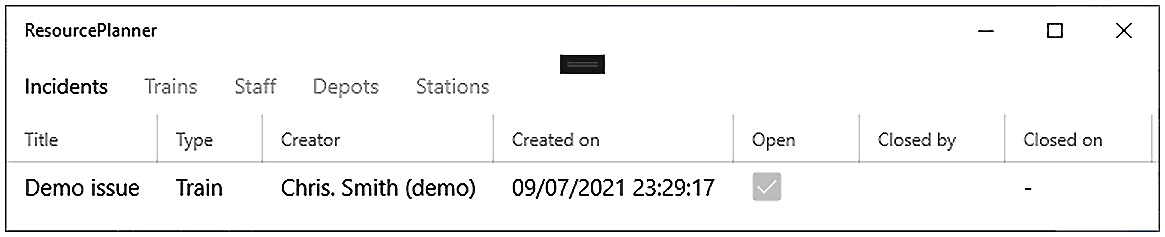
Figure 3.4 – DataGrid showing a demo issue
In this section, we only covered the basics of using the Windows Community Toolkit DataGrid control. If you wish to learn more about the DataGrid control, the official documentation contains hands-on examples covering the different APIs that are available for it. You can find out more here: https://docs.microsoft.com/en-us/windows/communitytoolkit/controls/datagrid. Now that we can display the list of existing issues, we will continue by writing a PDF export for issues. As part of this, we will also learn how to write a custom Uno Platform control that we will only use for the web.
Exporting issues in PDF format
In addition to being able to view data inside a line of business app, often, it is desired to be able to be export data, for example, as a PDF, so that you can print it or send it via email. For this, we will write an interface that allows users to export a given issue to PDF. Since there are no built-in APIs for this, we will use the iText library for this. Note that if you want to use the library in your application, you either need to follow the AGPL license or buy a commercial license for the library. However, before we can write the code to generate the PDF, we will need to prepare the project:
- First, we need to install the iText NuGet package. For this, right-click the solution and search for iText. Select the package. Then, from the project list, select the macOS, UWP, and WASM heads and click Install.
- Now, create a class named ExportIssueViewModel.cs inside the ViewModels folder with the following code:
using iText.Kernel.Pdf;
using iText.Layout;
using iText.Layout.Element;
using Microsoft.Toolkit.Mvvm.Input;
using System;
using System.IO;
using System.Runtime.InteropServices.WindowsRuntime;
using System.Windows.Input;
using UnoBookRail.Common.Issues;
namespace ResourcePlanner.ViewModels
{
public class ExportIssueViewModel
{
public readonly Issue Issue;
public ICommand SavePDFClickedCommand;
public ExportIssueViewModel(Issue issue)
{
Issue = issue;
SavePDFClickedCommand =
new RelayCommand(async () => { });
}
}
}
Note that we are adding those using statements now as we will need them later in this section.
- Now, create a new UserControl named ExportIssueView.xaml inside the Views folder.
- Replace the code inside ExportIssueView.xaml.cs with the following:
using ResourcePlanner.ViewModels;
using Windows.UI.Xaml.Controls;
namespace ResourcePlanner.Views
{
public sealed partial class ExportIssueView :
UserControl
{
private ExportIssueViewModel exportIssueVM;
public ExportIssueView(ExportIssueViewModel
viewModel)
{
this.exportIssueVM = viewModel;
this.InitializeComponent();
}
}
}
- Replace the code inside ExportIssueView.xaml with the code from GitHub:
- Lastly, replace the creation of Issue_ExportIssueViewCommand in the NavigationViewModel.cs file with the following code:
Issues_ExportIssueViewCommand = new RelayCommand(() =>
{
Content = new ExportIssueView(new
ExportIssueViewModel(this.selectedIssue));
});
Now that we've added the necessary interface, we will continue by writing the code for exporting an issue as a PDF. Since the behavior on the desktop will be different compared to that on the web, we will cover the desktop version first.
Exporting on desktop
Since we've already written the user interface to allow users to export issues, the only thing left is to update ExportIssueViewModel to generate the PDF and provide users with a way to access it. On the desktop, we will write the PDF file to the local filesystem and open it. Since the app is also a UWP app, we will write the file to the app's local folder. Now, let's update ExportIssueViewModel:
- First, create a new function called GeneratePDF inside the ExportIsseuViewModel class with the following code:
public byte[] GeneratePDF()
{
byte[] bytes;
using (var memoryStream = new MemoryStream())
{
bytes = memoryStream.ToArray();
}
return bytes;
}
- Now, add the following code before the assignment inside the using block:
var pdfWriter = new PdfWriter(memoryStream);
var pdfDocument = new PdfDocument(pdfWriter);
var document = new Document(pdfDocument);
document.Close();
This creates a new iText PdfWriter and iText PdfDocument that will be written to the byte array using the MemoryStream object.
- After adding PDFWriter, PDFDocument, and Document, add the following code to write the header of the document:
var header = new Paragraph("Issue export: " +
Issue.Title)
.SetTextAlignment(
iText.Layout.Properties.TextAlignment.CENTER)
.SetFontSize(20);
document.Add(header);
This creates a new paragraph with the text "Issue export:" and the issue's title. It also sets the text alignment and font size to make it easier to distinguish as the header of the document.
- Since we also want to export information about the issue, add the following code before the call to document.Close():
var issueType = new Paragraph("Type: " + Issue.IssueType);
document.Add(issueType);
switch (Issue.IssueType)
{
case IssueType.Train:
var trainNumber = new Paragraph("Train number: "
+ Issue.TrainNumber);
document.Add(trainNumber);
break;
case IssueType.Station:
var stationName = new Paragraph("Station name: "
+ Issue.StationName);
document.Add(stationName);
break;
case IssueType.Other:
var location = new Paragraph("Location: " +
Issue.Location);
document.Add(issueType);
break;
}
var description = new Paragraph("Description: " + Issue.Description);
document.Add(description);
This will add the necessary paragraph to the PDF document based on the issue's type. In addition to that, we will add the issue's description to the PDF document.
Note
Due to a bug in iText, running this code may create a NullReferenceException when adding the first element to the document. Unfortunately, at the time of writing this book, there is no known workaround. This will only occur when the debugger is attached and will not cause any issues when the app is running in production. When running the app with the debugger attached, you can click Continue via the toolbar to continue debugging the app.
- Lastly, replace the creation of SavePDFClickedCommand with the
following code:
SavePDFClickedCommand = new RelayCommand(async () =>
{
#if !__WASM__
var bytes = GeneratePDF();
var tempFileName =
$"{Path.GetFileNameWithoutExtension
(Path.GetTempFileName())}.pdf";
var folder = Windows.Storage.ApplicationData.
Current.TemporaryFolder;
await folder.CreateFileAsync(tempFileName,
Windows.Storage.CreationCollisionOption.
ReplaceExisting);
var file = await
folder.GetFileAsync(tempFileName);
await Windows.Storage.FileIO.WriteBufferAsync
(file, bytes.AsBuffer());
await Windows.System.Launcher.LaunchFileAsync
(file);
#endif
});
This will create a PDF, save it to the apps temporary folder, and open it with the default PDF handler.
Note
In this chapter, we are writing the file to a temporary folder and opening it using the default PDF viewer. Depending on your application and use case, FileSavePicker and other file pickers can be a very good fit. You can learn more about FileSavePicker and the other file pickers that are available here: https://platform.uno/docs/articles/features/windows-storage-pickers.html.
To try the issue export out, start the app and create a new issue. After that, select the issue from the issue list and click Export to PDF from the Issues dropdown at the top. Now, if you click on Create PDF, the PDF will be created. Shortly after that, the PDF will be opened in your default PDF viewer. The PDF should look something like this:

Figure 3.5 – Demo issue export PDF
Since we cannot write a file to the user's local filesystem when the app is running on the web using WASM, in the next section, we will update our app to provide a download link on WASM instead of the Create PDF button by writing a custom HTML-element control.
Exporting on the web with a download link
While the key feature of Uno Platform is to run code that runs on all platforms, it also allows developers to write custom controls that are platform-specific. You can use this to take advantage of platform-specific controls. In our case, we will use this to create an HTML a-tag to provide a download link for the WASM version of our app. We will do this using the Uno.UI.Runtime.WebAssembly.HtmlElement attribute:
- First, create a new class called WasmDownloadElement.cs inside the Views folder with the following code:
using System;
using System.Collections.Generic;
using System.Text;
using Windows.UI.Xaml;
using Windows.UI.Xaml.Controls;
namespace ResourcePlanner.Views
{
#if __WASM__
[Uno.UI.Runtime.WebAssembly.HtmlElement("a")]
public class WasmDownloadElement : ContentControl
{
}
#endif
}
This will be our a -tag, which we will use to allow users to download the issue-export PDF. Since we only want this control on WASM, we have placed it inside the #if __WASM__ preprocessor directive.
- To be able to customize the MIME type of the download and the name of the downloaded file, add the following code to the WasmDownloadElement class:
public static readonly DependencyProperty MimeTypeProperty = DependencyProperty.Register(
"MimeType", typeof(string),
typeof(WasmDownloadElement), new
PropertyMetadata("application/octet-stream",
OnChanged));
public string MimeType
{
get => (string)GetValue(MimeTypeProperty);
set => SetValue(MimeTypeProperty, value);
}
public static readonly DependencyProperty FileNameProperty = DependencyProperty.Register(
"FileName", typeof(string),
typeof(WasmDownloadElement), new
PropertyMetadata("filename.bin", OnChanged));
public string FileName
{
get => (string)GetValue(FileNameProperty);
set => SetValue(FileNameProperty, value);}
private string _base64Content;
public void SetBase64Content(string content)
{
_base64Content = content;
Update();
}
private static void OnChanged(DependencyObject dependencyobject, DependencyPropertyChangedEventArgs args)
{
if (dependencyobject is WasmDownloadElement wd)
{
wd.Update();
}
}
private void Update()
{
if (_base64Content?.Length == 0)
{
this.ClearHtmlAttribute("href");
}
else
{
var dataUrl =
$"data:{MimeType};base64,{_base64Content}";
this.SetHtmlAttribute("href", dataUrl);
this.SetHtmlAttribute("download", FileName);
}
}
While this is a lot of code, we are only creating two DependencyProperty fields on the WasmDownloadElement class, namely MimeType and FileName, and allowing them to set the content that will be downloaded. The rest of the code handles setting the correct attributes on the underlying control.
- Lastly, add the following code to the constructor of ExportIssueView, after the call to this.InitializeComponent():
#if __WASM__
this.WASMDownloadLink.MimeType =
"application/pdf";
var bytes = exportIssueVM.GeneratePDF();
var b64 = Convert.ToBase64String(bytes);
this.WASMDownloadLink.SetBase64Content(b64);
#endif
This will set the correct MIME type on the download link and set the correct content to download. Note that we defined the WASMDownloadLink element earlier in this chapter, inside the ExportIssueView.xaml file.
To test this, start the WASM head of your app. Once it has loaded, create an issue, then select it from the issue list and click Export to PDF via the Issues option. Instead of the Create PDF button, you should now see the Download PDF option, as shown in Figure 3.6:

Figure 3.6 – Exporting a PDF on WASM
Once you click the link, the PDF export will be downloaded.
Summary
In this chapter, we built a desktop app that works on Windows, macOS, and on the web using WASM. We covered how to write a data input form with input validation and how to use the Windows Community Toolkit. After that, we learned how to display data using the Windows Community Toolkit DataGrid control. Lastly, we covered how to export data in PDF format and provided a download link by writing a custom HTML control.
In the next chapter, we'll build a mobile app instead. While it will also be designed to be used by employees of UnoBookRail, the main focus will be running the app on a mobile device. Among other things, we'll use this app as an opportunity to look at working with unreliable connectivity and using device capabilities such as a camera.