Chapter 1
Quick Setup Guide
This chapter contains the essential information you need to get your Nikon D5500 prepped and ready to go. You’ll learn how to use a few of the basic controls and features, and how to transfer your photos to your computer. If you want a more complete map of the functions of your camera, skip ahead to Chapter 2. Live view is touched on only briefly in this chapter; if you want to begin using live view or shoot movies immediately, check out Chapter 6.
Pre-Flight Checklist
The initial setup of your Nikon D5500 is fast and easy. You just need to learn a few controls, charge the battery, attach a lens, and insert a memory card.
Charging the Battery
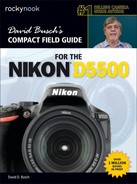
When the EN-EL14a battery is inserted into the MH-24 charger properly (it’s impossible to insert it incorrectly), an orange Charge light begins flashing, and remains flashing until the status lamp glows steadily, indicating that charging is finished, generally within about 90 minutes. When the battery is charged, slide the latch on the bottom of the camera and ease the battery in, as shown in Figure 1.1.
Introducing the Basic Controls
You’ll find descriptions of most of the controls used with the Nikon D5500 in Chapter 2, which provides a complete “roadmap” of the camera’s buttons and dials and switches. However, you may need to perform a few tasks during this initial setup process, and most of them will require the MENU button, the multi selector pad, and command dial. Figure 1.2 shows the location of these controls.
![]() MENU button. It’s located to the left of the LCD monitor. When you want to access a menu, press it. To exit most menus, press it again.
MENU button. It’s located to the left of the LCD monitor. When you want to access a menu, press it. To exit most menus, press it again.
![]() Multi selector pad. This is a thumbpad-sized button with projections at the up, down, left, and right “navigational” positions, plus a button in the center marked “OK.” With the D5500, the multi selector is used exclusively for navigation; for example, to navigate among menus on the LCD monitor or to choose one of the 39 focus points, to advance or reverse display of a series of images during picture review, or to change the kind of photo information displayed on the screen. The OK button is used to confirm your choices.
Multi selector pad. This is a thumbpad-sized button with projections at the up, down, left, and right “navigational” positions, plus a button in the center marked “OK.” With the D5500, the multi selector is used exclusively for navigation; for example, to navigate among menus on the LCD monitor or to choose one of the 39 focus points, to advance or reverse display of a series of images during picture review, or to change the kind of photo information displayed on the screen. The OK button is used to confirm your choices.
![]() Command dial. This dial, located on the right corner of the top surface, is used for some navigation and to make settings, such as f/stop or shutter speed.
Command dial. This dial, located on the right corner of the top surface, is used for some navigation and to make settings, such as f/stop or shutter speed.
![]() Touch screen. You can use your fingers to tap, slide, pinch, and stretch on the D5500’s LCD monitor. I’ll show you how to use these gestures next.
Touch screen. You can use your fingers to tap, slide, pinch, and stretch on the D5500’s LCD monitor. I’ll show you how to use these gestures next.

The Touch Screen
The LCD monitor supports a limited number of touch operations, such as adjusting some camera settings, zooming in and out of the image in playback, and, in live view only, selecting a focus point and taking a picture by tapping the screen. When adjustments are available, a white rectangle is drawn around the indicator that can be accessed by touch. You will see up/down and left/right triangles used to adjust increments, or a reversed arrow that represents “return” to the previous menu. Available gestures include:
![]() Tap. Touch the screen with a single finger to make an adjustment. For example, you can tap an up/down or left/right triangle to increment or decrement a setting, such as monitor brightness. In live view, when Touch Shutter is activated, tapping the screen locates the focus point at the tapped location and takes a picture. When Touch Shutter is deactivated, tapping the screen simply relocates the focus point. (You’ll find a Touch Shutter on/off icon at the left side of the live view screen, as explained in Chapter 6.)
Tap. Touch the screen with a single finger to make an adjustment. For example, you can tap an up/down or left/right triangle to increment or decrement a setting, such as monitor brightness. In live view, when Touch Shutter is activated, tapping the screen locates the focus point at the tapped location and takes a picture. When Touch Shutter is deactivated, tapping the screen simply relocates the focus point. (You’ll find a Touch Shutter on/off icon at the left side of the live view screen, as explained in Chapter 6.)
![]() Flick. Move a single finger a short distance from side to side across the monitor. Note that if a second finger or other object is also touching the monitor, it may not respond. During playback, a flick to the right or left advances to the next or previous image.
Flick. Move a single finger a short distance from side to side across the monitor. Note that if a second finger or other object is also touching the monitor, it may not respond. During playback, a flick to the right or left advances to the next or previous image.
![]() Slide. Move a single finger across the screen in left, right, up, or down directions. You can use this gesture during playback to scroll around within a zoomed image.
Slide. Move a single finger across the screen in left, right, up, or down directions. You can use this gesture during playback to scroll around within a zoomed image.
![]() Stretch/pinch. Spread apart two fingers to zoom into an image during playback, or pinch them together to zoom out.
Stretch/pinch. Spread apart two fingers to zoom into an image during playback, or pinch them together to zoom out.
A TOUCH OF SCREEN
Throughout this book, when telling you how to use a menu or feature, I’m going to stick to referring to the physical buttons and dials rather than explicitly say something like “press OK or tap the Return icon on the LCD monitor.” Nikon really needs to redesign the camera interface to take full advantage of the touch screen capabilities. Cameras from other vendors, for example, use slider controls instead of left/right touch arrows to make many adjustments. While some may find Nikon’s implementation helpful, it’s really best when used with the Touch Shutter feature in live view, zooming in/out of a playback image, or, perhaps, tapping a menu entry rather than scrolling up/down with the directional buttons.
Because the screen uses static electricity, it may not respond when touched with gloved hands, fingernails, or when covered with a protective film. I have a “skin” over my D5500’s monitor and it works just fine; your experience may vary, depending on the covering you use. Don’t use a stylus, pen, or sharp object instead of a finger; if your fingers are too large, stick to the physical controls such as the buttons or dials. As you’ll learn in Chapter 4, you can enable or disable the touch controls or enable them only during playback, using an option in the Setup menu.
Setting the Clock
The in-camera clock might have been set for you by someone checking out your camera prior to delivery. Press the MENU button to the left of the viewfinder, and then use the multi selector to scroll down to the Setup menu (it’s marked with a wrench icon), press the multi selector button to the right, and then press the down button to scroll down to Time Zone and Date, and press the right button again. The options for setting the 24-hour clock will appear on the screen that appears next. They include Time Zone, actual Date and Time, Date Format, and Daylight Saving Time (on/off).
Mounting the Lens
If your D5500 has no lens attached, you’ll need to mount one before shooting:
1. Select the lens and loosen (but do not remove) the rear lens cap.
2. Remove the body cap on the camera by rotating the cap away from the shutter release button.
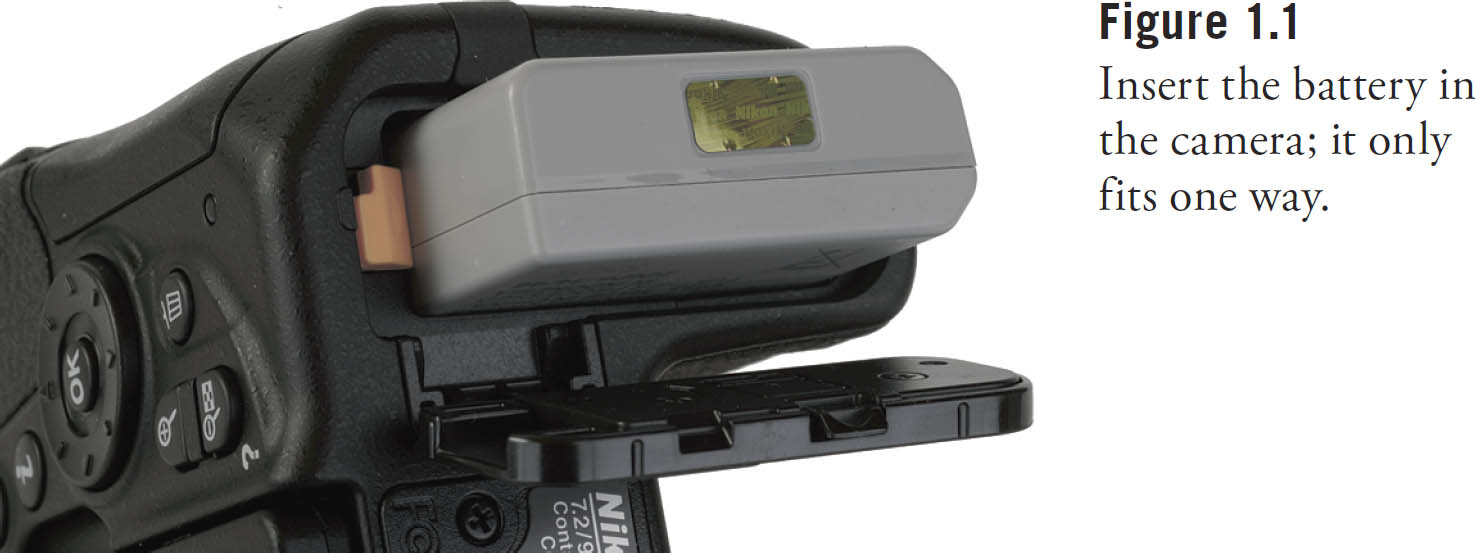
3. Once the body cap has been removed, remove the rear lens cap from the lens, set it aside, and then mount the lens on the camera by matching the alignment indicator on the lens barrel with the white bump on the camera’s lens mount (see Figure 1.3). Rotate the lens toward the shutter release until it seats securely.
4. Set the focus mode switch on the lens to AF or M/A (Autofocus with manual adjustment possible). If the lens hood is bayoneted on the lens in the reversed position, twist it off and remount with the “petals” (if present) facing outward. A lens hood protects the front of the lens from accidental bumps, and reduces flare caused by extraneous light arriving at the front of the lens from outside the picture area.
Adjusting Diopter Correction
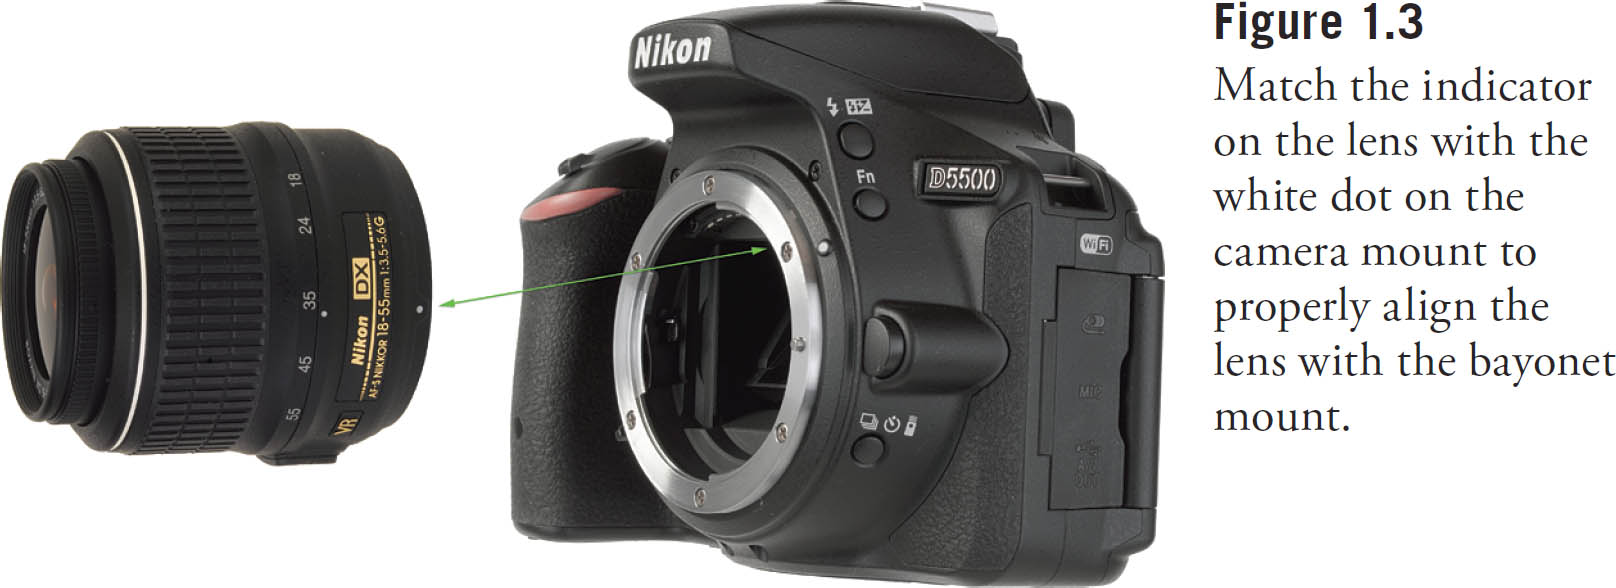
If you are a glasses wearer and want to use the D5500 without your glasses, or to add further correction, you can take advantage of the camera’s built-in diopter adjustment, which can be varied from –1.7 to +0.5 correction. Press the shutter release halfway to illuminate the indicators in the viewfinder, then move the diopter adjustment control next to the viewfinder (see Figure 1.4) while looking through the viewfinder until the indicators appear sharp. Should the available correction be insufficient, Nikon offers nine different Diopter-Adjustment Viewfinder Correction lenses for the viewfinder window, ranging from –3 to +1, at a cost of $16 to $20 each.
Inserting and Formatting a Memory Card
Next, insert a memory card. Slide the cover on the right side of the camera toward the back, and then open it. Inside, you’ll find an SD card slot. You should only remove the memory card when the camera is switched off, or, at the very least, when the yellow-green card access light (just above the Trash button on the back of the camera) that indicates the D5500 is writing to the card is not illuminated.
Insert the memory card with the label facing the back of the camera, oriented so the edge with the gold connectors goes into the slot first (see Figure 1.5). Close the door, and, if this is your first use of the card, format it (described next). When you want to remove the memory card later, press the card inward, and it will pop right out.

I recommend formatting the memory card before each shooting session, to ensure that the card has a fresh file system, and doesn’t have stray files left over. Format only when you’ve transferred all the images to your computer, of course.
![]() Setup menu format. Press the MENU button, use the up/down buttons of the multi selector (that thumb-pad-sized control to the right of the LCD monitor) to choose the Setup menu (which is represented by a wrench icon), navigate to the Format Memory Card entry with the right button of the multi selector, and select Yes from the screen that appears. Press OK to begin the format process.
Setup menu format. Press the MENU button, use the up/down buttons of the multi selector (that thumb-pad-sized control to the right of the LCD monitor) to choose the Setup menu (which is represented by a wrench icon), navigate to the Format Memory Card entry with the right button of the multi selector, and select Yes from the screen that appears. Press OK to begin the format process.
Selecting an Exposure Mode
The Nikon D5500 has four types of shooting modes: advanced modes/exposure modes; auto modes, which includes Auto and Auto (Flash Off); and a third set, which Nikon labels Scene modes. Also available is a fourth option, Special Effects, which allows you to process your images with some retouching effects, such as Color Sketch or Miniature Effect, as the picture is actually taken. Nikon D5500 has two types of exposure modes: Auto/Scene/Effects modes, in which the camera makes virtually all the shooting decisions for you, and advanced modes, which include semi-automatic and manual exposure modes (Program, Shutter-priority, Aperture-priority, and Manual).
Choosing a Scene Mode
The two Auto modes and 16 Scene modes can be selected by rotating the mode dial on the top right of the Nikon D5500. The Auto and Auto (Flash Off) settings have their own positions on the dial, while the Scene modes can be selected by rotating the mode dial to the SCENE position, and then rotating the main command dial to select one of the additional modes.
![]() Auto. In this mode, the D5500 makes all the exposure decisions for you, and will pop up the internal flash if necessary under low-light conditions. The camera automatically focuses on the subject closest to the camera (unless you’ve set the lens to manual focus), and the autofocus-assist illuminator lamp on the front of the camera will light up to help the camera focus in low-light conditions.
Auto. In this mode, the D5500 makes all the exposure decisions for you, and will pop up the internal flash if necessary under low-light conditions. The camera automatically focuses on the subject closest to the camera (unless you’ve set the lens to manual focus), and the autofocus-assist illuminator lamp on the front of the camera will light up to help the camera focus in low-light conditions.
![]() Auto (Flash Off). Identical to Auto mode, except that the flash will not pop up under any circumstances. You’d want to use this in a museum, during religious ceremonies, concerts, or any environment where flash is forbidden or distracting.
Auto (Flash Off). Identical to Auto mode, except that the flash will not pop up under any circumstances. You’d want to use this in a museum, during religious ceremonies, concerts, or any environment where flash is forbidden or distracting.
![]() Portrait. Use this mode when you’re taking a portrait of a subject standing relatively close to the camera and want to de-emphasize the background, maximize sharpness, and produce flattering skin tones. The built-in flash will pop up if needed.
Portrait. Use this mode when you’re taking a portrait of a subject standing relatively close to the camera and want to de-emphasize the background, maximize sharpness, and produce flattering skin tones. The built-in flash will pop up if needed.
![]() Landscape. Select this mode when you want extra sharpness and rich colors of distant scenes. The built-in flash and AF-assist illuminator are disabled.
Landscape. Select this mode when you want extra sharpness and rich colors of distant scenes. The built-in flash and AF-assist illuminator are disabled.
![]() Child. Use this mode to accentuate the vivid colors often found in children’s clothing, and to render skin tones with a soft, natural-looking texture. The D5500 focuses on the closest subject to the camera. The built-in flash will pop up if needed.
Child. Use this mode to accentuate the vivid colors often found in children’s clothing, and to render skin tones with a soft, natural-looking texture. The D5500 focuses on the closest subject to the camera. The built-in flash will pop up if needed.
![]() Sports. Use this mode to freeze fast-moving subjects. The D5500 selects a fast shutter speed to stop action, and focuses continuously on the center focus point while you have the shutter release button pressed halfway. However, you can select one of the other two focus points to the left or right of the center by pressing the multi selector left/right buttons. The built-in electronic flash and focus assist illuminator lamp are disabled.
Sports. Use this mode to freeze fast-moving subjects. The D5500 selects a fast shutter speed to stop action, and focuses continuously on the center focus point while you have the shutter release button pressed halfway. However, you can select one of the other two focus points to the left or right of the center by pressing the multi selector left/right buttons. The built-in electronic flash and focus assist illuminator lamp are disabled.
![]() Close Up. This mode is helpful when you are shooting close-up pictures of a subject from about one foot away or less, such as flowers, bugs, and small items. The D5500 focuses on the closest subject in the center of the frame, but you can use the multi selector right and left buttons to focus on a different point. Use a tripod in this mode, as exposures may be long enough to cause blurring from camera movement. The built-in flash will pop up if needed.
Close Up. This mode is helpful when you are shooting close-up pictures of a subject from about one foot away or less, such as flowers, bugs, and small items. The D5500 focuses on the closest subject in the center of the frame, but you can use the multi selector right and left buttons to focus on a different point. Use a tripod in this mode, as exposures may be long enough to cause blurring from camera movement. The built-in flash will pop up if needed.
![]() Night Portrait. Choose this mode when you want to illuminate a subject in the foreground with flash (it will pop up automatically, if needed), but still allow the background to be exposed properly by the available light. The camera focuses on the closest main subject. Be prepared to use a tripod or a vibration-resistant lens like the 18-55 VR kit lens to reduce the effects of camera shake.
Night Portrait. Choose this mode when you want to illuminate a subject in the foreground with flash (it will pop up automatically, if needed), but still allow the background to be exposed properly by the available light. The camera focuses on the closest main subject. Be prepared to use a tripod or a vibration-resistant lens like the 18-55 VR kit lens to reduce the effects of camera shake.
![]() Night Landscape. Mount your camera on a tripod and use this mode for longer exposure times to produce images with more natural colors and reduced visual noise in scenes with street lights or neon signs.
Night Landscape. Mount your camera on a tripod and use this mode for longer exposure times to produce images with more natural colors and reduced visual noise in scenes with street lights or neon signs.
![]() Party/Indoor. For indoor scenes with typical background lighting.
Party/Indoor. For indoor scenes with typical background lighting.
![]() Beach/Snow. Useful for bright high-contrast scenes with sand or snow. The built-in flash and AF-assist lamp are disabled.
Beach/Snow. Useful for bright high-contrast scenes with sand or snow. The built-in flash and AF-assist lamp are disabled.
![]() Sunset. Emphasizes the rich colors at sunset or sunrise, disables the flash, and may use a slow shutter speed, so consider working with a tripod.
Sunset. Emphasizes the rich colors at sunset or sunrise, disables the flash, and may use a slow shutter speed, so consider working with a tripod.
![]() Dusk/Dawn. Similar to Sunset mode, but preserves the subtle colors in the sky just after sunset, or just prior to dawn.
Dusk/Dawn. Similar to Sunset mode, but preserves the subtle colors in the sky just after sunset, or just prior to dawn.
![]() Pet Portrait. An “action” mode specifically for fast-moving, erratic subjects, such as pets.
Pet Portrait. An “action” mode specifically for fast-moving, erratic subjects, such as pets.
![]() Candlelight. Disables your flash to allow photographs by candle; a tripod is recommended.
Candlelight. Disables your flash to allow photographs by candle; a tripod is recommended.
![]() Blossom. Uses a small f/stop to expand depth-of-field when shooting landscapes with broad expanses of blossoms. This Scene mode may result in longer shutter speeds, so consider using a tripod.
Blossom. Uses a small f/stop to expand depth-of-field when shooting landscapes with broad expanses of blossoms. This Scene mode may result in longer shutter speeds, so consider using a tripod.
![]() Autumn Colors. Makes reds and yellows in Fall foliage richer.
Autumn Colors. Makes reds and yellows in Fall foliage richer.
![]() Food. Boosts saturation to make food look more appetizing in your snaps.
Food. Boosts saturation to make food look more appetizing in your snaps.
Special Effects modes, available when you rotate the mode dial to Effects, provide additional special looks. Of the following, Color Sketch, Miniature Effect, and Selective Color are available in both still and live view/movie-shooting modes.
![]() Night Vision. Produces images of the darkest scenes using the D5500’s high ISO sensitivity settings. Use a tripod, because blur is likely with the longer shutter speeds. Under this dim lighting, you’ll need to focus manually if working with the optical viewfinder; autofocus is available only in live view.
Night Vision. Produces images of the darkest scenes using the D5500’s high ISO sensitivity settings. Use a tripod, because blur is likely with the longer shutter speeds. Under this dim lighting, you’ll need to focus manually if working with the optical viewfinder; autofocus is available only in live view.
![]() Super Vivid. Provides brilliant, rich, contrasty colors.
Super Vivid. Provides brilliant, rich, contrasty colors.
![]() Pop. Increased saturation without excessive contrast.
Pop. Increased saturation without excessive contrast.
![]() Photo Illustration. Sharpens the outlines and reduces the number of colors to create a posterization effect.
Photo Illustration. Sharpens the outlines and reduces the number of colors to create a posterization effect.
![]() Toy Camera Effect. Blurry, vignetted pictures that look as if they were taken with a toy camera. In live view, you can vary the strength of the effect.
Toy Camera Effect. Blurry, vignetted pictures that look as if they were taken with a toy camera. In live view, you can vary the strength of the effect.
![]() Miniature Effect. This effect is widely becoming known as “Tilt/Shift” because it can be reproduced with special lenses that tilt and shift the plane of focus. By throwing backgrounds and foregrounds out of focus, the subjects in the middle of the frame appear to be miniatures photographed with shallow depth-of-field. A cool effect, but it’s already starting to be over-used.
Miniature Effect. This effect is widely becoming known as “Tilt/Shift” because it can be reproduced with special lenses that tilt and shift the plane of focus. By throwing backgrounds and foregrounds out of focus, the subjects in the middle of the frame appear to be miniatures photographed with shallow depth-of-field. A cool effect, but it’s already starting to be over-used.
![]() Selective Color. You choose the colors that you want to dominate the main subject in your image, and everything else is rendered in black-and-white.
Selective Color. You choose the colors that you want to dominate the main subject in your image, and everything else is rendered in black-and-white.
![]() Silhouette. Exposes for bright backgrounds, turning foreground objects into underexposed silhouettes.
Silhouette. Exposes for bright backgrounds, turning foreground objects into underexposed silhouettes.
![]() High Key. Exposes for bright scenes with lots of highlight areas.
High Key. Exposes for bright scenes with lots of highlight areas.
![]() Low Key. Tailors exposure for darker scenes, retaining murky shadows while allowing highlights to remain.
Low Key. Tailors exposure for darker scenes, retaining murky shadows while allowing highlights to remain.
Choosing an Advanced Mode
The advanced modes include Programmed auto (or Program mode), Shutter-priority, Aperture-priority, and Manual exposure mode, known collectively as PSAM modes, for their initials. These are the modes that allow you to specify how the camera chooses its settings when making an exposure for greater creative control. Figure 1.6 shows the position of the modes described next.
![]() P (Program). This mode allows the D5500 to select the basic exposure settings, but you can still override the camera’s choices to fine-tune your image, while maintaining metered exposure.
P (Program). This mode allows the D5500 to select the basic exposure settings, but you can still override the camera’s choices to fine-tune your image, while maintaining metered exposure.
![]() S (Shutter-priority). This mode is useful when you want to use a particular shutter speed to stop action or produce creative blur effects. Choose your preferred shutter speed, and the D5500 will select the appropriate f/stop for you.
S (Shutter-priority). This mode is useful when you want to use a particular shutter speed to stop action or produce creative blur effects. Choose your preferred shutter speed, and the D5500 will select the appropriate f/stop for you.

![]() A (Aperture-priority). Choose when you want to use a particular lens opening, especially to control sharpness or how much of your image is in focus. Specify the f/stop you want, and the D5500 will select the appropriate shutter speed for you.
A (Aperture-priority). Choose when you want to use a particular lens opening, especially to control sharpness or how much of your image is in focus. Specify the f/stop you want, and the D5500 will select the appropriate shutter speed for you.
![]() M (Manual). Select when you want full control over the shutter speed and lens opening, either for creative effects or because you are using a studio flash or other flash unit not compatible with the D5500’s automatic flash metering.
M (Manual). Select when you want full control over the shutter speed and lens opening, either for creative effects or because you are using a studio flash or other flash unit not compatible with the D5500’s automatic flash metering.
Changing Settings with the Information Edit Screen
All the settings that follow can be changed using the information edit screen. You can see your current settings from the shooting setting screen, shown at left in Figure 1.7. If this screen is not shown on the LCD monitor, you can produce it by pressing the Info button located to the right of the viewfinder window. You can change any of the settings arrayed along the bottom two rows of the shooting setting screen. To do so, press the i button, positioned next to the multi selector at roughly the 11 o’clock position. That summons the information edit screen (at right in the figure), which allows you to use the multi selector buttons to navigate to the settings in the bottom two rows. Navigate to the setting you want to change, press the OK button to view your options, and highlight your choice with the up/down multi selector buttons, and press OK again to confirm.
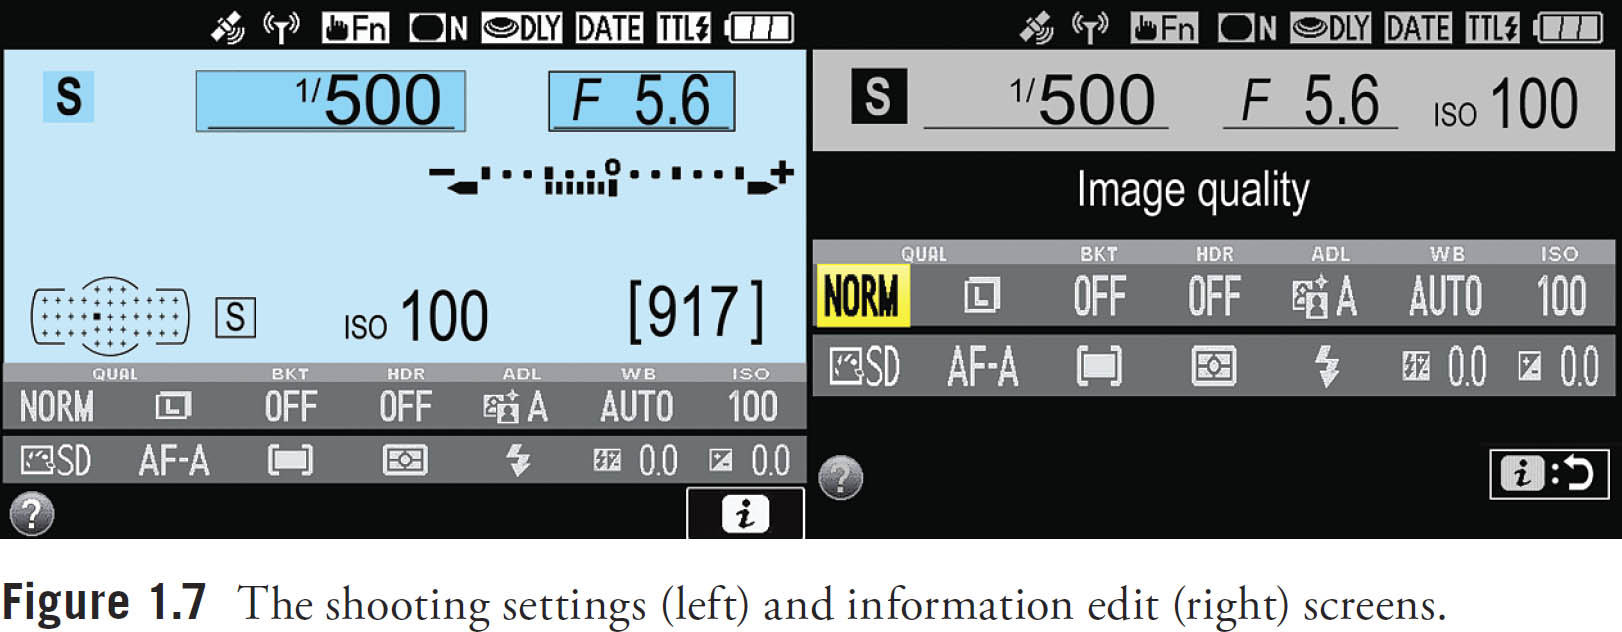
The Info button does nothing but switch the display on or off; the i button accesses the information edit screen and several other adjustment screens.
Choosing a Release Mode
The release mode determines when (and how often) the D5500 makes an exposure. Your D5500 has seven release (shooting/drive) modes: single frame, continuous L (3 frames per second), continuous H (5 frames per second), self-timer, delayed remote (ML-L3), quick response remote (ML-L3), and quiet shutter release. Change them by pressing the release mode/drive button located on the front of the camera below the lens release button on the left side of the lens mount when you’re holding the camera. Hold it down and rotate the command dial to select the mode you want. Press OK to confirm. The release modes are as follows:
![]() Single frame. In this mode, the D5500 takes one picture each time you press the shutter release button down all the way. If you press the shutter and nothing happens (which is very frustrating!), you may be using a focus mode that requires sharp focus to be achieved before a picture can be taken. This is called focus priority, and is discussed in more detail in Chapter 4.
Single frame. In this mode, the D5500 takes one picture each time you press the shutter release button down all the way. If you press the shutter and nothing happens (which is very frustrating!), you may be using a focus mode that requires sharp focus to be achieved before a picture can be taken. This is called focus priority, and is discussed in more detail in Chapter 4.
![]() Continuous L/Continuous H. These modes fire off shots at up to 3 or 5 frames per second, respectively. The frame rate can slow down as your D5500’s memory buffer fills, which forces the camera to wait until some of the pictures you have already taken are written to the memory card, freeing up more space in the buffer.
Continuous L/Continuous H. These modes fire off shots at up to 3 or 5 frames per second, respectively. The frame rate can slow down as your D5500’s memory buffer fills, which forces the camera to wait until some of the pictures you have already taken are written to the memory card, freeing up more space in the buffer.
![]() Quiet shutter release. This setting, represented by a Q symbol, activates the D5500’s “quiet mode,” which silences the camera’s beep noise during autofocus, reduces the sound the mirror makes when it flips back down, and delays that “noise” until you release the shutter button.
Quiet shutter release. This setting, represented by a Q symbol, activates the D5500’s “quiet mode,” which silences the camera’s beep noise during autofocus, reduces the sound the mirror makes when it flips back down, and delays that “noise” until you release the shutter button.
![]() Self-timer. You can use the self-timer as a replacement for a remote release, to reduce the effects of camera/user shake when the D5500 is mounted on a tripod or, say, set on a firm surface, or when you want to get in the picture yourself. Use Custom Setting c3 to specify delays of 2, 5, 10, or 20 seconds. You can also specify the number of shots taken at the end of the elapsed period, and the interval between those shots. Any time you use the camera on a tripod (with the self-timer or otherwise), make sure there is no bright light shining on the viewfinder window; if so, cover it or locate a DK-5 eyepiece cap and block the window.
Self-timer. You can use the self-timer as a replacement for a remote release, to reduce the effects of camera/user shake when the D5500 is mounted on a tripod or, say, set on a firm surface, or when you want to get in the picture yourself. Use Custom Setting c3 to specify delays of 2, 5, 10, or 20 seconds. You can also specify the number of shots taken at the end of the elapsed period, and the interval between those shots. Any time you use the camera on a tripod (with the self-timer or otherwise), make sure there is no bright light shining on the viewfinder window; if so, cover it or locate a DK-5 eyepiece cap and block the window.
![]() Delayed remote/Quick response remote. No special setting of the release mode is necessary when you plug the wired MC-DC2 remote into the side of the camera. However, if you want to use the ML-L3 infrared remote, you’ll need to change the release mode to either of these two settings: delayed remote (shutter releases two seconds after you press the button on the ML-L3 IR remote) or quick response remote (the shutter trips immediately when the button is pressed). Once you’ve selected either of these two release modes, the camera then “looks” for the remote signal for a period of time you specify using Custom Setting c4 (select from 1, 5, 10, or 15 minutes, as described in Chapter 4). As with the self-timer, make sure there is no bright light shining on the viewfinder window; if so, cover it or locate a DK-5 eyepiece cap and block the window.
Delayed remote/Quick response remote. No special setting of the release mode is necessary when you plug the wired MC-DC2 remote into the side of the camera. However, if you want to use the ML-L3 infrared remote, you’ll need to change the release mode to either of these two settings: delayed remote (shutter releases two seconds after you press the button on the ML-L3 IR remote) or quick response remote (the shutter trips immediately when the button is pressed). Once you’ve selected either of these two release modes, the camera then “looks” for the remote signal for a period of time you specify using Custom Setting c4 (select from 1, 5, 10, or 15 minutes, as described in Chapter 4). As with the self-timer, make sure there is no bright light shining on the viewfinder window; if so, cover it or locate a DK-5 eyepiece cap and block the window.
Choosing a Metering Mode
The metering mode you select determines how the D5500 calculates exposure. Use the information edit screen to change the metering mode. When using any PSAM mode, press the i button, navigate the screen to Metering Mode (it’s fourth from the left in the bottom row) with the directional buttons, press OK, and then use the left/right directional buttons to select one of the following metering modes: (See Figure 1.8.)
![]() Matrix metering. The standard metering mode; the D5500 attempts to intelligently classify your image and choose the best exposure based on readings from a 2,016-segment color CCD sensor that interprets light reaching the viewfinder using a database of hundreds of thousands of patterns.
Matrix metering. The standard metering mode; the D5500 attempts to intelligently classify your image and choose the best exposure based on readings from a 2,016-segment color CCD sensor that interprets light reaching the viewfinder using a database of hundreds of thousands of patterns.
![]() Center-weighted metering. The D5500 meters the entire scene, but gives the most emphasis to the central area of the frame, measuring about 8mm.
Center-weighted metering. The D5500 meters the entire scene, but gives the most emphasis to the central area of the frame, measuring about 8mm.
![]() Spot metering. Exposure is calculated from a smaller 3.5mm central spot, about 2.5 percent of the image area.
Spot metering. Exposure is calculated from a smaller 3.5mm central spot, about 2.5 percent of the image area.

Choosing a Focus Mode
You can easily switch between automatic and manual focus by moving the AF/MF, A/M, or M-AF/MF switch on the lens mounted on your camera. You can also select the autofocus mode (when the D5500 measures and locks in focus) and autofocus pattern (which of the 39 available autofocus points or zones are used to interpret correct focus).
When you are using Program, Aperture-priority, Shutter-priority, or Manual exposure mode, you can select the Autofocus mode when the D5500 measures and locks in focus prior to pressing the shutter release down all the way and taking the picture. Choose focus mode by pressing the i button and navigating to the second icon from the left on the bottom row of the information edit screen.
The four focus modes when not using live view are as follows (there are additional autofocus modes, when shooting in Live View mode, as I’ll explain in Chapter 6).
![]() (AF-S) Single-servo autofocus. This mode, sometimes called single autofocus, or AF-S, locks in a focus point when the shutter button is pressed down halfway, and the focus confirmation light glows at bottom left in the viewfinder. The focus will remain locked until you release the button or take the picture. This mode is best when your subject is relatively motionless.
(AF-S) Single-servo autofocus. This mode, sometimes called single autofocus, or AF-S, locks in a focus point when the shutter button is pressed down halfway, and the focus confirmation light glows at bottom left in the viewfinder. The focus will remain locked until you release the button or take the picture. This mode is best when your subject is relatively motionless.
![]() (AF-C) Continuous-servo autofocus. This mode, sometimes called continuous autofocus, or AF-C, sets focus when you partially depress the shutter button (or other autofocus activation button), but continues to monitor the frame and refocuses if the camera or subject is moved. This is a useful mode for photographing sports and moving subjects.
(AF-C) Continuous-servo autofocus. This mode, sometimes called continuous autofocus, or AF-C, sets focus when you partially depress the shutter button (or other autofocus activation button), but continues to monitor the frame and refocuses if the camera or subject is moved. This is a useful mode for photographing sports and moving subjects.
![]() (AF-A) Automatic autofocus. In this mode, the D5500 will select from AF-S or AF-C, depending on whether your subject is stationary or moving.
(AF-A) Automatic autofocus. In this mode, the D5500 will select from AF-S or AF-C, depending on whether your subject is stationary or moving.
![]() (M) Manual focus. When focus is set to manual by setting the AF/MF switch on the lens, you always focus manually using the focus ring on the lens. The focus confirmation indicator in the viewfinder provides an indicator when correct focus is achieved.
(M) Manual focus. When focus is set to manual by setting the AF/MF switch on the lens, you always focus manually using the focus ring on the lens. The focus confirmation indicator in the viewfinder provides an indicator when correct focus is achieved.
In Live View mode, your focus options, as explained in Chapter 6, are as follows:
![]() AF-S. This single autofocus mode, which Nikon calls single-servo AF, locks focus when the shutter release is pressed halfway. By default this mode uses focus-priority.
AF-S. This single autofocus mode, which Nikon calls single-servo AF, locks focus when the shutter release is pressed halfway. By default this mode uses focus-priority.
![]() AF-F. This mode is roughly the equivalent of AF-C. Nikon calls it full-time servo AF. The D5500 focuses and refocuses continually as you shoot stills in live view or record movies. Unlike AF-C, this mode also uses focus-priority.
AF-F. This mode is roughly the equivalent of AF-C. Nikon calls it full-time servo AF. The D5500 focuses and refocuses continually as you shoot stills in live view or record movies. Unlike AF-C, this mode also uses focus-priority.
![]() MF. Manual focus. You focus the image by rotating the focus ring on the camera.
MF. Manual focus. You focus the image by rotating the focus ring on the camera.
Choosing an AF-Area Mode
Use the information edit screen, described earlier, to navigate to the AF-area mode entry, the third icon from the left on the bottom row. Your choices are as follows:
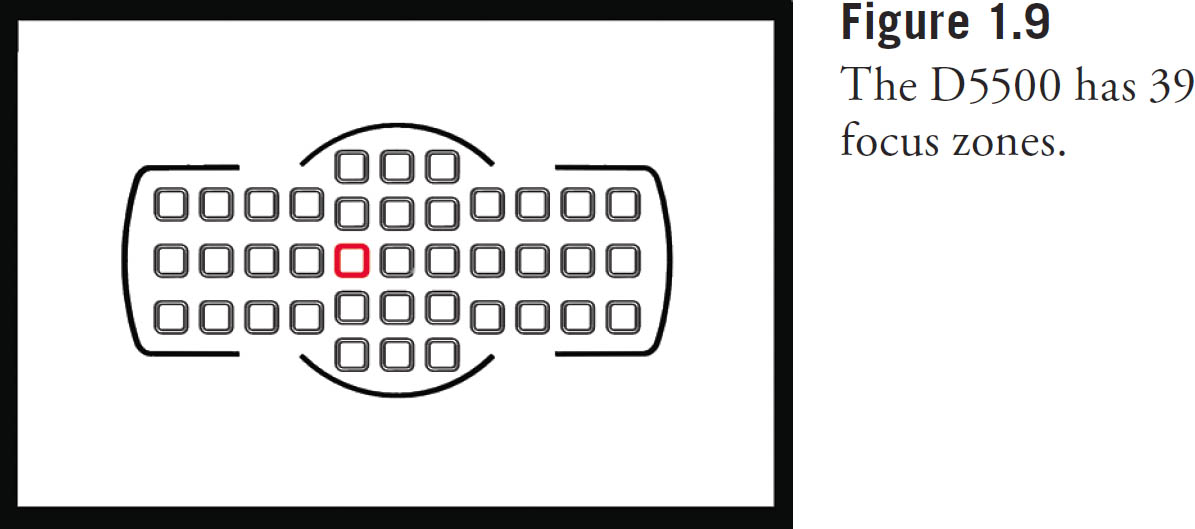
![]() Single-point. The camera focuses on a point you select, using the multi selector directional buttons. The focus zones are shown in Figure 1.9. (Available in AF-S, AF-C, and AF-A modes.)
Single-point. The camera focuses on a point you select, using the multi selector directional buttons. The focus zones are shown in Figure 1.9. (Available in AF-S, AF-C, and AF-A modes.)
![]() Dynamic-area AF (9 points). You select the focus point, and the camera also uses information from surrounding AF points (nine points, total) to calculate focus. (Available in AF-C and AF-A modes only.)
Dynamic-area AF (9 points). You select the focus point, and the camera also uses information from surrounding AF points (nine points, total) to calculate focus. (Available in AF-C and AF-A modes only.)
![]() Dynamic-area AF (21 points). You select the focus point, and the camera also uses information from surrounding AF points (21 points, total) to calculate focus. (Available in AF-C and AF-A modes only.)
Dynamic-area AF (21 points). You select the focus point, and the camera also uses information from surrounding AF points (21 points, total) to calculate focus. (Available in AF-C and AF-A modes only.)
![]() Dynamic-area AF (39 points). You select the focus point, and the camera also uses information from surrounding AF points (39 points, total) to calculate focus. (Available in AF-C and AF-A modes only.)
Dynamic-area AF (39 points). You select the focus point, and the camera also uses information from surrounding AF points (39 points, total) to calculate focus. (Available in AF-C and AF-A modes only.)
![]() 3D tracking. You select the focus point, and the camera will track your subject, using any of the other focus points, as needed, when using AF-A and AF-C modes. (In AF-S mode, focus tracking is not used, as focus is locked in when you press the shutter release halfway.) (Available in AF-C and AF-A modes only.)
3D tracking. You select the focus point, and the camera will track your subject, using any of the other focus points, as needed, when using AF-A and AF-C modes. (In AF-S mode, focus tracking is not used, as focus is locked in when you press the shutter release halfway.) (Available in AF-C and AF-A modes only.)
![]() Auto-area AF. The D5500 chooses a focus point. (Available in AF-S, AF-C, and AF-A modes.)
Auto-area AF. The D5500 chooses a focus point. (Available in AF-S, AF-C, and AF-A modes.)
Adjusting ISO
If you like, you can custom-tailor your ISO (sensitivity) settings. To start out, it’s best to set ISO to ISO 200 for daylight photos, and ISO 400 for pictures in dimmer light. You can adjust ISO now with the information edit screen.
Reviewing the Images You’ve Taken
The Nikon D5500 has a broad range of playback and image review options. (See Figure 1.10.)
![]() View image. Press the Playback button (marked with a white right-pointing triangle) located just to the right of the LCD monitor above the multi selector to display the most recent image on the LCD monitor.
View image. Press the Playback button (marked with a white right-pointing triangle) located just to the right of the LCD monitor above the multi selector to display the most recent image on the LCD monitor.
![]() View additional images. Press the multi selector button left or right or rotate the command dial to review additional images. Press/rotate right to advance to the next image, or left to go back to a previous image.
View additional images. Press the multi selector button left or right or rotate the command dial to review additional images. Press/rotate right to advance to the next image, or left to go back to a previous image.
![]() Change information display. Press the multi selector button up or down to change among overlays of basic image information or detailed shooting information.
Change information display. Press the multi selector button up or down to change among overlays of basic image information or detailed shooting information.

![]() Change magnification. Press the Zoom In button repeatedly to zoom in on the image displayed; the Zoom Out button reduces the image and displays thumbnails and calendar mode. When the image is zoomed in, a thumbnail representation of the whole image appears in the lower-right corner with a yellow rectangle showing the relative level of zoom. At intermediate zoom positions, the yellow rectangle can be moved around within the frame using the multi selector.
Change magnification. Press the Zoom In button repeatedly to zoom in on the image displayed; the Zoom Out button reduces the image and displays thumbnails and calendar mode. When the image is zoomed in, a thumbnail representation of the whole image appears in the lower-right corner with a yellow rectangle showing the relative level of zoom. At intermediate zoom positions, the yellow rectangle can be moved around within the frame using the multi selector.
![]() Exit image review. Press the Playback button again, or just tap the shutter release button to exit playback view.
Exit image review. Press the Playback button again, or just tap the shutter release button to exit playback view.
Using the Built-in Flash
The built-in flash is easy enough to work with that you can begin using it right away, either to provide the main lighting of a scene or as supplementary illumination to fill in the shadows. External flash will be covered in Chapter 5.
![]() Activating flash in Scene modes: The built-in flash will pop up automatically as required in Auto, Portrait, Child, Close Up, Night Portrait, Party/Indoor, and Pets Portrait Scene modes, as well as Color Sketch and Toy Camera Special Effects modes.
Activating flash in Scene modes: The built-in flash will pop up automatically as required in Auto, Portrait, Child, Close Up, Night Portrait, Party/Indoor, and Pets Portrait Scene modes, as well as Color Sketch and Toy Camera Special Effects modes.
![]() Activating flash in advanced modes: To use the built-in flash in Manual, Aperture-priority, Shutter-priority, or Program modes, just press the flash pop-up button (shown in Figure 1.11). When the flash is fully charged, a lightning bolt symbol will flash at the right side of the viewfinder display.
Activating flash in advanced modes: To use the built-in flash in Manual, Aperture-priority, Shutter-priority, or Program modes, just press the flash pop-up button (shown in Figure 1.11). When the flash is fully charged, a lightning bolt symbol will flash at the right side of the viewfinder display.

![]() In P and A modes: When using P (Program) and A (Aperture-priority) exposure modes, the D5500 will select a shutter speed for you automatically from the range 1/200th to 1/60th seconds. You can select an aperture, and the flash exposure will be calculated automatically.
In P and A modes: When using P (Program) and A (Aperture-priority) exposure modes, the D5500 will select a shutter speed for you automatically from the range 1/200th to 1/60th seconds. You can select an aperture, and the flash exposure will be calculated automatically.
![]() In S (Shutter-priority) mode: You select the shutter speed from 1/200th to 30 seconds, and the flash exposure will be calculated automatically.
In S (Shutter-priority) mode: You select the shutter speed from 1/200th to 30 seconds, and the flash exposure will be calculated automatically.
![]() In M (Manual) mode: You select the shutter speed from 1/200th (the highest shutter speed that can be used in standard flash modes) to 30 seconds, and aperture. The flash exposure will be calculated automatically.
In M (Manual) mode: You select the shutter speed from 1/200th (the highest shutter speed that can be used in standard flash modes) to 30 seconds, and aperture. The flash exposure will be calculated automatically.
Transferring Photos to Your Computer
The final step in your picture-taking session will be to transfer the photos you’ve taken to your computer for printing, further review, or image editing. Your D5500 allows you to print directly to PictBridge-compatible printers and to create print orders right in the camera, plus you can select which images to transfer to your computer.
I recommend using a card reader attached to your computer to transfer files, because that process is generally a lot faster and doesn’t drain the D5500’s battery. However, you can also use a cable for direct transfer, which may be your only option when you have the cable and a computer, but no card reader (perhaps you’re using the computer of a friend or colleague, or at an Internet café).
To transfer images from the camera to a Mac or PC computer using the USB cable:
1. Turn off the camera.
2. Pry back the cover that protects the D5500’s USB port, and plug the supplied USB cable into the USB port. (See Figure 1.12.)
3. Connect the other end of the USB cable to a USB port on your computer.
4. Turn the camera on. The operating system itself, or installed software such as Nikon Transfer or Adobe Photoshop Elements Transfer, usually detects the camera and offers to copy or move the pictures. Or, the camera appears on your desktop as a mass storage device, enabling you to drag and drop the files to your computer.

To transfer images from a memory card to the computer using a card reader, do the following:
1. Turn off the camera.
2. Slide open the memory card door and remove the SD card.
3. Insert the memory card into your computer’s memory card reader. Your installed software detects the files on the card and offers to transfer them. The card can also appear as a mass storage device on your desktop, which you can open and then drag and drop the files to your computer.
Resetting the Nikon D5500
If you want to change from the factory default values, you might think that it would be a good idea to make sure that the Nikon D5500 is set to the factory defaults in the first place. After all, even a brand-new camera might have had its settings changed at the retailer, or during a demo. Unfortunately, Nikon doesn’t make it easy to reset all settings in the camera to their factory defaults. In fact, there are no fewer than four different ways to “reset” the D5500, each of which does slightly different things. Those ways include:
![]() Two-button reset. This type of “rebooting” changes ten of the most basic settings in your camera, and is useful when you want to cancel the most common changes you make when adjusting your camera. It does not affect all Shooting menu settings, or any of the Custom Setting memory banks, described next. I’ll show you how to perform the two-button reset shortly.
Two-button reset. This type of “rebooting” changes ten of the most basic settings in your camera, and is useful when you want to cancel the most common changes you make when adjusting your camera. It does not affect all Shooting menu settings, or any of the Custom Setting memory banks, described next. I’ll show you how to perform the two-button reset shortly.
![]() Shooting menu bank reset. The Shooting menu has a separate Reset Shooting menu option that zeroes out the changes you’ve made to the default options.
Shooting menu bank reset. The Shooting menu has a separate Reset Shooting menu option that zeroes out the changes you’ve made to the default options.
![]() Custom Setting menu bank reset. The Custom Setting menu also has a separate Reset Custom Settings option that zeroes out most of the changes you’ve made to the default options. A two-button reset does not affect any of the settings in the Custom Setting menu banks.
Custom Setting menu bank reset. The Custom Setting menu also has a separate Reset Custom Settings option that zeroes out most of the changes you’ve made to the default options. A two-button reset does not affect any of the settings in the Custom Setting menu banks.
![]() Cold reset. The only way to reset all of the D5500’s internal settings is to remove the battery and allow the internal backup battery to run down until the settings are lost, which can take several weeks or longer. You can remove the battery and then turn on the camera briefly to reset most settings, but this won’t zero out all settings to the factory defaults as long as some juice remains in the backup battery (which is tucked deep inside the camera and not user-accessible). You might want to try a cold reset if your camera is hopelessly locked up, and you’d like to make one last attempt at restoring it to factory operation before sending it in for service.
Cold reset. The only way to reset all of the D5500’s internal settings is to remove the battery and allow the internal backup battery to run down until the settings are lost, which can take several weeks or longer. You can remove the battery and then turn on the camera briefly to reset most settings, but this won’t zero out all settings to the factory defaults as long as some juice remains in the backup battery (which is tucked deep inside the camera and not user-accessible). You might want to try a cold reset if your camera is hopelessly locked up, and you’d like to make one last attempt at restoring it to factory operation before sending it in for service.
Two-Button Reset
Just follow these steps to perform a two-button reset of the camera:
1. Find reset buttons. Locate the MENU and Info buttons on the back of the camera to the left and right of the viewfinder window, each marked with an adjacent green dot.
2. Start reset. Press and hold the two buttons for more than two seconds.
3. Release the two buttons. Your camera’s settings have been returned to the factory default.
SHOOTING MOVIES
You’ll learn more about shooting high-definition movie clips with your D5500 later in Chapter 6. But if you want to get started right away, it’s easy. Just select Live View mode by rotating the spring-loaded Live View (Lv) switch located next to the mode dial on the top right of the camera. When you want to start shooting, press the Movie button, with the red dot in the middle, located on top of the camera, southwest of the shutter release button. Press the Movie button again to stop shooting. Swivel the Lv switch once more to exit live view. That’s it!