
When I first began using my Pentax K200D, I immediately noticed that, for an entry-level camera, this dSLR had an amazing number of options and settings that can be used to customize the way it operates. In terms of features, the K200D compares very favorably with its more advanced sibling, the Pentax K20D. Not only are you able to change shooting settings applied at the time the picture is taken, but you can adjust the way your camera behaves. Indeed, if your K200D doesn’t operate in exactly the way you’d like, chances are you can make a small change in the Recording mode, Playback, Set-Up, and Custom Setting menus that will tailor the K200D to fit your needs. You’ll find an array of choices ranging from the mundane—what White Balance setting to use—to unusual—the ability to choose Adobe’s Digital Negative (DNG) format instead of RAW or JPEG. You’ll find all these options in your Pentax’s menu systems.
As I’ve mentioned before, this book isn’t intended to replace the manual you received with your K200D, nor have I any interest in rehashing its contents. You’ll still find the original manual useful as a standby reference that lists every possible option in exhaustive (if mind-numbing) detail—without really telling you how to use those options to take better pictures. There is, however, some unavoidable duplication between the Pentax manual and this chapter because I’m going to explain all the key menu choices and the options you may have in using them. You should find, though, that I will give you the information you need in a much more helpful format, with plenty of detail on why you should make some settings that are particularly difficult to understand.
The Pentax K200D has four different menu systems, the SCN (or Scene) menu, the Playback Mode Function menu, Capture Mode Function menu, and the main menu system:
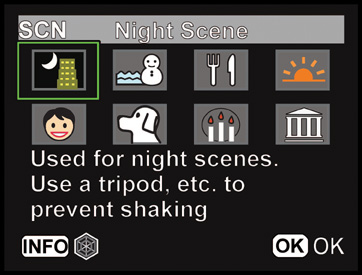
SCN menu. This menu, shown in Figure 3.1, pops up when the Mode dial is set to the SCN position. It has eight additional Scene modes. You can learn more about using this menu in Chapter 1 in the section “Selecting a Scene Mode.”
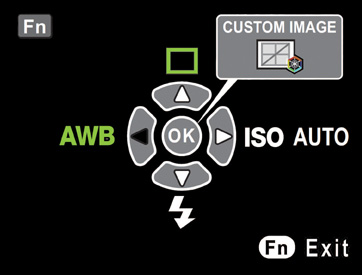
Playback Functions. This menu, shown in Figure 3.2, appears when you press the Fn button while reviewing images in Playback mode. You can use it to select images for printing, play back your photos in a slide show, convert RAW files to JPEG format, apply filter effects, or compare two images side by side. Read more about this menu in “Using the Function Menus” in Chapter 2.
Capture Functions. This menu appears when you press the Fn button while in Capture mode. (See Figure 3.3.) It includes options for changing the camera’s Drive mode (Single Shot, Continuous Shot, Self-Timer, Remote Control, and Bracketing), ISO setting, White Balance adjustments, and electronic flash settings. An introduction to this menu can be found in “Using the Function Menus” in Chapter 2, but I’ll also explain each of these functions in more detail later in this book. (ISO, White Balance, and Bracketing can be found in Chapter 4; Drive modes in Chapter 5; and flash options in Chapter 7.)
Main menus. This menu system appears when you press the Menu button to the left of the LCD display. It includes four tabbed menus labeled Rec. Mode, Playback, Set-up, and Custom Setting. I’ll describe each of these in the sections that follow.

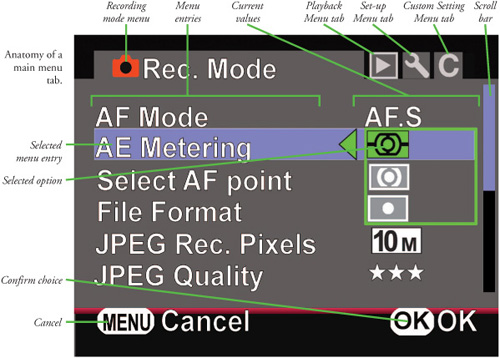
The K200D’s main menu system includes four separate screens of entries, each located on a “tab” marked with an icon representing that menu’s functions. Each tab includes from four to 24 entries, with a maximum of six shown on the screen at any one time. If a menu includes more than six entries, a scroll bar appears at the right side of the screen, and you can press the controller down button to scroll down to the additional entries that aren’t visible. The four menu tabs, shown in Figure 3.4, are as follows:
Rec. Mode (Recording Mode). A red camera icon lets you know you’re working with the Recording Mode menu, which includes entries for autofocus and autoexposure settings, image size, quality, and file formats, as well as Color Space and functions of the RAW button.
Playback. You’ll find settings that control picture review display, slideshows, and other functions in this menu, marked with a blue right-pointing triangle when the menu is active.
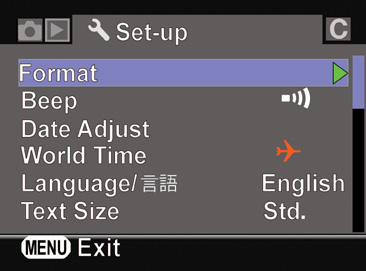
Set-up. A wrench icon marks the Set-up menu, which lets you format your memory card, turn the K200D’s Beep sound on/off for functions of your choice, and set the time and date, brightness level of the LCD, power settings, and other frequently changed operation functions.
Custom Setting. An orange C icon marks the Custom Setting menu when it’s active, with 23 settings plus a Reset function, covering a large number of options that you won’t be changing often. These include the order in which exposures should be bracketed; whether or not autofocus is used when triggering the camera with a remote control; or whether noise reduction should be applied during long exposures or when using high ISO settings.
The anatomy of the main menus generally follows the layout shown for the Recording Mode menu in Figure 3.4. The components are as follows:
The top row includes tabs for the four menus, with the active menu’s icon highlighted.
The left column within each menu represents the name of the menu entry, such as AF Mode, or AE Metering. Note that some menu entries are abbreviated, but their full name becomes visible when that entry is highlighted. For example, the JPEG Rec. Pixels entry becomes JPEG Recorded Pixels when it is selected.
The right-hand column has an icon or text that shows either the current setting for that menu item, or which represents the function of that menu entry. When a particular menu item is highlighted and the right controller key is pressed, the available options pop up, as shown in the figure. Use the up/down keys to select the choice you want, and press OK to confirm it.
A scroll bar appears at the right of the menu screen when additional menu entries are available. The position of the blue sliding “thumb” in the scroll bar (honest, that’s what it’s called) indicates the current position of the highlighted entry within the scrolling list. Use the up/down keys to scroll among the entries.
The bottom row includes a Menu/Exit indicator when no entry has been activated, showing that you can exit the main menus by pressing the Menu button. This changes to Menu/Cancel when an entry is active, and an OK icon appears on the screen to indicate that you can press the four-way controller’s OK button to confirm the highlighted option as your choice.
Navigating among the various main menus is easy and follows a consistent set of rules.
Press Menu to start. Press the Menu button to display the main menu screens.
Choose menu tab. Use the left/right four-way controller keys or the e-dial to choose the Rec. Mode, Playback, Set-up, or Custom Setting menu tab. Menu selection “wraps around”; if you continue scrolling left or right past the last menu tab, the first/last tab appears again.
Navigate among entries with the up/down keys. The four-way controller has buttons at the up/down/left/right positions. Press the up/down keys to navigate among the menu entries.
Activate a menu entry. Press the right button to activate a menu entry and the left button to de-activate it when you want to move to a different menu entry.
Choose options. Once a menu entry has been activated, use the up/down buttons to select from the available options.
Confirm your selection. Press the OK button to confirm your option. The menu entry is deactivated with the new setting indicated, and the menu entry remains highlighted in blue.
Leaving the menu system. Press the Menu button to exit the main menus or tap the shutter release button. If you haven’t confirmed your choice for a particular option, no changes will be made.
The buttons on the top of your camera, the e-dial and the Fn button on the back-right side are easily accessible and contain the settings you might change during a photo session. The green button and the Av buttons do things such as adjust EV compensation (exposure compensation) and reset exposure values in Program mode. The e-dial adjusts shutter speed, aperture, and ISO (in Sv Mode). The Fn button provides a similar setup to that of the point-and-shoot model cameras. It adjusts ISO mode, white balance, and flash modes. The Shooting menu options are accessed a bit less frequently when you’re using your K200D. You might make these adjustments as you begin a shooting session, or when you move from one type of subject to another. The first screen of the Recording Mode menu was shown in Figure 3.4.
This autofocus mode selection entry is available only when you are using one of the Exposure mode settings: Program, Sensitivity Priority (Sv), Shutter Priority (Tv), Aperture Priority (Av), Manual (M), or Bulb (B.) In any of the Mode dial Scene modes, or when using one of the SCN settings, the K200D chooses the autofocus method for you.
As I said in Chapter 1, you can manually focus the camera when the MF/AF switch on the left front side of the body is set to MF. You can also adjust focus manually after the camera has automatically focused when in AF mode. Press the shutter release down halfway and rotate the focusing ring on the camera. When the subject is in focus, the green focus indicator hexagon appears and you will hear a beep (unless you’ve disabled the beep for this function, as described later in this chapter). Even though you are focusing manually, the K200D is kind enough to help you by confirming sharp focus.
You might want to use Manual focus when shooting close-ups, because the range of sharpness (depth-of-field) is very shallow, and focusing the image yourself allows more precision in selecting the exact point of focus. Manual focus is also useful when you want to take advantage of the depth-of-field sharpness range to specify exactly what areas of your image are in focus for creative purposes. (This is called selective focus.) Manual focus also is useful if you are using an older lens that doesn’t offer autofocus features. (I’ll explain the use of these lenses in Chapter 7.)
Most of the time, however, you’ll want to use the Pentax K200D’s automatic focus features. This menu selection allows you to specify when the camera applies its focusing magic to your scene—either Single mode, or Continuous mode, as I originally described in Chapter 1:
AF.S: Single Mode. This mode, sometimes called Single Autofocus, locks in a focus point when the shutter release button is pressed halfway down. You’ll see a red square in the viewfinder that illuminates to indicate the focus point selected, a green octagonal focus confirmation indicator is shown at the bottom of the viewfinder, and the camera will emit a beep when the K200D has focused. The focus locks until you either release the button or press it all the way down to take the picture. If the subject begins moving, the camera switches to AF.C mode and tracks the movement by refocusing as necessary. This mode is best when your subject isn’t moving, because you can set focus once on the subject of your choice, then change your composition and re-frame your image as you like. All the Scene/SCN Modes use this focus exclusively, except the Moving Object, Kids, and Pet modes. If the K200D isn’t able to focus at all, the green octagon in the viewfinder will blink and the shutter release will be locked. This behavior is called focus priority; the shutter is disabled unless the image is sharply focused.
AF.C: Continuous Mode. While the shutter release button is pressed halfway down, the focus locks on your subject, but the camera will refocus as required if the subject is moving. This mode can be selected when using P, Sv, Tv, Av, M, or B Exposure modes. The Moving Object Scene (Picture), Kids, and Pet SCN modes use this focus method exclusively. In order for the K200D to continually focus, you have to keep the shutter release button pressed halfway down. If the subject is slightly out of focus, as indicated by the flashing green octagon, the shutter button is not locked and the K200D can still take a picture when the shutter release is pressed all the way down. This behavior is called release priority; a photo will be taken when the shutter release is pressed, regardless of whether the image is in sharp focus. That can be helpful for action shots and other subject matter when you’d prefer to take a photo, even if slightly out of focus, rather than miss the picture entirely.
Tip
In dark scenes, there may not be enough light for the K200D to focus easily. When using AF.S mode, you can pop up the flash (if it isn’t already elevated) by pressing the Flash Up button on the back-left corner of the camera. The flash will discharge several times when you partially depress the shutter release, providing enough illumination for automatic focus.
This menu entry allows you to select the area of the frame the Pentax K200D uses to calculate exposure: from multiple segments in 16 different metering zones; by emphasizing the center of the frame but taking into account the entire measurable area within the 16 zones; or by measuring exposure only from the center of the picture. I’ll provide more details on obtaining the best exposure in Chapter 4. Here are the three choices you have available:
Multi-Segment metering. Exposure is based on readings from 16 parts of the frame, which the K200D uses to make some intelligent guesses about what kind of photo you’re taking based on the distribution of light and dark values (landscape, portrait, and so forth).
Center-Weighted metering. Exposure is based on the entire frame, but with emphasis on subject matter in the center of the picture.
Spot metering. Exposure is calculated based only on what’s in the center of the frame within the round brackets shown in the viewfinder.
Use this menu entry to specify how the primary autofocus point is selected from among the 11 different zones in the camera’s viewfinder. The active AF point is displayed in the viewfinder screen, unless you’ve disabled that display using Custom Setting #8, as described later in this chapter. Your three AF point selection choices are as follows:
Auto. The K200D chooses the best AF point from among 11 zones distributed throughout the center area of the frame. Your subject does not have to be centered for the camera to locate it. This is your best choice for fast-moving action and other scenes in which you don’t know in advance where your main subject will be located at the moment of the exposure. The K200D will use its intelligence to choose the likely center of interest and lock focus on that AF point.
Select. In this mode, you select one of those 11 focus points for more control of what you want in focus, using the controller’s up/down/left/right keys. The center point is the default option unless you change it with the controller keys. The focus points don’t “wrap around” left to right/right to left/or up/down. When you reach the farthest focus point in any direction, the point movement stops. Use this method when you want to control the zone where focus is evaluated, particularly with subjects that are located away from the exact center of the frame. It’s best for stationary subjects, or those that are moving very slowly, because it takes time to relocate the focus point manually.
Center. The K200D uses the focus point in the center of your frame. Use this method when you know your main subject is going to be located in the middle of the frame. The camera automatically uses this method when you’re using older lenses (which don’t have DA, D FA, FA J, FA, or F in their names).
Your options within this menu entry are JPEG, RAW, or RAW+ (both JPEG and RAW file formats). So, you can elect to store only JPEG versions of the images you shoot, or you can save your photos as RAW images, which Pentax calls PEF, for Pentax Electronic Format files. Alternatively, you can choose the Adobe Digital Negative (DNG) RAW format, as described later in this chapter.
RAW images of either PEF or DNG type (with their .PEF or .DNG file extensions) consume more space on your memory card, but have the advantage of offering more flexibility during image editing (read on for more information on that). JPEG files (with their .JPG extensions) are more highly compressed and use less space on your memory card, but offer fewer options during image editing. Many photographers elect to save both JPEG and a RAW using the RAW+ choice, so they’ll have a JPEG version that might be usable as-is, as well as the original “digital negative” RAW file in case they want to do some extensive processing of the image later. You’ll end up with two different versions of the same file: one with a .jpg extension, and one with the .pef or .dng extension that signifies a RAW file. I’ll offer some more detailed advice on choosing a file format later in this chapter.
This setting allows you to choose the resolution of your image when shooting JPEG files. (RAW files are always saved at the highest resolution of 10 megapixels [3872 × 2592].) You can select:
10M. Stores 10-megapixel JPEG images at 3872 × 2592-pixel resolution. This size allows making sharp prints as large as 10 × 12 –inches (according to Pentax; your results may differ).
6M. Use this 3008 × 2000-pixel resolution to save some space on your memory card. Depending on your other settings (such as JPEG Quality), you can expect to make good prints from these 6-megapixel files that are as large as 8 × 10 inches.
2M. This setting produces 1824 × 1216, two-megapixel files that are best for prints no larger than 5 × 7 inches.
This entry allows you to choose from Good (*), Better (**), or Best (***) JPEG quality levels, which are actually indicators of how much compression is used to make the image file smaller. The Good quality level produces the smallest image files, but with a loss of image detail that might be noticeable, as you can see in Figure 3.5. Best quality offers the clearest images, but the file sizes are as much as three times larger.
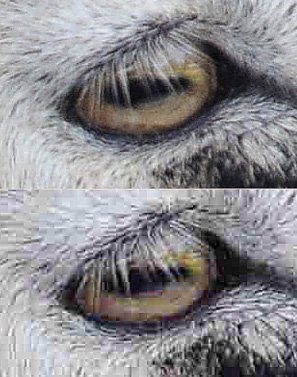
Figure 3.5. At low levels of JPEG compression, the image looks sharp even when you enlarge it enough to almost see the actual pixels (top); when using extreme JPEG compression (bottom) an image obviously loses quality.
In practice, you’ll probably use the JPEG Best or RAW+ selections most often. Why so many choices, then? There are some advantages to using the JPEG Better and JPEG Good options. Settings that are less than max allow stretching the capacity of your memory card so you can shoehorn quite a few more pictures onto a single card. That can come in useful when on vacation and you’re running out of storage, or when you’re shooting non-critical work that doesn’t require 10 megapixels of resolution (such as photos taken for real estate listings, web page display, photo ID cards, or similar applications). Some photographers like to record RAW+ so they’ll have an excellent quality JPEG file review for minor manipulations, while retaining access to the original RAW file for serious editing.
For most work, using lower JPEG Recorded Pixels and JPEG Quality settings is false economy. You never know when you might actually need that extra bit of picture detail. Your best bet is to have enough memory cards to handle all the shooting you want to do until you have the chance to transfer your photos to your computer or a personal storage device.
However, reduced image quality can sometimes be beneficial if you’re shooting sequences of photos rapidly, as the Pentax K200D is able to hold more of them in its internal memory buffer before transferring to the memory card. Still, for most sports and other applications, you’d probably rather have better, sharper pictures than longer periods of continuous shooting. Do you really need 10 shots of a pass reception in a football game, or six slightly different versions of your local basketball star driving in for a lay-up?
This setting is the first in the second screen of the Recording Mode menu listings. You have two choices:
PEF. This is Pentax’s proprietary RAW format. To convert images saved in this format for your image-editing software, you’ll need a utility that’s compatible with PEF files, such as Adobe Camera Raw, Pentax Photo Browser, or Pentax Photo Laboratory. These allow you to tweak the settings normally made in the camera, and to save in another format, such as TIFF, JPEG, or DNG.
DNG. Adobe’s Digital Negative format is a non-proprietary file specification that functions as a kind of Rosetta Stone for RAW files among a broad range of digital camera types. All the captured information contained in Pentax PEF files can be included in the DNG version, which serves as a “universal” RAW format not only for Pentax, but for cameras produced by Nikon, Canon, Sony, Olympus, and other vendors. The advantage of DNG is that one type of file can be used and shared among anyone who has the Adobe DNG Converter software, or another utility that can translate the DNG format. The disadvantage is that few vendors, other than Pentax, have been enlightened enough to include a DNG option within their cameras, so Adobe’s innovative format has not been used widely to date.
You’ll sometimes be told that Pentax’s PEF or DNG RAW files are the “unprocessed” image information your camera produces, before it’s been modified. That’s nonsense. RAW files are no more unprocessed than camera film is after it’s been through the chemicals to produce a negative or transparency. Your digital image undergoes a significant amount of processing before it is saved as a RAW file.
A RAW file is more similar to a film camera’s processed negative. It contains all the information captured by the sensor, but with no sharpening, no application of any special filters or other settings you might have specified when you took the picture. Those settings are stored with the RAW file so they can be applied when the image is converted to a form compatible with your favorite image editor. However, using RAW conversion software such as Adobe Camera Raw, you can override those settings and apply settings of your own. You can select essentially the same changes there that you might have specified in your camera’s picture-taking options.
RAW exists because sometimes we want to have access to all the information captured by the camera, before the camera’s internal logic has processed it and converted the image to a standard file format. RAW doesn’t save as much space as JPEG. What it does do is preserve all the information captured by your camera after it’s been converted from analog to digital form.
So, why don’t we always use RAW? Some photographers avoid using Pentax’s RAW PEF or DNG files on the misguided conviction that they don’t want to spend time in an image editor. But, if your basic settings are okay, such work is optional, and needs to be applied only when a particular image needs to be fine-tuned.
Although some photographers do save only in RAW format, it’s common to use RAW+JPEG, or, if you’re confident about your settings, just shoot JPEG and eschew RAW altogether. In some situations, working with a RAW file can slow you down a little. RAW images take longer to store on the memory card, and must be converted from RAW to a format your image editor can handle, whether you elect to go with the default settings in force when the picture was taken, or make minor adjustments to the settings you specified in the camera.
As a result, those who depend on speedy access to images or who shoot large numbers of photos at once may prefer JPEG over RAW. These photographers include wedding and sports shooters, who might take hundreds to more than a thousand pictures within a few hours.
JPEG was invented as a more compact file format that can store most of the information in a digital image, but in a much smaller size. JPEG predates most digital SLRs and was initially used to squeeze down files for transmission over slow dial-up connections. JPEG provides smaller files by compressing the information in a way that loses some image data. JPEG remains a viable alternative because it offers several different quality levels. At the highest quality Best level, you might not be able to tell the difference between the original RAW file and the JPEG version. If you don’t mind losing some quality, you can use more aggressive Better compression with JPEG to cut the size again.
Here you can choose between two different sets of colors—called gamuts—which is the range of colors that are available to represent an image. As you can see in Figure 3.6, you can select:
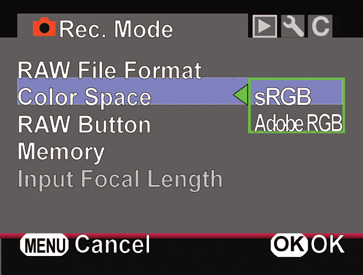
sRGB. This setting, standard RGB, includes the range of colors that is recommended for images that are going to be output locally on your printer or viewed on your computer display, as this color space matches that of the typical inkjet printer and monitor fairly closely.
Adobe RGB. This is an expanded color space useful for commercial and professional printing, and it can reproduce a wider range of colors, even though both color spaces reproduce the same absolute number of colors. There are 16.8 million when reduced to a 24-bit file from the original capture whether you’re using sRGB or Adobe RGB, but Adobe RGB spreads these colors over a larger space.
You’re probably surprised that the Pentax K200D doesn’t automatically capture all the colors we see. Unfortunately, that’s impossible because of the limitations of the sensor and the filters used to capture the fundamental red, green, and blue colors, as well as that of the phosphors used to display those colors on your camera and computer monitors. Nor is it possible to print every color our eyes detect, because the inks or pigments used don’t absorb and reflect colors perfectly.
Instead, the colors that can be reproduced by a given device are represented as a color space that exists within the full range of colors we can see. That full range was defined by scientists at an international organization back in 1931.
As I mentioned, regardless of which color space is used by the K200D, you end up with 16.8 million different colors that can be used in your photograph. (No one image will contain all 16.8 million!) But, the colors available will be different.
Adobe RGB is what is often called an expanded color space, because it can reproduce a range of colors that is spread over a wider range of the visual spectrum. Adobe RGB is useful for commercial and professional printing. You don’t need this range of colors if your images will be displayed primarily on your computer screen or output by your personal printer.
The other color space, sRGB, is recommended for images that will be output locally on the user’s own printer, as this color space matches that of the typical inkjet printer fairly closely, and it’s the color gamut most photofinishers expect to receive from snapshooters. While both Adobe RGB and sRGB can reproduce the exact same 16.8 million absolute colors, Adobe RGB spreads those colors over a larger portion of the visible spectrum. Think of a box of crayons (the jumbo 16.8 million crayon variety). Some of the basic crayons from the original sRGB set have been removed and replaced with new hues not contained in the original box. Your “new” box contains colors that can’t be reproduced by your computer monitor, but which work just fine with a commercial printing press.
Use this setting to specify the behavior of the RAW button, located on the front of the camera next to the K200 logo. What happens when the button is pressed depends on the format you are currently using, and the setting you make here:
JPEG --> [Choice]. If you’re shooting JPEG, pressing the RAW button switches the K200D from JPEG shooting mode to JPEG (i.e., no change is made), RAW, or RAW+JPEG, depending on the choice you make here.
RAW-->[Choice]. If you’re shooting RAW, pressing the RAW button switches the K200D from RAW shooting mode to JPEG, RAW (i.e., no change is made), or RAW+JPEG, depending on the choice you make here.
RAW+-->[Choice]. If you’re shooting RAW+JPEG, pressing the RAW button switches the K200D from RAW+JPEG shooting mode to JPEG, RAW, or RAW+JPEG (no change is made), depending on the choice you make here.
Cancel Each Time. When this option is highlighted, press the left/right controller keys to mark or unmark the check box. When the box is marked, each time you press the RAW button, the file format will be switched to the alternate format for one picture only. The K200D then reverts to the file format that had been in use before you pressed the RAW button. If the box is unmarked, the camera switches to the new file format setting “permanently”—or, at least, until the RAW button change is canceled doing one of the following: pressing the RAW button again, turning the camera off, rotating the Mode dial, accessing a different menu entry, or switching the camera from Capture mode to Playback mode to review an image.
Sometimes you make settings that you want to remain in force for the rest of your shooting session, but then revert to their default values when you turn the camera off. This clever option allows you to specify which settings the Pentax K200D should retain even when the camera is powered down and then switched on again. To mark or unmark settings to be memorized, scroll through the two pages of listings and press the left/right controller keys to add or remove a check from the box next to each option.
The settings you can save are as follows:
Flash Mode
Drive Mode
White Balance
Sensitivity (ISO Speed)
EV Compensation value
Flash Exposure Compensation value
Playback Display
Scene Display
File No.
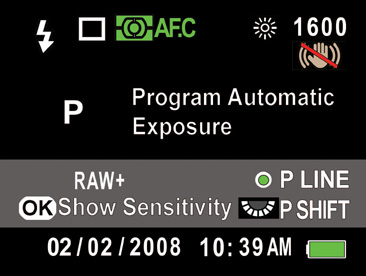
This menu can save you a lot of frustration if you realize what it can do for you. For example, it’s very common for photographers to forget they have boosted the ISO setting of their camera to a high level, such as ISO 1600, while shooting indoors, only to end up overexposing the daylight exposures they make without first changing back to a lower setting. Or, you might add exposure compensation under particular lighting conditions, and then continue to shoot with that EV boost when you’ve moved on to a new scene. The Memory setting allows you to tell the K200D to return to the default value when you’ve switched the camera off.
While most of the Memory Settings options simply store the current status for the setting listed, the File No. option is a special case, because it determines the file numbers used when writing your images to your SD card. Not understanding exactly how this works can result in some unintended consequences. I’ll summarize what you need to know in this section.
Your Pentax K200D creates new file names using the templates shown in Table 3.1:
Table 3.1. Pentax File Name Conventions
Color Space | JPEG | Pentax RAW | Adobe Digital Negative |
|---|---|---|---|
SRGB | IMGPnnnn.jpg | IMGPnnnn.pef | IMGPnnnn.dng |
Adobe RGB | _IGPnnnn.jpg | _IGPnnnn.pef | _IGPnnnn.dng |
So, an image named IMGP1002.jpg would be an sRGB picture; IMG1002.pef and IMGG1002.dng would be RAW files using the Pentax RAW and Adobe Digital Negative RAW formats, respectively. If the Adobe RGB color space was used instead, those three files would be named _IGP1002.jpg, _IGP1002.pef, and _IGP1002.dng, respectively. In the case of the RAW files, the color space you selected in the camera is used to build the file name, even though you can select the other color space when converting the file for manipulation in your image editor.
When the file numbers are reset, numbering of the nnnn portion of the file name begins again at 0001 and continues through 9999 before another reset occurs. Keep in mind that only 500 images are ordinarily stored in a given folder, so you might find images numbered IMGP0001.xxx (with .xxx being the file extension) through IMGP0500. xxx in a given folder, and images numbered IMGP501.aaa deposited in the next folder created. All you really need to know is that, until the file numbers are reset, image file names use the sequential numbers from 0001 through 9999, and the folders in which they reside depends on how many images are already in the folder.
The File No. entry determines when the reset back to 0001 takes place. You have two options:
On. When the File No. box is checked in the Memory Status entry, the Pentax K200D remembers the last number assigned and applies a number that is one higher to the next image stored, going from 0001 to 9999. The number is assigned even if the picture is stored in a new folder. New folders are created any time the existing folder contains 500 images, unless Auto Bracketing is being used; in that case, all images in the bracketed set are stored in the same folder, even if the number exceeds 500. Use this option when you want to keep track of the total number of images you’ve taken with your camera, even if you’ve used several different memory cards. You’ll have to carve a notch on the body of your K200D the first time you reach 9999 images, and every time thereafter, if you want to continue to keep count.
Off. When the File No. box is unchecked in the Memory Status entry, the Pentax K200D resets and uses a value of 0001 for the first image in a new folder. Use this option when you want to organize your images by folders that contain 500 or fewer images, or you’ll be using an image downloading utility that can apply new file names to images automatically as they are transferred from your camera or memory card to your computer. You’ll find more information on this option in Chapter 8.
Note that the file numbers appear in stored image files on the card; however, the number listed on the camera’s LCD contains just the file folder number and the image number.
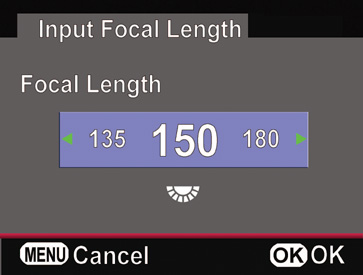
The current focal length of the lens mounted on the camera is used by the K200D when calculating the amount of shake reduction that is applied when the camera’s anti-shake feature is switched on. Pentax lenses with DA, D FA, FA J, FA, or F in their names automatically provide this information to the camera. Other lenses do not, but you can input the focal length setting you’d like to use for such lenses using this menu option. It’s available only when the Shake Reduction feature is turned on, and an applicable lens is mounted on the camera.
A listing of 34 different focal lengths, from 8mm to 800mm, appears with a default value of 35mm available in a horizontally scrolling list, as shown in Figure 3.7. You can use the controller left/right keys to select the value appropriate for your lens, or the closest value offered, such as 18mm (if you’re using a 17mm lens). This setting is grayed out and not selectable when using lenses that communicate their focal length to the camera. Set Custom Setting #23, using the aperture ring set to Permitted when using older lenses.
The Playback menu includes just five choices, shown in Figure 3.8, which allow you to specify some useful settings during picture review. You can make other Playback setting changes in the Custom Setting menu using CS #20 and CS#21, as described later in this chapter.
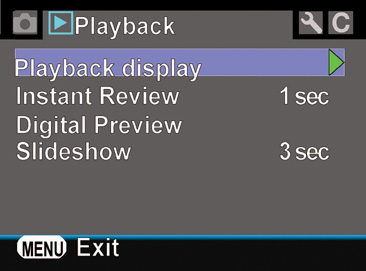
Playback Display
Instant Review
Digital Preview
Slide show
When reviewing images, the K200D can show flashing red pixels to indicate areas that are overexposed, and flashing yellow pixels to mark areas that are underexposed. These are commonly called “blinkies.” This menu entry includes a Bright/Dark Area option with a check box, which can be marked and unmarked with the left/right controller keys. Mark the box to enable blinkies, and unmark the box to disable them (because you find the flashing pixels distracting or prefer to locate over- and under-exposed areas on your own).
The second option within this entry allows you to enable or disable the Quick Zoom feature, which automatically zooms in to a specified magnification when the Playback button is pressed to view an image. When you select Off, the default “zoom” level is 1X. You can also use the up/down controller keys to specify X2, X4, X8, and X16 default zoom levels that are used each time you review an image. This option is useful when you want to zoom in to a particular magnification each time you use picture review.
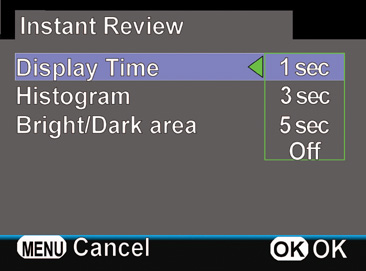
This menu entry lets you determine whether to display an instant review of the image you’ve just taken on the LCD and whether to show a histogram display and flashing yellow/red “blinkies.” Your choices are:
Display time. Highlight this entry, press the right controller button, and select from 1 second (really, too brief to be of much use other than as a confirmation a picture was actually taken), 3 seconds, 5 seconds, and Off, as shown in Figure 3.9. I usually select 5 seconds for most situations. You don’t have to worry about this longer display interfering with your desire to take the next picture. Even while the Instant Review is shown, you can return to Capture mode and take another picture by tapping or pressing the shutter release. I set this option to Off when I am shooting concerts and other darkened areas where the lighted LCD might prove distracting or annoying to those behind me. I also use the Off setting when shooting sports in Continuous mode, because I rarely use Instant Review, preferring to take a peek at one of my action shots after a particular sequence is over. Remember that with or without Instant Review, you can look at the last picture taken at any time by pressing the Playback button.
Histogram display. Highlight this option and press the left/right controller keys to enable or disable display of a histogram during Instant Review. (The check boxes for this option and the next one are obscured by the display time options in the figure.) You may find the histogram a help in determining whether your image is over-or under-exposed. While the Instant Review display is on the LCD, you can press the up/down controller keys to change the histogram from the standard brightness histogram to the detailed RGB histogram, which shows the image as a thumbnail, flanked by separate brightness, red, green, and blue histograms. I’ll explain how to use histograms in Chapter 4.
Bright/Dark Area display. Highlight this option and press the left/right controller keys to enable or disable display of flashing yellow (underexposed) and red (overexposed) pixels during Instant Review. The “blinkies” are a quick way to spot serious exposure problems.
In Chapter 2, in the sidebar “Using Digital and Optical Preview,” I described the difference between the Pentax K200D’s conventional optical depth-of-field preview, and its innovative digital preview, which is an actual preview picture the camera takes prior to (or instead of) the actual picture. Digital and optical previews are activated by rotating the switch that rings the shutter release all the way clockwise.
This option lets you specify whether the histogram display and/or bright/dark area display are shown along with the Digital Preview image.
Histogram display. Highlight this option and press the left/right controller keys to enable or disable display of a histogram during Digital Preview. While the Digital Preview is shown, press the up/down controller keys to change the histogram from the brightness histogram to the brightness/RGB histogram. I’ll explain how to use histograms in Chapter 4.
Bright/Dark Area display. Highlight this option and press the left/right controller keys to enable or disable display of flashing yellow (underexposed) and red (overexposed) pixels during Digital Preview.
I showed you how to activate a slide show of the images on your memory card in Chapter 2, using the Playback Functions menu. This menu entry lets you specify the interval between images, and whether the show should repeat when finished.
Interval. Highlight this entry and choose 3, 5, 10, or 30 seconds. The 3 and 5-second intervals are best for traditional slide shows, in which the goal is to showcase a series of images one after another. The 10- and 30-second displays are suitable for “background” slide shows, such as those at a trade show or science fair exhibit, particularly if the K200D is connected to a television screen monitor. You can start the show, and it will cycle through the images at a leisurely pace.
Repeat Playback. Highlight this entry and mark or unmark the check box to enable or disable repeating the slide show when it is finished. It’s often desirable to display a slide show continuously at trade shows or exhibits, and your K200D makes a perfect slide projector when connected to a television set and—preferably—an AC power source.
The Set-up menu is used for adjustments on how your camera behaves in Capture mode during your shooting sessions, as opposed to the settings available in the Recording Mode menu, which adjusts how pictures are taken, and the Playback menu, which handles the settings controlling what the camera does during display of your picture after it’s taken.
Format
Beep
Date Adjust
World Time
Language
Text Size
Guide Display
Brightness Level
Video Out
USB Connection
Auto Power Off
Folder Name
Select Battery
Pixel Mapping
Dust Alert
Dust Removal
Sensor Cleaning
Reset
Use this setting, the initial entry on the first page of the Set-up menu (see Figure 3.10), to erase everything on your SD memory card and set up a fresh file system ready for use. When you navigate to Format, press the right arrow to get to a page with just two selections: Format and Cancel. If you choose Format and press the OK button, all your data will be deleted; Cancel and OK returns you to the Set-up menu. A progress screen appears while formatting is underway.
I recommend reformatting your memory card after each shooting session. While you can move files from the memory card to your computer, leaving behind a “blank” card, or delete files using the Trash can button during Playback, both options can leave behind stray files, including those that have been marked as Protected. Format removes those files completely (and beyond retrieval—unless you use a utility program like those described in Chapter 9) and establishes a fresh file system on the card, with all the file allocation table (FAT) pointers (which tell the camera and your computer’s operating system where all the images reside) efficiently pointing where they are supposed to on a blank card.
You can turn the beep on or off individually for five different camera operations, or you can switch it off entirely. You may find the beeper noise for particular functions annoying, or you may be shooting in an environment (such as concerts, religious ceremonies, or museums) where such sounds are impolite. If you’re one of those (bless you!) who turn your cell phones to vibrate when you’re in the company of others (or even dining in a restaurant alone), you’ll like this option.
Just navigate to the Beep menu entry using the four-way controller, highlight the beep item that you want to enable or disable, and use the left/right controller keys to mark or unmark the check box, as shown in Figure 3.11. The following features have beeps associated with them:
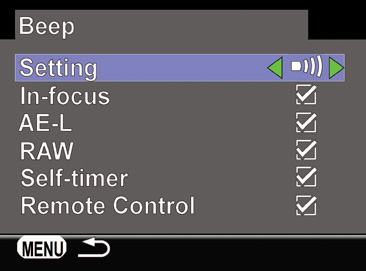
Setting. The first entry listed among Beep options lets you turn the beeper on or off for all functions. Highlight the top entry and press the left/right controller keys to enable or disable all beeping functions. Individual functions can be silenced or enabled using the options listed next.
In-focus. The camera beeps when correct focus has been achieved.
AE-L. The beep sounds when autoexposure and/or focus is locked by a press of the AE-L button. I’ll show you how to combine autoexposure lock and focus lock using the AE-L button in the discussion of Custom Setting #4 later in this chapter.
RAW. You’ll hear a beep each time you press the RAW button to change the file format, as discussed under the Recording Mode menu earlier in this chapter.
Self-timer. During the self-timer countdown, the LED on the front of the handgrip blinks and the beeper can (optionally) provide an alert. Enable or disable that sound here.
Remote Control. Beeps as the camera is triggered using the optional remote controller.
Here’s where you can adjust the date applied by your K200D to your “home” time zone. This information is embedded in the image file along with exposure information and other data. You can also specify an additional time zone as a “destination” time using the World Time adjustment, described next.
Date Style. Choose among [mm/dd/yy], [dd/mm/yy], or [yy/mm/dd] styles, and specify either a 12-hour or a 24-hour clock. When Date Style is highlighted, use the left/right controller keys to select the option you want to change, and then the up/down keys to switch among the style and 12/24 hour options. Press the left controller key to return to the Date Adjust menu, or press OK if you’re finished setting the date, time, and date style format. Press the Menu button to cancel and void any changes you’ve made.
Date. Select the Date option with the left/right controller keys and move among the month, date, and year choices. Use the up/down keys to change the month, day, and year. Press the left controller key to return to the Date Adjust menu, or press OK if you’re finished setting the date, time, and date style format. Press the Menu button to cancel and void any changes you’ve made.
Time. Select the Time option with the left/right controller keys and move among the hour, minute, and AM/PM options, using the up/down keys to change them. Press the left controller key to return to the Date Adjust menu, or press OK if you’re finished setting the date, time, and date style format. Press the Menu button to cancel and void any changes you’ve made.
Your Pentax K200D remembers two different time zones for you, a “home” time zone, which is set using the Date Adjust menu entry, described previously, and a “destination” time zone, which is an additional city that you want to track, usually because you are visiting there. You don’t need to set the time for your Destination setting; once you’ve entered the correct date and time for your Home zone using Date Adjust, when you switch to the Destination time zone, the camera automatically adds or subtracts the correct number of hours to compensate.
This menu entry allows you to specify which world city is your default home time zone, and which is your default destination zone. You can also shift gears, so to speak, and tell your camera whether you are currently in your home zone or destination zone.
For example, if you live on the East Coast of the United States, you would set the time for Eastern Daylight or Eastern Standard time using the Date Adjust option described above. In addition, you might want to specify a second location, perhaps the West Coast, where you might have friends, relatives, colleagues, or another company office. You might find it particularly useful to have the World Time display available when you travel to that second time zone.
To use the World Time feature, follow these steps:
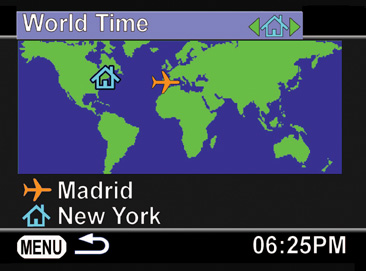
Access World Time. Highlight the World Time entry on the Set-up menu and press the right controller button to produce the World Time screen. (See Figure 3.12.)
Choose Home or Destination Time modes. The top line of the screen will show the icon of a house (your Home time zone) or an airplane (your Destination time zone). With the World Time line highlighted, press the left/right controller keys to switch to the zone you want as your current default, either Home or Destination. Once you’ve shifted to Home or Destination, the K200D will show those settings on the LCD and embed the local time in your images.
Specify city for Destination or Home zones. Press the down key to highlight either the Destination or Home listings, then the right key to change to a world map dotted with possible cities. (See Figure 3.13.)
Choose the region. Use the e-dial to select the region containing the city you want to specify.
Select a specific city from those available. With a city name highlighted, press the left/right keys to switch among available cities. Your selected city will be listed as the city name, and its location will blink on the world map.
Enable/disable DST option. When the city you want is listed, press the down key to highlight the DST (Daylight Savings Time) option, and then the left/right keys to mark or unmark the box that indicates that DST will be accounted for.
Confirm your selection. When you are satisfied with your setting, press the OK button to confirm your choice, or the Menu button to cancel World Time changes.

Tip
Reminder: Once you’ve set up Home and Destination cities for the World Time option, your K200D will display as its default whichever of the two zones you selected in Step 2. So, when you travel to your Destination time zone, you can set the camera to mark your files with your new local time, rather than the time at your original Home location. I use this feature a lot when traveling, so that the date stamps on my image files (not the pictures themselves, as is the case with some other digital cameras) reflect the time of day they were actually taken, rather than the time back home.
Use this menu entry to select from 18 different languages that will be used to display your menus and other messages. Available languages include English French, German, Spanish, Portuguese, Italian, Dutch, Danish, Swedish, Finnish, Polish, Czech, Hungarian, Turkish, Russian, Korean, Japanese, and both Traditional and Simplified Chinese.
If you accidentally set the language to a tongue that is incomprehensible to you, don’t panic. Press the Menu button and navigate to the menu marked with a wrench icon (in every language). That’s the Set-up menu. Scroll down to the fifth entry, which is labeled “Language” in English, and press the right key. English will be offered as the choice in the upper-left corner of the screen that appears on the LCD.
If you wear glasses and shoot without them, you may have difficulty reading the menu screens at times (even though you’ve set the viewfinder diopter correction for your vision). Use this menu option to set menu Text Size to Large (or back to Std—Standard) and when any menu item is selected, it will be shown in the text size you’ve specified.
This is the first entry on the second page of the Set-up menu (see Figure 3.14). It can be used to enable or disable a basic Guide Display, as shown in Figure 3.15 (or specify the amount of time the display is visible), each time you turn the camera on or change exposure modes with the Mode dial. Select Off, or choose from 3-second, 10-second, or 30-second display intervals. Most find that turning off the display or setting it for a brief display time works fine, because the same information can be called up by pressing the Info button. Note that when using any of the Scene modes, the Guide Display includes a typical sample thumbnail image of that type of shooting situation.
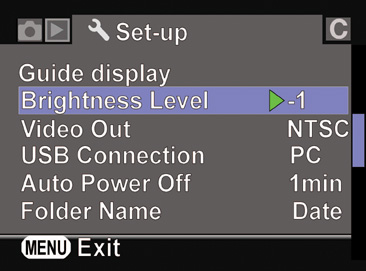
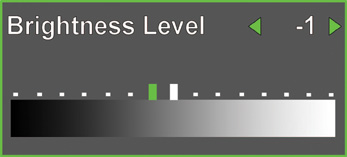
Choose this menu option to adjust the intensity of the LCD display. A grayscale strip appears on the LCD, as shown in Figure 3.16. Use the left/right controller keys to adjust the brightness to a comfortable viewing level over a range of +7 to –7. Under the lighting conditions that exist when you make this adjustment, you should be able to see the full range of tones on the grayscale strip, from black to white. If the dark area at the left of the strip is the same tone for more than one increment, the brightness has been set too low. If the two whitest increments on the right end of the strip blend together, the brightness is too high. Brighter settings use more battery power, but can allow you to view an image on the LCD outdoors in bright sunlight. When you have the brightness you want, press OK to lock it in and return to the menu, or press the Menu button to cancel the adjustment.
This setting controls the output of the K200D when directed to a conventional video system though the video cable when you’re displaying images. You can show these images on a monitor or connect to a VCR or other video device through the external device’s yellow composite video input jack. You can select either NTSC, used in the United States, Canada, Mexico, many Central, South American, and Caribbean countries, much of Asia, and other countries; or PAL, which is used in the UK, much of Europe, Africa, India, China, and parts of the Middle East.
Your Pentax will select a default value for you, based on the region you select in the World Time settings, described earlier. If you change from Home to Destination, the Video Out setting uses the default for that city. You may need to adjust back to your Home setting in some cases. Perhaps you’ve toted a compact NTSC LCD monitor along with you to Europe, and want to view your images using the NTSC protocol, rather than PAL, even while your camera is using the appropriate European time stamp.
You can link your Pentax K200D to a computer (PC or Macintosh) or to a PictBridge-compatible printer using the USB cable bundled with your camera. This option allows you to specify which of the two types of connections you want to use.
You have just two choices: PC or PictBridge. When using the PC connection, your computer sees the K200D as just another hard disk peripheral device. You can drag and drop image files from the folders on the memory card to a folder on your computer. I’ll provide more details on doing this in Chapter 8.
In PictBridge mode, you can print your JPEG (but not RAW) pictures directly from the camera to a PictBridge-compatible printer (most newer printers are). When you connect the printer to the K200D, the camera in PictBridge mode automatically recognizes the printer. A menu like the one shown in Figure 3.17 appears on the monitor screen of the K200D.
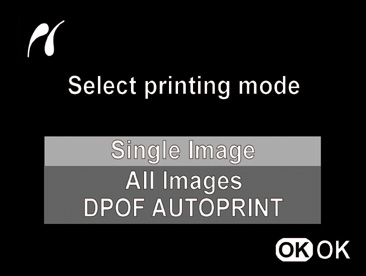
You can then print single images or all images on the memory card, or choose to print images that have been marked using the DPOF Autoprint option (if no images are already marked for printing, this option will be grayed out and unavailable). The DPOF option, unlike the Single Image or All Image choices, doesn’t allow you to change printer settings for the images being printed. Use the Single Image or All Image modes when you want to choose paper size, paper type, image quality, or whether or not the prints will be borderless.
To print single images or all images, just follow these steps:
Choose Single or All Images. Use the up/down keys to select Single Image or All Images and press OK.
Select individual images (Single Image only). If printing just a single image, press the left/right keys to choose an image from those available on your memory card. If you are printing All Images, skip this step; the settings you apply in steps 3-8 apply to each image on the card, and cannot be specified individually.
Choose number of copies. Use the up/down keys to choose the number of copies, from 1 to 99.
Add/remove Date. Press the Fn button to mark or unmark the Date box, which determines whether the date is printed on the image.
Confirm number of copies and date imprint. Press the OK button to confirm your settings so far, and you’ll be shown settings for:
Paper Size. Only the available paper sizes communicated by your PictBridge printer to the K200D may be selected.
Paper Type. Choose from *, **, or *** paper types, which is a somewhat unsatisfactory way of referring to the range between plain paper (*) and photo paper (***).
Quality. Again, you can choose from the amorphous * to *** indicators to choose Good, Better, or Best print quality.
Border Status. Indicates whether prints should be borderless or with borders.
Access settings screen. To change any of these settings, press the Fn button.
Select any or all of Paper Size, Paper Type, Quality, and Border Status (with/without). Use the up/down keys to highlight any of the settings you want to change.
Change settings. Press the right key to review and adjust any of the four settings. Press OK to confirm each option’s settings.
Return to Print According to Settings? Menu. Press OK to return to the printing menu.
Send your printing instructions to the printer. Press OK one last time to print your image.
To print all images on the memory card that you have marked with the DPOF option (introduced in Chapter 2), just follow these steps:
In Playback mode while viewing an image you want to mark for printing, press the Fn button to view the screen shown in Figure 3.2. The screen shows an image of the four-way controller, with labels representing the functions you can activate by pressing the controller’s keys.
Press the Up button to view the DPOF (Digital Print Order Format) screen.
Highlight Copies and use the left/right key to specify a number of copies, from 1 to 99.
Highlight Date and press the left/right keys to mark or unmark the Date box.
If you want to use the same Copies and Date parameters for all images on the memory card, press the Fn button. Each marked image will have a printer icon superimposed on it.
To mark or unmark additional images, rotate the e-dial to the right to view the next image, or to the left to see the previous image.
Repeat steps 3-5 to mark additional images.
When you’re finished, press OK. You’ll see a Data Being Recorded confirmation message before you’re returned to the Playback screen.
Connect your K200D to a PictBridge-compatible printer, and when the PictBridge menu appears, select DPOF Autoprint and press OK to automatically print the images you’ve selected, using the number of copies and date imprint option you specified. The marked images can also be given to a photofinisher, which has equipment that can interpret your print order settings.
You might want your Pentax K200D to turn itself off after a brief interval of non-use, saving battery power. Or, you might prefer to keep the camera turned on and active for a longer period, ready for an instant grab shot. This setting allows you to choose automatic power-down intervals of 1, 3, 5, 10, or 30 minutes, or disable automatic shut-off completely with the Off setting. Note that even if the camera powers down, the status LCD on top of the K200D remains active, and you can return the camera to full operation by tapping the shutter release or pressing the Info or Playback buttons.
As you take pictures, the Pentax K200D deposits the images into folders on your memory card containing up to 500 different pictures (unless you’re using Auto Bracketing, in which case all the images in a sequence will be stored in the same folder, even if more than 500 images are created in that folder). You can choose the naming format for those folders here.
If you have viewed one of your memory cards’ contents using a card reader, you noticed that the top-level folder on the card is always named DCIM. Inside that folder is another folder created by your camera. Cameras from different vendors use different folder naming conventions, and they can co-exist on the same card. For example, if your memory card is removed from your Pentax camera and used in, say, a camera from another vendor which also accepts SD, the other camera will create a new folder using a different folder name within the top-level DCIM directory.
By default, the Pentax K200D creates its folders using a three-number prefix (starting with 100 and going up to 999 if necessary), followed by two digits of the month and day, in the format MMDD or a different date format if specified in the Date Adjust menu entry. So, a folder containing images captured on February 8, 2009 might be deposited in a folder named 100_0208. If you happened to fill up that folder with 500 images, a new folder named 101_0208 would be created.
This menu option has just two options: Date, which uses the folder naming convention just described, or PENTX, which uses only a folder number and the string PENTX, as in 100PENTX, 101PENTX, and so forth. Use this option if you’d prefer not to have folders labeled with the current date.
This is the first option on the third screen of the Set-up menu (see Figure 3.18). If you own the optional D-BG3 battery grip, you can specify whether the K200D uses the camera’s internal battery as the primary power source, whether the battery in the grip functions as the primary power source, or whether the camera should select its main battery automatically. Note that if batteries are installed in both, some power will be drawn from each, regardless of which setting you choose. Your options are as follows:

Auto Select. In this mode, the K200D uses the battery that has the most power. It will then switch over to the other battery and use that until it’s depleted. This setting is probably your best choice for any shooting session in which you feel you won’t use up both batteries.
Body First. With this setting, the Pentax uses the battery in the K200D first, and doesn’t switch to the battery in the grip until the camera’s power is depleted. I use this setting only when I am shooting both with and without grip and have several additional replacement batteries. It allows me to keep the battery in the grip as fresh as possible in case I decide I need it on the spur of the moment. While shooting without the grip, I can remove and replace dead batteries in the body conveniently. If you are using the grip constantly, this option is not the best way to go.
Grip First. When I have my grip attached to my camera for a full shooting session, I like to use this mode. The battery in the grip runs out first, and the camera shifts over to its internal battery until I have a chance to drop a new battery into the grip. If I think I may not have enough replacement batteries, I can often recharge the dead battery removed from the grip while I continue shooting.
Use this option to tell your Pentax K200D to ignore “bad” pixels in the sensor. You can read more about the causes and fixes for such pixels in Chapter 9. Unlike the majority of digital SLRs, the Pentax has the facility built-in to “map out” these errant photosites.
Using this feature is simplicity itself. When you choose Pixel Mapping from the Set-up menu, a screen appears with the comment, “For checking the image sensor assembly to make adjustments,” which doesn’t really tell you very much (what kind of adjustments will be made?). Choose Pixel Mapping and press OK to start the process, or select Cancel to back out of the screen. A “Data being processed” message appears, and then you’re returned to the Set-up menu. Your defective pixels have been identified and the Pentax’s pixel map updated so their information will be ignored in the future. Note that you cannot use this feature if battery power is low.
This is not a setting, but, rather, it is a function that takes a “picture” of your sensor and provides an image that shows whether or not you have dust and other artifacts on your CCD. I’ll explain how to use this option in Chapter 9.
This is another function, rather than a setting, used to shake off dust on the sensor by shaking the CCD. You can perform the sensor-shaking from this menu, or mark a check box that will activate sensor cleaning each time the camera is turned on. I’ll explain this feature in more detail in Chapter 9.
This function does not clean your sensor, but, instead, lifts up your mirror and opens the shutter so you can clean the sensor yourself using a blower, damp swab, or some other means. The “Troubleshooting” section in Chapter 9 shows you how to do this safely.
If you’ve been playing around with all of the camera’s controls and you want to go back to all the default values for the settings in the menus, navigate to the Reset setting, the last in the Set-up menu. When you press the right arrow of the four-way controller, you’ll be taken to a new page where it will say “Back to initial settings” at the top and give you two options at the bottom: Reset and Cancel. If you press Reset, all settings go to default and the screen goes blank.
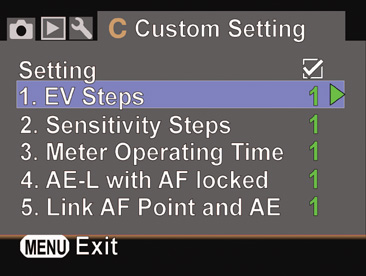
There are 23 options in the Custom Setting menu that modify how your camera behaves, plus a handy reset entry that returns all the settings to their defaults. Each of the custom settings from CS #1 to CS #23, are listed with a green numeral in the rightmost column that shows the number representing their current value, from 1 to 4 (see Figure 3.19). Some custom settings have just two values (1 or 2) for On or Off, or some other pair of options. Others may have up to four different options, listed from 1-4 in their submenu. Although you don’t need to learn what setting each number represents for each custom setting, it can be helpful to understand, at a glance, that, say, a 1 next to Preview Method means that Digital Preview is enabled, and a 2 means that Optical Preview is active.
To change a custom setting, highlight its menu entry and press the right key to produce a screen listing your options. Then, use the up/down keys to make your selection and the OK button to confirm it.
The first entry in the Custom Setting menu is labeled Setting (it doesn’t actually have a number), and can function as a sort of a temporary “reset” to restore each of the other custom settings to their default values until you activate your preferred options again.
Highlight the Setting entry and press the left/right keys to mark or unmark the check box. When the box is unmarked, each of the 23 custom settings revert to their default values (represented by the number 1). Mark the box to activate your custom settings instead. The customized options you’ve specified are not actually reset when the check box is unmarked; they are only temporarily ignored. If you want to actually reset the custom functions to their default values, use the Reset Custom Function entry, which follows CS #23 in the listing, and will be described later in this section.
1/2 EV steps
1/3 EV steps
This setting tells the K200D the size of the “jumps” it should use when making exposure adjustments—either one-third, one-half, or one full stop. The increment you specify here applies to f/stops, shutter speeds, EV changes, and autoexposure bracketing. As with ISO sensitivity step value, you can select from 1/2 EV steps (the default) or 1/3 EV steps increments. Figure 3.20 shows the selection screen, which is typical of all the Custom Setting screens, with one to four options. (Because they are so similar, I won’t provide sample screens for most of the other custom settings that follow.)
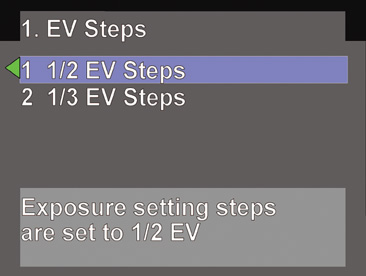
With 1/2 stop increments, you will have larger and more noticeable changes between settings. The Pentax will use exposure compensation values of + or –0, .5, 1.0, 1.5, or 2.0 stops, and will use shutter speeds such as 1/60th, 1/125th, 1/250th, and 1/500th second, and f/stops including f/5.6, f/6.7, f/8, f/9.5, and f/11. These coarser adjustments are useful when you want more dramatic changes between different exposures.
Choose the 1/3 stop setting when you want the finest increments between shutter speeds and/or f/stops. For example, the Pentax will use exposure compensation values of + or –0, .3, .7, 1.0, 1.3, 1.7, and 2.0 and shutter speeds such as 1/60, 1/80, 1/100, 1/125, 1/160 second, and 1/125th second, or f/stops such as f/5.6, f/6.3, f/7.1, and f/8, giving you (and the autoexposure system) maximum flexibility.
Options:
1 EV steps
As EV steps
This setting determines the size of the “jumps” it should use when making ISO adjustments (using the Capture Functions menu, as described in Chapter 2). The values (which don’t appear in the menu themselves) would be:
I EV steps. ISO 100, 200, 400, 800, 1600
1/2 EV steps. ISO 100, 140, 200, 280, 400, 560, 800, 1100, 1600
1/3 EV steps. ISO 100, 125, 160, 200, 250, 320, 400, 500, 640, 800, 1000, 1250, 1600
Options:
10 sec.
3 sec.
30 sec.
This option determines how long the exposure meter remains active before shutting itself off. The default value of 10 seconds is usually enough under most circumstances, and allows a little idle time when you begin using the camera to frame an image. Use the 3-second setting to save power, especially when you expect to be shooting more or less constantly, so the quick time-out won’t have much effect on the availability of the meter’s readings. Use the 30-second option when you want to have the meter alive for longer periods while you contemplate and frame a shot. If your meter does time out, just tap the shutter release button to revive it.
Options:
Off
On
Use this setting to determine whether both exposure and focus are locked when the focus is locked. As you’ll learn while becoming familiar with your Pentax K200D, the need to lock exposure, focus, or both doesn’t always happen at the same time. At times, you’ll want to freeze one or the other, or lock both simultaneously.
Exposure should be locked when you have framed your photo, are ready to shoot, and don’t anticipate any events (such as a cloud passing in front of the sun) that will change the exposure settings as determined by the K200D’s metering system. Focus should not be locked until the main subject you want as your center of interest is in sharp focus. Sometimes, this main subject is not located in one of the 11 focus zones in the viewfinder, and you may want to use AF.S (single autofocus) mode, adjust framing slightly to allow the camera to focus on your center of interest, lock focus, and then reframe to achieve the composition you want. In other situations, the desired point of focus can change if the subject is moving or begins moving. While AF.S will refocus a subject that begins moving after focus is locked, in such cases, you’re better off using AF.C (continuous autofocus), which refocuses to follow active subjects. The K200D’s Moving Object Scene mode also uses AF.C mode.
To determine how and when you should use this setting, you’ll need to have a better understanding of how the AE-L button and shutter release interact than is provided in the confusing explanation offered in the Pentax manual. I’m going to clear up everything for you.
When you are happy with the automatic exposure set by the Pentax K200D, there are two ways to lock in that exposure so that it does not change until either you have taken a picture (and the camera readies itself to calculate exposure for the next exposure) or you have unlocked exposure by not taking a picture. Lock exposure in either of these two ways:
Press the shutter release halfway with CS #4 set to On. Focus is locked when you are using AF.A mode (or one of the Scene/SCN modes that operate in AF.A mode). If you’re using AF.C mode, or AF.A mode and your subject begins moving, then only exposure is locked when the shutter release button is pressed halfway. In AF.C mode or AF.A mode with a moving subject, the camera will refocus as required to follow the subject.
When CS #4 is set to Off, only focus is locked. Exposure will continue to adjust as the light changes or as you reframe the image. When CS #4 is set to On, both focus and exposure are locked, until you take a picture or you release the button.
Press the AE-L button. When you press this button, the exposure is locked for as long as you continue holding down the AE-L button. A * indicator appears in the viewfinder and a beep (which you can disable in the Set-up menu) sounds. The exposure remains locked after you release the button, for a period of time ranging from one-half to twice the value set for the metering operating timer in CS #3 (usually about 5 to 20 seconds). Note that the AE-L button does not work in B (Bulb) exposure mode.
Off
On
When using Multi-Segment metering, the Pentax K200D examines 16 different zones in the frame to calculate exposure. You’ll find more on exposure metering in Chapter 4. This setting can be used to specify whether the camera takes into account the active autofocus point when determining focus settings, as follows:
1. Off. In Multi-Segment mode, the camera calculates exposure based on the 16 exposure zones available. Use this option for most scenes, to take into account the entire frame rather than just the subject.
2. On. The K200D calculates exposure based on the exposure zone in the focusing area that is linked to the active autofocus point. In other words, the camera assumes that the AF point of sharpest focus is the main subject, and bases exposure on that area of the frame. This choice may be best for subjects that are illuminated much differently from their surroundings, such as portraits of people with very light or very dark backgrounds.
Options:
0 – +
– 0 +
+ 0 –
0 + –
This is the first entry on the second screen of Custom Setting options. When using automatic exposure bracketing (explained in Chapter 4 in more detail), you can choose the order in which adjustments are applied. Your choice is generally just a matter of personal preference in how you want your bracketed exposures to be presented.
1. 0 – +. The first shot will have normal (as metered) exposure (0 compensation); the second has less exposure (– compensation); the third has additional exposure (+ compensation).
2. – 0 +. The first shot will have less exposure than metered; the second will have normal exposure; the second has less exposure; the third has additional exposure.
3. + 0 –. The first shot will have more exposure than metered; the second will have normal exposure; the third has less exposure.
4. 0 + –. The first shot will have normal (as metered) exposure; the second will have additional exposure; the third has less exposure.
Off
On
When setting White Balance using the Capture Function menu, you can fine-tune the color by adjusting the bias in the blue/amber and magenta/green directions, as I’ll describe in Chapter 4. This setting allows you to enable fine-tuning (giving you the most flexibility) or disable the option (reducing the chance that you’ll accidentally change the color incorrectly). There are two options available with this setting:
1. Off. You can only change the white balance using the preset choices that appear in Capture mode when you press the Fn button and the left arrow of the four-way controller to activate White Balance settings.
2. On. You can fine-tune the White Balance settings. A small grid (which I’ll explain in Chapter 4) appears, and the color bias can be adjusted by pressing the up key (more green); down key (more magenta); left key (more blue); or right key (more yellow/amber).
Options:
On
Off
The selected AF point can be optionally highlighted in red in the viewfinder. This is largely a matter of personal preference, as the extra power consumption is minuscule.
1. On. The selected AF point in the viewfinder is highlighted as a red light. This option can be especially useful for dim scenes to let you see exactly the point being used to calculate focus.
2. Off. Disables the red AF point highlighting. Use when you find the red AF point distracting, or if your subject contains tones or illumination levels that make it difficult to see the highlighted point.
Options:
Off
On
Use this setting to specify whether autofocus should be used while using the optional Pentax Remote Control F. Remote shooting is sometimes used as an alternative to the self-timer to allow you to get into the picture, or simply to take a photo without touching the camera and thereby inducing vibration.
The K200D offers two remote control options in Drive mode (accessed from the Capture Functions screen by pressing the Fn button followed by the controller up key). In Standard remote mode, the shutter is triggered as soon as the release button on the remote is pressed. In Delayed remote mode, the shutter is triggered about three seconds after the button on the remote is pressed. In either case, if you plan to be in the photo yourself, you should already be in position. The Delay mode allows you to tuck the remote control away so it doesn’t show in the picture.
This setting allows you to specify whether the autofocus system operates when the remote’s release button is pressed:
1. Off. The autofocus system does not operate when the remote’s button is pressed. You must focus ahead of time, which means you’ll need to focus by pressing the camera’s shutter release button halfway before using the remote control. Then, release the shutter button and take your picture using the remote. This default setting is best when you are able to focus on your scene before taking the photo.
2. On. When you press the release button on the remote, the camera’s autofocus system will try to focus your image. If it is able to focus, a picture will be taken. If the camera is unable to focus, the photo will not be captured. This option is handy when subjects in the frame may be moving until just before the picture is taken, and there is plenty of light so that autofocus will be possible.
Options:
On
Off
Visual noise is that awful graininess caused by long exposures and high ISO settings, and which shows up as multicolored specks in images. This setting helps reduce noise caused by long exposures/slow shutter speeds. This noise is rarely desirable in a digital photograph. There are easier and more controllable ways to add texture to your photos.
Slow shutter speeds allow more photons to reach the sensor, increasing your ability to capture a picture under low-light conditions. However, the longer exposures also increase the likelihood that some pixels will register random phantom photons, often because the longer an imager is “hot,” the warmer it gets, and that heat can be mistaken for photons.
1. On: For longer exposures, the K200D takes a second, blank exposure and compares that to the first image. Noise (pixels that are bright in a frame that should be completely black) in the “dark frame” image is subtracted from your original picture, and only the noise-corrected image is saved to your memory card. Because the noise-reduction process effectively doubles the time required to take and save a picture, you won’t want to use this setting when you’re rushed. Some noise can be removed later on, using tools like Bibble Pro or Photoshop.
2. Off: This setting disables long exposure noise reduction. Use it when you want the maximum amount of detail present in your photograph, even though higher noise levels will result. This setting also eliminates the extra time needed to take a picture caused by the noise reduction process. If you plan to use only lower ISO settings (thereby reducing the noise caused by ISO amplification), the noise levels produced by longer exposures may be acceptable. For example, you might be shooting a waterfall at ISO 100 with the camera mounted on a tripod, using a neutral density filter and a long exposure to cause the water to blur. (Try exposures of 2 to 16 seconds, depending on the intensity of the light and how much blur you want.) To maximize detail in the non-moving portions of your photos, you can switch off Slow Shutter Speed noise reduction. You can compare images with and without noise reduction in Figure 3.21.
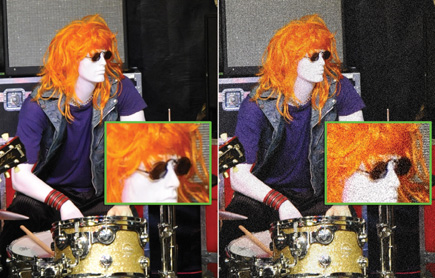
Off
Weakest
Weak
Strong
Depending on what kind of subject you are shooting, and how much noise reduction you want to apply, you can use this option to select Off, Weakest, Weak, or Strong High-ISO noise reduction.
Noise can also be caused by higher ISO sensitivity settings. The effects of high ISO noise are something like listening to a CD in your car, and then rolling down all the windows. You’re adding sonic noise to the audio signal, and while increasing the CD player’s volume may help a bit, you’re still contending with an unfavorable signal to noise ratio that probably mutes tones (especially higher treble notes) that you really want to hear.
The same thing happens when the analog image signal is amplified: You’re increasing the image information in the signal, but boosting the background fuzziness at the same time. Tune in a very faint or distant AM radio station on your car stereo. Then turn up the volume. After a certain point, turning up the volume further no longer helps you hear better. There’s a similar point of diminishing returns for digital sensor ISO increases and signal amplification as well.
As the captured information is amplified to produce higher ISO sensitivities, some random noise in the signal is amplified along with the photon information. Increasing the ISO setting of your camera raises the threshold of sensitivity so that fewer and fewer photons are needed to register as an exposed pixel. Yet, that also increases the chances of one of those phantom photons being counted among the real-life light particles, too.
Some kinds of subjects may not require this kind of noise cancellation, particularly with images that have a texture of their own that tends to hide or mask the noise.
Options:
Sensitivity/No. of Shots
Center of AF Point
Enable AF
Cancel AF
The four-way controller’s center OK button can have several functions. You can choose which of these functions is active while you shoot.
1. Sensitivity/No. of Shots. This choice lets you specify whether the ISO speed setting or number of recordable shots remaining is displayed in the lower-right corner of the viewfinder. Ordinarily, the number of shots remaining is listed (up to a maximum displayable value of 999). When this option is selected, in all exposure modes except Sv, you’ll see the ISO speed value at that location instead while the OK button is pressed. However, when you’re using Sensitivity Priority (Sv) mode, the ISO speed value is displayed by default, and the number of recordable shots is shown only while the OK button is pressed.
2. Center of AF Point. When this option is used, the active AF point jumps to the center AF point in the frame when the OK button is pressed. This can come in handy during action shooting and other situations when you want to make sure that the subject in the center of the frame is in sharp focus.
3. Enable AF. This is a deceptively cool, if oddly named, option. It disables autofocus activation when the shutter release is pressed halfway, instead assigning this task to the OK button. When this option is active, you can lock exposure and autofocus separately. Press the shutter release button halfway to lock exposure (say, while framing an action shot), then press the OK button to lock autofocus when the subject you want to shoot is positioned in the frame. Press the shutter release the rest of the way to take your photo. This sounds more complicated than it is in real life.
4. Cancel AF. Use this option if you sometimes want to de-activate autofocus quickly and use Manual focus instead. It’s usually much faster than fumbling around for the AF/MF slide switch on the side of the camera lens mount. When active, press the OK button to manually focus. The MF indicator appears in the viewfinder window. Release the OK button to re-activate autofocus.
Options:
Program shift
Tv
Av
Off
When using Program exposure mode, the e-dial can be used as a shortcut to several different functions. These include:
1. Program Shift. When this option is selected, spinning the e-dial switches the K200D from Program mode to Program Shift mode. You can then rotate the e-dial to change from the metered exposure to other shutter speed/aperture combinations that provide the same exposure. To return to standard Program mode, press the Green button (located on top of the camera, southeast of the shutter release).
2. Tv. When you’ve chosen this option, rotating the e-dial switches the K200D from Program mode to Tv (Shutter Priority) mode. You can then rotate the e-dial to change to a shutter speed of your choice, and the camera will select the correct aperture for the proper exposure. Press the Green button to return to Program mode.
3. Av. When you’ve chosen this option, rotating the e-dial switches the K200D from Program mode to Av (Aperture Priority) mode. You can then rotate the e-dial to change to an aperture of your choice, and the camera will select the correct shutter speed for the proper exposure. Press the Green button to return to Program mode.
4. Off. With this option active, rotating the e-dial while using Program mode has no effect.
Options:
Program Line
Tv Shift
Av Shift
Off
When shooting in Manual Exposure mode you can get help in finding the right exposure. You can set the Green button to temporarily switch from Manual exposure to another exposure mode. This capability would come in handy when you’re setting the exposure values yourself, and see a grab shot with illumination that might be different from the settings you’ve already made. Press the Green button, and the K200D will instantly switch from Manual exposure to one of the autoexposure methods you specified using this menu entry.
1. Program Line. Sets the aperture and shutter speed to the exposure calculated using Program exposure when the Green button is pressed.
2. Tv Shift. This option and the next are named confusingly. When you’re using Manual exposure and press the Green button, the current aperture you’ve selected is locked in, and the K200D adjusts the shutter speed to set the correct exposure. The camera does not switch to Tv (Shutter Priority mode) and lock the shutter speed while adjusting the aperture, as you might think. This is a Tv Shift mode; the shutter speed (time value) shifts, or changes.
3. Av Shift. Same deal. The Pentax does not switch to Av mode when the Green button is pressed. Instead, the shutter speed you’d set when using Manual mode is locked in, and the aperture is changed to achieve correct exposure.
4. Off. Green button is disabled.
Off
On
Here’s a simple one. Your Pentax K200D’s built-in flash needs a second or two to recharge after you’ve taken a picture. When you’ve selected Off using this custom setting, the shutter release button is locked until the flash has recharged. Use that option when you want to make sure that you don’t accidentally take a flash photo that might be underexposed.
1. Off. Use this setting if you want to make sure you won’t get any underexposed photos. In practice, the recycle time of your built-in flash will be fairly consistent at a given distance, so in any shooting session you’ll quickly learn how to pace yourself so the flash can keep up with your snapshooting.
2. On. At close distances, it’s likely that the flash will have almost enough juice to take a usable picture, even if it’s not fully charged. If getting any picture at all is more important than ensuring that you don’t get an underexposed photo, use this option. You’ll then be able to take a picture while the built-in flash is charging. This setting can be useful when your built-in flash is not the most important light source for the shot. If you’re using the flash, say, as fill for the shadows, having a full charge might not be essential.
Options:
On
Off
As you’ll learn in Chapter 7, you can trigger an external electronic flash without a cord in Wireless mode, using the built-in flash as a controller for the external unit. To use this mode, you must set the power switch of the external flash unit to Wireless and then set it to the SLAVE mode. The camera must be set to Wireless mode, using the Capture Functions menu (press the Fn button) and by pressing the four-way controller’s down key to access the flash options. You can choose from two options in this Custom Setting entry:
1. On. The built-in flash fires, and will trigger the remote slave flash, which detects the burst. This mode is useful when the main exposure for a shot will come from one or more slave flash units, and you want some additional light from the built-in flash to serve as fill for the shadows.
2. Off. The built-in flash functions as a controller for the remote slave flash, issuing a pre-flash burst that triggers the external unit, but not firing during the actual exposure. In this mode, all of the flash exposure will come from your remote unit(s).
Flash
Unchanged
Because the duration of electronic flash varies from very brief (about 1/1,000th second) to very, very brief (1/20,000th second or less with some units), the color temperature also changes. The K200D can automatically set the White Balance to flash when you’re using a Pentax flash unit that is capable of reporting these changes to the camera. There are two options with this setting:
1. Flash. White balance is set to flash when using flash. I recommend using this setting all the time.
2. Unchanged. White balance setting doesn’t change when using flash. You might want to use this setting if you’re shooting RAW images and plan to set the white balance yourself when importing the images.
Options:
Digital Preview
Optical Preview
Use this setting to specify the type of preview provided by the K200D when you rotate the Main switch all the way clockwise while the exposure meter is active. You can see either of two types of previews to gauge your camera’s depth-of-field and composition at the actual f/stop that will be used to take the picture. (The normal view through the viewfinder shows an image at the lens’s widest aperture, which won’t reflect the true depth-of-field unless the picture happens to be exposed at that lens opening. Your options are as follows:
1. Digital Preview. Use this mode for checking exposure, composition, and focus on the LCD before shooting. The camera takes an actual picture, which appears on the screen. You can then rotate the e-dial to zoom in and out of the preview image, with up to 16X magnification. Use the four-way controller keys to move the viewing window around in the zoomed image. Press the Fn button to save the preview as a new JPEG file. Or, press the shutter release halfway. The preview image vanishes from the LCD, and you can continue shooting in the normal way.
2. Optical Preview. Use this mode when you simply want to check depth-of-field with the viewfinder. It’s faster and uses less power.
Off
On
Use this option to specify whether the number of images remaining or the ISO sensitivity setting will be displayed on the top-panel LCD and in the viewfinder. You can set the OK button to display the attribute you don’t specify here. Choose from:
1. Off. If this option is chosen, the number of recordable images remaining will be displayed in the lower-right corner of the viewfinder and the LCD panel at the top of your camera.
2. On. When this option is active, the ISO sensitivity value will be displayed in the lower-right corner of the viewfinder and the LCD panel at the top of your camera.
Options:
On
Off
The K200D has a function that uses a sensor to rotate the image so that images shot in vertical orientation are rotated on the LCD screen and/or in your image editing application. This setting determines whether the orientation information is embedded in the image file; if you want to have vertical images rotated on your LCD screen, too, you’ll need to use CS #21, described next.
1. On. Turning this setting on tells the Pentax K200D to include camera orientation information in the image file. The orientation can be read by many software applications, including Adobe Photoshop and Photoshop Elements, as well as the camera’s Playback feature.
2. Off. Turn this feature off and none of the software applications will be able to determine the correct orientation for the image. I don’t recommend using this option.
On
Off
When you rotate the K200D to photograph vertical subjects in portrait, rather than landscape orientation, you probably don’t want to view them tilted onto their sides later on. The K200D is way ahead of you. It has a directional sensor built in that can detect whether the camera was rotated when the photo was taken. You can apply this information in two different ways—to automatically rotate images when they are displayed on the camera monitor, or to automatically rotate images in your image-editing application.
This menu choice deals with whether the image should be rotated when displayed on the camera monitor. You might or might not want to do that. When Rotate Tall is activated, the Pentax K200D rotates pictures taken in vertical orientation on the LCD screen so you don’t have to turn the camera to view them comfortably. However, this orientation also means that the longest dimension of the image is shown using the shortest dimension of the LCD, so the picture is reduced in size.
1. On. Use this option if you’d rather not turn your camera to view vertical shots in their natural orientation, and don’t mind the smaller image (see Figure 3.22).
2. Off. Turn the feature off if, as I do, you’d rather see a larger image and are willing to rotate the camera to do so (see Figure 3.23).
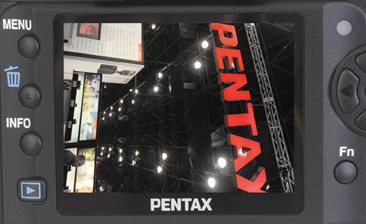
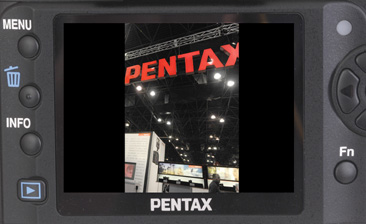
Options:
Off
On
Catch-in, or trap focus is a popular technique for sports photography and other situations in which you know where the action is going to take place (such as at the finish line of a horse race), but you don’t know exactly when. The solution is to prefocus on the point where the action will occur, and then tell your K200D not to actually take the photo until something moves into the prefocused spot. Sound magical? It’s actually not as difficult to achieve as you think. The key is to decouple the focusing operation from the shutter release function.
To do that, you’ll need to use a lens that is not focusing automatically, because you’ll want to set the focus yourself manually on the position where the action will occur. So, use either a Manual focus lens, or a DA or FA lens with an AF/MF switch that has been set to MF. The technique will not work with a lens that does not have its own AF/MF switch (such as the 18-55mm kit lens often furnished with the K200D).
Make sure CS #22 is set to On, activating the feature.
Set the focus mode switch on the camera to AF. You want the K200D’s autofocus mechanism to track the focus of subjects in your viewfinder; you simply don’t want any focus changes to happen automatically. So, you’ll have autofocus active, but not adjusting the focus of your lens because your lens has been set to Manual focus. (This will make more sense in a moment.)
In the Recording Mode menu, set the autofocus method to AF.S (single autofocus).
Manually focus on the position where the subject will appear when you want the photo to be taken, or at an equivalent distance.
Reframe your picture, if necessary, so that nothing is at the prefocused distance. (If an object occupies that spot, the K200D will take the photo immediately when you press the shutter release in the next step.)
Press and hold down the shutter release. The camera will not take a picture, because in AF.S mode, the shutter is locked until the subject is in focus.
The picture will be taken automatically when a subject moves into the prefocused area.
Options:
Prohibited
Permitted
This setting determines whether or not you can set the f/stop using the aperture ring of a camera equipped with one. As you’ll learn in Chapter 7, some lenses include a physical aperture ring for changing the lens opening on the lens itself, rather than having the f/stop set electronically by the camera. These lenses also may have an A (automatic) setting that enables the camera to set the aperture. Your choices:
1. Prohibited. When this setting is used, the shutter will be locked if the lens is set to anything other than A (that is, to a particular f/stop), or if an f/stop is selected when using a lens that does not have an A. This prevents accidentally taking pictures with a manually adjusted aperture when your intent was to have the camera set the f/stop for you.
2. Permitted. Use this setting if you want to take a photo even if the aperture has been set manually.
The last function follows the last item of the Custom Menu. It resets all 23 of the K200D’s Custom Settings to their default value of 1, returning the CS entries to their factory settings. Unlike the setting I call CS #0, which only disables and restores your custom settings, this one truly resets them. If you want something other than the default value for any setting, you’ll need to adjust each of them manually.