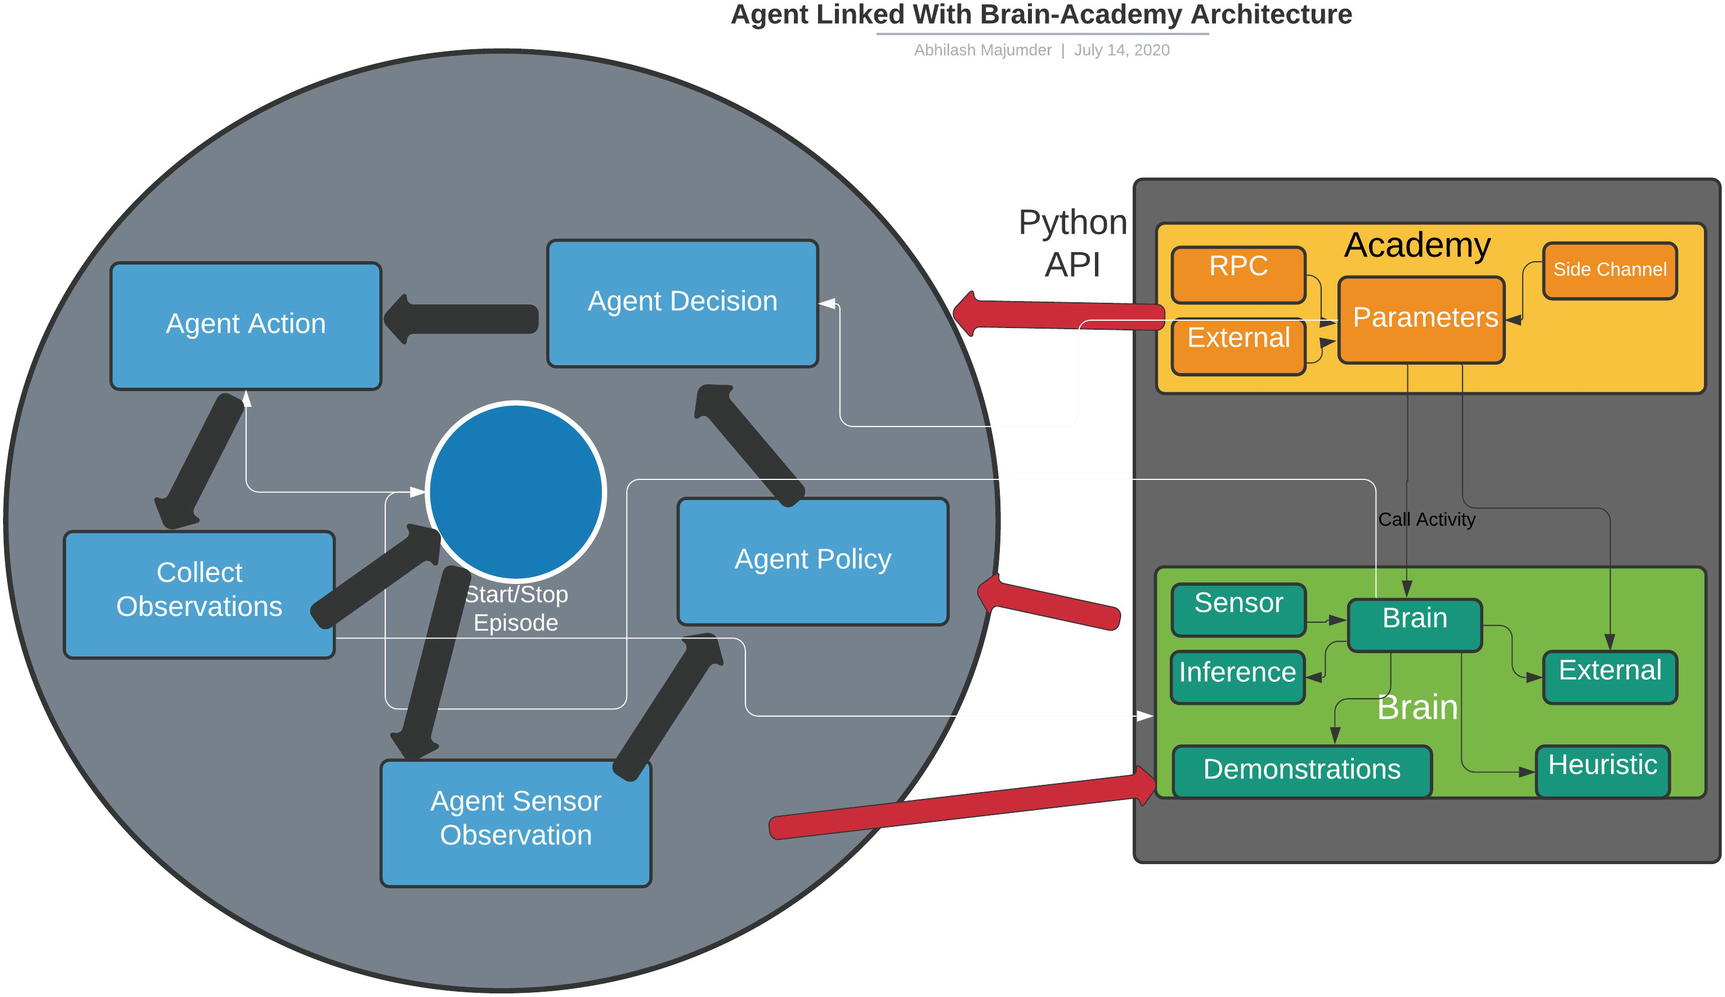
The brain architecture is an important aspect of the ML Agents Toolkit. In the previous chapter, we installed the ML Agents Toolkit and also learned briefly about this architecture. Internally the ML Agents Toolkit uses three different kinds of brains, with the addition of a player brain that is controlled by the user. We concern ourselves with understanding the inner workings of certain scripts in the ML Agents package, which uses the neural networks trained in Tensorflow in Unity Agents. Since we have tried to get a glimpse of deep Q-learning as the only deep RL algorithm as of now, we can also use this algorithm to train the brain of the agent. Whereas in Unity ML Agents, the default algorithm for the internal brain is proximal policy operation (PPO), which is robust and has a comfortable balance between ease of implementation, sample tuning, and complexity, we will explore different algorithms that will be used as the brain for the agent. In this section, we will have a deep insight into the brain architecture and all the associated C# scripts associated with it, including the different aspects of model training and hyperparameter tuning. We will be building games using ML Agents in Unity.
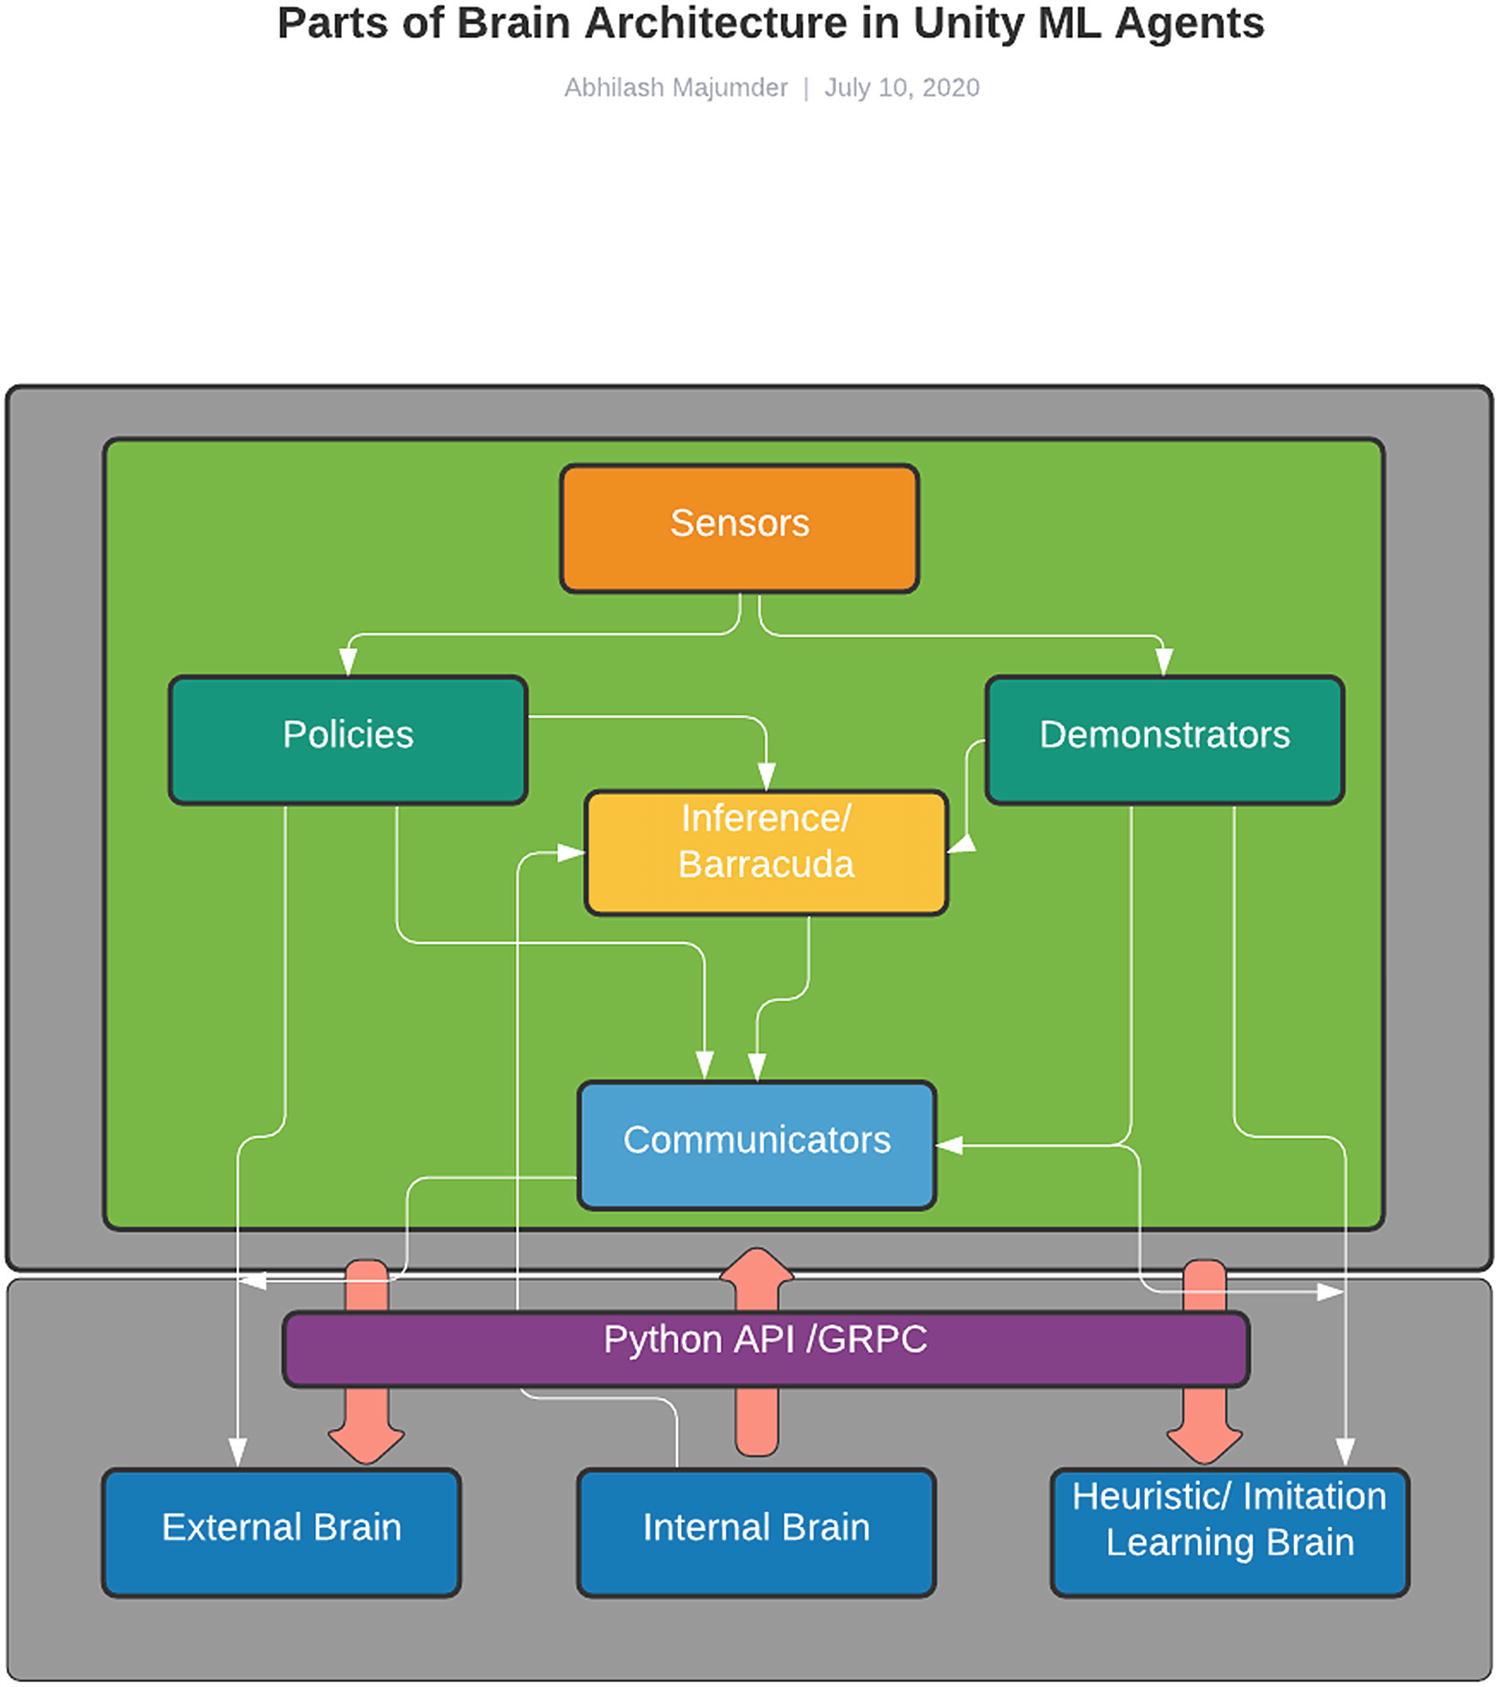
Before we dive into the associated scripts, let us recap certain aspects from the previous chapter where we emphasized the brain-academy architecture. Since the brain is primarily of three types—internal, heuristic, and external—we will concentrate mostly on certain aspects of the internal brain, which uses the Barracuda Inference Engine, and the xternal brain, which uses a communicator object to train the agent in real-time in Tensorflow. We mentioned the usage of certain scripts such as behavior parameters, which we will be exploring in-depth in this chapter. We would also look into how the engine configures itself when it is not connected to Python API via port 5004 for external training. The most important aspects of the brain architecture, in terms of C# scripts, are found in the Runtime folder under the “com.unity.ml-agents” package. The building blocks of the entire brain architecture, which uses several policies, relies on Inference Engine, sensors, communicators, demonstrators, and model loaders. Each of these parts constitute a separate functionality for the brain, such as the Inference Engine, which helps to run trained Tensorflow models in Unity. Since all these components are C# scripts, the brain architecture can be visualized as shown in Figure 4-1.
Figure 4-1
Parts of the brain architecture in Unity ML Agents
The sensors are the most important aspects of the brain architecture, as it controls the observation space required by the agent to make its decision and choose its action. The sensors are physics rays, which collect information in the form of discrete and continuous vectors, and these are used in the model training part. The sensor data is then used by the policies that control the deep RL algorithms, like PPO and (soft actor critic) SAC, of Unity ML Agents. The policies along with the communicator are associated with the external brain. The external brain is trained in Tensorflow in run-time, like we trained our model in the last chapter. The demonstrations are a different set of algorithms that rely on imitation learning and behavioral cloning, and these too rely on sensor data. Through the communicator, the demonstrations can be trained as a sampled heuristic/external brain, which implements the family of imitation learning. Then we have the Inference Engine, which is used for the pretrained models. The Inference Engine receives the trained vector of observations/actions space. This is then used as the internal brain. The Inference Engine also has a choice to use sensor data processed using the deep RL algorithms in the policies as well as the observed data from the pretrained models. This final neural network model that is stored can be used for real-time game play in Unity. Now that we understand the important aspects of the brain, let us get into the details of its implementation as well as the communication with different Python APIs.
Understanding the Architecture of the Brain
To understand the different aspects of the brain architecture, we will try to understand the C# scripts associated with it. Since the sensors play a significant part in collecting observations for the agent, we will be discussing the different types of sensors that we can use in our scenes. The sensors are physics rays and are used for collecting observations when they collide with another GameObject in the scene. These control the distribution of the observation space, whether it will be discrete or continuous. We will explore the different types of sensors used for getting the observations required for the ML Agents training phase. This sensor data is then encoded to produce a tensor, such as one-hot encoding technique, and then passed on to deep learning layers for different policies. Inside the sensors folder, there are several types of sensors that are used by ML Agents: camera sensor, ray sensor, ray perception 2D sensor, and many others. Each sensor type has unique attributes, and we will be exploring all of these in this section. Then we will be looking into the policies that contain the training algorithms for deep RL. This will also contain the fundamental script of the brain architecture that we studied briefly in the Chapter 3, the behavior parameters C# script. We will also be exploring the inference module in-depth to understand how Barracuda performs inference for the Internal brain during running of the pretrained model.
Sensors
Sensors are the most important aspects in the entire ML Agents Toolkit package. This contains the observation space and controls the distribution of the space. Depending on these observations, the agent has to choose a policy and perform an action. These sensors are essentially ray sensors from the Physics Engine of Unity and collect information upon colliding with a tagged prefab. First we will look into the ISensor.cs script, as it contains the main methods that will be used by ray sensors as well as camera sensors. We will then look into some of the different sensor variants that are present in this folder. Essentially the pipeline of using sensors for collection of observations can be visualized as shown in Figure 4-2.
Figure 4-2
Sensors in Unity ML Agents
ISensor: The ISensor is an interface containing all the function declarations that are to be used for the different sensors in ML Agents. It contains functions that affect the camera sensor by changing the data type of the visual observations as well as the ray sensors by modifying the type of ray casts (2D or 3D). The ISensor script starts with an enum that defines the possibilities of storing visual information collected from camera sensors, whether it will be in the form of float arrays or in PNG format (binary format).
public enum SensorCompressionType
{
None,
PNG
}
The next segment has a method, “GetObservationShape,” which controls the size of the observation space that will be used in RayPerceptionSensor script. As an example, in the case of ray sensors, if the sensor is observing the velocity vector of a RigidBody then its dimensions will be of size 3 (x, y, and z axes). However, in the case of a camera sensor, if an RGB pixel image is used, then the observation space would be 5 (height, width, and three channels for RGB). The latter will be discussed in detail how when we discuss how convolution neural networks (Conv2D) will be helpful in training these sampled images from the camera sensor. It also has a method, “Write,” which writes the observations to the output container (array). The “GetCompressedObservation” method is useful for compressing the output array of results when the dimensions or the size of the output is considerably large. Apart from these, there are also “Update” and “Reset” methods, which specify the internal states of the sensor. The “Update” method updates the sensors at each decision taken by the agent, while the “Reset” method is triggered at the end of each episode of the agent. There are also “GetCompressionType” and “GetName” methods, which control the compression type and provide a deterministic sorted order of the sensors across all the agents, respectively.
int[] GetObservationShape();
int Write(ObservationWriter writer);
byte[] GetCompressedObservation();
void Update();
void Reset();
SensorCompressionType GetCompressionType();
string GetName();
It also contains helper functions inside the “SensorExtensions” class, which provides the number of elements in ISensor’s observation space. This involves multiplying the shape elements of each input observation space as provided here:
public static int ObservationSize(this ISensor sensor)
{
var shape = sensor.GetObservationShape();
var count = 1;
foreach (var dim in shape)
{
count *= dim;
}
return count;
}
That completes the ISensor interface script. and we will explore how this script is being used in camera and ray sensors for creating the observation space of the agent. Let us understand the ray sensors, and then we will explore the camera sensors.
Ray Sensors
RayPerceptionSensor: The first sensor that is important in the context of ML Agents is the RayPerceptionsensor.cs script, which is present inside the Runtime folder under “com.unity.ml-agents” package. This sensor essentially controls the dimensions 2D or 3D, in which the rays will be cast. This is done by the following lines:
namespace Unity.MLAgents.Sensors
{
/// <summary>
/// Determines which dimensions the sensor will perform the casts in.
/// </summary>
public enum RayPerceptionCastType
{
Cast2D,
Cast3D,
}
“RayPerceptionCastType” contains the type of the cast ray. The next part contains a data structure (struct) that contains the details that are contained inside “RayPerceptionInput” sensor. It contains details such as ray length, collision detection, offset, radius of cast, layer mask, angles, cast type, and transform. The layer mask is an important attribute, as it allows the ray to pass through certain layers to detect objects that are present in other layers. The offset allows the ray to be cast at a distance of a few units from the source. The collision detection attribute is used for checking whether the ray sensor has collided with the tagged object. The angle controls the direction of the rays, and generally 90 degrees is considered as the “forward” direction with respect to the object. The cast type is from the “RayPerceptionCastType” enum, which controls whether it is 2D or 3D. The transform signifies the positional transform of the object from which the ray is triggered: the agent. The cast radius determines the radius for spherical raycast, and generally if 0 or less value is provided, it signifies normal rays.
public struct RayPerceptionInput
{
public float RayLength;
public IReadOnlyList<string> DetectableTags;
public IReadOnlyList<float> Angles;
public float StartOffset;
public float EndOffset;
public float CastRadius;
public Transform Transform;
public RayPerceptionCastType CastType;
public int LayerMask;
There are certain methods inside this class, such as the “OutputSize” method, that control the size of the sensors. This size forms the size of the observation space, which is required by the behavior parameters script. This is presented as:
public int OutputSize()
{
return (DetectableTags.Count + 2) * Angles.Count;
},
where the “DetectableTags.Count” controls the number of tagged GameObjects in the scene that the ray sensor from the agent can detect. The “Angle.Count” attribute returns the number of the different angles of the sensor rays that are fired from the agent.
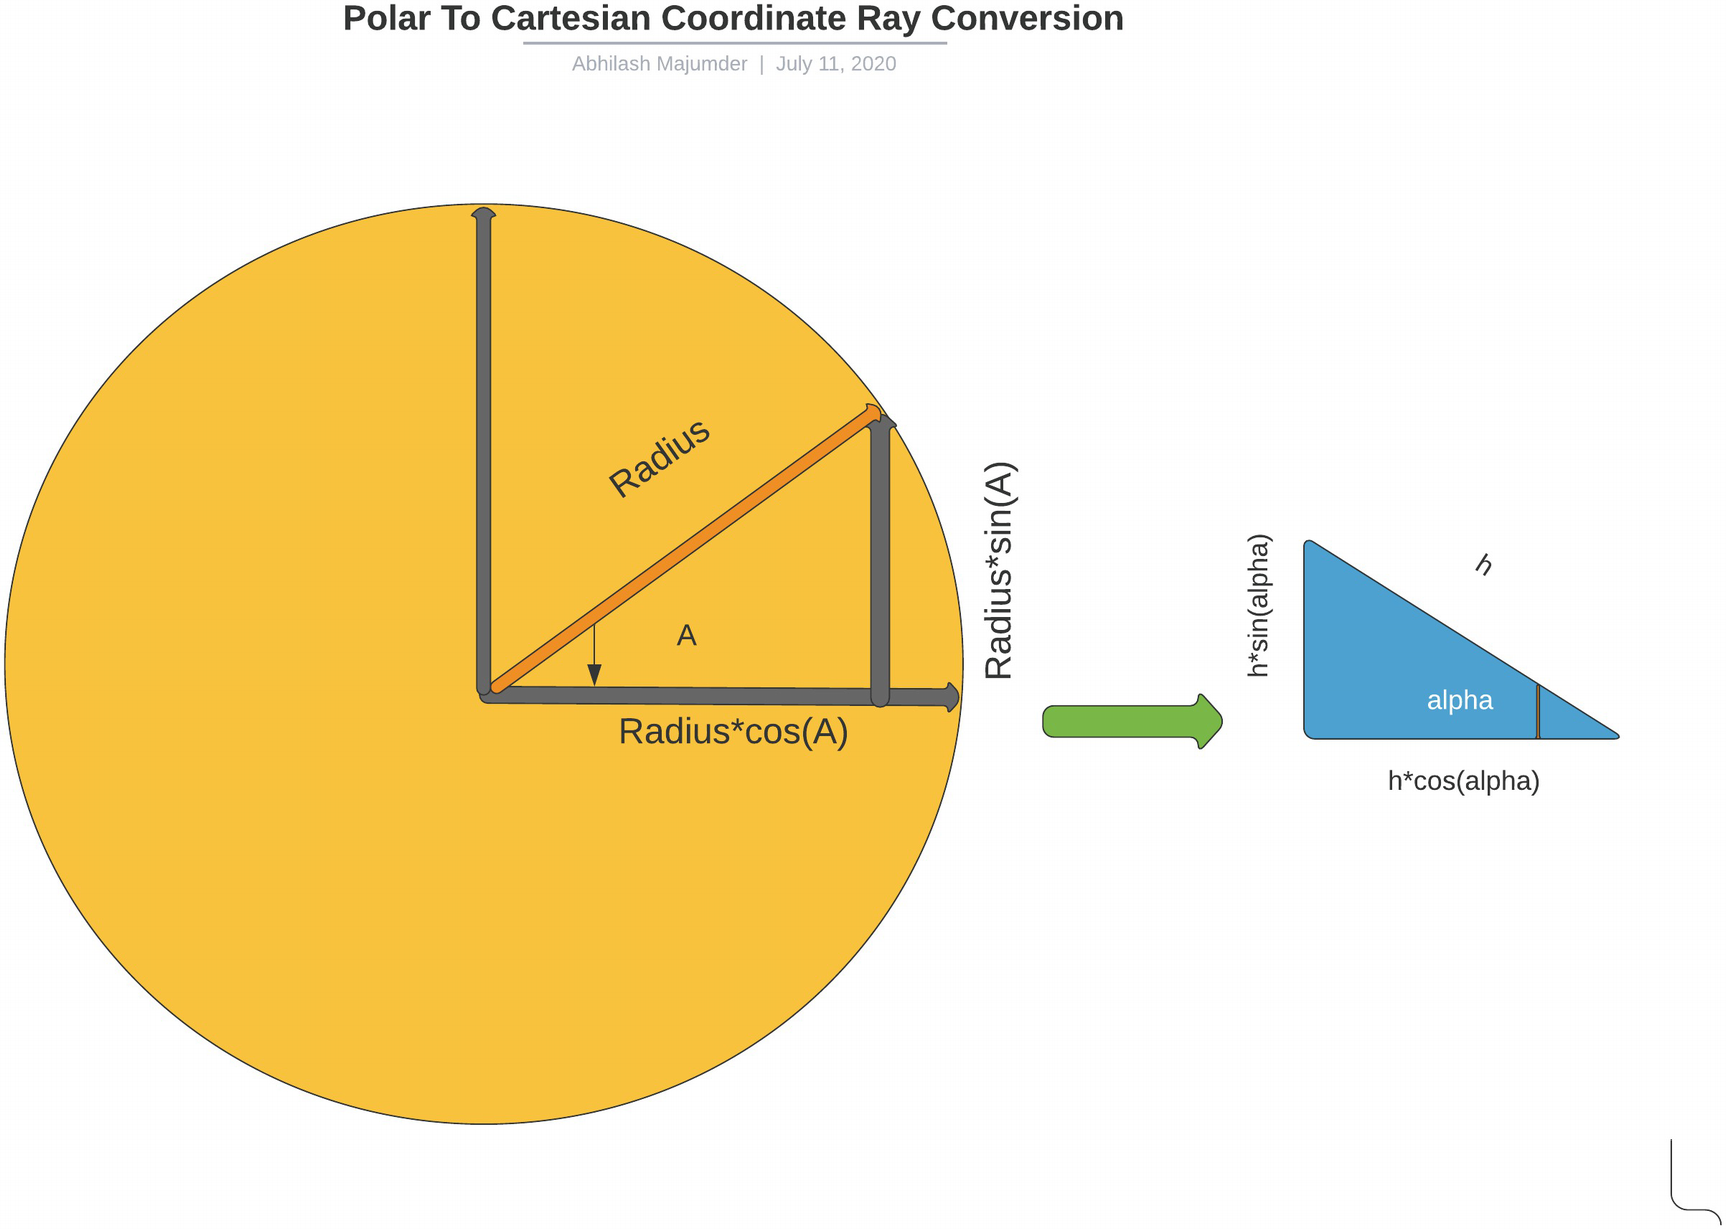
We will next understand other methods, such as “PolarToCartesian3D” and “PolarToCartesian2D.” These methods are useful for converting the ray transforms from polar coordinates in the Unity scene to Cartesian coordinates. Essentially this transforms the rays from local space to world space. The world space coordinates are then used for analyzing which detectable GameObjects the sensor rays hit. This can be done by using sine and cosine transforms of the transform positions. Diagrammatically this is shown in Figure 4-3.
Figure 4-3
Polar to Cartesian conversion of an n-D ray
The “radius” signifies the ray length in polar coordinates. The concerned axes here in Unity are the x and z axes. For our reference, we consider the x axis as the horizontal plane and z axis as the vertical one. This is represented by the axes in the circle at 90 degrees apart. If the angle of the sensor ray is “A” with respect to the x axis, then the corresponding ray length along the x axis is “radius*cos(A),” and along the vertical z axis “radius*sin(A).” Now let us explore the 2D ray conversion in the “PolarToCartesian2D” method. This is very important, as we will be using angles to specify the gap between the rays in our scene.
In the case of 2D ray sensor conversion, we consider mutually perpendicular x and y axes. If we compare this with our previous diagram, the x axis is the horizontal line, and the y is the vertical line. The angle is converted to radians for sin and cosine angle calculation. Similarly if we look into the 3D counterpart:
static internal Vector3 PolarToCartesian3D
(float radius, float angleDegrees)
{
var x = radius *
Mathf.Cos(Mathf.Deg2Rad * angleDegrees);
var z = radius *
Mathf.Sin(Mathf.Deg2Rad * angleDegrees);
return new Vector3(x, 0f, z);
}
In this case we have x-z as the mutually perpendicular axes, with y axis as 0. This is the part that we will be using in our scenes. For the next part, we have the “RayExtents” method, which controls the coordinates of the hitpoint of the sensor rays. This also estimates the distance from the ray source to the ray sensor and uses the polar to coordinate conversion to do this computation. Also here, we have the cases that decide if the ray is in 2D or in 3D.
var angle = Angles[rayIndex];
Vector3 startPositionLocal, endPositionLocal;
if (CastType == RayPerceptionCastType.Cast3D)
{
startPositionLocal = new Vector3(0, StartOffset, 0);
The next part contains the class “RayPerceptionOutput,” which controls the different outcomes if the sensor ray has hit a tagged object. Inside this class, there is a struct “RayOutput” that contains several attributes such as “HasHit,” ”HitTaggedObject,” ”HitTagIndex,” and “HitFraction.” These contain the details about whether the sensor ray has hit the concerned object, the tag of the hit object, the index of the object’s tag in the DetectableTags in the list (-1 if anything else was hit or nothing was specified), and the normalized distance to hit the object, respectively.
public struct RayOutput
{
public bool HasHit;
public bool HitTaggedObject;
public int HitTagIndex;
public float HitFraction;
The “ToFloatArray” method writes the ray output information to a subset of the float array. The list contains the observation data, which can be the following:
One-hot encoding data for the detectable tags. If “DetectableTags.Length” equals “n,” the first n elements of the list will be a one-hot-encoding of the detectable tag that was hit or 0 if nothing was hit.
“numDetectableTags” will be set to 1 if the sensor ray missed everything or 0 if it hit something (either “detectable” or not).
“numDetectableTags + 1” signifies the normalized distance if the object was hit or 1.0 if nothing was hit.
There is also a float buffer array that controls the size of the output buffer, given by (numDetectableTags+2) * RayOutputs.Length.
public void ToFloatArray(int numDetectableTags, int rayIndex, float[] buffer)
{
var bufferOffset = (numDetectableTags + 2) * rayIndex;
if (HitTaggedObject)
{
buffer[bufferOffset + HitTagIndex] = 1f;
}
buffer[bufferOffset + numDetectableTags] =
HasHit ? 0f : 1f;
buffer[bufferOffset + numDetectableTags + 1] =
HitFraction;
}
}
There is an internal class called “DebugDisplayInfo” that is used for debugging the attributes of the drawn sensor ray on the screen and also shows the frame rates. It also displays the information whenever the ray hits any detectable tag and is used by the “RayPerceptionsensorComponent.”
internal class DebugDisplayInfo
{
public struct RayInfo
{
public Vector3 worldStart;
public Vector3 worldEnd;
public float castRadius;
public RayPerceptionOutput.RayOutput rayOutput;
}
public void Reset()
{
m_Frame = Time.frameCount;
}
public int age
{
get { return Time.frameCount - m_Frame; }
}
public RayInfo[] rayInfos;
int m_Frame;
}
The next part is the implementation of the ray sensors, which inherits from the ISensor component. There are instantiated objects of “RayPerceptionInput” class and “DebugDisplayInfo” class. The public function RayPerceptionSensor sets the objects of the classes with initialized values and assigns sensor ray inputs.
float[] m_Observations;
int[] m_Shape;
string m_Name;
RayPerceptionInput m_RayPerceptionInput;
DebugDisplayInfo m_DebugDisplayInfo;
internal DebugDisplayInfo debugDisplayInfo
{
get { return m_DebugDisplayInfo; }
}
public RayPerceptionSensor(string name, RayPerceptionInput rayInput)
{
m_Name = name;
m_RayPerceptionInput = rayInput;
SetNumObservations(rayInput.OutputSize());
if (Application.isEditor)
{
m_DebugDisplayInfo = new DebugDisplayInfo();
}
}
The “SetNumObservations” method details the sizes of the observation array for the sensors. The “SetRayPerceptionInput” method checks whether the number of detectable tags, and the sensor rays are modified at runtime. It also checks if the size of the “RayPerceptionInput” array is the same as the “rayInput” array. This signifies that all the shapes related to sensor ray arrays are consistent and not modified at runtime.
if (m_RayPerceptionInput.OutputSize() != rayInput.OutputSize())
{
Debug.Log(
"Changing the number of tags or
rays at runtime is not " +
"supported and may cause errors
in training or inference."
);
SetNumObservations(rayInput.OutputSize());
}
m_RayPerceptionInput = rayInput;
}
The next part writes the observations by collecting information from the collision of the sensor ray with the detectable objects. First it collects the information regarding the number of sensor rays fired from the agent and the detectable tags in the scene. If there is an inconsistency in the shape of the associated sensor arrays, it resets the information and resizes the buffer. Then it uses the “PerceiveSingleRay” method to trigger the casting of the ray and write the information to the buffer. The output of the cast is then written to the “rayOutput” array, which is an object of the “RayPerceptionOutput” class. It also returns the observation array length.
public int Write(ObservationWriter writer)
{
using (TimerStack.Instance.Scoped("RayPerceptionSensor.Perceive"))
for (var rayIndex = 0; rayIndex < numRays; rayIndex++)
{
DebugDisplayInfo.RayInfo debugRay;
var rayOutput
= PerceiveSingleRay(m_RayPerceptionInput, rayIndex, out debugRay);
if (m_DebugDisplayInfo != null)
{
m_DebugDisplayInfo.rayInfos[rayIndex]
= debugRay;
}
rayOutput.ToFloatArray(numDetectableTags
, rayIndex, m_Observations);
}
writer.AddRange(m_Observations);
}
return m_Observations.Length;
}
We then address the “PerceiveSingleRay” static method. It takes an object of the “RayPerceptionInput” class, “rayIndex,” which is the index of the particular ray in the ray array, and the DebugDisplayInfo object. It then assigns the variables such as ray length, cast radius, extents, start and end position, and direction of the ray. However, if the scale is not the same as the scale used in Unity, then the absolute value of the “rayDirection” variable will be different from “rayLength.” There are also attributes that can transform the ray length for different cast lengths and hit fraction and also scale up or down the sphere or circle radius of the cast rays. There are also provisions to avoid division with 0 in case the unscaled ray length is 0.
var unscaledRayLength = input.RayLength;
var unscaledCastRadius = input.CastRadius;
var extents = input.RayExtents(rayIndex);
var startPositionWorld = extents.StartPositionWorld;
var endPositionWorld = extents.EndPositionWorld;
var rayDirection = endPositionWorld - startPositionWorld;
The next portion of the code segment checks whether the cast of the ray input ID of type 2D or 3D. It then checks if the cast radius is greater than 0, which signifies whether it will be a spherical cast or a ray cast. Then it uses the “Physics.RayCast” or “Physics.SphereCast” accordingly to fire the rays. It then checks whether the scaled ray length is 0 and also has checks to avoid division by 0.
if (input.CastType == RayPerceptionCastType.Cast3D)
After it has hit the target detectable tags, it uses the “CompareTag” method and assigns the “HitTagIndex” with the proper index of the hit target. It also computes the hit fraction and other attributes of the RayPerceptionOutput object. Once it has hit a detectable object, the loop breaks. Finally it assigns the worldStart, worldEnd, rayOuput, and castRadius variables with the computed values and returns the output ray to the “Write” method.
var rayOutput = new RayPerceptionOutput.RayOutput
{
HasHit = castHit,
HitFraction = hitFraction,
HitTaggedObject = false,
HitTagIndex = -1
};
if (castHit)
{
for (var i = 0; i < input.DetectableTags.Count; i++)
{
if (hitObject.CompareTag(input.DetectableTags[i]))
{
rayOutput.HitTaggedObject = true;
rayOutput.HitTagIndex = i;
break;
}
}
}
debugRayOut.worldStart = startPositionWorld;
debugRayOut.worldEnd = endPositionWorld;
debugRayOut.rayOutput = rayOutput;
debugRayOut.castRadius = scaledCastRadius;
return rayOutput;
However, the “Write” method also uses the “Perceive” method to call the “PerceoveSingleRay” method. This “Perceive” method takes the ray input array and the angles associated with the rays as input and passes them to the “PerceiveSingleRay” method to get the array of ray outputs and detectable tags. Then it is passed to the “Write” method to be written as the observation space.
RayPerceptionOutput output = new RayPerceptionOutput();
output.RayOutputs = new RayPerceptionOutput.RayOutput[input.Angles.Count];
for (var rayIndex = 0; rayIndex < input.Angles.Count; rayIndex++)
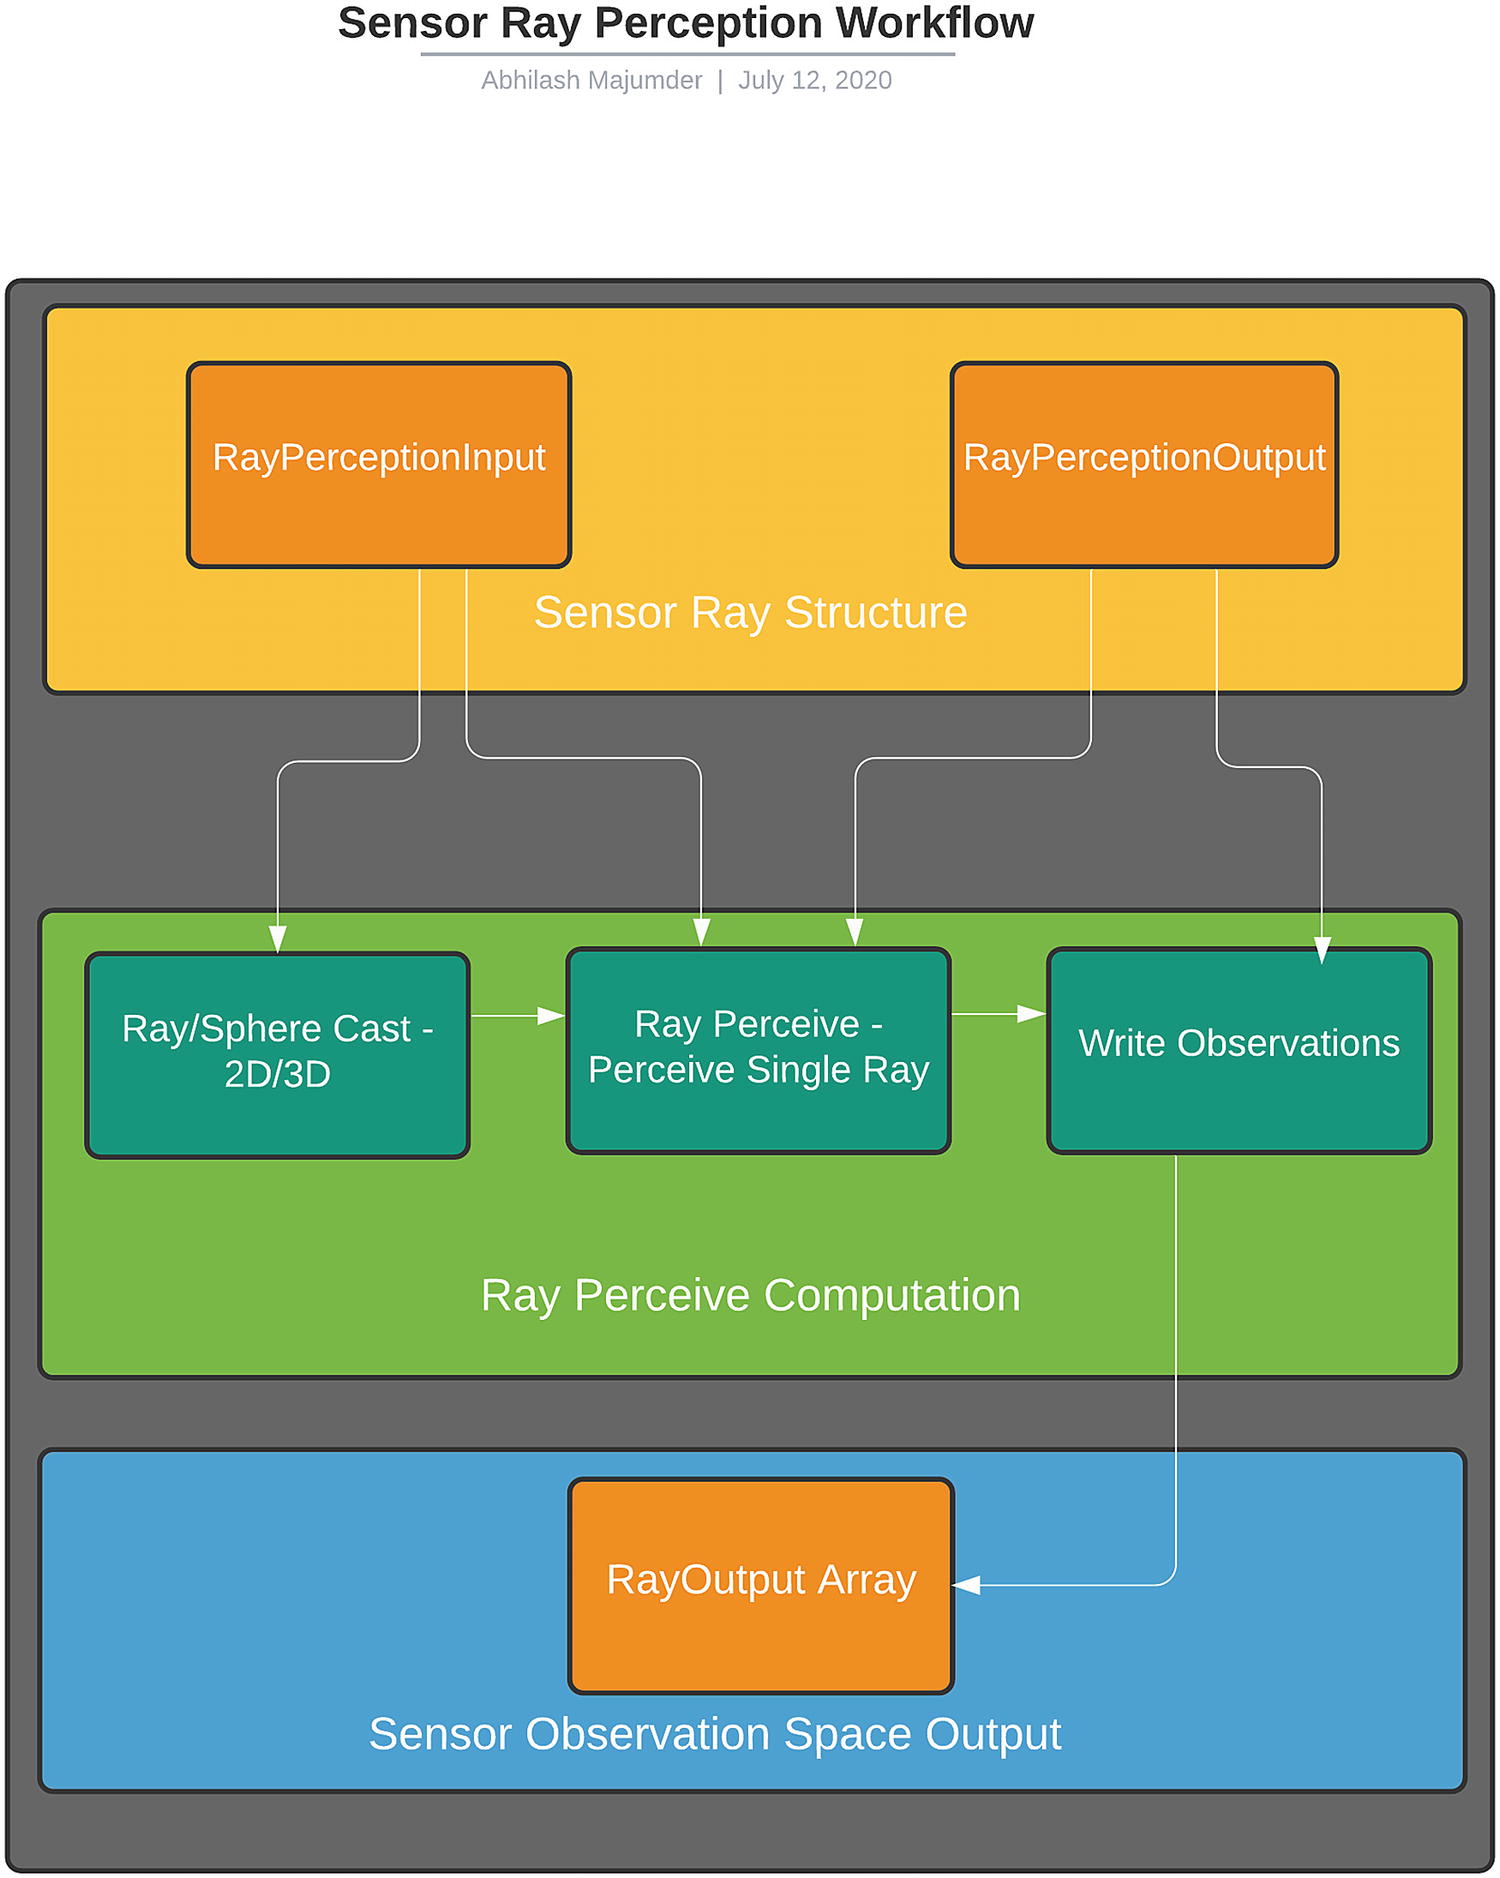
That completes the RayPerceptionsensor script, and it is the most important script that controls the rays being fired by the agent to get the observations of the detectable tags. The workflow of the RayPerceptionsensor script is shown in Figure 4-4.
Figure 4-4
“RayPerceptionSensor” script workflow
There are variants of this script used for 2D ray perception as well as for 3D ray perception, which we will look into.
RayPerceptionSensorComponent2D: This script is used for adding the 2D ray perception sensor component to an agent in a scene. It also declares the cast type as 2D and uses the “Physics.2D” module to cast the rays. Though it uses the RayPerceptionSensorComponentBase.cs script for its properties, the latter uses RayPerceptionSensor script internally. So all the functionalities like drawing spherical/ray casts along with perception of a single ray are done with the help of the RayPerceptionSensor script, which we discussed in the previous section. This script particularly declares that the type of the ray cast is 2D and can be added as a component in the Inspector Window against a particular agent.
public class RayPerceptionSensorComponent2D : RayPerceptionSensorComponentBase
{
public RayPerceptionSensorComponent2D()
{
RayLayerMask = Physics2D.DefaultRaycastLayers;
}
public override RayPerceptionCastType GetCastType()
{
return RayPerceptionCastType.Cast2D;
}
}
RayPerceptionSensorComponent3D: This is similar to the 2D component, except that here 3D cast type is used for the rays. Initially there is an offset provided to the start and end positions of the ray, as mentioned in the “StartVerticalOffset” and “EndVerticalOffset” methods. This script inherits from the “RayPerceptionSensorComponentBase” script. The offset declarations are declared as follows:
[Tooltip("Ray end is offset up or down by this amount.")]
float m_EndVerticalOffset;
public float EndVerticalOffset
{
get => m_EndVerticalOffset;
set { m_EndVerticalOffset = value; UpdateSensor(); }
}
The next code segment contains the type of the cast and assigns the values for the StartVerticalOffset and EndVerticalOffset variables.
public override RayPerceptionCastType GetCastType()
{
return RayPerceptionCastType.Cast3D;
}
public override float GetStartVerticalOffset()
{
return StartVerticalOffset;
}
public override float GetEndVerticalOffset()
{
return EndVerticalOffset;
}
SensorComponent: This is a variant of the ISensor script, which is for the Unity Editor. For simplicity, a particular ISensor implementation should have a corresponding SensorComponent to build it. Internally it calls the different methods of the “ISensor” script, which is triggered when the agent starts to create ray sensors or camera sensors. The methods—“GetObservationShape” and ”isVisual”—involve getting the observation shape of the sensor vector, checking whether the sensor type is visual (has five parameters) or a 3D vectorized attribute (example: velocity/position of RigidBody, which has three parameters,) respectively. The method “isVector” controls whether the output shape of the observation is vectorized or not (discrete or continuous).
public abstract ISensor CreateSensor();
public abstract int[] GetObservationShape();
public virtual bool IsVisual()
{
var shape = GetObservationShape();
return shape.Length == 3;
}
public virtual bool IsVector()
{
var shape = GetObservationShape();
return shape.Length == 1;
}
RayPerceptionSensorComponentBase: This script internally uses the functionality of the RayPerceptionSensor script and inherits from the SensorComponent script. This script is called when we assign a “RayPerceptionSensorComponent2D” or RayPerceptionSensorComponent3D component to our agent in the scene. It has the name of the sensor, which defaults to “RayPerceptionSensor.”
There are certain important attributes of this script that controls the sphere cast radius, ray length, and angles. It defaults to an angle of 70 degrees between the rays fired from the agent; greater than 90 degrees would allow the rays to go behind the object and at 90 degrees would be strictly restricted to left and right. The default sphere cast radius is 0.5 float units, and the default ray length is 20 float units. It controls the number of rays fired per direction and defaults to three (left, right, and center). It lists the detectable tags that the sensor rays can detect and the layer mask that signifies which layers the ray can pass through.
It also contains observation stacks, which signifies how many observations we would want to stack and pass it to the neural network (defaults to 1, signifying that no previous observations would be used for neural network training). It has other attributes, such as ray hit color, miss color, ray cast type (2D/3D), and start and end offset positions (inherited from the SensorComponent script). All of these components are editable in the Inspector Window when we will be assigning our RayPerceptionSensorComponent3D component/script to our agent in Unity in a later section.
[Tooltip("Number of raycast results that will be stacked before being fed to the neural network.")]
int m_ObservationStacks = 1;
public int ObservationStacks
{
get { return m_ObservationStacks; }
set { m_ObservationStacks = value; }
}
[HideInInspector]
[SerializeField]
[Header("Debug Gizmos", order = 999)]
internal Color rayHitColor = Color.red;
[HideInInspector]
[SerializeField]
internal Color rayMissColor = Color.white;
[NonSerialized]
RayPerceptionSensor m_RaySensor;
public RayPerceptionSensor RaySensor
{
get => m_RaySensor;
}
public abstract RayPerceptionCastType GetCastType();
public virtual float GetStartVerticalOffset()
{
return 0f;
}
public virtual float GetEndVerticalOffset()
{
return 0f;
}
The “CreateSensor” method overrides the “ISensor” script and initializes the sensor by using the methods in the “RayPerceptionSensor” script. It also stacks the observations if a value greater than 1 is used.
public override ISensor CreateSensor()
{
var rayPerceptionInput = GetRayPerceptionInput();
m_RaySensor = new RayPerceptionSensor(m_SensorName, rayPerceptionInput);
if (ObservationStacks != 1)
{
var stackingSensor = new StackingSensor(m_RaySensor, ObservationStacks);
return stackingSensor;
}
return m_RaySensor;
}
The next code segment contains the GetRayAngles float array method, which returns the angles of the sensor rays and the number of rays in each direction. The angular range between each ray is in arithmetic progression with a spacing of “delta.” The delta variable is calculated by dividing the maximum ray angle with the value of the number of rays in each direction. Then it interpolates the rays in the form of { 90, 90 - delta, 90 + delta, 90 - 2*delta, 90 + 2*delta }.
var anglesOut = new float[2 * raysPerDirection + 1];
var delta = maxRayDegrees / raysPerDirection;
anglesOut[0] = 90f;
for (var i = 0; i < raysPerDirection; i++)
{
anglesOut[2 * i + 1] = 90 - (i + 1) * delta;
anglesOut[2 * i + 2] = 90 + (i + 1) * delta;
}
return anglesOut;
}
The next segment is GetObservationShape, which also overrides the same method from the “RayPerceptionSensor” and governs the number of detectable tags and number of rays, stack size of observations, and observation size.
public override int[] GetObservationShape()
{
var numRays = 2 * RaysPerDirection + 1;
var numTags = m_DetectableTags?.Count ?? 0;
var obsSize = (numTags + 2) * numRays;
var stacks = ObservationStacks > 1
? ObservationStacks : 1;
return new[] { obsSize * stacks };
}
In the last section of the segment, the “GetRayPerceptionInput” method is overridden and all the variables are assigned according to the “RayPerceptionInput” struct (structure), which we discussed before.
public RayPerceptionInput GetRayPerceptionInput()
{
var rayAngles = GetRayAngles
(RaysPerDirection, MaxRayDegrees);
var rayPerceptionInput = new RayPerceptionInput();
The “OnDrawGizmosSelectedMethod” script takes the input ray and calls the “PerceiveSingleRay” function from “RayPerceptionSensor” script for each of the rays along different directions. Depending on whether the rays are null or not, the color of the rays are displayed. Older observations are displayed in a lighter shade so as to de-emphasize the current training episode.
var rayInput = GetRayPerceptionInput();
for (var rayIndex = 0; rayIndex < rayInput.Angles.Count; rayIndex++)
{
DebugDisplayInfo.RayInfo debugRay;
RayPerceptionSensor.PerceiveSingleRay(rayInput, rayIndex, out debugRay);
DrawRaycastGizmos(debugRay);
}
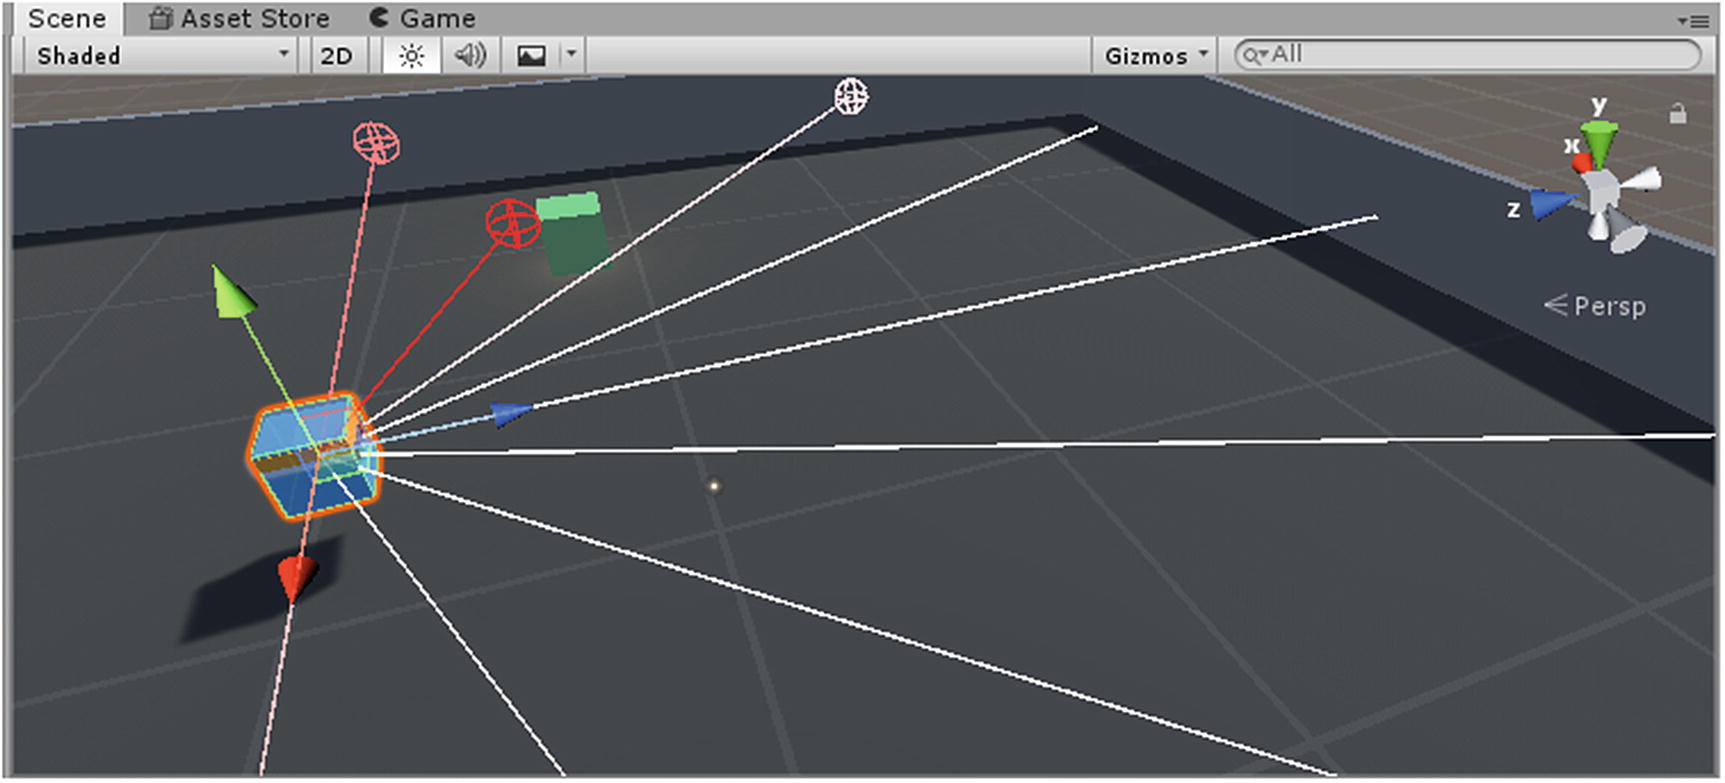
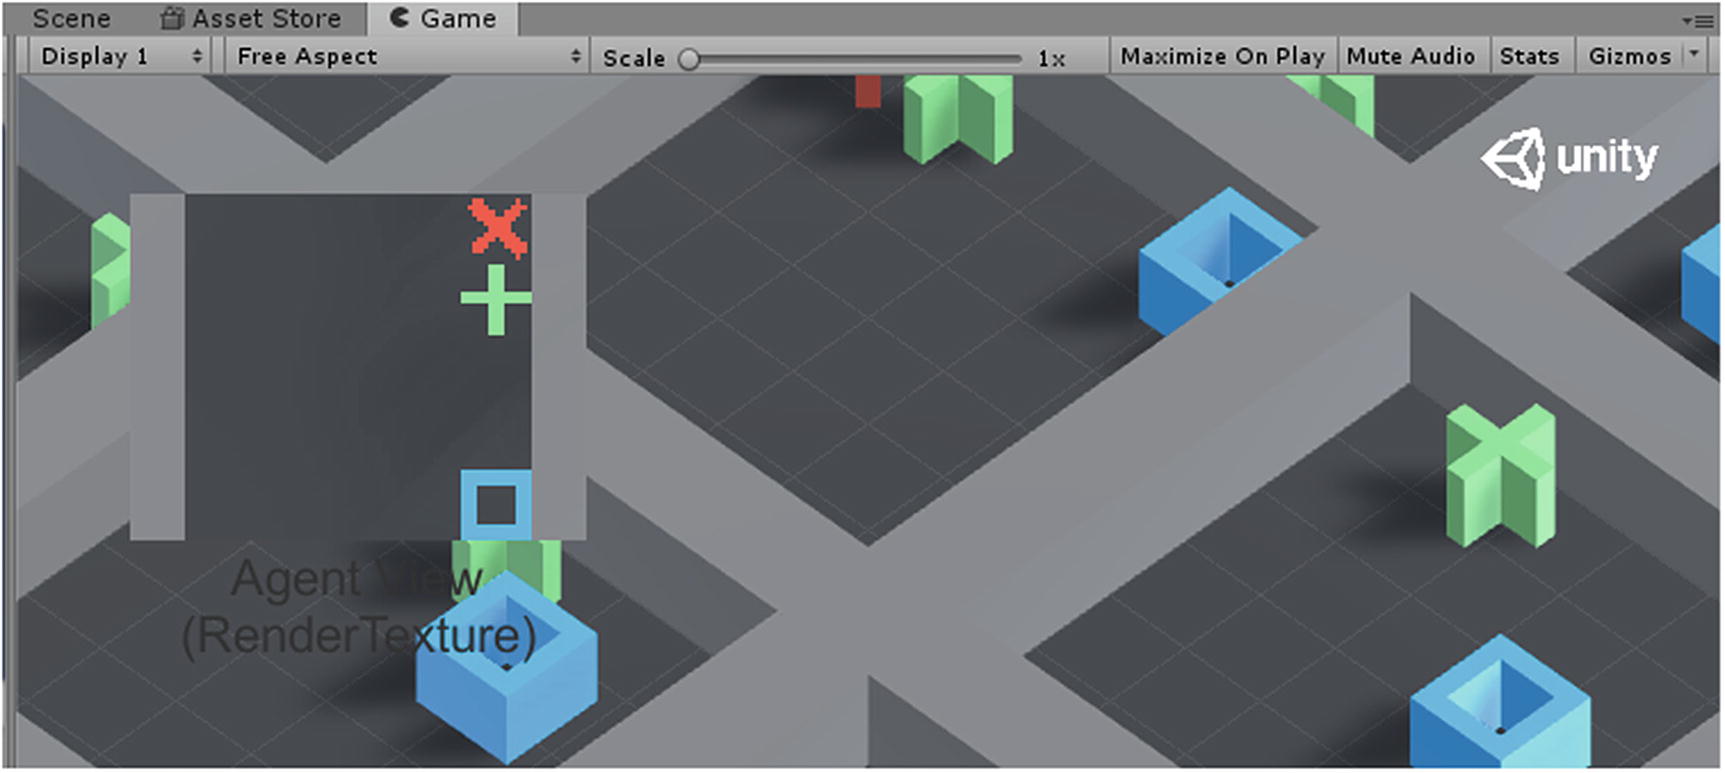
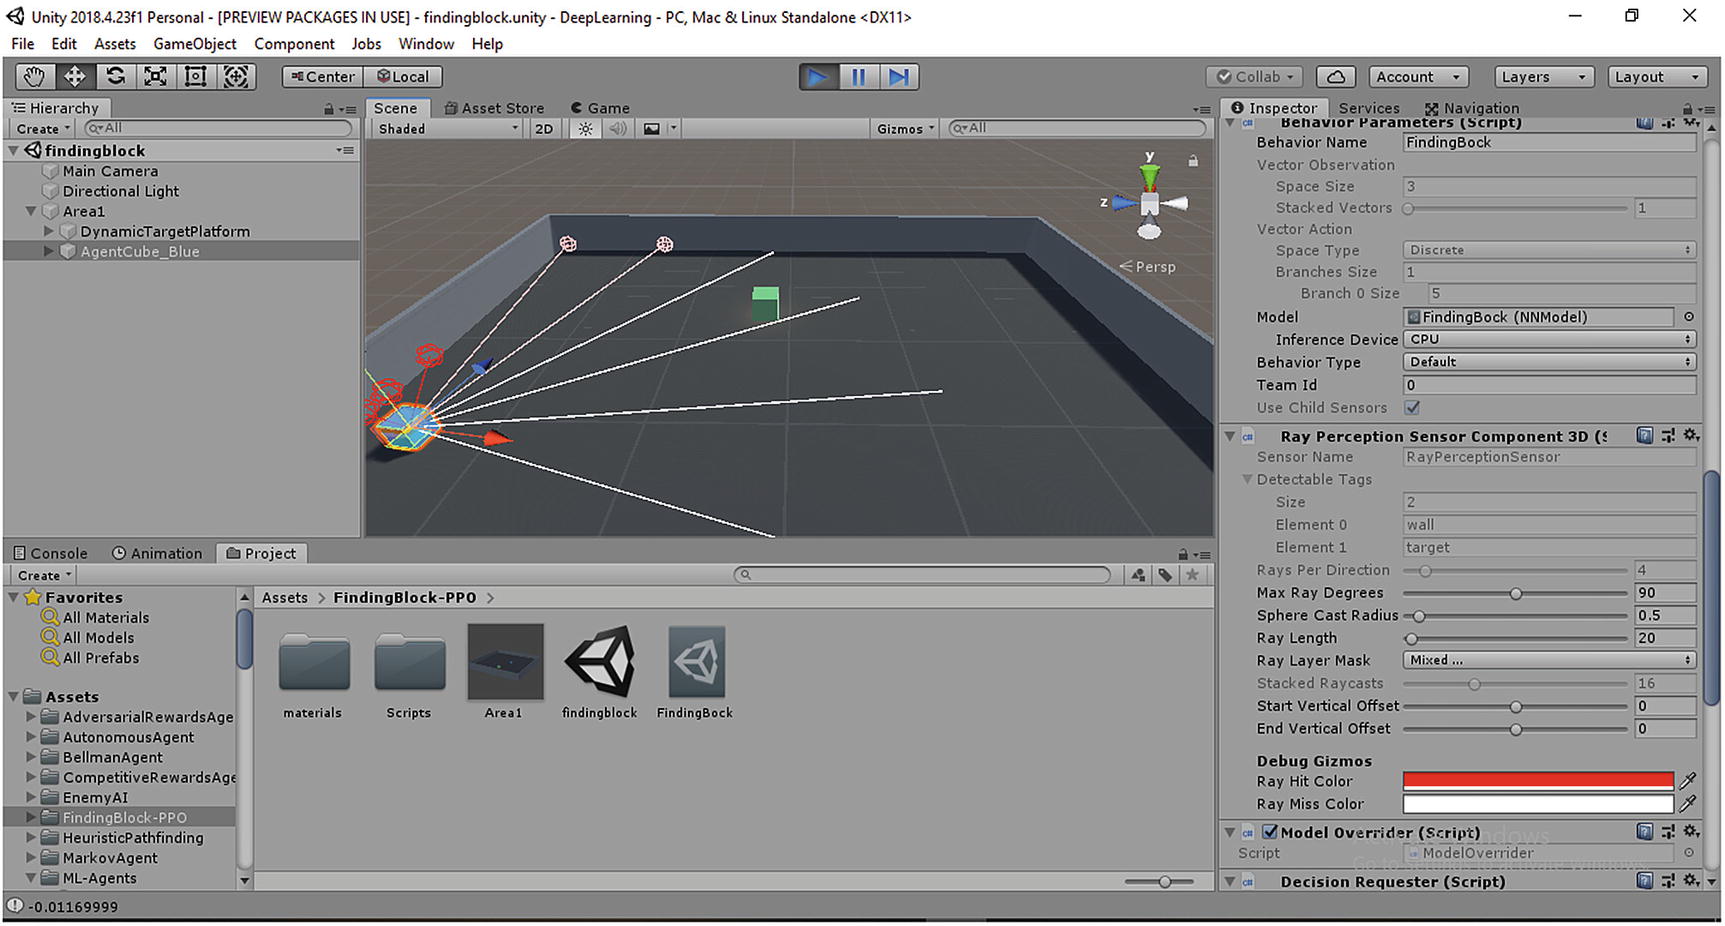
The “DrawRaycastGizmos” method uses the DisplayDebugInfo variable (from RayPerceptionSensor script) to debug the variables such as offset positions, ray direction, hit fraction, and hit radius. Figure 4-5 shows Ray Sensors using “RayPerceptionSensorComponent3D” in “FindingBlock-PPO” Unity scene, which we will study in a later section in this chapter.
Figure 4-5
Ray perception sensor 3D in Unity using sensor rays
This completes the fundamental aspects of the ray sensors. There are associated scripts, such as VectorSensor and StackingSensor.
VectorSensor: This script is a vector implementation of the ray sensors. It has different variants of “AddObservation,” a method overloading technique. This is useful when the observation size can be a transform (Vector3/Vector2), quaternion(x, y, z, w), Boolean, or an int. This will be used when we write our own agent script. If the expected observation space size is not consistent with the received observation space size during training, then it shows a warning. It truncates the observations if excessive observations are received and pads with 0 if lesser observations than expected are received.
public int Write(ObservationWriter writer)
{
var expectedObservations = m_Shape[0];
if (m_Observations.Count > expectedObservations)
{
Debug.LogWarningFormat(
"More observations ({0}) made than vector observation size ({1}). The observations will be truncated.",
else if (m_Observations.Count < expectedObservations)
{
Debug.LogWarningFormat(
"Fewer observations ({0}) made than vector observation size ({1}). The observations will be padded.",
m_Observations.Count, expectedObservations
);
for (int i = m_Observations.Count; i < expectedObservations; i++)
{
m_Observations.Add(0);
}
}
writer.AddRange(m_Observations);
return expectedObservations;
}
StackingSensor: This sensor is used for temporal stacking of the observations, and consecutive observations are stored in an array (1D) from left to right. The details of this particular sensor are cross-functional and are used in the deep RL algorithms, which require memory.
This completes the entire class of ray sensors. The agent uses the “RayPerceptionSensorComponent2D” or “RayPerceptionSensorComponent3D” in Unity. This script in turn calls the RayPerceptionSensorComponentBase script, which implements the SensorComponent script. The latter is an implementation of the ISensor script for the Unity Editor. The RayPerceptionSensorComponentBase script is displayed on the Inspector Window controlling the observations, rays, and their attributes. This script internally calls the “RayPerceptionSensor” script, which contains the structures “RayPerceptionInput” and “RayPerceptionOutput.” This is one of the most important parts of the brain, which is used for collecting observations from sensor rays. Figure 4-6 shows this architecture.
Figure 4-6
Ray sensor scripts in Unity ML Agents
Camera Sensor
In this section we will also explore the camera sensor, which is controlled by the CameraSensorComponent and CameraSensor scripts.
CameraSensorComponent: This script also inherits from the SensorComponent script like ray sensors and controls the different attributes of a visual observation space. Since environments like GridWorld rely on visual observations in a compressed form (PNG), which is then passed into deep learning computer vision algorithms, this script is used for assigning the height, width, compression, and the vectorized distribution of the input observation space. The script is assigned to an agent that controls the visual observation with the help of a camera present in the Unity scene. It assigns the camera as the default visual observation too. The width and height of the generated image is also an attribute that defaults to 84 units.
public class CameraSensorComponent : SensorComponent
{
[HideInInspector, SerializeField
, FormerlySerializedAs("camera")]
Camera m_Camera;
CameraSensor m_Sensor;
public Camera Camera
{
get { return m_Camera; }
set { m_Camera = value; UpdateSensor(); }
}
[HideInInspector, SerializeField
, FormerlySerializedAs("sensorName")]
string m_SensorName = "CameraSensor";
public string SensorName
{
get { return m_SensorName; }
set { m_SensorName = value; }
}
[HideInInspector, SerializeField
, FormerlySerializedAs("width")]
int m_Width = 84;
public int Width
{
get { return m_Width; }
set { m_Width = value; }
}
[HideInInspector, SerializeField
, FormerlySerializedAs("height")]
int m_Height = 84;
public int Height
{
get { return m_Height; }
set { m_Height = value; }
}
The script also has attributes that control whether the images are received in RGB (three channels) or in grayscale (one channel) format. It also contains the compression type of the image defaulting to “PNG.” This camera sensor object can then be used for collecting visual information (visual sensor). This object is of type ISensor, which governs all the sensors in the Unity ML Agents.
m_Sensor = new CameraSensor(m_Camera, m_Width, m_Height, Grayscale, m_SensorName, m_Compression);
return m_Sensor;
}
It also has overridden the method “GetObservationShape,” like in the case of ray sensor, which returns the observation vector (container), whose shape is controlled by the height, width, and the channels of the image (RGB/grayscale). It also has another method “UpdateSensor,” which assigns the name of the camera sensor and the compression type (none/PNG).
public override int[] GetObservationShape()
{
return CameraSensor.GenerateShape(m_Width
, m_Height, Grayscale);
}
internal void UpdateSensor()
{
if (m_Sensor != null)
{
m_Sensor.Camera = m_Camera;
m_Sensor.CompressionType = m_Compression;
}
}
CameraSensor: This inherits from the ISensor script and overrides its methods. The basic functionality of this script is to wrap a camera object to generate visual observations for the agent. It has the attributes that are present in the CameraSensorComponent script such as height, width, grayscale, name shape, and compression type and has associated functions to assign them. The “GetCompressedObservation” method encodes the image in PNG binary format.
public byte[] GetCompressedObservation()
{
using (TimerStack.Instance.Scoped("CameraSensor.GetCompressedObservation"))
{
var texture = ObservationToTexture(m_Camera, m_Width
, m_Height);
// TODO support more types here, e.g. JPG
var compressed = texture.EncodeToPNG();
DestroyTexture(texture);
return compressed;
}
}
The important methods include the override “Write” method, “ObservationToTexture” method. The latter is important because the camera captures the image presented on a render texture (Texture 2D). This function assigns the variables with the Texture 2D properties such as the width, height, and texture format (RGB24) and also controls the transform of the camera and its depth of view. This script can also help in rendering to offscreen texture, which is useful when training Resnet model in CPU. For each timestamp, the image is captured and activated so that it can be processed by the neural network. After it is processed, the RenderTexture variable is released, and a new image is assigned to it for the next time step.
var texture2D = new Texture2D(width, height, TextureFormat.RGB24, false);
var oldRec = obsCamera.rect;
obsCamera.rect = new Rect(0f, 0f, 1f, 1f);
var depth = 24;
var format = RenderTextureFormat.Default;
var readWrite = RenderTextureReadWrite.Default;
var tempRt =RenderTexture.GetTemporary(width, height, depth, format, readWrite);
The “Write” method then calls this “ObservationToTexture” method to the observation space of the agent. However, in this case, the observation space is written over a Tensor (which we will discuss in next chapter), which can be assumed as a dense matrix suitable for performing deep learning algorithmic computations. Once the visual information from the observation space is processed by the network running on the external brain, the associated texture is destroyed. The script does this with the help of the following lines:
using (TimerStack.Instance.Scoped("CameraSensor.WriteToTensor"))
{
var texture = ObservationToTexture(m_Camera,
m_Width, m_Height);
var numWritten = Utilities.TextureToTensorProxy(texture
, writer, m_Grayscale);
DestroyTexture(texture);
return numWritten;
}
The “GenerateShape” method returns the shape of the image and its associated channels: one for grayscale, three for RGB.
internal static int[] GenerateShape(int width, int height, bool grayscale)
In the GridWorld environment, there is a use of the camera sensor component. These two important scripts control the visual observation input from the camera and pass this information to the neural network for training. This is shown in Figure 4-7.
Figure 4-7
Camera sensor in GridWorld
There is another class called as “RenderTextureSensor,” which contains the initialization of the functions and methods used in the CameraSensor script, such as creating Texture 2D format and assigning the height, width, channels, name, and compression for training. The sensor part controls the centralized observation space of the agent and provides all the details for the agent to take its next decision base on the runtime policy. We have explored the two distinct variants of sensors in depth: the ray sensors and the camera sensors. The important conclusion is that both these sensors inherit from “ISensor” and “SensorComponent” script at the lower level and have their own individual functionality. In contrast to the ray sensors workflow, the camera sensor workflow can be visualized as shown in Figure 4-8.
Figure 4-8
Camera sensor workflow in Unity ML Agents
Policies
In this section, we will explore the policies that the agent follows while taking decisions. We will explore the BehaviorParameters script, which we mentioned briefly in the last chapter, and we will get to know how this script relates to the sensor components to get the observation space for the agent. The BarracudaPolicy script provides information related to the Inference Engine policy while running the internal brain. The HeuristicPolicy script is involved in making heuristic policies when no specific brain (Internal/External) is applied on the agent.
BehaviorParameters: As mentioned in the last chapter, this script is associated with the decision-making process of the agent after receiving the observation from the sensors. The agent has a choice to choose its decision as default, internal, or heuristic. If the default policy is chosen, the script tries to attain the current policy. This can be a pretrained policy running in the Inference Engine or a heuristic policy. If no pretrained model is present (no inference) and heuristic policy is not implemented, this default policy is used for real-time training of the neural network with Tensorflow (external brain). The default policy uses the remote process for decision making: (real-time training). If external brain training is not present, it will use the Inference Engine (internal brain), and if no model is provided it defaults to heuristic policy.
[Serializable]
public enum BehaviorType
{
Default,
HeuristicOnly,
InferenceOnly
}
The next code segment implements the policies at runtime and also generates the agent’s policy objects. This script uses the BrainParameters script, which has attributes such as observation size, stacked observations, vector action size, and discrete or continuous distribution of observations. The segment also contains a neural network model variable that is used if internal policy is chosen for inference. It also has attributes that specify the inference device, such as CPU or GPU, on which the pretrained model will run during game play in Unity.
[HideInInspector, SerializeField]
BrainParameters m_BrainParameters = new BrainParameters();
public BrainParameters BrainParameters
{
get { return m_BrainParameters; }
internal set { m_BrainParameters = value; }
}
[HideInInspector, SerializeField]
NNModel m_Model;
public NNModel Model
{
get { return m_Model; }
set { m_Model = value; UpdateAgentPolicy(); }
}
[HideInInspector, SerializeField]
InferenceDevice m_InferenceDevice;
public InferenceDevice InferenceDevice
{
get { return m_InferenceDevice; }
set { m_InferenceDevice = value; UpdateAgentPolicy();}
}
It also controls the behavior type, the name of the behavior, and Boolean variable, which controls whether child sensors would be used and also assigns a team ID for the behavior, which is represented as “FullyQualifiedBehaviorName.” The child sensors signify the sensors attached to the children GameObjects of the agent.
[HideInInspector, SerializeField]
BehaviorType m_BehaviorType;
public BehaviorType BehaviorType
{
get { return m_BehaviorType; }
set { m_BehaviorType = value; UpdateAgentPolicy(); }
}
[HideInInspector, SerializeField]
string m_BehaviorName = "My Behavior";
public string BehaviorName
{
get { return m_BehaviorName; }
set { m_BehaviorName = value; UpdateAgentPolicy(); }
[Tooltip("Use all Sensor components attached to child GameObjects of this Agent.")]
bool m_UseChildSensors = true;
public bool UseChildSensors
{
get { return m_UseChildSensors; }
set { m_UseChildSensors = value; }
}
public string FullyQualifiedBehaviorName
{
get { return m_BehaviorName + "?team=" + TeamId; }
}
The next method is “GeneratePolicy,” which is of type “IPolicy.” It takes arguments as the brain parameters and the behavior type. Based on the type of the behavior, a switch case is applied. If “HeuristicOnly” type is chosen, then it draws its behavior from the “HeuristicPolicy” (which we will discuss). If “InferenceOnly” policy is used, then there is a check to make sure that a valid pretrained model is available for inference through Barracuda. If not, then a warning is provided to change the behavior type. If a pretrained model is present, then it is passed to “BarracudaPolicy” script to run the inference.
case BehaviorType.HeuristicOnly:
return new HeuristicPolicy(heuristic
, m_BrainParameters.NumActions);
case BehaviorType.InferenceOnly:
{
if (m_Model == null)
{
var behaviorType = BehaviorType.InferenceOnly.
ToString();
throw new UnityAgentsException(
$"Can't use Behavior Type {behaviorType} without a model. " +
"Either assign a model, or change to a different Behavior Type."
);
}
return new BarracudaPolicy(m_BrainParameters, m_Model, m_InferenceDevice);
}
Then we have the “Default” policy, which initially checks whether the communicator is on. This implies the port 5004 is connected for real-time Python training of the model using Tensorflow. This is the external brain training taking place. In the event of the port being not connected, the policy checks for an available valid pretrained model for “Inference” policy. Otherwise it defaults to “Heuristic” policy.
case BehaviorType.Default:
if (Academy.Instance.IsCommunicatorOn)
{
return new RemotePolicy(m_BrainParameters, FullyQualifiedBehaviorName);
}
if (m_Model != null)
{
return new BarracudaPolicy(m_BrainParameters, m_Model, m_InferenceDevice);
}
else
{
return new HeuristicPolicy(heuristic, m_BrainParameters.NumActions);
}
default:
return new HeuristicPolicy(heuristic, m_BrainParameters.NumActions);
}
The last method of this script “UpdateAgentPolicy” updates the policy of the agent if the agent is not null.
internal void UpdateAgentPolicy()
{
var agent = GetComponent<Agent>();
if (agent == null)
{
return;
}
agent.ReloadPolicy();
}
This BehaviorParameter script uses certain adjoining scripts such as BrainParameters, BarracudaPolicy, “HeuristicPolicy,” and ”IPolicy” scripts, which are fundamental for its functionality. In the next sections of this chapter, using the Unity Editor, we will assign a “BehaviorParameters” script to the agent.
If we open any scene in the DeepLearning Assets folder and navigate to any agent in the scene, we will see the behavior parameters script attached to it. For instance, in this case the “BehaviorParameter” script for “Hallway” is shown in Figure 4-9.
Figure 4-9
BehaviorParameters script in the Hallway scene
Some of the parameters such as VectorObservation and VectorAction are derived from the BrainParameters script, and we can see variables such as Model (controls the neural network model), Inference Device (CPU/GPU), Behavior Type (HeuristicOnly, InferenceOnly, Default), Team ID, and Boolean Use Child Sensors, which we discussed in this script.
BrainParameters: This controls the observation input and output spaces. It determines whether the action space is discrete or continuous inside the “BrainParameter” class, and it holds data related to the size of the vector observation space (defaults to 1). It also has attributes such as “stacked vectors,” which refers to the concatenation of observations across different frames to be used for training.
[Range(1, 50)] public int NumStackedVectorObservations = 1;
The “VectorActionSize” variable defines the size of the action space. If the space is continuous, the size is simply defined as the size of the vector. For discrete action spaces, the size depends on the branching of the action space. It also has “VectorActionDescriptions,” which describe the action space and “VectorActionSpaceType,” which is continuous or discrete.
public SpaceType VectorActionSpaceType = SpaceType.Discrete;
The “NumActions” returns the number of actions inside the vector action space. If it is discrete, the length of the “VectorActionSize” array is returned (depending on branching factor). For continuous spaces, the value at the first index of the “VectorActionSize” array is returned as the observations are stacked.
public int NumActions
{
get
{
switch (VectorActionSpaceType)
{
case SpaceType.Discrete:
return VectorActionSize.Length;
case SpaceType.Continuous:
return VectorActionSize[0];
default:
return 0;
}
}
}
The last method in this script, Clone, initializes the BrainParameter object with the values discussed in this context. These attributes are then passed into the BehaviorParameters script, which appears on the Editor.
BarracudaPolicy: This is used for the Inference Engine for running a pretrained neural network in Unity. Internally this script uses the “ModelRunner” class. The first stage of this script contains the enum for the different types of “Inference Device,” which is CPU or GPU (0 or 1, respectively.) The “BarracudaPolicy” inherits from the “IPolicy” interface. It contains attributes such as the agent ID and the list of sensor shapes. The “ModelRunner” script is used across all the policies that have the similar deep learning model and the same inference device.
public enum InferenceDevice
{
CPU = 0,
GPU = 1
}
protected ModelRunner m_ModelRunner;
int m_AgentId;
List<int[]> m_SensorShapes;
This script also has a method BarracudaPolicy, which takes as arguments the attributes from the BrainParameters class, the neural network model to be used, and the inference device to run the model. This method uses the “GetOrCreateModel” method from the Academy class, which implies that if the model has been used previously for inference, it will continue using that. In the event that no pretrained model has been used for that agent before, it will get the built model assigned from the assets folder.
public BarracudaPolicy(
BrainParameters brainParameters,
NNModel model,
InferenceDevice inferenceDevice)
{
var modelRunner = Academy.Instance.GetOrCreateModelRunner(model, brainParameters, inferenceDevice);
m_ModelRunner = modelRunner;
}
It contains a “RequestDecision” method that makes decisions for the agent based on the trained model. It takes as input the list of sensors (ray/camera) and has an associated episode ID for each stage of the decision-making process.
public void RequestDecision(AgentInfo info, List<ISensor> sensors)
{
m_AgentId = info.episodeId;
m_ModelRunner?.PutObservations(info, sensors);
}
The “DecideAction” method uses the “GetAction” method from the ModelRunner script to allow the agent to take corresponding action against a particular decision.
public float[] DecideAction()
{
m_ModelRunner?.DecideBatch();
return m_ModelRunner?.GetAction(m_AgentId);
}
HeuristicPolicy: This is used when neither Default nor InferenceOnly options are provided in the BehaviorParameters script. This is a rather hard-coded implementation of the heuristic policies, which makes the agent take action each time the “RequestDecision” method is called. It does not use the BrainParameters script attributes and uses the input list of sensors from the agent directly to make its decisions. The methods that are important in this context are “RequestDecision” method, which takes the list of sensors as input, and the “DecideAction” method, which takes the previous decision made by the policy.
public HeuristicPolicy(ActionGenerator heuristic, int numActions)
{
m_Heuristic = heuristic;
m_LastDecision = new float[numActions];
}
public void RequestDecision(AgentInfo info, List<ISensor> sensors)
{
StepSensors(sensors);
m_Done = info.done;
m_DecisionRequested = true;
}
public float[] DecideAction()
{
if (!m_Done && m_DecisionRequested)
{
m_Heuristic.Invoke(m_LastDecision);
}
m_DecisionRequested = false;
return m_LastDecision;
}
The StepSensors function uses the ISensor.GetCompressedObservation, which makes the sensor usage consistent between training and inference. If no compression is used, then the observation space data from the sensors is used (written to ObservationWriter class); otherwise, it is passed as compressed data.
void StepSensors(List<ISensor> sensors)
{
foreach (var sensor in sensors)
{
if (sensor.GetCompressionType()
== SensorCompressionType.None)
{
m_ObservationWriter.SetTarget(m_NullList
, sensor.GetObservationShape(), 0);
sensor.Write(m_ObservationWriter);
}
else
{
sensor.GetCompressedObservation();
}
}
}
IPolicy: This interface is used across all the policy scripts we studied, as it is connected to a single agent. It provides the methods that are required by other policy scripts described in this section, to provide decisions that the agent can take. It has two unique declarations: the “RequestDecision” method, which signals the brain that the agent needs to make a decision based on the policy on which it is running, and the “DecideAction” method, which implies that the decision has to be taken at that particular time step this method is called.
The brain is expected to update its decisions once the “DecideAction” method is called.
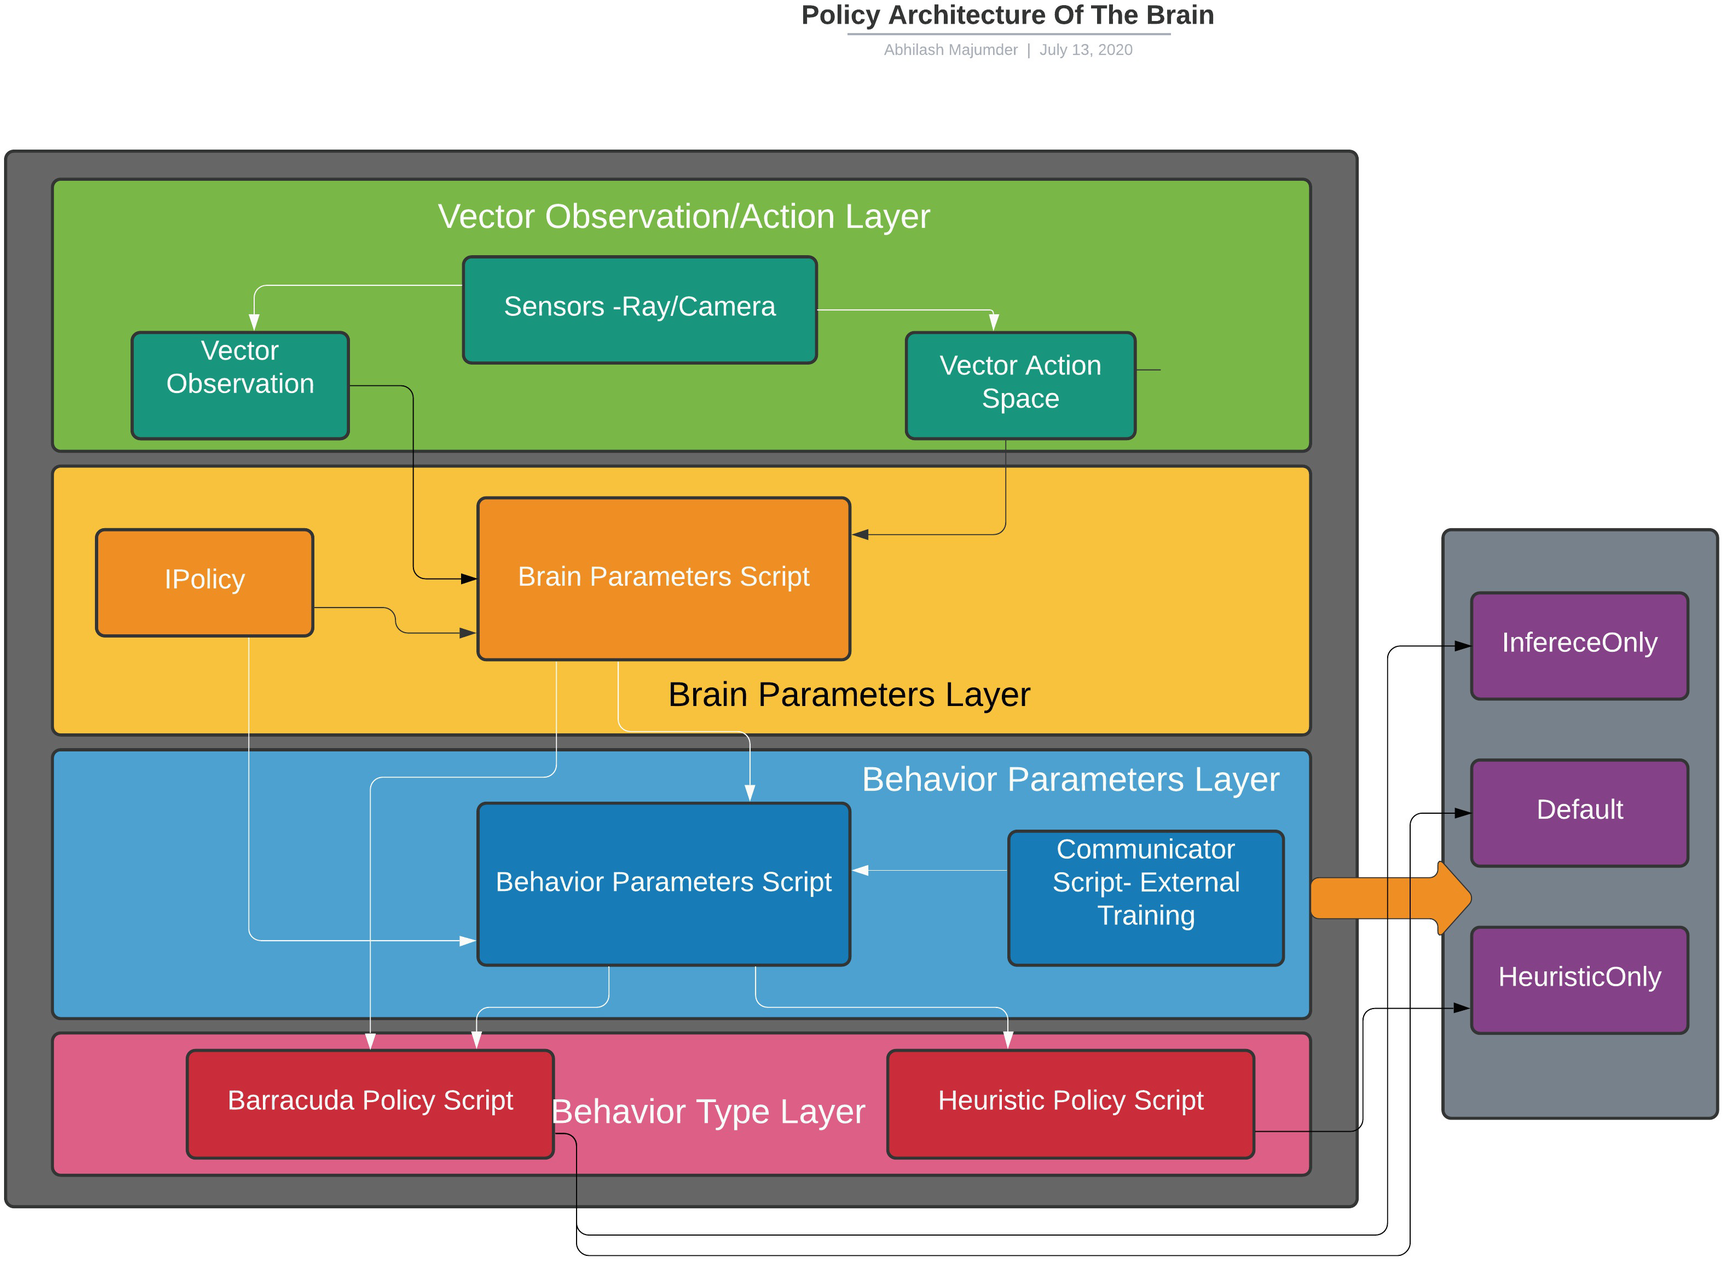
That completes the policies section, which involves the decision-making steps of the agent. This part takes as input the sensor data and acts as an interface for the different types of brain—internal, external, and heuristic—to work upon and provides the decisions to the agent. This is the C# part of the brain that internally links with the deep learning networks in Tensorflow (which we will discuss in the Chapter 5). The entire policy architecture can be summarized in Figure 4-10.
Figure 4-10
Sensor-Policy architecture in the brain of agents
By now we have a good understanding of the two major parts of the brain: sensors and policies. This is, however, restricted only to the C# layer of the ML Agents software development kit (SDK). The other important parts of the brain include the inference, communicators, and demonstrations. Of these the inference module is related to the Barracuda Engine and procedure of using Tensorflow pretrained model on stacked observation data. The demonstrators are an important aspect of the imitation learning set of algorithms. These two will be briefly discussed here since they have more to do with the Python side of ML Agents. The communicators is an interesting module that deals with how the connection takes place between the policy and Tensorflow/Python API.
Inference
This part is used for the Inference Engine for running the pretrained models in Unity. Essentially this deals with the compressed Tensor data that has been received as an output from the Tensorflow training. The Barracuda policy that we learned about previously uses this module to link the observations and action spaces and provides the decisions during gameplay. There are certain important aspects of this module, such as the “ModelRunner” script and ”BarracudaModelParamLoader” script. The associated scripts that deal with the Tensor-processed data are TensorApplier, TensorGenerator, TensorProxy, and the TensorNames script. We will be learning about some of the aspects of this module—namely, the ModelRunner script—to understand how the Barracuda policy uses this script to make decisions.
ModelRunner: The attributes of this script include the agent information, sensors, and dictionary containing the last action performed by the agent. It also contains properties like the neural network model, which is to be used for inference, inference device, inference inputs and outputs, and validation of the sensor shape. The “ModelRunner” method uses the parameters from the “BrainParameter” script and also has a “TensorAllocator” attribute for intermediate caching of the Tensor result of each episode of training. It then loads the model to be used by using the ModelLoader.Load syntax and assigns it as a Barracuda model. In the event of no model being present for inference, a null value is assigned.
The next part involves abstracting the inference inputs from the loaded Barracuda model with the help of BarracudaModelParamLoader.GetInputTensors command. Likewise, the inference outputs are also received from the Barracuda model. However, for running the inference, there are certain other attributes such as TensorGenerator and TensorApplier classes, which are required. The TensorGenerator is actually a dictionary, mapping between the Tensor Names and the generators. Generators can be considered as specialized functions that can help to analyze large data sets by passing it as an iterator. Instead of loading the entire data set during training or during use of a pretrained model, the generator helps to partition the data according to a function that allows better data inflow for processing. We will understand the use of a generator in depth when we study convolution neural networks in the next chapter. For the time being, it is safe to assume that the “TensorGenerator” class is a mapping that allows a proper data flow pipeline for inference. Similarly, the TensorApplier is a mapping between output Tensor names and the methods that will use that particular output Tensor. It also stores the model information and actions and updates the memory (buffer) of the agent.
The PrepareBarracudaInputs initializes the inference inputs from Barracuda and also creates a mapping in a dictionary between the names and the inference inputs.
The FetchBarracudaOutputs fetches the output depending on a particular “name” provided. This is important to get the correctly mapped inference input associated with a particular name so that it can be processed.
The PutObservations validates the shape of the sensor and associates an episode ID with each episode such that the decisions taken by the agent are in a sorted manner. If the agent reaches the goal by following the Inference Engine model, then the last action is removed from the dictionary, as no further steps should be taken for that episode.
public void PutObservations(AgentInfo info, List<ISensor> sensors)
if (!m_LastActionsReceived.ContainsKey(info.episodeId))
{
m_LastActionsReceived[info.episodeId] = null;
}
if (info.done)
{
m_LastActionsReceived.Remove(info.episodeId);
}
}
The “DecideBatch” method actually runs the pretrained model in batches in Inference Engine. The current batch size is checked and passed through the generator function in “TensorGenerator” script to produce a Tensor that can be passed as information to the agent. As mentioned the generator allows the data to be passed in the form of sequentially partitioned and processed data in batches rather than passing the entire data. This improves performance and also can assist if a large amount of memory is taken up while passing the processed data. The “BeginSample” method associates the sampled Tensor names with the inference input. The input tensors are then fed to the Inference Engine using the “GenerateTensor” method. This method is the initial pipeline for batch processing, which involves passing the Tensor data to the Inference Engine using the generator function.
The next stage involves preparing the Barracuda inference inputs corresponding to the prepared Tensor data. Here the TensorGenerator script becomes useful, which contains a mapping between the Tensor names (data) and the inference inputs.
var inputs = PrepareBarracudaInputs(m_InferenceInputs);
Profiler.EndSample();
Then the Barracuda/Inference Engine executes the model. For this it uses the WorkerFactory class internally to execute the model. The m_Engine variable uses the inference inputs and assigns a particular action in a time-step to be performed by the agent, such as 3D motion. This, in turn, returns the output of the executed model, in the form of memories, actions, and decisions taken by the agent. Here the TensorApplier script becomes useful; it controls the mapping between the associated inference output and the memories and actions taken by the agent.
The method “HasModel” checks whether a valid pretrained model is present for inference along with an associated inference device. The method “GetAction” retrieves the last action taken by the agent in a sorted order of the decisions vector.
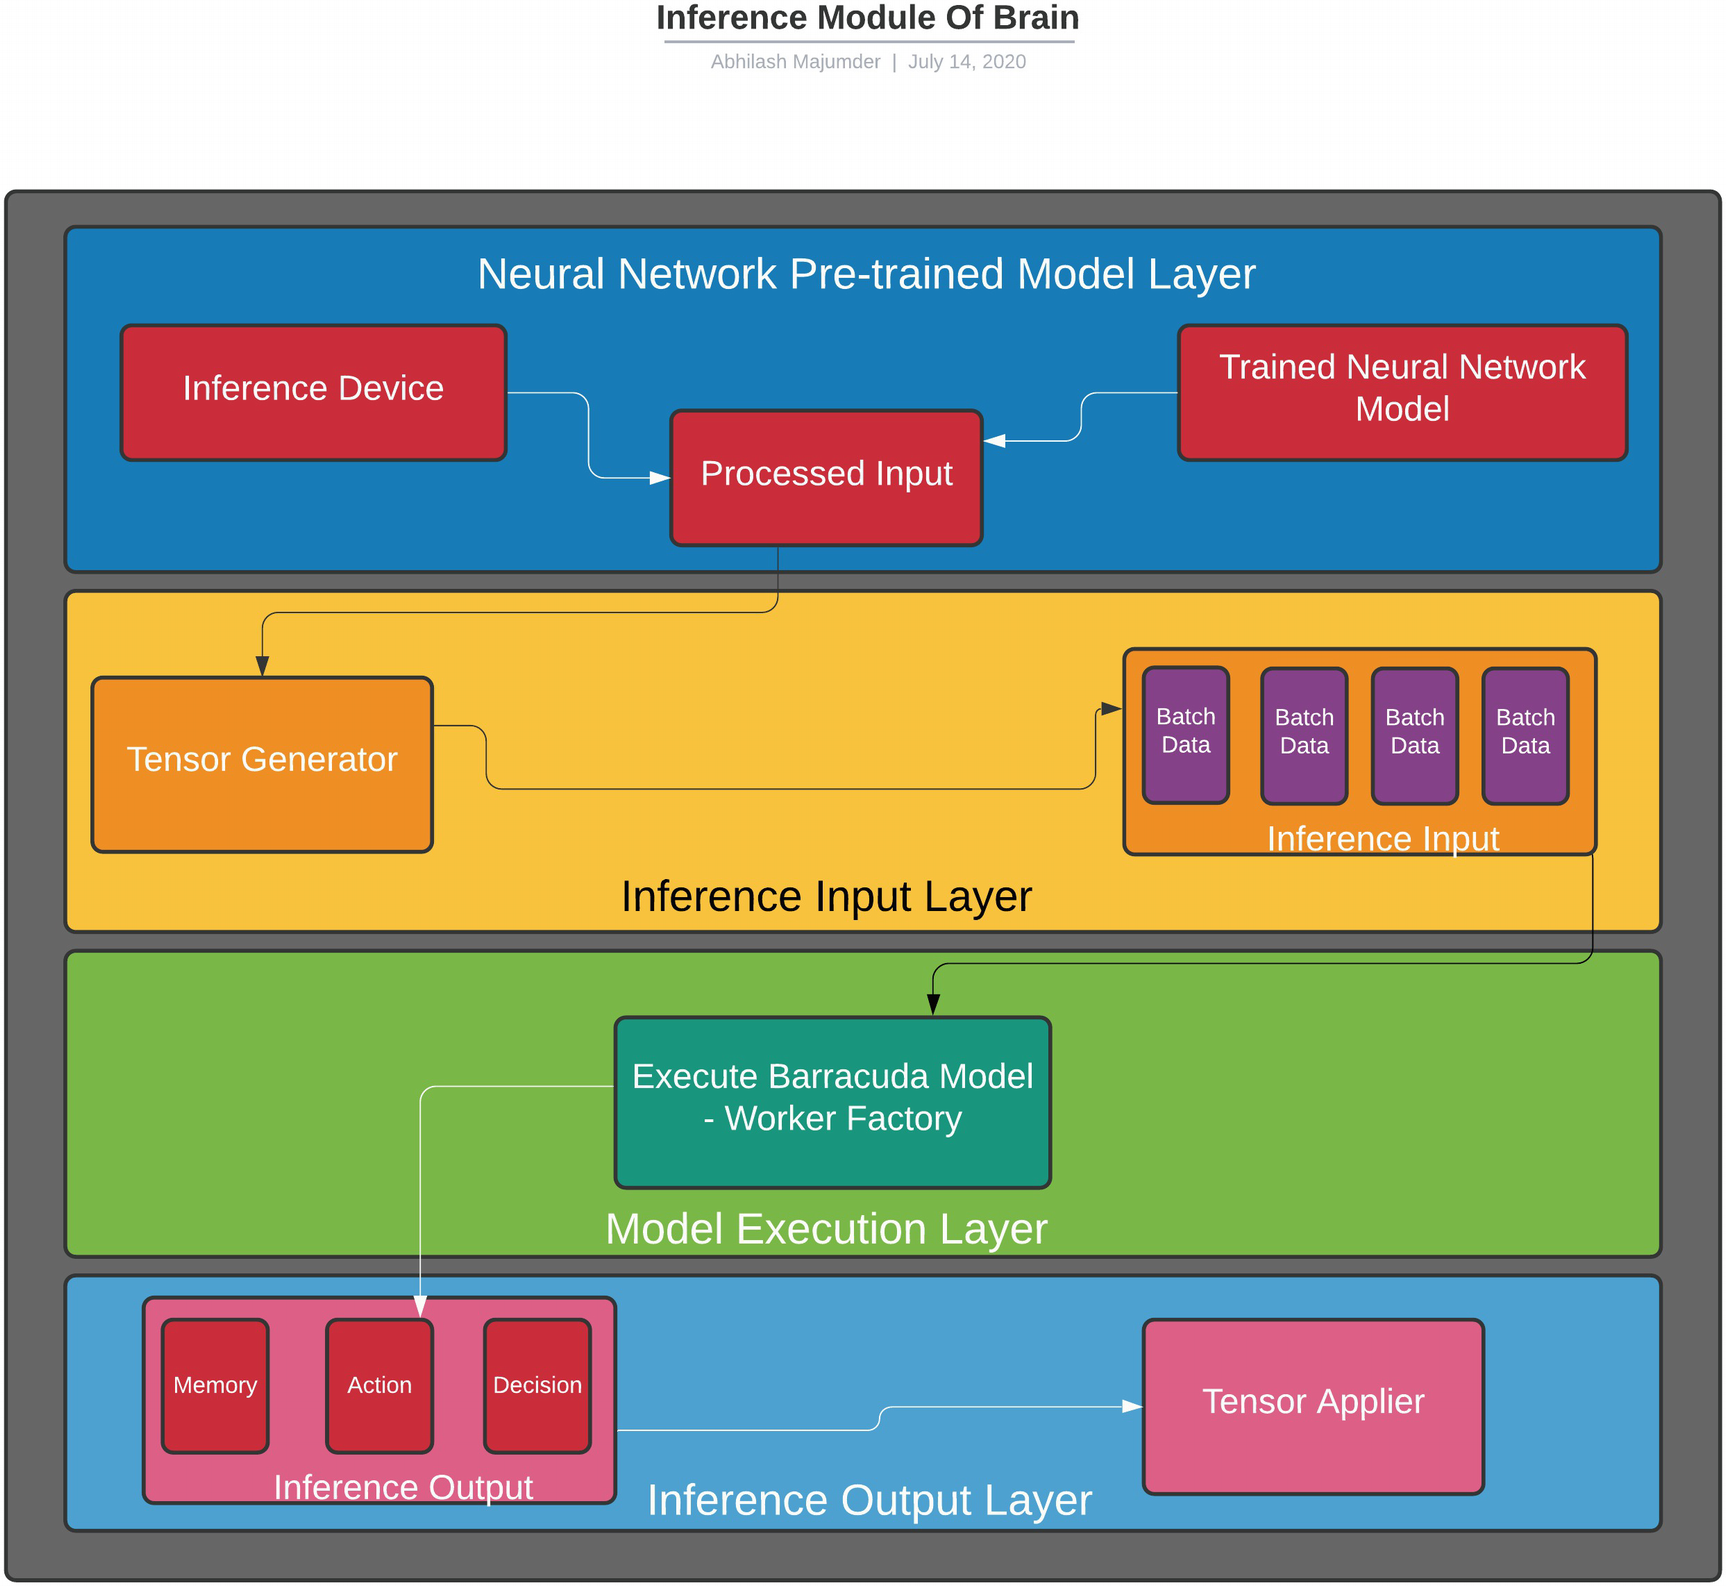
To summarize this particular script is associated with using the inference mode for the agent. The pipeline involves acquiring the processed data from the pretrained model, partitioning it into Tensor data according to a generator function for smoother batch processing, passing this Tensor data along with its Tensor name as inference input to the Barracuda Engine (“TensorGenerator”), executing the model, extracting the results in the form of memory, assuming actions taken by the agent in an inference output format, associating the inference output with the results of each episode with the help of TensorApplier, and extracting the latest output for the next episode. This continues as long as the agent has reached the goal in inference training or the episode is terminated. This can be illustrated in Figure 4-11.
Figure 4-11
Inference module workflow in ML Agents brain
The other scripts associated with this inference module include those mentioned here.
TensorGenerator: This script, as mentioned earlier, maintains a mapping between the Tensor name and the generator function for batch processing of the preprocessed data. This is important because in ML Agents, we will look into a variety of models using both discrete/multi-discrete and continuous observation spaces. Depending on the nature of the Tensor pretrained data, the generator function is different for each model. There can be different generators that can be used for this case, such as for batch processing, sequence length, or recurrent input (used in recurrent neural network):
m_Dict[TensorNames.BatchSizePlaceholder] =
new BatchSizeGenerator(allocator);
m_Dict[TensorNames.SequenceLengthPlaceholder] =
new SequenceLengthGenerator(allocator);
m_Dict[TensorNames.RecurrentInPlaceholder] =
new RecurrentInputGenerator(allocator, memories);
For instance, if we use a model which uses visual observation data (ConvD NN model), then we use the VisualObservationInputGenerator and if we use vectorized models (discrete/continuous) we have the VectorObservationGenerator. Based on the type of the deep RL algorithm used and the associated neural network model, the generators are different. However, without loss of generality, this script is associated with a smooth batch processing of data for the Inference Engine module to work upon.
if (isVectorSensor)
{
if (vecObsGen == null)
{
vecObsGen = new VectorObservationGenerator(allocator);
Along with this, Barracuda also has its own generator function associated with the Inference Model that can be used.
TensorApplier: This script is a mapping of the Tensor output with the memory and actions of the agent. Depending on the type of distribution—continuous or discrete—the mapping is different. For continuous action space, ContinuousActionOutputApplier is used, while DiscreteActionOutputApplier is used for discrete spaces. It also updates the memory with execution of each episode of the agent and uses the BarracudaMemoryOutputApplier method to hold the memory contents of each episode. The script also updates the agent based on the actions taken by it.
Demonstrations
Another fundamental part of the brain that involves imitation learning through heuristic policy and records the user’s gameplay for training the agent is the demonstrations module. This module does not require neural network training or Inference Engine to allow the agent to make decisions. Rather this is a separate module that is devoted to making the agent learn by imitating human control. The most important script that we will be exploring in this section is the DemonstrationRecorder script.
DemonstrationRecorder: In order to record demonstrations from an agent by heuristic control, we have to add this script to the agent. When the “Record” option is checked during the gameplay, the demonstrations are recorded in a .demo file located in the assets folder. This particular demo file contains the details of the demonstrations of executing the imitation learning algorithm, which may take a few minutes to many hours based on the complexity of the environment. Figure 4-12 shows the demonstration file in 3D Ball environment in Unity.
Figure 4-12
Sample demonstration file (.demo) in Unity
This script has certain attributes, such as the demonstrator name, the maximum length of the name, extension type of the file (.demo), and the default storage directory (Assets/Demonstrations).
[FormerlySerializedAs("demonstrationDirectory")]
[Tooltip("Directory to save the demo files. Will default to " +
"{Application.dataPath}/Demonstrations if not specified.")]
On initialization, rather during lazy initialization, the behavior parameters of the agent are taken as inputs and an associated file path and file name is provided for the demonstration file.
The “SanitizeName” method removes all characters, with the exception of alphanumeric characters, from the demonstration name. It can be considered analogous to regular expressions used for removing the characters.
internal static string SanitizeName(string demoName, int maxNameLength)
{
var rgx = new Regex("[^a-zA-Z0-9 -]");
demoName = rgx.Replace(demoName, "");
if (demoName.Length > maxNameLength)
{
demoName = demoName.Substring
(0, maxNameLength);
}
return demoName;
}
The MakeDemonstrationFilePath is important for saving the demonstration file after the observations are complete. It uses a timestamp to save the demonstrations files. After the training episode is over, the “AddDemonstratorWriterToAgent” method is called. It calls the behavior parameters of the agent and associates the trained observation file (.demo) file with it. The agent then runs this trained demonstrations file and uses imitation learning. The important part is that during the recording phase (training phase of imitation learning), the behavior parameter type can be set to HeuristicOnly, since in this case there are no associated internal/external brain to choose from. This heuristic brain runs on the HeuristicPolicy, which we discussed in the policy section of the brain. However, another modification can be using a player brain, that can record the actions through the user's gameplay.
var behaviorParams = GetComponent<BehaviorParameters>();
demoWriter.Initialize(
DemonstrationName,
behaviorParams.BrainParameters,
behaviorParams.FullyQualifiedBehaviorName
);
m_Agent.DemonstrationWriters.Add(demoWriter);
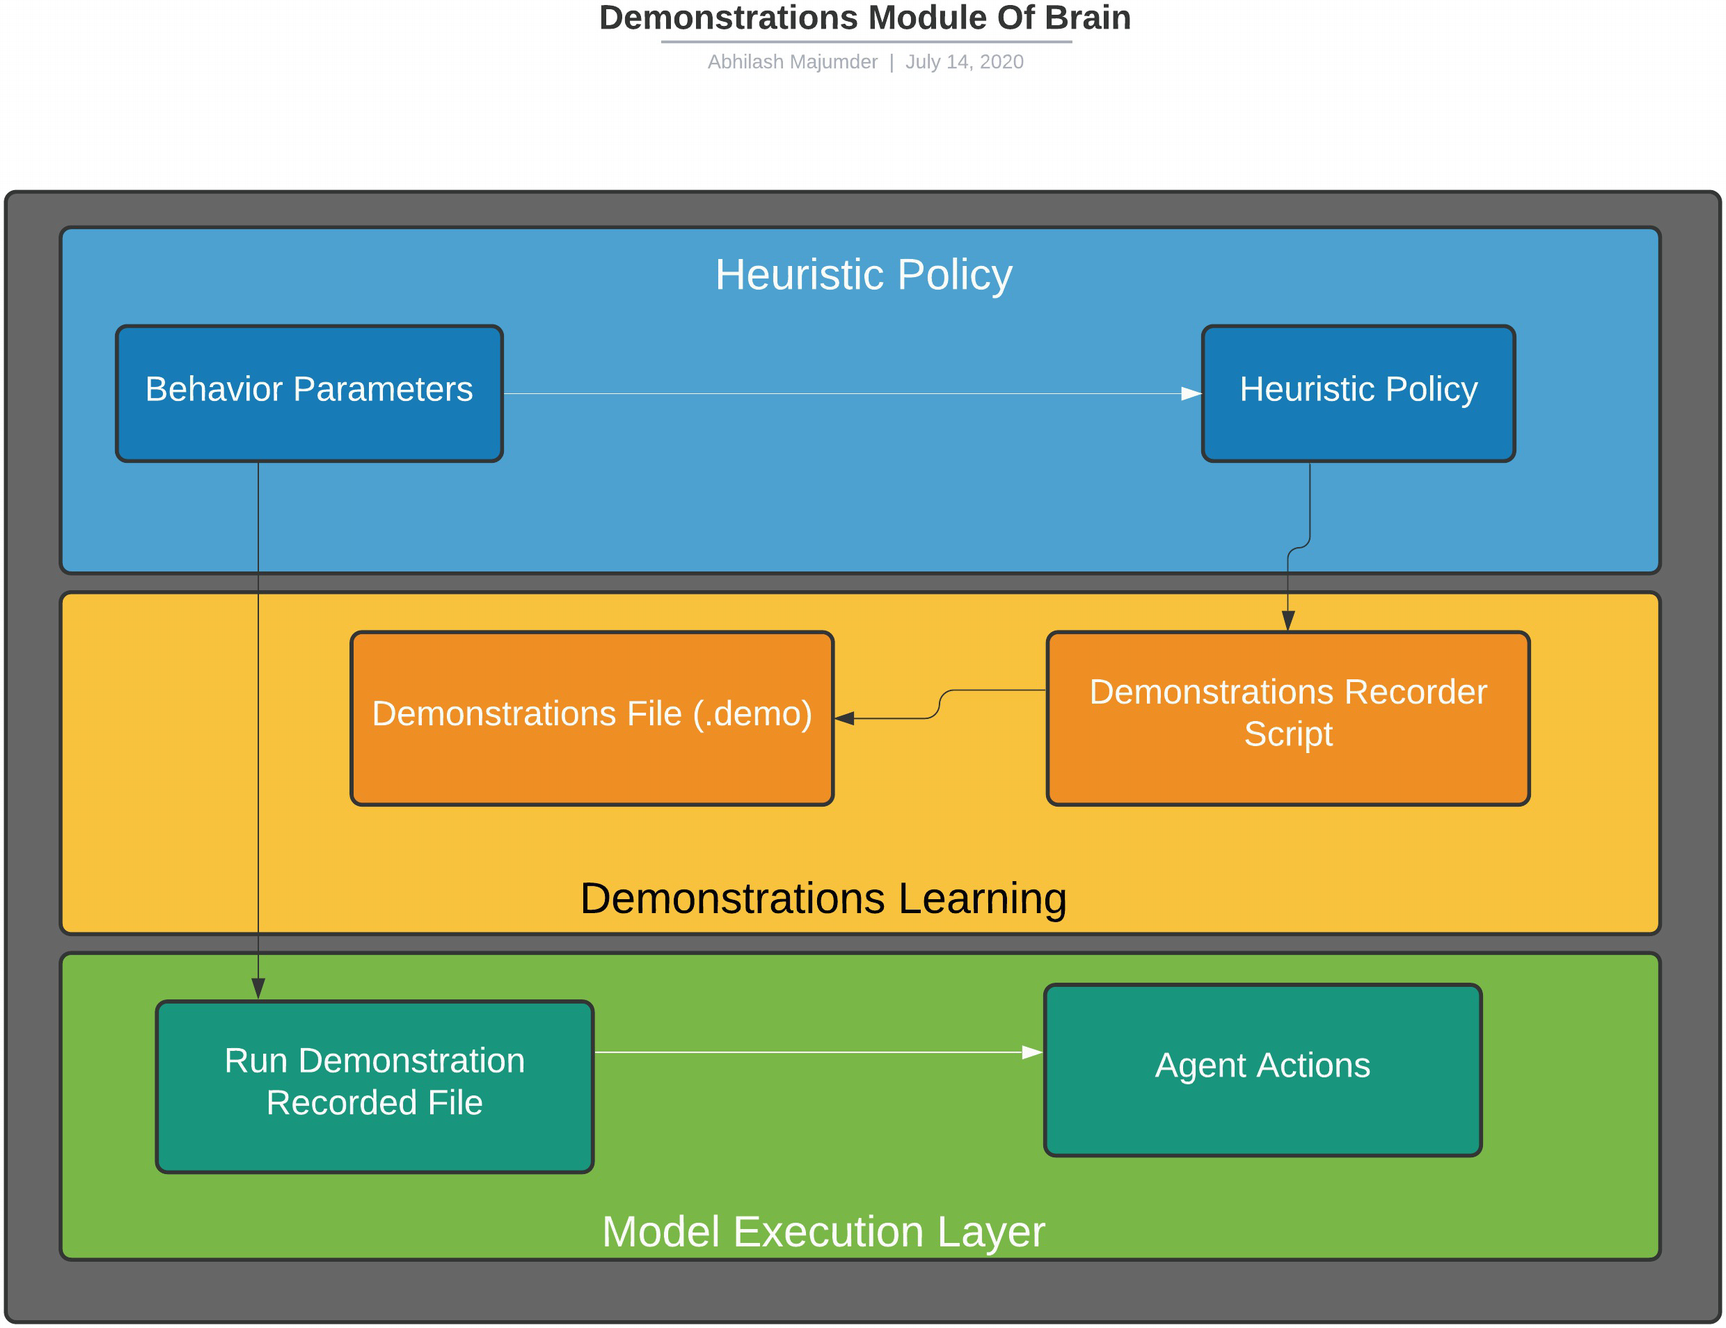
This concludes the demonstrations part and the associated script, which are very important to understand. The related scripts will be discussed separately when we will explore generative adversarial imitation learning (GAIL) in depth in later chapters. The workflow of imitation learning can be viewed, as shown in Figure 4-13.
Figure 4-13
Demonstrations module for imitation learning in brain
Communicators
The communicators module is associated with linking the brain with the Python API. Since this module is important for real–time training, it can be considered to be a part of the academy. Since this module controls the linkage between the C# and Python API for training, we will look into the ICommunicator script.
ICommunicator: The ICommunicator script contains the important attributes, such as the port number, for connecting to Python, the Unity Package Version, Unity Communication Version, name, and the RL capabilities of the C# framework.
public int port;
public string name;
public string unityPackageVersion;
public string unityCommunicationVersion;
public UnityRLCapabilities CSharpCapabilities;
These contain the important structures such as UnityRLParameters, which contain the Boolean variable isTraining, which checks if the port (5004) is used by the external brain for running the Tensorflow model.
internal struct UnityRLInputParameters
{
public bool isTraining;
}
The “QuitCommandHandler” and “ResetCommandHandler” quits and resets the events and parameter updates sent by the communicator. The script also handles the “UnityRLInputParameters” updates from the communicator.
The next part is important because in communicators there are two types: Unity communicator and external communicator. The flow of information (packets) between the two communicators is purely sequential. An initialization message packet is exchanged between the two communicators once a connection is established. This is analogous to the handshaking technique in computer networks. As a convention, the Unity input is a message from external to Unity and Unity output is a message from Unity to external. Message packets are sent sequentially one after another for each information exchange, except for the first time where the external communicator sends two messages for establishing the connection. The structure of the message can be presented as follows:
UnityMessage
...Header
...UnityOutput
......UnityRLOutput
......UnityRLInitializationOutput
...UnityInput
......UnityRLInput
......UnityRLInitializationInput
The “ICommunicator” interface contains all the declarations of the previous functions such as quit/reset the command received. It also sends the academy parameters through the communicator using the “Initialize” method:
The PutObservation sends the observations to the agent at each time step of external training through communicators. The DecideBatch signals the ICommunicator that the agents are ready to receive the action, and if the communicator has not received an action for its agents, then it needs to get an action at this point. The “GetActions” method gets the agent actions based on the batching procedure(key).
There are other scripts associated with the communicator, such as the rpccommunicator and UnityRLCapabilities script, which internally implements this Icommunicator interface. The most important functionalities of the communicators involve exchange of message packets between the Unity brain and the external communicator via port number 5004.
This concludes the in-depth analysis of the five main parts of the brain architecture: sensors, policies, communicators, inference/Barracuda, and demonstrations. Associated folders that are present in the brain architecture include “Editor” and Grpc. The Editor folder contains scripts that inherit/implement the four major parts of the brain for display in the Editor. The Grpc is a routing protocol that is used as a part of the communicator. In the next section, we will understand the academy architecture, which involves three major scripts: Agent, Academy, and DecisionRequester. These control and coordinate the training activities of the agent and its relationship with the environment.
Understanding the Academy and Agent
Now that we have an idea of the brain architecture, we can understand the different aspects of the academy, which works in sync with the brain. The academy can be considered to be part of the RL environment in Unity, which is responsible for controlling the training, episodes, epochs, and the environment variables for the agent brain. Accordingly the academy, agent, communicator, and Python API are the four major peripherals of the brain that assist the brain with its decision-making process. We studied the communicator object in the previous section, and here we will see how the academy is also related to the communicator. We will study the Academy script, which is associated with the academy architecture. In the later sections we will be looking at the “Agent” script and the DecisionRequester script.
Academy: The academy, along with the learning brain, is part of the environment, while the communicator is used for exchanging message packets between the former and the Python API. In the “FixedUpdate” method, the “Academy.Instance.EnvironmentStep()” method is called, which is used for setting up the environment for each episode of training.
void FixedUpdate()
{
Academy.Instance.EnvironmentStep();
}
The academy class is a singleton design pattern. The instance is initialized the first time it is accessed. After it is initialized, the academy attempts to connect to the Python API through the external communicator. In the event that no port is available or no message packets are exchanged between the external communicator and academy, the external brain will not function. In this case, the academy defaults the environment to run in Inference Mode or in Heuristic Mode. The communicator interaction is very important, as it interacts directly between the Python API and the academy. The script contains some important attributes such as the API version, which has to be compatible with the “UnityEnvironment.API_VERSION,” the package version, the training port (5004), and the flag for signaling the training port (“—mlagents-port”).
The academy script then follows a lazy initialization procedure, and once initialized, the connection remains open for message exchange between the communicator and the academy. It then checks whether the communicator is on by using the Boolean variable IsCommunicatorOn.
static Lazy<Academy> s_Lazy = new Lazy<Academy>(() => new Academy());
public bool IsCommunicatorOn
{
get { return Communicator != null; }
}
It controls the number of episodes completed, the total episode count of the training phase, the total steps completed in a single episode, and the total steps completed during the entire simulation. It uses the “ModelRunner” class (discussed), to store the neural network model trained in run-time for inference. It also has a random seed value for the inference to work.
int m_EpisodeCount;
int m_StepCount;
int m_TotalStepCount;
internal ICommunicator Communicator;
bool m_Initialized;
List<ModelRunner> m_ModelRunners = new List<ModelRunner>();
bool m_HadFirstReset;
int m_InferenceSeed;
public int InferenceSeed
{
set { m_InferenceSeed = value; }
}
The important aspect of the academy class is that in the event of a multi-agent environment, it maintains a synchronization in communication. This implies that the agents perform their steps in a consistent manner and an agent has to act based on a particular decision before another agent can request a decision. It also has variables such as DecideAction, AgentIncrementStep, and Destroy methods to control this synchronization. It controls the reset, action, pre-step, and other decisions taken by the agent.
internal event Action DecideAction;
internal event Action DestroyAction;
internal event Action AgentIncrementStep;
public event Action<int> AgentPreStep;
internal event Action AgentSendState;
internal event Action AgentAct;
internal event Action AgentForceReset;
public event Action OnEnvironmentReset;
AcademyFixedUpdateStepper m_FixedUpdateStepper;
GameObject m_StepperObject;
It then initializes the agent (“Academy” method) to make sure at least a valid agent is present in the scene. The “EnableAutomaticStepping” involves the use of “Academy/.EnvironmentStep” method to control the actions and decisions taken by the agent and also the environment for training. It is present in a Fixed Update method, as it is called for each frame for the agent to take an action, and attaches the “AcademyFixedUpdateStepper” component to the agent for this task.
void EnableAutomaticStepping()
{
if (m_FixedUpdateStepper != null)
{
return;
}
m_StepperObject = new GameObject("AcademyFixedUpdateStepper");
The “DisableAutomaticStepping” method is used for manually controlling the academy training steps rather than updating it at each frame. Contrary to the Fixed Update method, to utilize academy training, we have to manually set the stepping using the “Academy.EnvironmentStep” method. It is not recommended generally to disable the automatic update for best performance measures during online training with academy.
The “AutomaticSteppingEnabled” is used for automatic stepping during academy training. It chooses between the “DisableAutomaticStepping” and “EnableAutomaticStepping” depending on fixed updates are present in the training phase. The next method, “ReadPortFromArgs,” reads the port and the associated flag for training. The “EnvironmentParameters” are very important in this context as, if curriculum learning (which will be discussed later) is used, then the values of the parameters generated from the training process can be passed to the academy.
public EnvironmentParameters EnvironmentParameters
{
get { return m_EnvironmentParameters; }
}
The “StatsRecorder” method records the statistics of a particular academy being trained in Unity. The “InitializeEnvironment” method is used for initializing the environment and registering the side channels (part of communicators) for information exchange. The side channels will be particularly useful when we see how to pass information between the Jupyter Notebook and Unity when training a model. It allows us to register the observation and action space and has certain attributes to control the simulated training. The next step involves starting the port and establishing the connection with the external communicator (“rpcCommunicator”).
m_EnvironmentParameters = new EnvironmentParameters();
m_StatsRecorder = new StatsRecorder();
var port = ReadPortFromArgs();
if (port > 0)
{
Communicator = new RpcCommunicator(
new CommunicatorInitParameters
{
port = port
}
);
}
If the communicator is not connected, a new attempt to start the link between the UnityRLParameters and the communicator is started. Based on the outcome, if the communicator fails to respond due to no Python process being in the training state, then the academy defaults to “Inference” mode of learning. It also issues a warning stating that in the event of not being able to connect with the trainer on port 5004, with the current “API_VERSION,” the academy forces the brain to use the inference module and its associated policies.
if (Communicator != null)
{
try
{
var unityRlInitParameters = Communicator.Initialize(
The next few code segments are related to recording the different statistics of the training environment, such as episodes, number of episodes, resetting the environment, steps completed in a particular episode, and others. Another interesting aspect is that the Academy script uses the “GetOrCreateModel” method from the ModelRunner class, which we talked about in the inference module of the brain. This is required because in case the communicator is not connected, the academy resorts to the inference module, which runs on the Barracuda Engine and uses the ModelRunner script. Internally as we have studied, this script uses the BrainParameters script to make the decisions depending on the pretrained neural network, inference policy, and the inference device. The “Dispose” method disposes the connection if the training is completed by closing the communication and side channels with the communicator. Once the training/inference is completed, the academy resets itself, so that when we would want to train again using the internal or the external brain, it should connect with the inference or communicator module, respectively.
The entire workflow of the academy involves controlling the package versions, port number, API compatibility with Python along with controlling the episodes and steps in an episode during training. It also plays an important role in connecting the communicator with the brain for real-time training and also provides selection between the enable or disable environment steps option. It also controls the choice of brain to run the model based on whether the communicator sends a feedback message packet ensuring connection establishment. If connection is made, the online training procedure is triggered, which trains the external brain of the agent with Tensorflow through the Python API. If connection is not made, then the inference model is assigned to the brain. To conclude, this architecture controls all the environmental attributes required by the brain to train its policies. This is shown in Figure 4-14.
Figure 4-14
Academy layer linked with the brain in ML Agents
Agent: Since this script is particularly large, we will look into the important aspects of it. As mentioned, the agent uses the brain–academy architecture to make its decisions and corresponding actions. It has certain parameters that control the action space, whether continuous or discrete. For discrete spaces, the DiscreteActionMasks Boolean array controls the decision branches the agent will not take. It has the rewards, maximum steps reached in a training simulation period, and a corresponding episode ID. The AgentActions struct contains the float array vectorActions. As mentioned before, the agent receives the observation inputs through the sensor layer of the brain (ray/sphere/camera) and passes it to the different policies present in the policy layer of the brain to make corresponding decisions. Based on the availability of the communicator and the associated port, the academy decides whether to train the agent on external policy (real-time Tensorflow training) or in inference policy. The academy then passes this information to the BehaviorParameters script of the brain with an associated behavior type (default, inference only, heuristic only). There are also certain important variables that control the cumulative reward, completed episodes, step count, agent information, request decision, and request action. It also contains observation sensors and a list of sensors present in the agent prefab for the sensor module of the brain. For imitation learning, it also contains the DemonstrationWriters variable for writing the observations(heuristic policy) in the .demo file, which we studied in the “demonstrations” module of the brain.
The “OnBeforeSerialize” and “OnAfterDeserialize” methods are used for serialization of the agent parameters (decisions, steps, max steps, actions). The “LazyInitialize” method initializes the agent with the associated episode ID, agent information, policy (from the policies module of brain, BehaviorParameters), and sensors. It also initializes step increments in each episode of training (AgentIncrementStep), the decision that is to be taken by the agent (DecideAction), the action step of the agent (AgentAct), the agent send state (AgentSendState), and AgentForceReset, which resets the agent parameters. The methods ResetData, Initialize, and InitializeSensors are important for the workflow of the agent.
The “DoneReason” enum contains details such as DoneCalled, MaxStepReached, and Disabled, which signals the agent that the goal is reached or the training has stopped, the maximum steps that the agent reached, and whether the agent is disabled. The next important method is “NotifyAgentDone,” which marks the agent as done; this implies that the agent has reached a goal or the training has been terminated. This contains the rewards attained by the agent, the episode ID of the completed episode, and also collects decisions with the “CollectObservations” method. Since we mentioned that the last action is taken up by the agent in the successive training step, this is achieved by the “m_Brain?.RequestDecision” method. After the decision taken by the agent, the sensors are reset using the “ResetSensors” method. Now along with inference and external training, we also have demonstrators that rely on heuristic control. For that the agent selects the decision based on the contents of the “.demo” file and also writes the new set of rewards and actions through the “Record” method. For each episode, the rewards are calculated along with the decisions, and at the end of the episode, the array containing the details of that particular episode is cleared. The rewards are set to 0, and the request decision/request action variables are set to false. This method actually signals the agent to write the observations once the goal is reached by following a particular policy.
The “SetModel” method is similar to BehaviorParameters, which decides which model to use based on inference, external training model, or heuristic policy. The “ReloadPolicy” method reloads the current policy that the agent is using at the start of a particular episode. The “SetReward” method offers an implementation of the rewards attained by the agent during training. It is important to note that the rewards are used only during external brain training state in RL and not in inference mode. This method replaces any rewards added to the agent during the current training time step.
It is recommended to use a positive reward to reinforce learning (during training) and a negative reward to penalize mistakes. We will be using this in our scripts. The "AddReward" method is used for adding the Rewards for all the stages of the training (cumulative rewards across episodes).
The “GetCumulativeReward” method is used to get the cumulative rewards for the episode. The “UpdateRewardStates” method is used to update the rewards based on the policy used by the agent and depends on the BehaviorType. The “RequestAction” method is used to repeat the previous action taken by the agent according to the decision (latest) from its policies. In many cases a new decision may not be requested—for example, an agent may use the previous decision to translate along an axis. Here the agent uses the “RequestAction” method to stay on its course, the decision is called when the agent wants to change its course or its velocity/acceleration/force. The “ResetData” method resets the brain parameters, the observation/action spaces, and the vectors (discrete/continuous). Inside the “Initialize” method, there is a heuristic method that uses the “Input.GetAxis” to maneuver the agent along different axes. This is more or less a use-controlled heuristic policy that is used in case the demonstrations policy (imitation learning) is triggered by the brain.
public override void Heuristic(float[] actionsOut)
The “IntializeSensors” method relies on the sensor module of the brain and uses its methods such as acquiring the child sensors of the agent, controlling the stacked observations of vectors (VectorSensor and BrainParameter scripts)and other attributes. This method is like an interface that signals the sensor module of the brain to record the observations in the vector container(float array). The SendInfoToBrain sends the sensor information taken by the agent to the brain, which can then work on this data. As mentioned, this information is passed to the policies module of the brain. Here the academy plays a role—if the communicator is connected, external real-time training policy is taken up and the agent is trained using that policy. If not, the information is sent to the inference module of the brain, where the Barracuda Engine runs an associated pretrained neural network model. The “RequestDecision” method (discussed) then uses these observations from sensors and the policy of the brain to let the agent make a particular decision
m_Brain.RequestDecision(m_Info, sensors);
The other methods, “GetAction” and ”ScaleAction,” are used by the agent to convert those decisions taken into actions. The “CollectDiscreteActionMasks()” method is used to mask certain discrete actions, which the agent will not perform. Lastly, the “OnActionReceived” method signifies the actions taken by the agent based on the decision policy. For continuous cases, a float array is returned and this should be clamped to increase stability in training, and for discrete cases, the action space consists of the branches (e.g., input up arrow key signifies agent moving forward and vice versa).
To summarize, the agent script relies on the brain and academy to choose its decision and accordingly takes its action and gets rewards. The initialization stage includes assigning the values of brain parameters, agent parameters and setting up the reward functions for the environment. The agent attains the input information from the sensor module of the brain and passes it to the brain for processing. The academy then confirms whether to use external brain or internal brain, depending on the connection established by the communicator module. Based on that, respective policies are applied to the agent to make its decisions. The decision aspect invokes the agent to take actions. The results of the actions can be either a credit of positive or negative reward for the agent. Depending on whether the goal is reached or the rewards are attained, this process of requesting sensor information and processing it with the policies and providing actions continues. At the end of each episode, the agent is reset and all the agent parameters are reset.
The last script that we will discuss is the “DecisionRequester” script.
DecisionRequester: This script automatically requests decisions for an agent. This is a script that is required to be attached to an agent in our scene. It controls the frequency at which the agent will request the decisions, in units of academy time-steps. For instance, a value of 5 implies that the agent will request the decision after 5 academy time-steps. It controls the choice about whether the agent will take actions between decisions in academy time-steps, such as the example mentioned in the “agent” script. It also initializes the agent class.
[Range(1, 20)]
[Tooltip("The frequency with which the agent requests a decision. A DecisionPeriod " +
"of 5 means that the Agent will request a decision every 5 Academy steps.")]
public int DecisionPeriod = 5;
[Tooltip("Indicates whether or not the agent will take an action during the Academy " +
"steps where it does not request a decision. Has no effect when DecisionPeriod " +
"is set to 1.")]
[FormerlySerializedAs("RepeatAction")]
public bool TakeActionsBetweenDecisions = true;
[NonSerialized]
Agent m_Agent;
The method “MakeRequests” uses the decisions from the academy to inform the agent about whether or not it should request a decision or take actions between decisions.
void MakeRequests(int academyStepCount)
{
if (academyStepCount % DecisionPeriod == 0)
{
m_Agent?.RequestDecision();
}
if (TakeActionsBetweenDecisions)
{
m_Agent?.RequestAction();
}
}
That completes the entire architecture of the brain, academy, and agent in depth. We now have a fair understanding about the different scripts in the brain/academy section and have also studied the interactions between them. The link between the different parts of the brain, academy, and agent can be illustrated as shown in Figure 4-15.
Figure 4-15
Brain academy architecture linked with agent
There are certain scripts that require knowledge of deep learning in this module and will be discussed later, especially the ModelOverrider script. In the next section, with this knowledge, we will build a small deep learning agent in Unity and train it with Unity ML Agents.
Training an ML Agent with a Single Brain
In this section, we will create a simple agent whose task is to find the target object present in the scene. Only this time we will be using our own agent script implementation to train it with Unity ML Agents. For this, we have to navigate to the Assets folder under the DeepLearning folder and navigate to FindingBlock-PPO folder. We have to open up the findingblock Unity scene file. In this scene, the blue agent has to locate the green target with the help of ML Agents and sensors. It is surrounded in a bounding box platform. A sample preview of the scene looks similar to Figure 4-16.
Figure 4-16
Finding block scene in Unity ML Agents
Attach Behavior Parameters Script
Behavior Parameters: Now in this case, since we have to use external brain for training our agent in ML Agents, the first objective is to attach all the necessary components to the blue agent. For this the most important part is to associate a brain for the agent, and in this case we will attach the “BehaviorParameters” script to the blue agent. Now as we have mentioned, this controls all the vector observations, stacked vectors, the action space, inference device, and child sensors. For our case, we will keep most of the details with the default values except the space size of the vector observation. This is because in our case, the agent can move along x and z axes. For each axis, the agent can move in the positive and negative direction—hence the possible space of observation is two along a single axis. For both x and z axes, the total vector observation space becomes 2*2, which is 4. We know internally there is a float array that is present in the vector observations section, numbered from 0 to 3.
Ray Perception Sensor Component 3D: We will attach this script, as it is associated with the Sensors module of the brain and is used for collecting observations in the scene. We will keep most of the default values as it is, such as angles, rays in each direction, ray length, and so forth, or we can change them accordingly. We have to define the detectable tags that the agent has to observe. In this case, the agent should only observe the target and the wall boundary of the platform; and those detectable tags are mentioned accordingly. Figure 4-17 shows this setup in Unity.
Figure 4-17
RayPerceptionSensorComponent3D script attached to agent
Decision Requester: This script is also attached to the agent, as it helps in the decision-making process, as discussed before. We will keep the default values here.
Model Overrider: We have to attach this script to override our training model in run-time or during Inference. We will study this script in the next chapter.
That was all the associated scripts we had to attach to associate a brain to the agent. Now we have to write our own script to handle the agent and also design a reward function for our RL problem.
Writing Agent Script
For this context, we will open the findingblockAgent script. Since in this script we will be using dependencies from the ML Agents framework, we have to include some libraries, particularly the Unity.MLAgents and Unity.MlAgents.Sensors:
using System.Collections;
using System.Collections.Generic;
using UnityEngine;
using Unity.MLAgents;
using System;
using System.Linq;
using Unity.MLAgents.Sensors;
using Random = UnityEngine.Random;
Now this script inherits from the Agent script that we discussed in the previous section, which implies that we can now modify all the different attributes of the Agent script (episodes, rewards, decisions, actions) according to our needs. We will initialize the GameObjects, such as agents and targets, in the scene and also associate Rigidbodies to them so that we can apply a Force on the agent along the direction of its motion. Along with these, we also have variables for controlling the texture color of the platform. This is because once the agent reaches the goal, we want the platform to be lit in green color.
float rewards = 0f;
public GameObject main_agent;
public GameObject area;
public GameObject main_target;
private int target_hit_count = 0;
private findblockArea my_area;
public Rigidbody agent_body;
public Rigidbody target_body;
public GameObject ground;
public bool vectorObs;
public Material green_material;
public Material default_material;
public Renderer ground_renderer;
Now there are certain override methods that we will use in our script. The first overridden method is Initialize. In this method, we will initialize the agent, target, and the platform
public override void Initialize()
{
agent_body = GetComponent<Rigidbody>();
my_area = area.GetComponent<findblockArea>();
target_body = GetComponent<Rigidbody>();
}
The next overridden method is “CollectObservations,” which takes as input the sensors from the “VectorSensor” class. Since, in our case, we will be using ray sensors module of the brain, the Boolean variable “vectorObs” results in true. The “sensor.AddObservation” method collects the sensor information in the form of a float vector.
Since, we also require a default heuristic policy for our brain, we override the Heuristic method. This is a straightforward heuristic implementation where we use the W, A, S, and D keys to control our agent. For this we use the “Input.GetKey” method from Unity, and fill in the “actionOut” float array(contains the action spaces).
public override void Heuristic(float[] actionsOut)
{
actionsOut[0] = 0;
if (Input.GetKey(KeyCode.D))
{
actionsOut[0] = 3;
}
else if (Input.GetKey(KeyCode.W))
{
actionsOut[0] = 1;
}
else if (Input.GetKey(KeyCode.A))
{
actionsOut[0] = 4;
}
else if (Input.GetKey(KeyCode.S))
{
actionsOut[0] = 2;
}
}
The next overridden method is MoveAgent script that controls the motion of the agent. Since we are using the discrete action space, the agent can take decisions based on branching. As mentioned, the agent can move along both directions in the x and z planes, and for each action the agent takes, a force is applied to it. This helps the agent to move along the direction, rotation proposed by the action vector.
The next overridden method is “OnActionReceived,” which is used to credit the agent with rewards based on whether the agent has reached the target in that episode of training or not. Correspondingly, we call the “MoveAgent” method here for each step of the episode. The “AddReward” method adds the rewards. We can also use “SetRewards” to replace the rewards received with a single reward that the agent will receive on reaching the target.
public override void OnActionReceived(float[] vectorAction)
{
moveAgent(vectorAction);
AddReward(-0.0001f);
Debug.Log("Choosing action");
rewards += -0.0001f;
Debug.Log(rewards);
}
The last overridden method is “OnEpisodeBegin,” and as the name suggests, this controls the events that are required at the start of a particular training episode. This calls the reset() method, which is used to set the position of the target and the blue agent to a random start position within the platform. If in any case the blue agent goes below the surface of the platform, the “EndEpisode” method is signaled. This instructs the ML Agents architecture to start the next episode of training.
public override void OnEpisodeBegin()
{
Debug.Log("Resetting");
reset();
if (main_agent.transform.position.y <= -2.0f
|| main_agent.transform.position.y >= 3.0f)
{
Debug.Log("Down");
reset();
EndEpisode();
}
}
Those are all the overridden methods that are required in any traditional sensor(ray sensor)-based ML Agents agent in Unity. There are associated functions such as “OnCollisionEnter,” which checks if the agent has reached the green target and uses the “SetReward” method to set the agent rewards or if it has collided with the wall in which case the SetReward method credits a negative reward to simulate punishment.
void OnCollisionEnter(Collision collision)
{
if (collision.gameObject.CompareTag("target"))
{
SetReward(5.0f);
target_hit_count++;
rewards += 5.0f;
Debug.Log(rewards);
StartCoroutine(Lightupground());
EndEpisode();
}
else if (collision.gameObject.CompareTag("wall"))
{
SetReward(-0.02f);
rewards += -0.02f;
Debug.Log(rewards);
Debug.Log("Failed");
EndEpisode();
}
}
The reset method resets the agent by choosing any angle in range (0-360 degrees) for its direction and a random transform location along the x and z axes. Similarly the green target is also initialized at a random transform position at the start of each episode.
public void reset()
{
var rotate_sample = Random.Range(0, 4);
var rotate_angle = 90f * rotate_sample;
main_agent.transform.Rotate(new Vector3(0f
, rotate_angle, 0f));
var loc_random_x = Random.Range(-30f, 34f);
var loc_random_z = Random.Range(-29f, 50f);
main_agent.transform.position =
new Vector3(loc_random_x, 2.5f, loc_random_z);
agent_body.velocity = Vector3.zero;
agent_body.angularVelocity = Vector3.zero;
target_reset();
}
The “Lightupground” Enumerator lights up the platform surface by changing the material of the ground renderer to green, which asserts that the agent has reached the green target.
private IEnumerator Lightupground()
{
ground_renderer.material = green_material;
Debug.Log("Success");
yield return new WaitForSeconds(0.1f);
ground_renderer.material = default_material;
}
That concludes the findingblockAgent script, which is required for our blue agent to reach the green target or to find it. We will attach this script to the blue agent, and now we have to train this agent in Tensorflow and Unity ML Agents. To summarize we just have to override certain methods of the “Agent” script to make our own RL environment and agent in it. This is the ease of creation of a simulated RL environment which leverages the deep learning algorithms of Unity ML agents and the OpenAI Gym wrapper.
Training Our Agent
By now, we are familiar with training agent using the default PPO algorithm implemented in Unity ML Agents. So we will open our Anaconda prompt and type the mlagents learn command. We will use the “trainer_config.yaml” file (like in the last chapter), and since we have not created any hyperparameters particular to this “FindingBlock-PPO” Unity scene, we will use the default hyperparameter set present in the “yaml” file.
mlagents-learn <path to trainer_config.yaml> --run-id= "newFindingblockagent" --train
On writing this command, we will see the Unity logo with the Tensorflow API version, Unity package version, and Python API version. When prompted, we have to click the Play button in the Unity Editor to start the training process, as shown in Figure 4-18.
Figure 4-18
Training “FindingBlockAgent” with Tensorflow (external brain)
We will also see the list of the default hyperparameters and the outcome of each training episode. Now we internally can connect that the academy exchanges information packets with the communicator (port: 5004) to allow the training process. We can also connect with how the external brain is now training with the default policy of the “BehaviorParameters” script attached to the agent, as shown in Figure 4-19.
Figure 4-19
Training episodes with PPO algorithm in ML Agents
During training, we can also move over to the Scene View to see how the ray sensors are detecting the tagged objects in the scene, as shown in Figure 4-20.
Figure 4-20
Ray sensors detecting tags during Tensorflow training
Visualize with TensorBoard
Now we will visualize this learning in TensorBoard. We have already explored how to do that in the previous chapter. We have to navigate to the “config” folder of ML Agents and then we have to type the command:
tensorboard –logdir=summaries
This lets TensorBoard know that the logs and details of the training phase will be recorded in the “summaries” folder. Connection is made on port 6006 and a corresponding “http” address is provided which contains the device name of our system. When we open Tensorboard we will see the environment cumulative rewards and the episode length, as shown in Figure 4-21.
Figure 4-21
Environment parameters with TensorBoard
We will also visualize the loss, policy entropy, policy extrinsic reward, and value estimate details that are an important metric for learning, as shown in Figure 4-22.
Figure 4-22
Policy parameters with TensorBoard
Running in Inference Mode
We have built and trained our agent in Unity ML Agents. Now we have to use this trained model in Inference Mode. We can attach this model to the NNModel part of the “BehaviorParameters” script and select the inference device where we want to run. Finally, we can build this Unity scene with the trained model placed in agent as the internal brain (for inference) and watch the simulation, as shown in Figure 4-23.
Figure 4-23
Finding block agent simulation using ML Agents
Generic Hyperparameters
Since we used the default hyperparameters for our training according to the “trainer_config.yaml” file, we can play around with those hyperparameters accordingly to have a better outcome. The default set of hyperparameters can be presented as :
default:
trainer: ppo
batch_size: 1024
beta: 5.0e-3
buffer_size: 10240
epsilon: 0.2
hidden_units: 128
lambd: 0.95
learning_rate: 3.0e-4
learning_rate_schedule: linear
max_steps: 5.0e5
memory_size: 128
normalize: false
num_epoch: 3
num_layers: 2
time_horizon: 64
sequence_length: 64
summary_freq: 100
use_recurrent: false
vis_encode_type: simple
reward_signals:
extrinsic:
strength: 1.0
gamma: 0.99
This signifies that PPO algorithm is used as the deep RL algorithm (we will study this in the next chapter). We can control the epochs, episodes, and other attributes. If we are facing performance issues related to the system memory, we can change the batch size attribute. Changing the hidden units, learning rate can also help in faster convergence to a global minima. If we set the “use_recurrent” attribute to true, then we will be using a recurrent neural network for holding information inside the agent’s memory. We can increase the memory size attribute and also check the corresponding performance. However, for best practices, it is regarded that a hidden layer depth of around 128 with a batch size of 512 can perform fairly well in most of the use-cases. However, based on complex environments, these can be changed as well. We can play around with these hyperparameters and visualize it on TensorBoard. The implications associated with changing these parameters will be discussed in more depth in the next chapter.
Summary
We are at the end of this chapter, which details the entire architecture of the ML Agents in depth. Certain key takeaways from this chapter include:
We learned about the fundamental architecture of the brain in ML Agents. We studied about the different types of sensors for collecting information as well as the policies required to train those observations. We then learned about the inference module of the brain, which uses the Barracuda Engine. The demonstrations module, which is important for imitation learning was understood. Lastly we visited the communicators, which are also a part of the academy framework controlling the real-time Python API training process.
The next part revolved around understanding the academy architecture, where we saw how environment parameters are controlled by the academy. Based on the communicators’ response, the academy chooses the type of brain (inference, external, heuristic) for the agent.
We explored the Agent script, which we have also used for training our own “FindingBlock” agent. We understood how the agent links itself with the brain and the academy and takes actions based on the decisions provided by them. We observed the distinction between the discrete and continuous action spaces.
The Decision Requester script was explored, which controlled the agents’ decision-making process. We also went in depth on the Behavior Parameters script, which is a fundamental part of the brain.
In the next phase we create a simulation based on the PPO algorithm where an agent has to find a target in a constrained environment. We used RayPerceptionsensorComponent3D, behavior parameters, decision requester, and model overrider scripts to set up the brain-academy architecture for our agent. We then wrote the overridable method of the Agent script to create our own reward functions, observations, and action spaces.
We trained our agent using the mlagents-learn command, which we explored in the last chapter, and visualized the ray sensors, rewards, actions in real-time external training through Python API.
Visualization was done in Tensorboard regarding the policy rewards, cumulative rewards, and loss and then we used the trained brain for inference and built a Unity executable file containing the agent with the trained internal brain.
Lastly we briefly studied the default hyperparameters present in the “trainer_config.yaml” file. We will be discussing how changing a hyperparameter can affect the learning process in the next chapters.
With that we come to the end of this chapter. In the next chapter, we will learn about the different deep RL algorithms made in Unity ML agents as well as create our own deep learning models using the Gym Wrapper. We will look into the Python side of the ML Agents and also create vision-based neural networks for our agents.