


IBM Process Portal
IBM Process Portal 8.5.71 is implemented entirely from coaches and coach views, which illustrates how you can build sophisticated UIs using the Coach Framework. It provides the primary UI that business users can use to perform their work when using process solutions developed using IBM Business Process Manager (BPM).
This chapter outlines Process Portal features from the business user perspective and shows how process authors can extend Process Portal to provide custom UIs that enable business users to complete their work. It also describes ways in which the user experience can be modified and explains how to use Process Portal with IBM Process Federation Server to enable IT administrators to manage the BPM infrastructure without significantly impacting the business user experience.
This chapter includes the following topics:
5.1 Process Portal features
Two primary types of business users use Process Portal to perform their work:
•Knowledge workers
•Team leaders
Knowledge workers use Process Portal to do the following activities:
•Discover tasks they need to perform.
•Execute tasks.
•Access relevant information used to perform their work.
•Collaborate with other colleagues.
Team leaders use Process Portal to:
•Monitor and manage the work that is being performed by their team members.
•Report on and analyze the performance of business operations.
•Perform their own tasks.
This section describes the standard features of Process Portal that are available to knowledge workers and team leaders to perform their work. Customizations and extensions to the standard features are covered in subsequent sections.
5.1.1 Mobile enablement
With IBM BPM 8.5.7, you can access Process Portal from either your desktop or a mobile device, as illustrated in Figure 5-1. Mobile access enables field workers to participate in processes at the time of need rather than having to wait until they return to the office to complete work. Avoiding such delays can help to improve the overall performance of business operations.

Figure 5-1 Process Portal accessed from a desktop, tablet, or smartphone
The Process Portal UI is responsive. So the layout and behavior adapts, depending on the available screen size (or form factor) of the chosen device. Process Portal is accessed via a web browser using the following basic URL format:
https://<host>:<port>/ResponsivePortal
where <host> and <port> are specific to your IBM BPM deployment.
5.1.2 Process Portal layout
The Process Portal UI is divided into the following areas, as shown in Figure 5-2 on page 264:
•The main menu on the left side is used to manage the user profile and launch dashboards and processes.
•The context menu on the right side provides access to social features and the process instance stream.
•The central area displays content, including dashboards and task completion coaches.

Figure 5-2 Process Portal layout
On a smartphone, both the main menu and context menu are minimized by default. Click the hamburger icon on the top left to view the main menu. Similarly, click the vertical ellipses icon on the top right to view the context menu. On a tablet only the context menu is minimized by default. The context menu is sticky. When minimized, it remains minimized the next time you log on.
To open the Content Menu, click the horizontal ellipses icon or anywhere in the Content Header. The Content Menu provides an option to open the current content in a new window, which enables you to perform multiple activities simultaneously.
5.1.3 Discovering tasks with the Work dashboard
After you log in to Process Portal, you are presented with tasks within the Work dashboard, as illustrated in Figure 5-3. You see only the tasks that you are authorized to access.

Figure 5-3 Work dashboard displays tasks using the List View
By default tasks display as a list, but you can change this view to a tabular layout by selecting the Table View option, as illustrated in Figure 5-4.
Each task within the List View includes basic information about the task, but you can view business data and actions that can be performed on the task by selecting the task icon. Within the Table View, you can select which columns to display. To order tasks, click the column headers.

Figure 5-4 The Work Dashboard displaying tasks using the Table View
5.1.4 Locating tasks using filters and saved searches
You can quickly filter tasks in either view by entering search text at the top of the Work dashboard. The resulting task list includes only those tasks where the search text matches one or more process or business attributes that are associated with the task.
If you want a more precise search, you can define a Saved Search. Figure 5-5 on page 266 illustrates a Saved Search definition. You can either create a Saved Search from scratch or base one on an existing Saved Search as a starting point.

Figure 5-5 Saved Search definition
Within a Saved Search definition, you can specify a number of filter criteria, where each filter matches a specific process or business attribute, such as Name contains Approvals, where the Name of the task contains the word Approvals. The resulting task list includes only those tasks that match all the filter criteria.
In the illustrated example, the three filters are combined using a logical AND operator. However, within a specific filter, you can specify a search that matches any of the specified search text, separated by an OR operator. For example, Location Search Chicago OR Atlanta matches tasks where the Location business field is either Chicago or Atlanta.
When defining a Saved Search, the resulting task list displays at the bottom of the Saved Search dashboard. So you can test the Saved Search as it is being defined.
As the names suggests, you can give a Saved Search a name and save it for later use. However, you can also define a Saved Search to locate tasks without saving it. Individuals can create Saved Search for their personal use. Then, those Saved Searches display within the list of dashboards in the main menu. You can also share a Saved Search with a team or everyone within the organization.
When selecting a Saved Search, the resulting task list is displayed and managed in exactly the same way as the Work dashboard. That is, you can filter and view tasks in either List View or Table View, and you can add, remove, and order columns. In fact, the Work dashboard is actually implemented as a Saved Search.
5.1.5 Executing tasks
After you locate a task that you want to work on, you can launch the task by selecting it. Click the task so that the task can be claimed, and the task completion coach displays within the Process Portal window. When that happens, both the main menu and context menu are minimized to provide the maximum screen area for you to complete your work. The hamburger and vertical eclipse menu icons are visible on the task header so that you can access the main menu and context menu if needed while you complete you task.
When the task is complete or postponed, the Work dashboard displays to prompt you to select another task.
5.1.6 Working with processes and cases
BPM 8.5.7 no longer includes a distinction between processes and cases. Within Process Portal, these elements are collectively referred to as processes. Conceptually, cases are processes that are more unstructured and rely on the knowledge worker to determine the order to perform the activities and to determine when the case is complete. Process Portal enables business users to work with structured processes, unstructured cases, and hybrid processes that fall somewhere in between (that is, structured processes with ad-hoc activities and ad-hoc activities that call structured sub-processes).
The processes that you are authorized to start are listed in the launch list at the bottom of the main menu. When you select a process, a new process instance starts. A Launch UI Coach displays if you need to provide business data to define the context of the process. This concept is particularly important for cases that do not include a structured flow and only comprise a set of ad-hoc activities.
You use the process dashboard, illustrated in Figure 5-6, to view active or completed process instances. You can locate specific instances by specifying a search filter that matches on the process instance name. The icon to the left of each process instance name indicates whether it is on track, at risk or overdue. The star icon to the right of the instance name is used to follow the process. (See 5.1.9, “Social features” on page 269 for more details about social features.)

Figure 5-6 Process dashboard listing all active process instances
You can view the details of a specific process instance by selecting the process instance name from the process instance list.
Figure 5-7 on page 268 illustrates the Process Instance UI within the Process dashboard. The window is divided into the following main panes:
•The data section displays business data that is associated with the instance.
•The documents section lists any documents associated with the instance.
•The tasks section lists any active tasks that the user is authorized to claim.
•Streams provide a history of activities and collaborations.
•The activities section displays ad-hoc activities that the user is authorized to access.

Figure 5-7 Process dashboard showing process instance details
Table 5-1 describes the various ad-hoc activity states.
Table 5-1 Ad-hoc activity states
|
Icon
|
State
|
Description
|
Configuration
|
|
|
Ready
|
Activity to be triggered manually by the user.
Goes to Working state when triggered.
|
Manual,
Required
|
|
|
Ready-Optional
|
Activity to be triggered manually by the user, but does not have to be triggered to complete the process. Goes to Working state when triggered.
|
Manual,
Optional
|
|
|
Working
|
Activity has been triggered but is not yet completed. Goes to Completed state once complete.
|
Manual/Automatic
Required/Optional
|
|
|
Completed
|
Activity completed successfully.
|
Manual/Automatic
Required/Optional
|
|
|
Waiting
|
Activity waiting for a precondition to be satisfied.
After the precondition is met, it goes either to the Ready state for manual activities or the Working state for automatic activities.
|
Manual/Automatic
Required
|
|
|
Waiting-Optional
|
Activity is waiting for a precondition to be satisfied but does not have to be triggered to complete the process. After the precondition is satisfied, it goes either to the Ready state for manual activities or the Working state for automatic activities.
|
Manual/Automatic
Optional
|
|
|
Failed
|
Activity did not complete successfully. If restarted, activities resume their original state.
|
Manual/Automatic
Required/Optional
|
From the Process Instance UI, you can view a projected path analysis data by clicking the Gantt Chart icon on the right side of the header section, which is beyond the scope of this book. However, this process is discussed in the Process Performance video, and a link to that video is provided in the next section.
5.1.7 Performance dashboards
IBM BPM 8.5.0 introduced Process Performance and team performance dashboards. The performance dashboards are available to all users and are now accessed from the main menu in IBM Process Portal 8.5.7, along with all the other dashboards.
The performance dashboards enable team leaders to monitor the performance of business operations and take appropriate actions. The functionality provided by these dashboards goes beyond the scope of this book. However, you can find more information in the following videos:
5.1.8 Custom dashboards
Process authors create custom dashboards to extend Process Portal to provide business users with access to information and facilities that help them perform their work. Custom dashboards can be used for a variety of reasons, including:
•Retrieve and update business data from an external system of record.
•Report on process metrics such as SLAs and KPIs.
•Report on business data.
•Add new portal capabilities, such as Out of Office.
•Replace product dashboards, such as the Work dashboard with a Get Next Task dashboard.
Custom dashboards are exposed to specific teams and are accessed from the main menu in IBM Process Portal 8.5.7, along with all the other dashboards. For more information about how to process authors can build custom dashboards, refer to 5.2.4, “Extend Process Portal with custom dashboards” on page 277.
5.1.9 Social features
Process Portal includes a number of social capabilities that allow business users to collaborate when performing their work. These capabilities are available using the context menu.
Follow
To follow a process instance, click the star (favorites) icon positioned immediately after the name of a process instance in various places where they are referenced within the standard Process Portal dashboards, as illustrated in Figure 5-8. The instances that you are following appear at the top of the context menu.

Figure 5-8 Following and Mentions on the context menu
Stream
The Stream provides a history of the activities and communications that are associated with a specific process instance. You can view the Stream either from the Process dashboard (see (Figure 5-8) or from within the context menu when working on a task (see Figure 5-9).

Figure 5-9 The Stream shown on the context menu when performing a task
Mentions
Business users can collaborate by messaging each other using Mentions. Figure 5-8 shows how to post a message using the message box at the top of the Stream. A message can contain one or more at signs (@) to refer to colleagues. After the message is posted, everyone referenced within the message receives a notification that indicates that they have been mentioned. The number in the red circle next to the context menu icon indicates the number of mentions that are pending. Any pending messages are listed in the context menu, as illustrated in Figure 5-8. When read, the message disappears from the context menu, but there is a record of the conversation in the Stream so that the person referenced can refer back to it as required.
Experts
Business users can collaborate with Experts when performing tasks. Experts display in the context menu, as shown in Figure 5-10. Experts are identified in the following ways:
•Experienced Users are individuals who have worked on similar tasks in the past. These user are automatically identified by the system.
•Subject Matter Experts are individuals from teams who are explicitly assigned to activities at design time by the process author.
Expert team membership can be managed at run time using the BPM Admin console.

Figure 5-10 Collaborating with Experts when performing a task
Details
The last tab on the context menu, shown in Figure 5-11, provides general process instance details that can be useful when performing the task.

Figure 5-11 Viewing general process details when performing a task
5.2 Modifying the Process Portal user experience
The IBM BPM product team has received many requests for enhancements to make modifications and add new features to Process Portal. IBM has delivered many of these enhancements, but each user has specific requirements. So Process Portal 8.5.7 provides several options to modify the user experience:
•Personalization
•Configuration
•Styling
•Custom Dashboards
•Customization
Personalization is done by the business users themselves and impacts only each user’s personal user experience. General configuration options and portal styling are controlled by the Process Administrator and impacts everybody’s user experience. Custom Dashboards are defined by process authors and can be exposed to specific teams to provide custom UIs to enable business users to complete work. Finally, if all else fails, you can make customizations to Process Portal or even build a custom portal.
The sections that follow explains each of these methods.
5.2.1 Personalize the user experience
You can personalize Process Portal by making changes to the layout, updating personal preferences within the user profile, or defining you own Saved Searches.
Sticky modifications
We included previously an example of layout personalization by showing or minimizing the context menu. This option is sticky; so it remains open or closed when the user next logs on. Other layout changes that are sticky include:
•Task list
The task list includes a number of sticky personalization settings:
– Display tasks in either List View or Table View
– Add or remove columns to the Table View
– Specify the order that tasks are displayed
•Favorite dashboards
You can also configure dashboards as favorites by clicking the star icon within the dashboard menu, as shown in Figure 5-12. Your favorite dashboards are always visible, whereas other dashboards are shown only by clicking show more… or when searching for a dashboard.

Figure 5-12 Dashboard favorites
•Replacing the Work dashboard
The default dashboard displays each time you log in. Initially the Work dashboard is the default, but you can effectively replace the Work dashboard with an alternative by making another dashboard the default instead. For example, knowledge workers might choose to display their favorite Saved Search by default, whereas team leaders might choose to display the Team Performance dashboard by default. You can move favorite dashboards by dragging them to the required location using the shaded area to the right of the dashboard’s name. Moving a favorite to the top of the list makes it the default dashboard.
|
Note: To hide the Work dashboard use the com.ibm.bpm.portal.hideWorkDashboard configuration option using the Mashups Config Service, as detailed in 5.2.2, “Configure Process Portal” on page 274.
|
User profile
Within your profile, you can configure your personal Portal Preferences, as shown in Figure 5-13. In the profile, you can set language and locale settings, indicate whether tasks are opened in a new window, and specify various notification options.
|
Note: The language and locale settings defined in the user profile affects the content in both Process Portal and the task completion UI (where localizations are defined within the coaches).
|

Figure 5-13 Setting personal preferences in the profile
5.2.2 Configure Process Portal
You can configure Process Portal by adding or changing options in either:
•The Mashups Config Service
|
Important: Changes that you make via these configuration methods are not affected by interim fixes or new IBM BPM releases.
|
Configuration options in Mashups Config Service
The Mashups Config Service provides the following configuration options for Process Portal:
•Role-based task actions: Modify Task, Reassign, Due Date, Task Priority
•Refresh behavior
•Social Features: Following, Mentions, Experts, and Stream
•Hide Work dashboard
•Default start page (dashboard)
•Order of the dashboards
•Task-list format
•Browser behavior for opening tasks
•Time-tracking data for experts
•Support for resumable services
•HTML frame support
•Performance issues with snapshots in the Launch and Dashboards
|
Note: These configuration options define the default Process Portal behavior when the you first logs in. User personalization options take precedent. So some of these options can be overridden, such as Order of dashboards.
|
For more information about these configuration options, see IBM Knowledge Center:
To demonstrate Process Portal configuration, the example shown in Figure 5-14 on page 276 switches off Process Portal social features. In this example, go to the WebSphere Application Server Console, add the com.ibm.bpm.portal.disableSocial property, and set the value to following, mentions, experts, stream.
|
Note: Setting the com.ibm.bpm.portal.disableSocial property value to following, mentions, experts, stream is the same as setting it to all.
|

Figure 5-14 Switching off Process Portal social features using Mashups Config Service
After the BPM server restarts, the social features Following and Mentions no longer displays, as shown in Figure 5-15.

Figure 5-15 Process Portal with the social features disabled
Configuration options in 100Custom.xml
The 100Custom.xml configuration file provides the following configuration options for Process Portal:
•Configuring Process Portal notification and refresh behavior
•Configuring the default duration for projected path discovery in Process Portal
•Disabling the display of time tracking information in Process Portal
•Configuring the default snapshot for Process Portal running on a Process Center server
•Opening services in Heritage Process Portal in a new browser window
•Configuring the My Team Performance dashboard for Heritage Process Portal (deprecated)
For more information about these configuration options, refer to IBM Knowledge Center:
5.2.3 Style Process Portal
Styling Process Portal is as simple as styling coaches, as detailed in Chapter 2, “Creating user interfaces with coaches” on page 9, because the Process Portal UI is completely constructed using coaches, except for the login window.
Process Portal process app uses the BPM Theme (from the System Data toolkit) by default. Process authors can either update the Process Portal process app to use a different theme, or BPM Administrators can dynamically update the theme at run time, as detailed in Chapter 2, “Creating user interfaces with coaches” on page 9.
5.2.4 Extend Process Portal with custom dashboards
You can use custom dashboards for a variety of reasons, as outlined in 5.1.8, “Custom dashboards” on page 269. This section provides an example Custom Report Dashboard to demonstrate how to create a custom dashboard.
An example Custom Report Dashboard
This example Custom Report Dashboard is a human service that is exposed as a dashboard, as illustrated in Figure 5-16. If related to a process, the dashboard typically is defined in the same process app as the process itself, whereas a general purpose dashboard can reside in a separate process app. A dashboard can be exposed either to all users or to a specific team. After the process app is deployed, the dashboard displays in the main menu of Process Portal for all members of the specified team.

Figure 5-16 Example Custom Report Dashboard (Overview tab)
Figure 5-17 shows the human service flow for the Custom Report Dashboard. Get Chart Data in this example is a General System Service that retrieves the data for the dashboard.

Figure 5-17 Example Custom Report Dashboard (Diagram tab)
In reality, Get Chart Data is typically an Integration Service that retrieves data from a system of record or the BPM Performance Data Warehouse. Within this example, Get Chart Data constructs the chart data using Server Scripts, as illustrated in Figure 5-18.

Figure 5-18 Example Get Chart Data (General System Service)
Example 5-1 shows the JavaScript that is used to provide the Bar Chart Data within this example. This example illustrates the format of the data that is required to populate a bar chart using the stock Chart control.
Example 5-1 Bar Chart Data
tw.local.barChartData = {
plots: [
{
series: [
{
label: "Buy",
data: [
{ name: "Apple", value: 4 },
{ name: "Cherry", value: 3 },
{ name: "Lemon", value: 1 }
]
},
{
label: "Sell",
data: [
{ name: "Apple", value: 5 },
{ name: "Cherry", value: 2 },
{ name: "Lemon", value: 4 }
]
}
]
},
{
series: [
{
label: "Popularity",
data: [
{ name: "Apple", value: 2 },
{ name: "Cherry", value: 4 },
{ name: "Lemon", value: 5 }
]
}
]
}
]
};
The chart control is defined within the system dashboards toolkit, and you can use it to display the following chart types:
•Pie chart
•Bar chart (horizontal bar plot)
•Column chart (vertical bar plot)
•Line chart
•Area line chart
•Combo chart
The chart data is stored in private variables within the Custom Report Dashboard, as shown in the Variables Tab in Figure 5-19. The ChartData business object is a business object type that is also defined in the Dashboards toolkit.

Figure 5-19 Custom Report Dashboard (Variables tab)
Figure 5-20 shows the coach that is used to display the dashboard. This example illustrates the six different chart types that are supported by the Chart control. The Properties tab shows how the Chart control is configured. Display options are used to define which type of chart to display for each set of plot data. The Chart control and its configuration options are detailed further in IBM Knowledge Center:

Figure 5-20 Custom Report Dashboard (Coaches tab)
Figure 5-21 shows the example Custom Report Dashboard when launched from Process Portal.

Figure 5-21 Custom Report Dashboard (Coaches tab)
The system Dashboards toolkit
The system Dashboards toolkit was originally created to provide the coach view implementation for the Heritage Process Portal. The majority of the controls are specific to the Heritage Process Portal implementation, but it also includes a number of generic controls that are useful for building dashboards and task completion UI.
The Dashboards include the following generic controls:
•Chart
•Chart with Time Selector
•Data
•Data Section
•Dialog
•Floating Layout Control
•Icon Button Control
•Refresh Button
•Refresh Controller
•Split Panes Section
•Two Column Section
Other coach views within the Dashboards toolkit, such as Task List, can be useful when building a custom portal, but these are superseded by the coach views in the Responsive Portal Components toolkit.
To learn more about dashboard controls, refer to IBM Knowledge Center:
5.2.5 Define a Process Instance Launch UI
When launching a new process instance from Process Portal, it is a common requirement to present the user who started the instance with a form, so that the user can enter details providing the initial context for the process.
For structured Business Process Modeling Notation (BPMN) processes, you can define the process instance launch using a number of methods:
•Automatically assign the first task to the user by routing the task using Assign to: “Lane” with User Distribution: “Last User”.
•Create a custom dashboard that triggers a new process instance using an undercover agent (UCA) or JavaScript API.
•Create a custom Process Instance Launch UI.
The last option was introduced in IBM BPM 8.5.5 when the Basic Case capability was first introduced. At that time this option was the only option that worked for Basic Case. When the case capability was merged with structured processes in IBM BPM 8.5.7, this option became the preferred mechanism to accommodate this requirement for both process and cases.
Figure 5-22 on page 282 shows how to create a custom Process Instance Launch UI for a Process. This panel is available in the View tab for a Process definition. Click New to create a new client-side human service, or click Select to select an existing client-side human service.

Figure 5-22 Create a Process Instance Launch UI for a process
|
Note: You cannot create a Process Instance Launch UI for Business Process Definition (BPD) in the Eclipse-based Process Designer. You can only create a Process Instance Launch UI for the new Process type that was introduced in IBM BPM 8.5.7 or a Basic Case type that was introduced in BPM 8.5.5 using the web-based Process Designer.
|
After entering the name of a new client-side human service, the client-side human service and coach is automatically generated, as illustrated in Figure 5-23 on page 283. The business objects within the process are used to construct the coach automatically. This method provides you with a starting point to customize as required. For example, if you decide to remove some of the business fields that do not need to be populated at the start of the process or layout the coach using the grid, it’s entirely up to you.
|
Note: As the process is developed further, you can modify the business object definitions. You might need to revisit the Process Instance Launch UI (client-side human service and coach) to keep it aligned with the process by clicking Update in Figure 5-22.
|

Figure 5-23 Auto-Generated client-side human service and coach for the Process Instance Launch UI
|
Note: The process should be exposed to a particular team for it to show up within the Process Portal launch list. The client-side human service is actually a Task service that executes in the background.
|
Now that the process has a Process Instance Launch UI, each time a new process instance is launched from Process Portal the Launch UI coach is displayed, as illustrated in Figure 5-24 on page 284.
The process instance actually starts immediately when launched from Process Portal. The Launch UI client-side human service is executed as a task and displays as a completed task within the process instance stream.
The generated Launch UI coach includes an OK button and a Cancel button by default, but you can rename these buttons if you choose. When you complete the coach, press Cancel to set the cancelLaunch variable within the client-side human service to true, and the process instance is terminated. Otherwise, the process instances continues to execute as expected.

Figure 5-24 The Process Instance Launch UI displayed at run time from Process Portal
5.2.6 Define a custom Process Instance Details UI
All processes use the standard Process Instance Details UI by default, as illustrated in Figure 5-7 on page 268. Figure 5-25 shows the default Views configuration for a process.

Figure 5-25 The default configuration for the Details UI within the process Views tab
A custom Process Instance Details UI is typically required when the process author wants to present additional information in the context of a specific process or to define an alternative layout. The process author can define a custom Process Instance Details UI for all users by highlighting the Default Details UI option and then clicking New to create a new client-side human service or Select to select an existing client-side human service.
Similarly, the process author can define a custom Process Instance Details UI specifically for the Instance Owners team by creating a client-side human service using the Instance Owners Details UI option.
Figure 5-26 shows the process Views configuration after a new custom Process Instance Details UI is created for all users.

Figure 5-26 Custom Process Instance Details UI defined for All Users
When creating a new Process Instance Details UI, a new client-side human service is automatically generated, as illustrated in Figure 5-27. This approach provides a default implementation that is identical to the standard Process Instance Details UI, which can then be customized as required.

Figure 5-27 Auto-generated client-side human service baseline for the custom Process Instance Launch UI
The View Instance Details coach provides the main the UI for the custom Process Instance Details UI, as illustrated in Figure 5-28.

Figure 5-28 The View Instance Details coach for the custom Process Instance Details UI
5.2.7 Clone Process Portal
Process Portal, available until IBM BPM 7.5, was written in Java and was not intended to be customized. Nevertheless, many customers were determined to make modifications and needed to reverse engineer and update the code directly, which was extremely difficult and invalidated their product support.
In recognition of the desire for customers to make customizations, the new Process Portal in IBM BPM 8.0 was redeveloped using coaches to make it easier for customers to customize. However, the 20% of the implementation that was not coach-based ironically included the things that customer’s typically wanted to customize. For this reason, in IBM Process Portal 8.5.7, Process Portal is implemented entirely from coaches except for the login page and heritage dashboards.
To avoid incurring in any support issues, IBM advise customers not to modify Process Portal directly. Instead it is better to create your own custom portal that can be based on a copy of the reference implementation that IBM provides ready to use. That way the original IBM Process Portal 8.5.7 always remains intact and any support issues experienced with the custom portal can easily be reproduced on the IBM implementation.
|
Important: The Custom Process Portal is considered to be custom code and is not supported directly.
|
This section details how to clone IBM Process Portal 8.5.7. After you create a clone, you can make customizations, as described in 5.2.8, “Customize Process Portal” on page 299. However, strongly consider using configuration options and custom dashboards before making any customizations.
|
Note: Because the Custom Process Portal is a clone of a specific snapshot of the IBM implementation, it will not benefit from any interim fixes or upgrades to Process Portal, unless you decide to take another clone and reapply your customizations.
|
IBM Process Portal 8.5.7 includes the following elements:
•The Responsive Portal Components toolkit
•The Process Portal process app
•The Responsive Portal enterprise archive (EAR) file
You can close each of these elements, as described in the following sections.
|
Tip: Avoid manually cloning these components for IBM BPM 8.5.7 and get started quickly by downloading the baseline Custom Process Portal that is already prepared. See Appendix A, “Additional material” on page 395 for instructions about how to download the SG24-8355-ch5.zip file.
|
Create a Custom Process Portal Toolkit
Use the BPM Process Center console to create a clone of the Responsive Portal Components toolkit, as illustrated in Figure 5-29. The clone is named Process Portal Copy and has the acronym SYSRPC2 by default. You can rename the clone and the acronym. For the examples in this book, the clone is named Custom Process Portal Toolkit, but the acronym is left unchanged.

Figure 5-29 Cloning the Responsive Portal Components toolkit
|
Tip: Change the tag of each the coach view in the Custom Process Portal Toolkit to Custom Portal. Use Eclipse-based Process Designer to change these tags in bulk, as illustrated in Figure 5-30. Changing the tags is useful later to distinguish between coach views in the custom toolkit and the original toolkit. After updating the Custom Process Portal Toolkit, don’t forget to take a new snapshot.
|

Figure 5-30 Update coach view tags in Custom Process Portal Toolkit
Now you need to update the toolkit references in the Custom Process Portal Toolkit, so that there are no dependencies on the original toolkit:
1. Open the Action Bar coach view in Process Designer, as illustrated in Figure 5-31 on page 289.
2. Update the JavaScript for the load event handler to reference the Custom Process Portal Toolkit acronym, as shown in Example 5-2.
Example 5-2 Example to change toolkitAcronym
window.dojoConfig.App.bpmPortalComponents = {
toolkitAcronym: "SYSRPC2"
};
The toolkitAcronym is changed from “SYSRPC” to “SYSRPC2” so that it references the correct toolkit.
3. Repeat these steps for all remaining coach views within the Custom Process Portal Toolkit.

Figure 5-31 Update toolkit references in custom coach views
Create a Custom Process Portal process app
To create a Custom Process Portal process app:
1. Clone the Process Portal process app.
2. Add the Custom Process Portal Toolkit as a toolkit dependency.
3. Update toolkit references in Portal coach view load event handler.
4. Update the dynamic styles in the Portal and Work coach views.
5. Update data types to reference those defined in the custom toolkit.
6. Update the coach views to reference those defined in the custom toolkit.
7. Remove the Responsive Process Portal toolkit dependency.
8. Take a snapshot of the Custom Process Portal app.
These steps are detailed further in the following sections.
Clone the Process Portal process app
Use the BPM Process Center console to create a clone of the Process Portal process app, as illustrated in Figure 5-32 on page 290. The clone is named Process Portal Copy and has the acronym SYSRP2 by default. You can choose to rename the process app. For the remainder of this book, the example for the cloned process app use the name Custom Process Portal App, but the acronym is left unchanged.

Figure 5-32 Cloning the Process Portal process app
Add the Custom Process Portal Toolkit as a toolkit dependency
Open the Custom Process Portal App in Process Designer. Then, add the Custom Process Portal Toolkit as a toolkit dependency, as illustrated in Figure 5-33 on page 291. Leave the Responsive Portal Components toolkit as a dependency, because the Custom Process Portal App still uses the coach views referenced in the Responsive Portal Components toolkit at this point.

Figure 5-33 Adding the Custom Process Portal Toolkit as a toolkit dependency
Update toolkit references in Portal coach view load event handler
Open the Portal coach view. Then, update the JavaScript within the load event handler to reference the new custom process app and toolkit by updating the acronyms to SYSRP2 and SYSRPC2, respectively, as illustrated in Figure 5-34.

Figure 5-34 Updating Portal coach view load script to reference the custom process app and toolkit
|
Tip: Change the tag of each the coach view in the Custom Process Portal App to Custom Portal. Use Eclipse-based Process Designer to change these tags in bulk. Changing the name tags is useful later so that you can distinguish between coach views in the custom app and the original app and avoid making customizations to the original process app by mistake.
|
Update dynamic styles in Portal and Work coach views
Open the Portal coach view in Process Designer, select the Behavior tab, and update the Dynamic Styles by replacing the following line:
portal-components.less (portal-components.min.zip (SYSRPC))
with this line:
portal-components.less (portal-components.min.zip (SYSRPC2))
Be careful to retain the original order of the less files, as shown in Figure 5-35.
Repeat this process for the Work coach view.

Figure 5-35 Updating Portal coach view to reference the portal-components.less file
Update data types to reference those defined in the custom toolkit
Open the Portal coach view in Process Designer. Then, select the Variables tab, as illustrated in Figure 5-36 on page 293. Update the data types for the following variables to reference the business objects that are defined in the custom toolkit:
•currentTask (Task)
•currentDashboard (Dashboard)
•currentViewMode (PortalViewMode)
Similarly, open the RESPONSIVE_PORTAL client side human service in Process Designer. Then, select the Variables tab, and update the data types for the following variables to reference the business objects defined in the custom toolkit:
•currentTask (Task)
•currentDashboard (Dashboard)
•currentViewMode (PortalViewMode)

Figure 5-36 Updating the Portal coach view to reference data types in the custom toolkit
Update the coach views to reference views defined in the custom toolkit
To update coach views to references views in the custom toolkit:
1. Open the Portal coach view in Process Designer.
2. Go to the Layout tab, as illustrated in Figure 5-37 on page 294 and update the coach views to reference the following views defined in the custom toolkit:
– Side Pane (main menu)
• User Profile
• Launcher
– Main Pane
• Action Bar
• Coach Viewer
– Side Pane (context menu)
• Dashboard Context
• Task Details
• Task Experts
• Task Stream
• Task Context
– Notifications
|
Note: The Side Pane and Main Pane coach views contain other coach views. For example, the Main Pane contains Action Bar and Coach Viewer. Notice that the Side Pane is used twice, once for the main menu and then again for the context menu.
|
|
Tip: To select Side Pane and Main Pane, click the vertical edge on the left or right side. To select Task Details, Task Experts, Task Stream, and Task Context, click each of the tab headings.
|

Figure 5-37 Updating the Portal coach view to reference coach views in the custom toolkit
3. Open the Work coach view in Process Designer, go to the Layout tab, and update the following coach views to reference the views defined in the custom toolkit:
– Task Filter
– Last List
– Coach Viewer Modal
– Modify Task Modal
– Modify Instance Modal
– Notifications
Remove the Responsive Process Portal toolkit dependency
After you update all the toolkit references, as detailed in the previous section, you can remove the Responsive Portal Components toolkit as a toolkit dependency for the Custom Process Portal app.
|
Tip: If you have validation errors within the Custom Process Portal App after removing the Responsive Portal Components toolkit dependency, you have missed some of the references.
|
Take a snapshot of the Custom Process Portal App
Take a snapshot of the Custom Process Portal App, so that you have a base-line implementation that you can use to create one or more custom portals.
|
Note: Creating a second custom portal app is much easier, because it can share the same Custom Process Portal Toolkit. You do not need to update the toolkit dependencies if you create the second custom portal app by cloning the Custom Process Portal App baseline snapshot.
|
Create a Custom Process Portal EAR file
To create your own Custom Process Portal EAR file you need to perform the following steps:
1. Clone and unpack the Process Portal EAR file.
2. Update the web.xml file.
3. Update the application.xml file.
4. Update ibm-application-bnd.xmi file.
5. Package and rename the Custom Process Portal EAR file.
6. Install the Custom Process Portal EAR file.
7. Start the Custom Process Portal EAR file.
These steps are detailed further in the following sections.
Clone and unpack the Process Portal EAR file
Use the WebSphere Application Server Admin console to export the IBM_BPM_ResponsivePortal_SingleCluster EAR file, as illustrated in Figure 5-38.

Figure 5-38 Exporting IBM Process Portal EAR file
You can use either the local file system or your favorite Java developer tools to unpack and make the following changes to the EAR file.
|
Tip: The EAR file and embedded web archive (WAR) files are compressed (.zip) files. So if these files are updated on the local file system, you can modify them by extracting the content, making the updates, and compressing them again.
|
Update the web.xml file
Update the following file as shown in Example 5-3:
IBM_BPM_ResponsivePortal_SingleCluster.ear
esponsivePortal.warWEB-INFweb.xml
Example 5-3 The web.xml file extract
<init-param>
<param-name>appName</param-name>
<param-value>SYSRP2</param-value>
</init-param>
<init-param>
<param-name>serviceName</param-name>
<param-value>RESPONSIVE_PORTAL</param-value>
</init-param>
The appName should match the acronym for your Custom Process Portal App (SYSRP2).
The serviceName should match the human service within your Custom Process Portal App that defines the custom portal user interface. For now, you can leave the name as RESPONSIVE_PORTAL so that you can reuse the existing implementation as a base line for the custom portal. However, later you might want to change this name if you want to build a custom portal from scratch.
Update the application.xml file
Update the following file as shown in Example 5-4:
IBM_BPM_ResponsivePortal_SingleCluster.earMETA-INFapplication.xml
Example 5-4 The application.xml file extract
<application id="CustomPortal_ID">
<display-name>Custom Portal</display-name>
<description>Custom Portal</description>
<module id="WebModule_2084909887354">
<web>
<web-uri>responsivePortal.war</web-uri>
<context-root>/CustomPortal</context-root>
</web>
</module>
<security-role id="SecurityRole_2405939848572">
<description>An administrator</description>
<role-name>twuser</role-name>
</security-role>
</application>
Update the following attributes so that they do not conflict with the original Process Portal EAR file:
•The application id attribute uniquely identifies for the custom EAR file.
•The display-name attribute appears in the WebSphere Application Server console by default and is used to visually identify the app.
•The description attribute is for documentation purposes. (Optional)
•The module id attribute uniquely identifies the Responsive Portal WAR file inside the EAR file.
•The context root attribute defines the URL for Process Portal.
•The security-role id attribute uniquely identifies the security role for the EAR file.
Update the ibm-application-bnd.xmi file
Update the following file as shown in Example 5-5:
IBM_BPM_ResponsivePortal_SingleCluster.earMETA-INFibm-application-bnd.xmi
Example 5-5 The ibm-application-bnd.xmi file extract
<authorizationTable xmi:id="AuthorizationTable_1457365628655">
<authorizations xmi:id="RoleAssignment_1457365628655">
<specialSubjects xmi:type="com.ibm.ejs.models.base.bindings.applicationbnd:AllAuthenticatedUsers" xmi:id="AllAuthenticatedUsers_1457365628655" name="AllAuthenticatedUsers"/>
<role href="META-INF/application.xml#SecurityRole_2405939848572"/>
</authorizations>
</authorizationTable>
<application href="META-INF/application.xml#CustomPortal_ID"/>
Update the following attributes so that they match the changes made to the application.xml file:
•The role href attribute must use the security-role value as specified in the application.xml file.
•The application href attribute must use the application id value as specified in application.xml file.
After you make all the modifications to the EAR file, complete the actions in the following sections.
Package and rename the Custom Process Portal EAR file
Package the WAR and EAR files using your chosen tools and rename the Custom Process Portal EAR file so that it is unique:
IBM_BPM_CustomPortal_SingleCluster.ear
Install the Custom Process Portal EAR file
Use the WebSphere Application Server Admin console to install the custom Custom Process Portal EAR file, as shown in Figure 5-39 on page 298. Follow these steps:
1. Select Applications → New Application.
2. Select New Enterprise Application.
3. Select Choose File and locate the IBM_BPM_CustomPortal_SingleCluster.ear file on the file system.
4. Click Next on this panel and on all subsequent panels to accept the default settings.
5. After the installation completes, remember to save to the master configuration.

Figure 5-39 Installing the Custom Process Portal EAR file
6. Start the Custom Process Portal EAR file by using the WebSphere Application Server, as shown in Figure 5-40. Select Custom Portal, and click Start.

Figure 5-40 Starting the Custom Process Portal EAR file
Launch your Custom Process Portal
After you create a Custom Process Portal app and toolkit and the Custom Process Portal EAR file is running, you can launch your Custom Process Portal from a browser using the following URL (substituting the host name and port number accordingly):
https://<host>:<port>/CustomPortal
|
Tip: The host name and port numbers for the Custom Process Portal are identical to those used for the standard Process Portal.
|
Now that you have created a Custom Process Portal, you can customize Process Portal.
5.2.8 Customize Process Portal
This section details how to make customizations to IBM Process Portal 8.5.7. Before making any customizations, create a clone of Process Portal, as detailed in 5.2.7, “Clone Process Portal” on page 286, to avoid invalidating your BPM product support.
Make customizations using the coach-view configuration options
The Custom Process Portal app includes both the Portal and the Work coach views. The Portal coach view is the top-level coach view and contains all the coach-based content within the Custom Process Portal. The Work coach view provides the definition for the work dashboard in the Custom Process Portal. The coach views included in the Custom Portal Process Toolkit are documented in IBM Knowledge Center (because these are copies of those in the Responsive Portal Components toolkit):
All the coach views in the Custom Process Portal app and the Custom Process Portal Toolkit have configuration options that you can use in your customizations.
Add a link to the Heritage Portal
This section illustrates how to make a customization to the Custom Process Portal app. This example adds a link to the Heritage Process Portal, so that you can access it directly from the Custom Process Portal. To add the link, you use the configuration option on the Portal coach view within the Custom Process Portal App.
To add a link to the Heritage Portal:
1. Open the Custom Process Portal app in Process Designer.
2. Open the RESPONSIVE_PORTAL client side coach view, as illustrated in Figure 5-41 on page 300. Click the Portal coach view in the Coach Editor, select the Show links configuration option, and add the following link to the Links configuration option:
– Name: Heritage Process Portal
– Value: https://<host>:<port>/HeritagePortal
|
Tip: The host name and port numbers for the Heritage Process Portal are identical to those used for the standard Process Portal.
|
3. Save your changes.
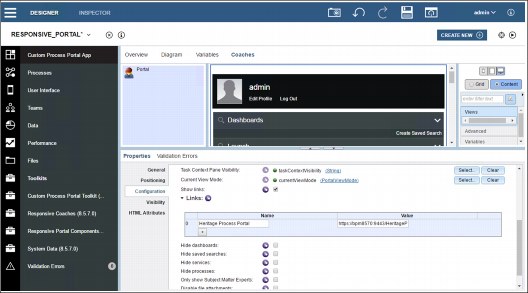
Figure 5-41 Configuration options within the Portal coach view
4. Launch the Custom Process Portal in your web browser. You see the Links section within the context menu that provide access to the Heritage Process Portal, as illustrated in Figure 5-42.

Figure 5-42 Links within the context menu providing access to the Heritage Process Portal
5. Click the Heritage Process Portal link to launch the Heritage Process Portal in a new browser window, as illustrated in Figure 5-43 on page 301.
|
Note: You do not need to provide credentials for the Heritage Process Portal, because you are already signed in to the Custom Process Portal.
|

Figure 5-43 Heritage Process Portal
Customize by updating the coach-view implementation
This section describes how to customize the Custom Process Portal Toolkit. The example updates the User Profile coach view to open a dialog box to indicate that the profile displays.
To customize the Custom Process Portal Toolkit:
1. Open the Custom Process Portal Toolkit in Process Designer.
2. Open the User Profile coach view, go to the Behavior tab, and select load as illustrated in Figure 5-44.
3. Insert the following line of JavaScript into the load event handler, so that the user is notified when the User Profile coach view is loading:
alert("this is the User Profile loading");
4. Save the changes and take a new snapshot of the Custom Process Portal Toolkit.

Figure 5-44 Customize the User Profile coach view within the Custom Process Portal Toolkit
5. Open the Custom Process Portal in your browser to test the customization. The dialog box opens as illustrated in Figure 5-45.

Figure 5-45 Testing the User Profile customization
Modify the JavaScript in the Custom Process Portal Toolkit
The JavaScript that is contained within the managed files in the Process Portal Toolkit is minimized,3 which makes it difficult to customize. However, you can modify this default behavior by completing these steps:
1. Set up the build environment.
2. Make customizations to toolkit managed files.
3. Update the custom toolkit with the updated managed files.
|
Note: All custom toolkit references within the process app and toolkit must reference the Custom Process Portal Toolkit to ensure that the custom managed files are used.
|
Set up the build environment
Create a directory on your local file system to do the portal customization work. This directory can be named anything, but it is assumed to be named custom-build for the remainder of this book. Create the following directories:
•custom-buildmin
•custom-buildlibant-contrib
Open the Custom Process Portal Toolkit in Process Designer. Click the Files link in the left menu bar, and double-click the portal-components.debug.zip file, as illustrated in Figure 5-47 on page 303. Click the folder icon to download the file. Decompress the file to your custom-build directory. Follow the same procedure to download the portal-components.min.zip file and extract it to your custom-build/min directory. The directory structure now looks like that shown in Figure 5-46.

Figure 5-46 Directory structure
|
Tip: Save the portal-components.debug.zip and the portal-components.min.zip files to a safe location, because you replace them with modified versions. Having backups of these files is recommended.
|

Figure 5-47 Saving Custom Process Portal Toolkit Managed Files
Download the ant-contrib-1.0b3.jar file from a trusted site and extract it into the following directory:
cutom-build/lib/ant-contrib
Download the yuicompressor-2.4.8.jar file from a trusted site and move it (without extracting it) into the following directory:
custom-build/lib
Make customizations to the toolkit managed files
This section describes how to customize the toolkit managed files using a simple example.
Make the following update to the custom-build/scripts/dashboardContext.controller.js file and save the file:
$scope.expireNewMentions = function() {
var delay, now = new Date().getTime();
console.log(“this is now “, now);
var delay, now = new Date().getTime();
console.log(“this is now “, now);
Now build the portal-components.min.zip file. This file provides JavaScript for Portal at run time. The dashboardContext.controller.js file is minimized and built into the compressed file along with other files.
Open a command window and navigate to the custom-build directory. If you are doing this work on the same system that BPM is on, you can make use of the ws_ant script. Otherwise, you need to download both Java and Apache Ant to build the portal-components.min.zip file.
The custom-build directory contains the create-min-zip.xml build file.
If you have a BPM installation available, run:
<path-to-BPM-install-root>inws_ant -f create-min-zip.xml
If you need to use Apache Ant and Java, run:
ant -f create-min-zip.xml
If the build was successful, you will find the portal-components.min.zip file in the custom-build/dist directory.
Update the custom toolkit with the updated managed files
Now, you need to upload the new version of the portal-components.min.zip file to the Custom Process Portal Toolkit:
1. Open the Custom Process Portal Toolkit in Process Designer.
2. Select the portal-components.min.zip file from the Files link.
3. To replace the current version: click Browse and locate the portal-components.min.zip file that you just created in the custom-build/dist directory.
4. Click Save to upload the file to Process Designer.
Customize the Login Page
The Process Portal Login Page is the only aspect of the Process Portal 8.5.7 UI that is not implemented using the Coach Framework. However, you can still customize the Login Page by updating the Java implementation within the Custom Process Portal EAR file.
This section assumes that you have already created a Custom Process Portal EAR file, by cloning the reference implementation, as detailed in 5.2.7, “Clone Process Portal” on page 286.
The login.jsp file and supported files are located within the Custom Process Portal EAR file:
IBM_BPM_ResponsivePortal_SingleCluster.ear
esponsivePortal.war
The login.jsp file is responsible for displaying the login page and for authenticating the user. An experienced Java UI developer can modify the login.jsp file and any associated files (such as the CSS files) within the EAR file to update the styling and layout, add a company logo, and incorporate any additional behavior.
Build a custom process portal
You can use the Custom Process Portal (detailed in 5.2.7, “Clone Process Portal” on page 286) as a baseline to create your own custom portal either by reusing the human services and coach views that have been cloned from the IBM implementation, by creating new human services and coach views of their own, or a combination of both.
Replace the custom portal landing page
The serviceName parameter in the web.xml file is used to specify the landing page that is displayed after you are authenticated when logging in to Process Portal.
The web.xml file is located within the Custom Process Portal EAR file:
IBM_BPM_ResponsivePortal_SingleCluster.ear
esponsivePortal.warWEB-INFweb.xml
To replace the custom portal landing pages, for example, update the web.xml file as follows to use your own CUSTOM _PORTAL human service for the landing page:
<init-param>
<param-name>serviceName</param-name>
<param-value>CUSTOM_PORTAL</param-value>
</init-param>
|
Tip: Within your Custom Process Portal App, you can create a duplicate of the RESPONSIVE_PORTAL human service as a baseline for your CUSTOM_PORTAL human service. Remove the Portal coach view from the coach, and replace it with your own content.
|
5.2.9 SPARK Portal Builder toolkit
In some scenarios, customizing Process Portal might not be sufficient: you might need a custom designed portal that is built completely from scratch that still takes advantage of the Coach Framework. The SPARK Portal Builder toolkit provides configurable, ready-to-use coach views for creating custom portals using the Coach Framework and the SPARK programming model.
In these types of scenarios, keep in mind the following points of interaction for users:
•Display of a list of tasks, instances, or services.
•Display the UI for the selected item in the list.
The SPARK Portal Builder toolkit includes a set of coach views for each of these types of interaction points, with different variants, that are designed specifically for tasks, instances, and services, as shown in Figure 5-48 on page 306.

Figure 5-48 SPARK Portal Builder components
You can find a full description of the SPARK Portal Builder toolkit at:
SPARK Portal Builder lists
Table 5-2 shows the list controls in the SPARK Portal Builder toolkit.
Table 5-2 Spark Portal Builder list controls
|
Control name
|
Description
|
|
Task List
|
Filters and sorts a list of tasks through configuration of search conditions
|
|
Task Search List
|
Filters and sorts a list of tasks by specifying an existing Saved Search
|
When you configure a list on a coach, the results display in a table to select a specific result, as shown in Figure 5-49.

Figure 5-49 Task list
Because the controls in the toolkit are based on the same framework as the SPARK UI toolkit described in Chapter 4, “SPARK UI Toolkit” on page 153, developers can specify the action that occurs when an item is clicked through the Item Clicked event configuration option.
SPARK Portal Builder UI frames
In the case of a Service or Task based list, the selection of an item normally requires the item be displayed on the same coach. The SPARK Portal Builder UI Frame allows you to complete process tasks or run exposed human service implementations within a coach, as depicted in Figure 5-50 on page 308. The content in the UI frame comes from the human service implemented for the activity in the process.

Figure 5-50 Example task list with a UI frame
Get Next task
There are some use cases that require work tasks to be pushed to users one at a time, instead of being pulled by the user from a set of assigned tasks. In these cases, you need a programmatic way to identify the set of tasks assigned to a user (or a user’s team), select the task that needs to be pushed to the user and render the selected task on the page.
You can use the SPARK Portal Builder Get Next task control to identify and select a task for the user currently logged in. The logic used to select the task can be customized through an Ajax service.
When you combine the capability of the Get Next task control with a Task UI frame control, you can achieve the push model for work assignments as shown in Figure 5-51 on page 309, an example implementation using a SPARK Button, Get Next task, and Task UI coach view to achieve a work assignment push pattern. The event handler configuration of the Get Next Task control is also shown in Figure 5-51 on page 309.

Figure 5-51 Example using a SPARK Button, Get Next task, and Task UI coach view
To invoke the selection service configured for the Get Next task coach view shown in Figure 5-52, the requestNextTask method must be invoked when the button is clicked, as show in Figure 5-52. The event handler configuration of a button that is invoking the requestNextTask method of a Get Next task control.

Figure 5-52 Button that invokes the requestNextTask method of a Get Next task control
Customizing the style of your portal
All of the coach views of the SPARK Portal Builder are based upon the same framework as the SPARK UI toolkit. You can style SPARK Portal Builder coach views in the same way you customize SPARK UIs—through configuration options for each control. You can further customize the style by using the SPARK Style control to specify CSS overrides or by embedding your own CSS within a wrapping coach view or page.
5.3 Securely accessing IBM Process Portal from a mobile device
Deploy IBM Process Sever securely behind the corporate firewall to prevent malicious attacks on mission critical processes. Process Sever is responsible for process orchestration, integrates back-end systems, and delivers coach-based UIs to your web browser. When Process Portal, tasks, and dashboards are accessed from a desktop computer, you can rely on the standard corporate security as the desktop computer that is deployed safely behind the corporate firewall. However, when accessed from a mobile device or a desktop computer outside the office, additional security is required.
For an on-premise deployment of IBM BPM, use a secure virtual private network (VPN) connection. Some organizations also use a secure internet browser4 for added security.
When using BPM on Cloud, no additional security considerations are required when exposing Process Portal to the Internet.
If the use of a VPN or BPM on Cloud are not acceptable, an alternative portal implementation might be required. For more information, refer to Chapter 6, “Combining the Coach Framework with other approaches” on page 313.
5.4 Process Federation Server
IBM Process Portal 8.5.7 can be used with either a single Process Server or in a federated topology using Process Federation Server. Process Federation Server enables the IT Administrator to manage the BPM infrastructure without significantly impacting the business user experience.
|
Note: Users might experience differences with Process Portal behavior when moving to a federated topology.
|
Process Federation Server is used to:
•Isolate processes
•Manage departmental deployments
•Massively scale the IBM BPM infrastructure
•Manage IBM BPM migrations
•Combine different task implementations such as, Business Process Execution Language (BPEL) and BPMN
Process Portal is deployed on a Process Server 8.5.7 instance whether connected to a Process Server or Process Federation Server. However, Process Federation Server can be connected to multiple Process Servers (or deployment environments) using different versions of IBM BPM back to BPM 8.0.1.3, as illustrated in Figure 5-53.

Figure 5-53 Process Federation Server connecting IBM Process Portal to multiple process servers
Process Federation Server federates the task list, the process launch list, the dashboard launch list, and saved searches from each of the connected Process Servers to provide access to a unified view through REST APIs.
|
Note: Team-based Saved Search, Follows, Mentions, and Performance Dashboards are not supported by the PFS in IBM BPM 8.5.7 at the time of writing this book.
|
Process Federation Server and Process Server APIs used by IBM Process Portal 8.5.7 are identical, so Process Portal is simply configured to connect to Process Federation Server when used in a federated topology.
Customers that have decided to develop their own task management user interface instead of using Process Portal can also leverage Process Federation Server capabilities using Process Federation Server REST APIs directly.
5.4.1 Process Federation Server Deployment
Process Federation Server is included within the IBM BPM 8.5.7 license. It is installed using the WebSphere Liberty profile and can either be deployed on its own physical host or virtual machine (VM), or share the same host/VM as one of the IBM Process Server 8.5.7 instances.
Similarly, IBM Process Portal 8.5.7 needs to be hosted by an IBM Process Server 8.5.7 instance. Thus, Process Portal can be deployed either on a dedicated Process Server or can reuse a Process Server that is being used for process execution.
5.4.2 More on Process Federation Server
For further information about Process Federation Server, refer to:
•Getting Started with Process Federation Server in IBM BPM 8.5.7 (video)
•Process Federation Server in IBM Knowledge Center
•Interconnect 2016 BTB-2890 presentation, Understanding the IBM BPM Process Federation Server
5.5 Conclusion
IBM Process Portal is an integral part of the IBM BPM UI. You can use it to perform work, to interact with BPM human tasks, and to gain visibility on process and team performance. This chapter provided information about Process Portal features from the business user perspective. It also explained how to personalize, extend, or customize Process Portal by using the Coach Framework. Finally, it discuss how Process Portal plays an important role in federating Process Servers as the business UI on the Process Federation Server.
The next chapter explores how to use alternative technologies and techniques to create BPM UIs either that are combined with coaches or that are completely independent.
1 You might want to view the Getting Started with Process Portal in IBM BPM 8.5.7 video (http://ibm.biz/IBM_Process_Portal_857_Video) or refer to Process Portal information available in IBM Knowledge Center (http://ibm.biz/IBM_Process_Portal_857).
2 Consult the following IBM Knowledge Center article for information about how to update configuration options in the 100Custom.xml file:
3 Minification is the process of removing all unnecessary characters from source code without changing its functionality. For more information, refer to:
4 See the IBM BPM System Requirements support site for a list of supported browsers:
..................Content has been hidden....................
You can't read the all page of ebook, please click here login for view all page.