I must confess: my behavior is governed by my state. If I didn’t get enough sleep, I’m going to be a bit tired. If I had a drink, I wouldn’t get behind the wheel. All of these are states, and they govern my behavior: how I feel, what I can and cannot do.
So, the State design pattern is a very simple idea: state controls behavior, state can be changed, the only thing which the jury is out on is who triggers the change from one state to another.
States are actual classes with behaviors, and these behaviors cause the transition from this state to another. In other words, a state’s members are the options in terms of where we can go from that state.
States and transitions are just enumerations. We have a special component called a state machine that performs the actual transitions.
Both of these approaches are viable, but it’s really the second approach that is the most common. We’ll take a look at both of them, but I must warn that I’ll glance over the first one, since this isn’t how people typically do things.
State-Driven State Transitions
We’ll begin with the most trivial example out there: a light switch that can only be in the on and off states. The reason why we are choosing such a simple domain is that I want to highlight the madness (there’s no other word for it) that a classic implementation of State brings, and this example is simple enough to do so without generating pages of code listings.
This implementation is far from intuitive, so much so that we need to discuss it slowly and carefully, because from the outset, nothing about the State class makes sense.
While the State is abstract (meaning you cannot instantiate it), it has nonabstract members that allow the switching from one state to another. This… to a reasonable person, it makes no sense. Imagine the light switch: it’s the switch that changes states. The state itself isn’t expected to change itself, and yet it appears this is exactly what it does.
Perhaps most bewildering, though, the default behavior of State.On()/Off() claims that we are already in this state! Note that these methods are virtual. This will come together, somewhat, as we implement the rest of the example.
The constructor of each state simply informs us that we have completed the transition. But the transition itself happens in OnState.Off() and OffState.On() . That is where the switching happens.
A state typically does not switch itself.
A list of possible transitions should not appear all over the place; it’s best to keep it in one place (SRP).
There is no need to have actual classes modeling states unless they have class-specific behaviors; this example could be reduced to something much simpler.
Maybe we should have been using enums to begin with?
Handmade State Machine
Let’s try to define a state machine for a typical phone conversation.
Now, the exact rules of this state machine, that is, what transitions are possible, need to be stored somewhere. Here is a UML State Machine diagram showing what kind of transitions we want:
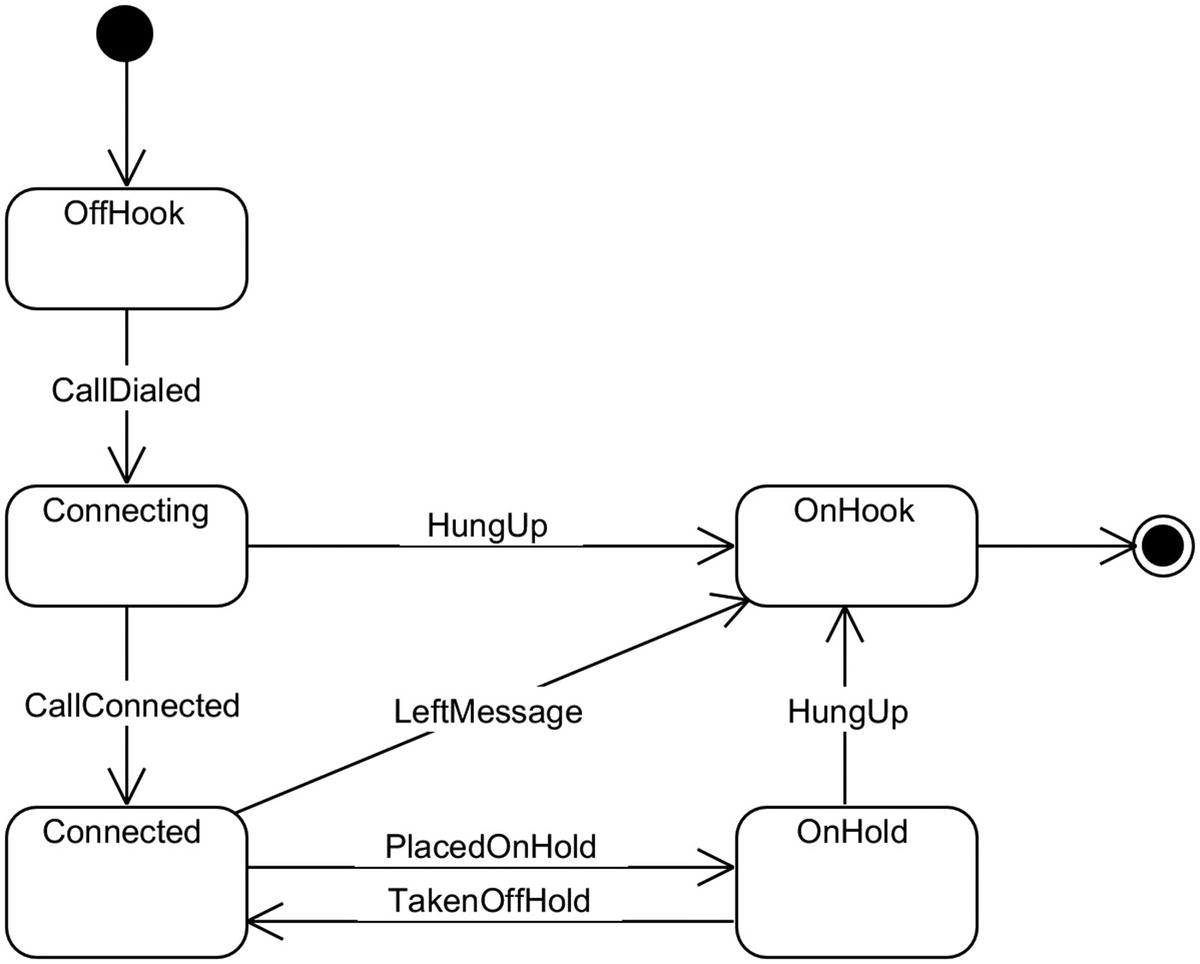
This is a little clumsy, but essentially the key of the dictionary is the State we’re moving from, and the value is a list of Trigger-State pairs representing possible triggers while in this state and the state you move into when you use the trigger.
So in the preceding line, we start out with the OffHook state (when you’re ready to make the call) and the exit state is when the phone is placed OnHook and the call is finished.
The algorithm is fairly obvious: we let the user select one of the available triggers on the current state, and provided the trigger is valid, we transition to the right state by using that rules dictionary that we created earlier.
This hand-rolled state machine’s main benefit is that it is very easy to understand: states and transitions are ordinary enumerations, the set of transitions is defined in a Dictionary, the start and end states are simple variables. I’m sure you’ll agree this is much easier to understand than the example we started the chapter with.
Switch-Based State Machine
In our exploration of state machines, we have progressed from the needlessly complicated Classic example where states are represented by classes to a handcrafted example where states are represented as enumerations, and now we shall experience one final step of degradation, as we stop using dedicated data types for states altogether.
But our simplifications won’t end there: instead of jumping from one method call to another, we’ll confine ourselves to an infinitely recurring switch statement where state will be examined and transitions will happen by virtue of the state changing.
The scenario I want you to consider is a combination lock. The lock has a four-digit code (e.g., 1234) that you enter one digit at a time. As you enter the code, if you make a mistake, you get the “FAILED” output, but if you enter all digits correctly, you get “UNLOCKED” instead and you exit the state machine.
As you can see, this is very much a state machine, albeit one that lacks any structure. You couldn’t examine it from the top level and be able to tell what all the possible states and transitions are. It is not clear, unless you really examine the code, how the transitions happen – and we’re lucky there are no goto statements here to make jumps between the cases!
This switch-based state machine approach is viable for scenarios with very small numbers of states and transitions. It loses out on structure, readability, and maintainability, but can work as a quick patch if you do need a state machine quickly and are too lazy to make enum cases.
Overall, this approach does not scale and is difficult to manage, so I would not recommend it in production code. The only exception would be if such a machine was made using code generation on the basis of some external model.
Encoding Transitions with Switch Expressions
The switch-based state machine may be unwieldy, but that’s partly due to the way information about states and transitioned is structured (because it’s not). But there is a different kind of switch – a switch statement (as opposed to expression) that, thanks to pattern matching, allows us to neatly define state transitions.
If the chest is locked, you can only open it if you have the key.
If the chest is open and you close it while having the key, you lock it.
If the chest is open and you don’t have the key, you just close it.
A closed (but not locked) chest can be opened whether you have the key or not.
This state machine is easy to read
Guard conditions such as haveKey are easy to incorporate, and fit nice into pattern matching
The formal set of rules for this state machine is defined in a way that cannot be extracted. There’s no data store where the rules are kept, so you cannot generate a report or a diagram, or run any verification checks beyond those that are done by the compiler (it checks for exhaustiveness).
If you need any behavior, such as state entry or exit behavior, this cannot be done easily in a switch expression – you would need to define a good old-fashioned method with a switch statement in it.
To sum up, this approach is great for simple state machines because it results in very readable code. But it’s not exactly an “enterprise” solution.
State Machines with Stateless
While hand-rolling a state machine works for the simplest of cases, you probably want to leverage an industrial-strength state machine framework. That way, you get a tested library with a lot more functionality. It’s also fitting because we need to discuss additional state machine–related concepts, and implementing them by hand is rather tedious.
As you can see, Stateless’ StateMachine class is a builder with a fluent interface. The motivation behind this API design will become apparent as we discuss the different intricacies of Stateless.
Types, Actions, and Ignoring Transitions
Let’s talk about the many features of Stateless and state machines generally.
There are a few interesting things worth discussing here. First of all, this state machine has actions – things that happen as we enter a particular state. These are defined in OnEntry() , where you can provide a lambda that does something; similarly, you could invoke something at the moment the state is exited using OnExit() . One use of such transition actions would be to start a timer when entering a transition and stop it when exiting one, which could be used for tracking the amount of time spent in each state. For example, you might want to measure the time the light stays on for purposes of verifying electricity costs.
Another thing worth noting is the use of Ignore() builder methods. This basically tells the state machine to ignore the transition completely: if the light is already off, and we try to switch it off (as in the last line of the preceding listing), we instruct the state machine to simply ignore it, so no output is produced in that case.
“No valid leaving transitions are permitted from state ‘False’ for trigger ‘False’. Consider ignoring the trigger.”
Reentrancy Again
In the preceding listing, PermitReentry() allows us to return to the false (off ) state on a Trigger.Off trigger. Notice that in order to output a corresponding message to the console, we use a different lambda: one that has a Transition parameter . The parameter has public members that describe the transition fully. This includes Source (the state we’re transitioning from), Destination (the state we’re going to), Trigger (what caused the transition), and IsReentry, a Boolean flag that we use to determine if this is a reentrant transition.
Hierarchical States
Now, if we are in the OnHold state, phoneCall.State will give us OnHold, but there’s also a phoneCall.IsInState(State) method that will return true when called with either State.Connected or State.OnHold.
More Features
Guard clauses allow you to enable and disable transitions at will by calling PermitIf() and providing bool-returning lambda functions, for example:
Parameterized triggers are an interesting concept. Essentially, you can attach parameters to triggers such that, in addition to the trigger itself, there’s also additional information that can be passed along. For example, if a state machine needs to notify a particular employee, you can specify an email to be used for notification:
External storage is a feature of Stateless that lets you store the internal state of a state machine externally (e.g., in a database) instead of using the StateMachine class itself. To use it, you simply define the getter and setter methods in the StateMachine constructor:
Introspection allows us to actually look at the table of triggers that can be fired from the current state through PermittedTriggers property .
This is far from an exhaustive list of features that Stateless offers, but it covers all the important parts.
Summary
State machines involve two collections: states and triggers. States model the possible states of the system and triggers transition us from one state to another. You are not limited to enumerations: you can use ordinary data types.
Attempting a transition that’s not configured will result in an exception.
It is possible to explicitly configure entry and exit actions for each state.
Reentrancy can be explicitly allowed in the API, and furthermore, you can determine whether or not a reentry is occurring in the entry/exit action.
Transitions can be turned on an off through guard conditions. They can also be parameterized.
States can be hierarchical, that is, they can be substates of other states. An additional method is then required to determine whether you’re in a particular (parent) state.
While most of these might seem like overengineering, these features provide great flexibility in defining real-world state machines.