
Chapter 12: Using RESTEasy Reactive to Implement Input Adapters
An input adapter is like a front door that exposes all the features provided by a hexagonal system. Whenever a user or other application wants to communicate with a hexagonal system, they reach one of the available input adapters. With such adapters, we can provide different ways to access the same functionality within the hexagonal system. If a client does not support HTTP communication, we can implement an adapter using a different protocol. The significant advantage here is that removing or adding new adapters does not influence the domain logic.
Due to the hexagonal architecture's decoupling and well-encapsulating nature, we can change technologies without major changes, or indeed any changes, occurring in the system domain logic.
In this chapter, we'll continue our journey in exploring the exciting features of Quarkus. One feature that fits quite well with implementing input adapters is the RESTEasy Reactive JAX-RS implementation, which is a part of the Quarkus framework. RESTEasy Reactive proposes an asynchronous and event-driven way to expose HTTP endpoints. So, we'll learn how to integrate such Reactive capabilities with input adapters from a hexagonal system.
We'll cover the following topics in this chapter:
- Exploring the approaches to handling server's requests
- Implementing input adapters with RESTEasy Reactive
- Adding OpenAPI and Swagger UI
- Testing Reactive input adapters
By the end of this chapter, you'll know how to implement and test input adapters with reactive behavior. You'll also know how to publish the API for these input adapters using OpenAPI and Swagger UI.
Technical requirements
To compile and run the code examples presented in this chapter, you need the latest Java SE Development Kit and Maven 3.6 installed on your computer. They are available for the Linux, Mac, and Windows operating systems.
You can find the code files for this chapter on GitHub at https://github.com/PacktPublishing/Designing-Hexagonal-Architecture-with-Java/tree/main/Chapter12.
Exploring the approaches to handling server's requests
In client-server communication, we have a process flow where a client sends a request, the server receives it, and it starts to do some work. Once the server finishes its work, it replies to the client with a result. From the client's perspective, this flow does not change. It's always about sending a request and receiving a response. What can change, though, is how the server can internally handle how a request is processed.
There are two approaches to handling the server's request processing: reactive and imperative. So, let's see how a server can handle requests imperatively.
Imperative
In a traditional web application running on Tomcat, every request that's received by the server triggers the creation of a worker thread on something called a thread pool. In Tomcat, a thread pool is a mechanism that controls the life cycle and availability of worker threads that serve application requests. So, when you make a server request, Tomcat pulls a dedicated thread from the thread pool to serve your request. This worker thread relies on blocking I/O to access databases and other systems. The following diagram illustrates how the imperative approach works:
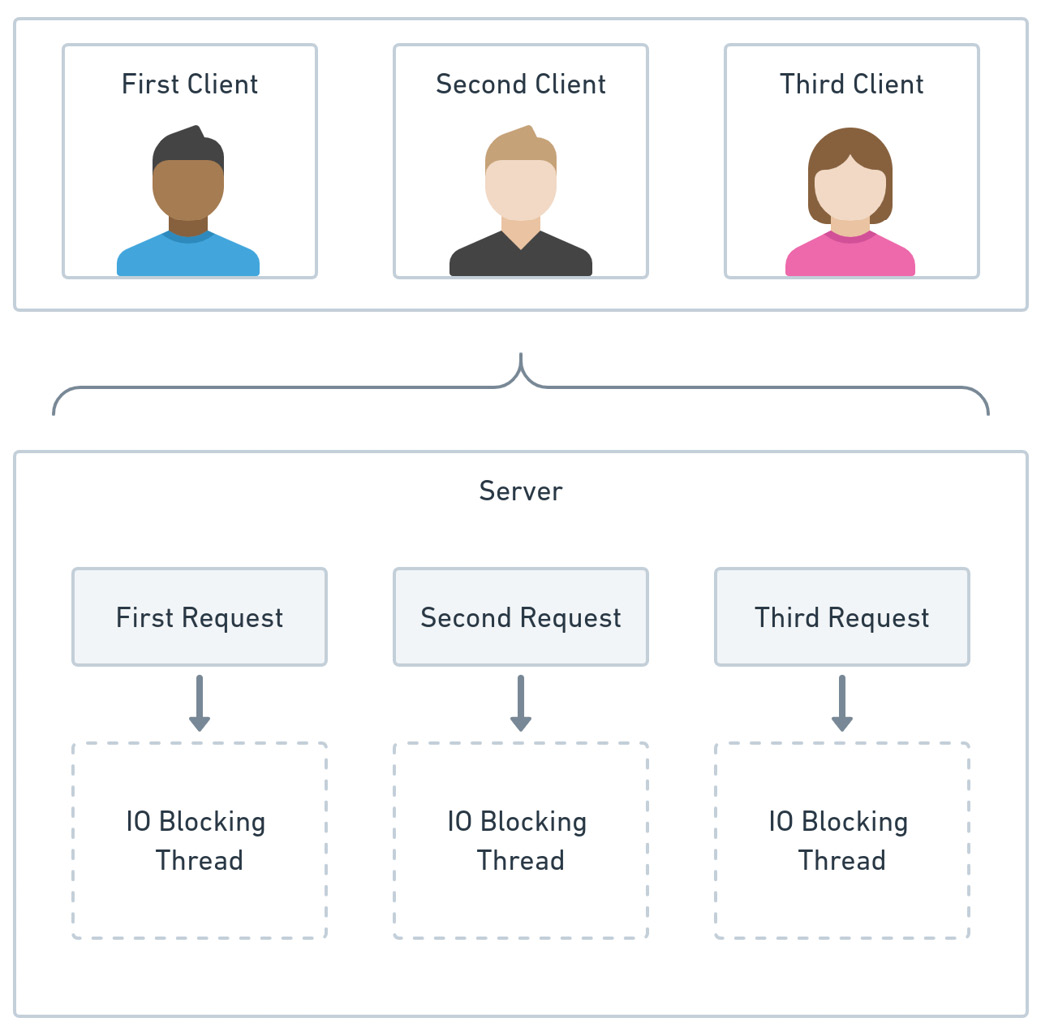
Figure 12.1 – The imperative approach
As shown in the preceding diagram, Server needs to create a new I/O blocking worker thread for each request.
Once a worker thread has been created and allocated to serve a request, it is blocked until the request is fulfilled. The server has a limited number of threads. If you have lots of long-running requests and continue to send such requests before the server can finish them, the server will run out of threads, which will lead to system failures.
Thread creation and management is also expensive. Server expends valuable resources in creating and switching between threads to serve client requests.
So, the bottom line of the imperative approach is that a worker thread is blocked to serve one – and only one – request at a time. To serve more requests concurrently, you need to provide more worker threads. Also, the imperative approach influences how the code is written. Imperative code is somewhat more straightforward to understand because things are treated sequentially.
Now, let's see how the reactive approach contrasts with the imperative one.
Reactive
As you may imagine, the idea behind the reactive approach is that you don't need to block a thread to fulfill a request. Instead, the system can use the same thread to process different requests simultaneously. In the imperative approach, we have worker threads that handle only one request at a time, while in the reactive approach, we have I/O non-blocking threads that handle multiple requests concurrently. Here, we can see how the reactive approach works:
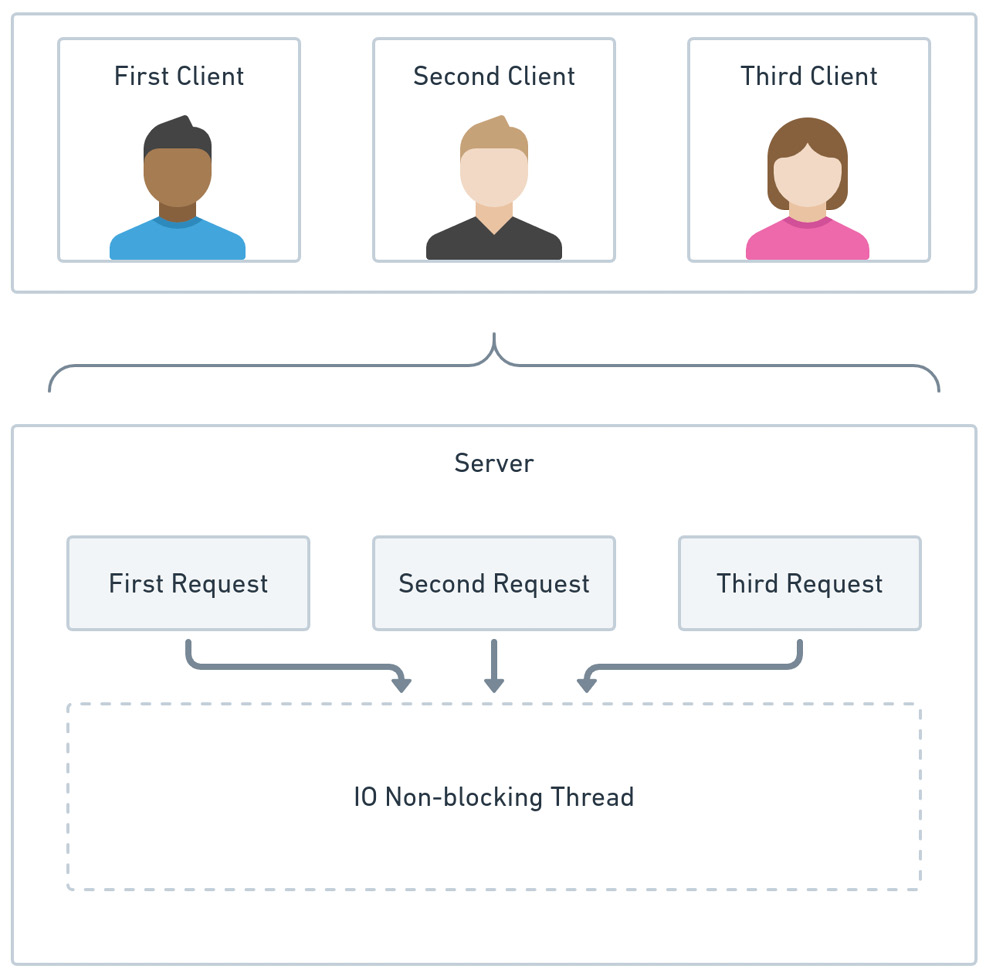
Figure 12.2 – The reactive approach
As shown in the preceding diagram, a single non-blocking thread can handle multiple requests.
In the reactive approach, we have a sense of continuation. Instead of the sequential nature of the imperative approach, with Reactive, we can see that things have continuity. By continuation, we mean that whenever a Reactive-ready server receives a request, that request is dispatched as an I/O operation with an attached continuation. This continuation works like a callback that is triggered and continues to execute the request once the server returns with a response. If this request needs to fetch a database or any remote system, the server won't block the I/O thread while waiting for a response. Instead, the I/O thread will trigger an I/O operation with an attached continuation and will release the I/O thread to accept other requests.
The following diagram illustrates how I/O threads trigger I/O operations:
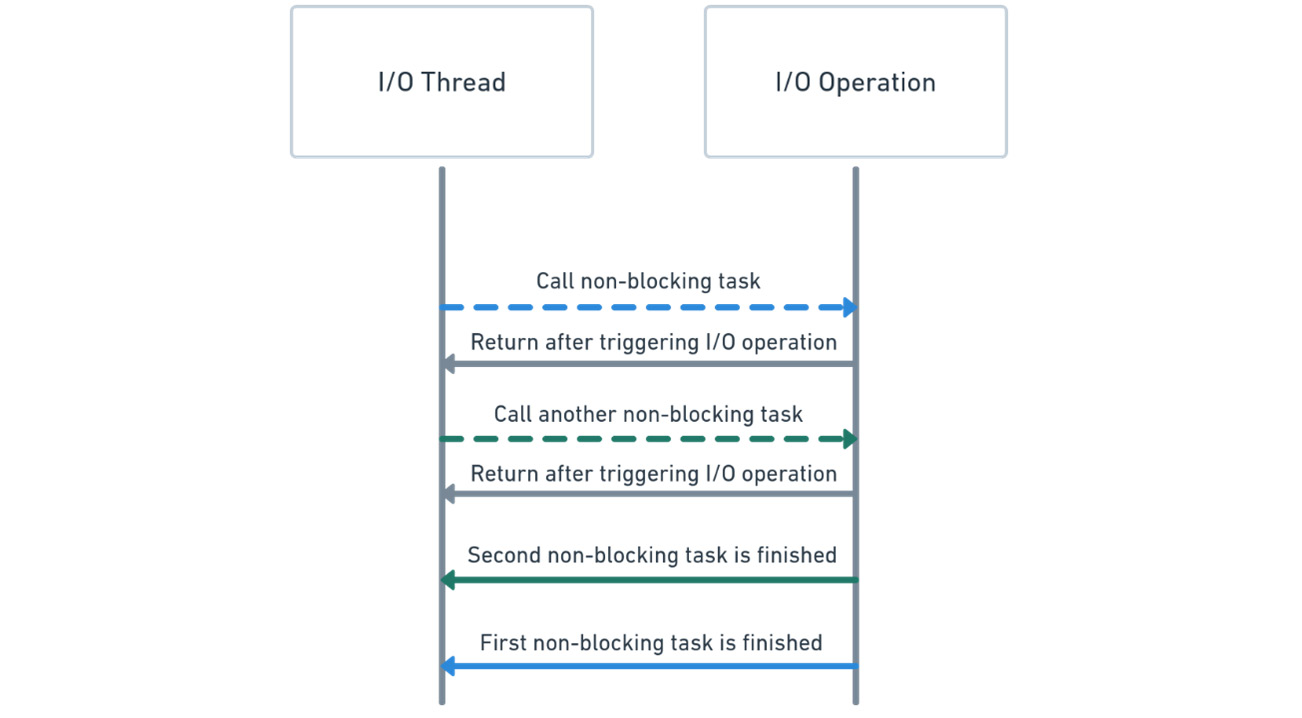
Figure 12.3 – I/O thread flow
As we can see, I/O Thread calls a non-blocking task that triggers I/O Operation and returns immediately. This happens because I/O Thread does not need to wait for the first I/O Operation to finish to call a second one. While the first I/O Operation is still executing, the same I/O Thread calls for another non-blocking task. Once I/O Operation has concluded, I/O Thread resumes execution by finishing the non-blocking tasks.
By avoiding wasting any time and resources that exist in the imperative approach, the reactive approach makes optimized use of the threads that don't block execution while waiting for an I/O operation to be finished.
Next, we'll learn how to implement reactive input adapters using the RESTEasy Reactive JAX-RS implementation provided by Quarkus.
Implementing input adapters with RESTEasy Reactive
RESTEasy Reactive is a JAX-RS implementation that supports both imperative and reactive HTTP endpoints. Such an implementation integrates with Vert.x, which is a toolkit that we can use to build distributed Reactive systems. RESTEasy Reactive and Vert.x work together in Quarkus to provide Reactive capabilities.
To understand what a Reactive endpoint looks like, we will integrate RESTEasy Reactive with the input adapters of the topology and inventory system.
Let's start by configuring the required Maven dependencies:
<dependencies>
<dependency>
<groupId>io.quarkus</groupId>
<artifactId>quarkus-resteasy-reactive</artifactId>
</dependency>
<dependency>
<groupId>io.quarkus</groupId>
<artifactId>quarkus-resteasy-reactive-
jackson</artifactId>
</dependency>
</dependencies>
With quarkus-resteasy-reactive, we bring the Reactive libraries, including Reactive RESTEasy and the Mutiny library, which we'll use to create code in a reactive fashion. We will use quarkus-resteasy-reactive-jackson for deserialization tasks involving the Reactive responses.
Once we have the dependencies configured, we can start implementing the Reactive input adapter for router management in the topology and inventory system.
Implementing the Reactive input adapter for router management
We'll work on top of the existing input adapters that we created in Chapter 8, Building the Framework Hexagon. We'll change those input adapters to enable JAX-RS and Reactive capabilities. We'll execute the following steps to do so:
- Let's start by defining the top-level path for requests related to router management on the RouterManagementAdapter class:
@ApplicationScoped
@Path("/router")
public class RouterManagementAdapter {
@Inject
RouterManagementUseCase routerManagementUseCase;
/** Code omitted **/
}
We use the @Path annotation to map a URL path to a resource in the system. We can use this annotation on top of a class or a method.
The only field of this class is RouterManagementUseCase, which is injected using the @Inject annotation. By utilizing this use case reference, we gain access to system features related to router management.
- Next, let's define a Reactive endpoint to retrieve a router:
@GET
@Path("/{id}")
public Uni<Response> retrieveRouter( Id id) {
return Uni.createFrom()
.item(
routerManagementUseCase.
retrieveRouter(id))
.onItem()
.transform(
router -> router != null ?
Response.ok(f) :
Response.ok(null))
.onItem()
.transform(Response.ResponseBuilder::build);
The @GET annotation says that only HTTP GET requests are allowed. The @Path("/{id}") annotation from the method level is concatenated with the @Path("/router") annotation from the class level. So, to reach this retrieveRouter method, we have to send a request to /router/{id}.
Also, note the @PathParam("id") annotation, which we use to capture a parameter from the URL.
What makes this endpoint a Reactive one is its Uni<Response> response type. Uni is one of the two types provided by the Mutiny library. In addition to Uni, there is also the Multi type.
We use the Uni and Multi types to represent what kind of data we're dealing with. For example, if your response returns just one item, you should use Uni. Otherwise, if your response is like a stream of data, like those that come from a messaging server, then Multi may be more suited for your purpose.
By calling Uni.createFrom().item(routerManagementUseCase.retrieveRouter(id)), we're creating a pipeline that executes routerManagementUseCase.retrieveRouter(id). The result is captured on transform(f -> f != null ? Response.ok(f) : Response.ok(null)). If the request is successful, we get Response.ok(f); otherwise, we get Response.ok(null). Finally, we call transform(Response.ResponseBuilder::build) to transform the result into a Uni<Response> object.
The remaining endpoints we are about to implement all follow a similar approach to the one described previously.
- After implementing an endpoint to retrieve a router, we can implement an endpoint to remove a router from the system:
@DELETE
@Path("/{id}")
public Uni<Response> removeRouter(@PathParam("id") Id id) {
return Uni.createFrom()
.item(
routerManagementUseCase.removeRouter(id))
.onItem()
.transform(
router -> router != null ?
Response.ok(router) :
Response.ok(null))
.onItem()
.transform(Response.ResponseBuilder::build);
}
The @DELETE annotation corresponds to the HTTP DELETE method. Again, we are defining a Path parameter on the @Path("/{id}") annotation. The method body has a Uni pipeline that executes routerManagementUseCase.removeRouter(id) and returns Uni<Response>.
- Let's implement the endpoint to create a new router:
@POST
@Path("/")
public Uni<Response> createRouter(CreateRouter createRouter) {
/** Code omitted **/
return Uni.createFrom()
.item(
routerManagementUseCase.
persistRouter(router))
.onItem()
.transform(
router -> router != null ?
Response.ok(f) :
Response.ok(null))
.onItem()
.transform(Response.ResponseBuilder::build);
}
We use the @POST annotation because we're creating a new resource. The @Path("/") annotation at the method level, when concatenated with the @Path("/router") annotation at the class level, generates the /router/ path. We have the Reactive code in the method body to handle the request and return Uni<Response>.
- Next, we will implement the endpoint so that a router can be added to a core router:
@POST
@Path("/add")
public Uni<Response> addRouterToCoreRouter(AddRouter addRouter) {
/** Code omitted **/
return Uni.createFrom()
.item(routerManagementUseCase.
addRouterToCoreRouter(router,
coreRouter))
.onItem()
.transform(
router -> router != null ?
Response.ok(router) :
Response.ok(null))
.onItem()
.transform(Response.ResponseBuilder::build);
}
Again, we use the @POST annotation here. The @Path("/add") annotation at the method level, when concatenated with @Path("/router") at the class level, generates the /router/add path. The Reactive code creates a pipeline to execute routerManagementUseCase.addRouterToCoreRouter(router, coreRouter) and return Uni<Response>.
- Finally, we must implement the endpoint to remove a router from a core router:
@DELETE
@Path("/{routerId}/from/{coreRouterId}")
public Uni<Response> removeRouterFromCoreRouter(
/** Code omitted **/
return Uni.createFrom()
.item(routerManagementUseCase.
removeRouterFromCoreRouter(
router, coreRouter))
.onItem()
.transform(
router -> router != null ?
Response.ok(f) :
Response.ok(null))
.onItem()
.transform(Response.ResponseBuilder::build);
}
Here, we use the @DELETE annotation to require the HTTP DELETE method on the request. In the @Path annotation, we have two path parameters – routerId and coreRouterId. We use these two parameters to obtain the Router and CoreRouter objects when we call routerManagementUseCase. removeRouterFromCoreRouter(router, coreRouter) inside the pipeline provided by Uni.
As we can see, when using Quarkus, it does not take too much to shift from an imperative to a Reactive way to implementing REST endpoints. Much of the work is done behind the scenes by the framework and its libraries.
Now, let's move on and implement Reactive input adapters for switch management.
Implementing the Reactive input adapter for switch management
Following a similar approach to the one we followed in the previous section, we can implement the Reactive input adapters for switch management by executing the following steps:
- We will start by enabling JAX-RS on the SwitchManagementAdapter class:
@ApplicationScoped
@Path("/switch")
public class SwitchManagementAdapter {
@Inject
SwitchManagementUseCase switchManagementUseCase;
@Inject
RouterManagementUseCase routerManagementUseCase;
/** Code omitted **/
}
This class is annotated with @Path("/switch"), so all the switch management-related requests will be directed to it. Following this, we inject both SwitchManagementUseCase and RouterManagementUseCase to execute operations on the Application hexagon.
- To enable switch retrieval in the topology and inventory system, we need to implement the Reactive behavior on the retrieveSwitch method:
@GET
@Path("/{id}")
public Uni<Response> retrieveSwitch(@PathParam("id") Id switchId) {
return Uni.createFrom()
.item(
switchManagementUseCase.
retrieveSwitch(switchId))
.onItem()
.transform(
aSwitch -> aSwitch != null ?
Response.ok(aSwitch) :
Response.ok(null))
.onItem()
.transform(Response.ResponseBuilder::build);
}
By adding the @GET and @Path annotations, we activate JAX-RS on the retrieveSwitch method. We place switchManagementUseCase.retrieveSwitch(switchId) so that it's executed inside a Mutiny pipeline that returns Uni<Response>.
The call on item returns immediately. It triggers the operation that's executed by the retrieveSwitch method and allows the thread to continue serving other requests. The result is obtained when we call onItem, which represents the continuation of the operation that's triggered when we call item.
- Next, we must add Reactive behavior to the createAndAddSwitchToEdgeRouter method:
@POST
@Path("/create/{edgeRouterId}")
public Uni<Response> createAndAddSwitchToEdgeRouter(
CreateSwitch createSwitch,
@PathParam("edgeRouterId") String
edgeRouterId){
/** Code omitted **/
return Uni.createFrom()
.item((EdgeRouter)
routerManagementUseCase.
persistRouter(router))
.onItem()
.transform(
router -> router != null ?
Response.ok(f) :
Response.ok(null))
.onItem()
.transform(Response.ResponseBuilder::build);
}
The preceding method handles the HTTP POST requests to create a switch object and add it to an edge router. We call the routerManagementUseCase.persistRouter(router) method here, which is wrapped inside a Mutiny pipeline, to return Uni<Response>.
- Finally, we must define the Reactive endpoint to remove a switch from an edge router:
@DELETE
@Path("/{switchId}/from/{edgeRouterId}")
public Uni<Response> removeSwitchFromEdgeRouter(
@PathParam("switchId") String switchId,
@PathParam("edgeRouterId") String
edgeRouterId) {
/** Code omitted **/
return Uni.createFrom()
.item(
(EdgeRouter)routerManagementUseCase.
persistRouter(router))
.onItem()
.transform(
router -> router != null ?
Response.ok(f) :
Response.ok(null))
.onItem()
.transform(Response.ResponseBuilder::build);
}
As we did with our previous removal operation, where we removed a router from a core router, we use the @DELETE annotation to make the removeSwitchFromEdgeRouter method only accept the HTTP DELETE requests. We pass the Path parameters, switchId and edgeRouterId, to obtain the switch and edge router objects required for the operation.
After defining the Reactive endpoints for retrieveSwitch, createAndAddSwitchToEdgeRouter, and removeSwitchFromEdgeRouter, we can start implementing the Reactive input adapter for network management.
Implementing the Reactive input adapter for network management
As you may imagine, the network Reactive input adapter follows the same standard that's used by the router and switch Reactive adapters. In the following steps, we will enable Reactive behavior for endpoints related to network management:
- Let's start by enabling JAX-RS on the NetworkManagementAdapter input adapter:
@ApplicationScoped
@Path("/network")
public class NetworkManagementAdapter {
@Inject
SwitchManagementUseCase switchManagementUseCase;
@Inject
NetworkManagementUseCase networkManagementUseCase;
/** Code omitted **/
}
At this point, you may be familiar with the @Path annotation at the class level. We inject the SwitchManagementUseCase and NetworkManagementUseCase use cases to assist in the operations that are executed by this input adapter.
- Next, we must define a Reactive endpoint so that networks can be added to a switch:
@POST
@Path("/add/{switchId}")
public Uni<Response> addNetworkToSwitch(AddNetwork addNetwork, @PathParam("switchId") String switchId) {
/** Code omitted **/
return Uni.createFrom()
.item(
networkManagementUseCase.
addNetworkToSwitch(
network, networkSwitch))
.onItem()
.transform(
f -> f != null ?
Response.ok(f) :
Response.ok(null))
.onItem()
.transform(Response.ResponseBuilder::build);
}
The idea we apply here is the same one we applied to the previous implementations. Inside the addNetworkToSwitch method, we add some Reactive code that will use a Mutiny pipeline to call networkManagementUseCase.addNetworkToSwitch(network, networkSwitch) and return Uni<Response>.
- Finally, we must define the Reactive endpoint to remove a network from a switch:
@DELETE
@Path("/{networkName}/from/{switchId}")
public Uni<Response> removeNetworkFromSwitch(@PathParam("networkName") String networkName, @PathParam("switchId") String switchId) {
/** Code omitted **/
return Uni.createFrom()
.item(
networkManagementUseCase.
removeNetworkFromSwitch(
networkName, networkSwitch))
.onItem()
.transform(
f -> f != null ?
Response.ok(f) :
Response.ok(null))
.onItem()
.transform(Response.ResponseBuilder::build);
}
Here, we use the @DELETE annotation and two path parameters, networkName and switchId, to remove a network from a switch. Inside the Mutiny pipeline, we call networkManagementUseCase.removeNetworkFromSwitch( networkName, networkSwitch). The pipeline result is Uni<Response>.
With that, we have finished implementing the Reactive input adapter for network management. Now, the RouterManagementAdapter, SwitchManagementAdapter, and NetworkManagementAdapter input adapters are ready to serve HTTP requests in a Reactive way.
These three input adapters and their endpoints form the hexagonal system API.
In this section, we learned not just to create ordinary REST endpoints, but we also went the extra mile by using RESTEasy Reactive to enable Reactive behavior on the input adapter's endpoints. That's a fundamental step to tap into the advantages that a Reactive approach can provide. With the Reactive approach, we no longer need to depend on I/O blocking threads, which may consume more computing resources than I/O non-blocking threads. I/O blocking threads need to wait for I/O operations to finish. I/O non-blocking threads are more efficient because the same thread can handle several I/O operations at the same time.
The next section will cover how to use OpenAPI and Swagger UI to document and publish the hexagonal system API.
Adding OpenAPI and Swagger UI
Understanding and interacting with third-party systems is sometimes a non-trivial undertaking. In the best scenario, we may have the system documentation, an organized code base, and a set of APIs that, together, help us understand what the system does. In the worst scenario, we have none of these things. This challenging situation requires courage, patience, and persistence to venture into trying to understand a tangled code base with intricate complexities.
OpenAPI represents an honorable effort to increase our capacity to express and understand what a system does. Originally based on the Swagger specification, the OpenAPI specification standardizes how APIs are documented and described so that anyone can grasp the capabilities offered by a system without much effort.
We spent the previous section implementing the Reactive input adapters that form the API of our hexagonal system. To make this system more understandable to other people and systems, we'll use OpenAPI to describe the functionalities provided by the input adapters and their endpoints. Also, we'll enable Swagger UI, a web application that presents a clear and organized view of the system's APIs.
Quarkus comes with built-in support for the OpenAPI v3 specification. To enable it, we need the following Maven dependency:
<dependencies>
<dependency>
<groupId>io.quarkus</groupId>
<artifactId>quarkus-smallrye-openapi</artifactId>
</dependency>
</dependencies>
The quarkus-smallrye-openapi dependency provides the libraries that contain the OpenAPI annotations we can use to describe the Reactive endpoints methods on the input adapter classes. This dependency lets us configure Swagger UI, too.
Remember that we configured four Java modules: domain, application, framework, and bootstrap. To activate and configure Swagger UI, we need to create the resource/application.properties file inside the bootstrap module. Here is how we can configure this file:
quarkus.swagger-ui.always-include=true
quarkus.swagger-ui.urls-primary-name=Topology & Inventory
quarkus.swagger-ui.theme=material
quarkus.swagger-ui.title=Topology & Inventory - Network Management System
quarkus.swagger-ui.footer=© 2021 | Davi Vieira
quarkus.swagger-ui.display-operation-id=true
mp.openapi.extensions.smallrye.info.title=Topology & Inventory API
mp.openapi.extensions.smallrye.info.version=1.0
mp.openapi.extensions.smallrye.info.description=Manage networks assets
We set quarkus.swagger-ui.always-include to true to ensure that Swagger UI will also be available when the application is started using the prod (production) profile – one of the built-in Quarkus profiles. With quarkus.swagger-ui.theme, we can configure the interface theme. We will use the remaining properties to provide a high-level description of the API.
Let's learn how to use the OpenAPI annotations to expose and describe the hexagonal system's endpoints. Look at the following example from the RouterManagementAdapter class:
@ApplicationScoped
@Path("/router")
@Tag(name = "Router Operations", description = "Router management operations")
public class RouterManagementAdapter {
@GET
@Path("/{id}")
@Operation(operationId = "retrieveRouter",
description = "Retrieve a router from the network
inventory")
public Uni<Response> retrieveRouter(@PathParam("id")
Id id) {
/** Code omitted **/
}
The @Tag annotation, which is used at the class level, lets us define the metadata information that's applied for all the endpoints defined in the RouterManagementAdapter class. This means that the method endpoints, such as the retrieveRouter method in the RouterManagementAdapter class, will inherit that class-level @Tag annotation.
We use the @Operation annotation to provide details of an operation. In the preceding code, we're describing the operation that's performed at the /{id} path. We have the operationId parameter here, which is used to uniquely identify the endpoint, and the description parameter, which is used to provide a meaningful operation description.
To make Quarkus and Swagger UI display a fancy UI of our hexagonal system's API, we just need to add these OpenAPI annotations to the classes and methods (properly configured with JAX-RS) that we want to expose on Swagger UI.
You can compile and run the application using the code from this book's GitHub repository. Make sure that you execute the following commands in the chapter12 directory:
$ mvn clean package
$ java -jar bootstrap/target/bootstrap-1.0-SNAPSHOT-runner.jar
This will open the following URL in your browser:
http://localhost:8080/q/swagger-ui/
Also, you'll see something similar to the following screenshot:
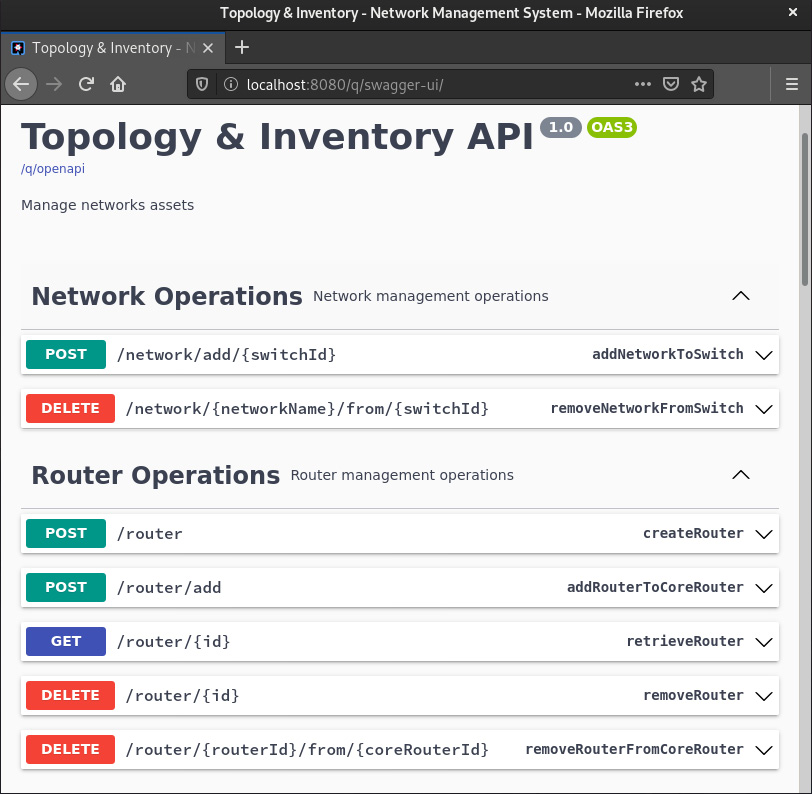
Figure 12.4 – Swagger UI from topology and inventory system
In the preceding screenshot, the operations are grouped into Network Operations, Router Operations, and Switch Operations. These groups come from the @Tag annotation we inserted for each of the input adapter classes. Each endpoint inherited its respective @Tag metadata information.
So far, we have our hexagonal system properly configured with Reactive endpoints that are well-documented with OpenAPI and Swagger UI. Now, let's learn how to test these endpoints to ensure they are working as expected.
Testing Reactive input adapters
Our testing efforts started on the Domain hexagon by unit testing the core system components. Then, we moved on to the Application hexagon, where we could test the use cases using behavior driven design techniques. Now that we have implemented Reactive REST endpoints on the Framework hexagon, we need to find a way to test them.
Fortunately, Quarkus is well equipped when it comes to endpoint testing. To get started, we need the following dependency:
<dependencies>
<dependency>
<groupId>io.rest-assured</groupId>
<artifactId>rest-assured</artifactId>
<scope>test</scope>
</dependency>
</dependencies>
The rest-assured dependency allows us to test HTTP endpoints. It provides an intuitive library that's very useful for making requests and extracting responses from HTTP calls.
To see how it works, let's implement a test for the /router/{routerId} endpoint:
@Test
@Order(1)
public void retrieveRouter() throws IOException {
var expectedRouterId =
"b832ef4f-f894-4194-8feb-a99c2cd4be0c";
var routerStr = given()
.contentType("application/json")
.pathParam("routerId", expectedRouterId)
.when()
.get("/router/{routerId}")
.then()
.statusCode(200)
.extract()
.asString();
var actualRouterId =
getRouterDeserialized(routerStr).getId().getUuid()
.toString();
assertEquals(expectedRouterId, actualRouterId);
}
To create a request, we can use the static io.restassured.RestAssured.given method. We can specify the content type, parameters, HTTP method, and body of a request with the given method. After sending the request, we can check its status with statusCode. To obtain the response, we call extract. In the following example, we're getting the response in the form of a string. This is because the return type of the Reactive endpoint is Uni<Response>. So, the result is a JSON string.
We need to deserialize the JSON string into a Router object before running assertions. The deserialization work is accomplished by the getRouterDeserialized method:
public static Router getRouterDeserialized(String jsonStr) throws IOException {
var mapper = new ObjectMapper();
var module = new SimpleModule();
module.addDeserializer(Router.class, new
RouterDeserializer());
mapper.registerModule(module);
var router = mapper.readValue(jsonStr, Router.class);
return router;
}
This method receives a JSON string as a parameter. This JSON string is passed to an ObjectMapper mapper when we call mapper.readValue(jsonStr, Router.class). In addition to providing a mapper, we also need to extend and implement the deserialize method from the com.fasterxml.jackson.databind.deser.std.StdDeserializer class. In the preceding example, this implementation is provided by RouterDeserializer. This deserializer will transform the JSON string into a Router object, as shown in the following code:
public class RouterDeserializer extends StdDeserializer<Router> {
/** Code omitted **/
@Override
public Router deserialize(JsonParser jsonParser,
DeserializationContext ctxt)
throws IOException {
JsonNode node =
jsonParser.getCodec().readTree(jsonParser);
var id = node.get("id").get("uuid").asText();
var vendor = node.get("vendor").asText();
var model = node.get("model").asText();
var ip = node.get("ip").get("ipAddress").asText();
var location = node.get("location");
var routerType = RouterType.valueOf(
node.get("routerType").asText());
var routersNode = node.get("routers");
var switchesNode = node.get("switches");
/** Code omitted **/
}
The deserialize method intends to map every relevant JSON attribute to a domain type. We perform this mapping by retrieving the values we want from a JsonNode object. After mapping the values that we want, we can create a router object, as shown in the following code:
var router = RouterFactory.getRouter(
Id.withId(id),
Vendor.valueOf(vendor),
Model.valueOf(model),
IP.fromAddress(ip),
getLocation(location),
routerType);
Once all the values have been retrieved, we call RouterFactory.getRouter to produce a Router object. Because a router may have child routers and switches, we call fetchChildRouters and fetchChildSwitches so that they also have StdDeserializer implementations:
fetchChildRouters(routerType, routersNode, router);
fetchChildSwitches(routerType, switchesNode, router);
We call the fetchChildRouters and fetchChildSwitches methods because a router may have child routers and switches that need to be deserialized. These methods will perform the required deserialization.
After deserializing the JSON string response, we can run the assertion on a Router object:
var actualRouterId = getRouterDeserialized(routerStr).getId().getUuid().toString();
assertEquals(expectedRouterId, actualRouterId);
To test the /router/{routerId} endpoint, we are checking if the ID of the router that's been retrieved by the Reactive endpoint is equal to the one we passed in the request.
You can run this and other tests that are available in this book's GitHub repository by executing the following command inside the chapter12 directory:
$ mvn test
The output of the preceding code will be similar to the following:
[INFO] -------------------------------------------------------
[INFO] T E S T S
[INFO] -------------------------------------------------------
[INFO] Running dev.davivieira.topologyinventory.framework.adapters.input.rest.NetworkManagementAdapterTest
2021-09-29 00:47:36,825 INFO [io.quarkus] (main) Quarkus 2.2.1.Final on JVM started in 2.550s. Listening on: http://localhost:8081
2021-09-29 00:47:36,827 INFO [io.quarkus] (main) Profile test activated.
2021-09-29 00:47:36,827 INFO [io.quarkus] (main) Installed features: [cdi, resteasy-reactive, resteasy-reactive-jackson, smallrye-context-propagation, smallrye-openapi, swagger-ui]
[EL Info]: 2021-09-29 00:47:38.812--ServerSession(751658062)--EclipseLink, version: Eclipse Persistence Services - 3.0.1.v202104070723
[INFO] Tests run: 2, Failures: 0, Errors: 0, Skipped: 0, Time elapsed: 5.418 s - in dev.davivieira.topologyinventory.framework.adapters.input.rest.NetworkManagementAdapterTest
[INFO] Running dev.davivieira.topologyinventory.framework.adapters.input.rest.RouterManagementAdapterTest
[INFO] Tests run: 5, Failures: 0, Errors: 0, Skipped: 0, Time elapsed: 0.226 s - in dev.davivieira.topologyinventory.framework.adapters.input.rest.RouterManagementAdapterTest
[INFO] Running dev.davivieira.topologyinventory.framework.adapters.input.rest.SwitchManagementAdapterTest
[INFO] Tests run: 3, Failures: 0, Errors: 0, Skipped: 0, Time elapsed: 0.085 s - in dev.davivieira.topologyinventory.framework.adapters.input.rest.SwitchManagementAdapterTest
2021-09-29 00:47:39,675 INFO [io.quarkus] (main) Quarkus stopped in 0.032s
The preceding output describes the execution of the Reactive endpoint tests for the RouterManagementAdapter, SwitchManagementAdapter, and NetworkManagementAdapter input adapters.
One benefit of executing these endpoint tests is that we are not only testing the endpoint functionality on the Framework hexagon but we're performing comprehensive tests that check the behavior of all the hexagons of the system.
Summary
In this chapter, we had the opportunity to dive into more Quarkus features, especially RESTEasy Reactive. We started by reviewing what imperative and reactive mean in the context of client-server communication.
Then, we learned that Quarkus provides RESTEasy Reactive as its JAX-RS implementation, enabling us to implement Reactive endpoints on input adapters. After that, we exposed the hexagonal system's API using OpenAPI and Swagger UI. And to ensure we implemented the Reactive endpoints correctly, we wrote the endpoint tests using the rest-assured library.
In the next chapter, we'll continue exploring the Reactive capabilities offered by Quarkus and emphasize the data persistence aspects with Hibernate Reactive.
Questions
- What is the difference between imperative and reactive requests?
- What is the name of the JAX-RS implementation provided by Quarkus?
- What is the purpose of OpenAPI?
- Which library should we use in Quarkus to test HTTP endpoints?