
Exposure Essentials
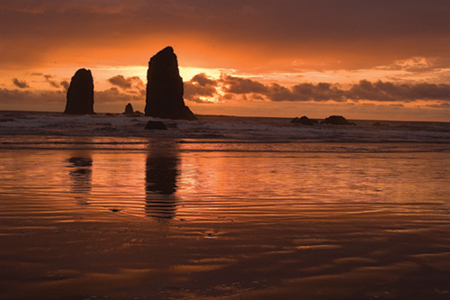
These sea stacks along the Oregon coast make beautiful silhouettes at sunset. The wet beach is reflecting the colors of the magenta sky.
Proper exposure is critical to shooting excellent nature images. The correctly exposed digital image avoids overexposed bright areas, has few noise problems in the shadows, and the pixels capture enough light so the colors are accurate. The cameras light meter working together with the lens aperture and the shutter determine the final exposure. However, there are times when the camera needs help to get the best exposure, so you must learn to do that too.
Fortunately, digital exposure is much easier than exposing slide film. Digital cameras let you see the image immediately so you can judge the exposure with the highlight alert and histogram. No longer do you wonder if the exposure “turned out” because using the highlight alert and histogram proves that it did. Although exposure with digital cameras is easier, it is still helpful to master exposure fundamentals. Understanding aperture values and shutter speeds and how they work together is necessary. Knowing the advantages and disadvantages of different metering patterns is essential. You must learn why some subjects need exposure compensation and how to do it.
Digital exposure requires you to keep detail in most highlights (specular reflections that have no detail anyway are exceptions) while retaining detail in the dark sections of the image too. The dynamic range is the difference between dark and light areas that can be successfully recorded with a digital sensor. It is about 6 stops of light. Since digital exposures can be instantly monitored with the highlight alert and histogram, it is easy to adjust the exposure while the subject is still present until you get exactly what you want. You could even bracket exposures widely, especially in tough situations, and then delete inferior exposures later with no cost. Both JPEG and RAW digital captures can be optimized with software to improve an exposure that is close, but not perfect.

Keeping detail in the white feathers of this Trumpeter swan is crucial to the digital photographer. Make sure the histogram data begins close to the right side without clipping.
RAW AND JPEG IMAGES
Before we discuss exposure in detail, it’s important to decide what kind of files you want to shoot because properly exposing the two is slightly different. Two common file formats are JPEG and RAW. A JPEG is a lossy file format that is processed by the camera for sharpness, saturation, white balance, contrast, and color space. A RAW file is unprocessed data from the sensor. RAW really refers to a family of file formats. Each manufacturer has their own proprietary RAW format. My Canon camera uses .CR2 and CRW, Barbara’s Nikon uses NEF, Olympus has .ORF, Fuji uses .RAF, and the other camera makes use different ones too. A RAW file must be converted with software to get the best quality.
There is a huge debate about which file format is the best one to use. While the debate is interesting, there is no wrong answer. A case can be made for both. Let’s look at the advantages and disadvantages of each before deciding what may be best for you.
JPEG Advantages
• JPEGs are processed by the camera so time is saved.
• They take up less space on the memory card.
• The cameras buffer empties quicker so you can keep shooting.
• Since JPEGs are smaller than RAW, the maximum burst rate is much higher which is good for action.
JPEG Disadvantages
• Data is thrown away when the JPEG is first made and each time you save it thereafter.
• JPEGs are limited to 8 bits of data which can cause posterization. This means you may lose continuous tones which cause banding, especially if you work on the image extensively with software.
• The processing parameters such as color space, white balance, contrast, exposure, saturation, and sharpening are locked into the file. This reduces your ability to make adjustments later with software.
RAW Advantages
• Since these files contain unprocessed raw data from the sensor, you have tremendous control over white balance, sharpening, contrast, color, saturation, and exposure.
• RAW files are more than 8 bits so you have more head-room (less chance of losing continuous tones) when using software to optimize the image.
• RAW converters offer excellent adjustments for noise control and lens defects.
• These large files fill memory cards fast.
• The number of images that can be shot in a continuous burst is greatly reduced.
• They must be processed by a RAW converter so this takes plenty of time.
WHAT FILE TYPE SHOULD YOU SHOOT?
The answer depends on your needs. If you want quality and don’t want to spend time processing RAW files, then a high-quality JPEG is the best choice. Of course, make sure you nail the exposure and set the white balance properly since it isn’t easy to adjust later once you shoot the shot. Cameras offer a variety of JPEG choices depending on the quality you want. It is best to select the highest quality. If you need a lower-quality JPEG for use on the web, it is easy to convert a high quality one to the size you need. If you love working on computers and want the finest quality image possible for making large prints, then shooting RAW images is clearly the way to go. RAW offers far more control for adjusting exposure, color, contrast, and white balance.
Just so you know, we shoot large JPEGs only when photographing friends, parties, and other subjects where the absolute best quality isn’t necessary and we intend to give the images away anyway. For serious nature photography, we only shoot RAW images. We shoot a lot of images, edit them ruthlessly, and keep only the very best. For example, Barbara was photographing two Reticulated Giraffes fighting in Samburu National Park. She held the shutter button down and took more than 200 images before the fighting stopped. By editing tightly, she only kept about 15 images from the series. In no way do I wish to imply that pros don’t shoot JPEGs. Professional sport photographers mainly shoot JPEGs because they need to use the images quickly to meet deadlines and the higher burst rate is helpful to properly photograph action.

These two reticulated giraffes were literally banging heads together. Wildlife interacting with each other frequently provides the chance to shoot exceptional images.
PROPERLY EXPOSING JPEGs
JPEGs really need to be perfectly exposed when you shoot the image. Due to the small bit depth, trying to make a JPEG image lighter or darker can cause all sorts of problems such as losing continuous tones. If at all possible, try to avoid clipping the right and left sides of the histogram. For most scenes, it is best to have the right side of the histogram graph begin close to the right side. It doesn’t have to be right on the edge, but hopefully the data is somewhat right of the center of the histogram. If the contrast in the scene is so great that you can’t avoid clipping, let the image clip on the left or black side of the histogram, preserving highlight detail on the right.
PROPERLY EXPOSING RAW IMAGES
Unlike JPEGs where the exposure needs to be right on when you shoot the image, RAW files offer tremendous latitude for exposure adjustments. Exposures that are no more than 1 stop overexposed or 2 stops underexposed can be improved with software. Essentially, RAW image files are like film negatives. By adjusting RAW files with software, it is possible (within limits) to make the exposure almost as good as if it had been exposed perfectly in the first place.
Although RAW files can be optimized for exposure, this still takes time and you may suffer some loss of quality. It is still best to perfectly expose the RAW image too. By using the histogram, it is easy to know when you have the perfect exposure. Your goal is to make the data on the histogram graph begin as close to the right side of the graph as possible without climbing the right side. A spike on the right side is called clipping and reveals pixels that have little or no detail because they are overexposed. If the pixel has no detail, there is no way to give it detail. Also, try to avoid getting a spike (clipping) on the left-hand side if possible. Obviously, if you have some completely black areas in the image, they may show up on the left side and that is fine. For most images, your histogram should begin at the right edge without clipping and end before it gets to the very left edge. This method of exposing RAW images is often called “exposing to the right”. By exposing RAW images this way, your digital file has the greatest flexibility and most detail. The sensor measures the light more accurately when you do this which reduces digital noise problems and the signal-to-noise ratio is much better. I could go into a long discussion about digital noise and signal-to-noise ratios, but if you shoot your RAW images so the histogram is snuggled up to the right side without clipping any detail, you really don’t need to know a lot about these.
EXPOSURE THEORY
You’ll learn how to get terrific exposures soon, but first let’s go over some exposure fundamentals that you need to know. If you already know this, then skip ahead a bit. But, if you don’t, you owe it to yourself to master exposure fundamentals.
Photographers have spoken the language of stops since the beginning. A stop is a quantity of light. All stops of light are the same amount of light. The two controls determining how much light strikes your digital sensor is the aperture and the shutter speed. Both of these can be divided into stop intervals.
Aperture Values
Here’s the standard aperture series.
1 1.4 2.0 2.8 4.0 5.6 8.0 11 16 22 32
These numbers are derived by dividing the focal length of the lens by the diameter of the lens effective aperture. You don’t need to know the math though. Here’s what you do need to know! Memorize the standard series of f-numbers that is listed above. If you remember the first two numbers, 1 and 1.4, and then alternately double those, you’ll generate the entire series of numbers. Most lenses start at f/2.8 or f/4 and go to f/22 or f/32. The aperture controls your depth of field which is the zone of acceptably sharp focus in the image. The depth of field is very small at f/2 or f/2.8 for example, but increases as you “stop down” to f/22. The aperture in the lens is largest when the f-number is smallest and smallest when the f-number is large such as f/22 or even f/32. This relationship confuses beginning photographers because it is counterintuitive. Big f-numbers refer to small apertures so bigger numbers like f/22 mean less light. The best way to get used to this relationship is to memorize the f-number series. Remember that as the f-number gets bigger (f/8 to f/11 for example), depth of field increases, but the size of the aperture decreases so less light passes through the lens. Moving the aperture to a bigger f-number subtracts light. Conversely, moving the f-number from f/16 to f/8 permits more light to pass through the lens, but you lose depth of field.
Now let’s talk the language of stops. Each of the numbers in the f-number series varies from its nearest neighbor by 1 stop of light. For example, f/4.0 is 1 stop from f/5.6 and f/2.8. The nice thing about stops is they are easy to add and subtract. If the aperture is set at f/8 and you want to add 2 stops of light, what aperture do you select? If you say f/16, you have moved the aperture 2 stops, but f/16 is a smaller aperture so you didn’t add 2 stops of light, you subtracted them. The correct answer is f/4.0. Your goal is to become comfortable using f/stops so you know what direction to go to increase or decrease the amount of light passing through the lens.
Be sure to understand the numerical relationship that exists. Each 1 stop move on the standard full stop scale is a doubling or halving of the light. Moving the aperture from f/8 to f/5.6 doubles the light striking the sensor. Moving the aperture from f/8 to f/11 is halving the light. Moving to f/16 is halving the light again so only 1/4 of the light that passed through the aperture at f/8 is available at f/16.
There is one final point. Remember that f-numbers are ratios between the focal length of the lens and the diameter of the aperture. Take a 24 mm and a 300 mm lens and stop the lenses down to a shooting aperture of f/16 with the depth of field preview lever or button. If you shine a light into the front of each lens you can easily see the apertures, are they the same size? Although both lenses are set at f/16, the 300 mm has a larger aperture than the 24 mm lens, yet both lenses pass the same amount of light. Remember that aperture size varies with the focal length of the lens. This information is helpful later on when we discuss how to shoot sharp images.
Shutter Speed Values
Shutter speeds are exposure controls too. The shutter is found right in front of your sensor. The speed of the shutter as it opens and then closes determines how long light can strike the sensor so that photons can be captured by the pixels. Here’s the standard shutter speed series in 1 stop intervals.
Shutter Speeds in Seconds
8 4 2 12 1/4 1/15 1/30 1/60 1/125 1/250 1/500 1/1000
Each shutter speed listed varies from it’s nearest neighbor by 1 stop of light. This series doubles or halves the light from 1 stop to the next too. Naturally, the longer the shutter is open, the more light that is recorded by the sensor. Changing to a longer shutter time such as 1/8 to 1/4 second adds 1 stop of light to the exposure. Moving to a faster shutter speed reduces or subtracts light. The shutter speed determines your ability to freeze action or to show motion. A fast shutter speed of 1/1000 second can sharply record a large flying bird if you pan with it. On the other hand, if you like the silky look in a waterfall, then you need an exposure time in the 1–4 second range to permit the cascading water to blur.
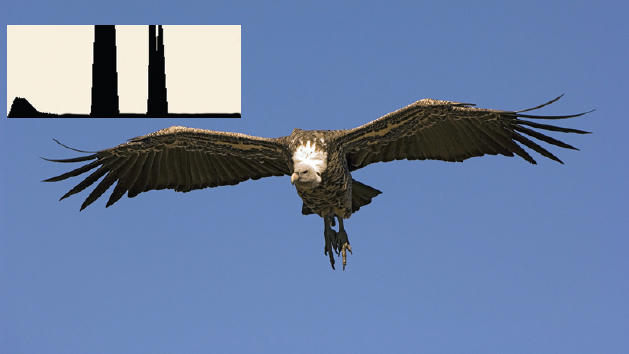
Continuous autofocusing and fast-shutter speeds in the 1/1000-second range can crisply record this Ruppell’s Vulture dropping in to feast on the scraps of a lion kill in the Masai Mara. The histogram shows some pixels that correspond to the white neck are near the right edge without clipping.
F-stop intervals
There is one more thing you must know. The f-number and shutter speed series listed above is for one full stop intervals. Nearly all cameras offer ½ stop intervals and many of them can be set for 1/3 stop intervals too. These interval choices are usually made using a custom function. What is the best interval choice to use. One stop intervals are too large for digital capture. One-half stop intervals are excellent, especially if you use the typical luminance histogram. One-third stop intervals are best if you are a control freak and you use the RGB channel histogram display that is offered on a few cameras.
Equivalent exposure (reciprocity)
F-numbers and shutter speeds work together to properly expose images. This is called the “Law of Reciprocity”. Suppose you are photographing a gorgeous mountain landscape. The camera is set on aperture priority and indicates proper exposure is 1/125 second at f/8. Since the landscape has a near foreground and distant background, depth of field is needed to get everything sharp so set the aperture to f/22. You subtracted 3 stops of light by going from f/8 to f/11 to f/16 to f/22. To maintain proper exposure, the shutter speed must be adjusted to compensate for subtracting 3 stops of light with the aperture. Since the initial shutter speed is 1/125 second, slowing the shutter down 3 stops to 1/15 second maintains the best exposure. The original exposure of 1/125 at f/8 is exactly the same as 1/15 second at f/22 and the reciprocity law works. On aperture priority, the camera automatically makes this adjustment for you. If you were using manual exposure, you have to make the adjustment yourself.
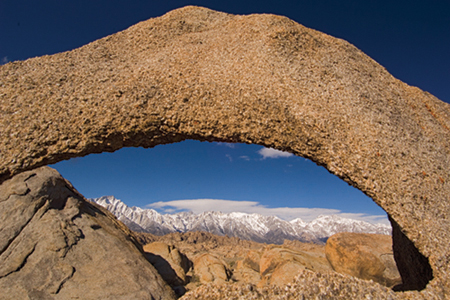
Stopping down to f/22 is necessary here to keep both the arch in the near foreground, the Alabama Hills, and the Sierra Nevada Mountain Range all in focus.
UNDERSTANDING THE EXPOSURE METER
The companies that make digital cameras want you to shoot excellent images and they work hard to design the camera to do exactly that. Yet, nobody has figured out a way to make an exposure meter deliver perfectly exposed images every time. Digital cameras have through-the-lens metering systems that often produce excellent results. Light travels through-the-lens aperture, is measured by the exposure meter, the shutter opens, pixels record how many photons hit them, and the shutter closes sending the sensor into darkness once again.
Ambient Light and Reflectance Problems
Your through-the-lens reflective light meter is a technical marvel and does a fine job, but it does have one major flaw. The problem with all reflective light meters is the reading they suggest is influenced by two variables. The amount of light reflected from any scene or subject is determined by how much ambient light is present and the inherent reflectance characteristics of the object being metered. The meter does its best to determine how much light is present to properly expose the subject. Obviously, there is more light illuminating a Canada goose on a bright sunny day than a dark rainy day. More ambient light is present on a sunny day. Ambient light varies depending on weather conditions such as cloud cover or time of the day. Ambient light varies a lot so the meter attempts to determine how much is out there so you’ll get a wellexposed image. But, there is another variable that influences how much light reflects from a subject. Suppose it is a sunny day and a white gull is fighting with a black crow over a scrap of food. Both birds are illuminated by the sun so each has the same amount of ambient light striking them. Yet the crow comes out much darker in the image than the white gull because the crow reflects a smaller percentage of the ambient light than the gull. This second variable is subject reflectance. Given the same amount of ambient light, white subjects reflect more light to the sensor than dark subjects. Now we have two variables, subject reflectance and ambient light. The camera meter attempts to solve the exposure equation with its sophisticated metering system. But, you might remember from high school math class it is pretty tough to solve an equation with two unknowns. The camera meter struggles with this too.
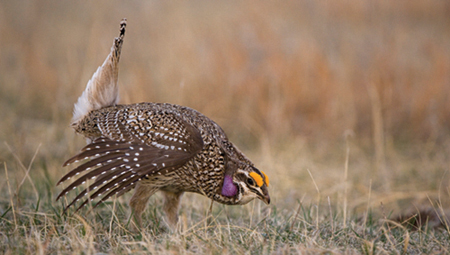
This male sharp-tailed grouse is dancing on a lek in central Nebraska during April. The sun hasn’t risen above the horizon yet so the light is dim.
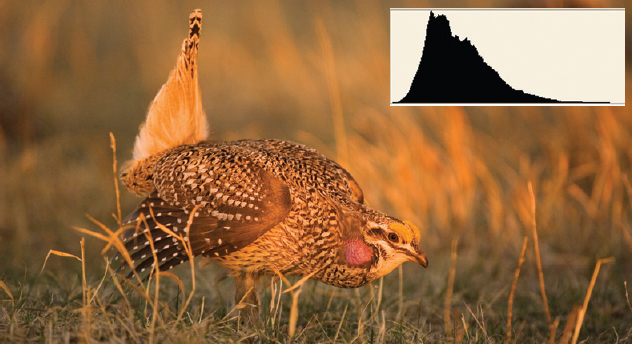
A few minutes later, this grouse is bathed in golden sunshine. Notice how the light is warmer and higher in contrast. The reflectance values of the grouse remain the same, but the amount of ambient light is much greater.
The Problem with Your Camera’s Meter
Since the exposure equation can’t be solved with two variables, camera manufacturers decided to say one variable, subject reflectance, doesn’t vary and is a known value. Now the meter can solve the equation for the ambient light variable. Therefore, camera meters are programmed to believe everything they “see” is middle tone which is known as 18% reflectance. Notice middle tone is not 50% reflectance. As it turns out, 18% reflectance is the middle tonality between pure white and solid black. Since the meter “knows” everything reflects 18% of the light, it can set the aperture and shutter speed automatically to yield great exposures. Many people say cameras are calibrated for 18% middle tone gray. Actually, the color gray has nothing to do with this. Middle tone could be 18% reflectance blue, red, green, brown, or even orange.
Since camera meters believe that everything they look at is 18% reflectance, why does it have a problem? You run into metering problems anytime you meter a subject such as a black raven in a snowcovered landscape where the actual reflectance varies considerably from 18%. Let’s suppose a black raven and an 18% gray Canada goose is standing in clean white snow. Everything is illuminated by the same amount of ambient light. If you meter the middle tone Canada goose, it will be perfectly exposed. If you meter the black raven, it will be overexposed. The camera makes it 18% reflectance so it lightens up the raven way too much. If you meter just the white snow and shoot, the snow comes out with 18% reflectance so it is too dark. Your exposure meter is not smart. The meter has been programmed to believe that everything it “sees” is 18% reflectance. Since most things are not 18% reflectance, the meter knows one thing which is wrong most of the time. The meter only knows how to expose middletone scenes well. The meter tries to make whatever it “sees” to be middle tone in reflectance which sometimes is not the best exposure. We’ll learn how to compensate for subject reflectance shortly to get the best exposure.
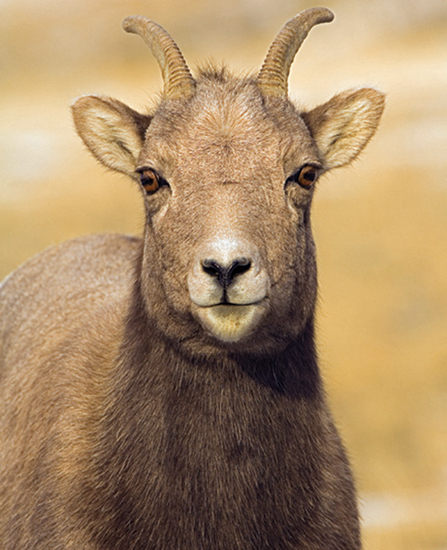
The soft brown fur of the young bighorn sheep is close to middle tone reflectance so a meter reading off the fur should produce a fine exposure.
Metering Choices
Digital cameras offer choices of metering patterns. Depending on the model and manufacturer, the names for similar choices may be different and the number of choices vary as well. My Canon-1Ds Mark II offers four metering choices which include Evaluative, Partial, Spot, and Center-weighted averaging. Barbara’s Nikon D70 has three metering choices that include Color Matrix, Center-weighted, and Spot.
Evaluative or Color Matrix Metering Mode
These choices are similar. They divide up the image into many sectors which are analyzed by the camera using complicated algorithms to determine the exposure. The camera compares the brightness of the subject and the background, compensates for backlighting, and other variables. If you are going to use automatic exposure, this sophisticated mode is an excellent choice.
Center-Weighted Averaging
This metering mode meters the entire scene, but puts emphasis on the middle of the image because that is most likely where the subject is. It works well when bright sky is near the top of the frame because the sky doesn’t influence the meter much. Center-weighted averaging works okay, but evaluative or color matrix metering really does a better job handling most situations.
Partial Metering
This mode uses the center of the frame to determine exposure. It is most effective when bright areas surround the frame. Since the meter only considers the center of the frame, it ignores white clouds at the top of the frame that might cause the camera to underexpose the main subject.
Spot Metering
This metering mode measures the light only from a small area in the middle of the frame which makes up about 2–3% of the viewfinder. It is the most precise way to meter, but requires a good deal of practice and study to really master. You must meter carefully, learn to judge reflectance values, and know how to compensate the exposure. Spot metering is the best way to expose slide film, but may be overly precise for many digital photographers due to the slightly wider dynamic range digital can capture and the use of the highlight alert and histogram metering aids. Nevertheless, we use spot metering with the camera set on manual for nearly all of our landscape and closeup images while using evaluative for most wildlife photography.
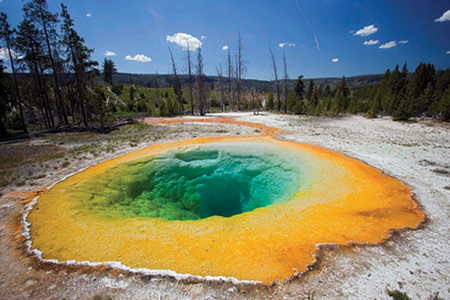
The partial or spot metering pattern works best at Morning Glory Pool. We would spot meter the orange foreground, add one stop of light and check the histogram to be sure that compensation is correct.
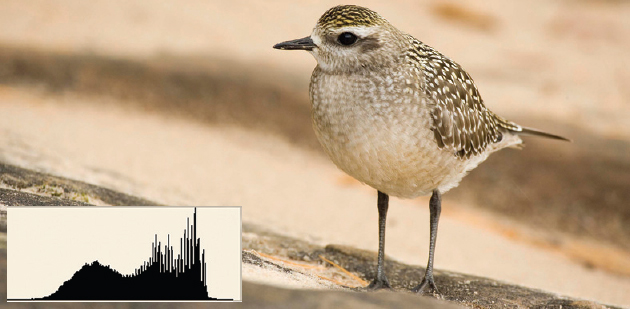
Aperture priority keeps the aperture set at f/8 so the background is nicely thrown out of focus while maintaining decent sharpness on this American Golden-Plover.
Shooting Mode Choices
The Canon EOS 20D body offers numerous autoexposure modes that include landscapes, flowers, sports, closeups, aperture priority, shutter priority, program, manual, and automatic depth of field to name a few. The modes that are most useful to serious nature photographers are aperture priority, shutter priority, and manual exposure.
Aperture Priority
This shooting mode is the most widely used choice among nature photographers. This automatic exposure choice let’s you determine the depth of field by selecting the aperture. If you are photographing a landscape where you have a nearby foreground and distant background, set the camera to f/16 or f/22 to cover the depth in the scene. On the other hand, if you were taking a wildflower or deer portrait, it is effective to isolate the subject against an out-of-focus background so setting f/5.6 to reduce the depth of field might be best.
The aperture priority mode keeps the aperture you select while allowing the shutter speed to vary to maintain the exposure. If the ambient light changes, the camera automatically adjusts for changing light levels by selecting a different shutter speed so the aperture can stay where you set it. The aperture has priority over the shutter speed.
This mode works in the same way. You set the desired shutter speed and the camera adjusts the aperture. It is not as widely used as aperture priority, but does have it’s place. Photographing flying birds is a good place to use it. Suppose you are at Bosque del Apache in New Mexico during December. This wildlife refuge is famous for hosting thousands of wintering sandhill cranes and snow geese. It is a terrific place to photograph these birds in flight. By panning with the birds, it is quite easy to use autofocus and get sharp images if you have a shutter speed of 1/1000 second. By using shutter priority, you could set the camera on 1/1000 second so the aperture varies to keep the best exposure. Some photographers know they need high shutter speeds to record the birds sharply on the sensor, so they use aperture priority and set the lens aperture wide open at f/4. Let’s say proper exposure for the lighting conditions with ISO 400 is f/8 at 1/1000 second. Setting the camera on aperture priority and picking f/4 forces the camera to use f/4 at 1/4000 second. The very fast shutter speed of 1/4000 second does freeze the flying birds, but so does 1/1000 second. Using 1/4000 second is unnecessary. It’s desirable to use a shutter speed of 1/1000 second because you’ll get more depth of field at f/8 to sharply focus each bird in the flock.
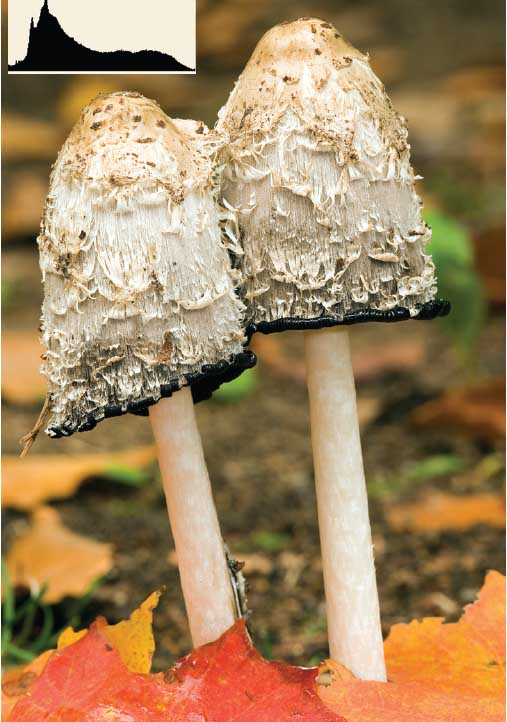
Using manual exposure to meter the caps of the mushrooms and adding one stop of light should work fine. Since these shaggy mane mushrooms aren’t going anywhere, there is plenty of time to check the histogram and highlight alert.
I use shutter priority when photographing wildlife in Kenya. Since I use a bean bag from the safari vehicle all of the time, I am confident of getting sharp images if I maintain a shutter speed of 1/250 second. By forcing the shutter to stay at 1/250 second, the aperture adjusts for changing light and frequently gives me more depth of field to use. The extra depth of field I get because I don’t needlessly using shutter speeds higher than necessary makes it easier to sharply photograph a group of giraffes on the horizon or a herd of wildebeest.
Manual Exposure
This is our preferred choice when photographing non-wildlife subjects. This method requires you to adjust both the aperture and shutter speed while looking at a metering scale inside the viewfinder to get proper exposure. Used in conjunction with the cameras through-the-lens spot meter (not all cameras have one), it is a precise way to get the exposure you want. But, there is a learning curve. You must learn to adjust the shutter and aperture controls and understand the metering scale in the camera in detail. You also must judge reflectance values and learn how to compensate for them and this takes practice.
AIDS TO HELP YOU GET THE BEST EXPOSURE
Histogram
The histogram is the key to making sure you get the best exposure. While the histogram might seem to be difficult to understand at first glance, it actually is a very simple bar graph of your exposure. It’s a graphic representation of the exposure. The graph shows 256 shades of gray along the horizontal axis, beginning with solid black with a value of 0 on the far left to a pure white value of 255 at the far right. The vertical axis shows how many pixels there are at each of the 256 possible values.
If you overexpose the image, you’ll see a spike at the far right side of the histogram. This spike represents pixels that are overexposed. Normally you want to avoid overexposed pixels because they have little or no detail. However, some specular reflections from metal or water have no detail anyway so it is okay to have a small spike on the right-hand side if your scene includes these brilliant highlights.
Try to avoid spikes on the far left side of the histogram too. A spike here reveals pixels that have no detail because the light was so dim that these pixels didn’t record much data about the light. However, many scenes have deep blacks or dark shadows so do expect some pixels to show up on the left side of the graph. While the exposure can be darkened or lightened with software, having many dark pixels can become a problem due to digital noise which are pixels that show up as unexpected colors or brightness values from neighboring pixels.
Spikes of pixels that appear on the far left or right of the histogram are said to be clipped. It is important to reduce clipping as much as possible because clipping indicates detail may be lost. Clipping can be minimized or eliminated entirely by making the appropriate exposure compensation. However, don’t be alarmed if you see a spike in the histogram that goes up to the top, but isn’t on the left or right edge. This is not clipping! It merely means a lot of pixels have exactly that value. This happens anytime you photograph something that has many similar tones. A set of cottontail rabbit tracks in the snow creates a histogram that goes off the top of the graph because many of the tones in the image are the same.
Histogram Shapes
There is no such thing as a perfectly shaped histogram. The shape depends on the tones that make up the image. Try photographing a meadow full of wildflowers where some flowers are white, but most of the meadow is light and dark shades of green, with a few black shadows thrown in. The histogram looks like a mountain range where a few tones appear in the black and white portions of the graph and then the tones gradually rise up toward the middle where the majority of the tones in the scene are found.
Try photographing a dark subject in the snow such as a bison in the snow at Yellowstone. Most of the tones are either very light or very dark with little else in-between. You’ll get a histogram that has two dominant hills of data. One hill represents dark pixels and the other shows the light pixels. You may see gaps in the middle of the histogram, but don’t be alarmed. These gaps merely show tonal values that don’t exist in the image.
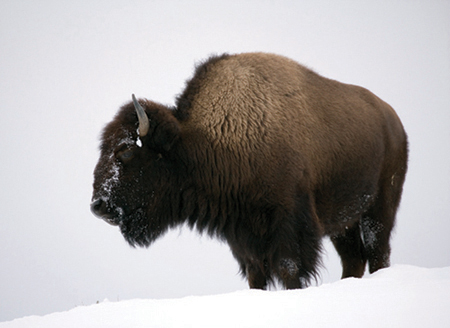
There is no such thing as the perfectly shaped histogram. The histogram is dependent on the tones in the scene. You can expect two clumps of data if you properly expose this bison in the snow. One hill of data will be near the right side for the white snow and the other near the left side for the dark fur with little in-between.
Highlight Alert
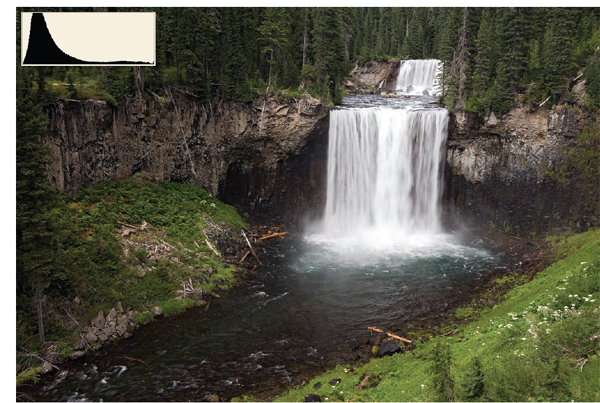
Digital cameras offer a highlight alert or warning function to help you avoid overexposing the image. You may need to turn this feature on before it operates. The control is normally listed on a menu. When the highlight alert is turned on, any pixels that are overexposed blink off and on when you view the image on the cameras LCD monitor. Many photographers refer to flashing pixels as the “blinkies”. Try to reduce or eliminate blinking pixels since these represent pixels with no detail. There are times when it is fine to have a few blinkies though. While photographing Scott Fall, I noticed the whitest part of the waterfall where water struck the plunge pool was blinking. Dark rocks surrounded the waterfall. If I reduced the exposure enough to eliminate blinking pixels, the dark areas were clipped on the black (left) end of the histogram. Since there was no detail in the foamy white water anyway, there was no reason to be overly concerned about overexposure. It would come out white in the print with no detail, just as it looked in real life. By allowing a few pixels to be overexposed in the white water, more detail could be captured in the rocks.
Problem Situations for Autoexposure
While evaluative metering works nicely, there are times when manual exposure and spot metering are better. I was photographing gorgeous Colonnade Falls in the backcountry of Yellowstone National Park. This waterfall is seldom photographed due to its remoteness so I composed as many compositions as possible. I composed a tight shot with my constant aperture 24–70 mm f/2.8 L lens. Using the camera on evaluative metering, I took a shot and checked the histogram which showed I needed to give the scene more light so I set my cameras compensation dial to +1 to get the best exposure. The large amount of white water the meter “saw” caused the underexposure problem. Then I composed a shot so less white water appeared in the image and more dark pine trees. When I took the picture, my highlight alert immediately showed I was overexposing some of the white water so I set the camera to zero compensation to get an excellent exposure. Then I made the waterfall even smaller by zooming in to 35 mm and again the highlight alert came on so I made another adjustment. Every time I changed the focal length, a different percentage of white water and dark trees occupied the frame so the meter kept changing the exposure even though ambient light wasn’t changing. This forced me to constantly adjust the exposure with the compensation dial.
Using autoexposure with a zoom lens was a disaster here. As I zoomed in and out composing different shots of Colonnade Falls, the camera constantly changed the exposure since the meter was reading varying amounts of white water and dark trees.
Finally, I decided to use manual exposure and spot metering. I metered the whitest water only and compensated for the reflectance by adding 1.5 stops of light with the shutter speed. The histogram showed this was the best exposure. Now I could zoom in and out all I wanted and the best exposure wouldn’t change unless the ambient light level changed.
A Serious Autoexposure Problem
When using a tripod to shoot landscapes and closeups, your eye isn’t normally peering through the cameras viewfinder. This means light can enter the viewfinder which could make it impossible to get a good exposure. This problem commonly occurs when you are using a device that cost you light such as a polarizing filter, macro lens focused at high magnification, extension tube, or teleconverter. If the viewfinder is pointed at a bright source of light such as the sun or bright sky, you may have a serious underexposure problem when using any automatic exposure mode. Using the exposure compensation dial won’t help either. In this situation, light enters the viewfinder and the meter measures it along with light coming through the lens. The meter doesn’t care where the light is coming from so it considers all of it and sets the exposure. However, light from the viewfinder doesn’t record on the sensor since the mirror blocks this light causing underexposure. Most cameras have a way to block the viewfinder by placing a plastic cover over the viewfinder or closing a built-in curtain. This solves the problem! Unfortunately, you have to do it with every different shot. It gets monotonous closing and opening the viewfinder. Holding your hand closely in front of the viewfinder solves the problem too, but you have to do it every shot. If you meter on manual, light entering the eyepiece is not a problem at all. For this reason, you may want to use manual exposure anytime you shoot images where your eye isn’t up to the viewfinder.
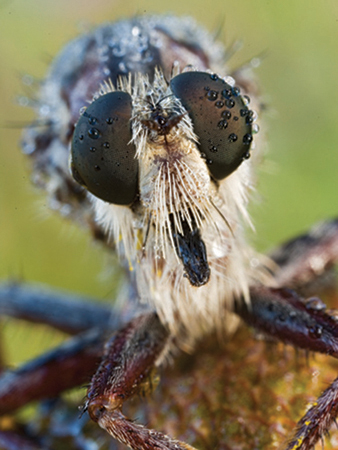
Robber fly
In some situations such as high-magnification closeup photography where you lose a lot of light through the lens, autoexposure can be thrown off by light entering the viewfinder causing underexposure.
EXPOSURE COMPENSATION
Using automatic exposure is a proven way to effectively take many wonderful images. Since you know meters have problems with subject reflectance, it is necessary to learn to compensate the exposure. You’ll find that at least half the time you need some exposure compensation to get the very best exposure. Fortunately, exposure compensation is easy to do, especially when you have the histogram and highlight alert to guide you.
Exposure compensation is most likely necessary anytime you photograph a subject that has bright highlights and very dark shadows. Backlighting also tends to create a need for compensation. In both cases, extreme contrast causes the need to compensate. Photographing anything where the scene is full of tonal values significantly more reflective than 18% or less reflective than 18% needs to be compensated too. For example, the sand dunes in Death Valley National Park are more reflective than 18%. You’ll find you need to compensate for the reflectance of the sand by adding 1 to 1.5 stops of light to the exposure. Snow scenes are even more reflective so they might need +2 full stops of compensation to get the best exposure. A landscape image of a pine forest might be darker than middle tone due to the dark bark and shadows present in the scene so −0.5 stops of light could be the perfect compensation.
Digital cameras have an exposure compensation dial or button somewhere on the camera body. Study your manual to find out where it is. Be careful though, most cameras have an exposure compensation dial for natural light which is what you want to find right now, plus another one for flash. Don’t get the two confused! Adjusting the flash compensation control won’t do anything for your natural light exposures and vice-versa.
Use the histogram to determine when exposure compensation is needed. For example, if you set your camera on aperture priority and evaluative and photograph a mostly white snow scene, your exposure will be too dark. Since most of the scene is white, the meter tries to make it middle-tone so the pixels representing the lightest areas are too far from the right side of the graph. To get the most detail in a RAW image, move the right side of the data so it is snuggled up to the right edge of the graph without clipping any of the pixels. If you were shooting a JPEG, you still want to move the histogram to the right, but not all the way to the right edge. To compensate the exposure, set the natural light compensation control to +1, block the viewfinder, and shoot another shot. Check the right edge of the data and make sure it is close to the right side of the histogram. If it isn’t close enough, then try + 1.5 stops of compensation and keep checking until it is where it should be.
Understanding the Exposure Compensation Button
This control is quite easy to use once you get used to it. The compensation button is set up in stops of light just like your apertures and shutter speeds. Depending on the camera, the stops might be 1, ½, or 1/3 stop intervals. The scale you see has a negative direction (less light) and a positive direction (more light). To move the pixel values to the right, you must add more light by setting positive compensation. If you are getting blinking pixels as shown by the highlight alert and clipping the pixels on the right-hand side, then compensate the exposure by setting negative values to reduce the exposure. Normally, all it takes is one or two adjustments with the exposure compensation control to get the perfect histogram.
Compensating Manual Exposures
If you decide to use manual exposure and meter with your through-the-lens spot meter, that’s a great way to go to. But, you still need to compensate the exposure on manual. In the manual mode, most cameras show an exposure scale inside the viewfinder. This scale may be divided into full, ½ or 1/3 stop intervals. Be sure to check the scale carefully so you know exactly what you have. Depending on the camera, the scale might cover a range of 1 stop, 2 stops, and even 3 stops in some cameras. The middle of the scale is zero compensation. When you manually meter using your through-the-lens spot meter, it’s effective to adjust the shutter speed and/or aperture so the exposure indicator lines up with the zero point. From there you can adjust for subject reflectance. In the case of a snow scene or white flower, try spot metering only the white area and move the shutter speed or aperture so the exposure indicator that you see inside the viewfinder lines up at the +2 position. If you were photographing a black bear, meter the dark fur of the bear and compensate for the reflectance of the dark fur by moving the aperture or shutter speed so the meter lines up on the −1.5 stop position. Of course, always check the histogram and highlight alert to guarantee you have the best exposure.
Exposure Bracketing
Viewing the LCD monitor to check the histogram and highlight alert is a problem in bright ambient light. Rather that struggle trying to view the monitor in bright light, it’s effective to use auto bracketing in situations that don’t involve catching the decisive moment. Any digital image such as a wildflower portrait, landscape, or closeup of a dewy spider web can be handled quite nicely with auto bracketing.
Depending on the camera model, it may have a number of ways to set up the auto bracketing feature. Autoexposure bracketing means the camera automatically adjusts the exposure from one shot to the next, depending on the parameters you set. For example, my Canon cameras can be set to shoot three exposures that vary from each other by ½ stop intervals. The first exposure is what the meter thinks is the best. The second exposure is ½ stop darker and the third is ½ stop lighter. As auto bracketing suggests, the camera automatically brackets the exposure a set amount which you choose around the exposure that you set manually or what the camera sets automatically. Rather than struggle trying to view the LCD monitor in bright ambient light, at times it is smarter to get the best exposure by letting the camera bracket the exposure. Then download the images to your computer and use your software program to select the best exposure by checking the histogram of each image in the bracketed series of three.
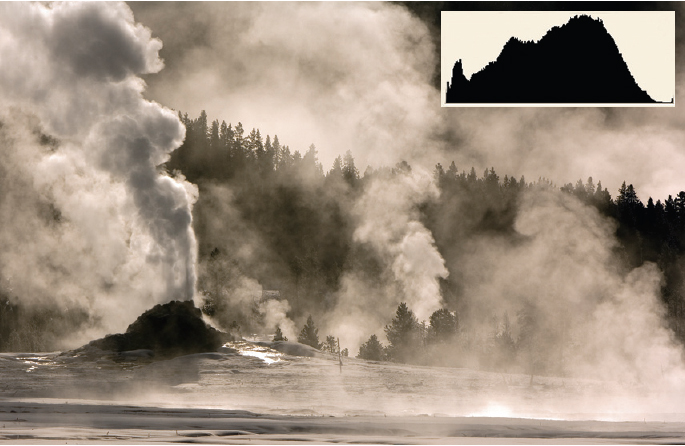
White Dome Geyser backlit is a tough one to meter. Use the histogram in the field to get close and then bracket the exposure so you can select the best one on the computer.
By having the camera bracket the exposure ½ stop (or 1/3 stop if you like smaller exposure increments) either side of what you think is the best exposure, it is easy to get at least one excellent exposure, especially if you use the compensation dial too (when necessary) to get the exposure close in the first place.
ISO CONSIDERATIONS
Digital Noise
ISO stands for International Organization of Standards. It was originally used by film manufacturers to rate the speed of their film. In theory, any film that was rated ISO 100 would have a similar exposure to any other film with the same ISO rating. An ISO 50 film was considered slow while ISO 400 was a fast film. You might think the higher speed films were more useful because fast films permitted using higher shutter speeds to stop action or stopping down the lens more for depth of field while still maintaining higher shutter speeds to get sharp images. However, nature photographers shunned high-speed film. High-speed films were less colorful and worst of all, the light sensitive silver grains in the emulsion were larger than slow-speed films. These large particles tended to appear in the image as tiny bits of sand called grain. While grain sometimes had a moody appeal, normally it was a distraction in a print and made the image appear soft.
Film has grain. Digital does not. All the pixels on a sensor are the same size. Yet ISO values are still used. A digital sensor has a native speed or ISO. This means when the sensor is made it has a specific inherent speed. Digital cameras typically have a native speed of ISO 100 or ISO 200. These cameras permit you to vary the ISO from the native setting. They do this by changing the sensitivity of the sensor circuits. You want to take advantage of the ISO choices offered by your camera. For example, a Canon EOS 20D offers a choice of ISO 100, 200, 400, 800, or 1600. By using a custom function, it is possible to select ISO 3200 for really dim light. Each of the ISO choices in this series beginning with ISO 100 is twice as sensitive to light.
Digital Noise
Since digital doesn’t have grain, surely it is best to use ISO 1600 all the time. ISO 1600 provides plenty of shutter speed for sharp images and makes it easy to stop the lens down for more depth of field. However, digital noise becomes a problem. The more you amplify the electronic sensor data, the more “noise” problems you have. It also occurs during long exposures in the 1 second and longer range. Digital noise most frequently occurs in the dark areas of an image. Digital noise is individual pixels that are much brighter or darker than their neighbors or they are odd colors when all the neighboring pixels are a different color. Prints made from a digital image that have a lot of noise appear to have grain.
To get the best image quality, use the cameras native ISO speed whenever possible since digital noise is low. Some cameras have a digital noise reduction feature when shooting at long shutter speeds in the 1 second and longer range. This does work well so do use it. However, it may double the time to take an exposure. With a 4-second exposure, it may take the camera twice as long to take the image due to the noise reduction feature so you must wait a bit longer between shots.
ISO SHOOTING STRATEGIES
There are times to use other ISO settings besides the native one in nature photography. Using a 500 mm lens to photograph wildlife is a good time to choose a higher ISO. Long lenses magnify the animal as well as any camera movement that happens when you shoot. High shutter speeds reduce this problem so many nature photographers routinely use ISO 200 when using long lenses, even in fairly bright light. In really dim light on a cloudy day or very early or late in the day, using ISO 400 or even ISO 800 may be necessary to reach fast enough shutter speeds to shoot sharp images. While you may see some noise at the higher ISO settings, it still is better to get sharp images with some noise artifacts than fuzzy images using the native ISO with no noise problems.
Being able to change the ISO on a digital camera from shot to shot is a huge advantage. It is easy to adjust the ISO on a digital camera to suit the light conditions. You should set the ISO to suit the light conditions to get the shutter speed you need. To blur a waterfall, a shutter speed in the one second range is necessary. To photograph a waterfall with a long shutter speed, put on a polarizing filter which absorbs about 2 stops of light, stop the lens down to f/22, and set the lowest ISO setting offered by your camera. On a dark cloudy day, that combination should put you in the desired shutter speed range of 2–4 seconds. These long shutter speeds permit the water to blur during the exposure imparting a silky look to the water.
If you want to sharply photograph a flamingo or sandhill crane flying past, then shoot the lens wide open at f/4 and set the camera to ISO 200 or even ISO 400 to get more shutter speed. There are times to push the ISO up to get more depth of field too. If you were photographing a colony of penguins or flock of birds in flight, using ISO 800 and setting the camera to f/8 or even f/11 if the light is bright enough gives you enough shutter speed to make a sharp image while having enough depth of field to cover the subject adequately.
FINAL THOUGHTS
Always use the histogram and highlight alert to fine tune the exposure. Avoid the temptation of judging the exposure by how the image appears on the LCD monitor. Looking at the image on the cameras monitor is worthless for judging the exposure because the brightness of the image depends on the angle you view the monitor. By changing the viewing angle, you can make a perfectly exposed image look too dark or too light. Plus, many cameras let you make the monitor brighter or darker so how can you judge an image for exposure. Avoid this common mistake of using the LCD monitor to judge exposure. Use the histogram! It’s the perfect tool for judging exposure because it tells you exactly how your pixels are exposed. Do not judge the exposure by how bright the image appears on the computer monitor either. Once again, brightness controls in the computer, ambient light levels in the room, and viewing angles all play a part in how bright the image appears. If you always use the histogram to judge exposure, you will know when it is correct.