4 A Basic Workflow for Silver Printing
This chapter describes the process we use to make a traditional silver print from a digital negative. We present our process here in a step-by-step recipe for you to follow. The recipe has three basic stages: preparing the image in Photoshop®, printing the negative on a desktop printer, and printing the silver image in the darkroom. We have taught this process to hundreds of students and most find that they make a pleasing print on the first try.
The essential element of this process is the correction curve. We provide a correction curve for our specific process using the Epson 2200 printer, Matte Black ink, Photoshop CS2, Pictorico High-Gloss White Film, and Ilford Ilfobrom Grade 2 paper. For the best results, you should try to mimic our process as closely as possible. We have tried to select materials that simplify the process where possible. (If you are unable to mimic our process exactly, don’t give up; just give the process a try, knowing that your final print might not be precisely calibrated.) This recipe is designed to give you a taste of how to make silver images from a digital negative. Eventually, you will want to create your own correction curves, as outlined in Chapter 7.
Box 4.1 Correction Curves
Correction curves for this process are available on the Web site: www.digital-negatives.com. This chapter describes the process using the Epson 2200, but additional curves are available for the Epson R2400, the Epson 4000, and other printers. Each curve is bundled in a .zip file containing specific instructions for using the curve.
Box 4.2 Materials Needed to Make an 8 × 10-inch Silver Print
For preparing the image
• A computer with a calibrated monitor
• Photoshop 7.0, CS or CS2
• An image that has been adjusted to look good on your computer screen
• A correction curve for the specific silver process: 2200-UCmk-Gloss-AG.acv (available on the Web site: www.digital-negatives.com)
For printing the negative
• An inkjet printer (we’ll use the Epson 2200 for this example)
• Pictorico High-Gloss White Film, letter size
For printing the silver print
• Ilford Galerie Glossy FB Graded #2 paper, 8 × 10-inch
• A contact print frame
• A light source
For developing the silver print
• Four photo trays, 11 × 14-inch tray
• Ilford developer
• A standard fix
An essential idea to printing images with digital negatives is that all of the imaging tuning work should happen in the computer. You will not get to do any burning or dodging in the darkroom, printing onto the silver paper is a fairly mechanical process. In order to edit images well on your computer screen, you will need to have a properly calibrated computer. The steps for calibrating your computer are outlined in Chapter 8.
The basic steps for preparing the image for printing the digital negative are quick and easy.
- Edit. Open a positive, grayscale image in Photoshop and edit it until it looks as you want it on the computer screen. Some further details on image editing are provided in Chapter 3, Capturing the Optimal Image.
- Duplicate the image. The steps for preparing the image are destructive and are best performed on a flattened image. You should duplicate the image so as not to apply these changes to your original edited file. Select Image > Duplicate…; in the Image Duplicate window (Figure 4-1), change the name to ‘My Image Negative.’ Check the box Duplicate Merged Layers Only to flatten the duplicate image.
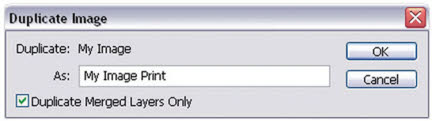
Figure 4-1 Duplicate Image window.
- Resize the image. The image should be resized for your target print size and the appropriate resolution for your printer. Select Image > Image Size. In theImage Size window (Figure 4-2), change the Width or Height settings to make the image about 8 × 10 inches or smaller; Photoshop automatically changes the other value to ensure that the image retains its proportions. Also, change the Resolution to 360 ppi. Almost all printers print at 300 ppi, but Epson printers print best at 360. Click OK to resize.
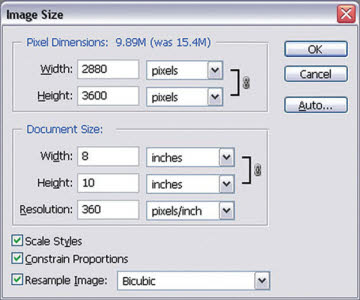
Figure 4-2 Image Size window.
- Apply the correction curve. The correction curve for printing negatives for silver printing using the Epson 2200 is available as 2200-UCmk-Gloss-Ag.acv on the Web site: www.digital-negatives.com. Additional correction curves are available for other printer models. Download the .zip file containing the correction curve and move the curve file into a folder to hold all your correction curves.
In Photoshop, open the Curves window (Image > Adjustments > Curves). Click the Load button. This opens a Load window (Figure 4-3). Search for your correction curves folder, select the appropriate curve film, and load it.
Figure 4-3 Load a curve.
- The curve file will make your image appear flat by reducing the contrast of the image (Figure 4-4).
- Invert and flip the image. You will be printing a negative, so the image needs to be inverted. Go to Image > Adjustments > Invert. The printed negative will be placed face down on the silver paper to print; this flips the image left-to-right. So the negative should be flipped once in the computer to ensure the final image has the original orientation. Go to Image > Rotate Canvas > Flip Canvas Horizontal.

Printing the Negative on the Epson 2200
The steps in this section provide the precise instructions for printing a digital negative onto Pictorico High-Gloss White Film using the Epson 2200 printer running on Microsoft Windows® XP. Since the instructions for printing are identical for both the White Film and for the OHP Transparency Film, we provide printing instructions Apple Macintosh® OSX 10.4 in the section Printing the Negative in Chapter 5.
- Adjust the printer in-feed to accommodate media 8½ inches wide and slide in a sheet of 8½ × 11-inch Pictorico High-Gloss White Film, printable side up (there should be a notch in the upper right corner when the printable side is facing you). Make sure that your printer has the matte black ink cartridge installed (rather than the photo black). This was the ink we used when creating the correction curve.
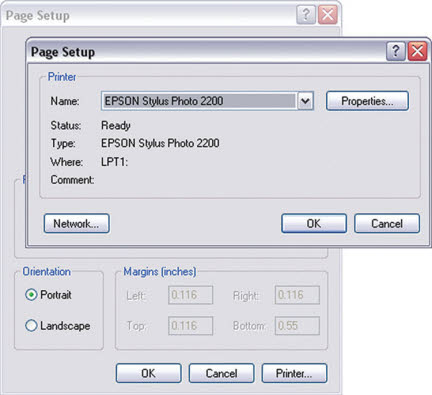
- In Photoshop, with the negative image open, open the Print Setup window (File > Print Setup). Click the Printer button to open the Page Setup window (Figure 4-5). Select the printer from the Name drop list (Epson Stylus Photo 2200) and click OK to return to the main window.
In the main Page Setup window, select the letter (8½ × 11 inch) paper size, the sheet paper source, and the correct paper orientation (vertical or horizontal). Click OK to close the window.
- Now open the Print with Preview window (File > Print with Preview) (Figure 4-6). On the left, you will see the negative image positioned on an 8½ × 11-inch page. This is a reality check. If image size or orientation is not correct, go back to the Image Size or Page Setup window and correct them. On the lower left-hand side of the Print with Preview window is a drop box that has two options: Output and Color Management. Select Color Management from the drop list. Further down, in the Options box, set Color Handling to No Color Management. (We discuss the reasons for these settings in Chapter 9, About Printers.) At the top right-hand corner of the Print with Preview window, click Print.
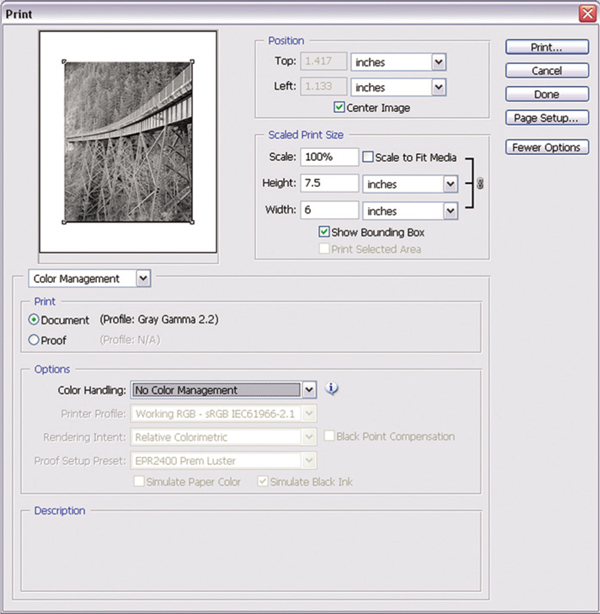
Figure 4-6 Print with Preview window.
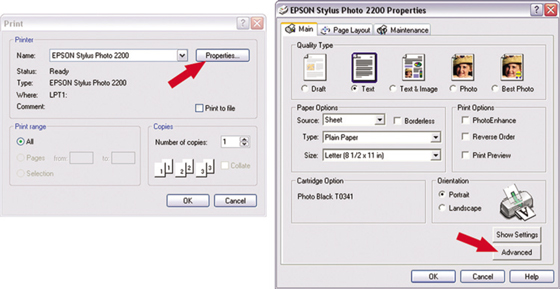
- In the Print window, make sure that Epson 2200 is the selected printer (Figure 4-7A). Click the Properties button to access the Epson Stylus Photo 2200 Properties window (Figure 4-7B). In the Properties window, click the Advanced button to access the advanced properties settings.
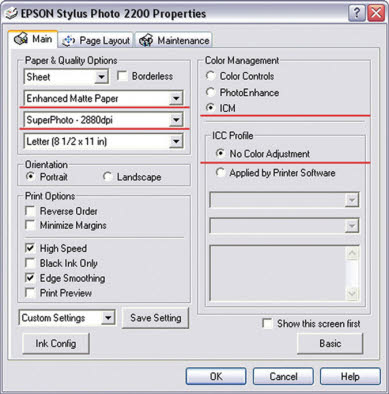
Figure 4-8 shows the Advanced Properties settings for the Epson 2200. Under Paper & Quality Options, choose a media type from the first drop list. In the next drop box, you will not see Pictorico White High-Gloss White Film as an option, so choose Enhanced Matte Paper, which was the media setting used when constructing the 2200-UCmk-Gloss-Ag.acv correction curve. (More on media settings in Chapter 9.) In the next drop box, set Print Quality to Superfine 2880 dpi.On the right-hand side of the window in the Color Management group box, select ICM, and set the ICC Profile to No Color Adjustment. Click OK to return to the Print window and click Print to print the negative.
If getting the printer setup sounds confusing and needlessly complex, that is because it is. The essential settings are hidden among so many layers that it is easy to overlook one. However, there is a basic logic to this setup madness and the following checklist, along with reference to the screen grabs in this chapter, should get you through the maze.
Printer Setup Checklist
- Choose the printer. Do this in the Page Setup window and check it again in the Print window.
- Check that you have the correct ink installed. For Epson printers this is typically a choice between matte black and photo black. It is important to use the same ink as was used when the original correction curve was created.
- Check that you have correctly sized and oriented the image (check this in the Print with Preview window).
- Turn off Printer Color Management in two places: the Print with Preview window and under Color Management in the Print window.
- Select the correct print media in the Print window. It is important to use the same media setting originally used when deriving the correction curve.
- Choose Quality rather than High Speed printing and select the highest dpi printing mode the printer will support.
A newly printed negative will need to be completely dry before using it to print an image. It is essential that the ink be dry for the negative to have the expected densities and for it to print properly. We often hurry the process with 60 seconds or so under a warm hair dryer. The surface of the negative is delicate. Protect it from fingerprints and abrasion.
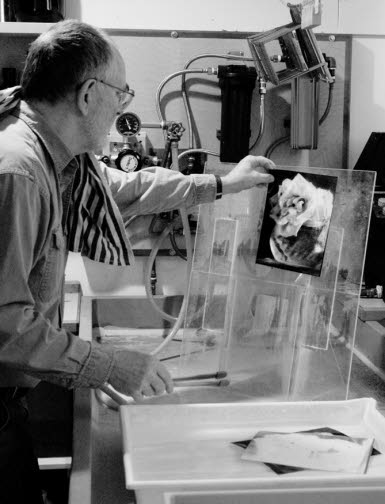
Printing the Silver Image in the Darkroom
Exposing the Photo Paper
Silver emulsion paper is sensitive to blue and green light; and it is very sensitive. Any exposure to a traditional visible light source can quickly fog the paper and give you a final print with gray highlights, or more commonly, just solid black. You need to work in a room that can be made completely black.
Typical silver emulsion papers are not sensitive to red or yellow light. Thus you can use a darkroom safelight that provides dim red/yellow light, but allows you to see as you work. Some simple darkroom safelight bulbs merely replace traditional tungsten bulbs in a screw-in fixture. (Don’t try to buy just a yellow light bulb as it will likely still expose your paper; you really should buy a safelight bulb.)
For this recipe, you will use graded Ilford Ilfobrom paper that prints at the same contrast (grade 2) regardless of the color of light used to expose the paper. This makes it easier to use just about any light source to expose the paper. (See Chapter 6 for more on visible light sources.) This recipe will work adequately for most grade 2 papers.
Silver emulsions are also generally very fast; this means they are very sensitive to light and expose quickly. But the High-Gloss White Film on which we print our silver negatives is very dense and reduces the amount of light hitting the photo paper. Typical exposure times using an enlarger as a light source can easily be 2–5 minutes. Using a bare light bulb the times can still be 10–20 seconds. If your exposure times are shorter than about 30 seconds, you may wish to plug your light source into a darkroom timer (Figure 4-9), but we have made numerous prints using our hands on the switch as a timer.
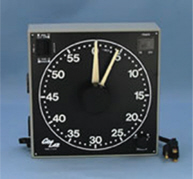
Figure 4-9 Darkroom timer.
Your exposure light will likely not be the same as the light sources that we used for creating the original curves and test data for these printing steps. Therefore you will need to determine the specific base exposure for your light source and the Ilford Ilfobrom paper. The base exposure is the minimum exposure to print to maximum black, or DMax, through the white glossy film. The steps for determining the base exposure are included in Chapter 6, Exposure.
To expose your silver paper:
- Keep the silver paper inside the protective box until it is needed, and then remove only one sheet at a time. Keep the box closed.
- Place your contact print frame under your light source. Adjust the light source to ensure that the entire contact print frame will be exposed by light.
- Set up your developer, fix, and washing trays as described in the next section, Processing the Print, so that you can immediately develop the print after exposure.
- Turn off any normal light in the room and turn off the light source. Turn on the safelight if you have one.
- Remove one sheet of silver paper. The emulsion is typically faced up in the box, and it will have a slightly tacky feel. Place the printed negative face down over the silver paper so that the printed side is touching the silver emulsion. Contact printing is typically done emulsion to emulsion to ensure the prints will be as sharp as possible.
- Place the negative and silver paper into the contact printing frame so that the negative is contacting the glass of the frame and the silver paper is lying such that the emulsion is facing the negative.
- Place the contact printing frame under the light source.
- Turn on the light source for the duration of the base exposure.
- Carefully remove the silver paper from the contact frame and proceed to the next section to develop it.
Processing the Print
Setting Up the Developing Trays
Arrange four photo trays in a row in your darkroom (Figure 4-10). It is convenient to have a shallow sink large enough to hold all four trays because chemicals tend to get splashed about during the development process. But, lacking a large sink, any flat surface with old newspaper to catch the drips will also work.
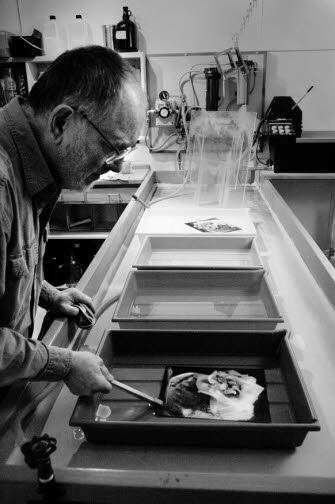
- Into the first tray pour one liter of developer, diluted according to the instructions on the bottle.
- Into the second tray pour one liter of water and add 10 milliliters of glacial acetic acid. Glacial acetic acid is undiluted, 100% acetic acid and this is the most economical way buy the acid if you do a lot of developing. You can alsobuy it as a 28% dilution, in which case add 30 milliliters of acid to each liter of water.
- In the third tray pour one liter of fixer.
- In the fourth tray pour several liters of water.
Developing the Print
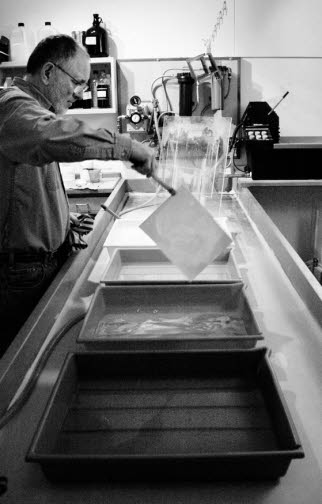
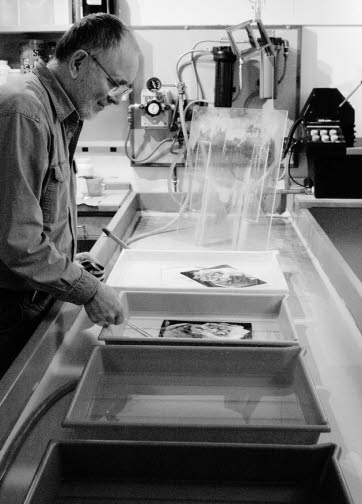
With room lights off and the safelight on, slide an exposed print into the developer and begin timing. You want to develop long enough for maximum black to form, but not much longer. Give the print continuous, gentle agitation throughout development (just poking at it doesn’t count). Usually development takes 1 minute at room temperature for RC (resin-coated) papers, and between 2 and 3 minutes for fiber papers. Do not try to develop the print by inspection under the safelight. The safelight light is dim and it is nearly impossible to judge print quality by its light. After a set development time pull the print from the developer, hold it for 15–20 seconds to drain (Figure 4-11), and slide it into the stop bath. After 30–60 seconds in the stop bath, drain the print, and slide it into the fixer (Figure 4-12). Leave the print in the fixer, with occasional agitation, for at least 1 minute before turning on the room lights. After evaluating the print, you will need to return it to the fixer for about 5 minutes to fix completely, after which you will place it in the final tray, which is a plain-water holding bath.
Viewing and Evaluating the Wet Print
It is difficult to evaluate a newly processed wet print because it will look different once it has been washed and dried. The first problem is that while processing the print you have been standing in a very dimly lit room and your pupils have enlarged quite a bit.When you turn on the bright room lights, it takes a while for your eyes to adjust, and during that period a print will look brighter than it really is. To compensate for this problem, many printers have a special, low-wattage viewing light in the darkroom that they turn on only to evaluate a newly processed print. A single 40–60 watt bulb, placed high and over your shoulder, is about right. If the newly processed print looks bright and snappy under this viewing light, it will probably also look good under normal room light after it has dried down.
A second problem is that a silver print looks rather different when it is under water than when it is dry. To solve that problem, stand a sheet of plastic up in the sink, slap the wet print onto it (Figure 4-13), and gently squeegee most of the water from the print’s surface before beginning evaluation.
Even with these viewing precautions, it is often necessary to dry a print, mount it, and hang it on the wall for a few weeks before you can make the final critical evaluation.
Washing and Drying Silver Prints
Silver prints should be archivally processed, which simply means removing all residual fixer from the print before drying it. RC paper consists of a photographic emulsion coated on a plastic base. Unlike fiber-based paper, RC paper absorbs few chemicals and can be archivally washed in 5–10 minutes of gently flowing water. Once excess water is squeegeed from its surface, RC paper also dries within minutes.
For fiber-based papers like the Ilford paper recommended in this chapter, it generally takes at least 1 hour of washing in an archival washer to completely remove all chemicals. Archival washers have an individual slot for each print and maintain a gentle water flow across the print surface throughout the washing process. After washing, excess water can be gently squeegeed from both sides of the print. Then they are airdried by placing them face down on a plastic screen overnight.
Things to Know about Processing Silver/Gelatin Prints
It is prudent to use print tongs or wear rubber gloves to protect your hands from the chemicals. We know several old-time silver printers who delight in getting into the developer practically up to their elbows to vigorously agitate the print. These chemicals are mild enough that you can often get away with that practice for years, maybe for a lifetime. But we also know others who eventually developed sensitivity to the chemicals, resulting in nasty rashes. If you do get your hands in the chemicals, do not panic. Rinse the chemical off, dry your hands, and get on with life. But avoiding unnecessary contact seems prudent.
You only need two sets of print tongs: one for the developer and one to be used in both the stop and fix baths. Developer is alkaline and its action is stopped by the dilute acid of the stop bath. Never poke the developer tongs into the stop bath and then return them to the developer or your developer will soon die. If you do absentmindedly dip the developer tongs into stop bath, rinse them in hot water, and wipe them off before returning to the developer. The stop and fix baths are both mildly acidic and it does the stop bath no harm to get some fixer into it. So one pair of tongs can be used for both baths.
Keep several towels handy in the darkroom. Any small chemical drips can be wiped up immediately, before they dry and form dust in the darkroom. And if you get your hands wet handling a print, you can quickly dry them before touching the enlarger or fresh printing paper.
Both the developer and the stop bath should be made up fresh for each printing session. Fixer, however, can be poured back into a bottle and used for more than one session. To get some idea of how many prints can be processed in a given amount of fixer, read the bottle or package the fixer came in. For the utmost archivalness, fine-art printers often have two fixing baths and the print spends about 5 minutes in each bath. When the first fixer bath nears exhaustion, it is thrown out, replaced by thesecond bath, and a fresh second bath is made up. In the end, processing chemicals are a relatively small part of the overall cost of making silver prints. If you want your prints to be archival, it makes sense to err on the side of caution in not exhausting your chemicals.
Variations
The recipe in this chapter is designed to work well for a specific set of materials (printer model, photo paper, negative film, chemistry, etc.). In this section, we would like to present options for working with some variations if you are unable to exactly mimic our recipe. If you cannot work with the same materials as discussed in this recipe, definitely go ahead and try out the process with what you have; the results may not be extraordinary, but they should be sufficiently good to get a feel for working with digital negatives.
- Printer models. Sadly, it seems that the printer model has a very significant impact on the final results. All of the different models seem to lay down ink very differently, resulting in negatives with highly variable density. The steps in this chapter are designed for working with the Epson 2100/2200 printer because it is commonly used by many photographers, and we recommend it for printing digital negatives. You can find steps and curves available for additional printer models on the Web site (www.digital-negatives.com); in particular, we have support for the Epson R2400 printer, the Epson 4000 printer, plus other printer models. See if support for your printer is available. If your printer is not supported, you should still try out the processes in your darkroom; just remember that your results may be merely adequate. Further details on how to set up your printer driver are available in Chapter 9, About Printers.
- Photo paper. Photo paper is fairly easy to substitute. We have used Ilford Ilfobrom paper for our recipe because it is an inexpensive, high-quality paper that is readily available. If you want to use a different paper, we suggest that you use any grade 2 paper or a multigrade paper with a filter set for grade 2. Remember that any paper’s grade 2 can easily be different than the Ilford grade 2, so your resulting print may be slightly softer or harder than expected. You should be able to get good results with almost any silver paper working around the same grade.
- Negative film. We recommend that you print using Pictorico High-Gloss White Film. This is an excellent film for producing silver negatives for contact printing. There are a number of other white film materials available that are likely to work well. In particular, you might try Ilford Smooth High-Gloss Media or Oriental Graphica Glossy White Film. Film materials do not use a paper base and will show no texture in the negative. It is likely that these materials will give similar results to using the Pictorico High-Gloss White Film.
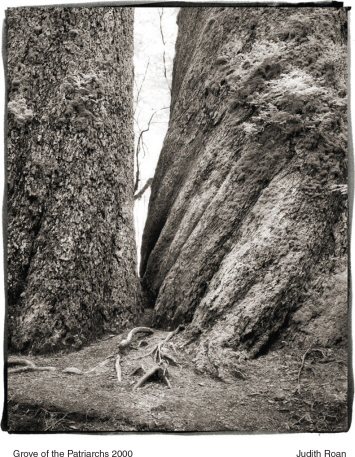
‘Huge trees like these used to cover the Pacific Northwest. Only a few isolated scraps of those forests now remain.’
Palladium
Photographed with a Mamiya 7 medium format camera using black and white film and scanned with an Imacon 646. A mild correction curve was applied to the positive image file which was then inverted and printed as a negative on Pictorico OHP with an Epson 4000 printer using the Quadtone RIP driver. Most of the image correction was applied as a custom quadtone profile in the driver. The digital negative was used to expose a sheet of Arches Platine coated with a lithium/palladium emulsion.
Final print size, about 15 × 18 inches.