Chapter 2
Enjoying Wide-Angle Lenses
IN THIS CHAPTER
![]() Reviewing wide-angles
Reviewing wide-angles
![]() Shooting landscapes with wide-angles
Shooting landscapes with wide-angles
![]() Photographing cities and buildings
Photographing cities and buildings
![]() Capturing wide-angle interiors and portraits
Capturing wide-angle interiors and portraits
![]() Improving your shots
Improving your shots
When you think of wide-angle photography, sweeping landscapes and large cityscapes probably come to mind. Those are the show-stopping shots we’ve all seen. However, you can also capture great-looking shots of other interesting subjects using a wide-angle lens, including shots of buildings, interiors, people, and more. You can easily fall in love with this type of photography, and it offers a refreshing change of pace from stalking the cat around the house. Join me in this chapter as I walk you through how to take great wide-angle shots of a wide range (get it?) of different subjects.
Wide-Angle Whatzit
Wide-angle focal lengths are shorter than those on other types of lenses. They take photos with a wider angle of view. The long and the short of it is that focal lengths less than 25mm are considered wide-angle on cropped-frame cameras, whereas focal lengths less than 40mm are wide-angle on full-frame cameras.
 You need to consider the camera as well as the lens. For example, putting a 35mm lens on a full-frame camera puts you in wide-angle territory, but not if you put the same lens on a cropped-frame camera.
Most cropped-frame kits for consumer-level APS-C cameras have zoom lenses with focal lengths from 18–55mm. That means you’re equipped and able to shoot wide angles when you zoom out. Four Thirds cameras with kit lenses from 14–42mm should zoom out to at least 20mm to enjoy wide-angle photography.
If you’re a full-frame user with a standard zoom lens, you probably have good wide-angle capability built into your lens. For example, the Canon EF 24–105mm f/4L IS USM lens operates well into wide-angle territory.
Aside from standard zoom lenses with wide-angle focal lengths, a number of different types of dedicated wide-angle zoom and wide-angle prime lenses are available from most lens manufacturers. You can also pick up an ultra wide-angle zoom lens, as shown in Figure 2-1. Turn to Book 1, Chapter 3 for more information on focal lengths and how wide-angles compare to everything else.
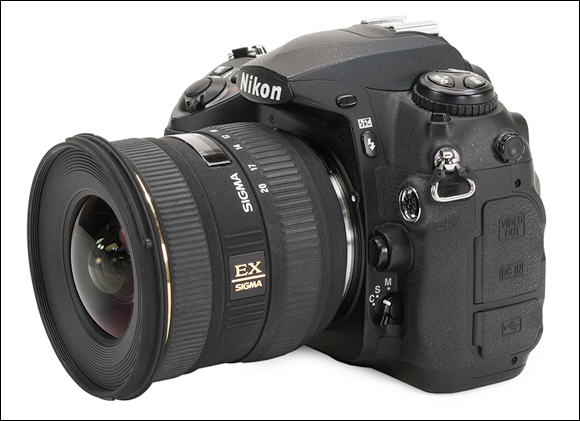
FIGURE 2-1: Ultra wide-angle lenses capture amazing scenes.
 In this chapter, I mention the camera and sensor size along with the focal length of each photo. With this information, you can calculate a 35mm-equivalent focal length if you like, and compare it to your setup. Book 1, Chapters 1 and 3 have more information on how to do this and why it’s sometimes necessary.
Looking at Landscapes
You can find few better tools for shooting landscapes than a digital SLR with a wide-angle lens. Throw in a tripod and a remote shutter release and you're set. The tripod lets you take longer exposures without worrying about keeping the camera steady. I recommend using a remote or setting the drive mode to a timer in these instances to minimize camera shake.
I photographed the sunset in Figure 2-2 using just those tools. The weather at the lake was ideal. It was late afternoon and the sun was well off to my right. The lighting was bright but not as harsh as during midday. The color of the sky and lake were amazing. I took this photograph with my Nikon APS-C dSLR. I set the lens to 20mm to capture a wide but still natural-looking shot.

FIGURE 2-2: A beautiful lake photographed with an ultra wide-angle lens.
Figure 2-3 shows a totally different scene, shot using the same basic wide-angle landscape technique. I used a different Nikon APS-C camera, set the lens to 11mm, mounted the camera on a tripod, and used a remote to trigger the shutter. The entire scene was well lit by the evening sun, which is to the left of the frame. The clouds add welcome texture and detail to the sky.
Keep these tips in mind when shooting wide-angle landscapes:
- Great shots are about great locations. The world has many pretty places, but some of them are plagued with power poles, lines, and signs that take away from the natural beauty. I’ve discovered that the landscape shots that I like the best are free from these distractions. Finding these locations is not always easy, so keep an eye out. You may have to go off the beaten path to get to them.

FIGURE 2-3: The wind-swept plains of Oklahoma captured near sunset.
- Keep the camera level. If possible, align the camera so that the horizon is straight. Use a tripod to lock in the orientation. If you don’t feel comfortable eyeballing it, use your camera’s electronic level to help. Some elements of the scene may not cooperate. Tree lines are notorious for being uneven. That’s okay, so long as it doesn’t feel like the photo tips one way or the other. If necessary, make corrections after you’ve taken the photo in the camera or Photoshop.
- Compose using the Rule of Thirds. Remember the Rule of Thirds is even more important than usual when framing wide-angle shots, especially landscapes with the horizon. Notice that in my two examples, the horizon is situated toward the bottom third of the photo. You can compose your shots so that the land, rather than the sky, dominates. If you don’t get it right on location, try straightening and cropping the photo in software.
Wide-angle lenses vignette quite often, which means their corners are darker than their centers. You can correct this problem in software or with special in-camera lens correction options, if available. I sometimes use vignetting purposely to make the photo look interesting.
Capturing Wide-Angle Cityscapes
Wide-angle lenses also excel at capturing cities and skylines. Figure 2-4 shows one way to capture an expansive view. I took this shot from inside the top of the Gateway Arch, a 630-foot-high monument in St. Louis, Missouri. The sun is off to the left of the frame and made shooting in that direction very difficult. I chose to angle the camera to the north for this shot. Notice that this photo is an example of not strictly following the Rule of Thirds. The horizon is in the center of the frame, which is normally bad. In this case, I think it works because of the diagonal elements in the scene. Your eyes gravitate toward a point below the center of the photo and off to the right. The window frame also accentuates this line.

FIGURE 2-4: You can capture large parts of cities from the right vantage point.
This photo is interesting because you can see about 30 miles (48 km) toward the distant horizon, yet the buildings in the city below are nice and detailed. The highway angling away from the Arch is a great element. The cars and trucks traveling on it are mostly dots. This is a stunning location to shoot from. I took this shot using a Nikon APS-C camera and ultra wide-angle lens set to 14mm.
Not every city has a good vantage point from which to photograph. Of those that do, not all are equally accessible. You should, however, be able to find some interesting buildings to photograph. Look at your downtown area near the city center. If that doesn't work, look at other parts, perhaps well outside. These are often photogenic. Schools, museums, memorials, and government buildings are often ideal subjects. When you find the right subject, make sure to have your wide-angle lens with you, because you’ll need it.
Figure 2-5 shows a small part of downtown Detroit. I am standing on Brush Street, looking southeast toward the Renaissance Center. This street reminded me of a canyon, so I got in the middle and used the buildings on both sides to frame the far end of the street. I set the lens to 20mm and took the shot with my Sony APS-C camera. Notice that I'm a few blocks away from the subject of the photo. This is a testament to how tall the building is. In situations like this, you may have to physically move to the right distance for your shot to work.
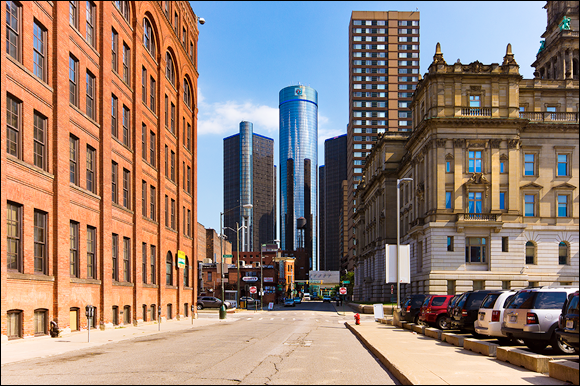
FIGURE 2-5: This cityscape was shot from ground level and has a more immediate feel.
When you’re shooting cityscapes, keep these tips in mind:
- Do a walkabout. Choosing the right vantage point is probably the most challenging aspect of capturing cityscapes. In some cases, you may not be able to find a good view at all, especially if the terrain is flat and there are no surrounding hills or heights. You can often find a good spot to shoot from if the city is bordered by water on one or more sides.
- Watch the horizon. A crooked horizon can be distracting unless it’s a purposeful design element of the photo. Use your camera’s level if possible.
- Check the foreground. Pay attention to what’s close to you as well as what’s off in the distance.
Focusing on Single Buildings
Single buildings are often easier and more convenient to capture than a larger cityscape is. Figure 2-6 shows the former Dearborn Hyatt Regency (now Edward Hotel & Convention Center) located just across the road from the Ford Motor Company world headquarters in Dearborn, Michigan. It’s a large, curved, 14-story building. I took several shots of the entire building, but then moved in close to the entrance and held the camera vertically to capture this photo. It showcases the curve of the top very nicely, along with the restaurant on top. The white car in front of the door was a matter of fortunate timing that I took advantage of. I used a Sony APS-C camera for this photo, and set the lens to 10mm.
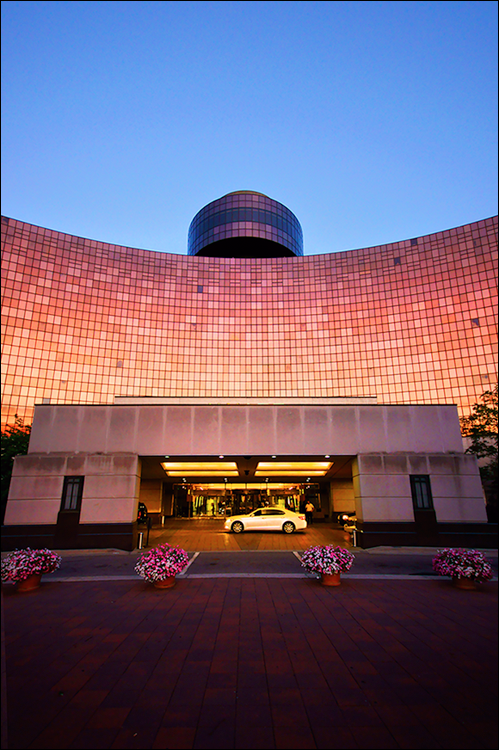
FIGURE 2-6: Single buildings are natural subjects for wide-angle photography.
Figure 2-7 shows another close-up of a single building. This time it’s the Allen County War Memorial Coliseum (named well before the original 140-character limit imposed by Twitter), located in Indiana. Originally built in 1952, this large arena was updated in 2001 when builders literally raised the roof over 40 feet. They made other extensive renovations and improvements at that time, and have since added on almost 50,000 square feet of additional conference and event space adjoining the arena. It’s impressive to be in and photograph.

FIGURE 2-7: Point the camera up to capture creative viewpoints.
The building is so large that you have to step well back to photograph it, even using wide angles. For a more dramatic, artistic presentation, I chose to get close and point the camera up, resulting in this angled shot. This side of the Coliseum faces west, and light from the setting sun is bathing it in golden-hour goodness. I used a Sony APS-C dSLR and ultra wide-angle lens set to 10mm. This shot would be impossible without using wide-angles.
Find out as much as you can about what you’re photographing. Learning about a location draws you closer to your photos and gives you stories to tell.
Photographing Interiors
Believe it or not, a wide-angle lens is indispensable when shooting indoors, whether you’re in a large or small location.
I took the photo shown in Figure 2-8 from the balcony of a local church. The modern sanctuary is large and open, and ends in a stage rather than a pulpit. The room invites you to photograph it with a wide-angle lens. In fact, it really requires it. I had to move to the back of the balcony and zoom out to 10mm with my Nikon APS-C camera to fit the entire room in the frame.
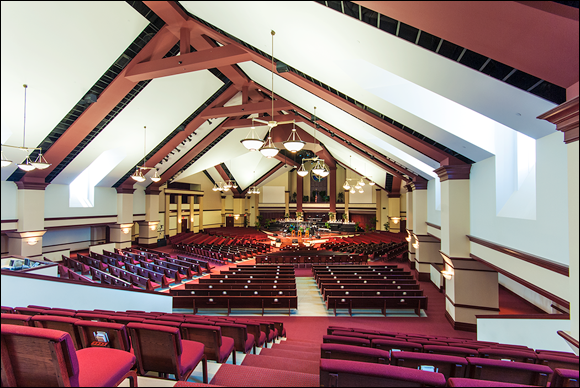
FIGURE 2-8: Interiors, large and small, are captured nicely by wide-angle lenses.
The problem with large interiors, however, is often with the lighting. Although the scene may look fine in person, photographing interiors usually requires more light than you think, and larger rooms have a tendency to be even darker. The situation is made even more difficult if you want to use a smaller aperture to increase the depth of field (also called stopping down). To cope with the lighting and capture a reasonable shot, use a longer shutter speed, higher ISO, additional lighting, or a technique like HDR (high dynamic range) photography.
Wide-angle lenses can be incredibly practical. Take your digital SLR and a wide-angle lens (a zoom lens may work fine) with you when house shopping. When you review the photos, you’ll see rooms instead of corners. That will make it easier to plan how you will furnish and decorate.
Keep these points in mind when shooting wide-angle interiors:
- Watch for vertical distortion. Pointing the camera up or down will introduce vertical distortion, which is particularly unappealing in interior shots. As you compose the scene, pay attention to vertical lines. If they tip toward or away from you, you know you have a problem. Unless you have an overriding artistic purpose, keep the camera pointing straight away from you (as opposed to up or down).
- Use a tripod if possible. Although you may think you don’t need a tripod when shooting inside, exposure can be a real challenge. Being able to use slower shutter speeds will help you keep the ISO low, which will in turn keep noise from overwhelming an otherwise good shot.
Shooting Wide-Angle Portraits
My wife took the shot shown in Figure 2-9 of our three boys and me as we were dropping one of our kids off at summer camp. We’re proudly displaying our sunglasses and having a great time hamming it up for her. She used a Canon APS-C dSLR and standard zoom lens set to 18mm. That’s right in the middle of the wide-angle range for an APS-C camera. Although it doesn’t contain an impressive landscape, this is nonetheless a very valuable wide-angle shot to show. You can capture artistic shots or photos of everyday life, including portraits of people, using wide angles. Simply put, this is one of my favorite photos, and it was shot spontaneously.
One key to using wide angles when photographing people is not to be too far away. Unless you’re photographing a large group of people, stay close. Another important point is to makes sure the shutter speed is quick enough to capture guys who are giggling and being silly. My wife set the camera to shutter-priority mode with a shutter speed of 1/500 second. That was possible because we were outside in bright sunlight.

FIGURE 2-9: Wide-angle portraits capture groups of people very effectively.
Not every wide-angle shot requires a special lens, tripod, remote, or other extra gear. Keep your standard zoom lens attached and zoom out when you need to.
Improving Your Wide-Angle Shots
Wide-angle photography is incredibly fun, and there are many ways to improve your photos. When you go out to take wide-angle shots, try to use wide-angle focal lengths to your advantage. You will be rewarded with special photos if you recognize and emphasize elements of the scene that cry out to be photographed with wide angles.
Frame tall objects from afar
When you’re shooting a scene and want to make sure to get it all in, step back and use a wide-angle lens. Figure 2-10 is an exterior shot of the Gateway Arch. My family and I had just arrived for a visit and were walking down the trail from the now-demolished parking garage toward the Arch. I took a series of shots as we got closer. In this one, I estimate my position to be about 100 feet away. It looks closer than that in the photo, but the Arch is huge, and distances can be deceiving in wide-angle shots. The legs, for reference, are 54 feet wide at the base. The moral of the story is this: Distance can make a world of difference when shooting in wide-angle territory. I was able to capture the entire Arch with very little apparent distortion because I stood back and used an ultra wide-angle lens set to 14mm on a Nikon APS-C dSLR.
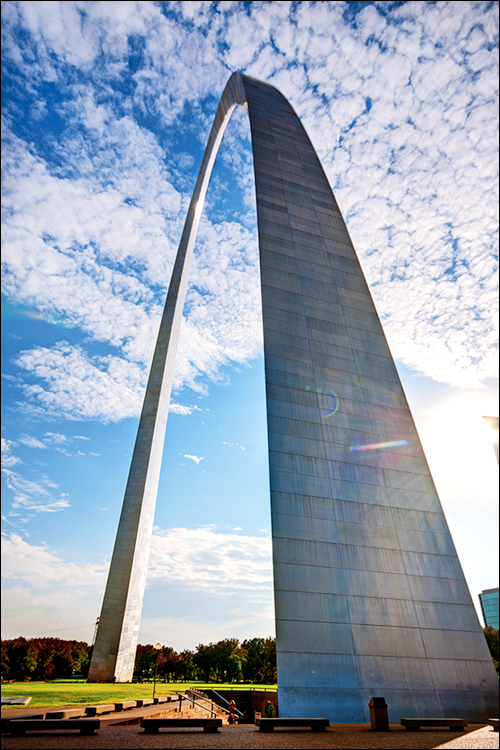
FIGURE 2-10: Scenes like this beg to be photographed with a wide-angle lens.
Pointing the camera up or down when you’re working with focal lengths in the wide-angle region causes vertical distortion. At times, you have no choice. In this case, though, I moved back to photograph the Arch. That kept vertical distortion in this photo to a minimum.
Some wide-angle scenes confuse automatic focus modes. If your scene is complex and you have a specific point that you want in focus, try choosing the specific AF point or switching to manual focus.
Get up close and personal
I took the photo shown in Figure 2-11 from a low perspective, but more important, up close and personal. The camera is about 18 inches away from the front wheel of this gorgeous yellow Harley. I used a Sony APS-C dSLR and set the focal length of the lens to 10mm.

FIGURE 2-11: You can get close with wide-angle lenses.
The point here is that I was able to feature the entire bike and still have room for the building and the sky by getting pretty close. In fact, I was sitting on the ground when I took this shot. The result? Everything fits without making the motorcycle seem small. In fact, it dominates the frame. This would not have been possible with another lens. I would have had to photograph a particular part of the bike or move away to fit it all in.
If you continually set your tripod to the same height, your shots will end up looking similar. Shake things up — consider using the ground for support, instead — even when you’re using a wide-angle lens. Remember, you don't always need to be standing when you take a photo.
Use the vertical
Don't be afraid to switch your camera to a vertical (portrait) orientation, even when shooting wide-angle shots. The photo in Figure 2-12 is an effective example. I took this shot using a Nikon APSC-dSLR and wide-angle zoom lens set to 10mm. I didn’t need to hold the camera vertically, but after taking a series of shots holding the camera normally I decided I wanted a change of pace. I therefore switched to portrait orientation (holding the camera vertically). The result is a compelling shot that enabled me to capture much more of the lake and sky than I would have otherwise.

FIGURE 2-12: Frame some subjects vertically for a change of pace.
Combine different elements into one shot
Sweeping landscapes and impressive cultural monuments aren’t the only beautiful scenes out there to capture in wide angles. Figure 2-13 shows a local park. It’s simple, but still very interesting. I took this shot with a Nikon APS-C dSLR and an ultra wide-angle lens set to 11mm. The scene has several elements that make it work. The colorful brick path is covered with a scattering of small leaves and is very important to the photo. It extends away and disappears as it sweeps to the right in the distance. That creates a feeling of mystery. The trees on each side add color, and the lamps, bench, and fences add interesting details. The clouds and the sky are equally important. I was able to capture all these different elements in one shot without making the photo look cramped. In fact, it feels nice and relaxed.
Emphasize height
Use wide-angle shots to emphasize height. The photo shown in Figure 2-14 is of the Cadillac Tower in Detroit, Michigan. This building is 40 stories tall and 438 feet high. Although that is almost 200 feet shorter than the Gateway Arch shown earlier, it still looks quite impressive in this shot.

FIGURE 2-13: Beautiful scenery is everywhere around you.

FIGURE 2-14: Wide-angle lenses can emphasize height as well as width.
I used a wide-angle lens set to 10mm and held the camera (Sony dSLR with an APS-C image sensor) vertically to fit the entire building in the photo. That's the beauty of using wide-angle lenses. You can fit in so much more than normal lenses, including very tall buildings. The reason this shot appears to have quite a bit of vertical distortion is that I had to point the camera up to get the top of the building in the scene. Although I could have stood farther away and held the camera closer to horizontal, I chose to get right next to the building and look up. I wanted to fill the frame with as much of the building as possible for artistic effect and to emphasize its height. Compare this to the Arch shown earlier (refer to Figure 2-10), where I was able to stand farther back and not point the camera up as much.