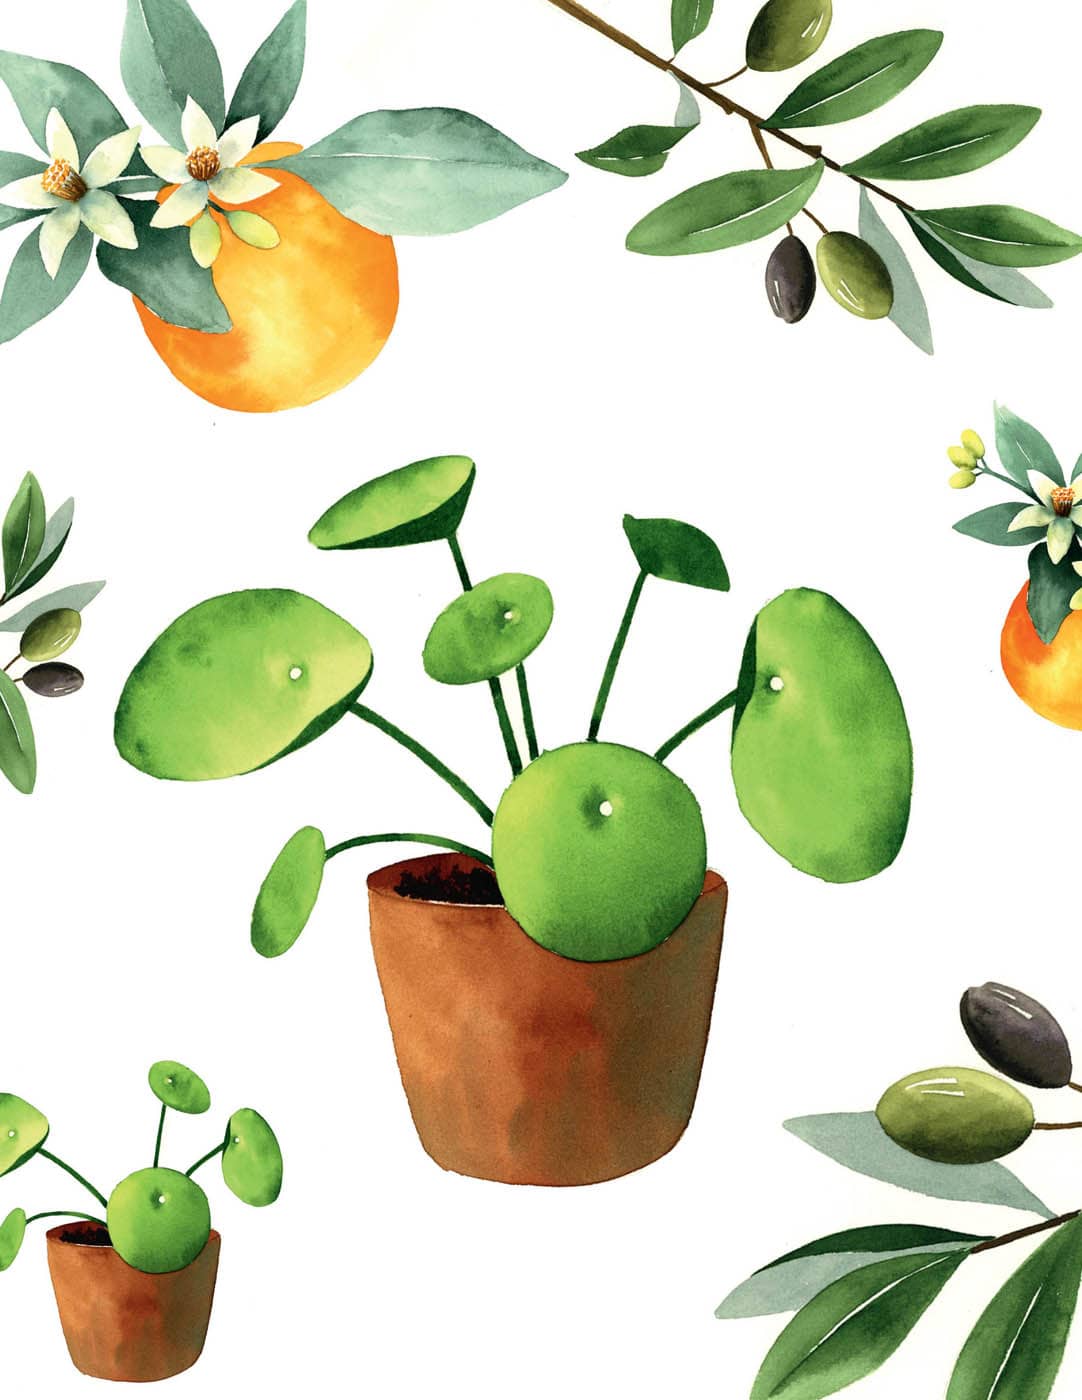
To be successful at creating orange blossoms and oranges, use the three-step sketch method to draw the blossoms first, adding leaves and the fruit afterward. In this example, the key point is to arrange leaves and fruits as the background of the blossoms. In this way, coloring white flowers will become much more manageable.
SKETCH THE BLOSSOMS
Sketch five-petal orange blossoms in two different angles using the three-step sketch method.
SKETCH THE BLOSSOMS, LEAVES, AND FRUIT
1Draw a line indicating the branch, slanting it downward to the right. Draw a large circle at the bottom right for the basic shape of the orange. Draw two small circles to mark the placement of the blossoms. Note how the shapes overlap.
2Draw one angle A and one angle B blossom in the two small circles. Draw guidelines for the leaves branching out from the stem. Note the number and location of leaf guidelines. Draw ovals to mark the placement of buds at the left end of the branch and at the top of the orange. Draw a large leaf on the right of the branch.
3Draw four leaves on the upper part of the branch and two leaves under the left flower. All the leaves are surrounding the blossoms. An effective way to paint white flowers is to use leaves as a background. Add details to the stamens and the branch.
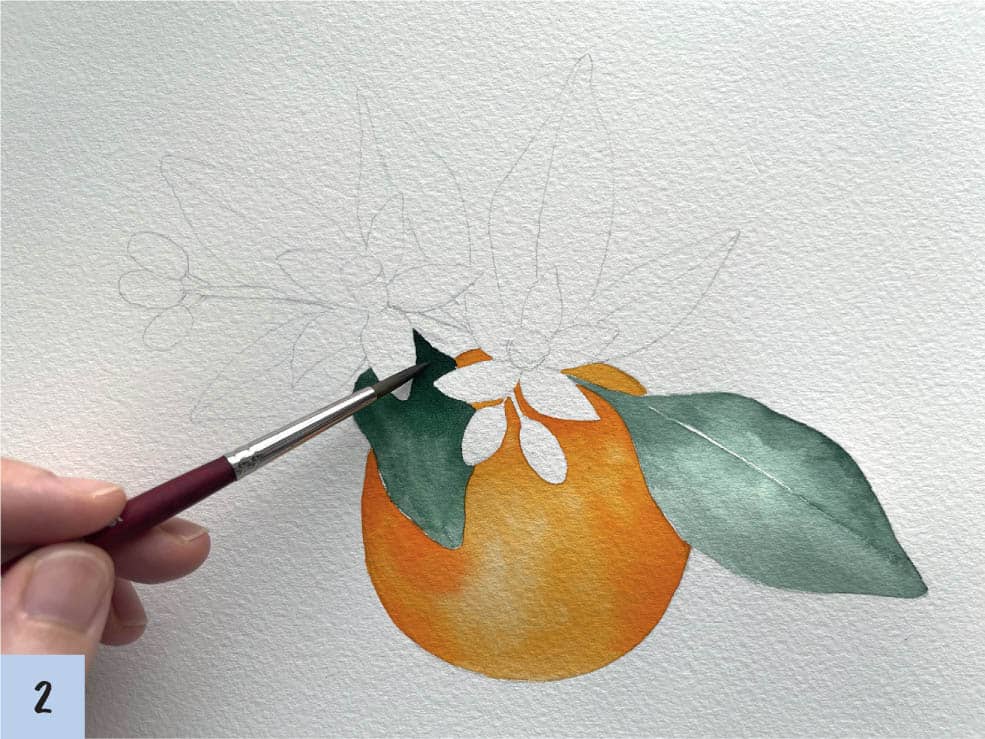
PAINT THE BLOSSOMS, LEAVES, AND FRUIT
In this lesson, you’ll use a new color: Van Dyke Green. When used alone, it creates a gloomy, vintage feel. However, when used alongside high-saturation colors such as orange, it creates a unique mood by adding weight to the lightness of the orange. While working on this piece, observe how challenging colors can make a big difference to a painting. After working with these colors, challenge yourself to use diverse colors to express your individuality.
1Begin by painting the orange. Working wet-on-wet (see here), brush water on the circle and apply Level 2 density orange paint. While the paint is still wet, apply a layer of Level 4 density orange over the left side, the right edge, and at the bottom of the petals. Leave the paint to spread naturally; don’t blend the edges.
2Working wet-on-dry (see here), use Level 2 density Van Dyke Green to color the large leaf on the right, leaving the middle vein of the leaf white. While the paint is still wet, apply the same color in Level 3 density over the top of the leaf and the area near the stem. Blend the edges smoothly.
Working wet-on-dry, use Level 5 density Van Dyke Green to color the top portion of the leaf resting on top of the orange. Use Level 3 density of the same color near the bottom of the leaf, and create a light gradient between the two shades.
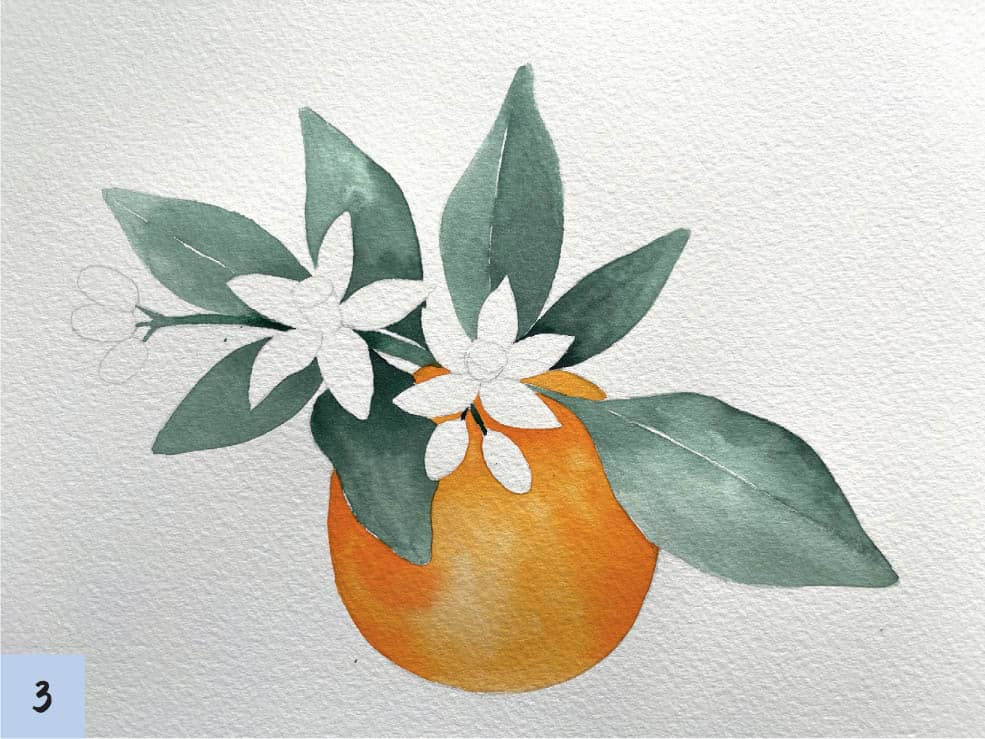
3Color the rest of the leaves and the stem by repeating step 2, noting placement of the shadows.
4Color the stamens. Working wet-on-dry, use Level 5 density Permanent Yellow Deep (golden yellow) to add details to the stamen by drawing vertical lines and dots using the brush tip.
5Color the two front petals of the Angle B blossom. Working wet-on-dry, color the interior of the petals using Level 2 density Indigo. Create a light gradient toward the edges of the petals. Make smooth strokes, using the brush tip on the interiors. The color should spread naturally.
Apply Level 3 density Indigo to the petals closest to the stamen. Use Level 1 density yellow-green to color the edges of the petals. Color the remainder of the petals following steps 6 and 7.
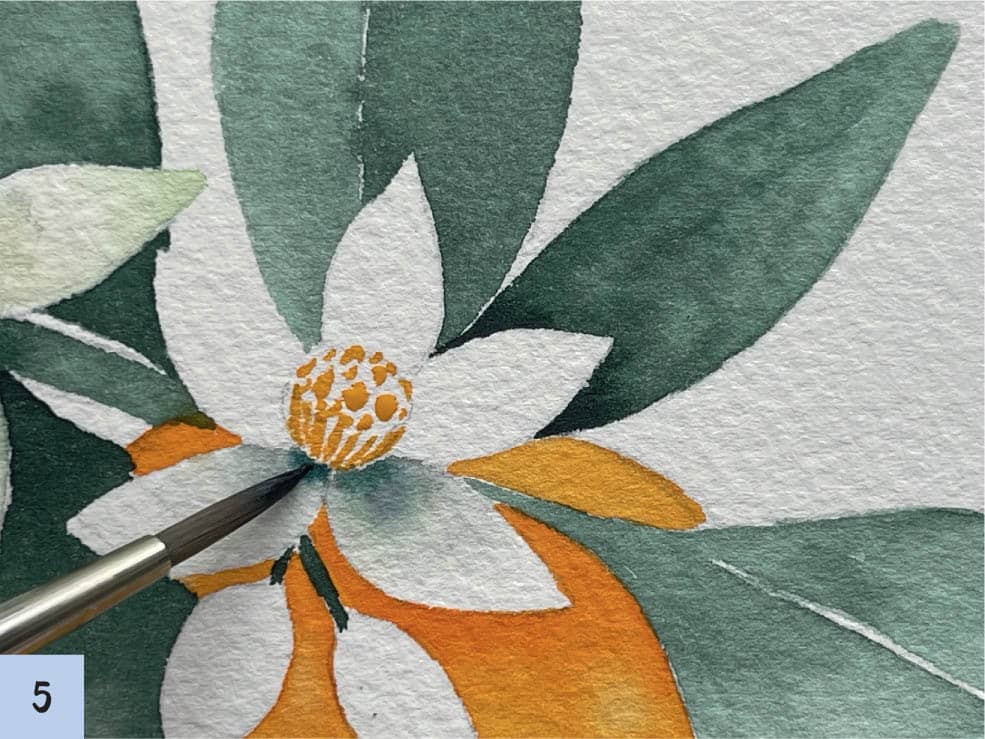
6Fill the gaps between the yellow lines of the stamens with Level 4 density Burnt Umber. Paint a line at the bottom right of each dot.
Color all buds completely with Level 1 density yellow-green. Apply a glaze (see here) of Level 1 density olive green near the stem.
Use Level 1 density yellow-green to color the exterior of the petals. Color the rest of the petals using the same method.
Olive Branch
Olive trees are among the best small-fruit plants that beginners can practice painting. Since olives don’t grow in bunches, like blueberries or grapes, coloring them is quite simple.
SKETCH THE OLIVE BRANCH
1Draw a line slightly slanting right for the stem. Draw two leaves on the left side of the stem and one leaf on the right, as shown. The leaves’ curved center vein indicates a slight curl.
2Draw an olive below the leaf on the left. Draw two more fruits behind the leaf on the right. Add highlights to each fruit as shown in the dotted line. Draw guidelines for additional leaves on the top and bottom of the main stem.
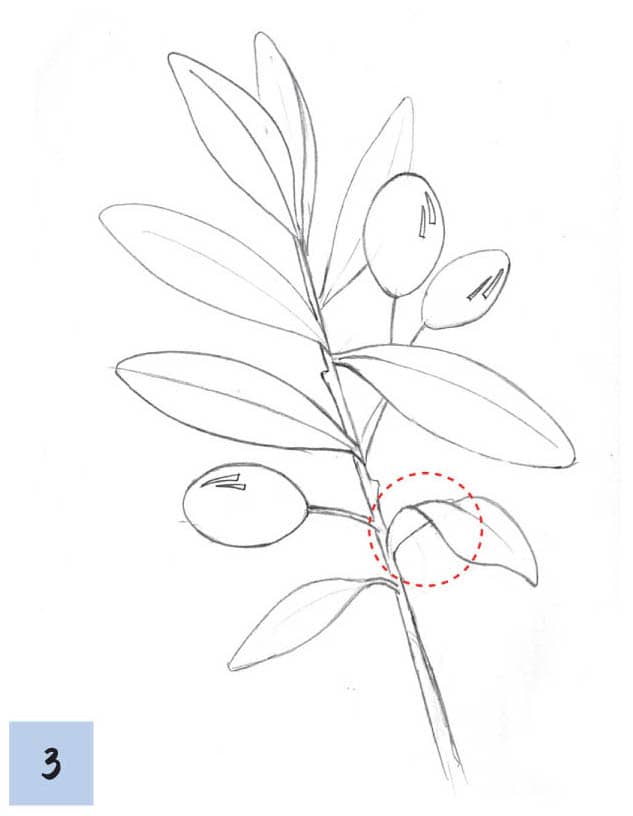
3Draw the additional leaves at the top and bottom of the stem. Note how the leaves curve, showing the undersides.
Draw the rest of the leaves positioned at the top and bottom of the stem. Draw the backside of the leaves marked with dotted lines. The guidelines on each stem are necessary for painting, so do not erase them.
PAINT THE OLIVE BRANCH
As you paint the leaves, make sure not to color the midrib line at the center—leave it blank or white. In this portion of the lesson, you’ll learn how to create highlights on the surface of the olives. All of the painting will use the wet-on-dry technique.
1Add color starting at the top of the stem where it joins the leaf. Working wet-on-dry, color the beginning of the stem and leaf in Level 4 density Hooker’s Green. As you approach the end of the leaf, use the paint in Level 2 density to create a gradient. Make sure the color isn’t as light as Level 1 density; if it’s too light, there won’t be enough difference between the leaf and the white midrib.
2Use Level 5 density Hooker’s Green to color the front side of the top right leaf.
3Color the remaining leaves following the instructions in step 1, except for the leaves noted by the dotted circles.
4Mix indigo and Hooker’s Green in a 3:1 ratio to create green-gray. (If you don’t have indigo, mix Hooker’s Green, Prussian blue, and black in a 1:1:1 ratio.) Paint the undersides of the leaves that show that portion with Level 2 density green-gray.
5Paint the two olives, as shown. Apply Level 5 density olive green to one side of the fruit (the shaded side). Create a gradient as you move the brush toward the highlighted area, using Level 2 density olive green. Don’t color the highlighted area.
6Mix a 1:1 ratio of sepia and clear violet to create dark violet for the remaining olive. Apply Level 4 density dark violet on the left side, creating a gradient as you move toward the right with Level 2 density paint. Don’t color the highlighted area.
7Paint the stem with Level 4 density burnt umber to complete the painting (see finished image, here).
Potted Pilea
The pilea is another plant suitable for beginners. The structure doesn’t become complex even when the angle of the leaves change since the basic leaf shape is a circle. Despite its simplicity, your drawing and painting will look beautiful.
SKETCH THE POTTED PILEA
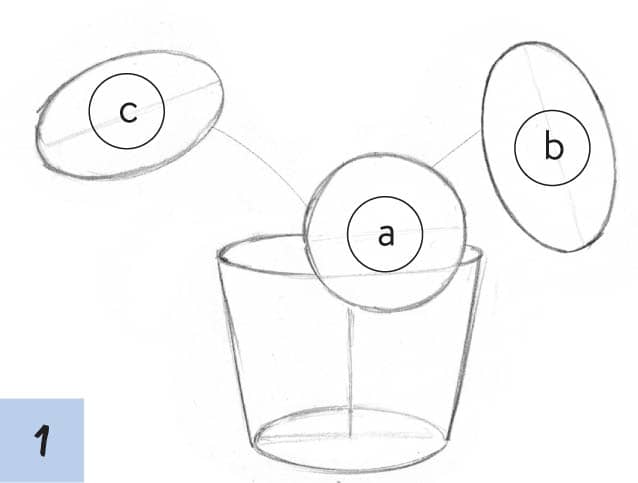
1Draw a basic pot (see below). Draw a large circle (leaf a) overlapping the top-right portion of the pot. Draw a long oval (leaf b) near leaf a on the right side of the pot. Draw a long oval (leaf c) on the left side of the pot. Leave space between leaves a and c. Draw guidelines as shown on the oval leaves to indicate their angles.
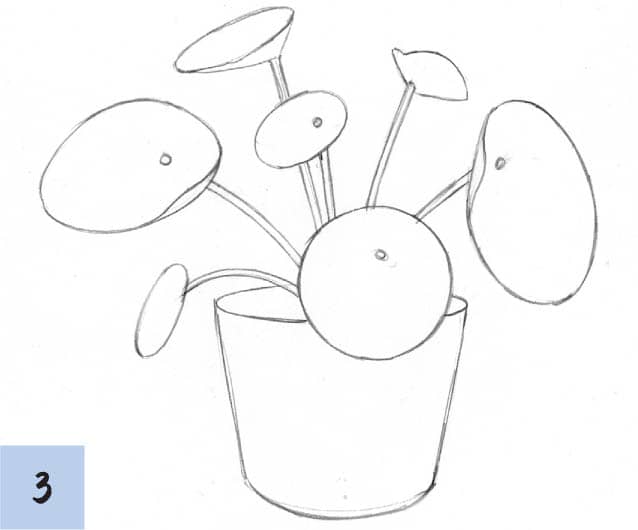
2Draw small ovals for leaves d and e between the larger leaves. Leaf f has a cone shape with a wide horizontal top due to its angle. Leaf g has a fan shape. Add tiny circles in the positions shown to indicate where the stems attach to the leaves.
3Add details to some of the leaves by adding curves that reveal the underside. Draw thick stems that connect to the small circles on the leaves.
PAINT THE POTTED PILEA
Sap green is the only color that will be used to paint the leaves. However, you’ll be able to create several shades by changing the density level of the paint.
1Begin by painting leaf a. Working wet-on-wet, brush water over the leaf except for the tiny circle near the top. Apply Level 3 density sap green to the right side of the leaf, creating a gradient as you move toward the left. Be careful as you paint not to color the tiny circle.
2Apply Level 5 density sap green at the left edge of the tiny circle using the tip of the brush. Use a thin stroke.
3Wash the brush and remove any excess water. Wipe away the paint on the right edge of the tiny circle using the brush. Repeat to remove additional paint, creating a brighter highlight. This technique creates a noticeable three-dimensional effect.
4Color the bottom-right edge of the leaf with Level 5 density sap green to shade the leaf.
5Repeat steps 1 to 4 for leaves b, c, and e. However, when coloring leaf c, apply Level 3 density sap green to the left side of the leaf and make a gradient.
6For leaf f, apply Level 3 density sap green on the upper part of the leaf and make a gradient downward. For leaf d, apply Level 3 density sap green on the left bottom of the leaf and create a gradient upward. Paint the underside of leaves and stems with Level 5 density sap green.
7Working wet-on-wet, brush water on the front side of the pot. Color the right side with Level 3 density burnt umber. Create a gradient, making the left side brighter than the right. Paint the right third of the pot with Level 2 density Cerulean Blue (sky blue) and paint the left third of the pot with Level 2 density Raw Umber.
8Working wet-on-dry, use Level 4 density burnt umber to paint a flat layer for the pot’s interior. Leave a thin unpainted border between the interior and the exterior of the pot.
9While the paint in the interior of the pot is still wet, create random brushstrokes using Level 5 density sepia to mimic the look of soil (see the finished image, here).