
In this chapter, we will cover:
Creating our model definition with the Model Editor
Importing our model definition
Creating data enumerations
Using From Collect patterns in the Guided BRL Editor
Organizing knowledge with Working Sets
Creating rules templates
Creating knowledge snapshots
Guvnor is the business rules manager included with Drools to manage knowledge and to be a centralized repository for Drools knowledge bases. However, it is not just used to manage rules, because it has extra features that make it a robust business rules manager ready to be used in any production environment.
This chapter will cover recipes more oriented to rules authoring and knowledge management, showing the latest features included in the 5.2.0 release, and the next chapter will cover tasks related to administration and configuration of this BRMS.
One of the first tasks before starting to write rules inside Guvnor is to define our domain model. This model can be defined by uploading a JAR file containing the model or by modeling using the Model Editor included in Guvnor. In this recipe, you will see how to use the Model Editor to define your fact definition.
Before starting to use Guvnor, you should install it inside a Servlet container or Application Server. In this book, we are going to use the JBoss Application Server 5.1 to deploy this web application. The Guvnor 5.2.0 distribution file, available at http://www.jboss.org/drools/downloads already comes with a version ready to be deployed in a JBoss AS 5.1, and it also comes with WAR files compatible with JBoss AS 6.0 and Apache Tomcat 6.0.
Carry out the following steps in order to create a model definition using the Model Editor:
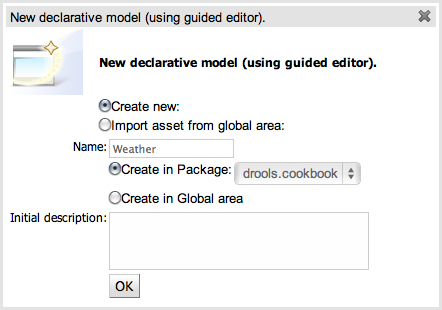
Open Guvnor in your favorite web browser and create a new package. Once the application is loaded, you need to create a New Declarative Model using this option from the Create New contextual menu. This is shown in the following screenshot:

The next step is to create a new declarative model that will be used to group your declared facts. A pop-up will be displayed to choose the name and the package where the facts are going to belong, as shown in the following screenshot:
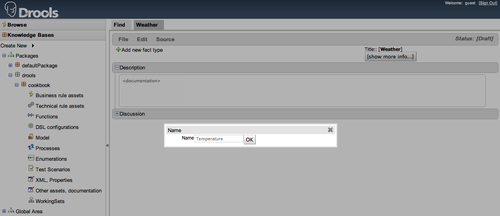
Click on Add a new fact type to create a new fact. After you insert the fact name, in this example we will define a Temperature fact, and press OK. Then you will be able to define the Temperature fact field's name and types, as shown in the following screenshot:
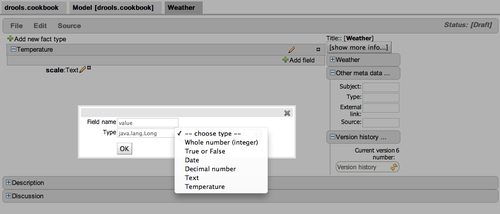
Once you have declared the fact, you can start adding fields by clicking on the Add new fact type link. This link will show a pop-up where you have to choose the field name and field type. The Type combobox comes with a few predefined types, but you can write your own custom type if none of them fits your needs, as shown in the following screenshot:
Once you are finished with the modeling of the fact, save the changes with the Save changes option from the File menu to make it available in your package.
The declaration of facts using the Guvnor Model Editor is an alternative that we can use in different situations. For example, when we don't have access to the Java model to create facts in order to hold internal states that don't need to be declared in your real domain model, or for testing purposes, and so on. This Model Editor is a graphical interface, so you don't have to manually write the declaration of facts using metadata, as this feature internally defines the facts using metadata.
The only thing to keep in mind is that after adding a field, the field type is not going to be shown correctly in the fact field list. However, the type value is still correctly assigned to the field name, and you can check it by pressing the pencil button to modify the values.
The basic way to be able to write rules using our domain model is by uploading our Java model into Guvnor. In the examples files, you will find a JAR file with the domain model, which is used in this recipe. Let's take a look at how to do it.
Carry out the following steps in order to import your Java model definition into Guvnor:
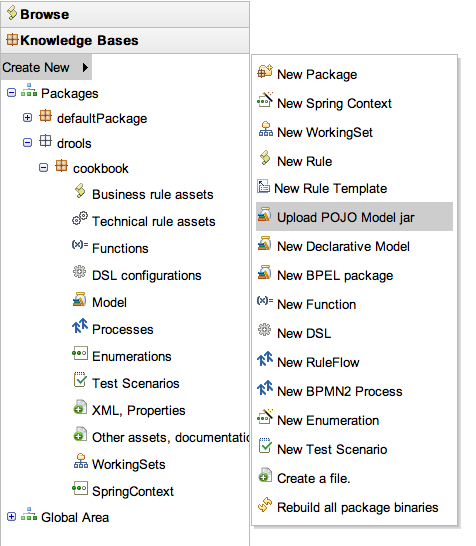
In your package definition, create a new model archive (JAR) choosing the Upload POJO Model jar option, as shown in the following screenshot:
Once you have selected this menu option, one pop-up, New model archive (jar), will be displayed on the screen. In this pop-up, you can choose a name for the model archive that is going to be created. This can also be used to import a previous JAR model created in the global area, as shown in the following screenshot:
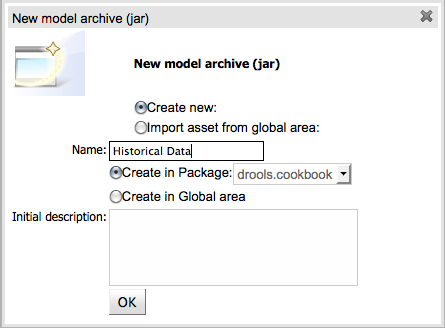
A new tab, Historical Data, will appear to upload your JAR model. In this tab, you will see a standard file upload component to choose your file name and one Upload button to start the uploading process, as shown in the following screenshot:

This feature simply works as a file uploader that should be used to upload a JAR model that contains the domain to be used in writing rules. There is also an extra button to download the uploaded model. The declaration of the domain model is a preliminary and non-exclusive step that should be executed before starting the rules authoring.
Enumerations are useful to map fact fields to a list of predefined values. The Guvnor integration will make the rule authoring process a friendly task for non-technical people, using common values that will restrict the possible fact values instead of using internal fact values that can be confusing for business analysts. This recipe will show you how to take advantage of this.
Carry out the following steps in order to create a new data enumeration in your knowledge declaration:
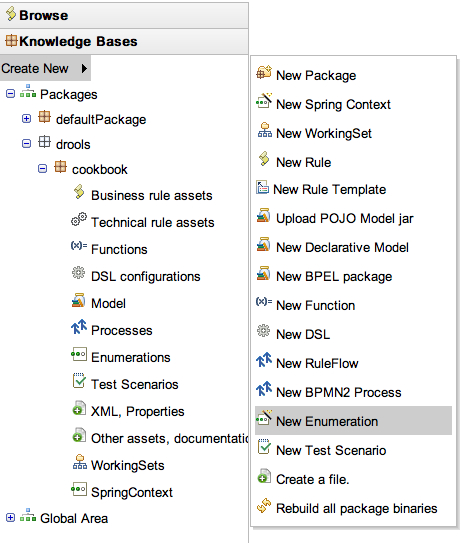
In your package definition, choose the New Enumeration option to create a new declarative enumeration, as shown in the following screenshot:
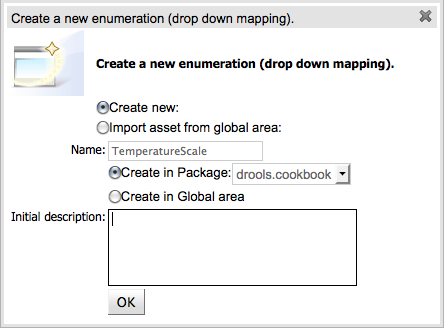
Once you have selected this menu option, one pop-up, Create a new enumeration (drop down mapping), will be displayed on the screen. Then, choose the name and package destination for this new asset. As you can see in the following screenshot, there is also an option to import previously defined enumerations into the selected package:
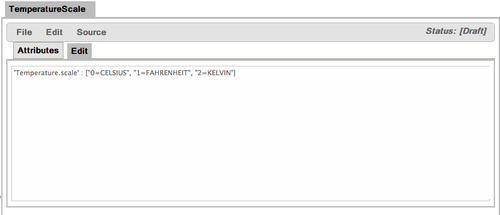
Next, start writing the enumeration mappings inside a simple textbox, as shown in the following screenshot. In this example, you can see the possible values of the scale field from the Temperature fact. Once the enumeration is saved, these values are going to be displayed when you start to write rules using the BRL editor:
Once you have finished writing the enumerations, save your changes using the Save option from the File menu.
Data enumerations are useful to use in guided editor drop-down lists. These enumerations are nothing more than a set of values to be displayed in the guided rules editor, where these values can be statically or dynamically defined in the text field from the enumeration editor.
In order to define the values, you can use two different approaches, which are as follows:
The first one is to declare the string values directly on the editor.
The other approach is to obtain the string values from an external datasource. Using the datasource approach will consist of a Java helper class with a method that should return a
java.util.Listof String types. This helper class will have to reside in Guvnor's classpath.
The simple approach to define the data enumeration values is to write them directly in the editor:
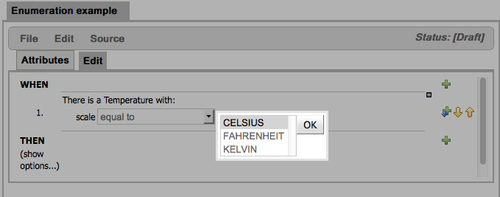
'Temperature.scale' : ["0-CELSIUS", "1-FAHRENHEIT", "2-KELVIN"]
Each of these enumeration components is defined using a key-value tuple using a minus character as the separator. With this declaration, the scale field of the previously defined Temperature fact can be assigned with the values 0, 1, or 2 in the guided editor. As you can see in the following screenshot, the CELSIUS, FAHRENHEIT, and KELVIN values are mapped inside the editor in a combo list selection:
The enumeration values mapping can be more complex. One example of this is using the previously defined enumeration values to restrict another enumeration mapping:
'Temperature.scale' : ["0-CELSIUS", "1-FAHRENHEIT", "2-KELVIN"]
'Temperature.humidity[scale==0]' : ['NORMAL']
'Temperature.humidity[scale==1]' : ['HIGH']
'Temperature.humidity[scale==2]' : ['NORMAL', 'HIGH']
In this case, the humidity field will have different values that are going to depend on the scale field value, and the guided editor will be affected, only displaying the humidity field values according to the selected scale value.
The datasource option relies on an extra helper class that will provide the enumeration string values that could implement the values extraction in different ways. For example, statically written inside the helper class or reading them from an external source such as a database, an XML file, and so on:
'Temperature.scale' : (new drools.cookbook.TemperatureScaleHelper()).getActiveScales()
In the previous snippet of code, the helper class should be instantiated in the enumeration declaration to invoke the method that will return the string values list.
Keep in mind that the data enumerations are loaded the first time you open a rule with the guided editor, and if you already had a guided editor open before the data enumeration declaration it should be reopened to display these changes in the field editors.
From Collect patterns are useful to gather a set of facts from the working memory, bringing a reduced set of your working memory facts to the engine. These patterns were not supported in the previous Guvnor releases; however, thanks to the community effort, it is now possible to use them in the Guided BRL Editor.
Carry out the following steps in order to use a From Collect pattern in the Guided BRL Editor:
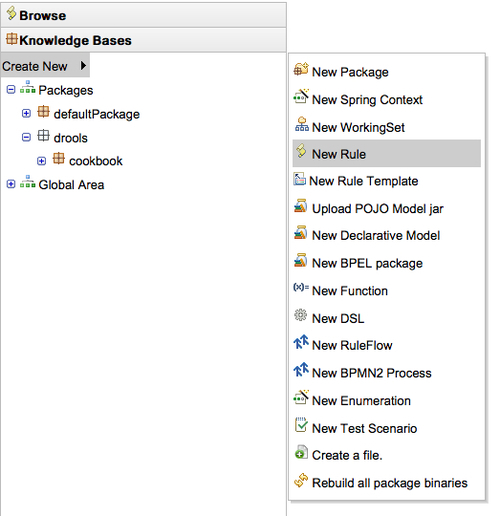
As always, first you have to create a new asset. In this case, you will have to create a new rule by selecting the New Rule option, as shown in the following screenshot:
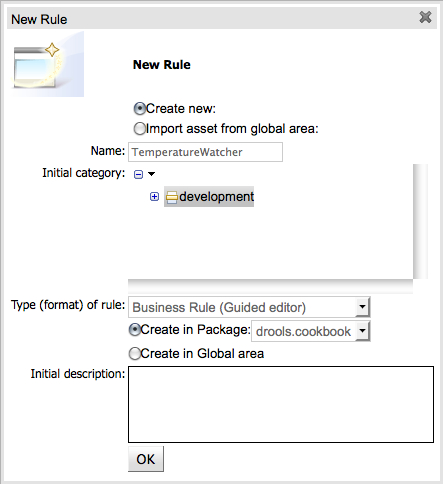
After this step, a new pop-up, New Rule, will show up to configure the rule properties, such as category, package, description, rule format, and so on. However, the only requirement to write the rules is the Business Rule (Guided Editor) format selection, as shown in the following screenshot:
Now it is time to add patterns to our guided rule editor by clicking on the green cross, as shown in the following screenshot:

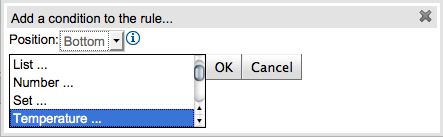
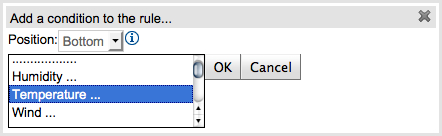
Once you have clicked, a new pop-up will show up with all the possible conditions that you can use in your LHS. In this case, we are going to select Temperature and confirm the selection by clicking on the OK button:
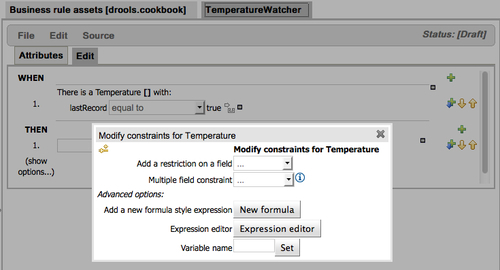
Once the Temperature fact is selected, a new LHS pattern will be added into the TemperatureWatcher rule editor. Clicking on the There is a Temperature WHEN rule pattern link will show up another pop-up, Modify constraints for Temperature, in which you can start adding constraints to the pattern.
For this rule example, we are going to add a constraint to know if this was the last Temperature fact inserted into the working memory and another one to match the Temperature scale. As shown in the following screenshot, the only options that are going to be used are the Add a restriction on a field to add the constraints to the Temperature fact, and the Variable name to set a name to the matched pattern (in this case, $last_record will be the variable name for the matched patterns):
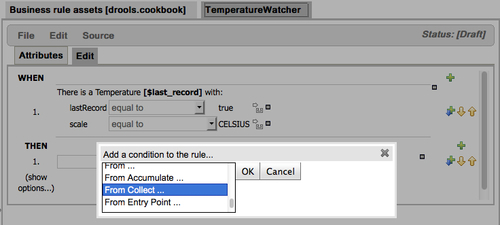
Once we have the first pattern done, we can start writing the second and more interesting pattern, which will be the pattern using a From Collect constraint. To do this, you have to click on the green cross and select the From Collect condition from the conditions list. Click on the OK button to confirm it, as shown in the following screenshot:
At this point you will see another pattern in the Guided Editor with two sections to be completed with patterns. The first section is to bind the output of the pattern to a
java.util.Collection, ajava.util.Set, or ajava.util.Listfact type, as shown in the following screenshot: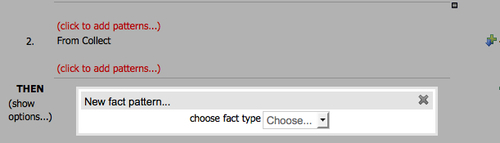
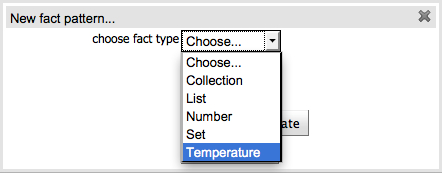
After the pattern creation, this is going to be assigned to a
java.util.Listfact type and also its size field will be restricted, as shown in the following screenshot:
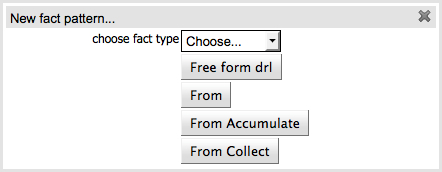
The next step is to complete the second part of the pattern, where a new pop-up, New fact pattern, will be shown displaying all the possibilities to complete it, as shown in the following screenshot:

Now it is time to add constraints to the From Collect Temperature fact, and add a pattern to match all the previously inserted Temperature facts (
lastRecord==false constraint) with the same temperature measurement scale (scale==$last_record.scale constraint), within the last hour (($last_record.timestamp - timestamp) <= 3600constraint), as shown in the following screenshot: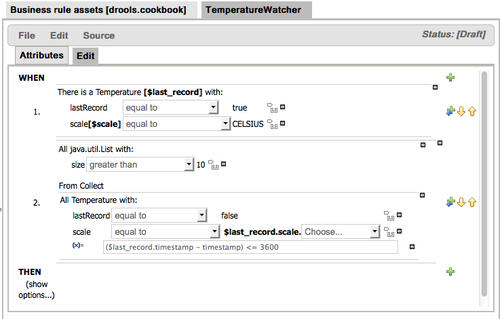
Don't forget to complete the RHS pattern and save the changes.
As we discussed in the recipe introduction, these From Collect pattern constraints allow us to define a subset of working memory facts to act as a pattern data source. In this recipe, we are using the new From Collect Guvnor constraint support to create more powerful LHS patterns instead of the common pattern constraints.
As a last tip, you can see in the following screenshot that the second part of the pattern can be completed with a lot of options, that is, it will allow us to concatenate From, From Accumulate, and From Collect constraints, to create a data source of really complex facts:
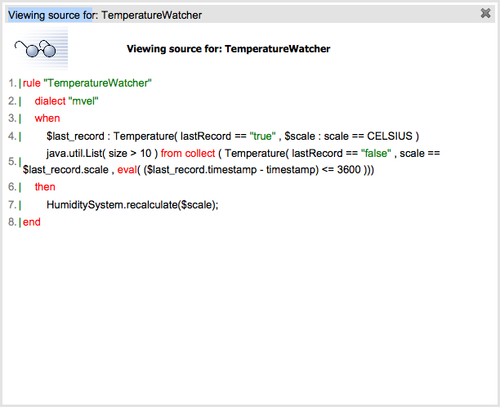
Remember that you can preview the rule being generated using the View source option from the Source menu. The following screenshot shows the TemperatureWatcher rule:
Another feature of the new Guvnor is Working Sets. Suppose that you have a really big domain model, and all these fact definitions belong to the same domain but they could be grouped into fine grained subdomains. You would like to explicitly define these subdomains to create rules with a more specific fact model group in order to improve the design efficiency, adding restrictions in rule authoring.
However, there is nothing better than an example to show how it can be used. So, let's look at it.
Carry out the following steps in order to create a Working Set for your domain model:
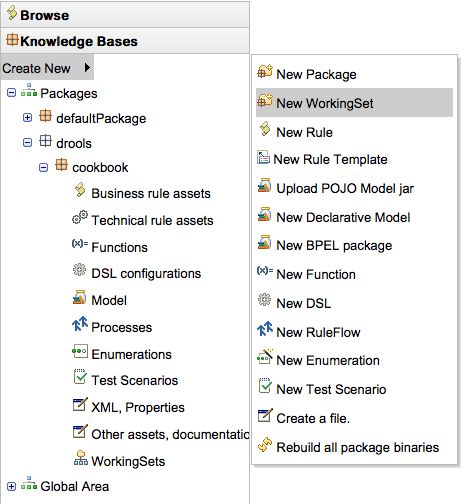
First, you will have to create a new asset. In this case, we need to choose the Working Set option.
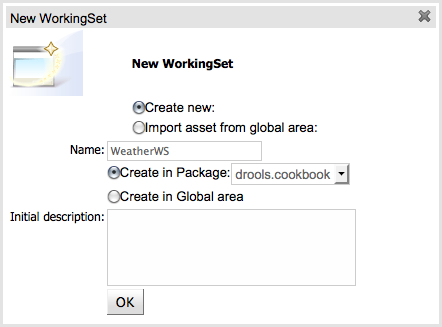
A new pop-up, New WorkingSet will appear on the screen. Choose a name for the Working Set and select the package destination. In this recipe, we are going to use WeatherWS as our Working Set name, as shown in the following screenshot:
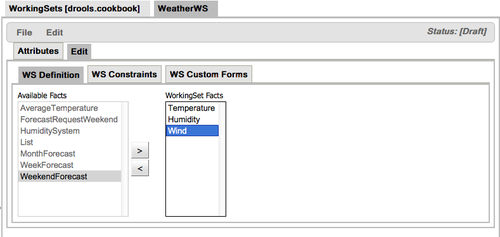
Once the created working set tab is opened, you have to add the fact types that are going to belong to your subdomain/package of types. In this case, we created a Working Set to group all the facts relative to Weather, where Temperature, Humidity, and Wind fact types were added, as shown in the following screenshot. This domain model is pretty simple, with only six fact types, but it will be enough to show the Working Sets' capabilities on rules authoring:
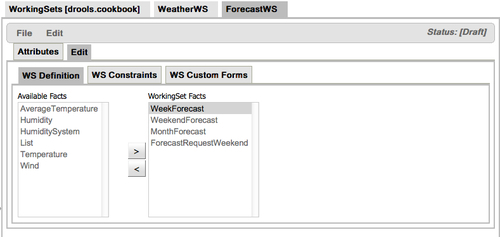
Then we have to create another working set named ForecastWS to group the Weekend, Week, and Monthly weather forecast, as shown in the following screenshot:
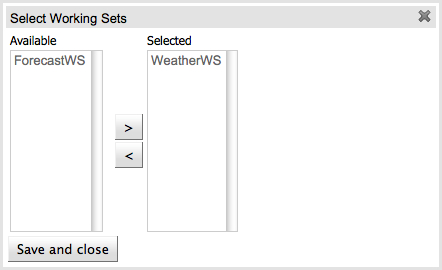
Once they are created, we can start to write rules using Working Sets to restrict the rules domain. Once you have created a rule using the Guided Editor, you will see a new option to Select Working Sets in the Edit menu, where the Working Sets can be assigned to the rule, as shown in the following screenshot:
Once you have selected which working sets are going to be available for the current rule, you will see how this impacts the rule authoring. When you add a new condition (LHS) or action (RHS) to the rule, you will see how the available facts are restricted to the selected working sets. In this case, only Humidity, Temperature, and Wind facts are available to be used, as shown in the following screenshot:
When you define a Working Set and assign it to a rule, you will see how the available facts reduce further, impacting in the conditions and consequences that can be written.
Also, this will impact in another way when a Working Set is assigned to a rule that currently had conditions or consequences with no available facts. These conditions/consequences are not going to disappear or be removed; they will only turn into read-only mode, as you can see in the following screenshots:
Before Working Sets selection:
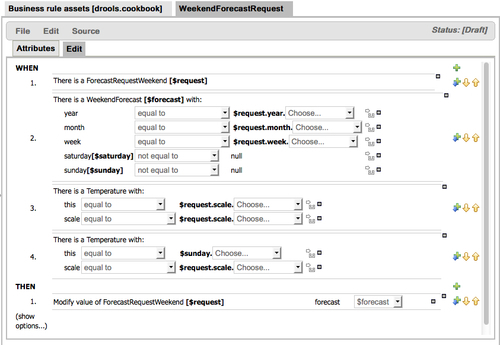
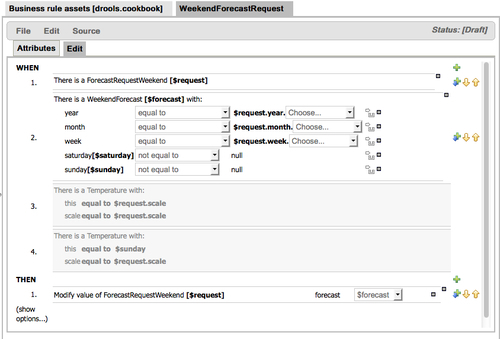
As you can see the preceding screenshot, patterns 3 and 4 were converted to read-only mode, disabling all possibilities to edit, move, or remove the patterns.
Working Sets currently can only be assigned to rules and not to packages or users. However, these improvements are supposed to be supported in the coming releases.
Another thing to keep in mind is about the nature of Working Sets and how they are strictly related to the packages assignment, instead of the rules assignment. Technically, it is not possible to assign different Working Sets to different rules in the same package, because they are internally related to packages and the assignment will affect all the rules in them.
This is also one of latest features included in Guvnor, which allows you to write rule templates in a graphical way using a combination of a Guided Editor together with a custom spreadsheet editor to complete the template data. As you may know, rules templates can be used when in your knowledge, you have a group of rules following the same patterns, constraints, and consequences in the RHS, only with differences in the constants, names for objects, or fields. In this recipe, you will see how to create the rules, how to assign the values to the template keys, and how to preview the rules that are being generated.
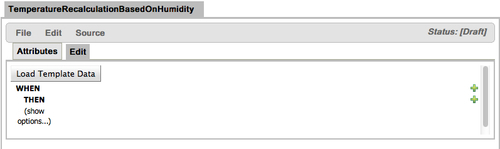
Create a new Rule Template asset with a name, initial category, and package.
Once the created rule template is loaded, you will see an editor that is almost identical to the Rule Guided Editor, as shown in the following screenshot. However, it also has a button that will open a pop-up to add the template data, which will be covered in the following steps:
At this point you can start adding patterns in the conditional section as is usually done in the Guided Editor. However, in the process to assign a value to a field constraint, you will see the option to assign a Template key to the field value, as shown in the following screenshot:
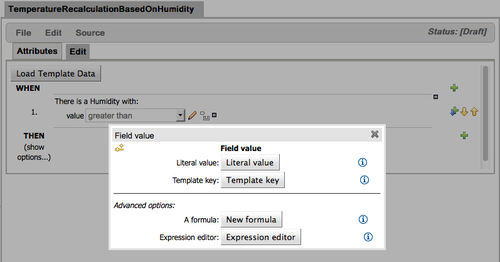
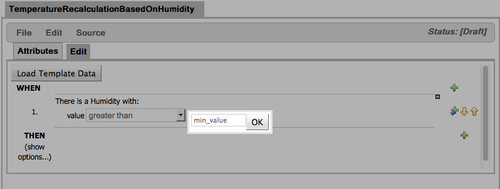
After assigning a template key, the Field value pop-up will be displayed on the screen. It will display a label value with a value text. Once you click on this label, it will be transformed into a text box, where a template key identifier can be assigned, as shown in the following screenshot:
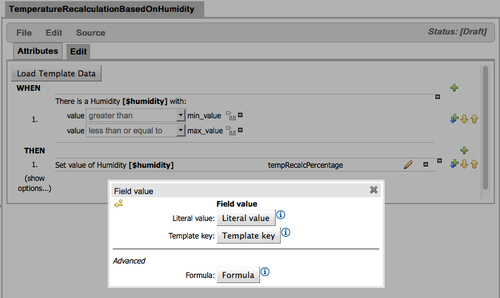
These template keys also can also assigned in the consequence patterns, in the same way as they are assigned in the conditional section:
Once the rule authoring is done and the template keys are assigned, you can start to add the template data using the custom spreadsheet editor, which will be displayed in a pop-up when you click on the Load Template Data button, as shown in the following screenshot:
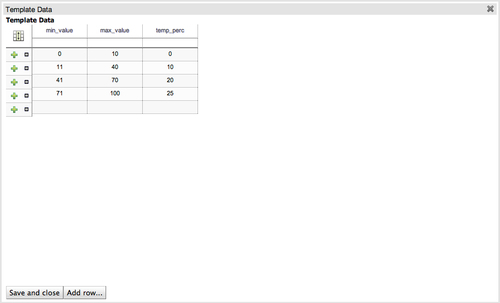
In this template data editor, you can start assigning all the possible values that the template keys can have. To assign the values, you have to add a row, by clicking on the Add row… button, and then you only have to assign the values to each of the template key fields, as shown in the following screenshot:
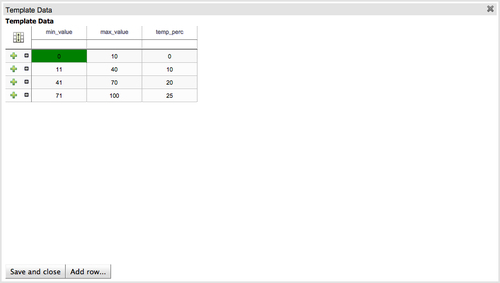
Once you have added all your rows, close and save the rows data by clicking on the Save and Close button. Also remember to save the rule template changes.
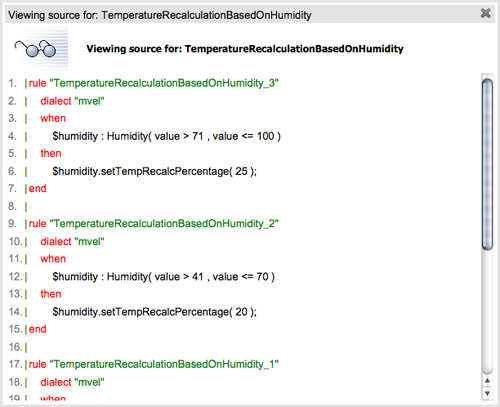
Finally, after saving all the changes, you can get a preview of the rules to be generated using the View source option that can be found in the Source menu of the Rule Template editor, as shown in the following screenshot:
Rules templates can be created with regular DRL files, creating the rule file, adding tags, and then expanding the rule file before adding it to the KnowledgeBuilder to compile the rules. However, the integration with Guvnor simplifies this process by automatically generating the rules without the need to manually expand them. It also adds a nice graphical editor that converts the rule authoring process.
As we discussed in this recipe, the pattern constraint values can be assigned to a static identifier, known as the template key. These template keys are later used to replace the constraint values with the values assigned in the template data editor.
Note
Template keys can be mixed with regular constraint values when you are adding patterns in a rule template.
After all the template keys and patterns are defined, the process continues filling the template data using the graphical editor. This editor simplifies the expansion of the rules, hiding the process to manually create the object and assigns them to expand the rules, as this has to be done when using regular DRL files. Each row that is added in the template data editor will generate a new rule when the package is compiled, but the rule will be only generated correctly if all the row fields have values. Otherwise, the rule can be expanded incorrectly, with only the consequences, conditions, or neither, as shown in the following screenshot:

Note
Custom enumerations are also supported in the template data editor giving more flexibility to the rules authoring process.
Once all the necessary rows are added and the template data and rule template are saved, the rules are ready to be consumed for an external application.
This is the most important piece of knowledge needed to start using rule templates inside Guvnor, which really simplifies the process to author rules, thanks to all these graphical editors.
In the process of adding, modifying, and deleting your rules, you would like to create snapshots to store the evolution of your stored knowledge and to have incremental deployments. Guvnor allows you to accomplish this in an easy way giving us a tool to create deployment snapshots, freezing the knowledge in that point of time and also giving us the possibility to compare the differences between previously created snapshots.
Follow the steps given here, in order to create snapshots of your knowledge:
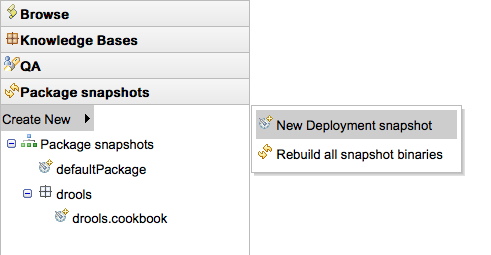
The Package Snapshots section is accessed in the main menu. It displays all the existing packages and all the created deployment snapshots. Select New Deployment snapshot from the list. It also allows us to create a new snapshot and rebuild all the existing ones, as shown in the following screenshot:
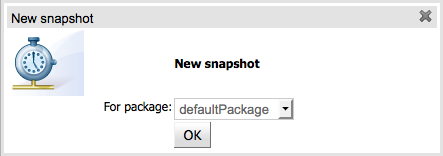
Once the selection is done, a pop-up, New snapshot, will appear on the screen. Select a package to generate a snapshot. You can use any package created in the previous recipes or the defaultPackage provided by Guvnor to follow the further steps:
Once the package is selected, you have to assign a name for the snapshot, as shown in the following screenshot:
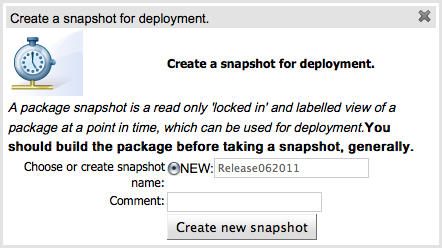
After pressing the Create new snapshot button, a pop-up will be displayed informing us that the snapshot was successfully created and the package snapshot will be displayed in the Package Snapshots tree view under the generated package name snapshot, as shown in the following screenshot:
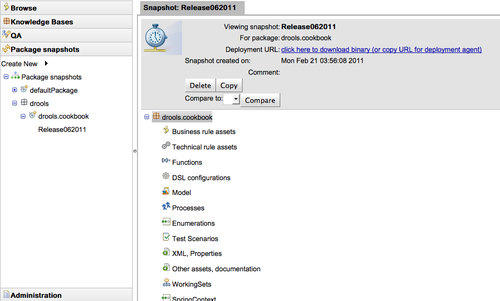
Once the package snapshot is created, it is ready to be used. As you can see in the previous screenshot, it provides a custom deployment URL to be used by your application.
The deployment snapshots simply freeze the knowledge for when you need it, saving a state of the knowledge that cannot be modified. Of course, you can still modify the knowledge through the Knowledge Bases, but any change will not be reflected in the snapshots.
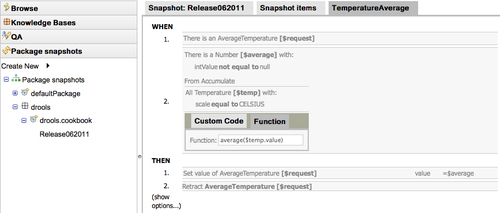
These package snapshots can also be explored to visualize their content, but all the knowledge will be displayed in the read-only mode. For example, the Business Rules assets section of the Snapshot items tab can be explored to see the rules that were included in it:
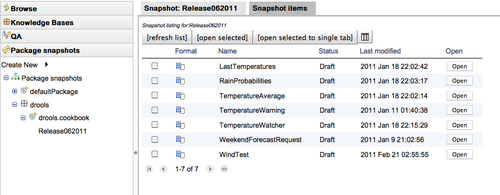
Now, all the assets included in the snapshot can be opened to visualize their content, but they cannot be modified or deleted. As you can see in the following screenshot, all the options to edit the rules are disabled making it impossible to make any modification:
After this recipe, hopefully you understand how useful the creation of deployment snapshots is and you now understand how to create them. They are a critical feature to improve the quality of rules development giving us the possibility to create incremental knowledge without interfering in the rules authoring process.
Each time you create a new snapshot, you may like to know the evolution of the knowledge, which rules were added, modified, or removed from the package. This comparison is only possible when you have more than one snapshot in the package, for obvious reasons.
When you open a package snapshot, you will see an option to create a comparison between snapshots. This comparison can be made by selecting the package snapshot that is going to be compared with the current one selected in the Compare to combobox and then clicking on the Compare button. After the Package snapshots module compares the snapshots, it will display a table view with the differences between them, as shown in the following screenshot:
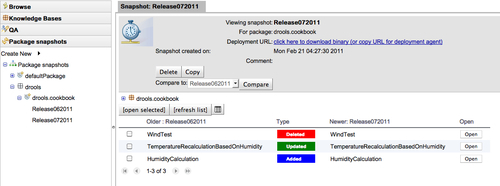
In this case, it displays that some rules were deleted, updated, and also that a new rule was added in the snapshot, showing the knowledge evolution between the deployment snapshots.