
In this chapter, you will learn
DB2 data types and the range of their values
How to work with large objects
How to choose proper data types
How to work with user-defined data types (UDTs)
How to manipulate date, time, and string data
How to use generated columns
How to work with
SEQUENCEobjects andIDENTITYcolumns
Now that you have learned the basic DB2 SQL procedure structure, it is time for an overview of the DB2 SQL PL language elements and their usage before discussing any of the more advanced features of the language. Many decisions on the topics covered in this chapter—such as the choices of the proper data types and the usages of SEQUENCE objects, IDENTITY columns, and generated columns—are generally the tasks performed during database setup and table creation. Choices of the data types for parameters and local variables in the SQL procedures, User-Defined Functions (UDFs) and triggers, which are covered extensively in the rest of the book, mostly need to match the column definition in your underlying tables.
A data type tells you what kind of data can be saved in a column or in a variable, and how large the value may be. There are two categories of data types in DB2:
The built-in data types are provided with DB2. DB2 supports a wide range of data types for your business need. A summary of DB2 built-in data types are shown in Figure 3.1.
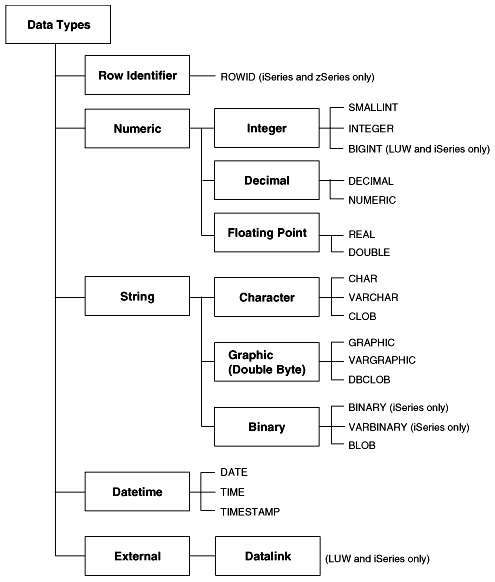
DB2 for iSeries and zSeries supports the ROWID data type. A ROWID data type is one that uniquely identifies a row. A query that uses ROWID navigates directly to the row because the column implicitly contains the location of the row. When a row is inserted into a table, DB2 generates a value for the ROWID column, unless one is supplied. If it is supplied, it must be a value that was previously generated. The value of ROWID cannot be updated and does not change, even after table space reorganizations. There can only be one ROWID column in a table.
There are six numeric data types in DB2. Their precisions and value ranges are listed in Table 3.1.
Table 3.1. DB2 Built-In Numeric Data Types
Precision (Digits) | Data Value Range | |
|---|---|---|
| 5 | –32,768 to 32,767 |
| 10 | –2,147,483,648 to 2,147,483,647 |
| 19 | –9,223,372,036,854,775,808 to 9,223,372,036,854,775,807 |
| LUW, zSeries: 31 iSeries: 63 | LUW, zSeries: Any value with 31 digits or less. iSeries: Any value with 63 digits or less. |
| LUW, iSeries: 24 zSeries: 21 | LUW: Smallest Largest Smallest positive Largest negative REAL value –1.175E-37 iSeries: Smallest Largest Smallest positive Largest negative zSeries: Smallest Largest Smallest positive Largest negative |
| 53 | LUW: Smallest Largest Smallest positive Largest negative iSeries: Smallest Largest Smallest positive Largest negative zSeries: Smallest Largest Smallest positive |
DB2 supports both single-byte and double-byte character strings. DB2 uses 2 bytes to represent each character in double-byte strings. Their maximum lengths are listed in Table 3.2.
Table 3.2. DB2 Built-In String Data Types
Maximum Length | |
|---|---|
| LUW: 254 bytes iSeries: 32,766 bytes zSeries: 255 bytes |
| LUW: 32,672 bytes iSeries: 32,740 bytes zSeries: 32,704 bytes |
32,700 bytes | |
| 2,147,483,647 bytes |
| LUW: 127 characters iSeries: 16,383 characters zSeries: 127 characters |
| LUW: 16,336 characters iSeries: 16,370 characters zSeries: 16,352 characters |
| 1,073,741,823 characters |
32,766 bytes | |
32,740 bytes | |
| 2,147,483,647 bytes |
You can also specify a subtype for string data types. For example, CHAR and VARCHAR columns can be defined as FOR BIT DATA to store binary data. On iSeries, other subtypes can be specified such as FOR SBCS DATA, FOR DBCS DATA, and CCSID. On zSeries, other subtypes that can be specified are FOR SBCS DATA and FOR MIXED DATA.
DB2 date and time data types include DATE, TIME, and TIMESTAMP. The TIMESTAMP data type consists of both the date part and the time part, while DATE and TIME data types only deal with the date and the time component, respectively. Their limits are listed in Table 3.3.
The last data type in Figure 3.1, DATALINK, is used to work with files stored outside the database. It is not covered in this book.
Large Object (LOB) data types are used to store data greater than 32KB, such as long XML documents, audio files, or pictures (up to 2GB). Three kinds of LOB data types are provided by DB2:
You will need to take into account some performance considerations when dealing with LOBs. Refer to Chapter 12, “Performance Tuning,” for more details.
LOBs can be used as parameters and local variables of SQL procedures. Figure 3.2 demonstrates a very simple usage of LOBs and returns a CLOB to the stored procedure caller.
Example 3.2. SQL procedure STAFFRESUME.
CREATE PROCEDURE staffresume  ( IN p_empno CHAR(6)
                              , OUT p_resume CLOB(1M) )
    LANGUAGE SQL
    SPECIFIC staffresume                           -- applies to LUW and iSeries
 -- WLM ENVIRONMENT <env>                          -- applies to zSeries

BEGIN
    SELECT resume INTO p_resume
        FROM emp_resume
        WHERE empno=p_empno AND resume_format = 'ascii';

    INSERT INTO emp_resume ( empno
                           , resume_format
                           , resume )
        VALUES             ( p_empno
                           , 'backupcopy'
                           , p_resume );
END
Choosing the correct data type is a simple and yet important task. Specifying the wrong data type may result in not only wasted disk space but also poor performance. To choose the correct data type, you need to fully understand your data and their possible values and usage. Table 3.4 offers a checklist for data type selection.
Table 3.4. Simple Data Type Checklist
Question | Data Type |
|---|---|
Is the string data variable in length? |
|
If the string data is variable in length, what is the maximum length? |
|
Do you need to sort (order) the data? | |
Is the data going to be used in arithmetic operations? | |
Does the data element contain decimals? | |
Is the data fixed in length? |
|
Does the data have a specific meaning (beyond DB2 base data types)? |
|
Is the data larger than what a character string can store, or do you need to store non-traditional data? |
User-defined distinct types are simple user-defined data types (UDTs) which are defined on existing DB2 data types. DB2 also supports other kinds of UDTs, which are beyond the scope of this book. In this book, UDT is only used to refer to the user-defined distinct type.
UDTs can be used to give your data semantic meaning. The syntax of creating UDTs is shown in Figure 3.3.
Example 3.3. CREATE DISTINCT TYPE syntax.
>>-CREATE DISTINCT TYPE--distinct-type-name--AS----------------->

>--| source-data-type |--WITH COMPARISONS----------------------><
The source-data-type can be any DB2 built-in data type discussed in this chapter. The WITH COMPARISONS clause allows you to use system-provided operators for source data types on your UDTs. The WITH COMPARISONS clause is not allowed with BLOB, CLOB, DBCLOB, LONG VARCHAR, LONG VARGRAPHIC, or DATALINK source data types.
You can use the UDTs to enforce your business rules and prevent different data from being used improperly because DB2 SQL PL enforces strong data typing. Strong data typing requires more explicit casting when comparing different data types because the data types are not implicitly cast.
To show you an example, suppose you define the two following variables:
DECLARE v_in_mile       DOUBLE;
DECLARE v_in_kilometer  DOUBLE;
Nothing will prevent you from performing incorrect operations such as
IF (v_in_mile > v_in_kilometer)
This operation is meaningless because you cannot compare miles with kilometers without converting one of them first. But DB2 is unable to tell this. To DB2, both variables are floating-point numbers. It is perfectly normal to add them or directly compare them. UDTs can be used to prevent such mistakes.
You can create two new data types: miles and kilometers.
CREATE DISTINCT TYPE miles AS DOUBLE WITH COMPARISONS;
CREATE DISTINCT TYPE kilometers AS DOUBLE WITH COMPARISONS;
Then you can declare your variables using the UDTs instead:
DECLARE v_in_mile       miles;
DECLARE v_in_kilometer  kilometers;
Now you will receive an SQL error
SQL0401N The data types of the operands for the operation ">" are not
compatible. LINE NUMBER=7.  SQLSTATE=42818
if you try to execute the same statement:
IF (v_in_mile > v_in_kilometer)
If this error is somewhat expected, you might be surprised to learn that the following statement will also result in the same SQL error:
IF (v_in_mile > 30.0)
What is happening here? The answer is that DB2 requires you to explicitly cast both DOUBLE and kilometers data type to miles data type.
When you create one user-defined distinct data type, DB2 generates two casting functions for you: one to cast from UDT to the source data type and another to cast back.
In this example, for miles UDT, you have these two functions:
MILES (DOUBLE)
DOUBLE (MILES)
Similarly, you have these two functions for kilometers UDT:
KILOMETERS (DOUBLE)
DOUBLE (KILOMETERS)
In order for these two statements to work, they need to be rewritten using the casting functions:
IF (v_in_mile > MILES(DOUBLE(v_in_kilometer)/1.6))
IF (v_in_mile > miles(30.0))
You have to cast the v_in_kilometers twice because there is no casting function between miles and kilometers unless you create it manually. The factor of 1.6 is added to convert kilometers into miles.
DB2 provides many built-in supports for data manipulation. Because of the complexity involved with manipulating date, time, and string data, it is particularly important to understand how to use system-provided features on these data types.
Dates and times are the data types that differ the most among Database Management Systems (DBMSs). This section shows you examples of some of the basic date and time manipulations.
You can get the current date, time, and timestamp by using the appropriate DB2 special registers:
SELECT CURRENT DATE      FROM SYSIBM.SYSDUMMY1;
SELECT CURRENT TIME      FROM SYSIBM.SYSDUMMY1;
SELECT CURRENT TIMESTAMP FROM SYSIBM.SYSDUMMY1;
CURRENT DATE, CURRENT TIME, and CURRENT TIMESTAMP are three DB2 special registers. Another useful DB2 special register for date and time operation is CURRENT TIMEZONE. You can use it to get the CURRENT TIME or CURRENT TIMESTAMP adjusted to GMT/CUT. All you need to do is to subtract the CURRENT TIMEZONE register from the CURRENT TIME or CURRENT TIMESTAMP:
SELECT CURRENT TIME - CURRENT TIMEZONE      FROM SYSIBM.SYSDUMMY1;
SELECT CURRENT TIMESTAMP - CURRENT TIMEZONE FROM SYSIBM.SYSDUMMY1;
Given a date, time, or timestamp, you can extract (where applicable) the year, month, day, hour, minutes, seconds, and microseconds portions independently using the appropriate function:
SELECT YEAR (CURRENT TIMESTAMP)        FROM SYSIBM.SYSDUMMY1;
SELECT MONTH (CURRENT TIMESTAMP)       FROM SYSIBM.SYSDUMMY1;
SELECT DAY (CURRENT TIMESTAMP)         FROM SYSIBM.SYSDUMMY1;
SELECT HOUR (CURRENT TIMESTAMP)        FROM SYSIBM.SYSDUMMY1;
SELECT MINUTE (CURRENT TIMESTAMP)      FROM SYSIBM.SYSDUMMY1;
SELECT SECOND (CURRENT TIMESTAMP)      FROM SYSIBM.SYSDUMMY1;
SELECT MICROSECOND (CURRENT TIMESTAMP) FROM SYSIBM.SYSDUMMY1;
You can also extract the date and time independently from a timestamp:
SELECT DATE (CURRENT TIMESTAMP) FROM SYSIBM.SYSDUMMY1;
SELECT TIME (CURRENT TIMESTAMP) FROM SYSIBM.SYSDUMMY1;
The date and time calculations are very straightforward:
SELECT CURRENT DATE + 1 YEAR                           FROM SYSIBM.SYSDUMMY1;
SELECT CURRENT DATE + 3 YEARS + 2 MONTHS + 15 DAYS     FROM SYSIBM.SYSDUMMY1;
SELECT CURRENT TIME + 5 HOURS - 3 MINUTES + 10 SECONDS FROM SYSIBM.SYSDUMMY1;
DB2 also provides many date and time functions for easy date and time data manipulation. For a complete list, refer to the SQL Reference corresponding to your platform.
A few date and time functions are used here as examples to show you how you can work with date and time data in DB2. To calculate how many days there are between two dates, you can subtract dates as in the following:
SELECT DAYS (CURRENT DATE) - DAYS (DATE('2000-01-01'))
  FROM SYSIBM.SYSDUMMY1;
If you want to concatenate date or time values with other text, you need to convert the value into a character string first. To do this, you can simply use the CHAR function:
SELECT CHAR(CURRENT DATE)            FROM SYSIBM.SYSDUMMY1;
SELECT CHAR(CURRENT TIME)            FROM SYSIBM.SYSDUMMY1;
SELECT CHAR(CURRENT TIME + 12 HOURS) FROM SYSIBM.SYSDUMMY1;
To convert a character string to a date or time value, you can use:
SELECT TIMESTAMP ('2002-10-20-12.00.00.000000') FROM SYSIBM.SYSDUMMY1;
SELECT TIMESTAMP ('2002-10-20 12:00:00')
  FROM SYSIBM.SYSDUMMY1; -- For LUW, zSeries
--SELECT TIMESTAMP '2002-10-20 12:00:00'
    FROM SYSIBM.SYSDUMMY1; -- For iSeries
SELECT DATE ('2002-10-20')                      FROM SYSIBM.SYSDUMMY1;
SELECT DATE ('10/20/2002')                      FROM SYSIBM.SYSDUMMY1;
SELECT TIME ('12:00:00')                        FROM SYSIBM.SYSDUMMY1;
SELECT TIME ('12.00.00')                        FROM SYSIBM.SYSDUMMY1;
String manipulation is relatively easy compared with date and timestamps. Again, DB2 built-in functions are heavily used. A few of them are used in this section to show you how DB2 string operations work. For a complete list, refer to the SQL Reference corresponding to your platform.
You can use either the CONCAT function or the || operator for string concatenation. The following two statements are exactly the same:
SELECT CONCAT('ABC', 'DEF') FROM SYSIBM.SYSDUMMY1;
SELECT 'ABC' || 'DEF' FROM SYSIBM.SYSDUMMY1;
However, when you have more than two strings to concatenate, the || operator is much easier to use.
You might have to use UPPER or LOWER function in string comparisons if you want the comparison to be case-insensitive. DB2 string comparison is case-sensitive.
COALESCE is another frequently used string function. It returns the first argument that is not null. In your application, if you have the following query SELECT coalesce(c1, c2, 'ABC') FROM t1;
assuming the c1 and c2 columns of table T1 are both nullable character strings, you will receive the value of c1 if it is not null. If c1 is null, you will receive the value of c2 if it is not null. If both c1 and c2 contain null values, you will receive the string ''ABC'' instead.
LUW allows a column to be declared as a generated column. It is a column that derives the values for each row from an expression, and is used to embed your business logic into the table definition. The syntax for generated columns is shown in Figure 3.4. Generated columns have to be defined with either the CREATE TABLE or ALTER TABLE statements.
Example 3.4. Generated column syntax for LUW.
|---column-name----+---------------------+----------------------------------->
                   |                     |
                   '-| data-type |-------'

|--+-GENERATED--+-ALWAYS-----+--AS--+-(--generation-expression--)-------------|
                '-BY DEFAULT-'
Values will be generated for the column when a row is inserted into the table. Two options are supported, namely GENERATED ALWAYS and GENERATED BY DEFAULT. For a GENERATED ALWAYS identity column, DB2 has full control over the values generated, and uniqueness is guaranteed. An error will be raised if an explicit value is specified. On the other hand, the GENERATED BY DEFAULT option does not guarantee uniqueness. DB2 will only generate a value for the column when no value is specified at the time of insert.
Figure 3.5 shows an example of a table using a generated column.
Example 3.5. An example of generated columns using a simple expression for LUW.
CREATE TABLE payroll
( employee_id INT NOT NULL
, base_salary DOUBLE
, bonus DOUBLE
, commission DOUBLE
, total_pay DOUBLE GENERATED ALWAYS AS
            (base_salary*(1+bonus) + commission)
)
In this example, there is a table named payroll in the department. Three columns are related to an employee’s total pay, namely base_salary, bonus, and commission. The base_salary and commission are in dollars, and the bonus is a percentage of the base_salary. The total_pay is calculated from these three numbers. The benefit of using a generated column here is to perform pre-calculation before the query time and to save the calculated value in the column. If your application has to use the value frequently, using the generated column will obviously improve the performance.
To insert a record into the payroll table, you can either use the DEFAULT keyword, as in
INSERT INTO payroll VALUES (1, 100, 0.1, 20, DEFAULT);
You could also not enumerate the column:
INSERT INTO payroll (employee_id, base_salary, bonus, commission)
VALUES (1, 100, 0.1, 20);
Both will generate the same result. Because the column is always defined as generated, you cannot supply a real value for the total_pay column. If not all identity columns are specified in the INSERT statement, DB2 will automatically substitute them with default values according to the column definitions.
It is a good practice to specify all the columns defined in the table and the associated values. This allows you to easily identify if there is a mismatch or missing column names and values. Notice how the reserved word DEFAULT is used so that DB2 will supply the default value for the generated column.
The generation expression in Figure 3.5 is a very simple arithmetic formula. More logic could be built into it by using a CASE statement. The CASE statement will be discussed in detail in Chapter 4, “Using Flow of Control Statements.” For now, it is sufficient to know that a CASE statement checks conditions and chooses which statement to execute depending on the result. In the next example, the company has decided that each employee will be either a bonus employee or a commission employee, but not both. A bonus employee receives a base salary and a bonus. A commission employee receives a base salary and a commission. A more complex table definition is shown in Figure 3.6.
Example 3.6. An example of generated columns using a CASE expression for LUW.
CREATE TABLE payroll2
( employee_id INT NOT NULL
, employee_type CHAR(1) NOT NULL
, base_salary DOUBLE
, bonus DOUBLE
, commission DOUBLE
, total_pay DOUBLE GENERATED ALWAYS AS
    (   CASE employee_type
        WHEN 'B' THEN base_salary*(1+bonus)
        WHEN 'C' THEN (base_salary + commission)
        ELSE 0
        END
    )
)
When the total pay is calculated, the employee type is checked first. If the type is ’B’, indicating a bonus employee, the total pay is the total of the base salary and the bonus. If the type is ’C’, indicating a commission employee, the total pay is calculated by adding the base salary and the commission. If a wrong employee type is entered, the total pay is set to 0, indicating a problem.
Numeric generation is a very common requirement for many types of applications, such as the generation of new employee numbers, order purchase numbers, ticket numbers, and so on. In a heavy online transaction processing (OLTP) environment with a high number of concurrent users, use of database tables and user-defined programmatic increment methods usually degrade performance. The reason is that the database system has to lock a table row when a value is requested to guarantee no duplicated values are used. The locks are discussed more in detail in Chapter 5, “Understanding and Using Cursors and Result Sets.” Instead of relying on your own methods for generating unique IDs, you can make use of facilities provided by DB2.
DB2 provides two mechanisms to implement such sets of numbers: identity columns and sequence objects. As you explore the usage of identity columns and sequence objects, you will see that both of them achieve basically the same goal: automatically generating numeric values. Their behaviors can be tailored by using different options to meet specific application needs. Although they are created and used differently, DB2 treats both of them as sequences. An identity column is a system-defined sequence, and a sequence object is a user-defined sequence.
A few SQL procedure examples will be used to demonstrate how to work with automatic numbering in DB2. In order to better illustrate the usage, some of the procedures use DB2 SQL PL features covered in the following chapters.
An identity column is a numeric column defined in a table for which the column values can be generated automatically by DB2. The definition of an identity column is specified at table creation time. Existing tables cannot be altered to add or drop an identity column. Figure 3.7 shows the syntax of an identity column clause used in a CREATE TABLE statement. Only one column in a table can be defined to be an identity column.
Example 3.7. Syntax of the identity column clause.
|---column-name----+---------------------+--------------------->
                   |                     |
                   '-| data-type |-------'

---'-GENERATED--+-ALWAYS-----+--AS--+-IDENTITY--+-------------------------+-+|
                '-BY DEFAULT-'                  '-| identity-attributes |-'

identity-attributes:
|--+---------------------------------------------------------+--|
   |    .-----------------------------------------------.    |
   |    V                      .-1----------------.     |    |
   '-(-----------+-START WITH--+-numeric-constant-+---+-+--)-'
                 |               .-1----------------. |
                 +-INCREMENT BY--+-numeric-constant-+-+
                 | .-NO MINVALUE----------------.     |
                 +-+-MINVALUE--numeric-constant-+-----+
                 | .-NO MAXVALUE----------------.     |
                 +-+-MAXVALUE--numeric-constant-+-----+
                 | .-NO CYCLE-.                       |
                 +-+-CYCLE----+-----------------------+
                 | .-CACHE--20---------------.        |
                 +-+-NO CACHE----------------+--------+
                 | '-CACHE--integer-constant-'        |
                 | .-NO ORDER-.                       |
                 '-+-ORDER----+-----------------------'
Data types for identity columns can be any exact numeric data type with a scale of zero such as SMALLINT, INTEGER, BIGINT, or DECIMAL. Single and double precision floating-point data types are considered to be approximate numeric data types, and they cannot be used as identity columns.
Within the IDENTITY clause, you can set a number of options to customize the behavior of an identity column. Before discussing these options, let’s look at Figure 3.8 to see how a table can be created with an identity column.
Example 3.8. Example of a table definition with an identity column
CREATE TABLE service_rq
    ( rqid SMALLINT NOT NULL
        CONSTRAINT rqid_pk
        PRIMARY KEY                                                    -- (1)
    , status VARCHAR(10) NOT NULL
        WITH DEFAULT 'NEW'
        CHECK ( status IN ( 'NEW', 'ASSIGNED', 'PENDING',
        'CANCELLED' ) )                                                -- (2)
    , rq_desktop CHAR(1) NOT NULL
        WITH DEFAULT 'N'
        CHECK ( rq_desktop IN ( 'Y', 'N' ) )                           -- (3)
    , rq_ipaddress CHAR(1) NOT NULL
        WITH DEFAULT 'N'
        CHECK ( rq_ipaddress IN ( 'Y', 'N' ) )                         -- (4)
    , rq_unixid CHAR(1) NOT NULL
        WITH DEFAULT 'N'
        CHECK ( rq_unixid IN ( 'Y', 'N' ) )                            -- (5)
    , staffid INTEGER NOT NULL
    , techid INTEGER
    , accum_rqnum INTEGER NOT NULL                                     -- (6)
        GENERATED ALWAYS AS IDENTITY
        ( START WITH 1
       ,  INCREMENT BY 1
       ,  CACHE 10 )
    , comment VARCHAR(100))
Figure 3.8 is the definition of a table called service_rq, which will be used in a later sample. The service_rq table contains an identity column called accum_rqnum, shown in Line (6). Note that the GENERATED ALWAYS option is specified, and therefore DB2 will always generate a unique integer. The value of accum_rqnum will start at 1 and increment by 1.
From examining the other column definitions (2, 3, 4, and 5), you will see that some are defined with a CHECK constraint so that only the specified values are allowed as column values. A primary key is also defined for this table, as shown in Line (1).
In DB2 for zSeries, explicitly create a unique index on the primary key column:
CREATE UNIQUE INDEX rqid_pk ON service_rq (rqid); -- zSeries only
Figures 3.9 and 3.10 show two different ways to insert a record into the service_rq table.
Example 3.9. First method of inserting into a table with an identity column.
INSERT INTO service_rq
    ( rqid
    , rq_desktop
    , rq_ipaddress
    , rq_unixid
    , staffid
    , comment )
VALUES
    ( 1
    , 'Y'
    , 'Y'
    , 'Y'
    , 10
    , 'First request for staff id 10' )
Example 3.10. Second method of inserting into a table with an identity column.
INSERT INTO service_rq
    ( rqid
    , status
    , rq_desktop
    , rq_ipaddress
    , rq_unixid
    , staffid
    , techid
    , accum_rqnum
    , comment )
VALUES
    ( 2
    , DEFAULT            -- (1)
    , 'Y'
    , 'Y'
    , 'Y'
    , 10
    , NULL
    , DEFAULT            -- (2)
    , 'Second request for staff id 10' )
The use of the DEFAULT keyword in Figure 3.10 is the same as what has been discussed in the generated columns section.
As shown in Figure 3.7, a few other options are available when defining the identity attribute. The START WITH option indicates the first value of the identity column and can be a positive or negative value. Identity values can be generated in ascending or descending order, and can be controlled by the INCREMENT BY clause. The default behavior is to auto-increment by 1 (and therefore, it is ascending). Options MINVALUE and MAXVALUE allow you to specify the lower and upper limit of the generated values. These values must be within the limit of the data type. If the minimum or maximum limit has been reached, you can use CYCLE to recycle the generated values from the minimum or maximum value governed by the MINVALUE and MAXVALUE option.
The CACHE option can be used to provide better performance. Without caching, (by using option NO CACHE), DB2 will issue a database access request every time the next value is requested. Performance can be degraded if the insert rate of a table with an identity column is heavy. To minimize this synchronous effect, specify the CACHE option so that a block of values is obtained and stored in memory to serve subsequent identity value generation requests. When all the cached values in memory are used, the next block of values will be obtained. In the example shown in Figure 3.8, 10 values are generated and stored in the memory cache. When applications request a value, it will be obtained from the cache rather than from the system tables that are stored on disk. If DB2 is stopped before all cached values are used, any unused cached values will be discarded. After DB2 is restarted, the next block of values is generated and cached, introducing gaps between values. If your application does not allow value gaps, use the NO CACHE option instead of the default value of CACHE 20.
It is often useful to be able to use the identity value previously generated by DB2 in subsequent application logic. The generated value can be obtained by executing the function IDENTITY_VAL_LOCAL within the same session of the INSERT statement; otherwise NULL is returned. The function does not take any parameters. Figure 3.11 demonstrates two different ways to use the IDENTITY_VAL_LOCAL function.
Example 3.11. Example of using IDENTITY_VAL_LOCAL.
CREATE PROCEDURE addnewrq ( IN p_rqid SMALLINT
                          , IN p_staffid INTEGER
                          , IN p_comment VARCHAR(100)
                          , OUT p_accum_rqnum INTEGER )
    LANGUAGE SQL
    SPECIFIC addnewrq                             -- applies to LUW and iSeries
 -- WLM ENVIRONMENT <env>                         -- applies to zSeries
BEGIN
    INSERT INTO service_rq
        ( rqid, status, rq_desktop
        , rq_ipaddress, rq_unixid, staffid
        , techid, accum_rqnum, comment )
    VALUES
        ( p_rqid, DEFAULT, 'Y'
        , 'Y', 'Y', p_staffid
        , NULL, DEFAULT, p_comment ) ;

    SELECT                           -- (1)
        identity_val_local()
    INTO
        p_accum_rqnum
    FROM
        sysibm.sysdummy1;

    VALUES                           -- (2)
        identity_val_local()
    INTO
        p_accum_rqnum;
END
In Figure 3.11, procedure addnewrq uses two ways to obtain the value just inserted into service_rq. On Line (1), it uses the SYSIBM.SYSDUMMY1 table. Another method is to instead use the VALUES clause shown in Line (2). If you call the procedure multiple times with the same rqid value, as in
CALL addnewrq(3, 1050, 'New Request', ?)
you receive an error with SQLSTATE 23505 indicating a unique constraint was violated because the rqid column is defined as a primary key in Figure 3.8. Note that the result of IDENTITY_VAL_LOCAL keeps increasing even though the INSERT statement fails. This indicates that once an identity value is assigned by DB2, it will not be reused regardless of the success or failure of the previous INSERT statement.
Notice that the example in Figure 3.11 only involves a single row insert. If the statement inserts multiple rows prior to execution of IDENTITY_VAL_LOCAL, it will not return the last value generated—it will return NULL.
Consider the example in Figure 3.12.
Example 3.12. Example of a multi-row insert before IDENTITY_VAL_LOCAL for LUW and iSeries.
CREATE PROCEDURE insert_multirow
    ( OUT p_id_generated INTEGER )
    LANGUAGE SQL
    SPECIFIC insrt_multirow                       -- applies to LUW and iSeries
BEGIN
    INSERT INTO service_rq                        -- (1)
        ( rqid
        , staffid
        , accum_rqnum
        , comment )
    VALUES
        ( 30000, 1050, DEFAULT, 'INSERT1')        -- (2)
       ,( 30001, 1050, DEFAULT, 'INSERT2')        -- (3)
    ;
    VALUES                                        -- (4)
        identity_val_local()
    INTO
        p_id_generated;

    -- For clean up purpose
    DELETE FROM service_rq
        WHERE rqid = 30000 or rqid = 30001;

END
Two sets of values on Lines (2) and (3) are being inserted with a single INSERT statement separated by a comma. The output parameter p_id_generated is assigned to the result of the IDENTITY_VAL_LOCAL function at Line (4). Successfully calling insert_multirow will give you the following on LUW:
P_ID_GENERATED: NULL
"INSERT_MULTIROW" RETURN_STATUS: "0"
On iSeries, the result would be something similar to
Output Parameter #1 = 5
Statement ran successfully  (761 ms)
Because an identity column is part of a table definition, to reset or change a characteristic of an identity column you need to issue an ALTER TABLE statement as shown in Figure 3.13.
Example 3.13. Syntax and example of altering identity column characteristics.
                                    .-COLUMN-.
>>-ALTER TABLE--table-name---ALTER--+--------+--column-name------>
          .-----------------------------------------.
          V                                         |
|-----------+-SET INCREMENT BY--numeric-constant--+-+----------><
            +-SET--+-NO MINVALUE----------------+-+
            |      '-MINVALUE--numeric-constant-' |
            +-SET--+-NO MAXVALUE----------------+-+
            |      '-MAXVALUE--numeric-constant-' |
            +-SET--+-NO CYCLE-+-------------------+
            |      '-CYCLE----'                   |
            +-SET--+-NO CACHE----------------+----+
            |      '-CACHE--integer-constant-'    |
            +-SET--+-NO ORDER-+-------------------+
            |      '-ORDER----'                   |
            '-RESTART--+------------------------+-'
                       '-WITH--numeric-constant-'
Except for the RESTART option (which has not been introduced), the options listed in Figure 3.13 behave exactly the same as they were described earlier in this chapter. If you want the identity column to be restarted at a specific value at any time, you will find the RESTART option very useful. Simply alter the table, provide the RESTART WITH clause, and explicitly specify a numeric constant.
A sequence is a database object that allows automatic generation of values. Unlike an identity column that is bound to a specific table, a sequence is a global and stand-alone object that can be used by any table in the same database. The same sequence object can be used for one or more tables. Figure 3.14 lists the syntax for creating a sequence object.
Example 3.14. Syntax of the CREATE SEQUENCE statement.
                                         .-AS INTEGER-----.
>>-CREATE SEQUENCE--sequence-name---*----+----------------+--*-->
                                         '-AS--data-type--'
>-----+-------------------------------+--*---------------------->
      '-START WITH--numeric-constant--'
      .-INCREMENT BY 1------------------.
>-----+---------------------------------+--*-------------------->
      '-INCREMENT BY--numeric-constant--'
      .-NO MINVALUE-----------------.
>-----+-----------------------------+--*------------------------>
      '-MINVALUE--numeric-constant--'
      .-NO MAXVALUE-----------------.       .-NO CYCLE--.
>-----+-----------------------------+--*----+-----------+--*---->
      '-MAXVALUE--numeric-constant--'       '-CYCLE-----'
      .-CACHE 20-----------------.       .-NO ORDER--.
>-----+--------------------------+--*----+-----------+--*------><
      +-CACHE--integer-constant--+       '-ORDER-----'
      '-NO CACHE-----------------'
As with identity columns, any exact numeric data type with a scale of zero can be used for the sequence value. These include SMALLINT, INTEGER, BIGINT, or DECIMAL. In addition, any user-defined distinct type based on of these data types can hold sequence values. This extends the usage of user-defined distinct types in an application. You may already notice that options supported for sequence objects are the same as the ones for identity columns. Refer to the previous subsection for their descriptions.
Figure 3.15 and Figure 3.16 show the creation of two sequence objects. For example, the sequence staff_seq is used to provide a numeric ID for each staff member. It is declared as an INTEGER, starts at 360, is incremented by 10, and no maximum value is explicitly specified. It is implicitly bound by the limit of the data type. In this example, values generated are within the limit of an INTEGER data type. The NO CYCLE option indicates that if the maximum value is reached, SQLSTATE 23522 will be returned, which means that the values for the sequence have been exhausted. The second sequence object, shown in Figure 3.16, is defined as SMALLINT and used to generate ticket numbers for service requests. This sequence object will start at 1 and increment by 1. Because NO CYCLE is specified, the maximum value generated will be 5000. The CACHE 50 option indicates that DB2 will acquire and cache 50 values at a time for application use. Like identity columns, if DB2 is stopped and sequence values were cached, gaps in sequence values may result.
At any time, you can either drop and re-create the sequence object or alter the sequence to change its behavior. Figures 3.17 and 3.18 show the syntax of the ALTER SEQUENCE and DROP SEQUENCE statements, respectively.
Example 3.17. Syntax of the ALTER SEQUENCE statement.
>>-ALTER SEQUENCE--sequence-name-------------------------------->
        .-------------------------------------------.
        V                                           |
  >-------+-RESTART--+-------------------------+-+--+------------><
          |          '-WITH--numeric-constant--' |
          +-INCREMENT BY--numeric-constant-------+
          +-+-MINVALUE--numeric-constant--+------+
          | '-NO MINVALUE-----------------'      |
          +-+-MAXVALUE--numeric-constant--+------+
          | '-NO MAXVALUE-----------------'      |
          +-+-CYCLE----+-------------------------+
          | '-NO CYCLE-'                         |
          +-+-CACHE--integer-constant--+---------+
          | '-NO CACHE-----------------'         |
          '-+-ORDER----+-------------------------'
            '-NO ORDER-'
Just like other database objects in DB2, manipulation of sequence objects is controlled by privileges. By default, only the sequence creator or a user with administrative authorities (such as SYSADM and DBADM on LUW), hold the ALTER and USAGE privileges of the object. If you want other users to be able to use the sequence, you need to issue the following:
GRANT USAGE ON SEQUENCE <sequence_object_name> TO PUBLIC
The USAGE and ALTER privileges can be granted to PUBLIC or any individual user or group.
Two expressions, NEXT VALUE and PREVIOUS VALUE, are provided to generate and retrieve a sequence value. Figure 3.19 is an example of their usage. Two alternate expressions, NEXTVAL and PREVVAL, can be used interchangeably with NEXT VALUE and PREVIOUS VALUE, respectively, for backward compatibility reasons.
Example 3.19. Usage of the NEXT VALUE and PREVIOUS VALUE expressions.
CREATE PROCEDURE seqexp ( out p_prevval1 int
                        , out p_nextval1 int
                        , out p_nextval2 int
                        , out p_prevval2 int )
    LANGUAGE SQL
    SPECIFIC seqexp                               -- applies to LUW and iSeries
 -- WLM ENVIRONMENT <env>                         -- applies to zSeries
BEGIN

    -- DECLARE host variables
    DECLARE v_prevstaffno INT;

    -- Procedure logic
    INSERT INTO staff
        ( id, name, dept
        , job, years, salary
        , comm )
    VALUES
        ( NEXT VALUE FOR staff_seq, 'Bush', 55
        , 'Mgr', 30, NULL
        , NULL);

    UPDATE staff
       SET id = ( NEXT VALUE FOR staff_seq )
     WHERE name='Bush';

    VALUES PREVIOUS VALUE FOR staff_seq INTO v_prevstaffno;     -- (1)

    DELETE FROM staff WHERE id = v_prevstaffno;                 -- (2)

    VALUES                                                      -- (3)
        ( PREVIOUS VALUE FOR staff_seq
        , NEXT VALUE FOR staff_seq
        , NEXT VALUE FOR staff_seq
        , PREVIOUS VALUE FOR staff_seq )
    INTO p_prevval1, p_nextval1, p_nextval2, p_prevval2;
END
You can use the NEXT VALUE and PREVIOUS VALUE expressions in SELECT, VALUES, INSERT, and UPDATE statements. In Figure 3.19 on Line (2), the DELETE statement needs to reference the value just generated in the WHERE clause. Because NEXT VALUE and PREVIOUS VALUE cannot be used in a WHERE, clause you need to use two separate SQL statements. You can use a VALUES INTO statement to obtain and store the generated value in a variable, v_prevstaffno. The DELETE statement can then specify the variable in the WHERE clause.
The last VALUES statement on Line (3) in the example shows that if more than one sequence expression for a single sequence object is used in a statement, DB2 will execute NEXT VALUE and PREVIOUS VALUE only once. In the example, assuming the value last generated is 500, the statement on Line (3) will have the result 500, 510, 510, 500.
For more examples on how to use sequence objects in your stored procedures, refer to Chapter 10, “Leveraging DB2 Application Development Features.”
Database triggers can be used to achieve the same results as generated columns. Triggers are discussed in greater detail in Chapter 9, “User-Defined Functions and Triggers.” This section presents an alternative to the generated column example show in Figure 3.5.
Figure 3.20 shows the alternate table creation script.
Example 3.20. Table creation for an alternative to a generated column.
CREATE TABLE payroll
( employee_id INT NOT NULL,
  base_salary DOUBLE,
  bonus DOUBLE,
  commission DOUBLE,
  total_pay DOUBLE
);
The column total_pay needs to be generated based on the values in the base_salary, bonus, and commission columns. Figure 3.21 shows the two triggers required to support this.
Example 3.21. Triggers for generated column logic.
CREATE TRIGGER bi_genpayroll
    NO CASCADE BEFORE INSERT ON payroll
    REFERENCING NEW AS n
    FOR EACH ROW MODE DB2SQL
       SET n.total_pay=n.base_salary*(1+n.bonus) + n.commission;

CREATE TRIGGER bu_genpayroll
    NO CASCADE BEFORE UPDATE OF base_salary, bonus, commission ON payroll
    REFERENCING NEW AS n
    FOR EACH ROW MODE DB2SQL
       SET n.total_pay=n.base_salary*(1+n.bonus) + n.commission;
In this chapter, DB2 data types were discussed. You learned all DB2 built-in data types and their valid values, which enable you to choose the right data type for your SQL procedure development. LOB data, date and time data, and string data and their manipulations were further demonstrated with examples.
The DB2 user-defined distinct data type UDT was also introduced. You can use the UDT to have better control over the use of your data.
Generated columns (for LUW), identity columns, and sequence objects were also covered. The values of generated columns are calculated and generated for you automatically by DB2. DB2 sequence object and identity columns are used to implement auto-incremental sequential numbers. Even though these features are normally defined at database setup time, you still may have to work with them in SQL procedures.