ASP.NET is built on top of an extensible HTTP request processing architecture known as the HTTP pipeline. Every time you author a new .aspx page, you are defining a new endpoint to service a request. The page, however, is just the last class in a series of classes that are used to process each request.
This chapter covers the details of the HTTP pipeline, beginning with a detailed look at how a request is routed through the various pieces of the architecture and ultimately dispatched to your page. We then look at the three primary points of extensibility in the pipeline: defining custom application classes, building custom modules, and writing custom handlers. The chapter concludes with a look at threading and pooling in the pipeline, discussing both the resource management of ASP.NET and the implications of threading for your applications.
The best way to understand the internals of the request processing architecture in ASP.NET is to trace the path of a request from its initial entry into a server all the way to its ultimate dispatching to the ProcessRequest method of your Page class. We begin with a high-level overview of how requests are routed on a machine processing requests with ASP.NET, and then take a more detailed look at the internals of the pipeline.
Typically, ASP.NET requests initiate from IIS.[9] When an HTTP request comes in from a client, typically on port 80, the IIS process (inetinfo.exe) receives the request and attempts to locate an extension mapping for the URL requested. If the request is for an ASP.NET page (it ends with .aspx), IIS loads the aspnet_isapi.dll ISAPI extension DLL and passes the request on to it. Once the aspnet_isapi.dll receives the request, it attempts to locate the ASP.NET worker process, housed in aspnet_wp.exe. If it is not running, it is started, and several named pipe connections are established between the ISAPI DLL and the worker process. Once these connections are established, the request is sent across a named pipe to the ASP.NET worker process for handling. Inside the worker process, ASP.NET routes the request to a designated AppDomain and dispatches it to the HTTP pipeline in that AppDomain. The end result of the request passing through the pipeline is the compilation (first time only) and creation of a class that implements the IHttpHandler interface, typically your Page-derived class. This handler acts as the endpoint of the request, populates the response buffer, and delivers the response back through the same channels it came from until IIS ends up sending back the response buffer. Figure 4-1 depicts this high-level view of request processing in ASP.NET.
Once the request makes it into the worker process, it goes through a series of steps and classes before it arrives at the ultimate handler. To begin with, each ASP.NET application is housed within an AppDomain in its worker process. AppDomains are a CLR construct that provides processlike memory and security isolation, without the overhead of actually creating separate processes. ASP.NET uses AppDomains to separate applications from each other so that if one application has a problem, it can safely be removed without affecting the remaining applications. Figure 4-2 depicts the various pipeline classes that live within an application's AppDomain and shows how they interact to service a request.
The first thing that happens when a request is dispatched to an application is that an instance of the HttpWorkerRequest class is created (1), which contains all the information about the current request, including the requested URL, the headers, and so on. Once the HttpWorkerRequest class is created, it is passed into the static ProcessRequest method of the HttpRuntime class, which is executed in the AppDomain of the application, initiating the processing of the request (2). The first thing the HttpRuntime class does is to create a new instance of the HttpContext class, initialized with the HttpWorkerRequest class (3). The HttpContext class is the “glue” of the pipeline, since it holds all the classes together by keeping all the relevant information about the current request in one location. When the HttpContext class is first created, it allocates new instances of the HttpRequest and HttpResponse classes and stores them as fields. It also provides property accessors to the application and session state bags. Once the HttpContext class is created, the HttpRuntime class requests an instance of the HttpApplication-derived class for this application by calling the static GetApplicationInstance method of the HttpApplicationFactory class (4). GetApplicationInstance either creates a new instance of the HttpApplication (or a derivative) class or pulls one from a pool of application objects if one is available (5). Once the HttpApplication class is created or retrieved, it is initialized, and during its initialization it allocates any modules that are defined for this application (6). Modules are classes that implement the IHttpModule interface and serve to pre- and postprocess requests.
Once the modules have been created, the HttpRuntime class asks its newly retrieved HttpApplication class to service the current request by calling its BeginProcessRequest method (7), defined by the IHttpAsyncHandler interface implemented by the application class. The HttpApplication class then takes over the request processing and locates the appropriate handler factory for the current request, based on the URL path. For example, if the request is for an .aspx page, it uses the PageHandlerFactory class. Once it locates the appropriate factory, it invokes the GetHandler method on the IHttpHandlerFactory interface to retrieve a fresh copy of the appropriate handler class. Handler classes serve as the endpoint for requests and very often are simply the Page-derived class that is created from an .aspx file. In general, handlers are classes that implement the IHttpHandler interface and populate the response buffer when asked to process a request. Once the handler is created, its ProcessRequest method is called (8), passing in the current HttpContext class so that it has access to the Request, the Response, and all the other request-specific pieces of information necessary. Once the ProcessRequest method returns, the request is complete.
One of the most important classes in the pipeline is the HttpContext class. This class maintains all the request-specific data and is accessible to most elements within the pipeline. The context class shows up as a parameter to many methods, including the ProcessRequest method of handlers, and it is directly accessible via the Context property of both the Page class and the HttpApplication class. Table 4-1 shows the set of properties available on the HttpContext class.
Table 4-1. Properties of HttpContext
Name | Type | Description |
|---|---|---|
|
| Context for the request currently in progress |
|
| Application-wide property bag |
|
| Active application instance |
|
| Per-client session state |
|
| HTTP request object |
|
| HTTP response object |
|
| Security ID of the caller |
|
| Handler for the request |
|
| Per-request property bag |
|
| HTTP server object |
|
| Unhandled exception object |
|
| Application-wide cache |
|
| Trace class for diagnostic output |
|
| Whether tracing is currently enabled |
|
| The current worker request object |
|
| Whether custom error pages are currently enabled |
|
| Whether the current request is in debug mode |
|
| Whether the current request can still be cancelled |
The Items property bag is a particularly useful collection to be aware of because it lets you store and retrieve request-specific data from anywhere in the pipeline. This can be useful if you are building custom modules, for example, and want to save information at one point during the request to read again later in the request. The interface to the Items collection is similar to all the other property-bag collections, using a string-based indexer to store an object reference.
Another useful property to know about is the static Current property of the HttpContext class. This property always points to the current instance of the HttpContext class for the request being serviced. This can be convenient if you are writing helper classes that will be used from pages or other pipeline classes and may need to access the context for whatever reason. By using the static Current property to retrieve the context, you can avoid passing a reference to it to helper classes. For example, the class shown in Listing 4-1 uses the Current property of the context to access the QueryString and print something to the current response buffer. Note that for this static property to be correctly initialized, the caller must be executing on the original request thread, so if you have spawned additional threads to perform work during a request, you must take care to provide access to the context class yourself.
The first point of extensibility in the HTTP pipeline that we explore is the application class. In any ASP.NET application, the HttpApplication class plays a vital role in nearly every aspect of processing requests. It acts as the initial entry point for a request to a particular application; it serves as a repository of globally available resources in an application, such as application state, the cache, and session state; and it provides access to many important events that occur during the lifetime of an application. You can make use of many of these features by simply using the HttpApplication instance that is created implicitly for you when your application starts. It is accessible through the HttpContext class and the Page class via their ApplicationInstance properties.
You can also customize the application class associated with your application by creating a class that derives from HttpApplication and intercepting events or adding whatever supplemental functionality you desire. For ASP.NET to know about and use your application class, you must create a file called global.asax, located at the top of the virtual directory associated with your application. Like .aspx files, this file is parsed and compiled into an assembly when the application is first accessed. In this case, the class created derives from HttpApplication. Listing 4-2 shows a sample global.asax file with several commonly defined event handlers. Note that the Application directive is used at the top of the file instead of the Page directive used by .aspx files. Also notice that the page consists primarily of a server-side script block, which contains of a number of method definitions. These methods are specially named such that when the class is created, they are automatically wired up as handlers to the corresponding events.
Example 4-2. A Sample global.asax File
<%! file: global.asax %>
<%@ Application Language="C#" %>

<script runat=server>
protected void Application_Start(object src, EventArgs e)
{ }

protected void Session_Start(object src, EventArgs e)
{ }

protected void Application_BeginRequest(object src,
                                        EventArgs e)
{ }

protected void Application_EndRequest(object src,
                                      EventArgs e)
{ }

protected void Application_AuthenticateRequest(object src,
                                               EventArgs e)
{ }

protected void Application_Error(object src, EventArgs e)
{ }

protected void Session_End(object sender, EventArgs e)
{ }

protected void Application_End(object src, EventArgs e)
{ }
</script>
As with .aspx files, you can use code-behind for global.asax files if you prefer to precompile your HttpApplication-derived class. If you are working with Visual Studio .NET, you will notice that when you create a new ASP.NET Web application project, it creates a new global.asax file for you with an associated code-behind class. Listing 4-3 shows a global.asax file that uses code-behind, which is shown in Listing 4-4. Also, as with the Page directive, you can elect either to precompile the code-behind class or to use the src attribute to have ASP.NET automatically compile the file into a class for you. You may notice that Visual Studio .NET again uses the CodeBehind attribute on the Application directive, even though technically this is not an attribute recognized by ASP.NET. This attribute is used exclusively by Visual Studio .NET to create the association between the .asax file and its code-behind file in the designer. As with pages, Visual Studio .NET uses the precompiled model when working with application classes.
Example 4-3. Using Code-Behind with global.asax
<%! file: global.asax %>
<%@ Application Inherits="MyApp" %>
Example 4-4. Code-Behind File for global.asax
//file: myapp.cs
using System;
using System.Web;
using System.Web.UI;

public class MyApp : HttpApplication
{
  //...
}
Typically, you would create a custom application class to add handlers to application-level events that occur during request processing. For example, you may want to trap the BeginRequest and EndRequest notification events issued for every request that is handled by an application, perhaps to calculate the time it takes to process each request. Listing 4-5 shows a sample global.asax file that traps the BeginRequest and EndRequest events to calculate the time taken to process each request. In the EndRequest handler, once the time has been calculated, it prints out a footer to the response buffer to show the time it took at the bottom of each page.
Example 4-5. Tracking Request Time in a global.asax File
<%! file: global.asax %>
<%@ Application Language="C#" %>

<script language="C#" runat=server>
protected void Application_BeginRequest(object sender,
                                        EventArgs e)
{
  this.Context.Items["startTime"] = DateTime.Now;
}

protected void Application_EndRequest(object sender,
                                      EventArgs e)
{
  DateTime dt = (DateTime)this.Context.Items["startTime"];
  TimeSpan ts = DateTime.Now - dt;
  this.Context.Response.Output.Write(
    "<br/><font size=1>request processing time: {0}</font>",
    ts);
}
</script>
It is worth noting the usage of the Items collection of the HttpContext class shown in the previous example. As mentioned earlier, the Items collection is a generic property bag of data that is maintained by the HttpContext class on a per-request basis. It can be used as a place to save data that is used by elements in the pipeline for a particular request. It is critically important that you not store data like this in fields of your HttpApplication-derived class, because as we will see in more detail later in this chapter, each request to a particular application may have a distinct instance of the application class created (or more likely, drawn from a pool). As soon as you begin adding state to your application class, it can quickly become confusing as one request is handed an application class with state initialized from a previous one. So as a general rule, never store instance-state in an HttpApplication-derived class, or if you do, take care to reinitialize that state with each request. Alternatively, you can rely on one of the many state repositories available to you in the pipeline, such as the Items collection of the HttpContext class, the application-wide Cache object, or the per-client session state bag.
A number of events are available in the HttpApplication class. Table 4-2 shows the events that are exposed by HttpApplication, most of which are issued with each request that is processed by your application, the two exceptions being the Error and Disposed events. To add a handler for any one of these events, you can either explicitly wire up a delegate to the event during the initialization of your application, or you can define a method whose name is of the form “Application_event,” and it will be wired up automatically at runtime.
Table 4-2. Events Exposed by HttpApplication
Event | Reason for Firing | Order |
|---|---|---|
| New request received | 1 |
| Security identity of the user has been established | 2 |
| User authorization has been verified | 3 |
| After authorization but before invoking handler, used by caching modules to bypass execution of handlers if cache entry hits | 4 |
| To load session state | 5 |
| Before request sent to handler | 6 |
| After request sent to handler | 7 |
| After all request handlers have completed, used by state modules to save state data | 8 |
| After handler execution, used by caching modules to store responses in cache | 9 |
| After request is processed | 10 |
| Just before shutting down the application | - |
| When an unhandled application error occurs | - |
| Before content sent to client | - |
| Before HTTP headers sent to client | - |
In addition, you can wire up handlers to a number of events that occur at different times during the lifetime of an application. The only way to wire up handlers to these particular events is to define methods with the names that match the events, because they are invoked internally by other classes in the pipeline and are not exposed directly as events on the HttpApplication class. Table 4-3 shows the list of additional events, none of which are issued on a per-request basis, for which you can add handlers.
Table 4-3. Additional Events Available through global.asax
Event | Reason for Firing |
|---|---|
| Application starting |
| Application ending |
| User session begins |
| User session ends |
In addition to the events exposed by the HttpApplication class and global.asax, several properties and methods are worth noting. Listing 4-6 shows the class with some of its more commonly used members. Note that there are property accessors to all the core elements of the pipeline, including the application state bag, the context, the request, the response, the session state, and the server. The virtual Init() method can be overridden in derived classes to perform initialization and is called once in the lifetime of your HttpApplication-derived class, after all modules for that application have been added. Another interesting method is CompleteRequest(), which can be called at any time during request processing to preemptively terminate a request.
Example 4-6. Members of the HttpApplication Class
public class HttpApplication : IHttpAsyncHandler, IComponent
{  // Properties
  public HttpApplicationState Application {get;}
  public HttpContext          Context     {get;}
  public HttpModuleCollection Modules     {get;}
  public HttpRequest          Request     {get;}
  public HttpResponse         Response    {get;}
  public HttpServerUtility    Server      {get;}
  public HttpSessionState     Session     {get;}
  public IPrincipal           User        {get;}
   // Methods
  public virtual void Init();
  public void CompleteRequest();
   // ...
}
In addition to defining methods within server-side script blocks in global.asax files, you can also define instances of classes by using the object tag. You can use the object tag to create either .NET classes or COM classes (accessed via interoperability) and can select the scope (either session or application) at which you would like the object to live. Listing 4-7 shows a sample object declaration within a global.asax file.
Example 4-7. Using the object Tag in global.asax
<%! File: global.asax %>

<object id="MyGlobalCollection" runat="server"
 scope="application" class="System.Collections.ArrayList" />
Using the object tag in global.asax does two things for you. First, it creates a read-only property using the name specified with the id attribute in your HttpApplication-derived class, which on first access instantiates the class and stores it in either the HttpApplicationState.StaticObjects or the HttpSessionState.StaticObjects collection, depending on the scope. The second thing it does is to add a read-only property to every Page-derived class created by .aspx file compilation, so that you can easily reference the object from every page in your application.
The declarative object creation syntax is in place largely to ensure that traditional ASP applications that use this same syntax will still work the same way. In the new ASP.NET world of class-based programming, the idea of implicitly adding properties to access a global object to every page is somewhat distasteful and should probably be avoided. Prefer instead to work directly with the session state bag, discussed in detail in Chapter 10, or for application-wide objects, the Cache, discussed in detail in Chapter 9.
The second and most commonly used point of extensibility in the pipeline is the handler. Every time you author a new .aspx file, you are creating a new Page-derived class, which acts as an endpoint to a request, or a handler. To act as a handler within the pipeline, a class must implement the IHttpHandler interface, shown in Listing 4-8.
Example 4-8. The IHttpHandler Interface
public interface IHttpHandler
{
  void ProcessRequest(HttpContext ctx);
  bool IsReusable {get;}
}
The Page class implements this interface, and in its implementation of the ProcessRequest method, it populates the response buffer by rendering all the controls contained within the page. When you create a new .aspx file, your only concern is to create controls on the page, which are in turn rendered at the appropriate time by the Page base class from which you derive.
Suppose, however, that you want to build a class that services requests but doesn't take advantage of the Page control-based rendering mechanism. You could create a page that contained nothing but code, or you could take more complete control over the request processing mechanism and author your own handler directly. You may also want to use the HTTP pipeline to service requests that are made to non-ASP.NET extensions. In either case, you can construct a custom handler by creating a class that implements the IHttpHandler interface directly, and then adding information to your configuration file indicating when that handler should be used.
To see an example, suppose we wanted to create a simple calculator handler that accepted GET requests, with an accompanying query string providing the parameters and operation, as shown in Listing 4-9.
Example 4-9. GET-Based Calculator Request
http://localhost/httppipeline/calc.calc?a=3&b=4&op=multiply
The first step is to create a new class that implements the IHttpHandler interface. In our implementation of ProcessRequest, we look for the a, b, and op variables passed through the query string, perform the calculation, and write the result back to the response object. The read-only property, IsReusable, decides whether a new instance of this class will be created for each request or shared, pooled instances of this class will be used. The CalcHandler class is shown in Listing 4-10.
Example 4-10. Sample Calc Handler Class
// File: CalcHandler.cs

public class CalcHandler : IHttpHandler
{
  public void ProcessRequest(HttpContext ctx)
  {
    int a = int.Parse(ctx.Request["a"]);
    int b = int.Parse(ctx.Request["b"]);

    switch (ctx.Request["op"])
    {
      case "add":
        ctx.Response.Write(a+b);
        break;
      case "subtract":
        ctx.Response.Write(a-b);
        break;
      case "multiply":
        ctx.Response.Write(a*b);
        break;
      default:
        ctx.Response.Write("Unrecognized operation");
        break;
    }
  }

  public bool IsReusable { get { return true; } }
}
The next step is to make ASP.NET aware that we would like our class to be used as the endpoint for any GET requests made to our application with the endpoint of calc.calc. To do this, we need to add an entry to our configuration file within the httpHandlers element, as shown in Listing 4-11. Note that for the verb, we restrict requests to be GET requests only. You could also specify “*” here if you didn't want to restrict the types of requests serviced by your handler. The path attribute indicates the endpoint name you want mapped onto this handler, and the type attribute defines the type and assembly from which the type should be loaded to service requests.
Example 4-11. web.config Entry for Calc Handler
<!— file: web.config —>
<configuration>
  <system.web>
    <httpHandlers>
      <add verb="GET" path="calc.calc"
          type="CalcHandler, CalcHandler" />
    </httpHandlers>
  </system.web>
</configuration>
The last step in wiring up a handler is to let IIS know that you would like requests of a given extension to be mapped into the ASP.NET worker process. By default, only ASP.NET-specific extensions (.aspx, .ascx, .ashx, and so on) are mapped to the ASP.NET worker process. Figure 4-3 shows a sample extension mapping created through the Internet Information Services utility.

One common example of when you might want to implement a custom handler is when you have existing (non-HTML) files on your system that you would like to expose as pages in a Web application. Instead of converting the files to an HTML format, you could write a handler that would read the files at request time and dynamically generate “HTMLized” content.
To see an example, suppose we want to display source code files with syntax coloring. That is, every time someone navigates to a .cs file in our application, we render it not as plain text but as HTML-enhanced text to show the keywords in blue and the comments in green, much as the Visual Studio .NET editor does. The first step is to construct a new class that implements the IHttpHandler interface. In our implementation of ProcessRequest, we open the requested file, parse its contents, and populate the response buffer with a syntax-colorized version of the code. The shell of such a class is shown in Listing 4-12.
Example 4-12. A Custom Handler for Viewing .cs Source Files
// File: CsSourceHandler.cs
public class CsSourceHandler : IHttpHandler
{
  public void ProcessRequest(HttpContext ctx)
  {
    try
    {
      StreamReader sr =
               new StreamReader(ctx.Request.PhysicalPath);
      // write out html and body elements first
      context.Response.Output.Write("<html><body>");

      // extract short file name to print at top of file
      string filename = context.Request.PhysicalPath;
      int idx = filename.LastIndexOf("\");
      if (idx >=  0)
        filename = filename.Substring(idx+1,
                                     filename.Length-idx-1);
      context.Response.Output.Write("//File: {0}<br>",
                                    filename);

      string str;
      do
      {
        str = sr.ReadLine();
        if (str != null)
          context.Response.Output.Write("{0}<br/>",
               /*convert str to colorized html here*/ );
      } while (str != null);
      context.Response.Write("</body></html>");
    }
    catch (FileNotFoundException )
    {
      context.Response.Write("<h2>Missing file</h2>");
    }
  }

  public bool IsReusable
  {
    get {return false; }
  }
}
The code for colorizing the source code text is not shown here but is included in the set of samples for this book.[10] Once we add the mapping for .cs files to our handler in our web.config file, clients can view any .cs files with syntax coloring. If a request for a file ending with the .cs extension comes into our application, a new instance of our CsSourceHandler class is created, and its ProcessRequest method is invoked. The only remaining concern is that we must ensure that IIS passes requests for .cs extensions to ASP.NET, which will then route the request appropriately. Typically, the last step in hooking up a custom handler, therefore, is to map the desired extension to the ASP.NET ISAPI extension DLL, as shown in the previous example in Figure 4-3. Note that in this particular case, this step is unnecessary because when ASP.NET is installed, it associates all .NET source code files with ASP.NET, which in turn maps requests for source code files to the HttpForbiddenHandler class, preventing users from accessing any source files in your application by default. The entry in our local web.config file for .cs extensions overrides the one found in machine.config, and our handler is called.
In addition to creating custom handlers by building classes and configuring them through web.config and IIS, you can create them without the configuration steps by using the .ashx extension. Any file ending with .ashx (where the “h” stands for “handler”) goes through the same parsing and compilation phase that .aspx files go through, but the resulting class must implement the IHttpHandler interface directly instead of deriving from Page. The format of .ashx files begins with a WebHandler directive, followed by a class definition much like one you would place directly in a source file. The class you would like to serve as the endpoint for requests made to this file is indicated through the Class attribute of the WebHandler directive, and the class must implement IHttpHandler. Using .ashx files to define custom handlers is convenient because there is no need to go through the process of registering a new extension, nor do you have to add any configuration elements to your web.config file. Listing 4-13 shows a sample .ashx file that implements the same calculator handler shown earlier, and Listing 4-14 shows a request to perform a calculation using this file as an endpoint.
Example 4-13. Building a Custom Handler with .ashx Files
<!— file: calc.ashx —>
<%@ WebHandler Language="C#" Class="CalcHandler" %>

using System;
using System.Web;

public class CalcHandler : IHttpHandler
{
  public void ProcessRequest(HttpContext ctx)
  {
    int a = int.Parse(ctx.Request["a"]);
    int b = int.Parse(ctx.Request["b"]);

    switch (ctx.Request["op"])
    {
      case "add":
        ctx.Response.Write(a+b);
        break;
      case "subtract":
        ctx.Response.Write(a-b);
        break;
      case "multiply":
        ctx.Response.Write(a*b);
        break;
      default:
        ctx.Response.Write("Unrecognized operation");
        break;
    }
  }

  public bool IsReusable { get { return false; } }
}
You may have noticed that the IHttpHandler interface supports a read-only property called IsReusable, used to indicate whether instances of a particular handler can be safely pooled. If you build a custom handler and return true from this property, ASP.NET pools instances of your handler as they are used to service requests. If you return false, a new instance of your handler is created each time a request is serviced. In general, it typically doesn't make that much difference whether your handlers are pooled or not, because the instantiation mechanism in the CLR and the garbage collector are quite efficient, so typically little is gained by doing pooling on your handler classes. The one case you might consider enabling pooling is if it takes significant time to set up the handler. For example, if your handler retrieved information from a database to perform its request processing, and that information did not change from one request to the next, it might make sense to request pooling on your handler. Handler pooling is never used by the standard handlers provided by ASP.NET. The Page class, which is by far the most common handler, returns false from IsReusable, and the factory class that allocates pages does not even perform pooling. The same goes for .ashx handlers—they are never pooled.
If you want more control over the creation of your handler, you can write a custom handler factory—a class that implements the IHttpHandlerFactory interface, as shown in Listing 4-15. The first method, GetHandler(), is called when a new instance of the requested handler is needed. The ReleaseHandler() method is called when the pipeline is finished processing a request with a handler, placing the control of handler creation and destruction in your hands. The deployment of a handler factory is identical to that of a custom handler, but instead of specifying a class that implements IHttpHandler, you specify a class that implements IHttpHandlerFactory. When a handler is requested, the runtime queries the class listed in the configuration file, and if it supports the IHttpHandlerFactory interface, it uses the factory to create an instance of the handler. Otherwise, it queries the class for its IHttpHandler interface and creates it directly.
Example 4-15. IHttpHandlerFactory Interface
public interface IHttpHandlerFactory
{
  IHttpHandler GetHandler(HttpContext ctx, string
            requestType, string url, string translatedPath);
  void ReleaseHandler(IHttpHandler handler);
}
You may want to consider implementing your own custom handler factory if you want to build your own pooling mechanism, or if you want to initialize your handlers with some data as they are being created by passing data into a nondefault constructor of your handler class. Listing 4-16 shows a slightly more involved example with a class called PooledCalcFactory that implements a pooling handler for the calculator handler class we wrote earlier. The pooling implementation uses a static instance of the Stack collection class with a limited size of ten. Note that every access to the shared stack object is protected by a lock on the Type object of the PooledCalcFactory class. This guarantees that no more than one instance will ever manipulate the stack shared by all instances of the class.
Example 4-16. A Custom Pooling Factory for the Calc Handler
// File: PoolingFactory.cs
public class PooledCalcFactory : IHttpHandlerFactory
{
  const int cPoolSize = 10;
  // Static stack of CalcHandler instances
  private static Stack _handlers = new Stack(cPoolSize);

  // GetHandler returns a CalcHandler instance from
  // the static stack, if available, or a new instance
  public IHttpHandler GetHandler(HttpContext ctx,
      string requestType, string url, string translatedPath)
  {
    IHttpHandler handler = null;

    // Acquire a lock on the SyncBlock associated with our
    // Type object to prevent concurrent access to our
    // static stack
    lock (this.GetType())
    {
      // if handler is available on stack, pop it
      if (_handlers.Count > 0)
        handler = (IHttpHandler) _handlers.Pop();
    }

    // if no handler was available, create new instance
    if (handler == null)
      handler = new CalcHandler();

    return handler;
  }

  // ReleaseHandler puts a handler back on the static
  // stack, if the handler is reusable and the stack
  // is not full
  public void ReleaseHandler(IHttpHandler handler)
  {
    if (handler.IsReusable)
      lock(this.GetType())
      {
        if (_handlers.Count < cPoolSize)
          _handlers.Push(handler);
      }
  }
}
As mentioned earlier, the deployment of this factory class, along with the calculator handler, is nearly identical to the way we deployed the calculator handler initially. This time, however, we specify the type and assembly of our factory class instead of the handler class directly, as shown in Listing 4-17.
The last and perhaps most powerful point of extensibility in the HTTP pipeline is the module. Modules live at the application scope and can tap into any of the HttpApplication events. They are created the first time the application is created and exist throughout the lifetime of the application. Modules are typically used to perform pre- or postprocessing on requests, similar in many ways to ISAPI filters in IIS. ASP.NET itself uses modules for a number of application-level features, including authentication, authorization, output caching, and out-of-process session state management. Table 4-4 shows the various system-provided modules and the services they provide.
Table 4-4. Modules Defined in ASP.NET
Module | Purpose |
|---|---|
| Page-level output caching |
| Out-of-process session state management |
| Client authentication using integrated Windows authentication |
| Client authentication using cookie-based forms authentication |
| Client authentication using MS Passport |
| Client authorization based on requested URL |
| Client authorization based on requested file |
Note that all these services require hooks into the pipeline before the request is issued to a handler. This is a common requirement of a module, to be able to tap into the request processing pipeline and potentially alter, abort, or otherwise change the current request.
To construct your own module, you begin by building a class that implements the IHttpModule interface, shown in Listing 4-18. This interface consists of two methods, Init() and Dispose(). The Init method is called when the module is first created, and it takes as a parameter a reference to the current HttpApplication object. Typically, a module uses the application class to register delegates to some of the events exposed by HttpApplication. The Dispose method is called when the application is being closed, giving modules an opportunity to perform any cleanup necessary.
Example 4-18. IHttpModule Interface
public interface IHttpModule
{
  void Dispose();
  void Init(HttpApplication context);
}
To see an example, let's build a module that tracks the request processing time for all requests serviced by an application. The logic for this class is identical to our earlier implementation of tracking request time through the global.asax file, and in fact, the capabilities of global.asax and modules largely overlap. We discuss how best to choose which technique to use in the next section. Listing 4-19 shows our TimerModule class, which will keep track of the start request time in the Items collection of the HttpContext class, as we did in our global.asax example. This time, for variety, instead of printing the timing results to the response buffer, we create a custom header that contains the timing information.[11]
Example 4-19. Sample Module to Collect Request Timing Information
// File: TimerModule.cs
//
public class TimerModule : IHttpModule

{
  public void Dispose() {}

  public void Init(HttpApplication httpApp)
  {
    // subscribe delegates to the BeginRequest and
    // EndRequest events of the HttpApplication class
    httpApp.BeginRequest +=
            new EventHandler(this.OnBeginRequest);
    httpApp.EndRequest +=
            new EventHandler(this.OnEndRequest);
  }

  public void OnBeginRequest(object o, EventArgs ea)
  {
    HttpApplication httpApp = o as HttpApplication;

    // record time that event was handled in
    // per-request Items collection
    httpApp.Context.Items["sTime"] = DateTime.Now;
  }

  public void OnEndRequest(object o, EventArgs ea)
  {
    HttpApplication httpApp = o as HttpApplication;

    DateTime dt = (DateTime)httpApp.Context.Items["sTime"];

    // measure time between BeginRequest event
    // and current event
    TimeSpan ts = DateTime.Now - dt;

    httpApp.Context.Response.AddHeader("RequestTiming",
                                       ts.ToString());
  }
}
Now, to deploy this module, the class must be compiled into an assembly, deployed in the /bin directory of the application (or in the GAC), and an entry must be made in the web.config file of the application under the httpModules element. Listing 4-20 shows a sample web.config file that would register this module, assuming we compiled the class into an assembly named TimerModule. Note that the add element takes a name and a type for attributes, where the name is some application-unique string identifying the module, and the type is the class name (fully namespace qualified) followed by the assembly name.
Example 4-20. Timer Module Configuration
<!— File: web.config —>
<configuration>
  <system.web>
    <httpModules>
      <add name="Timer"
           type="TimerModule, TimerModule" />
    </httpModules>
  </system.web>
</configuration>
In addition to monitoring requests and supplementing responses, modules can be used to filter both requests and responses. Filtering is useful if you want to modify the incoming request before it reaches its handler or to change the outgoing response as it is being written. Filters can be useful for adding things like common footers to all pages processed by an application or even stripping off portions of a response before sending it back to the client.
To build a module that acts as a filter, you need to construct a new Stream-derived class and at the beginning of each request (Application_BeginRequest), create a new instance of your Stream-derived class and assign it to the Filter property of either the Request or the Response object. From this point on, all writes to the Response stream (or reads from the Request stream) will use your new stream class. The tricky part in getting a filter working properly is that you need to keep the old Request or Response stream around, cached in your custom stream, so that you can read from or write to the actual request or response stream when you need to. Your new stream class thus acts as a filter sitting between the original stream and any reads or writes. This relationship is shown in Figure 4-4.
To see an example of building a filtering module, suppose we wanted to alter the outgoing response of all requests made to an application by stripping off some portion of the response and logging it to a file. As we will see in the next chapter, there is a compelling reason to build such a filtering module. One of the diagnostic features of ASP.NET, called tracing, augments the output of any given page with supplemental information about the request. This is extremely useful information, but there is no way to tell ASP.NET to write that trace information to a file instead of directly to the Response stream. So for our example, we will build an HttpModule that monitors all responses, looking for the beginning of the trace output of a response (if there is one). Once the trace output is detected, we will stop passing it along to the Response stream and instead redirect the output to a file stream to store on disk.
Our first task is to build the custom stream class that sits between any calls to Response.Write() and the actual Response stream. This class, which we call TraceRedirectStream, is shown in Listing 4-21. The first thing to note about this custom stream class is that it encapsulates two streams as data members. The first, called _primaryStream, is initialized to the actual Response stream. The second, called _otherStream, is initialized to a file stream to which the trace information is to be written. The constructor of our custom stream class takes the two streams as parameters, as well as the request URL so that it can document what request generated the trace information. Many of the Stream functions of this class simply forward along to the _primaryStream data member, so that it behaves like the standard Response stream in most ways. The interesting functions are Write and FindTraceStartTag. The purpose of FindTraceStartTag is to scan the text being written for the string that indicates the beginning of the trace output. This function is then used within the Write method to determine which stream to write to. The first time the trace start tag is encountered, we write out a header to the file stream to document the request URL, and then all subsequent writes to our stream are sent to the file stream and not to the original Response stream.
Example 4-21. Custom Stream Class to Redirect Trace Output
public class TraceRedirectStream : Stream
{
  private Stream  _primaryStream;
  private Stream  _otherStream;
  private bool    _inTrace = false;
  private string  _requestUrl;
  // Signals the start of the trace information in a page
  private const string _cStartTraceStringTag =
                        "<div id="__asptrace">";

  public TraceRedirectStream(Stream primaryStream,
                             Stream otherStream,
                             string requestUrl )
  {
    _primaryStream = primaryStream;
    _otherStream   = otherStream;
    _requestUrl    = requestUrl;
  }

  private void WriteLine(Stream s, string format,
                         params object[] args )
  {
    string text = string.Format(format +
                                Environment.NewLine, args);
    byte[] textBytes = Encoding.ASCII.GetBytes(text);
    s.Write(textBytes, 0, textBytes.Length);
  }

  public override bool CanRead
  {
    get { return(_primaryStream.CanRead); }
  }

  public override bool CanSeek
  {
    get { return(_primaryStream.CanSeek); }
  }

  public override bool CanWrite
  {
    get { return(_primaryStream.CanWrite); }
  }

  public override long Length
  {
    get { return(_primaryStream.Length); }
  }

  public override long Position
  {
    get { return(_primaryStream.Position); }

    set
    {
      _primaryStream.Position = value;
      _otherStream.Position = value;
    }
  }

  public override long Seek(long offset,
                            SeekOrigin direction)
  {
    return _primaryStream.Seek(offset, direction);
  }

  public override void SetLength(long length)
  {
    _primaryStream.SetLength(length);
  }

  public override void Close()
  {
    _primaryStream.Close();
    _otherStream.Close();
  }

  public override void Flush()
  {
    _primaryStream.Flush();
    _otherStream.Flush();
  }

  public override int Read( byte[] buffer, int offset,
                            int count )
  {
    return _primaryStream.Read(buffer, offset, count);
  }

  public override void Write( byte[] buffer, int offset,
                              int count )
  {
    if (_inTrace)
    {
      // if we are writing out trace information,
      // it is always the last part of the output stream,
      // so just continue writing to the log file until
      // the request completes.
      _otherStream.Write(buffer, offset, count);
    }
    else
    {
      // We are not currently writing out trace information,
      // so as we write response information, look for the
      // trace start string, and begin writing to the trace
      // log if we encounter it. Scan the entire buffer
      // looking for the trace start tag.
      int idx = FindTraceStartTag(buffer, offset, count);

      if (idx > 0) // if non-negative, start tag found
      {
        WriteLine(_otherStream,
                  "<hr/><h3>Request URL: {0}</h3>",
                  _requestUrl);
        _inTrace = true;

        // write non-trace portion of buffer to primary
        // response stream
        _primaryStream.Write(buffer, offset, idx);
        // write trace portion to other stream (log)
        _otherStream.Write(buffer, idx+offset, count - idx);
      }
    }
  }

  public override int ReadByte()
  {
    int b = _primaryStream.ReadByte();
    _otherStream.Position = _primaryStream.Position;
    return(b);
  }

  public override void WriteByte( byte b )
  {
    if (this._inTrace)
      _otherStream.WriteByte(b);
    else
      _primaryStream.WriteByte(b);
  }

  private int FindTraceStartTag(byte[] buffer, int offset,
                                int count)
  {
    int bufIdx = offset;
    int ret = -1;

    while ((bufIdx < count+offset) && (ret < 0))
    {
      if (buffer[bufIdx] ==
               TraceRedirectStream._cStartTraceStringTag[0])
      {
        int i=1;
        while ((i <
           TraceRedirectStream._cStartTraceStringTag.Length)
               && (bufIdx+i < count+offset))
        {
          if (buffer[bufIdx+i] !=
               TraceRedirectStream._cStartTraceStringTag[i])
            break;
          i++;
        }
        if (i >=
           TraceRedirectStream._cStartTraceStringTag.Length)
          ret = bufIdx;
      } // if (buffer[bufIdx]...
      bufIdx++;
    } // while (bufIdx < ...

    return ret;
  } // private int FindTraceStartTag...

} // public class TraceRedirectStream...
Now we are left with the task of installing this stream in place from a module. Our custom HttpModule adds handlers for the BeginRequest and EndRequest events so that our custom stream can be installed and closed when the request is complete. The installation of the stream involves creating a new instance and assigning it to the Filter property of the Response object with each new request. This custom module is shown in Listing 4-22.
Example 4-22. TraceDumpModule Class
public class TraceDumpModule : IHttpModule
{
  private TraceRedirectStream  _responseStream;
  private string               _logFileName;

  public void Init( HttpApplication httpApp )
  {
    _logFileName = @"C:	emp	racelog.htm";

    httpApp.BeginRequest +=
            new EventHandler(OnBeginRequest);
    httpApp.EndRequest += new EventHandler(OnEndRequest);
  }

  void OnBeginRequest( object sender, EventArgs a )
  {
    HttpApplication httpApp = sender as HttpApplication;

    FileInfo fiLogFile;
    if( File.Exists(_logFileName) )
      fiLogFile = new FileInfo(_logFileName);

    // Open the log file (for appending) and log
    // any trace output made to that request.
    //
    Stream responseLog = File.Open( _logFileName,
                       FileMode.Append, FileAccess.Write );

    long pos = httpApp.Request.InputStream.Position;
    CopyStream(httpApp.Request.InputStream, responseLog);

    httpApp.Request.InputStream.Position = pos;

    // Set the response filter to refer to the trace
    // redirect stream bound to the original response
    // stream and the log file. As this stream processes
    // the response data, it will selectively send non-
    // trace output to the original stream, and trace
    //output to the log file
    //
    _responseStream =
           new TraceRedirectStream(httpApp.Response.Filter,
               responseLog, httpApp.Request.Url.ToString());
    httpApp.Response.Filter = _responseStream;
  }

  void OnEndRequest( object sender, EventArgs a )
  {
    if( _responseStream != null )
      _responseStream.Close();
  }

  void CopyStream( Stream inStream, Stream outStream )
  {
    byte[] buf = new byte[128];
    int bytesRead = 0;
    while ((bytesRead=inStream.Read(buf, 0, buf.Length))
            > 0 )
    {
      outStream.Write(buf, 0, bytesRead);
    }
  }

  public void Dispose()
  {}
}
Unlike handlers, which are pooled only when you create custom handlers whose IsReusable property returns true, modules are always pooled. Each time a new instance of the HttpApplication-derived class is created, a new set of modules is created to accompany it. Thus, the advice given earlier for application classes holds true for custom modules as well—save no state between requests.
As noted earlier, all the functionality of a module can also be implemented in the application-specific global.asax file. The converse is not true, however, because global.asax provides several additional events and features that are not available to modules, such as the session start event or the ability to use the object tag to declare application or session scoped objects. For many tasks at the application level, however, it is not always clear whether the feature should be implemented in a module or in the global.asax file. Table 4-5 provides a comparison of various features supported by modules and the global.asax file.
Table 4-5. Module versus global.asax
Feature | Module |
|
|---|---|---|
Can receive event notifications for all | Yes | Yes |
Can receive event notifications for | No | Yes |
Can be deployed at the machine level | Yes | No |
Supports declarative object instantiation | No | Yes |
Note that the one significant advantage of modules is that they can be deployed at the machine level. By deploying your module's assembly in the GAC, you can add that module either directly to the machine-wide machine.config file or individually to multiple applications' web.config files, without having to recopy the assembly to each application's /bin directory. The one significant advantage of the global.asax file is that it supports additional events issued when the application starts and ends and when each session starts and ends. The global.asax file also supports declarative object instantiation, but as we have seen, this is a feature most developers are unlikely to make much use of anyway.
As a general guideline, it is usually wise to place any application-specific features that are unlikely to be useful in other applications in global.asax. If you find yourself building a feature, such as a response timer, that might be useful to more than one application, consider building it as a module instead of coding it directly into global.asax.
To efficiently service multiple client requests, Web servers make extensive use of concurrency, by launching multiple processes and/or spawning multiple threads to service requests and perform work. As we have seen, ASP.NET creates a distinct AppDomain for each application housed in its worker process, but what has not yet been mentioned is how threads are allocated and dispatched to service those requests.
For the most part, ASP.NET developers need not concern themselves with the multitude of issues that come with developing in a multithreaded environment. Page requests are always serviced on the same thread, and a distinct instance of the Page class is always created to service any new requests. Distinct instances of application and module objects are also used to service each request. It is important, however, to understand how threads are used to service requests, so that you don't make any incorrect assumptions about concurrent access to any of the state in your applications.
To begin with, ASP.NET uses the process-wide CLR thread pool to service requests. The size of this pool is configurable in the processModel element of machine.config, discussed in Chapter 3, and is set to a default of 25 worker threads and 25 I/O threads. When running on Windows 2000 or Windows XP, ASP.NET services requests primarily on I/O threads from the CLR thread pool. This is done for efficiency because each request is initiated by an asynchronous write to a named pipe from the ISAPI extension DLL, aspnet_isapi.dll, within the IIS process (inetinfo.exe). When the asynchronous write is received by the ASP.NET worker process (aspnet_wp.exe), it is processed on an I/O thread, so to avoid thread switching, the request is usually serviced directly on that thread. Note that this behavior changes with Windows Server 2003 and IIS 6.0 because ASP.NET is more tightly integrated. In IIS 6.0, there is no dedicated worker process for ASP.NET since it is integrated into the process model exposed by IIS 6.0, which lets you designate whether a particular virtual directory lives in a distinct worker process (w3wp.exe) or in a worker process shared by other virtual directories. In this scenario, ASP.NET services requests on worker threads drawn from the process-wide CLR thread pool.
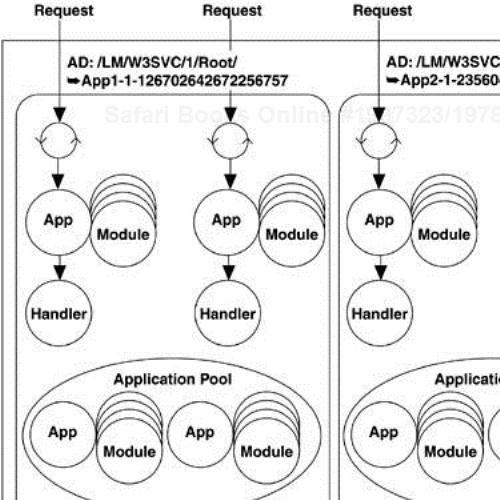
For each request that comes in, a new instance of the appropriate HttpApplication-derived class is created, as are the associated modules for that application. To avoid reallocating applications and modules too often, each AppDomain maintains a pool of applications and modules. The maximum size of the application pool is the same as the size of the thread pool, so by default, up to 25 requests per worker process can be processed concurrently, each with its own application and module set. Figure 4-5 shows a possible snapshot in time of the ASP.NET worker process. In this scenario, there are two active applications in the worker process, each with a dedicated AppDomain. Each application is currently processing two requests, and each is using two threads from the ASP.NET thread pool to service those requests.
Several aspects of this architecture may influence the way you construct your ASP.NET applications. First of all, the fact that applications and modules are instantiated multiple times for a particular application means that you should never rely on adding fields or other state to your application or module classes, because it is replicated and not shared across multiple requests as you might think. Instead, use one of the many state repositories available in the pipeline, such as the application-wide cache, the session state bag, the application state bag, or the per-request items collection of the HttpContext class. Also, by default, most handlers created to service requests are not pooled. As we have seen, you can pool handlers and even control pooling on a per-handler basis via the IsReusable property of IHttpHandler, but the only handlers that are pooled implicitly are custom handlers that you write with no designated handler factory. The PageHandlerFactory class does not perform pooling, nor does the factory SimpleHandlerFactory class, which instantiates .ashx-defined handlers. Typically, therefore, each request is serviced by a freshly allocated instance of the appropriate handler class, which is discarded after the request completes.
When we discussed implementing custom handlers earlier in the chapter, the call to the ProcessRequest method of the handler was always made synchronously in the context of the thread executing the request in the pipeline. There may be occasions where you would like this invocation to be asynchronous, allowing the primary request processing thread to be returned to the thread pool while your handler performs its work. For these occasions, there is another handler interface, derived from IHttpHandler, called IHttpAsyncHandler, shown in Listing 4-23.
Example 4-23. The IHttpAsyncHandler Interface
public interface IHttpAsyncHandler : IHttpHandler
{
  IAsyncResult BeginProcessRequest(HttpContext ctx,
                                   AsyncCallback cb,
                                   object obj);
  void EndProcessRequest(IAsyncResult ar);
}
Handlers that implement this interface must implement two additional methods beyond the standard methods of IHttpHandler. The first method is BeginProcessRequest, which the application class calls instead of directly calling ProcessRequest. It is then up to the handler to launch a new thread to process the request, and return immediately from the BeginProcessRequest method, passing back a reference to a class that implements IAsyncResult so that the runtime can detect when the operation is complete. The other method, EndProcessRequest, is called when the request processing is complete, and can be used to clean up any allocated resources if necessary.
The most straightforward ways to implement an asynchronous handler would be either to use an asynchronous delegate invocation or to call ThreadPool.QueueUserWorkItem with the method to perform the request processing. Unfortunately, using either of these two techniques would completely defeat the purpose of building an asynchronous handler, because they both draw from the same process-wide CLR thread pool that ASP.NET uses to service requests. While the primary request thread would indeed be freed up and returned to the thread pool, another thread would be drawn out of the pool to perform the asynchronous delegate execution (or work item completion), resulting in a net gain of zero threads for servicing additional requests and thus rendering the asynchronous nature of the handler useless.
To build a truly effective asynchronous handler, therefore, you must spawn an additional thread by hand in response to BeginProcessRequest (or even better, use a thread from a different thread pool, discussed later).
There are three important aspects to building a successful asynchronous handler:
Constructing a class that supports
IAsyncResultto be returned fromBeginProcessRequestSpawning the thread to perform your request processing asynchronously
Notifying ASP.NET that you are finished processing the request and are ready to return the response
We begin the construction of an asynchronous handler by building a class that supports IAsyncResult. This class will be returned from the call to BeginProcessRequest and later will be passed into our implementation of EndProcessRequest, so among other things, this class is a useful place to store request-specific state that we may need to use during the processing of a request. The IAsyncResult interface is shown in Listing 4-24.
Example 4-24. The IAsyncResult Interface
public interface IAsyncResult
{
  public object     AsyncState             { get; }
  public bool       CompletedSynchronously { get; }
  public bool       IsCompleted            { get; }
  public WaitHandle AsyncWaitHandle        { get; }
}
In our example, we store a reference to the HttpContext object associated with this request, a reference to the AsyncCallback delegate passed into BeginProcessRequest (which we must later invoke to complete the request), and a generic object reference for extra data that may be used by the caller of BeginProcessRequest. The other element that must be implemented in this class is a synchronization object that threads can wait on to be signaled when the operation completes. We use the common technique of supplying a ManualResetEvent that fires when our request is complete, but we allocate it only if someone requests it. Finally, our class has a convenience method called CompleteRequest that triggers the Manual ResetEvent if it was created, invokes the AsyncCallback delegate, and sets our IsCompleted flag to true. The complete class definition for AsyncRequestState is shown in Listing 4-25.
Example 4-25. The AsyncRequestState Class Definition
class AsyncRequestState : IAsyncResult
{
  public AsyncRequestState(HttpContext ctx,
                           AsyncCallback cb,
                           object extraData )
  {
    _ctx = ctx;
    _cb = cb;
    _extraData = extraData;
  }

  internal HttpContext _ctx;
  internal AsyncCallback _cb;
  internal object _extraData;
  private bool _isCompleted = false;
  private ManualResetEvent _callCompleteEvent = null;

  internal void CompleteRequest()
  {
    _isCompleted = true;
    lock (this)
    {
      if (_callCompleteEvent != null)
        _callCompleteEvent.Set();
    }
    // if a callback was registered, invoke it now
    if (_cb != null)
      _cb(this);
  }

  // IAsyncResult interface property implementations
  public object AsyncState
  { get { return(_extraData);   } }
  public bool CompletedSynchronously
  { get { return(false);        } }
  public bool IsCompleted
  { get { return(_isCompleted); } }
  public WaitHandle AsyncWaitHandle
  {
    get
    {
      lock( this )
      {
        if( _callCompleteEvent == null )
         _callCompleteEvent = new ManualResetEvent(false);

        return _callCompleteEvent;
      }
    }
  }
}
The next step is to spawn a new thread on which we will process our request. The method we call on this new thread will need access to the state we cached in the AsyncRequestState class shown in Listing 4-25, but unfortunately the ThreadStart delegate used to spawn new threads in .NET does not take any parameters. To get around this, we create another class with the necessary state cached as data members (in this case, simply a reference to the AsyncRequestState object for this request) and with an instance method that can be used to initialize the ThreadStart delegate. Listing 4-26 shows the definition of this class, called AsyncRequest. Note that the ProcessRequest method we define in this class is the method that will be called from our manually created thread, and when it completes, it signals that the request processing is complete by invoking CompleteRequest on the AsyncRequestState object.
Example 4-26. The AsyncRequest Class Definition
class AsyncRequest
{
  private AsyncRequestState _asyncRequestState;

  public AsyncRequest(AsyncRequestState ars)
  {
    _asyncRequestState = ars;
  }

  public void ProcessRequest()
  {
    // This is where your non-CPU-bound
    // activity would take place, like accessing a Web
    // service, polling a slow piece of hardware, or
    // performing a lengthy database operation.
    // We put the thread to sleep for 2 seconds to simulate
    // a lengthy operation.
    Thread.Sleep(2000);

    _asyncRequestState._ctx.Response.Write(
            "<h1>Async handler responded</h1>");

    // tell asp.net we are finished processing this request
    _asyncRequestState.CompleteRequest();
  }
}
Finally, we are ready to build the asynchronous handler class itself. This class, which we just call AsyncHandler, must implement all the methods of the IHttpAsyncHandler interface shown earlier, which derives from IHttpHandler, for a total of four methods. The ProcessRequest method is not used and will never be called, because we implement BeginProcessRequest. In BeginProcessRequest, we create a new instance of our AsyncRequestState class, initializing it with the HttpContext object, the AsyncCallback delegate, and the generic object reference passed in as parameters. We then prepare a new AsyncRequest object, initialized with the freshly created AsyncRequestState object, and launch a new thread. Our implementation of EndProcessRequest does not do anything in this example, but it can be used in general to perform any cleanup or last-minute response additions. The AsyncHandler class definition is shown in Listing 4-27.
Example 4-27. The AsyncHandler Class Definition
public class AsyncHandler : IHttpAsyncHandler
{
  public void ProcessRequest(HttpContext ctx)
  {
    // not used
  }

  public bool IsReusable
  {
    get { return false;}
  }

  public IAsyncResult BeginProcessRequest(HttpContext ctx,
                                        AsyncCallback cb,
                                        object obj)
  {
    AsyncRequestState reqState =
                      new AsyncRequestState(ctx, cb, obj);
    AsyncRequest ar = new AsyncRequest(reqState);
    ThreadStart ts = new ThreadStart(ar.ProcessRequest);
    Thread t = new Thread(ts);
    t.Start();

    return reqState;
  }

  public void EndProcessRequest(IAsyncResult ar)
  {
    // This will be called on our manually created thread
    // in response to our calling ASP.NET's AsyncCallback
    // delegate once our request has completed processing.
    // The incoming
    // IAsyncResult parameter will be a reference to the
    // AsyncRequestState class we built, so we can access
    // the Context through that class if we like.
    // Note - you *cannot* access the current context
    // using the HttpContext.Current property, because we
    // are running on our own thread, which has not been
    // initialized with a context reference.
    AsyncRequestState ars = ar as AsyncRequestState;
    if (ars != null)
    {
      // here you could perform some cleanup, write
      // something else to the Response, or do whatever
      // else you needed
    }
  }
}
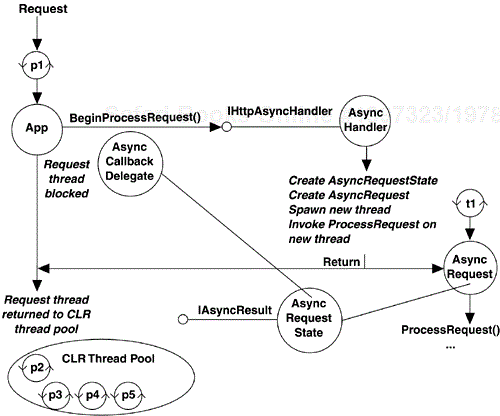
If we now build this handler and register it as an endpoint (as we did with our earlier handlers), it will successfully process requests asynchronously from the calling request thread of ASP.NET. Figure 4-6 shows the sequence of events that take place when a request mapped onto our asynchronous handler is made. First, the application class notices that our handler implements IHttpAsyncHandler, so instead of calling the synchronous ProcessRequest method, it invokes BeginProcessRequest on our handler, passing in the current context and an asynchronous callback delegate for our handler to invoke when it is complete. Our handler then creates a new AsyncRequestState object, initialized with the parameters passed into BeginProcessRequest. Next, our handler creates a new AsyncRequest object, initialized with the AsyncRequestState object, and launches a new thread using the AsyncRequest.ProcessRequest method as the entry point. Our handler then returns the AsyncRequestState object to the application object, and the calling thread is returned to the thread pool while our hand-created thread continues processing the request.
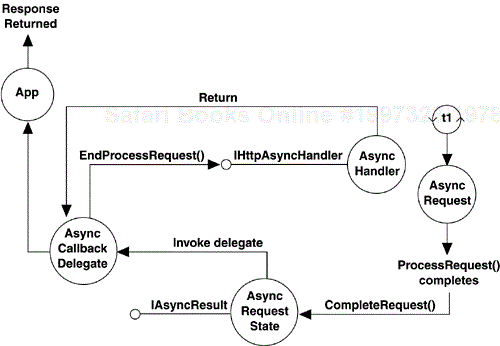
Once the ProcessRequest method of our AsyncRequest object has finished performing its lengthy tasks, it calls the CompleteRequest method of our AsyncRequestState class. This in turn fires the AsyncCallback delegate originally passed into our BeginProcessRequest method, signaling that the response has been prepared and is ready for return. The first thing the AsyncCallback delegate does is to call the EndProcessRequest method on our asynchronous handler class. Once that returns, it triggers the completion of the request by sending back the prepared response. Note that all of this processing happens on the secondary thread that we created in our handler, not on a thread pool thread. Figure 4-7 shows the steps for completing the request to our asynchronous handler.
One problem remains with our asynchronous handler implementation—it has the potential to create an unbounded number of threads. If many requests are made to our asynchronous handler, all of which take a significant amount of time to service, we could easily end up creating more threads than the underlying operating system could handle. To deal with this, we need to provide a secondary thread pool to service our asynchronous requests in a bounded fashion. The mechanics of creating custom thread pools are beyond the scope of this chapter, but a fully operational asynchronous handler using a supplemental thread pool is available for download in the online samples for this book.
Building asynchronous handlers instead of synchronous ones can add considerable complexity to a design, so you should take care when determining whether you really need the asynchronous capability of these types of handlers. The purpose of an asynchronous handler is to free up an ASP.NET thread pool thread to service additional requests while the handler is processing the original request. This makes sense to do only if the work of servicing the request requires a significant amount of non-CPU-bound time to complete. For example, if the completion of a request depended on the completion of several remote procedure calls or perhaps Web service invocations, that would be a candidate to implement an asynchronous handler. Building asynchronous handlers to service CPU-intensive requests only adds threads to compete with the ASP.NET thread pool threads and may slow down the overall processing time for the request.
Requests in ASP.NET are serviced by a collection of classes referred to as the HTTP pipeline. This pipeline has three primary points of extensibility: custom applications, custom handlers, and custom modules. A custom application is built by creating a new class that derives from HttpApplication, which happens automatically when you author a global.asax file. Custom applications can be used to perform application-level tasks by trapping events and responding to them. A custom handler is built by creating a new class that implements the IHttpHandler interface and registering that class in your application's configuration file. Custom handlers can be used as endpoints to a request in lieu of Page classes if the baggage of the Page processing architecture is not necessary. A custom module is built by creating a new class that implements the IHttpModule interface and adding event handlers to that class for any of the application-level events. Custom modules are useful for performing generic filtering and monitoring in ASP.NET applications.
Most development in ASP.NET can take place without concern for multithreading issues, because most of the classes in the pipeline are used by only one thread at a time at the instance level. It is important to understand, however, that both modules and application classes are pooled, so it is not wise to store any cross-request state in either. In some cases, it may be necessary to build asynchronous handlers to avoid clogging the ASP.NET worker thread pool with requests that take a long time to complete.
[9] It is possible to host ASP.NET using another mechanism for dispatching and processing requests. Microsoft has produced a sample called Cassini, which demonstrates hosting ASP.NET in a custom Web server application. For more details, see http://www.asp.net.
[10] Samples for this book are available at http://www.develop.com/books/essentialasp.net.
[11] Thanks go to Aaron Skonnard, who first showed me this timer module example.