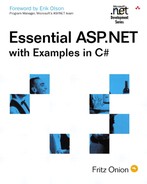
As technologies mature, the programmatic interface to those technologies rises in its level of abstraction. Web applications are finally maturing, and the abstraction level rises with ASP.NET. An analogous transition was made not so long ago with desktop applications. Building an application for a PC used to mean that you had to develop your own interface, including menuing systems, window interaction, mouse and keyboard interaction, and so on. With the advent of platforms such as Macintosh and Windows, the level of abstraction rose. Developers could take advantage of core windowing components that managed menus and windows for them, and it became much rarer for developers to have to render pixels to the screen to interact with the user. Instead, a program now consists of collections of components that are prebuilt to render themselves to the screen and receive input from the user. Developers can then work with these higher-level components to construct applications. Each component has state associated with it, like the text of a menu item or the bitmap image to render to in a window, and it has a mechanism for rendering that state to the target device (usually the screen). Developers construct programs by manipulating the state of these components, and let the objects render themselves automatically, as depicted in Figure 2-1.
Web applications are very different from desktop applications, but analogies can be drawn between the two types of applications. Instead of rendering by drawing pixels to a display, Web applications render by generating HTML to be processed by a browser. The current state of Web application development is analogous to desktop application development before windowing operating systems were available. Each request is serviced with an HTML response, typically created by performing some data lookup on the server machine and then carefully constructing the HTML to represent that data to the client. While HTML is much higher-level than pixel rendering, the concept of mapping state in an application to HTML for the client to view is similar. That HTML today is rendered primarily by using printf or its equivalent to write strings into a response buffer that is carried back to the client.
Now, instead of manually generating the HTML for clients to view the server-side state, we construct a model with a higher level of abstraction, similar to the window component model that windowed operating systems provide. Instead of using windows that know how to render themselves as pixels to a screen, however, we create a set of objects that can render themselves as HTML to the response buffer. This approach potentially can provide similar improvements in developer productivity by removing the details of HTML generation from the hands of developers and letting them focus on the state of a set of components that can render themselves as HTML. This conceptual model is illustrated in Figure 2-2.
Much like desktop application development models, the Web Forms model is constructed from a set of primitive controls. They are referred to as server-side controls in ASP.NET because even though they are rendered to the client as HTML, they exist on the server. The best way to understand server-side controls is to see them in action, so consider the page shown in Listing 2-1.
Example 2-1. An ASP.NET Page Using Server-Side Controls
<!— WebFormPage1.aspx —>
<%@ Page Language="C#" %>
<html>

<body>
  <form runat=server>
    Enter name: <input type=text id=_name runat=server/>
    <br/>
    Personality: <select id=_personality runat=server>
                   <option>extraverted</option>
                   <option>introverted</option>
                   <option>in-between</option>
                </select>
    <input type=submit value="Submit" />
    <p>
      <% if (IsPostBack) {%>
        Hi <%=_name.Value%>, you selected
           <%=_personality.Value%>
      <% } %>
    </p>
  </form>
</body>
</html>
In many respects, this looks like a traditional ASP page you might write with interspersed server-side code. There are two significant differences, however. First, note that the form, input, and select elements on the page have been marked with a runat=server attribute, an attribute usually reserved for differentiating client-side and server-side script blocks. Second, notice that within the paragraph element at the bottom of the page, we were able to reference the value attribute of the input and select elements within server-side evaluation blocks (<%= %>). In a traditional ASP page, these expressions would have no meaning on the server. To retrieve the values of the input and select elements, you would look at the request string for variables whose names matched the identifiers of the two controls. We were also able to test the Boolean value IsPostBack to find out whether this was an initial GET request issued by the client or a subsequent POST back to our page.
In ASP.NET any HTML element can now have the runat=server attribute applied to it. When an element is marked with this attribute, ASP.NET creates a server-side control during page compilation and adds it as a field to the Page-derived class. The type of the control depends on the element marked as server-side. Listing 2-2 shows the fields that would be created in the Page-derived class created from the .aspx file from Listing 2-1.
Example 2-2. Generated Page-Derived Class with Server-Side Controls
using System.Web.UI;
using System.Web.UI.HtmlControls;
using System.Web.UI.WebControls;

public class WebFormPage1_aspx : Page
{
  protected HtmlInputText _name;
  protected ListItem      __control3;
  protected ListItem      __control4;
  protected ListItem      __control5;
  protected HtmlSelect    _personality;
  protected HtmlForm      __control2;

  // ...
}
These server-side controls added to the Page-derived class for our page are initialized with the values entered by the client when a post-back occurs. Furthermore, any modifications to the state of these controls is reflected when the page renders a response to the client. As developers, we can now manipulate controls and their state in a similar fashion to the way desktop controls can be manipulated.
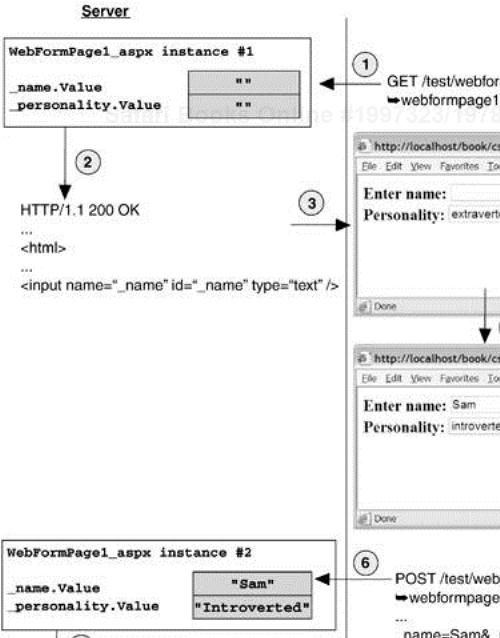
Figure 2-3 enumerates the steps of a client-server interaction when server-side controls are used. Initially (step 1), the client makes a GET request for our page. ASP.NET services this request by creating an instance of our Page-derived class. Because this is an initial request for the page and there are no accompanying POST variables with the request, the values of the server-side controls in our page are set to their defaults (empty strings in this case). At step 2, our Page-derived class instance renders itself into the response buffer, and that response is returned to the client in step 3. The client is now presented with our initial form, and can manipulate and add values to all the controls on the form (step 4). When the user presses the Submit button, a POST request is made to the server, with the values of the controls in the form passed as POST variables (step 5). This time, when ASP.NET creates a new instance of our Page-derived class, it notices that the request was a POST request with accompanying POST variables, so it passes the body of the POST request to the page and asks it to restore the state of any server-side controls (step 6). Our Page-derived class extracts the _name and _personality variables from the POST body and initializes the data members of the class corresponding to those variables with the variable values. This time, when the Page-derived class renders itself (step 7) the server-side controls render themselves with their current contents, which are the same as the values submitted by the client in step 5 unless we change them on the server. In step 8, the client receives the response to the POST with the controls rendered with their current state.
One useful facet of this model is that controls marked with the runat=server attribute retain their state across post-backs to the same page. In traditional ASP pages, you must take explicit action to get this behavior, but it falls naturally out of the Web Forms model.
In the previous section, we stated that you can mark any HTML element with the runat=server attribute to make it accessible programmatically on the server. This at first seems implausible because there are many HTML elements whose values are not sent in the body of a POST request. For example, consider the page shown in Listing 2-3, which shows the implementation of a simple accumulator. When the user posts the page with a numeric value in the input element, the value is added to a running total. The running total is maintained in a server-side span element, whose value is extracted with each post-back and added to the value submitted by the user, and the resultant sum is assigned back into the InnerText attribute of the server-side span element.
Example 2-3. Accumulator Page
<!— Accumulator.aspx —>
<%@ Page Language="C#" %>

<html>
<script runat=server>
protected void Page_Load(object src, EventArgs e)
{
  if (IsPostBack)
  {
    int op1 = int.Parse(_op.Value);
    int op2 = int.Parse(_sum.InnerText);
    _sum.InnerText = (op1+op2).ToString();
  }
}
</script>
<body>
  <form runat=server>
    <h2>ASP.NET accumulator page</h2>
    <input size=2 type=text id=_op runat=server/>
    Sum:<span id=_sum runat=server>0</span>
    <p>
     <input type=submit value="Add" />
    </p>
  </form>
</body>
</html>
This page works in spite of the fact that the contents of the span, whose value we depend on for maintaining the total, is not passed back as part of the default post action of the client-side form. The only control in our page's form whose contents is sent back when the form is posted is the _op input element. Or is it?
Listing 2-4 shows the HTML that is rendered the first time this page is requested. Notice that in addition to all the explicit elements that were in our .aspx page, there is a hidden input element named __VIEWSTATE. The value of this element is a base64-encoded string that acts as a state repository for the page. Any elements on a page whose contents are not implicitly posted back via the standard form POST mechanism have their values saved to and restored from this hidden field. It is also used to propagate supplemental state for controls—for example, what prior value was stored in a control so that server-side change notifications can be issued. While the technique of propagating state using hidden input fields is common practice in Web applications, ASP.NET takes it a step further and uses it to unify the server-side control model by ensuring that all elements marked with runat=server retain their state across post-backs.
Example 2-4. Accumulator Page Rendering
<html>

<body>
  <form name="_ctl0" method="post"
        action="accumulator.aspx" id="_ctl0">
   <input type="hidden" name="__VIEWSTATE"
value="dDwtMTE3NzEwNDc2Njs7PvcRil1nMNe70yha9afq+YEvj46N" />

    <h2>ASP.NET accumulator page</h2>
    <input name="_op" id="_op" type="text" size="2" />
    Sum:<span id="_sum"></span>
    <p>
     <input type=submit value="Add" />
    </p>
  </form>
</body>
</html>
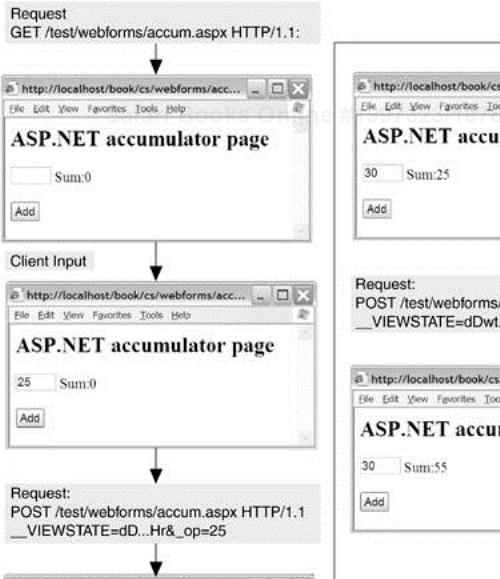
Figure 2-4 demonstrates a request sequence for our accumulator page. Each time a request is serviced by the accumulator page, the current value of the _sum span element is restored from the hidden __VIEWSTATE field. And when the page renders its response, the current value of the server-side span element representing the _sum field is placed into the __VIEWSTATE field so that the next time the page is posted back, the value of the _sum can be restored to its most recently displayed value.
Many of the server-side controls in ASP.NET can generate server-side events in addition to simply acting as state retainers. The server-side control that most obviously generates server-side events is the button. When a client clicks a button in a form, the form is typically submitted back to the server via a POST request, as we have seen in earlier examples in this chapter. What we have not explored yet is the ability to link server-side functions in our Page-derived class.
Server-side events are implemented using the standard event mechanism in the CLR: delegates. Controls that generate server-side events typically expose events of the generic EventHandler delegate type.[5] To register a handler for a server-side event, you must first define a method in your Page-derived class whose signature matches that of the EventHandler delegate. Then you must create a new instance of the EventHandler delegate initialized with your handler and subscribe it to the event exposed by the control. Listing 2-5 shows a sample page that registers an event handler for the ServerClick event of the HtmlInputButton server-side control.
Example 2-5. Server-Side Event Handler Using Explicit Delegate Subscription
<!— event.aspx —>
<%@ Page Language="C#" %>

<html>
<script runat=server>
protected void OnClickMyButton(object src, EventArgs e)
{
  _message.InnerText = "You clicked the button!";
}

protected void Page_Init(object src, EventArgs e)
{
  _MyButton.ServerClick +=
                        new EventHandler(OnClickMyButton);
}
</script>
<body>
  <form runat=server>

    <h2>ASP.NET event page</h2>
    <p>
    <input type=button id=_MyButton
           value="Click me!" runat=server />
    </p>
    <span id=_message runat=server/>
  </form>
</body>
</html>
Note that in our implementation we provided a handler for the Init event of our Page-derived class using the AutoEventWireup described in Chapter 1 (by simply naming the function Page_Init). Within this handler, we explicitly created a new EventHandler delegate instance, initialized with the OnClickMyButton function, and subscribed that delegate to the ServerClick event of the HtmlInputButton control on our page. When the button is now clicked in the client browser, our event handler is invoked during the post-back sequence.
An alternative syntax for wiring up event handlers to server-side controls is to add an attribute to the control's tag in the page named OnEvent, where Event is the name of the event you would like to subscribe to. The value for this attribute should be the name of the server-side method in your Page-derived class you would like to have called when the event is fired. For example, instead of explicitly wiring up the delegate as we did in Listing 2-5, we could annotate the input control tag as shown in Listing 2-6.
Example 2-6. Server-Side Event Handler Using OnEvent Syntax
<!— event.aspx —>
<%@ Page Language="C#" %>

<html>
<script runat=server>
protected void OnClickMyButton(object src, EventArgs e)
{
  _message.InnerText = "You clicked the button!";
}
</script>
<body>
  <form runat=server>
    <h2>ASP.NET event page</h2>
    <p>
    <input type=button id=_MyButton
           value="Click me!"
           OnServerClick="OnClickMyButton" runat=server />
    </p>
    <span id=_message runat=server/>
  </form>
</body>
</html>
It is important to understand that server-side events are generated as part of the post-back sequence and are issued through the standard HTTP POST mechanism. Because a given page always issues a generic POST request to the server, it is not obvious how to map a particular post-back request onto server-side events. For example, if we have multiple buttons on a page, each of which has a designated server-side handler, how does ASP.NET know which event to fire when a POST occurs to the page? Listing 2-7 shows a sample page with this problem. There are three separate buttons, and each button has a distinct handler whose implementation changes the color of the server-side div element. If some additional information is not sent through the POST issued by each of these buttons, it will be impossible for ASP.NET to tell which button was pressed and to invoke only the handler for that particular button.
Example 2-7. Color Page Demonstrating Three Separate Server-Side Event Handlers
<!— color.aspx —>
<%@ Page Language="C#" %>

<html>
<script runat=server>
protected void OnRed(object src, EventArgs e)
{
  _color.Style["background-color"] = "Red";
}

protected void OnGreen(object src, EventArgs e)
{
  _color.Style["background-color"] = "Green";
}

protected void OnBlue(object src, EventArgs e)
{
  _color.Style["background-color"] = "Blue";
}

protected void Page_Init(object src, EventArgs e)
{
  _redButton.ServerClick   += new EventHandler(OnRed);
  _greenButton.ServerClick += new EventHandler(OnGreen);
  _blueButton.ServerClick  += new EventHandler(OnBlue);
}

protected void Page_Load(object src, EventArgs e)
{
  if (!IsPostBack)
  {
    _color.Style["background-color"] = "Red";
    _color.Style["width"] = "100";
    _color.Style["height"] = "100";
  }
}

</script>
<body>
  <form runat=server>

    <h2>ASP.NET color page</h2>
    <div id=_color runat=server />
    <p>
    <input type=button id=_redButton value="Red"
           runat=server />
    <input type=button id=_greenButton value="Green"
           runat=server />
    <input type=button id=_blueButton value="Blue"
           runat=server />
    </p>
  </form>
</body>
</html>
Fortunately, ASP.NET does pass additional information with each POST request when server-side events are issued. In fact, there are two additional hidden fields on a form that uses server-side events like the one shown in Listing 2-7. The first field, __EVENTTARGET, is populated with the identifier of the control that generated the post-back, and the second field, __EVENTARGUMENT, is used to pass any parameters necessary to the event. These two hidden fields are populated in the client by using client-side JavaScript to trap the client-side event of the object and then issuing a post-back programmatically. When the POST is processed on the server, ASP.NET checks the contents of the __EVENTTARGET field and fires only events issued by the control whose ID is in that field. Listing 2-8 shows the client-side HTML generated by the color.aspx page shown in Listing 2-7.
Example 2-8. Color Page Rendering
<html><body>
  <form name="_ctl0" method="post"
        action="color.aspx" id="_ctl0">
<input type="hidden" name="__EVENTTARGET" value="" />
<input type="hidden" name="__EVENTARGUMENT" value="" />
<input type="hidden" name="__VIEWSTATE" value="dD...==" />

<script language="javascript">
<!—
     function __doPostBack(eventTarget, eventArgument) {
            var theform = document._ctl0;
            theform.__EVENTTARGET.value = eventTarget;
            theform.__EVENTARGUMENT.value = eventArgument;
            theform.submit();
     }
// —>
</script>

    <h2>ASP.NET color page</h2>
    <div id="_color"
       style="background-color:Red;width:100;height:100;"/>
    <p>
    <input language="javascript"
           onclick="__doPostBack('_redButton','')"
           name="_redButton" id="_redButton"
           type="button" value="Red" />
    <input language="javascript"
           onclick="__doPostBack('_greenButton','')"
           name="_greenButton" id="_greenButton"
           type="button" value="Green" />
    <input language="javascript"
           onclick="__doPostBack('_blueButton','')"
           name="_blueButton" id="_blueButton"
           type="button" value="Blue" />
    </p>
  </form>
</body>
</html>
The server-side event model completes the Web Forms control model. Through the use of hidden fields, ASP.NET brings a familiar programming model to developers who are used to working with controls that issue events and render their current state, but may not be familiar with the disconnected HTTP protocol over which Web applications communicate.
The analogy between the desktop control model and Web Forms is not complete. Although the fundamental elements behave similarly, such as rendering of state and event propagation, the Web Forms model has an imposed sequencing on the rendering process that does not exist in the desktop model. It is critical for Web developers using ASP.NET to understand this sequencing in order to use the model effectively.
Pages are short-lived objects, as are all the elements they contain. A page is created for the sole purpose of processing a request, and once that request processing has completed, the page is discarded. This means that each request to a page is processed by a new instance of that Page class. Moreover, an explicit, deterministic sequence of events takes place after the page is created to service a request. This sequence of events is something that every ASP.NET developer should be aware of, because your pages will not behave the way you expect if you perform things in the wrong order. For example, consider the page shown in Listing 2-9.
Example 2-9. Sample Page with Incorrect Control State Manipulation
<!— File: sample.aspx —>
<%@ Page Language="C#" %>

<html>

<body>
  <form runat=server>

    <h2>ASP.NET sample page</h2>
    <h3>Page type: <span id=_message runat=server/></h3>
    <%
      // Error - modifying a property of a server-side
      // control within a script block like this can lead
      // to inconsistencies
      _message.InnerText = this.GetType().ToString();
    %>
  </form>
</body>
</html>
As noted in the comments, the assignment to the InnerText property of the server-side span element has no effect because it falls within a server-side block of code delineated with <%%> tags that is placed after the control that is modified. All server-side code within <%%> tags is added to a Render method of the Page class, as discussed in Chapter 1. By this time, the server-side span has already rendered itself into the response buffer with its inner text set to an empty string, and the assignment has no effect on the output of the page. This is in contrast to a traditional desktop control model, where any modifications made to a control at any time are saved and reflected in that control's rendering.
Figure 2-5 shows the events that occur during a page's lifetime. As a page developer, you have hooks into most of these events, either by defining event handlers for a particular event or by providing overridden versions of virtual functions defined in the Page base class. Most of the programmatic manipulation of server-side controls should occur either in the Load event handler for a page or within a server-side control event handler. The Load event fires after the all the server-side controls have been created and had their state restored from the POST body of the request. This gives you an opportunity to both view the values submitted by the client, as well as a chance to populate controls with values you want the client to see in the response to this request.
Perhaps the most appealing aspect of the Web Forms model is that in combination with code-behind, it enables true separation of page logic from page layout and rendering. For example, recall the page shown in Listing 2-1, where the input and select elements were marked with the runat=server attribute, enabling state retention and server-side manipulation of those elements. Although this was helpful, our .aspx page was more than pure layout. It included server-side script to print a message, and we statically populated the options of the select element. Using code-behind with Web forms, we can very often remove all code from our .aspx pages, creating a clean partitioning of form logic and form layout. Listing 2-10 demonstrates this technique by showing the same page displayed in Listing 2-1 but now rewritten with a code-behind file, which is shown in Listing 2-11.
Example 2-10. Sample Page with Server-Side Controls and Code-Behind
<!— WebFormPage2.aspx —>
<%@ Page Language="C#"
         Inherits="EssentialAspDotNet.WebForms.Page2"
         Src="Page2.cs" AutoEventWireUp="false" %>

<html>

<body>
  <form runat=server>
    <h3>Enter name:
        <input type=text id=_name runat=server/></h3>
    <h3>Personality:
        <select id=_personality runat=server /></h3>
     <input type=button id=_enterButton
             value="Enter" runat=server/>
    <p runat=server id=_messageParagraph />
  </form>
</body>
</html>
Example 2-11. Code-Behind File for Sample Page
// Page2.cs

using System;
using System.Web;
using System.Web.UI;
using System.Web.UI.HtmlControls;
using System.Web.UI.WebControls;

namespace EssentialAspDotNet.WebForms
{

public class Page2 : Page
{
  protected HtmlSelect         _personality;
  protected HtmlInputText      _name;
  protected HtmlInputButton    _enterButton;
  protected HtmlGenericControl _messageParagraph;

  override protected void OnInit(EventArgs e)
  {
    // Wire up handler to ServerClick event of button
    _enterButton.ServerClick += new EventHandler(OnEnter);
  }

  override protected void OnLoad(EventArgs e)
  {
    // On initial access, populate select with items
    if (!IsPostBack)
    {
      _personality.Items.Add(new ListItem("extraverted"));
      _personality.Items.Add(new ListItem("introverted"));
      _personality.Items.Add(new ListItem("in-between"));
    }
  }

  protected void OnEnter(object src, EventArgs e)
  {
    // When the user presses enter, print a message
    string msg = string.Format("Hi {0}, you selected {1}",
                      _name.Value, _personality.Value);
    _messageParagraph.InnerText = msg;
  }
}

}
Note that we were able to manipulate server-side controls on the form from fields declared in our code-behind class. In fact, looking just at the code-behind file, it appears that we are manipulating uninitialized fields in our class, because the _personality, _name, _enterButton, and _messageParagraph fields are never explicitly created but are definitely used. If you look closely, you will notice that these field names match exactly the identifiers of their corresponding server-side controls in the .aspx file. This is an important relationship that you will use almost anytime you work with Web forms and code-behind classes. When you declare a field, either protected or public, with the same name as the identifier of a server-side control in your form, that field is initialized with a reference to that server-side control when the class is created. It is also crucial that the field be of the correct type—in our case we were mapping to four different HTML control types and had to carefully declare each field with the correct type, matching it to the element on the form to which it corresponds. We discuss this mapping of server-side HTML elements to classes in more detail in the upcoming HtmlControls section.
This process of associating server-side controls with fields in a Page-derived class occurs during the parsing of the .aspx page. The parser must be careful not to redefine fields in the class that is generated from the .aspx file, because this would mask any fields declared with the same name in the code-behind base class. Instead, the parser uses reflection to query the code-behind base class during the parsing of the .aspx file. If there is a public or protected field declared in the code-behind base class whose name matches the identifier of the server-side control, it will not generate a field for that control in the generated class. If there is no such field in the code-behind base class, it will create a field in the newly generated class. This guarantees that all server-side controls have a corresponding field in the generated class, either inherited from the code-behind base class or declared directly in the generated class. This is also why the code-behind base class must declare these fields as either public or protected, so that the derived class can access them and assign the newly created control references to them.
Figure 2-6 shows this field binding. In this example, the Test.aspx file contains three server-side controls: the form, which has no explicit identifier, the server-side span element named _foo, and the server-side input element named _bar. The code-behind class, BasePage, contains a single protected field named _foo of type HtmlGenericControl, which is what a span element maps to. Thus, when the parser generates the class from the Test.aspx file, it adds two fields to the derived class: one for the form control with an artificially generated identifier (_ctl0) and the other using the _bar identifier assigned in the page.
Many of the server-side controls contain URL properties, such as the src attribute of the img control or the href property of the a control. There is a convenient syntax that you can use within a URL property of a server-side control to reference the root of your application directory to avoid hard-coding relative paths in your application's directory structure. The syntax is to precede the path with the tilde character (~), which at compile time is resolved to a reference to Request.ApplicationPath, as shown in Listing 2-12. Note that this syntax works only with server-side controls and cannot be used with regular HTML elements.
Throughout this chapter, the examples have referenced control classes such as HtmlInputText and HtmlGenericControl, simply stating that they were examples of server-side controls. This section more formally introduces these classes and their compatriots in the HtmlControl hierarchy. It is classes from this hierarchy that your page will work with if you elect to use server-side controls by adding runat=server attributes to existing HTML elements in a form (in contrast to using the syntactically different WebControls, discussed in the next section).
You can mark literally any HTML element in an .aspx file with the runat=server attribute to obtain a server-side version. When you do this, the server-side control that is created to correspond to the client-side HTML element comes from the HtmlControl hierarchy. This hierarchy is shown in Figure 2-7.
Note that all these classes derive from a common base class, System.Web.UI.Control, and, more specifically, from System.Web.UI.HtmlControls.HtmlControl. The Control base class contains functionality and state common to all server-side controls, the details of which are discussed in Chapter 8, where we look at building your own server-side controls. The HtmlControl base class further adds properties and methods common to all HtmlControls. This includes properties such as Style and Disabled. When you create an .aspx file with HTML tags attributed with runat=server, the class chosen from this hierarchy depends on the tag. Table 2-1 lists the various HTML tags and their corresponding HtmlControl-derived classes.
Table 2-1. Tag Mappings for HtmlControls
Tag |
|
|---|---|
|
|
|
|
|
|
|
|
|
|
|
|
|
|
|
|
|
|
|
|
|
|
|
|
|
|
|
|
|
|
|
|
|
|
|
|
Note that while many of the HTML elements have unique mappings, there is a class of tags that all map to a single control: HtmlGenericControl. The HtmlGenericControl class represents controls that have no unique server-side behavior, such as the span, body, and p elements. This class simply contains a TagName property in addition to the properties it inherits from the HtmlControl base class. The TagName is set to the name of the tag that should be rendered by the control (such as span, body, or p), and the inherited attribute collection (Attributes) is a generic set of name/value pairs that will be rendered as attributes for the tag. Note also that this control derives from the HtmlContainerControl, meaning that it can contain other controls and literal HTML within its tag.
The remainder of the HtmlControls have properties, methods, and events similar to their HTML counterparts, so anyone used to working with HTML should feel comfortable with these controls. For details on each control, refer to the online documentation available through MSDN.[6]
Web Forms with HTML server-side controls is a compelling model in and of itself, but the HtmlControls are true to their browser counterparts and retain the many idiosyncrasies of HTML elements. Even more compelling would be a set of server-side controls that were not one-to-one mappings of HTML elements but programmatically friendlier controls that took care of mapping to the appropriate HTML elements. Enter WebControls.
Most of the HTML elements you might place on a page can also be rendered by classes in the WebControl hierarchy. This is a set of classes parallel to the HtmlControl classes that provide a simplified, more uniform programming model and many more advanced composite controls, such as the DataGrid, Xml, Calendar, and Validation controls. Figure 2-8 shows the complete hierarchy of WebControls available in ASP.NET.
This example shows the idiosyncratic nature of the HTML controls. To set the background color of an HtmlTable class to gray, you would assign gray to the BgColor property of the class. To set the background color of a span element via its server-side equivalent, the HtmlGenericControl, you would need to set the Style attribute to background-color:gray;. The analogous classes in the WebControls hierarchy would be Table and Label, both of which have a BackColor attribute that stores not a string but an instance of the System.Color class. So in each case, you would set the BackColor property to Color.Gray. This consistency in naming and sharing of common properties is found throughout the WebControls hierarchy.
In addition to increased uniformity, the WebControls provide many more complex controls that render not as single HTML elements but as combinations of HTML elements based on control state. Many of these controls are discussed in detail in future chapters, including the validation and data binding controls. Other interesting controls that we look at now include the list controls, the Xml control, the Panel control, and the AdRotator control.
ASP.NET introduces several new list controls, all of which derive from the common base class ListControl. Each list control supports a collection of items (of type ListItemCollection) and properties to set and retrieve the selected item (or index), data binding, and the ability to issue a POST back to the form when the selection is changed. Listing 2-13 shows the common properties of the ListControl class.
Example 2-13. ListControl Properties
public class ListControl : WebControl
{
  public virtual bool     AutoPostBack          {get; set;}
  public virtual string   DataMember            {get; set;}
  public virtual object   DataSource            {get; set;}
  public virtual string   DataTextField         {get; set;}
  public virtual string   DataTextFormatString  {get; set;}
  public virtual string   DataValueField        {get; set;}
  public virtual ListItemCollection Items       {get; set;}
  public virtual int      SelectedIndex         {get; set;}
  public virtual ListItem SelectedItem          {get;}

  public event EventHandler SelectedIndexChanged;
  //...
}
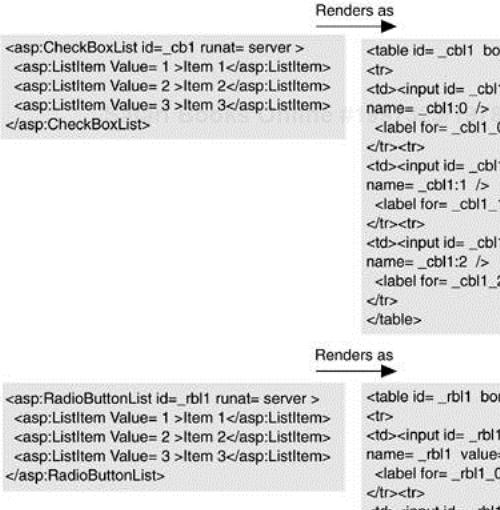
Two of the list controls should be familiar to anyone with HTML experience: DropDownList and ListBox. Each of these controls renders as HTML Select elements; the only difference is that ListBox renders with a Size attribute set to 4 (by default), so that it appears as a fixed list. The other two list controls are examples of controls that exist only as server-side controls: CheckBoxList and RadioButtonList. These controls give you a programmatic interface on the server similar to that of DropDownList and ListBox, but when they render to the client, they render as tables (or as spans if RepeatLayout is set to Flow) with embedded input elements, because they have no direct equivalent in HTML. Figure 2-9 shows the rendering of two instances of these controls.
Several additional controls in the WebControls hierarchy provide interesting alternatives to hand-rendering HTML techniques. The Xml control provides a mechanism for performing XSL transforms on XML input as part of a page's output. The AdRotator control uses an XML file as input to render an image that changes with each post-back, which is useful for randomly displaying images, often for advertisements. Finally, the Panel control, which renders as a DIV element, is useful for containing groups of controls whose alignment or visibility you need to change programmatically. Listing 2-14 shows a sample .aspx page that uses all these controls together.
Example 2-14. Sample Use of Xml, AdRotator, and Panel Controls
<!— File: XmlAdPanel.aspx —>
<%@ Page language="c#" %>
<HTML>
<body>
<form runat="server">
<asp:Xml id=_xml1 runat="server"
         DocumentSource="sample.xml"
         TransformSource="sampleTransform.xsl">
</asp:Xml><br/>
<asp:AdRotator id=_ar1 runat="server"
     Width="468px" Height="60px"
     AdvertisementFile="pics.xml"></asp:AdRotator>

<asp:Panel id=_p1 runat=server HorizontalAlign='center'
                  Visible='true' bgColor='cornsilk'>
  <asp:Label id=_l1 runat=server>Panel label</asp:Label>
  <br/>
  <asp:TextBox id=_tb1 runat=server/>
  <br/>
  <asp:Button Text='Push me!' runat=server/>
</asp:Panel>
</FORM>

  </body>
</HTML>
One of the first questions many people ask when they see that ASP.NET provides two sets of controls is, Which set of controls should I use? The answer depends on your needs. For most developers, it will be simpler to work with the WebControls hierarchy of controls because they are most like the desktop equivalents that most programmers are familiar with. They are also more uniform in their treatment of attributes. For example, every WebControl exposes a CssClass attribute providing a hook to a style-sheet style, but none of the HtmlControls expose such an attribute. Thus, to associate a style-sheet class with an HtmlControl, you must programmatically populate the Attributes collection with a name/value pair consisting of the string “class” and the name of the style-sheet class.
The two primary reasons for using HtmlControls are porting and using alternate designers. It may be simpler to port existing ASP or plain HTML pages to ASP.NET by selecting a subset of the elements on a form to run on the server by just adding the runat=server attribute. A designer other than Visual Studio .NET may be simpler to work with if the HtmlControls are used instead of the WebControls, because the designer is more likely to recognize familiar HTML elements. However, many of the most popular designers, including FrontPage and Dreamweaver, have announced support for ASP.NET WebControl elements. It is also not a matter of either/or, because WebControls can be freely mixed with HtmlControls, so if it makes more sense to use WebControls in one place and HtmlControls in another, feel free to do so.
All the topics discussed in this chapter are directly applicable to building Web forms with the Visual Studio .NET designer; however, there are some subtleties to the way the designer works that you should be aware of.
Figure 2-10 shows a sample ASP.NET Web application in Microsoft Visual Studio .NET. In this example, a pair of server-side controls has been added with the designer, and a handler has been associated with the Click event of the server-side button. There are two important Page attributes to notice in the generated .aspx file. First, note the Codebehind attribute, whose value is set to the source file for the code-behind. This is not equivalent to the src attribute discussed in Chapter 1, but is a tag used exclusively by Visual Studio .NET to associate source files with .aspx pages (so that they show up as connected in the Solution Explorer and so that the code-behind file can be brought up for any .aspx page by using the F7 key). ASP.NET does not recognize this attribute and ignores it altogether. For the code-behind class to be referenced by a Visual Studio .NET–created page, it must be compiled into an assembly and placed in the /bin directory of the virtual root for that application. This is exactly what Visual Studio .NET does for you. In fact, all code files within a Web application project are compiled into a single assembly, which is placed in the /bin directory of the virtual root associated with that project. The second important attribute to note is AutoEventWireup, which is set to false. This means that your page and code-behind class may not use the automatic event wire-up mechanism for Page events. Instead, you must explicitly register delegates for any events you want to handle.
To complete the picture, Listing 2-15 shows the code-behind file, WebForm1.aspx.cs, that is referenced by the .aspx page in our sample project. Note that when the designer is used to place a server-side control on a form, it takes care to place a protected data member of the appropriate type in the code-behind file. Also note that because AutoEventWireup is disabled from the .aspx page, the code-behind generated by Visual Studio .NET is careful to explicitly wire up the Load event handler of the Page class. The Init event of the Page class is used as the bootstrap to initialize all the other events by calling the helper function, InitializeComponent. Notice that the designer explicitly added an event handler for the Click event of the server-side button in the InitializeComponent implementation. In general, anytime you add a handler for a server-side event in the designer, it explicitly subscribes to that event in this method. The Init event is handled by overriding the virtual OnInit method inherited from the Page base class, which is registered as an event handler for the Init event in the Page class's constructor.
Example 2-15. Visual Studio .NET–Generated Code-Behind File
using System;
using System.Collections;
using System.ComponentModel;
using System.Data;
using System.Drawing;
using System.Web;
using System.Web.SessionState;
using System.Web.UI;
using System.Web.UI.WebControls;
using System.Web.UI.HtmlControls;

namespace WebFormsApp
{
  public class WebForm1 : Page
  {
    protected Button _PushMe;
    protected TextBox _Name;

    private void Page_Load(object sender, EventArgs e)
    {
     // Put user code to initialize the page here
    }

#region Web Form Designer generated code
    override protected void OnInit(EventArgs e)
    {
      InitializeComponent();
     base.OnInit(e);
    }

    private void InitializeComponent()
    {
      _PushMe.Click +=
                 new System.EventHandler(Button1_Click);
      this.Load += new System.EventHandler(this.Page_Load);
    }
#endregion
    private void Button1_Click(object sender, EventArgs e)
    {
    }
  }
}
There are several mistakes people often make when they begin working with Visual Studio .NET because of some of these default settings. The first mistake is to assume that the Codebehind attribute implicitly compiles the code-behind file when the page is accessed. This is not true, and the code-behind file must be explicitly compiled and then deployed to the /bin directory of the application. Another mistake is to remove the AutoEventWireup attribute (or set it to true) without removing the explicit event wire-up in the code-behind file. Removing this attribute causes ASP.NET to automatically add an event handler for any function in the code-behind file or in the .aspx file that matches one of the hard-coded event handlers. In most cases, this will be the Page_Load method defined in the code-behind file, and the symptom will be that the Load event appears to fire twice for each Page creation. In reality, the Load event is firing only once, but there are now two handlers registered for the event.
ASP.NET brings control-based programming to Web application development with Web forms. Borrowing from the familiar desktop application control model, ASP.NET defines a number of control classes to represent elements on a Web form. These controls render themselves as HTML as part of a response to an HTTP request. Any modification made to the state of these controls on the server is reflected in the subsequent rendering to the client, letting the developer focus more on structuring the application and less on the details of rendering to a browser. To make this control-based programming model work for all elements on a page, ASP.NET introduces ViewState as a means of transferring the state of controls that are not propagated as part of a standard POST request. Server-side events complete the control model.
Two sets of server-side control classes are available: HtmlControls and WebControls. The HtmlControl classes closely mirror their HTML tag counterparts and are convenient to use when converting an existing HTML page to ASP.NET. The WebControls provide a more uniform programmatic interface and will be used by most developers building ASP.NET pages from scratch.
[5] Some controls define their own event handler delegates to pass additional information. For example, items within a datagrid expose events using the DataGridItemEventHandler, which takes a reference to a DataGridItemEventArgs class containing a link to the item for which the event was fired.
[6] MSDN documentation is available through Visual Studio .NET or at http://msdn.microsoft.com.