
In introducing Quartz 2D, and throughout the book up to this point, the fact that Quartz 2D has a resolution independent drawing model has been emphasized. It has also been pointed out that Quartz 2D does not, in general, base its drawing model on the concept of a pixel. However, computer graphics is riddled with resolution dependent graphics that are pixel-based. One of the most popular examples today are the images captured by digital cameras. The digital camera works by capturing light and generating a set of color pixels that closely match what it “sees.”
To draw pixel-based graphics, like the images from a digital camera, Core Graphics needs some way to model those graphics. The Quartz 2D API uses the concept of an image for this task.
Image is a bit of an overloaded term when you apply it to computer graphics. In fact, all of the graphics you create using a computer could be called images. In Core Graphics, however, the term “image” has a specific connotation.
If you wanted to be very exact, you might say that in Quartz 2D, an image is defined as a rectangular array of color samples from an associated color space. Returning to the digital camera, for example, the CCD in the camera captures light from a scene and generates a large set of color values (usually RGB) that represent that light. Each RGB triplet is called a color sample. The camera structures these color samples into a large, rectangular array, and computer graphics professionals like to call each sample a picture element (or pixel). The camera generates a big rectangular array of color samples and that matches the Quartz 2D definition of an image.
This definition is actually a very tedious one for a concept that many software engineers are already familiar with. As an application developer you are no doubt familiar with image files such as JPEGs and GIFs. These file formats encode image data not only from scanners and digital cameras, but also from artificial sources like 3D renderers and ray tracing programs. Graphics programmers familiar with pixel-based graphics libraries will recognize that pixel buffers are also images. The RGB values of the pixels in the buffer represent a color sample from an RGB color space.
Keep in mind, however, that there are some things that people who work with computers often call “images” but that do not match the Core Graphics definition of an image. For example, many graphics professionals refer to PDF files as “images.” But PDF data, in general, doesn’t match the Quartz definition of an image. PDF data consists of a series of drawing commands consisting of bezier curves, coordinate transformations, and other such things. The data in the file is not simply a rectangular array of pixels, there is no guarantee that all of the colors in the PDF file have come from the same color space. These two facts alone do not fit the Core Graphics definition of an “image.”
In addition to images, Quartz 2D also allows you to work with image masks. Like an image, an image mask is a big rectangular array of pixels. Each pixel has an associated value. Unlike images, however, the values of pixels in an image mask do not represent colors. In fact, it doesn’t make much sense to talk about drawing an image mask because the mask itself does not contain any drawable information. Instead, your application uses an image mask to modify the way the computer draws an image. Using the mask, the computer can selectively transfer pixels from an image onto a graphics context. The pixel values in an image mask determine how much of the color in the corresponding pixel of the image should be transferred to the drawing destination. Figure 8.1 illustrates the effects of copying an image through a mask.
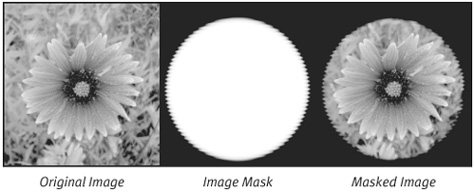
The figure shows an image, a mask, and the results of combining the two. In the masked image, the black part surrounding the flower actually represents transparent pixels in the image.
The image mask is represented in a drawable form so that you can see how the values in the mask affect the way the computer transfers the image onto the drawing destination. Where the mask is black (full masking), the mask prevents the image from drawing in the destination. Where the mask is white (no masking), the image pixels are copied directly to the destination. In places where the mask is between 0 and 1, a proportional amount of the source image is transferred to the destination. Because the original image is completely opaque, the net effect is exactly the same as if the image were blended with the destination using the mask value as the pixel’s alpha.
Now that you know what images and image masks are, you can begin to explore how Core Graphics allows you to work with them. This chapter explores the way that Quartz represents images and masks data and examines the characteristics of an image and the opaque data type, CGImage, that Quartz uses to keep track of images. Finally, the various options your application can take advantage of when drawing images is discussed.
Quartz 2D uses the same opaque data type to represent both images and image masks. That opaque data type is simply called CGImage. The CGImage object itself is a surprisingly lightweight entity. Rather than keeping track of a lot of data in and of itself, the CGImage class relies on other objects to manage many details on its behalf. The CGImage object’s job is tie together these different objects into a single entity that the computer can draw on a CGContext.
The first important aspect of the image maintained by a CGImage object is its geometry. For a rectangular array of color samples, or pixels, that means that the CGImage keeps track of how many pixels high and how many pixels wide the image is. Because this is working with pixels, a discrete valued entity, CGImage uses integers (more specifically size_t) to represent the height and width of an image.
All of the color samples in the pixels of a CGImage come from a particular color space. The CGImage keeps track of this color space by using an instance of the CGColorSpace opaque data type. The primary job of the color space is to help the computer interpret the values of the pixels. As you will see, however, the color space has a more subtle duty in that it defines how many color components each pixel in the color should have.
A CGImage also needs some means of getting at the data structures that store the actual pixel information. In this task, the CGImage enters a partnership with the code that created it. The CGImage doesn’t own any of the image data itself. Instead, it works with an opaque type called the CGDataProvider. A CGDataProvider is simply an object that knows how to supply a CGImage instance with pixel data. Some CGDataProviders own the data they pull pixels from. Others allow your application to maintain the image data. Altogether, these different data providers give you a lot of flexibility in locating, storing, and working with image data.
Quartz offers even more flexibility when it comes to the pixel data itself. The simplest way to store color samples is as ordered n-tuples. The number of values in each “tuple” is determined by the color space and whether or not the image contains an alpha channel. A grayscale image with no alpha would use a single value in each “tuple” (a single value for each pixel). An RGB image with an alpha channel would require four values for each pixel. Quartz gives you options in terms of the number and kinds of values that your image specifies for each component in a pixel. It also gives you a bit of wiggle room to select the ordering of the channels within a pixel (in particular the position of the alpha channel relative to the color components of each pixel).
All of this information comes together when your application creates a CGImage. More of this topic will be explored shortly. The true beauty of Quartz, however, is the fact that it encapsulates much of the underlying complexity of images behind a relatively simple API for drawing images. The next topic to cover is the way your application draw images with Quartz 2D, and afterward the question of how to create images will be revisited.
Quartz 2D includes a single routine call for drawing an image in a context, CGContextDrawImage. This routine accepts three arguments, the context you want to draw the image in, a rectangle within that context into which you want the image drawn, and the image that the computer should draw. Quartz 2D bolsters this relatively simple routine call with hallmark features like color management, resolution independence, and powerful transformations to provide a very feature-rich environment for drawing images.
In working with computer graphics, resolution of an image (measured in pixels per inch) can play an important role in how the computer handles the image. It may surprise you to learn, however, that Core Graphics doesn’t concern itself much with the resolution of an image. In fact, the CGImage opaque data type doesn’t even keep track of resolution as an attribute of an image.
All of the Quartz 2D drawing primitives are resolution independent entities. The computer takes these primitives and reproduces them at the full resolution of the output device. In working with images, Quartz 2D accomplishes this task using two techniques called resampling and interpolation.
Resampling is a process in which the computer takes an image, overlays a new grid of pixels on top of the image, and generates new samples (one for each pixel in the grid) based on the image colors of the underlying image. This process is illustrated in Figure 8.2.
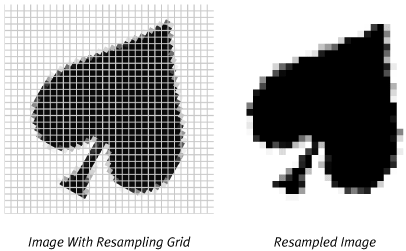
The left side of Figure 8.2 shows a high resolution image with a resampling grid laid down on top of it. This example is going to resample the image at a lower resolution. The image on the right is the result of resampling the image to that grid. The figure demonstrates the application of a very simple resampling algorithm. When trying to determine the color for a pixel in the resampled image, you apply the color of the source immediately underneath its center.
If you look at the left-hand image of Figure 8.2, however, you will see that some of the squares in the resampling grid actually cover more than one pixel in the source image. A more sophisticated algorithm would generate the color for the resampled pixel by combining these pixels.
The technique that the computer uses to generate the resampled pixel is called the interpolation algorithm. By changing the interpolation algorithm, the computer can improve the resulting image, but the higher quality often comes at the expense of increased processing time. Quartz 2D allows the program some measure of control over this trade-off by allowing it to specify a hint that helps the library decide which interpolation algorithm to choose.
Interpolation, and the interpolation algorithms applied to a graphic, depend on the capabilities of the device that Quartz is drawing to. A graphics card rendering Quartz images in hardware might be able to employ one or two simple interpolation techniques. A bitmap graphics context where the rendering is handled by software on a general purpose processor might be able to use many different interpolation techniques.
Your application can indicate what level of interpolation quality it wants the computer to use by using the CGContextSetInterpolationQuality method of a CGContext. This routine allows you to provide a hint to the context about whether you would like to use a lower quality, faster interpolation technique, or a higher quality interpolation algorithm that takes longer to calculate.
Keep in mind, however, that interpolation and interpolation quality are very device-specific. When drawing to the screen, for example, your application might find that using a high quality interpolation setting provides acceptable performance. That same interpolation quality setting might be problematically slow when the same drawing code prints the graphics to a high-resolution printer.
Apart from drawing images, Quartz also can add an image mask to the current clipping area of a context. If you need to clip your drawing to a complex shape, you may find it easier to create an image mask and clip your drawing to that.
You add the clipping mask to the context with the routine CGContextClipToMask. As with the other routines that add to the clipping area, the computer will intersect your mask with the clipping area already established in the context. After adding the mask, subsequent drawings will show through the translucent portions of the mask and be suppressed wherever the mask is opaque.
There are a number of services in the operating system that can return CGImages to your application. The most obvious source is Core Graphics, which offers a number of routines for creating CGImages from various data sources. However, in addition to Quartz, you can obtain CGImages from other operating system services. For example, QuickTime provides the routine GraphicsImportCreateCGImage, which can create a CGImage from a QuickTime Graphics importer.
The next few sections explore some of the Quartz 2D routines that your application can use to directly create images from data sources that are directly supported by Core Graphics itself. The next chapter examines some handy techniques your application can use to import images from external sources, like image files, and in other data formats, like TIFF images.
Given the breadth of color spaces that Quartz 2D supports, CGImage has to work with quite a variety of pixel types. The different characteristics that describe pixel formats are very important when you want to create an image or find out more about an image you have obtained elsewhere. Before talking about creating CGImage objects, take a look at the characteristics that describe the pixels they contain.
There are two general categories of information that describe the pixels of a CGImage. The first category describes the color characteristics of the pixels. This information is related to the color space and alpha channel. The computer needs to know how many color components the application will use to represent each pixel, and it needs to know which of those components represent which channel. The second category describes the actual bit and byte-level characteristics of each pixel. This information describes how the pixels are arranged in memory. For example, a 32 bit-per-pixel ARGB Image will use one byte for each color channel, while a 16 bit-per-pixel ARGB image might use only five bits for each color channel. The computer needs to know all of this information to understand the pixels of an image completely.
All of the color samples, and therefore the pixels, in a CGImage come from the same color space. Correspondingly, the color space of an image defines the number of components that go into each pixel. For example, if an image lives in an RGB color space, each pixel will have at least three color components. CMYK images, in contrast require four color components per pixel.
Note
While Quartz 2D always includes an alpha channel for most of the colors it works with, one exception is in image data. Quartz 2D can create CGImages from image data that does not include an alpha channel. This means that the pixels in an RGB image need not have four components per pixel.
If you are creating an image from your own data, you will have to tell the computer what color space the pixels are coming from. You represent that color space using an instance of the CGColorSpace opaque data type. If your code already has a CGImage and wants to know how many color channels each pixel of the image requires, you can retrieve the CGColorSpace object CGImageGetColorSpace. You can then ask the color space for the number of components in each color sample using the CGColorSpaceGetNumberOfComponents method.
In addition to the color channel information, Mac OS X also supports alpha channel transparency. One option for your pixel data is that it will not contain any alpha information at all. In the case that the image data does not contain an alpha channel, the pixels may still contain an additional component that the computer needs to ignore.
If an image does contains alpha information, then each pixel requires an additional component that carries the alpha information. Quartz 2D will need to know two other important bits of information about how the alpha channel relates to the color channels. From a byte-ordering standpoint, the library will have to know where the alpha channel is found in relation to the color channels. CGImage supports pixels with the alpha channel as either the first or last component of each pixel. Quartz 2D will also need to know if the components in the color channels have already been multiplied by the alpha value or not.
Quartz 2D collects these two characteristics of the alpha channel in an enumeration called CGImageAlphaInfo. The names of the values in this enumeration are very descriptive. For example, kCGImageAlphaLast indicates that the pixel format contains an alpha channel and that it is the last component of each pixel. The value kCGImageAlphaNoneSkipFirst indicates that the image does not contain alpha information but that the computer should skip the first component of each pixel anyway.
Note
QuickDraw’s 32-bit pixel format is an excellent example of a pixel type where the pixels occupy enough space for an additional component, but that component does not maintain alpha channel information for the pixel. This pixel format is characterized by the kCGImageAlphaNoneSkipFirst enumeration value. In this pixel format, the computer encodes the three color channels in the three low order bytes. The upper byte, however, is generally ignored. If you are going to create a CGImage from a QuickDraw PixMap (perhaps via a graphics port), you will need to take this additional byte into account.
While this extra component is ignored by QuickDraw, in general, the QuickDraw implementation on Mac OS X does change the value of this byte. For compatibility reasons, when you draw into a QuickDraw port, the computer will change the value of this byte to 255 (which, when interpreted as an alpha value usually represents an opaque pixel).
The other important characteristics of images is the way that the pixel channels are organized in memory. We’ve just seen a bit of this information in the discussion of the different alpha channel options where the CGImageAlphaInfo enumeration tells us whether or not the alpha channel is the first component in a pixel or the last. There are additional features of the pixels that help a CGImage extract color information from its pixel data.
The first attribute like this is a value that tells how many bits the pixel data uses to represent the value of each color component. For example, a popular way of encoding RGB data in 16 bits is to use five bits of data for each color channel. With five bits per channel and three channels, this RGB pixel format only uses 15 bits for color information. The last bit is ignored, so each pixel uses 16 bits.
To help the library identify situations like this, where bits might be ignored, the second piece of information Quartz 2D likes to know is the number of bits that go into a single pixel.
A third important aspect of how pixel data is organized is the number of bytes in a single row of the image (commonly called rowBytes). The computer will often organize image data so that the number of bytes in one row of the image is wider than its pixel data alone would suggest. This is often done for performance reasons. For example, the registers of the AltiVec programming unit work best with data that are aligned to 16-byte (128 bit) boundaries, that is, addresses whose value is an even multiple of 16. The AltiVec processor, therefore, will find it easiest to access the pixels in a row if each row starts on a 16-byte boundary. To help ensure that this is the case, the computer may pad images to 16 bytes in order to ensure that the AltiVec processor can access the rows as efficiently as possible. This is just one example of a reason the image data might be padded. The important point to realize is that an image may have a larger value for its rowBytes than the pixel layout would indicate alone.
Taking into account all the pixel formatting options we’ve just discussed, alpha information, bits per component, bytes per pixel, rowBytes, and the color space, you might imagine that Quartz has a lot of flexibility when working with different image types. The system does not support every combination of the different variables. In practice, this is rarely a problem, as CGImage does support creating images from popular image formats like those shown in Table 8.1.
Table 8.1. Some Popular Quartz 2D Pixel Formats
Color Space | Bytes per Pixel | Bits per Component | Alpha Information | Description |
|---|---|---|---|---|
CMYK | 32 | 8 |
| The most popular CMYK format is probably 32 bit CMYK with one byte for each color channel. |
RGB | 32 | 8 |
| You often run into 32 bit-per-pixel RGB images. Typically three bytes will be color data. If the pixel format contains alpha, the remaining byte will contain the alpha information. If you are working with QuickDraw, you will usually skip the first byte. If you are working with data from Cocoa, the alpha channel is often found in the last position. |
RGB | 16 | 5 |
| The color components are usually the low order bits of the 16 pixels. The first bit is usually ignored. |
RGB | 128 | 32 bit floats |
| Mac OS X 10.4 and later support 128 bit-per-pixel floating point pixel formats. |
Grayscale | 1 | 8 |
| Single byte grayscale images are popular |
Note
When creating a CGContext that draws into an offscreen bitmap, we will find that many of the attributes used to describe images are also used when describing offscreen pixel buffers. In practice, Quartz 2D is much more flexible when accepting different attribute combinations for images than it is when creating bitmap contexts. For example, Quartz 2D can create a CGImage from 24 bit-per-pixel RGB pixel data, but it may not be able to create an offscreen context that generates 24 bit-per-pixel RGB pixel data.
Image masks do not contain any color information, of course, nor do they include alpha information. In spite of this, masks have very similar characteristics to images. The pixels in an image mask have a single component value that represents the mask value for that pixel. Most image masks use 1, 2, 4, or 8 bits per component. Usually, with an image mask, the number of bits per component and the number of bits per pixel will match. Image masks also have a rowBytes value, which enjoys the same oddities as the rowBytes field in images.
This chapter has covered the way that the application describes pixel information to the computer, but no time has been spent on where the pixel data comes from. To retrieve its pixel information, a CGImage works with a class known as a data provider. A data provider is little more than an object that encapsulates a bundle of bytes and returns those bytes on demand. Core Graphics represents data providers using the opaque data type CGDataProvider. Your application can create a data provider in a number of ways.
The simplest data provider is one that provides access to a memory buffer that your application owns. In the case of working with images, this memory buffer is more likely than not, a pixel buffer. However, when working with CGImages, that is not your only choice. Core Graphics also allows you to work with blocks of memory that contain compressed image data in JPEG or PNG format.
Regardless of what the block of memory contains, you create the data provider the same way using the routine CGDataProviderCreateWithData. This routine takes a pointer to the data buffer and an integer expressing the size of the memory block. The routine also takes a routine pointer. When the CGDataProvider is finished using the memory buffer, it will call the routine pointer, giving your application the opportunity to release that buffer. In addition to the routine pointer, CGDataProviderCreateWithData accepts a pointer value that the computer will pass to the routine. If your application does not want to use the routine pointer, you can simply pass NULL for both of these parameters.
Image files are another popular source of pixel data. If you want to create a data provider that provides CGImage with the contents of a file, you can use the routine CGDataProviderCreateWithURL. In most cases you will pass a local file URL to this routine, however you can also pass network URLs. If the operating system is able to resolve that URL and extract data from it, then it can create a CGImage from that network data. However, network access can be a complex process, subject to network outages and the like. Because Core Graphics doesn’t have any opportunity to return network errors, there are better mechanisms in Mac OS X for retrieving remote data.
A third technique for creating a data provider allows your computer to return pixel data through callback routines. Your application can create a structure containing routine pointers, and the computer will call those routines in response to data requests sent to the CGDataProvider object. The Quartz API allows you to create two different types of callback data providers. One of the simplest kinds of data provider is one that sequentially reads a stream of data. A direct access data provider should only be used if your application can skip around in the data set and access the data randomly. If your application can skip around in the data stream and access the data randomly, then you can create a direct access data provider. The direct access and stream-based data providers have slightly different callback structures.
While the pixel data as presented by the data provider should be immutable, you can ask the computer to scale the pixel values as it draws the image by adding a decode array to your image.
The decode array is simply represented as an array of floating point values. Although your application constructs the array as a single dimensional array, the computer interprets those values in pairs. The decode array for the image should contain the same number of value pairs as there are color channels (plus the alpha if the image data contains it) in the image.
Each pair of values in the decode array specifies a valid range for the pixel values of the corresponding color channel. For example, if your decode array contains the values (0.5, 0.8) for the red channel of an RGB image, then as the computer takes each pixel from the data provider, it will scale the red value for that particular pixel so that it lies between 0.5 and 0.8 in the representation of that image on screen.
Core Graphics also allows you to supply a decode array for image masks. Using a decode array with a mask allows you to scale the mask value just as you scale color channel values using the decode array in color images.
Your application can use the decode array to provide a number of image effects. For example, you can use the decode array to remove the alpha channel of an image by using (0, 0) as the value pair for the alpha channel value of the image. If you want to invert an image, you can pass (1,0) as the value pair for each channel. When the computer maps the color channels through the decode array, it will invert each color channel.
The decode array is an intrinsic part of the CGImage object. If you want to use a different decode array with your pixel data, you will have to create another image with the alternate decode array.
Creating an image from a pixel buffer in memory is probably one of the most popular techniques. Quartz 2D supplies the routine CGImageCreate for this purpose. This routine takes quite a few parameters, but you should not let this put you off. The sample code snippet in Listing 8.1 illustrates a simple application of this routine. The code in this listing is used to explore the basic technique, and you can modify it to support your own particular pixel formats as needed.
Example 8.1. Creating an Image from a Pixel Buffer in Memory
CGImageRef CreateImageFromARGB32Bitmap(
    unsigned int height,
    unsigned int width,
    void *baseAddr,
    unsigned int rowBytes)
{
    const size_t bitsPerComponent = 8;
    const size_t bitsPerPixel = 32;

    CGImageRef retVal = NULL;

    // Create a data provider. We pass in NULL for the info
    // and the release procedure pointer.
    CGDataProviderRef dataProvider =
            CGDataProviderCreateWithData(
                    NULL, baseAddr, rowBytes * height, NULL);

    // Get our hands on the generic RGB color space.
    CGColorSpaceRef rgbColorSpace = CGColorSpaceCreateWithName(
            kCGColorSpaceGenericRGB);
    // Create an image
    retVal = CGImageCreate(
            width, height, bitsPerComponent, bitsPerPixel,
            rowBytes, rgbColorSpace, kCGImageAlphaPremultipliedFirst,
            dataProvider, NULL, true, kCGRenderingIntentDefault);

    // The data provider and color space now belong to the
    // image so we can release them.
    CGDataProviderRelease(dataProvider);
    CGColorSpaceRelease(rgbColorSpace);

    return retVal;
}
Our sample code creates an image based on a very specific pixel format. This routine creates an image from 32 bit-per-pixel (8 bits per component), premultiplied, ARGB data. Your own code may have to support other pixel formats, but the basic technique is the same.
Our routine accepts the height and width of the image as parameters. It also accepts the pointer to the image data and the number of bytes in each image row. As was said, in some cases the number of bytes in one row of an image may be more than the width of the image multiplied by the number of bytes in a pixel.
As with all images, we need to create a data provider to serve as the conduit between our data source (the pixel buffer) and the CGImage. The code sample uses CGDataProviderCreateWithData. This routine creates a simple data provider based on a pointer to a block of memory and the size of that block. In this case, we do not give the data provider any mechanism for releasing the data. This code would rely on some external agent to ensure that the pixel data exists until the image is released and that the computer frees the pixel data when it is no longer needed.
After creating the data provider, the code also creates a color space for your image. In this case, you know the image data to be RGB data and can assume that the color samples in the pixel data come from the generic RGB space on the operating system. If your image data comes from some other source, say a scanner, it would be much better to use the color space of that source rather than the generic space.
With the data provider and color space in hand, you can finally create an image based on the pixel data. CGImageCreate ties together all the different pieces and returns an instance of the CGImageRef opaque data type. Note that in this case we indicate our data is using premultiplied alpha values and that the alpha channel is the first component of each pixel. The code passes in NULL as the decode array, indicating the choice to use the color values from the pixel buffer directly without scaling them.
The last two parameters of the CGImageCreate call involve concepts that haven’t been covered yet since they have more to do with drawing the image than creating it. The next to last parameter tells the operating system that the image can be drawn with interpolation. This will come into play if Quartz wants to draw the image with a transformation that requires it to resample the graphic and generate additional pixels.
The final parameter relates to the way the computer transforms the colors of the image when drawing the image to a device that uses a color space other than the one the application has created the image in. This parameter is called the rendering intent for the image. Color management documentation can offer more information about the different rendering intents. In this sample code the default value is requested.
After calling CGImageCreate, you have the return value for the routine; however, keeping in line with the ownership rules of CG objects, you need to release the auxiliary objects created within the routine. Release both the color space, and the data provider that you created. If the image itself has retained those objects, then these release calls will not free the objects, but you still must release your claim on them.
This routine returns the CGImage that it has created and expects the calling routine to release that image when it has finished with it.
If you are a QuickDraw programmer and are trying to transition your code to Quartz, you may find that creating a CGImage from a PixMap is a useful transition strategy. Creating an image from a QuickDraw PixMap is no different than creating an image from any other block of pixel memory. The PixMap will have to have a pixel format that is compatible with Quartz 2D. That means, for example, that you cannot use 8 bit-per-pixel indexed color spaces with Quartz 2D.
One aspect of PixMaps that seems to trip up QuickDraw code from older Macintosh applications is the rowBytes fields. Older versions of the Mac OS treated the high order bits of the rowBytes fields as flags. Application code would often mask out these high order bits using either 0x7FFF or 0x3FFF as the bit mask.
Later versions of the Mac OS, including Mac OS X, include routines that you should use to extract the base address and rowBytes of a PixMap. These routines are GetPixBaseAddr and GetPixRowBytes respectively. If your code uses the old masking behavior for the PixMap’s rowBytes field, you should update the code to use GetPixRowBytes instead.
When you are using a PixMap as the source of an image on Mac OS X, you should probably ensure that the PixMap’s pixels are locked for as long as the CGImage exists. You lock a PixMap using the LockPixels routine and unlock them with UnlockPixels. On Mac OS X, there is a very small, but non-zero chance, that a PixMap’s pixels will move over the life time of the image. LockPixels and UnlockPixels are not expensive routines and calling them, potentially without cause, shouldn’t be an egregious burden.
Listing 8.2 includes a sample routine that converts a 32-bit color QuickDraw PixMap into a Core Graphics image. This routine was taken from a code sample, called CGImageFromPixMap, that is included in the Chapter 8 code samples.
Example 8.2. Creating a CGImage from a QuickDraw PixMap
CGImageRef CreateCGImageFrom32BitPixMap(PixMapHandle offscreenPixMap)
{

    // Extract information about the geometry of the offscreen
    Rect bounds;
    GetPixBounds(offscreenPixMap, &bounds);

    // Calculate the length of the pixel data and use that
    // to create the data provider for the image
    long rowBytes = GetPixRowBytes(offscreenPixMap);
    unsigned int dataLength = rowBytes * (bounds.bottom - bounds.top);
    // We pass the CGDataProvider an
    CGDataProviderRef dataProvider = CGDataProviderCreateWithData(
            offscreenPixMap,
            GetPixBaseAddr(offscreenPixMap),
            dataLength,
            NULL);

    // We're now ready to create the image.
    CGColorSpaceRef rgbColorSpace =
            CGColorSpaceCreateWithName(kCGColorSpaceGenericRGB);
    CGImageRef pixImage = CGImageCreate(
            bounds.right - bounds.left,
            bounds.bottom - bounds.top,
            8, 32, rowBytes, rgbColorSpace,
            kCGImageAlphaNoneSkipFirst, dataProvider,
            NULL, true, kCGRenderingIntentDefault);

    CGColorSpaceRelease(rgbColorSpace);
    rgbColorSpace = NULL;

    CGDataProviderRelease(dataProvider);
    dataProvider = NULL;

    return pixImage;
}
If your application has access to PNG or JPEG data, then Core Graphics includes the ability to work with that data directly. Creating a CGImage from compressed data in either of these formats is as easy as creating an appropriate data provider and calling Quartz to create an image from that provider.
Because your application can create a data provider from a number of sources, you have a lot of options for the source of the compressed data. For example, if you have JPEG data in a block of memory owned by your application, you can use the same call to CGDataProviderCreateWithData used in the previous example.
In this code sample, a CGImage is created from a PNG file included in the application’s resources. Listing 8.3 demonstrates one potential implementation for this kind of routine.
Example 8.3. Creating an Image from a PNG Resource
CGImageRef CreateImageFromPNGResource(CFStringRef resourceFileName)
{
    CGImageRef retVal = NULL;

    // Try to get a URL to appropriate URL in our resources
    CFURLRef resourceURL = CFBundleCopyResourceURL(
            CFBundleGetMainBundle(), resourceFileName,
            CFSTR("png"), NULL);

    // if we succesfully obtained the URL, create an image from it.
    if(NULL != resourceURL) {
            CGDataProviderRef dataProvider =
                    CGDataProviderCreateWithURL(resourceURL);

            retVal = CGImageCreateWithPNGDataProvider(
                           dataProvider, NULL, true,
                           kCGRenderingIntentDefault);

            CGDataProviderRelease(dataProvider);
            CFRelease(resourceURL);
    }

    return retVal;
}
Creating an image from PNG or JPEG data frees you from having to work with a lot of the details concerning the pixel format that are important when creating an image from a pixel buffer. These settings are taken from the JPEG or PNG data itself. This simplifies the sample code somewhat.
The code begins by asking the main bundle to return a URL to the PNG file in the Resources directory of the application package whose name matches the one passed in as a parameter to this routine. If the computer returns this URL successfully, you create a data provider from the URL and call CGImageCreateWithPNGDataProvider to create the actual CGImage instance. If this had been working in JPEG data instead, you could use the routine CGImageCreateWithJPEGDataProvider. As in the previous example, NULL is passed in for the decode array, true to allow the computer to use interpolation when drawing the image, and the default rendering intent is used for the image.
As in the previous code sample, the routine ends by releasing the auxiliary objects it has created and returns the CGImage it has created to the caller. The caller is responsible for releasing the CGImage after finishing with it.
Creating image masks is very similar to creating images. The largest difference is that color masks do not require a color space and have a single component per pixel. The primary routine your application can use to create an image mask is CGImageMaskCreate. Aside from the fact that the color space parameter is missing, this routine accepts arguments that are identical to those passed to CGImageCreate.
Another popular task is creating an image based on the contents of another image. This can helpful if, for example, you have cached a background for a view in an offscreen port and want to copy part of that image to the window as part of redrawing your view.
To perform such a task, you would like to take an existing image, the entire background, and create a new image with the same pixels as a rectangle in that larger image. Mac OS X 10.4, Tiger, provides a routine for just this purpose. On Tiger you can call CGImageCreateWithImageInRect passing in a source image and a rectangle. The computer extracts the portion of the image in the rectangle and creates a new image with those pixels as its contents.
Unfortunately, older versions of Mac OS X don’t include this routine. However, a strategy that may be useful is to create an offscreen pixel map, draw the image into that map, and use a sub-rectangle of the pixel map to create a new image.
This technique suffers a bit in that it is not always possible to match the color settings of the original image exactly. For example, a JPEG image can be 24 bit-per-pixel RGB, but the operating system cannot create 24-bit RGB offscreen graphics contexts. However, your code may be able to use a pixel map with similar color characteristics (say 32-bit XRGB in this case) to create an image that very closely matches the color space of the original image.
If you do not need to create an independent CGImage, then you may be better off simply using context clipping or an image mask to select only that portion of the source image you are interested in drawing.
Another useful routine is CGImageCreateCopyWithColorSpace. This routine allows you to create a new image that is identical to the source image except that the color samples will be interpreted as having been taken from another color space. For this to work, the original image’s color space and the color space passed to CGImageCreateCopyWithColorSpace must have the same number of components
It is important to understand that this routine will not correct the image to the color space you pass it. Instead the routine uses the exact same image data and just changes the environment used to interpret those pixel values.
If you need to color correct an image from one color space to another, you have several choices. If Quartz 2D can create a bitmap graphics context for your desired color space, then you can create an offscreen bitmap and use CGContextDrawImage to draw into that context. Quartz will color correct the source image to the destination color space as part of that drawing operation. This technique is demonstrated with sample code shortly when discussing image drawing performance.
If Quartz 2D cannot create an offscreen bitmap that uses the color space you want, then you will have to revert to using ColorSync (or some other color management system) to correct the image data. Unfortunately this kind of operation is beyond the scope of this book.
If you want to combine an image and a mask into a new image, you can do so with the routine CGImageCreateWithMask. This routine accepts two parameters.
The first is a CGImageRef that represents the source image you want to mask. Just about any image will do, but it may not already have a mask or masking color applied to it.
The second parameter, also a CGImageRef, can either be an image mask or an image. If you pass in an image, the computer will reinterpret the source samples of the image as the alpha channel values for the resulting image. For this reason, the image should contain a single channel per pixel.
Ideally the second parameter, the masking image, should match the size of the source image in the first parameter. If the second image does not match the size of the first, then the computer will scale it so that their sizes do match.
In the resolution independent drawing universe of Quartz 2D, images are a bit like a racing duck out of water. Getting them to run quickly requires a bit of attention and training.
It’s relatively easy to recognize some of the performance issues that working with images in the Quartz 2D environment will engender. For example, in addition to the geometrical transformations needed to take an image from user space to the device’s coordinate system, images incur the added overhead of resampling and interpolating the pixels of the image on the destination device.
There are other performance impacts of images, however, that may not be as immediately obvious. Working with images also can involve working with large volumes of pixel data. Shuffling around all that data can also have a performance impact on your application. For example, if your image data is very large, drawing it may require the system to page in a lot of virtual memory. Going to the disk to page in memory is a very slow operation.
This section discusses a potpourri of issues that may affect your application when working with Quartz 2D. Our goal is not to solve every performance problem that could arise when working with Quartz 2D and images, however thinking about these issues may help you track down and resolve performance problems within your own application.
It is important to note that regardless of the data provider that offers the pixel data, the image model presented to your application by CGImage requires the pixel data to be immutable for the life of the image. Once you have created a CGImage with its associated data provider, the data provided should be the same every time the computer asks for it.
The immutability of the pixels gives the operating system the freedom to optimize the way it draws your image. For example, if you ask the computer to draw the image repeatedly to the screen, Quartz 2D might hypothetically decide to cache a representation of that image in VRAM. The GPU on the graphics card could reproduce this image from VRAM anywhere on the display very quickly.
If the pixels of the image were not immutable, however, optimizations of this kind would be much more difficult.
It is important to realize that this immutability of the image is your application’s responsibility and may not be enforced by the operating system. If you do create a bitmap context and a CGImage on the same memory buffer and try to draw the CGImage after changing the pixel data, the current version of the operating system may properly draw the modified image to some devices and not draw it properly on others. Moreover, your application might break in future versions of the operating system when Apple changes the behavior of the operating system.
The fact that you must create a new CGImage every time your image data changes is closely related to a performance guideline which recommends that you reuse the same CGImageRef to draw some image data if that data has not changed.
The reasons for reusing a CGImageRef are very similar to the reasons the operating system requires pixel data to be immutable. If you reuse an existing CGImageRef, the operating system has more opportunities to help you optimize the drawing of your images.
Continuing with the hypothetical optimization just mentioned, if the computer caches information about your image (like the VRAM cache mentioned in the previous section), that cached image information will be part of the opaque CGImage object. When you reuse that CGImage object, you give the operating system the opportunity to use that cached information to draw your image more quickly.
When drawing images, interpolation can be a time-consuming operation. You should only use image interpolation when you need high quality rendering. For example, if your application is going to allow the user to drag an image around the screen, and you wish to provide feedback showing the image’s position as it is dragged, you might consider drawing the drag feedback with a low-quality image interpolation setting to maximize the performance of the drag operation. Once the user has dropped the image, you could then redraw the image with a higher quality in its final position.
By the same token down-sampling an image takes some processing time. Consider an application that handles large image but draws thumbnails in a scrolling list. This application will get better performance if it calculates and caches the scaled down thumbnail images than if it tries to repeatedly scale and draw the full-size images.
Quartz 2D carefully incorporates color management as a fundamental feature of the graphics library. Both CGImages and CGContexts have color spaces associated with them. When you draw an image in a context, the color management system in Quartz carefully maps the colors from the image into the color space of the destination context.
This additional color matching step does not come for free. If you plan to draw an image to a particular color space repeatedly, you can improve drawing performance by skipping this color matching step. To do that, you can create a new image from pixel data that has already been corrected to the destination color space.
Note
Speeding up this color management step is another instance where honoring the immutability of pixels and reusing CGImages can give you a performance boost. The computer might be able to cache intermediate results of color matching calculations to speed up subsequent renderings of a CGImage.
For many images, you might be able to use Quartz to create a new image in the destination color space. The following code sample illustrates one strategy for creating a color corrected version of an image. This sample converts an image to the color space of the main display. You might use this code to transform an image that you will draw in a window repeatedly.
Example 8.4. Converting an Image to the Display’s Color Space
CGColorSpaceRef CreateDisplayColorSpace()
{
    CGColorSpaceRef retVal = NULL;
    CMProfileRef systemMonitorProfile = NULL;

    // As the system for the default display profile.
    CMError getProfileErr = CMGetSystemProfile(&systemMonitorProfile);
    if(noErr == getProfileErr) {
            // Create a CGColorSpace from that profile
            retVal = CGColorSpaceCreateWithPlatformColorSpace(
                           systemMonitorProfile);

            // Be sure to close the profile
            CMCloseProfile(systemMonitorProfile);
    } else {
           // If we could not open a profile... we simply return the
           // generic RGB color space.
           retVal = CGColorSpaceCreateWithName(
                          kCGColorSpaceGenericRGB);
    }

    // This is a "Create" routine so the caller is responsible for
    // releasing the result.
    return retVal;
}
void ReleaseTempImageCallback(void *info, const void *data, size_t size)
{
    free(info);
}

CGImageRef CopyImageWithDisplayColorSpace(CGImageRef sourceImage)
{
    const UInt8 bytesPerPixel = 4;

    CGImageRef retVal = NULL;

    size_t width = CGImageGetWidth(sourceImage);
    size_t height = CGImageGetHeight(sourceImage);

    CGColorSpaceRef displayColorSpace = CreateDisplayColorSpace();

    // Allocate a block of memory large enough to hold the
    // color transformed image.
    // We assume the display is an ARGB color space.

    // Calculate rowbytes to be a multiple of 16 bytes
    size_t rowBytes = ((bytesPerPixel * width) + 15) & ~15;
    void *imageBuffer = malloc(rowBytes * height);

    // We create a bitmap graphics context that draws into our block of
    // memory and matches any drawing to the context to the display
    // color space.
    CGContextRef offscreenContext =
            CGBitmapContextCreate(
                   imageBuffer, width, height, 8,
                   rowBytes, displayColorSpace,
                   kCGImageAlphaPremultipliedFirst);

    // Now we can draw the source image into the offscreen
    // context. This allows the computer to color correct the
    // image to the display color space
    CGContextDrawImage(offscreenContext,
           CGRectMake(0, 0, width, height), sourceImage);
    // We're done with the bitmap context.
    CGContextRelease(offscreenContext);
    offscreenContext = NULL;

    // Now we create another image using our color corrected image data.
    CGDataProviderRef imageDataProvider =
           CGDataProviderCreateWithData( imageBuffer, imageBuffer,
                   rowBytes * height, ReleaseTempImageCallback);

    retVal = CGImageCreate(
                   width, height, 8, 32, rowBytes,
                   displayColorSpace, kCGImageAlphaPremultipliedFirst,
                   imageDataProvider, NULL, false,
                   kCGRenderingIntentDefault);

    CGDataProviderRelease(imageDataProvider);
    imageDataProvider = NULL;

    return retVal;
}
Listing 8.4 calls into service a number of Quartz topics not yet covered. In particular, it creates an offscreen graphics context and a CGImage. Creating an image was discussed earlier in this chapter, and creating offscreen contexts is covered in the chapter on offscreen drawing.
The first routine CreateDisplayColorSpace uses a ColorSync routine to retrieve the color profile of the main display. It then creates a color space based on that profile and returns it to the caller. In the unlikely event that the computer cannot retrieve the system profile, then the code uses the generic RGB color space as the destination color space.
The second routine ReleaseTempImageCallback is used by the CGDataProvider used when the image was created. Data providers are discussed later in this chapter. This routine allows the code to release the image data of the new image when the application is done with it.
Much of the work in this code sample is handled by the CopyImageWithDisplayColorSpace. This routine creates a new image based on source image data but color corrected to the display color space. The routine does make the simplifying assumption that the display color space will be an RGB color space. It also assumes the image might have an alpha channel that the code should preserve.
The code begins by extracting attributes of the source image. From those attributes it allocates an image buffer large enough to hold a copy of the image but repurposed as a 32 bit-per-pixel ARGB image. The code creates the context with the display’s color space. The code then draws the image into the offscreen context. This drawing operation induces Quartz to correct the source image into the color space of the context, the display color space. Finally, the code takes the now corrected image data and constructs a new CGImage from it.
The end result of all this work is a CGImage that does not have to be color corrected (again) when drawn to the display. This Quartz 2D-based technique is certainly not the only way to change the color space of the image. You could also use ColorSync to correct your image data prior to creating the original CGImage.
Every time the computer has to draw an alpha composited pixel, it must read the value of the pixel in the destination context, multiply its value by the color of the pixel being composited, and write the results back into the destination. This read-modify-write cycle can take some time. Contrast this with the instance where the pixel being drawn is opaque. The computer can skip the read and modify steps and simply write the opaque pixel to the destination. Needless to say, this can be a significant performance boost and means that, in some cases, you may be able to boost the performance of your application by correctly setting the alpha channel information in your images to exclude alpha if the image has none.
As Mac OS X evolves, the video memory on the graphics card is rapidly becoming a premium resource. When you draw an image to the display the computer will have to transfer some fraction of the image data across the graphics bus to the video card. This ties the performance of the graphics to the speed of the VRAM bus.
For some graphics, the computer may be able to send the drawing commands that create the graphics to the video card faster than it can pass over an image generated by those drawing commands. For example, suppose your application needs to fill a large area of a window with a blue field and place a small icon in the middle of it. If you draw this graphic from a cached CGImage, the computer might have to transfer all the pixels of the image across the bus. If, however, you can draw the blue field using a line art primitive, the computer can issue the drawing commands for the background using a few bytes, and the graphics processor on the video card can quickly fill the rectangle in the frame buffer. Drawing the icon might still require sending data across the bus, but certainly it will not require as much work as transferring the larger image.
Moreover, as the graphics system evolves to rely more heavily on the graphics card memory space in VRAM, it will quickly become crowded. If you are drawing several images, you will be driving the graphics resources of other applications out of VRAM which can have an adverse affect on the behavior of the system as a whole.
These facts should not be taken as a general injunction against drawing images in windows. However, there may be instances in your application where you have used an image in the past, but replacing that code with similar code that does not use images might improve performance.
Most often, this kind of thing comes into play in applications written to pixel-based libraries like QuickDraw. Those applications would often cache graphics in offscreen bitmaps as an optimization technique. The application would then transfer those graphics to the display because the pixel copy operation (from main memory to main memory) was a cheaper operation than reissuing the drawing commands.
If your graphics are relatively simple, say the graphic picture of the scale on a ruler, then you may actually enjoy enhanced performance by removing the “optimization” of caching the graphics in an offscreen bitmap. The computer may be able to draw the scale more quickly using line art primitives given that those primitives cause fewer bytes to be shipped across the video bus and much of the rendering can be handled asynchronously by the GPU.
Perhaps the most important point to make about images and Quartz 2D is that the library does not treat images the same way that traditional graphics libraries do. Moreover, advances in the graphics architecture and other systems on Mac OS X gives the system a very different profile than other graphics environments. For example, the sheer volume of pixel data with many images can lead to problems with the virtual memory system. As a result, some of the techniques you would use to optimize drawing in other graphics libraries can have an adverse effect on the performance of Quartz 2D.
When in doubt, your best bet is to keep your drawing code as simple as possible. When you keep it simple, you make it easier for the operating system to work on your behalf and optimize the graphics pipeline. If you do this and still find your graphics has disappointing performance, carefully apply profiling tools, among others, to determine where your bottlenecks are.
If for no other reason, images are an important part of the Quartz 2D imaging model because they represent the best way to exert pixel-level control over your graphics. For developers making the transition from pixel-based graphics libraries, images may be the key to duplicating functionality that Quartz 2D cannot duplicate in other ways. As you work with images, however, keep in mind that they consume a lot of memory and are inherently resolution dependent. These facts have an impact on both the performance of programs that use images and the quality of the output they generate.