
Chapter 6. Securing the System
Introduction
This chapter includes several hacks that demonstrate some security
mechanisms that aren’t well-documented elsewhere. I’ve also provided
some new twists on old security favorites. Everyone has heard of
sudo, but are you also aware of the
security pitfalls it can introduce? You’re probably also well-versed in
ssh and scp, but you may have yet to harness the
usefulness of scponly.
You’ll also find several scripts to automate some common security practices. Each provides an excellent view into another administrator’s thought processes. Use their examples to fuel your imagination and see what security solutions you can hack for your own network.
Strip the Kernel
Don’t be shy. A kernel stripped down to the bare essentials is a happy kernel.
Picture the typical day in the life of a system administrator. Your mission, if you choose to accept it, is to achieve the impossible. Today, you’re expected to:
Increase the security of a particular server
Attain a noticeable improvement in speed and performance
Although there are many ways to go about this, the most efficient way is to strip down the kernel to its bare-bones essentials. Having this ability gives an administrator of an open source system a distinct advantage over his closed source counterparts.
The first advantage to stripping the kernel is an obvious security boost. A vulnerability can’t affect an option the kernel doesn’t support. The second is a noticeable improvement in speed and performance. Kernels are loaded into memory and must stay in memory. You may be wasting precious memory resources if you’re loading options you have no intention of ever using.
If you’ve never compiled a kernel or changed more than one or two kernel options, I can hear you groaning now. You’re probably thinking, “Anything but that. Kernels are too complicated to understand.” Well, there is a lot of truth in the idea that you haven’t really used an operating system until you’ve gone through that baptism of fire known as kernel compiling. However, you may not have heard that compiling a kernel isn’t all that difficult. So, grab a spare afternoon and a test system; it’s high time to learn how to hack a BSD kernel.
I’ll demonstrate on a FreeBSD system, but you’ll find resources for other systems at the end of this hack.
Before you start, double-check that you have the kernel source installed. On an Intel FreeBSD system, it lives in /usr/src/sys/i386/conf. If that directory doesn’t exist, become the superuser and install it:
# /stand/sysinstall
Configure
Distributions
spacebar [  ] src to select it
spacebar [  ] sys to select it
tab to OK
Next, navigate into that directory structure and check out its contents:
#cd /usr/src/sys/i386/conf#ls./ GENERIC.hints OLDCARD gethints.awk ../ Makefile PAE GENERIC NOTES SMP
Two files are important: the original kernel configuration file, GENERIC, and NOTES. Note that NOTES is instead called LINT on 4.x FreeBSD systems.
Customizing Your Kernel
Customizing a kernel is a very systematic process. Basically, you examine each line in the current configuration file, asking yourself, “Is this applicable to my situation?” If so, keep it. Otherwise, remove it. If you don’t know, read NOTES for that option.
I always customize my kernel in several steps. First, I strip
out what I don’t need. Then, I use buildkernel to test my new configuration
file. If it doesn’t build successfully, I know I’ve inadvertently
removed something essential. Using the error message, I go back and
research that missing line.
If the build succeeds, I read through NOTES to see if there are any options I
wish to add to the kernel. If I add anything, I’ll do another buildkernel, followed by an installkernel if the build is successful. I
find it much easier to troubleshoot if I separate my deletions from my
additions.
Let’s copy over GENERIC and see about stripping it down:
#cp GENERIC STRIPPED#vi STRIPPED# # GENERIC -- Generic kernel configuration file for FreeBSD/i386 # # For more information on this file, please read the handbook section on # Kernel Configuration Files: # # http://www.FreeBSD.org/doc/en_US.ISO8859-1/books/handbook/kernelconfig-config.html # # The handbook is also available locally in /usr/share/doc/handbook # if you've installed the doc distribution, otherwise always see the # FreeBSD World Wide Web server (http://www.FreeBSD.org/) for the # latest information. # # An exhaustive list of options and more detailed explanations of the # device lines is also present in the ../../conf/NOTES and NOTES files. # If you are in doubt as to the purpose or necessity of a line, check first # in NOTES.
CPU options
The first thing you’ll notice is that this file is very well commented. It’s also divided into sections, making it easier to remove things such as ISA NIC, SCSI, and USB support. The first section deals with CPU type:
machine    i386
cpu        I486_CPU
cpu        I586_CPU
cpu        I686_CPU
ident      GENERIC
Whenever you come across a section you’re not sure about, look
for that section in NOTES.
Here, I’ll search for CPU:
# grep CPU NOTESYour output will include a few pages worth of CPU information. The first few lines describe which CPUs belong with the I486, I586, and I686 entries. Once you find your CPU, remove the two entries that don’t apply. If you’re not sure what type of CPU is installed on the system you’re configuring, try:
# grep CPU /var/run/dmesg.boot
CPU: Intel(R) Pentium(R) III CPU         1133MHz (1138.45-MHz 686-class CPU)
acpi_cpu0: <CPU> port 0x530-0x537 on acpi0
Since a Pentium III is considered to be an I686_CPU, I’ll remove the I486_CPU and I586_CPU lines from this system’s
configuration file.
The rest of the output from grep CPU
NOTES contains extra lines that can be added to the
kernel. Read through these to see if any apply to your specific CPU
and the needs of the machine you are configuring. If so, make a note
to try adding these later.
System-specific options
The next section contains a heck of a lot of options. If this is your first kernel, most of your research will be deciding which options you need for your particular system. I find the handbook most helpful here, as it lists the pros and cons of nearly every option. I always keep these options on all of my systems:
options     SCHED_4BSD       # 4BSD scheduler
options     INET             # InterNETworking
options     FFS              # Berkeley Fast Filesystem
options     COMPAT_FREEBSD4  # Compatible with FreeBSD4
options     COMPAT_43        # Compatible with BSD 4.3 [KEEP THIS!]
Note that that last listed option tells you to keep it. Do keep anything that contains such a comment.
The rest of the options are specific to that system’s needs. For example, does it need to support IPv6? Do you wish to use softupdates or the new MAC framework? Does this system need to be an NFS server or NFS client? Does this system have a CD-ROM attached or any SCSI devices?
Does the system have multiple processors? If so, uncomment the next two lines; otherwise, you can safely remove them:
# To make an SMP kernel, the next two are needed
#options     SMP            # Symmetric MultiProcessor Kernel
#options     APIC_IO        # Symmetric (APIC) I/O
Supported buses and media devices
The next section deals with devices. First, we start with the buses:
device        isa
device        eisa
device        pci
If you grep device NOTES,
you’ll see that you can also add the agp and mca buses if your system requires them. If
your system doesn’t use the isa
or eisa buses, you can remove
those lines.
If you wish to disable floppy support on your server, removing these lines will do it:
# Floppy drives
device        fdc
Next, does your server use IDE or SCSI devices? If it uses IDE, the next section applies:
# ATA and ATAPI devices
device      ata
device      atadisk            # ATA disk drives
device      atapicd            # ATAPI CDROM drives
device      atapifd            # ATAPI floppy drives
device      atapist            # ATAPI tape drives
options     ATA_STATIC_ID      # Static device numbering
Remember, you can remove the CD-ROM, floppy, and tape lines to suit your requirements. However, keep the other lines if you use an IDE hard drive. Conversely, if your system is all SCSI, delete the ATA lines and concentrate on this section:
# SCSI Controllers
device        ahb        # EISA AHA1742 family
device        ahc        # AHA2940 and onboard AIC7xxx devices
<snip>
Keep the entries for the SCSI hardware your system is using, and remove the entries for the other devices. If your system doesn’t have SCSI hardware, you can safely delete the entire SCSI section.
The same logic applies to the following RAID section:
# RAID controllers interfaced to the SCSI subsystem
device        asr        # DPT SmartRAID V, VI and Adaptec SCSI RAID
device        ciss       # Compaq Smart RAID 5*
device        dpt        # DPT Smartcache III, IV - See NOTES for options!
device        iir        # Intel Integrated RAID
device        mly        # Mylex AcceleRAID/eXtremeRAID
and for the SCSI peripherals and RAID controllers sections:
# SCSI peripherals
device        scbus     # SCSI bus (required)
device        ch        # SCSI media changers
<snip>

# RAID controllers
device        aac        # Adaptec FSA RAID
device        aacp       # SCSI passthrough for aac (requires CAM)
<snip>
Peripheral support and power management
The next few entries are usually keepers as it’s always nice to have a working keyboard, unless you’re using a headless system [Hack #26] .
# atkbdc0 controls both the keyboard and the PS/2 mouse
device        atkbdc       # AT keyboard controller
device        atkbd        # AT keyboard
The next line depends on whether you’re using a serial or a PS/2 mouse:
device psm # PS/2 mouse
You’ll probably want to keep your video driver:
device vga # VGA video card driver
However, you’ll probably remove the splash device, unless you plan on configuring a splash screen [Hack #24] .
device splash # Splash screen and screen saver support
You’ll have to choose a console driver. It can be either the
default SCO driver or the pcvt
driver (see the handbook for details):
# syscons is the default console driver, resembling an SCO console
device       sc
# Enable this for the pcvt (VT220 compatible) console driver
#device      vt
#options     XSERVER           # support for X server on a vt console
#options     FAT_CURSOR        # start with block cursor
The next options refer to power management on laptops, as well as laptop PCMCIA cards. Unless your server is a laptop, you can remove these:
# Power management support (see NOTES for more options)
#device       apm
# Add suspend/resume support for the i8254.
device        pmtimer

# PCCARD (PCMCIA) support
# Pcmcia and cardbus bridge support
device        cbb            # cardbus (yenta) bridge
#device       pcic           # ExCA ISA and PCI bridges
device        pccard         # PC Card (16-bit) bus
device        cardbus        # CardBus (32-bit) bus
Do you plan on using your serial and parallel ports? If not, the next section allows you to disable them:
# Serial (COM) ports
device        sio        # 8250, 16[45]50 based serial ports

# Parallel port
device        ppc
device        ppbus      # Parallel port bus (required)
device        lpt        # Printer
device        plip       # TCP/IP over parallel
device        ppi        # Parallel port interface device
#device       vpo        # Requires scbus and da
Interface support
Now it’s time to support your system’s NICs. Here’s one way to find out the device names of your interfaces:
# grep Ethernet /var/run/dmesg.boot
rl0: Ethernet address: 00:05:5d:d2:19:b7
rl1: Ethernet address: 00:05:5d:d1:ff:9d
ed0: <NE2000 PCI Ethernet (RealTek 8029)> port 0x9800-0x981f irq 10 at device 11.0 on pci0
Once you know which interfaces are in your system, remove the NICs that aren’t. If your system doesn’t contain any ISA or wireless NICs, you can safely remove those entire sections.
Do make note of this comment, though:
# PCI Ethernet NICs that use the common MII bus controller code.
# NOTE: Be sure to keep the 'device miibus' line in order to use these NICs!
device        miibus    # MII bus support
device        dc        # DEC/Intel 21143 and various workalikes
<snip>
Any NICs underneath that comment require that miibus entry. If you forget it, your kernel won’t build.
Fortunately, the error message will have the word miibus in it.
Next come the pseudodevices. If you plan on using encryption, keep
the random device. You’ll
probably also need to keep the loop and ether devices.
If you use an analog modem to connect to your service
provider, keep the ppp and
tun devices. Otherwise, remove
them, along with the slip
device.
Several applications—including emacs, xterm, script, and the notorious telnet—require the pty device. Depending upon the use of your
server, you may be able to remove that device. If it breaks needed
functionality, you can always recompile it back into your
kernel.
Are you planning on using memory disks? If not, you can remove
md. If you’re not sure, try
reading man mdmfs.
If you previously removed IPv6 support with options INET6, you might as well remove
these two devices as well:
device        gif        # IPv6 and IPv4 tunneling
device        faith      # IPv6-to-IPv4 relaying (translation)
The next device has some security implications, as it is
required in order to run a packet sniffer such as tcpdump. However, it’s also required if
your system is a DHCP client. If neither applies, remove the
bpf device:
# The `bpf' device enables the Berkeley Packet Filter.
# Be aware of the administrative consequences of enabling this!
device        bpf        # Berkeley packet filter
USB support
Does your system have any USB devices? If so, you need a
host controller as well as USB bus support. First, determine which
type of USB host controller you have. man
uhci and man ohci
describe which hardware goes with which controller. Once you’ve
found your hardware, keep the appropriate interface entry:
# USB support
device        uhci        # UHCI PCI->USB interface
device        ohci        # OHCI PCI->USB interface
Also, don’t forget to keep that USB bus line:
device usb # USB Bus (required)
Are you confused about the next three USB options?
Fortunately, each has a manpage. Try man
udbp, man ugen, and
man uhid to see if any apply to
your particular situation.
#device       udbp        # USB Double Bulk Pipe devices
device        ugen        # Generic
device        uhid        # "Human Interface Devices"
Next, keep the devices you have installed and remove the rest.
Again, note that USB NICs need that miibus entry we saw earlier. Also, some
entries require device scbus and
device da. Double-check your
SCSI sections. If you removed these devices earlier
and need them, add them to this section.
device        ukbd        # Keyboard
device        ulpt        # Printer
device        umass       # Disks/Mass storage - Requires scbus and da
device        ums         # Mouse
device        urio        # Diamond Rio 500 MP3 player
device        uscanner    # Scanners
# USB Ethernet, requires mii
device        aue        # ADMtek USB ethernet
device        axe        # ASIX Electronics USB ethernet
device        cue        # CATC USB ethernet
device        kue        # Kawasaki LSI USB ethernet
Finally, the only option group left is Firewire support. If you need it, keep the entire
section, and double-check that you have a device scbus and device da entry somewhere in your
configuration file. If you don’t need Firewire support, remove the
entire section:
# FireWire support
device        firewire   # FireWire bus code
device        sbp        # SCSI over FireWire (Requires scbus and da)
device        fwe        # Ethernet over FireWire (non-standard!)
Whew. We finally made it through the configuration file. Congratulations! You now have a much better idea of the hardware on your system and can rest easily in the knowledge that soon no extra drivers will be wasting memory resources. Not only that, your next kernel configuration will go much more quickly as you’ve already researched the possibilities.
Building the New Kernel
Now comes the moment of truth. Will the configuration file actually build? To find out:
#cd /usr/src#make buildkernel KERNCONF=STRIPPED
Replace STRIPPED with whatever name
you called your kernel configuration file. If all goes well, you
should just get your prompt back after a period of time, which varies
depending upon the speed of your CPU. If you instead get an error
message, you probably forgot miibus, scbus, or da, and the message will reflect that. Add
the missing line and try again.
Occasionally you’ll get a kernel that just refuses to build,
even when you’re sure the configuration file is fine. If that’s the
case, try building GENERIC. If that
fails, you have a hardware issue.
I once inherited a system with a flaky motherboard. I tried a
few kernel compiles, which took forever before finally resulting in an
error code 1. Fortunately, I use
removable drives, so I simply inserted the drive into another system,
successfully compiled the kernel, and then returned the drive to the
flaky system for the actual kernel install.
Keeping Track of Your Options
Once I have a successful build, I like to document what I removed from the original kernel. This is easily done:
#echo "These are the lines I deleted" > changes.txt& diff GENERIC STRIPPED >> changes.txt
The diff utility will list
the differences between the original and my version of the kernel
configuration file. Note that I used >> to append those differences without
removing my previously echoed
comment. See [Hack #92] for more examples that use
diff.
Before installing the kernel, read through NOTES to see if there are any lines you wish to add. Additionally, if you wish to take advantage of memory addresses over 4 GB, carefully read through PAE and its section in the handbook to see if it is appropriate for your situation.
If you add any lines, repeat the make
buildkernel command when you are finished. I also like to
append my additions to my changes.txt file:
#echo "And these are the lines I added" >> changes.txt& diff GENERIC STRIPPED >> changes.txt
Note that this time it is very important I remember to append
both my comment and the output of diff by using two > characters.
Installing the New Kernel
Now, let’s install the kernel:
#cd /usr/src#make installkernel KERNCONF=STRIPPED
This process is much quicker than building the kernel. However, the kernel won’t actually be loaded into memory until you reboot. Before you do that, it’s always a good idea to print out the “If Something Goes Wrong” page of the FreeBSD Handbook, just in case something goes wrong. See http://www.freebsd.org/doc/en_US.ISO8859-1/books/handbook/kernelconfig-trouble.html#KERNELCONFIG-NOBOOT.
It’s rare that a kernel will install but not boot, but it never hurts to be prepared ahead of time.
See Also
The Kernel Configuration section of the FreeBSD Handbook (http://www.freebsd.org/doc/en_US.ISO8859-1/books/handbook/kernelconfig.html)
The “Why would I want to create my own custom kernel?” section of the OpenBSD FAQ (http://www.openbsd.org/faq/faq5.html#Why)
The NetBSD Kernel FAQ (http://www.netbsd.org/Documentation/kernel)
FreeBSD Access Control Lists
Unix permissions are flexible and can solve almost any access control problem, but what about the ones they can’t?
Do you really want to make a group every time you want to
share a file with another user? What if you don’t have root access and
can’t create a group at will? What if you want to be able to make a
directory available to a web server or other user without making the
files world-readable or -writable? Root-owned configuration files often
need to be edited by those without root privileges; instead of using a
program like sudo (see [Hack #61] and [Hack
#62] ), it would be better just to allow certain
nonowners to edit these files.
Access Control Lists (ACLs) solve these problems. They allow more flexibility than the standard Unix user/group/other set of permissions. ACLs have been available in commercial Unixes such as IRIX and Solaris, as well as Windows NT, for years. Now, thanks to the TrustedBSD project’s work, ACLs are available in FreeBSD 5.0-RELEASE and beyond.
ACLs take care of access control problems that are overly complicated or impossible to solve with the normal Unix permissions system. By avoiding the creation of groups and overuse of root privileges, ACLs can keep administrators saner and servers more secure.
Enabling ACLs
ACLs are enabled by an option in the file system superblock, which contains internal housekeeping information for the file system.
Edit the superblock with the tunefs command,
which can be used only on a read-only or unmounted file system. This
means that you must first bring the system into single-user mode. Make
sure there aren’t any active connections to the system, then shut it
down:
# shutdown now

*** FINAL System shutdown message from [email protected] ***
System going down IMMEDIATELY

Dec 11 10:28:07 genisis shutdown: shutdown by root:
System shutdown time has arrived
Writing entropy file:.
Shutting down daemon processes:.
Saving firewall state tables:.
Dec 11 10:28:10 genisis syslogd: exiting on signal 15
Enter full pathname of shell or RETURN for /bin/sh:
#
At the prompt, type:
#/sbin/tunefs -a enable /#/sbin/tunefs -a enable /usr#exit
If you use the UFS2 file system, you are done. The UFS_ACL option is enabled in the default
GENERIC kernel, so reboot and enjoy. If you use UFS1, though, don’t
reboot yet.
Additional UFS1 Configuration
Things are more difficult if you, like most FreeBSD 5.0 users,
use UFS1. (FreeBSD 5.1 and later come with UFS2 as the default file
system.) ACLs are built on top of extended attributes, which are not native to UFS1. To
enable extended attributes, you must add options UFS_EXTATTR and options UFS_EXTATTR_AUTOSTART to your kernel
configuration and compile and install the new kernel [Hack
#54] . Don’t reboot yet; you still need to
initialize the extended attributes on each file system.
For example, to initialize extended attributes on the /var filesystem, use extattrctl, the
extended attributes control command:
#mkdir -p /var/.attribute/system#cd /var/.attribute/system#extattrctl initattr -p /var 388 posix1e.acl_access#extattrctl initattr -p /var 388 posix1e.acl_default
Repeat for each filesystem on which you wish to enable ACL
support. Just replace /var with
the mount point of the desired file system. After initializing the
attributes with reboot, the
extended attributes should be enabled.
Viewing ACLs
Okay, you’ve successfully enabled ACLs. Now what? Let’s start
by viewing ACLs. Looking at ACLs is simple. Files with ACLs will be
designated with a + in the long
listing provided by ls -l:
% ls -l acl-test
-rw-rw-r--+ 1 rob  rob  0 Apr 19 17:27 acl-test
Use the getfacl command to
see information about the ACL:
% getfacl acl-test
#file:acl-test
#owner:1000
#group:1000
user::rw-
user:nobody:rw-
group::r--
group:wheel:rw-
mask::rw-
other::r--
The user::, group::, and other:: fields should all be familiar. They
are simply the ACL representations of the standard Unix permissions system. The nobody and wheel lines, however, are new. These specify
permissions for specific users and groups (in this case, the nobody user and the wheel group) in addition to the normal set
of permissions.
The mask field sets maximum
permissions, so an r-- mask (set
with m::r) in combination with an
rw- permission for a user will give
the user only r-- permissions on
the file.
Adding and Subtracting ACLs
The setfacl command adds, changes, and deletes ACLs. Like chmod, only the file’s owner or the
superuser can use this command. You only need to use a few of its
options to start manipulating ACLs.
First, a word on syntax. ACLs are specified just as they’re
printed by getfacl. Let’s remove
and reconstruct the ACL for acl-test:
%setfacl -b acl-test%setfacl -m user:nobody:rw-,group:wheel:rw- acl-test
The -b option removes all
ACLs, except for the standard user, group, and other lines. The
-m option modifies the ACL with the
specified entry (or comma-separated entries). Entries may also be
abbreviated: the code here could have been shortened to u:nobody:rw-,g:wheel:rw-.
You can even use setfacl to
modify traditional permissions; setting a user::rw- ACL entry is equivalent to running
chmod u=rw on a file.
Removing ACLs is almost identical: setfacl -x u:nobody:rw-,g:wheel:rw- removes
that ACL. You can also specify ACLs in files. The -M and -X
options perform the functions of their lowercase relatives, but read
their entries from a file. Consider the acl-test file again:
%cat test-acl-listu:nobody:rw- # this is a comment g:wheel:rw- %setfacl -X test-acl-list acl-test%getfacl acl-test#file:acl-test #owner:1000 #group:1000 user::rw- group::r-- mask::r-- other::r--
Using ACLs with Samba and Windows
If you compile Samba with ACL support, you can edit ACLs on files shared by Samba with the native Windows ACL tools. Simply compile (or recompile) Samba with ACL support:
#cd /usr/ports/net/samba#make -DWITH_ACL_SUPPORT install clean
You will see the Samba port configuration dialog with ACL support enabled, as shown in Figure 6-1.

Once you have Samba up and running, browse to a share on an ACL-enabled file system. Right-click any file and select Properties, and you’ll see something like Figure 6-2. Go to the Security tab, and you can see and change the ACL as though it were on a Windows server.
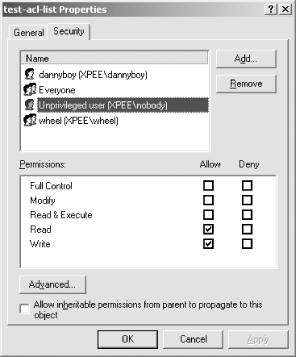
If you’ve been reluctant to move from a Windows server to Samba because of its lack of ACLs, you can start thinking seriously about deploying Samba and FreeBSD on your file servers.
Setting Default ACLs
Let’s consider a more advanced example. You want to make your cool_widgets directory accessible to Bob, your partner in coolness, but not to the world. If you just add an ACL entry, added files won’t automatically pick up the directory’s ACL. You should instead set a default ACL on the directory. Any files created in the directory will inherit the default ACL.
Passing the -d option to
either getfacl or setfacl will
operate on the default ACL of a directory, instead of on the directory
itself:
%mkdir cool_widgets%chmod o-rwx cool_widgets%ls -ldrwxr-x--- 2 rob rob 512 Apr 19 21:21 cool_widgets %getfacl -d cool_widgets#file:cool_widgets #owner:1000 #group:1000
Pretty boring, isn’t it? Let’s try to add a default ACL:
% setfacl -d -m u:bob:rw- cool_widgets
setfacl: acl_calc_mask( ) failed: Invalid argument
setfacl: failed to set ACL mask on cool_widgets
Oops. Default ACLs don’t work quite like regular ACLs do. You
cannot set specific entries on a default ACL until you add the generic
user::, group::, and other:: entries:
%setfacl -d -m u::rw-,g::r--,o::---,u:bob:rw- cool_widgets%setfacl -m u:bob:r-x cool_widgets
Note the nondefault r-x entry
for bob on the directory. The
default ACL affects files that will be created inside the directory
but not the directory itself. An ACL entry
u:bob:rw- will now be added to any
file created in cool_widgets.
Now you have a cool_widgets
directory whose files can be read and written by both yourself and
Bob, without the use of a group. If you later decide to get rid of the
default ACL, the -k option to
setfacl works for directory ACLs
just as the -b option does for file
ACLs.
See Also
man tunefsman extattrctlman getfaclman setfacl“FreeBSD Access Control Lists,” as originally published on ONLamp’s BSD DevCenter (http://www.onlamp.com/pub/a/bsd/2003/08/14/freebsd_acls.html)
The TrustedBSD project (http://www.trustedbsd.org/)
Protect Files with Flags
Ever feel limited when tightening up Unix
permissions? Really, there’s only so much you can do with r, w,
x, s, and t
.
When you consider the abilities of the superuser account, traditional Unix permissions become moot. That’s not very comforting if you’re a regular user wishing to protect your own files or an administrator trying to protect the files on a network server from a rootkit.
Fortunately, the BSDs support a set of extended permissions known as flags. Depending upon your securelevel, these flags may prevent even the superuser from changing the affected file and its flags.
Preventing File Changes
Let’s start by seeing what flags are available. Figure 6-1 summarizes the flags, their meanings, and their usual usage.
Flag name | Meaning | Usage |
archive | Forces or prevents a backup | |
nodump | Excludes files from a dump | |
system append | Applies to logs | |
system immutable | Applies to binaries and /etc | |
system undeletable | Applies to binaries and /etc | |
user append-only | Prevents changes to existing data | |
user immutable | Prevents any type of changes | |
user undeletable | Prevents deletion or rename |
Any user can use any flag that starts with u to protect her own files. Let’s say you
have an important file that you don’t want to change inadvertently.
That’s a candidate for the uchg
flag. To turn that flag on, use the chflags (change
flags) command:
%chflags uchg important_file%ls -lo important_file-rw-r--r-- 1 dru wheel uchg 14 Dec 1 11:13 important_file
Use ls -lo to view a file’s
flags. (I tend to think o was the
only letter left. Perhaps a mnemonic would be “Hello,
this is why I can’t modify that file!” Perhaps
not.) Let’s see exactly how immutable this file is now. I’ll start by
opening the file in vi, adding a
line, and trying to save my changes:
Read-only file, not written; use ! to override.
Okay, I’ll use wq!
instead:
Error: important_file: Operation not permitted.
Looks like I can no longer make changes to my own file. I’ll receive the same results even if I try as the superuser.
Next, I’ll try to use echo to
add some lines to that file:
% echo "test string" >> important_file
important_file: Operation not permitted.
Finally, I’ll try moving, deleting, and copying that file:
%mv important_file testmv: rename important_file to test: Operation not permitted %rm important_fileoverride rw-r--r-- dru/wheel uchg for important_file?yrm: important_file: Operation not permitted %cp important_file test%
Notice an important difference between the mv and rm
commands and the cp
command. Since mv and rm require a change to the original file
itself, they are prevented by that unchangeable flag. However, the
cp command doesn’t try to change
the original file; it simply creates a new file with the same
contents. However, if you try ls
-lo on that new file, the uchg flag will not be
set. This is because new files inherit permissions and flags from the
parent directory. (Okay, that’s not the whole story. See man umask for more gory details.)
Watch Your Directories
What do you think will happen if you place all of your
important files in a directory and recursively set uchg on that directory?
%mkdir important_stuff%cp resume important_stuff/%chflags -R important_stuff/%ls -lo important_stuff/drwxr-xr-x 2 dru wheel uchg 512 Dec 1 11:23 ./ drwxr-xr-x 34 dru wheel - 3072 Dec 1 11:36 ../ -rw-r--r-- 1 dru wheel uchg 14 Dec 1 11:13 resume
So far so good. That file inherited the uchg flag from the directory, so it is now
protected from changes. What if I try to add a new file to that
directory?
% cp coverletter important_stuff
cp: important_stuff/coverletter: Operation not permitted
Because the directory itself is not allowed to change, I can’t add or remove any files from the directory. If that’s what you want, great. If not, keep that in mind when playing with directory flags.
What if you change your mind and really do want to change a
file? If you own the file, you can unset the flag by repeating the chflags command with the no word. For example:
% chflags nouchg resumewill allow me to make edits to my résumé. However, I won’t be
able to delete it from that protected directory unless I also use the
nouchg flag on the important_stuff directory.
Preventing Some Changes and Allowing Others
Sometimes, the uchg flag is a bit too drastic. For example,
if you want to be able to edit a file but not inadvertently delete
that file, use this flag instead:
% chflags uunlnk thesis
%
I can now edit that file to my heart’s content. However, if I
try to move or delete that file, I’ll receive those Operation not permitted error messages
again.
The uappnd flag is more interesting. It allows you to append
changes to a file but prevents you from modifying the existing
contents. This might be useful for a blog:
% chflags uappnd myblog
%
Then again, it might not. echoing comments to the end of the file
works nicely. However, opening it in an editor does not. Note that
this flag also prevents you from moving or deleting the file.
Log Protection
Let’s move on to the rest of the flags, which can be managed
only by the superuser. sappnd,
schg, and sunlnk work exactly the same as their u equivalents. So, think s for superuser and u for user.
The append flag was a bit weird for a regular user, but it is ideal for protecting the system logs. One of the first things an intruder will do after breaking into a system is to cover up his tracks by changing or deleting logs. This command will thwart those attempts:
# chflags -R sappnd /var/logNow is a good time to mention a security truth: security is a myth. In reality, security is a process of making things more inconvenient in the hopes that a miscreant will go elsewhere. Remember, though, that inconvenience doesn’t just affect the bad guys; it also affects you.
That command seems ideal because it allows logs to be appended
to but not modified or deleted. That’s great if you live in the world
of unlimited disk space. Of course, it also just broke newsyslog, and you’ve just delegated
yourself the joys of manual log rotation.
There’s one other thing you need to consider when you start
playing with the superuser flags. If your securelevel is set to 0 or -1, the superuser can unset
any flag by adding no to it. If
your attacker has heard of flags before and has managed to gain access
to the superuser account, all of your flag setting was for naught.
Having said that, suppose you’re hardening a server and want to
protect the logs. Your securelevel is set at 1 or higher, and you plan
on using that previous chflags
command. Since you’re now responsible for log rotation, you might as
well start by taking stock of the contents of /var/log before turning on that sappnd flag. Remove any unnecessary logs
now, before setting the flag.
Next, edit /etc/crontab and
comment the newsyslog
line so it looks like this:
# Rotate log files every hour, if necessary.
#0        *        *        *        *        root        newsyslog
Comment out any lines in /etc/syslog.conf that refer to logs you removed.
You should also consider using something like the following script to warn you if a partition is filling up:
#!usr/local/bin/bash
# checkfreespace.sh
# check that a device has sufficient free space
# thanks to David Lents and Arnold Robbins for awk/gawk/nawk suggestions

# set the following variables as necessary
PARTITION="/var/log"
THRESHOLD="80"

USED=$(
    eval "df | awk -- '$6 =  = ENVIRON["PARTITION"]
        { printf( "%0.d", $5 ) }'"
);

if [ "$USED" -ge $THRESHOLD ]
then
  echo "Used space of $USED above $THRESHOLD on $PARTITION"
else
  # disable this if running through cron
  echo "Enough free space"
fi
If you schedule this program through cron, it will mail any output to the user
owning the cron job. Edit the two
variables at the top of the script to change the partition to scan and
the threshold above which the script will warn. With the variables set
as shown, the script will warn if /var/log is more than 80% full.
Remember, once you disable newsyslog, it becomes your responsibility to
monitor disk space in /var/log.
You won’t be able to compress or delete log files unless the superuser
temporarily unsets the sappnd flag.
This can be a real pain if your securelevel is 1 or higher, as the
system first has to be dropped down to single-user mode. This usually
isn’t an option on busy systems as it will disconnect all current
connections. Carefully consider the size of /var/log and how often the system
realistically can be put into single-user mode before setting this
flag.
Protecting Binaries
When a system is compromised, the attacker may install a
rootkit that will try to change your system’s binaries. For example,
it might replace ps with a version
that doesn’t display the rootkit’s processes. Or, it might replace a
commonly used utility with another program that executes something
nastier than expected.
[Hack
#58] shows how to create your own file integrity
checking program that will alert you if any of your binaries or other
important files are changed. An additional layer of protection is to
use chflags to prevent those files
from being changed in the first place. Usually, the schg flag is used to prevent any modifications. Useful
candidates for this flag are:
/usr/bin, which contains user programs
/usr/sbin, which contains system programs
/etc, which contains system configurations
Again, evaluate your particular scenario before implementing
this flag. The protection provided by this flag usually far outweighs
the inconvenience. The only time the contents of /usr/bin or /usr/sbin should change is when you upgrade
the operating system or rebuild your world. Doing that requires a
reboot anyway, so dropping to single-user mode to unset schg shouldn’t be a problem.
How often do you change your configuration files in /etc? If you typically configure a system
only when it is installed and rarely make changes afterward, protect
your configurations with schg.
However, keep in mind that a rare configuration change may require you
to drop all connections in order to implement it. Also, if you need to
add more users to your system, remember to remove that flag from
/etc/passwd, /etc/master.passwd, and /etc/group first.
Things are a bit more problematic for a system running installed
applications. Most ports install their binaries into /usr/local/bin or /usr/X11R6/bin. If you set the schg flag on those directories, you won’t be
able to patch or upgrade those binaries unless you temporarily unset
the flag. You’ll have to balance your need to keep your server up and
running with the protection you gain from the schg flag and how often you have to patch a
particular binary.
Controlling Backups
The last two flags, arch and
nodump, affect backups. The
superuser can ensure a particular file or directory will
always be backed up, regardless of whether the contents have been
altered, by setting the arch
flag.
Similarly, when using dump to
back up an entire filesystem, the superuser can specify which portions
of that filesystem will not be included by
setting the nodump flag.
Tighten Security with Mandatory Access Control
Increase the security of your systems with MAC paranoia.
Ever feel like your Unix systems are leaking out extra unsolicited information? For example, even a regular user can find out who is logged into a system and what they’re currently doing. It’s also an easy matter to find out what processes are running on a system.
For the security-minded, this may be too much information in the hands of an attacker. Fortunately, thanks to the TrustedBSD project, there are more tools available in the admin’s arsenal. One of them is the Mandatory Access Control (MAC) framework.
Tip
As of this writing, FreeBSD’s MAC is still considered experimental for production systems. Thoroughly test your changes before implementing them on production servers.
Preparing the System
Before you can implement Mandatory Access Control, your kernel must support it. Add the following line to your kernel configuration file:
options MAC
You can find full instructions for compiling a kernel in [Hack #54] .
While your kernel is recompiling, take the time to read man 4 mac, which lists the available MAC
modules. Some of the current modules support simple
policies that can control an aspect of a system’s behavior, whereas
others provide more complex policies that can affect every aspect of
system operation. This hack demonstrates simple policies designed to
address a single problem.
Seeing Other Users
One problem with open source Unix systems is that there are very
few secrets. For example, any user can run ps
-aux to see every running process or run sockstat -4 or
netstat -an to view all connections
or open sockets on a system.
The MAC_SEEOTHERUIDS
module addresses this. You can load this kernel module
manually to experiment with its features:
# kldload mac_seeotheruids
Security policy loaded: TrustedBSD MAC/seeotheruids (mac_seeotheruids)If you’d like this module to load at boot time, add this to /boot/loader.conf:
mac_seeotheruids_load="YES"
If you need to unload the module, simply type:
# kldunload mac_seeotheruids
Security policy unload: TrustedBSD MAC/seeotheruids (mac_seeotheruids)When testing this module on your systems, compare the before and after results of these commands, run as both a regular user and the superuser:
ps -auxnetstat -ansockstat -4w
Your before results should show processes and sockets owned by
other users, whereas the after results should show only those owned by
the user. While the output from w
will still show which users are on which terminals, it will not
display what other users are currently doing.
By default, this module affects even the superuser. In order to
change that, it’s useful to know which sysctl MIBs control this module’s behavior:
# sysctl -a | grep seeotheruids
security.mac.seeotheruids.enabled: 1
security.mac.seeotheruids.primarygroup_enabled: 0
security.mac.seeotheruids.specificgid_enabled: 0
security.mac.seeotheruids.specificgid: 0
Tip
sysctl is used to modify
kernel behavior without having to recompile the kernel or reboot the
system. The behaviors that can be modified are known as
MIBs.
See how there are two MIBs dealing with specificgid? The enabled one is off, and the
other one specifies the numeric group ID that would be exempt if it
were on. So, if you do this:
# sysctl -w security.mac.seeotheruids.specificgid_enabled=1
security.mac.seeotheruids.specificgid_enabled: 0 -> 1
you will exempt group 0 from this policy. In FreeBSD, the
wheel group has a GID of 0, so
users in the wheel group will see
all processes and sockets.
You can also set that primarygroup_enabled MIB to 1 to allow users
who share the same group ID to see each other’s processes and
sockets.
Note that while you can change these MIBs from the command line, you will be able to see them only with the appropriate kernel module loaded.
Quickly Disable All Interfaces
ifconfig allows you to enable and disable individual interfaces as required. For example, to stop traffic on
ed0:
# ifconfig ed0 downTo bring the interface back up, simply repeat that command,
replacing the word down with
up.
However, ifconfig does not
provide a convenient method for stopping or restarting traffic flow on
all of a system’s interfaces. That ability can be quite convenient for
testing purposes or to quickly remove a system from a network that is
under attack. The MAC_IFOFF module is
a better tool for this purpose. Let’s load this module and see how it
affects the system:
#kldload mac_ifoffSecurity policy loaded: TrustedBSD MAC/ifoff (mac_ifoff) #sysctl -a | grep ifoffsecurity.mac.ifoff.enabled: 1 security.mac.ifoff.lo_enabled: 1 security.mac.ifoff.other_enabled: 0 security.mac.ifoff.bpfrecv_enabled: 0
By default, this module disables all interfaces, except the
loopback lo device. When it’s safe
to reenable those interfaces, you can either unload the module:
# kldunload mac_ifoff
Security policy unload: TrustedBSD MAC/ifoff (mac_ifoff)
or leave the module loaded and enable the interfaces:
# sysctl -w security.mac.ifoff.other_enabled=1
security.mac.ifoff.other_enabled: 0 -> 1
Perhaps you have a system whose interfaces you’d like to disable at bootup until you explicitly enable them. If that’s the case, add this line to /boot/loader.conf:
mac_ifoff_load="YES"
See Also
man 4 macman mac_seeotheruidsman mac_ifoffman sysctlThe TrustedBSD project (http://www.trustedbsd.org/)
The
sysctlsection of the FreeBSD Handbook (http://www.freebsd.org/doc/en_US.ISO8859-1/books/handbook/configtuning-sysctl.html)The MAC section of the FreeBSD Handbook (http://www.freebsd.org/doc/en_US.ISO8859-1/books/handbook/mac.html)
Use mtree as a Built-in Tripwire
Why configure a third-party file integrity checker when you already have mtree?
If you care about the security of your server, you need
file integrity checking. Without it, you may never know if
the system has been compromised by a rootkit or an active intruder. You
may never know if your logs have been modified and your ls and ps
utilities replaced by Trojaned equivalents.
Sure, you can download or purchase a utility such as tripwire, but you already have the mtree
utility; why not use it to hack your own customized file integrity
utility?
mtree lists all of the files
and their properties within a specified directory structure. That
resulting list is known as a specification. Once
you have a specification, you can ask mtree to compare it to an existing directory
structure, and mtree will report any
differences. Doesn’t that sound like a file integrity checking utility
to you?
Creating the Integrity Database
Let’s see what happens if we run mtree against /usr/bin:
#cd /usr/bin#mtree -c -K cksum,md5digest,sha1digest,ripemd160digest -s 123456789> /tmp/mtree_binmtree: /usr/bin checksum: 2126659563
Let’s pick apart that syntax in Figure 6-2.
Command | Explanation |
| This creates a specification of the current working directory. |
| This specifies a keyword. In our case, it’s
|
| Here, I’ve specified the three cryptographic
checksums understood by |
| This gives the numeric seed that is used to create the specification’s checksum. Remember that seed to verify the specification. |
> | This redirects the results to the file /tmp/mtree_bin instead of stdout. |
If you run that command, it will perk along for a second or two, then write the value of the checksum to your screen just before giving your prompt back. That’s it; you’ve just created a file integrity database.
Before we take a look at that database, take a moment to record the seed you used and the checksum you received. Note that the more complex the seed, the harder it is to crack the checksum. Those two numbers are important, so you may consider writing them on a small piece of paper and storing them in your wallet. (Don’t forget to include a hint to remind you why you have that piece of paper in your wallet!)
Now let’s see what type of file we’ve just created:
#file /tmp/mtree_bin/tmp/mtree_bin: ASCII text #ls -l /tmp/mtree_bin-rw-r--r-- 1 root wheel 111503 Nov 23 11:46 /tmp/mtree_bin
It’s an ASCII text file, meaning you can edit it with an editor
or print it directly. It’s also fairly large, so let’s use head to examine the first bit of this file.
Here I’ll ask for the first 15 lines:
# head -n 15 /tmp/mtree_bin
#           user: dru
#        machine: genisis
#           tree: /usr/bin
#           date: Sun Nov 23 11:46:21 2003

# .
/set type=file uid=0 gid=0 mode=0555 nlink=1 flags=none
.               type=dir mode=0755 nlink=2 size=6656 time=1065005676.0
    CC          nlink=3 size=78972 time=1059422866.0 cksum=1068582540
                md5digest=b9a5c9a92baf9ce975eee954994fca6c
                sha1digest=a2e4fa958491a4c2d22b7f597f05885bbe8f6a6a
                ripemd160digest=33c74b4200c9507b4826e5fc8621cddb9e9aefe2
    Mail        nlink=3 size=72964 time=1059422992.0 cksum=2235502998
                md5digest=44739ae79f3cc89826f6e34a15f13ed7
                sha1digest=a7b89996ffae4980ad87c6e7c56cb207af41c1bd
The specification starts with a nice summary section. In my
example, the user that created the specification was dru. Note that I used the su utility to become the superuser before
creating the specification, but my login shell knew that I was still
logged in as the user dru. The
summary also shows the system name, genisis, the directory structure in
question, /usr/bin, and the time
the specification was created.
The /set type=file line shows
the information mtree records by
default. Notice that it keeps track of each file’s uid, gid, mode,
number of hard links, and flags.
Then, each file and subdirectory in /usr/bin is listed one at a time. Since I
used -K to specify three different
cryptographic hashes, each file has three separate hashes or
digests.
Preparing the Database for Storage
Once you’ve created a specification, the last place you want to leave it is on the hard drive. Instead, sign that file, encrypt it, transfer it to a different medium (such as a floppy), and place it in a secure storage area.
To sign the file:
# md5 /tmp/mtree_bin
MD5 (/tmp/mtree_bin) = e05bab7545f7bdbce13e1bb04a043e47
You may wish to redirect that resulting fingerprint to a file or a printer. Keep it in a safe place, as you’ll need it to check the integrity of the database.
Next, encrypt the file. Remember, right now it is in ASCII text and susceptible to tampering. Here I’ll encrypt the file and send the newly encrypted file to the floppy mounted at /floppy:
# openssl enc -e -bf -in /tmp/mtree_bin -out /floppy/mtree_bin_enc
enter bf-cbc encryption password:
Verifying - enter bf-cbc encryption password:
The syntax of the openssl
command is fairly straightforward. I decided to encrypt
enc -e with the Blowfish -bf algorithm. I then specified the input
file, or the file to be encrypted. I also specified the output file,
or the resulting encrypted file. I was then prompted for a password;
this same password will be required whenever I need to decrypt the
database.
Once I verify that the encrypted file is indeed on the floppy, I must remember to remove the ASCII text version from the hard drive:
# rm /tmp/mtree_binTip
The ultra-paranoid, experienced hacker would zero out that
file before removing it using dd
if=/dev/zero of=/tmp/mtree_bin bs=1024k count=12.
I’ll then store the floppy in a secure place, such as the safe that contains my backup tapes.
Using the Integrity Database
Once you have an integrity database, you’ll want to compare it periodically to the files on your hard drive. Mount the media containing your encrypted database, and then decrypt it:
# openssl enc -d -bf -in /floppy/mtree_bin_enc -out /tmp/mtree_bin
enter bf-cbc encryption password:
Notice that I used basically the same command I used to encrypt
it. I simply replaced the encrypt switch (-e) with the decrypt switch (-d). The encrypted file is now the input,
and the plain text file is now the output. Note that I was prompted
for the same password; if I forget it, the decryption will
fail.
Before using that database, I first want to verify that its
fingerprint hasn’t been tampered with. Again, I simply repeat the
md5 command. If the resulting
fingerprint is the same, the database is unmodified:
# md5 /tmp/mtree_bin
MD5 (/tmp/mtree_bin) = e05bab7545f7bdbce13e1bb04a043e47
Next, I’ll see if any of my files have been tampered with on my hard drive:
#cd /usr/bin#mtree -s 123456789 < /tmp/mtree_binmtree: /usr/bin checksum: 2126659563
If none of the files have changed in /usr/bin, the checksum will be the same. In this case it was. See why it was important to record that seed and checksum?
What happens if a file does change? I haven’t built world on this system in a while, so I suspect I have source files that haven’t made their way into /usr/bin yet. After some poking about, I notice that /usr/src/usr.bin has a bluetooth directory containing the source for a file called btsockstat. I’ll install that binary:
#cd /usr/src/usr.bin/bluetooth/btsockstat#make#make install#ls -F /usr/bin | grep btsockstatbtsockstat*
Now let’s see if mtree
notices that extra file:
#cd /usr/bin#mtree -s 123456789 < /tmp/mtree_bin. changed modification time expected Wed Oct 1 06:54:36 2003 found Sun Nov 23 16:10:32 2003 btsockstat extra mtree: /usr/bin checksum: 417306521
Well, it didn’t fool mtree.
That output is actually quite useful. I know that btsockstat was added as an extra file, and I know the date and time it
was added. Since I added that file myself, it is an easy matter to
resolve. If I hadn’t and needed to investigate, I have a time to
assist me in my research. I could talk to the administrator who was
responsible at that date and time, or I could see if there were any
network connections logged during that time period.
Also note that this addition resulted in a new checksum. Once the changes have been resolved, I should create a new database that represents the current state of /usr/bin. To recap the necessary steps:
Use
mtree -cto create the database.Use
md5to create a fingerprint for the database.Use
opensslto encrypt the database.Move the database to a removable media, and ensure no copies remain on disk.
Deciding on Which Files to Include
When you create your own integrity database, ask yourself, “Which files do I want to be aware of if they change?” The answer is usually your binaries or applications. Here is a list of common binary locations on a FreeBSD system:
/bin
/sbin
/usr/bin
/usr/sbin
/usr/local/bin
/usr/X11R6/bin
/usr/compat/linux/bin
/usr/compat/linux/sbin
The sbin directories are especially important because they contain system binaries. Most ports will install to /usr/local/bin or /usr/X11R6/bin.
The second question to ask yourself is “How often should I check the database?” The answer will depend upon your circumstances. If the machine is a publicly accessible server, you might consider this as part of your daily maintenance plan. If the system’s software tends to change often, you’ll also want to check often, while you can still remember when you installed what software.
See Also
man mtree
Intrusion Detection with Snort, ACID, MySQL, and FreeBSD
How the alert administrator catches the worm.
With the current climate of corporate force reductions and the onslaught of new, fast-spreading viruses and worms, today’s administrators are faced with a daunting challenge. Not only is the administrator required to fix problems and keep things running smoothly, but in some cases he is also responsible for keeping the network from becoming worm food. This often entails monitoring the traffic going to and from the network, identifying infected nodes, and loading numerous vendor patches to fix associated vulnerabilities.
To get a better handle on things, you can deploy an Intrusion Detection System (IDS) on the LAN to alert you to the existence of all the nastiness associated with the dark side of the computing world.
This hack will show you how to implement a very effective and stable IDS using FreeBSD, MySQL, Snort, and the Analysis Console for Intrusion Databases (ACID). While that means installing and configuring a few applications, you’ll end up with a feature-rich, searchable IDS capable of generating custom alerts and displaying information in many customizable formats.
Installing the Software
We’ll assume that you already have FreeBSD 4.8-RELEASE or newer installed with plenty of disk space. The system is also fully patched and the ports collection is up-to-date. It also helps to be familiar with FreeBSD and MySQL commands.
Install PHP4, Apache, and MySQL
We’ll start by installing PHP4, Apache, and the MySQL client. As the superuser:
#cd /usr/ports/www/mod_php4#make install clean
When the PHP configuration
options screen appears, choose the GD Library Support option. Leave the other default
selections, and choose OK.
The build itself will take a while because it must install Apache and the MySQL client in addition to PHP.
Install MySQL-server
You’ll also need the MySQL server, which is a separate port. To ensure this
port installs correctly, temporarily set the system hostname to
localhost:
#hostname localhost#cd /usr/ports/databases/mysql40-server#make install clean
This one will also take a while.
More installations
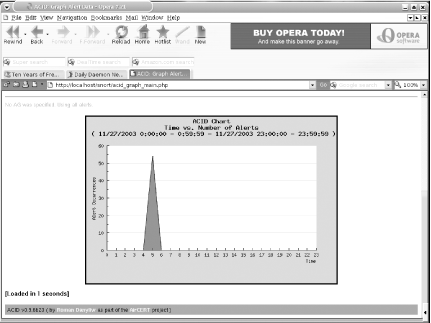
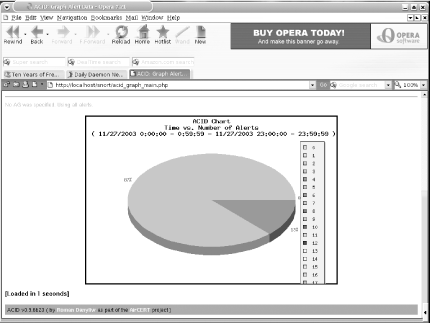
There are a few other ports to install. The next three applications are used by ACID to create graphs of the output. ACID supports bar graphs (as shown in Figure 6-3), line graphs (Figure 6-4), and pie charts (Figure 6-5).
We’ll need adodb , a database library for PHP:
#cd /usr/ports/databases/adodb#make install clean
PHPlot adds a graph library to PHP so it will support charts:
#cd /usr/ports/graphics/phplot#make install clean
JPGraph adds more support to PHP for graphs:
#cd /usr/ports/graphics/jpgraph#make install clean
Finally, we must install ACID and Snort. Start by modifying snort’s Makefile to include MySQL support:
#cd /usr/ports/security/snort#vi Makefile
Change:
CONFIGURE_ARGS= --with-mysql=no
to:
CONFIGURE_ARGS= --with-mysql=yes
Save your changes and exit.
Finally, install acid,
which will also install snort
using your modified Makefile:
#cd /usr/ports/security/acid#make install clean
Configuring
Now that we’ve installed all the necessary pieces for our IDS, it’s time to configure them to work together.
Configure Apache and PHP
You’ll need to make two changes to Apache’s configuration
file, /usr/local/etc/apache/httpd.conf. First,
search for #ServerName, remove
the hash mark (#), and change
www.example.com to your actual
server name. Then, for security reasons, change ServerSignature On to ServerSignature Off. This prevents the
server from providing information such as HTTP server type and
version. Most admins who run IDSs on their networks like to keep
their presence somewhat hidden, since there are exploits/tools
written to defeat IDS detection.
Configure PHP
After installing PHP, you will notice two sample configuration files in /usr/local/etc, php.ini-dist and php.ini-recommended. As the name suggests, the latter is the recommended PHP 4-style configuration file. It contains settings that make PHP “more efficient, more secure, and [encourage] cleaner coding.” Since our focus is security, I recommend using this file.
Configuring PHP is as simple as copying the sample configuration file to /usr/local/etc/php.ini:
#cd /usr/local/etc#cp php.ini-recommended php.ini
Configure MySQL
MySQL supports several configurations. Use my-small.cnf or my-medium.cnf if you have less than 64 M
of memory, my-large.cnf if you
have 512 M, and my-huge.cnf if
you have 1-2 G of memory. Later, if you find your system running out
of swap space, you can stop mysql
and copy one of the smaller *.cnf files to fix the problem. In my
example, I’ll copy over my-large.cnf:
# cp /usr/local/share/mysql/my-large.cnf /etc/my.cnfNext, set up the initial databases and install the server:
#/usr/local/bin/mysql_install_db#/usr/local/etc/rc.d/mysql-server.sh start
You can use the sockstat
command to confirm that the MySQL server is running.
You should see MySQL listening on port 3306:
# sockstat | grep mysql

USER     COMMAND    PID   FD PROTO  LOCAL ADDRESS         FOREIGN ADDRESS
mysql    mysqld     16262 5  tcp4   *:3306                *:*
mysql    mysqld     16262 6  stream /tmp/mysql.sock
Then, set the password for the root MySQL user. You’ll have to
use the FLUSH PRIVILEGES command
to tell MySQL to reload all of the user privileges, or the server
will continue using the old (blank) password until it
restarts:
#/usr/local/bin/mysql -u rootWelcome to the MySQL monitor. Commands end with ; or g. Your MySQL connection id is 1 to server version: 4.0.16-log Type 'help;' or 'h' for help. Type 'c' to clear the buffer. mysql>SET PASSWORD FOR root@localhost=PASSWORD('your_password_here'),mysql>FLUSH PRIVILEGES;Query OK, 0 rows affected (0.00 sec)
Then, you can create the snort database:
mysql>CREATE DATABASE snort;
Query OK, 1 row affected (0.00 sec)
Now we can create a MySQL user with sufficient permissions to
access the new snort database. Do
not use the MySQL root user! By creating a new user who has
access to only one database, we’ve limited the damage an attacker
could do if he ever gained access to this account.
MySQL uses the GRANT
command to give users access to databases. You can control which
types of statements the user can issue, as well as the network hosts
from which the user can access MySQL. localhost is a nice, safe setting, as we
only need to access the database from the local machine. Again, this
restricts the damage that an attacker could do from another
compromised host.
mysql>GRANT INSERT,SELECT ON snort.* tosnort_user_here@localhostIDENTIFIED BY 'snort_users_password';Query OK, 0 rows affected (0.00 sec) mysql>GRANT INSERT,SELECT,CREATE,DELETE on snort.*tosnort_user_here@localhost IDENTIFIED BY 'snort_users_password';Query OK, 0 rows affected (0.01 sec) mysql>FLUSH PRIVILEGES;Query OK, 0 rows affected (0.01 sec) mysql>quitBye
Configure Snort
First you’ll need to download the latest sources from http://www.snort.org (currently v2.0.5). After
unpacking, use the create_mysql
file to create the necessary tables in the snort database. That’s all the
configuration you need; you can now simply delete the unpacked
directory.
#tar xvfz snort-2.0.5.tar.gz#cd snort-2.0.5/contrib#cp create_mysql /tmp#/usr/local/bin/mysql -p < /tmp/create_mysql snortEnter password: Enter the MySQL root password here #cd /usr/local/etc#cp snort.conf-sample snort.conf#vi snort.conf
Scroll down until you reach the #
output database: log, mssql, dbname=snort user=snort password=test
line. Insert the following lines beneath
it:
output database: log, mysql, user=mysql_user_namepassword=mysql_users_passworddbname=snort host=localhost output database: alert, mysql, user=mysql_user_namepassword=mysql_users_passworddbname=snort host=localhost
Now page down toward the bottom of the file and select the
types of rules you want to monitor for. Keep in mind that the more
rules you use, the more work snort will have to do, using up CPU cycles
and memory that might be better used elsewhere. For example, if you
don’t want to monitor X11 or Oracle on any computer on your network,
comment out those rules. When you’re done, save your changes and
exit.
Finish by creating the snort log directory:
#cd /var/log#mkdir snort
Configure ACID
Start by tightening the permissions of the configuration file:
# chmod 644 /usr/local/www/acid/acid_conf.phpTip
Have a good read through the Security section of /usr/local/www/acid/README when you’re configuring ACID. It contains many good pointers to ensure your configuration is secure.
Then, change the section that contains alert_dbname = "snort_log"; to include the
appropriate entries:
$alert_dbname   = "snort";
$alert_host     = "localhost";
$alert_port     = "";
$alert_user     = "mysql_snort_user";
$alert_password = "mysql_snort_users_password";
Leave the Archive
parameters alone, unless you want to create a separate database for
snort to store archived alert
messages in. To do this, you’ll need to log into MySQL, create an
archive database, set the
appropriate permissions, and run the mysql_create script again as described
earlier. The Snort and ACID documentation describe this in more
detail.
You do need to tell ACID where to find some of the libraries installed earlier. In particular, change:
$ChartLib_path = "";
to:
$ChartLib_path = "/usr/local/share/jpgraph";
Running ACID
# /usr/local/sbin/apachectl start
/usr/local/sbin/apachectl start: httpd started
Then, link the ACID web directory. Of course, for security reasons, I recommend giving the link name something other than acid.
#cd /usr/local/www/#ln -s /usr/local/www/acid /usr/local/www/snort
Point your web browser to http://localhost/snort/acid_main.php and click the Setup link. Click the Create ACID AG button to create the extended tables that ACID will use. When it finishes, you should see something similar to the following:
Successfully created 'acid_ag'

Successfully created 'acid_ag_alert'

Successfully created 'acid_ip_cache'

Successfully created 'acid_event'
Now click the Main page link to be taken to ACID’s main display
page. At this point you might ask, “Where are the alerts?” There
aren’t any—we didn’t start snort!
Running Snort
First, try starting snort
manually to make sure it works. Use the -i switch to specify the network interface
that will be monitoring traffic. In my case, it is xl0.
#cd /usr/local/etc#/usr/local/bin/snort -c snort.conf -i xl0database: using the "alert" facility 1458 Snort rules read... 1458 Option Chains linked into 146 Chain Headers 0 Dynamic rules +++++++++++++++++++++++++++++++++++++++++++++++++++ Rule application order: ->activation->dynamic->alert->pass->log --= = Initialization Complete = =-- -*> Snort! <*- Version 2.0.5 (Build 98) By Martin Roesch ([email protected], www.snort.org)
If snort doesn’t show any
errors, as depicted here, pat yourself on the back: snort is running!
Quit snort by pressing
Ctrl-C, and restart it in daemon mode:
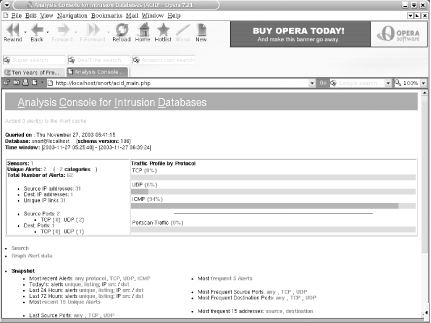
# /usr/local/bin/snort -c snort.conf -i xl0 -DNow flip on over to the ACID display page in your web browser. You should start to see alerts coming in. Figure 6-6 shows a sample alert listing.
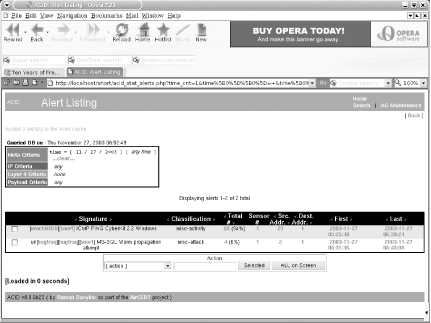
Note that each detected signature includes a hyperlink to information about that particular type of attack. Snort also keeps track of how many packets matched that signature, the number of unique source and destination addresses, and the time frame between the first and last packet.
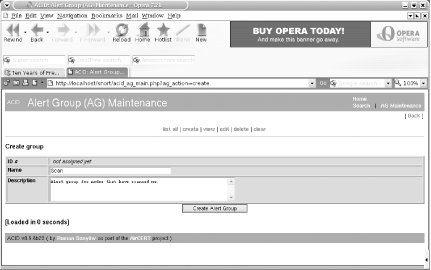
You can also configure your own alert groups to better organize your results, as shown in Figure 6-7.
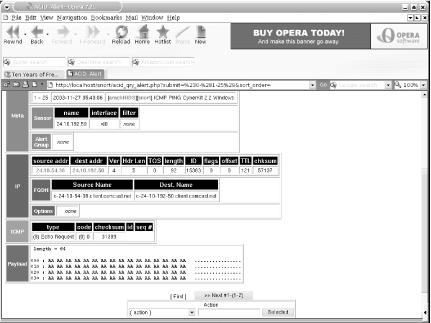
ACID can also display each rogue packet in intimate detail, as seen in Figure 6-8.
Keep in mind that you’ll probably start getting false positives, depending on the types of traffic on your network. However, these can easily be weeded out by making the appropriate changes to your /usr/local/etc/snort.conf file and the rule files in /usr/local/share/snort.
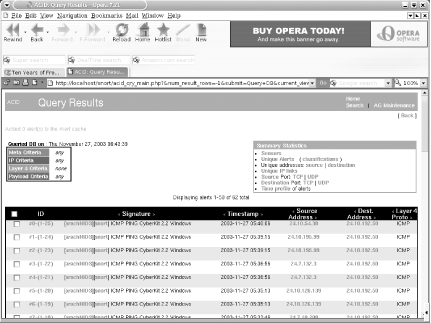
If you start noticing a bunch of alerts that look like Figure 6-9, it’s a good indication that some nodes on your network are infected with a virus or worm.
Hacking the Hack
Snort and ACID have many additional features. For example, you
can use your favorite mail transfer agent, such as Sendmail or
Postfix, to send out email alerts, and you can create an archive
database to store alerts generated by
snort. There’s even a snort plug-in for the Big Brother System and Network Monitor that can alert
you when 30 or more alerts are generated.
You can also add additional security to MySQL, Snort, and ACID by creating a nonprivileged
snort user and locking down the
/usr/local/www/acid directory
with the use of a properly configured .htaccess file. Configuration of these
features goes beyond the scope of this hack, but I encourage you to
read all the documentation included with these applications, as well
as the documentation at each application’s home page, to find out how
you can tailor them to suit your needs.
See Also
The MySQL Reference Manual (http://www.mysql.com/documentation/index.html)
The Snort web site (http://www.snort.org/)
The Analysis Console for Intrusion Databases (ACID) web site (http://www.cert.org/kb/acid/)
The Big Brother Network and System Monitor web site (http://bb4.com/)
Encrypt Your Hard Disk
Keep your secrets secret by keeping everything secret.
People often store sensitive information on their hard disks and have concerns about this information falling into the wrong hands. This is particularly relevant to users of laptops and other portable devices, which might be stolen or accidentally misplaced.
File-oriented encryption tools like GnuPG are great for encrypting particular files that will be sent across untrusted networks or stored on disk. But sometimes these tools are inconvenient, because the file must be decrypted each time it is to be used; this is especially cumbersome when you have a large collection of files to protect. Any time a security tool is cumbersome to use, there’s a chance you’ll forget to use it properly, leaving the files unprotected for the sake of convenience.
Worse, readable copies of the encrypted contents might still exist
on the hard disk. Even if you overwrite these files (using rm -P) before unlinking them, your application
software might make temporary copies that you don’t know about or that
have been paged to swapspace. Even your hard disk might have silently
remapped failing sectors with data still in them.
The solution is simply never to write the information unencrypted to the hard disk. Rather than taking a file-oriented approach to encryption, consider a block-oriented approach—a virtual hard disk that looks just like a normal hard disk with normal filesystems, but which encrypts and decrypts each block on the way to and from the real disk.
NetBSD includes the encrypting block device driver cgd(4) to help you accomplish this task; the
other BSDs have similar virtual devices that, with somewhat different
commands, can achieve the same thing. This hack concentrates on NetBSD’s
cgd.
The Cryptographic Disk Device
To the rest of the operating system, the cgd(4) device looks
and behaves like any other disk driver. Rather than driving real
hardware directly, it provides a logical function layered on top of
another block device. It has a special configuration program, cgdconfig , to create and configure a cgd device and point it at the underlying
disk device that will hold the encrypted data. You can stack several
logical block devices together; cgd(4) on top of vnd(4) is handy for making an encrypted
volume in a regular file without repartitioning, or you can make an
encrypted raid(4).
Once you have a cgd
configured, you can put a disklabel on it to
divide it up into partitions, make filesystems or enable swapping to
those partitions, or mount and use
those filesystems, just like any other new disk.
Roland C. Dowdeswell wrote the cgd driver. It first appeared in
NetBSD-current after the 1.6 release branch. As a result, it is not in
the 1.6 release series; it will be in the 2.0 release and, in the
meantime, many people are using it with -current.
In order to use cgd, ensure
that you have the line:
pseudo-device cgd 4 # cryptographic disk devices
in your kernel configuration file; otherwise, build and install
a new kernel. You’ll also need a running system, as the NetBSD
installer currently doesn’t support installing new systems directly
into a cgd.
Preparing the Disk
First, decide which filesystems you want to move to an
encrypted device. You need to leave at least the small root filesystem
(at /) unencrypted in order to
load the kernel and run init,
cgdconfig, and the rc.d scripts that configure your cgd. In this example, we’ll encrypt
everything except /.
We are going to delete and remake partitions and filesystems,
and will require a backup to restore the data. So, make sure you have
a current, reliable backup stored on a different disk or machine. Do
your backup in single-user mode, with the filesystems unmounted, to
ensure you get a clean dump. Make
sure you back up the disklabel of your hard disk as well, so you have
a record of the original partition layout.
With the system in single-user mode, / mounted as read-write, and everything
else unmounted, delete all the data partitions you want to move into
cgd.
Then, make a single new partition in all the space you just
freed up, say, wd0e. Set the type
for this partition to ccd. (There’s
no code specifically for cgd, but
ccd is very similar. Though it
doesn’t really matter what it is, it will help remind you that it’s
not a normal filesystem.) When finished, label the disk to save the
new partition table.
Scrubbing the Disk
We’ve removed the partition table information, but the
existing filesystems and data are still on disk. Even after we make a
cgd device, create filesystems, and
restore our data, some of these disk blocks might not yet be
overwritten and might still contain our data in plain text. This is
especially likely if the filesystems are mostly empty. We want to
scrub the disk before we go further.
We could use dd to write
/dev/zero over the new wd0e partition, but this will leave our disk
full of zeros, except where we later write encrypted data. We might
not want to give an attacker any clues about which blocks contain real
data and which are free space, so we want to write noise into all the
disk blocks. We’ll create a temporary cgd, configured with a random, unknown
key.
First, we make a parameters file to tell cgd to use a random key:
# cgdconfig -g -k randomkey -o /tmp/wd0e-rnd aes-cbcThen, we use that file to configure a temporary cgd:
# cgdconfig cgd0 /dev/wd0e /tmp/wd0e-rndTip
If this seems to get stuck, it may be that /dev/random doesn’t have enough entropy
for cgdconfig. Hit some keys on
the console to generate entropy until it returns.
Now we can write zeros into the raw partition of our cgd (this device will be cgd x d on NetBSD/i386 and cgd x c on most other platforms):
# dd if=/dev/zero of=/dev/rcgd0d bs=32kThe encrypted zeros will look like random data on disk. This
might take a while if you have a large disk. Once finished,
unconfigure the random-key cgd:
# cgdconfig -u cgd0Creating the Encrypted Disk Device
The cgdconfig program,
which manipulates cgd
devices, uses parameters files to store such information as the
encryption type, key length, and a random password salt for each
cgd. These files are very important
and must be kept safe—without them, you will not be able to decrypt
the data!
We’ll generate a parameters file and write it into the default location (make sure the directory /etc/cgd exists and is mode 700):
# cgdconfig -g -V disklabel -o /etc/cgd/wd0e aes-cbc 256This creates a parameters file describing a cgd using aes-cbc encryption, a key verification
(-V) method of disklabel, and a key length of 256 bits. Remember, you’ll want to save this
file somewhere safe later.
Now it’s time to create our cgd, for which we’ll need a passphrase. This passphrase must be entered every time
the cgd is opened, usually at each
reboot, and it is from this passphrase that the encryption key used is
derived. Make sure you choose something you won’t forget and others
won’t guess.
The first time we create the cgd, there is no valid disklabel, so the
validation mechanism we want to use later won’t work. We override it
this one time:
# cgdconfig -V re-enter cgd0 /dev/wd0eThis will prompt twice for a matching passphrase.
Now that we have a new cgd,
we need to partition it and create filesystems. Recreate your previous
partitions with all the same sizes, although the offsets will be
different because they’re starting at the beginning of this virtual
disk. Remember to include the -I
argument to disklabel, because
you’re creating an initial label for a new disk.
Then, use newfs to create
filesystems on all the relevant partitions. This time your partitions
will reflect the cgd disk
names:
# newfs /dev/rcgd0hModifying Configuration Files
We’ve moved several filesystems to another disk, and we need
to update /etc/fstab
accordingly. Each partition will have the same letter but will be on
cgd0 rather than wd0. So, you’ll have /etc/fstab entries that are similar to
these:
/dev/wd0a   /     ffs     rw,softdep    1 1
/dev/cgd0b  none  swap    sw            0 0
/dev/cgd0b  /tmp  mfs     rw,-s=132m    0 0
/dev/cgd0e  /var  ffs     rw,softdep    1 2
/dev/cgd0f  /usr  ffs     rw,softdep    1 2
/dev/cgd0h  /home ffs     rw,softdep    1 2
Note that /tmp should be a
separate filesystem, either mfs or
ffs, inside the cgd, so that your temporary files are not
stored in plain text in the /
filesystem.
Each time you reboot, you’re going to need your cgd configured early, before fsck runs and filesystems are
mounted.
Put the following line in /etc/cgd/cgd.conf:
cgd0 /dev/wd0e
and the following line into /etc/rc.conf:
cgd=YES
You should now be prompted for cgd0’s passphrase whenever rc starts.
Restoring Data
Next, mount your new filesystems, and restore your data into them.
It often helps to have /tmp
mounted properly first, as restore
can use a fair amount of space when restoring a large dump.
To test your changes to the boot configuration, unmount the
filesystems and unconfigure the cgd, so when you exit the single-user shell,
rc will run as it does on a clean
boot. Now you can bring the system up to multiuser and make sure
everything works as before.
Hacking the Hack
Here are some other things you might consider doing, for extra hack value:
Use two separate
cgds: one with a random key just for swap and one like thecdgin this hack.Use multiple
cgds for different kinds of data, e.g., one mounted all the time and others mounted only when needed.Use a
cgdconfigured on top of avndmade from a file on a remote network file server (NFS, SMBFS, CODA, etc.) to safely store private data on a shared system.Build a kernel with a special minimized, embedded ramdisk root image containing
init,cgdconfig, your parameters file, and any other required tools. Boot that image from removable media (such as a USB flash device) that you carry securely on your person, and remount / from thecgdon the hard disk. This can help defend against someone tampering with the kernel orcgdconfigbinary in the unencrypted portion of the hard disk and using it to steal your passphrase.
Final Thoughts and Warnings
Prevent cryptographic disasters by making sure you can always recover your passphrase and parameters file. Protect the parameters file from disclosure, perhaps by storing it on removable media as just mentioned, because the salt it contains helps protect against dictionary attacks on the passphrase.
Keeping the data encrypted on your disk is all very well, but
what about other copies? You already have at least one other such copy
(the backup we used during this setup), and it’s not encrypted. Piping
dump through a file-based encryption tool such as gpg can be one way of addressing this issue,
but make sure you can decrypt it to restore after a disaster.
Like any form of software encryption, the cgd key stays in kernel memory while the
device is configured and may be accessible to privileged programs and
users, such as kmem grovelers.
Running your system with an elevated securelevel is highly recommended.
Once the cgd volumes are
mounted as normal filesystems, their accessibility is just like any
other file. Take care of file permissions, and ensure that your
running system is protected against application and network security
attacks.
Avoid using suspend and resume, especially for laptops with a BIOS
suspend-to-disk function. If an attacker can resume your laptop with
the key still in memory or read it from the memory image on disk
later, the whole point of using cgd
is lost.
See Also
man cgdman disklabelThe Encrypting Disk Partitions (using
gbde) section of the FreeBSD Handbook (http://www.freebsd.org/doc/en_US.ISO8859-1/books/handbook/disks-encrypting.html)
Sudo Gotchas
Be aware of these limitations when configuring sudo.
sudo is a handy utility for giving out some, but not all root privileges
to users of Unix and Unix-like systems. sudo has some limitations and gotchas,
however.
Limitations of sudo
Tools like sudo exist because
the standard Unix privilege model is monolithic. That is, you are
either root, with all the privileges and dangers attendant, or you
aren’t, in which case you lack the ability to affect the system in
significant ways. sudo is a
workaround of this model. As such, there are limits to what it can
achieve, and many of these limitations show up in interactions with
the shell. For example:
% sudo cd /some/protected/dir
Password:
sudo: cd: command not found
Because a process cannot affect the environment of its parent,
cd can’t be implemented as a
program external to the shell. The command is therefore built into the
shell itself. sudo can confer
privilege only on programs, not pieces of programs. So, the only way
to cd to a protected directory
using sudo is to execute the shell
itself with sudo:
%sudo bash#cd /some/protected/dir#pwd/some/protected/dir
A workaround is to write a script like the following:
#!/usr/local/bin/bash
cd /some/protected/dir;/bin/ls
If you enable access to this command in /usr/local/etc/sudoers, authorized users
will be able to ls the contents of
a protected directory. This won’t allow you to cd to a protected directory, but it will
allow you to do work in one.
Another possibility is to allow the user to run a restricted
shell, for example, bash -r. This
is not a good general solution, though, since most such shells are
very restrictive. For example, bash -r disallows use of cd!
Another interaction between the shell and sudo involves I/O redirection.
% sudo echo "secret stuff"  > /some/protected/dir/secret
bash: /some/protected/dir/secret: Permission denied
The problem here is that the bash shell does the I/O direction, not the
echo command. This time there is a
workaround, however:
%echo "secret stuff" | sudo tee -a /some/protected/dir/secret> /dev/null%sudo cat /some/protected/dir/secretsecret stuff
Here we use sudo to run
tee with the -a (append) switch, which dumps the I/O
stream coming from stdin to a file. We throw away the stdout stream
since we just want the file. Now sudo can confer privilege on the
program tee,
and we get the desired result, although it’s a bit awkward.
The same problem exists when trying to redirect stdin. In this
case, we can use the similar, but less unusual, expedient of sudo cat to get at the data.
The following interaction is not really a limitation, but more of a wart:
%sudo cat /some/protected/dir/secret | wc | sudo tee/some/protected/dir/count > /dev/nullPassword:Password:
Here we have no cached credentials, so sudo prompts us for our password. But since
there are two sudo commands in the
pipeline, we get two password prompts, one right after the other. When
we enter our password and press Return, nothing happens—our cursor
stays put on the next line. We are actually at the second password
prompt, but there is no indication of this. Entering our password
again will get us out of the mysteriously hung pipeline.
sudo Configuration Gotchas
sudo is very flexible. The /usr/local/etc/sudoers file has rich
semantics to implement a nearly infinite set of policies that can
range from very open to very restrictive. Of course, open policies are
easier to understand and implement than the restrictive ones, because
there are so many ways to subvert many seemingly restrictive
policies.
The earlier examples of sudo
limitations assumed that all the commands used were authorized for our
use in the sudoers file. However,
both cat and tee are dangerous commands that could allow
a user to easily take control of a system. (Consider sudo tee /etc/spwd.db < myevilspwd.db.)
This underlines the generic risk of enabling commands with sudo. It is difficult to analyze all the
possible ways a particular command could be misused to subvert a
closed security policy. The more commands you enable with sudo, the harder this task becomes. In
general, beware of commands that are capable of modifying files, such
as editors, dd, cat, and tee, or those that allow shells to be run
from within them, such as emacs and
vi.
Tip
vim provides an rvim variant that disallows shell escapes.
This variant is installed to /usr/local/bin/rvim when you build the
port /usr/ports/editors/vim.
You can try restricting what arguments can be given to dangerous commands, but beware of alternate methods for supplying those arguments. For example, the following configuration entry recently came up on the sudo-users mailing list:
Cmnd_Alias PASSWD = /usr/bin/passwd, !/usr/bin/passwd root
This works great if the user types passwd root:
% sudo passwd root
Sorry, user test is not allowed to execute '/usr/bin/passwd root' as root on ****.
Consider, though:
% sudo passwd -l root
Changing local password for root
New Password:
Oops! The addition of the -l
flag causes the pattern in the sudoers file not to match the equivalent
command.
The moral is: to restrict parameters in sudoers, you must disallow all permutations of arguments and switches that you deem undesirable.
man sudoers warns about
another danger:
It is generally not effective to "subtract" commands from ALL using the
'!' operator.  A user can trivially circumvent this by copying the
desired command to a different name and then executing that.  For exam-
ple:

    bill        ALL = ALL, !SU, !SHELLS

Doesn't really prevent bill from running the commands listed in SU or
SHELLS since he can simply copy those commands to a different name, or
use a shell escape from an editor or other program.  Therefore, these
kind of restrictions should be considered advisory at best (and rein-
forced by policy).
Shell Access with sudo
Authorizing shell access with sudo obviously opens your security policy to
the largest possible extent, since any available command can then be
run in the root-enabled shell. This may be exactly what you want, but
you also lose sudo’s audit trail,
since subsequent commands issued from the shell are not logged.
One way to allow shell access to trusted users without losing the audit trail is to use sudoscript [Hack #62] .
See Also
man sudoman sudoersman passwdThe
sudoweb site (http://www.courtesan.com/sudo/)The Sudo-users mailing list archive (http://www.sudo.ws/pipermail/sudo-users/)
sudoscript
sudo can help enforce strict security policies, but what about situations in which you don’t want to restrict what commands your users run?
Maybe you’re looking for a way to keep track of what your
sysadmin team does as root, so you
can quickly find out what happened when something goes wrong. Even if
you’re the only administrator, it’s possible to make a bad error as
root without realizing it. An audit
trail allows you to go back and see exactly what you did type during
that 3:00 AM hacking session.
As mentioned in [Hack #61] , giving access to a shell with
sudo means that you lose your audit
trail the moment the root shell executes. One answer to this problem is
sudoscript.
Another scenario where sudoscript is useful is one similar to the
situation that caused me to write sudoscript in the first place. I was a
sysadmin in a small startup whose engineers all had the root password.
The IT crew all used sudo, but they
had tried without success to convince the engineers to use it. Upon
investigation, I discovered that the principal reason for this was the
prohibition on running shells with sudo.
Tip
In fact, the sysadmins used the “everything-but-shells” method the sudoers manpage warns against [Hack #61] .
It quickly became clear that I wasn’t going to be able to argue
that sudo, as implemented, was
equivalent to having a root shell; positions had hardened long before I
showed up. So, I wrote sudoscript to
bring these engineers back into the IT department’s supported circle. It
worked, and having the audit trail saved my bacon several times.
sudoscript Overview
sudoscript is a pair of Perl
scripts. One is called sudoshell
, or just ss.
Contrary to its name, sudoshell is
not a shell like tcsh or bash. Instead, it is a frontend script that
uses authorization from sudo to run
as root and runs script(1) on a FIFO (named pipe) managed by
the second script. That script is a daemon, called sudoscriptd . It takes data from the FIFO opened by sudoscript and tags it with the user’s name,
PID, and a timestamp before writing it to a log file. This log file,
/var/log/sudoscript, is managed
by the daemon and rotated if its size exceeds 2 MB. The effect of all
this is a root shell that saves its terminal input and output in a log
file.
Tip
FreeBSD provides sudoscript
in the ports collection in /usr/ports/security/sudoscript. Download
OpenBSD and NetBSD ports from http://egbok.com/sudoscript/.
Is sudoscript Secure?
The answer is yes and no. The answer is “yes” because
sudoscript doesn’t confer any
privilege of its own; it relies on sudo for that. For that reason, programming
or architecture errors in sudoscript (which I have worked hard to
avoid) shouldn’t increase the security risk to a system. The user of
sudoscript already has the
privilege to do anything at all on the system.
The answer is “no” if you expect the audit trail provided by
sudoscript to be bulletproof. It
isn’t. For one thing, an xterm will
produce a shell that is not audited. Additionally, the FIFO that the
scripts use must be writable by the effective user running it. If that
effective user is root, then of
course there are many, many ways to avoid the audit trail. Simply
killing the daemon (but not sudoshell) would do the trick nicely, for
example.
The moral is: don’t give sudoscript to users you don’t trust with
root. If you have to give it to
such users, though, it is probably better than nothing.
Using sudoscript
Build sudoscript from source in the ports tree or install it from a
binary package. (Note that both are misnomers with respect to sudoscript, since it is pure Perl. These
mechanisms install the scripts and supporting files.) If you want to
enable only root shells, sudoscript
configuration is easy. Add an entry like the following to /usr/local/etc/sudoers:
Cmnd_Alias SS = /usr/local/bin/sudoshell, /usr/local/bin/ss
You can then grant sudoscript
access to chosen users through the usual mechanisms. For
example:
%wheel          ALL=SS
joe             joesbox=SS
Now when a user runs ss:
%ssThe sudoscriptd doesn't appear to be running! Would you like me to start it for you? (requires root sudo privilege)?yesThis will be a one-off startup of the daemon. You may have to arrange for it to be started when the system starts, if that's what you want. See the INSTALL file in the distribution for details. sudoscriptdwaiting for the daemon ..done Script started, output file is /var/run/sudoscript/ssd.test_root_1667/test1667.fifo #
The INSTALL file mentioned lives in /usr/local/share/doc/sudoscript- version/, along with lots of other documentation.
As shown in the example, sudoshell will start sudoscriptd if it isn’t running already. You
probably want to add sudoscriptd to
the system startup, which you can do by renaming /usr/local/etc/rc.d/sudoscriptd.sh.sample
to /usr/local/etc/rc.d/sudoscriptd.sh.
Unfortunately, this script isn’t a true rc-style startup script in the
manner of SysV init, in that it
doesn’t have start and stop targets; however, this will change in
the next release. (As of this writing, sudoscript is at Version 2.1.1.)
Tip
The impatient can modify the startup script using [Hack #86] .
sudoscript can enable shells
as users other than root. This
could be handy for auditing activity of the dba user, for instance. If you want to use
this feature, you must also add a Unix group called ssers. If this group exists when sudoscriptd starts, it will make some
changes to the files in /var/run/sudoscript (where the FIFOs live)
to accomodate group access to those files. This has security
implications in that anyone in the ssers group will have access to the FIFOs
being used by any other concurrent user of sudoscript. Both the user that will run
ss and the
user ss will enable must be in the
ssers group.
To get nonroot shells to work, you also have to change your sudoers entries like so:
Host_Alias      DBBOXES    = db1,db2,db3
Cmnd_Alias      SS         = /usr/local/bin/sudoshell,
                             /usr/local/bin/ss
Cmnd_Alias      SSASDBA    = /usr/local/bin/sudoshell -u dba,
                             /usr/local/bin/ss -u dba
%wheel          ALL=SS
joe             joesbox=SS
datamonkey      DBBOXES=(dba) SSASDBA
Once the ssers group and the
preceding entries in are place:
%iduid=1004(datamonkey) gid=1004(datamonkey) groups=1004(datamonkey), 92(ssers) %ss -u dbaPassword: Script started, output file is /var/run/sudoscript/ssd.datamonkey_dba_2223/datamonkey2223.fifo bash-2.05b$iduid=1005(dba) gid=1005(dba) groups=1005(dba), 92(ssers)
The sudoscript Log File
The sudoscript log file
lives in /var/log/sudoscript. It
contains entries like the following:
Mon Dec 22 00:32:19 New logger for datamonkey with pid 2223
Mon Dec 22 00:32:19 datamonkey:2223 Script started on Mon Dec 22 00:32:19
    2003
Mon Dec 22 00:32:25 datamonkey:2223 bash-2.05b$ id
Mon Dec 22 00:32:25 datamonkey:2223 uid=1005(dba) gid=1005(dba)
        groups=1005(dba), 92(ssers)
Mon Dec 22 00:49:09 datamonkey:8603 bash-2.05b$ vi .bashrc

(Tons and tons of garbage)

Mon Dec 22 00:49:54 datamonkey:8603 bash-2.05b$ exit
Mon Dec 22 00:49:54 datamonkey:8603
Mon Dec 22 00:49:54 datamonkey:8603 Script done on Mon Dec  22 00:49:54 2003
Mon Dec 22 00:49:54 logger (datamonkey,8603) caught signal. Exiting
This looks pretty bad! The problem is that the script command faithfully stores all the
input and output in the shell, including all the escape codes that the
terminal emulator turns into things like cursor movement and screen
refreshes. The problem is particularly acute when the user enters a
full screen editor, such as vi.
There are two approaches to this problem that help turn the gibberish
into useful data. First, this sed
script from Unix Power Tools, Third Edition
(O’Reilly) will remove simple escape codes from script output.
#!/bin/sh # Public domain. # Put CTRL-M in $m and CTRL-H in $b. # Change �10 to 177 if you use DEL for erasing. eval `echo m=M b=H | tr 'MH' '�15�10'` exec sed "s/$m$// :x s/[^$b]$b// t x" $*
Run the previous output through this script. You’ll see something like:
Mon Dec 22 00:32:19 New logger for datamonkey with pid 2223
Mon Dec 22 00:32:19 datamonkey:2223 Script started on Mon Dec 22 00:32:19
    2003
Mon Dec 22 00:32:25 datamonkey:2223 bash-2.05b$ id
Mon Dec 22 00:32:25 datamonkey:2223 uid=1005(dba) gid=1005(dba)
        groups=1005(dba), 92(ssers)
Mon Dec 22 00:49:09 datamonkey:8603 bash-2.05b$ vi .bashrc

(Still tons of garbage)

Mon Dec 22 00:49:54 datamonkey:8603 ESC[Mon Dec 22 00:49:54 datamonkey:8603 bash-2.05b$
exit
Mon Dec 22 00:49:54 datamonkey:8603
Mon Dec 22 00:49:54 datamonkey:8603 Script done on Mon Dec  22 00:49:54 2003
Mon Dec 22 00:49:54 logger (datamonkey,8603) caught signal. Exiting
That’s a more intelligible version of the output, but the
vi session is still scrambled. We
can take advantage of the fact that we probably are running the same
terminal emulator as the user. If we snip out just the vi session from the log and then cat it to the screen, we get:
This is a normal line in a file
Why does this look so bad??

~
~
.. many more ~ lines..
~
~
~
:q
That’s recognizable as a vi
screen. In fact, our screen has been updated several times, once for
every time the screen was refreshed in the original session. The final
display shows the final state of the vi session.
See Also
man sudoscriptman sudoscriptdman sudoshellThe
sudoscriptweb site (http://egbok.com/sudoscript/)The Sudoscript-user mailing list subscription link (http://lists.sourceforge.net/mailman/listinfo/sudoscript-user)
The Problem of PORCMOLSULB (http://egbok.com/sudoscript/PORCMOLSULB.html)
Restrict an SSH server
Control your ssh scripts by placing them in a jail.
Using SSH increases the security of file transfers and network logins. Many network tasks, however, don’t really need the shell associated with a user account—remote backups, for example. After all, a shell brings with it commands and an entry point into a system’s directory structure. That’s somewhat scary when you consider that many of your SSH tasks are scripted.
Configuring a restricted SSH shell such as scponly can mitigate this risk. Not only does it provide
noninteractive (read scripted) logins into the SSH
server, it limits the set of available commands. Additionally, it
provides a chroot option,
allowing you to restrict the scponly
user account to its own directory structure.
Installing scponly
Before installing this port, read through the available options in its Makefile:
#cd /usr/ports/shells/scponly#more Makefile
Depending on the scripts you plan on using, consider disabling
wildcard processing (which can help prevent accidents like rm -R *). You can also enable rsync support, which is ideal if you’re
using rsnapshot for backups
[Hack #39] . If you want to
restrict the account to its own directory, preventing your scripts
from accessing anything else on the SSH server, include the chroot option.
Once you’ve chosen your desired options, pass them to the
make command. Here I’ll enable
chroot support:
# make -DWITH_SCPONLY_CHROOT installTip
If you include the chroot
option, do not use the clean target at the end of your make command. make clean will remove the work/ directory, which contains a script
that will set up the chroot for
you.
Toward the end of the installation, you’ll see this message:
Run following script to setup chroot cage:
/usr/ports/shells/scponly/work/scponly-3.8/setup_chroot.sh
Before running this script, choose a new name for the user account you wish to restrict. The script will abort if you use an existing user account.
Here I’ll create a chroot for
an account named backup:
#cd work/scponly-3.8/#chown +x setup_chroot.sh#./setup_chroot.shNext we need to set the home directory for this scponly user. please note that the user's home directory MUST NOT be writable by the scponly user. this is important so that the scponly user cannot subvert the .ssh configuration parameters. for this reason, an "incoming" subdirectory will be created that the scponly user can write into. if you want the scponly user to automatically change to this incoming subdirectory upon login, you can specify this when you specify the user's home directory as follows: set the home dir to /chroot_path//incoming when scponly chroots, it will only chroot to chroot_path and afterwards, it will chdir to incoming. enter the home directory you wish to set for this user:/usr/home/rembackup/Install for what username?backupls: /lib/libnss_compat*: No such file or directory creating /usr/home/rembackup/incoming directory for uploading files
Testing the chroot
The script will have created the following directory structure for you:
#ls -l /usr/home/rembackuptotal 10 drwxr-xr-x 2 root wheel 512 Jan 22 12:37 bin/ drwxr-xr-x 2 root wheel 512 Jan 22 12:38 etc/ drwxr-xr-x 2 backup wheel 512 Jan 22 12:38 incoming/ drwxr-xr-x 2 root wheel 512 Jan 22 12:37 lib/ drwxr-xr-x 7 root wheel 512 Jan 22 12:37 usr/ #ls -l /usr/home/rembackup/bin/total 1868 -rwxr-xr-x 1 root wheel 88808 Jan 22 12:37 chmod* -rwxr-xr-x 1 root wheel 14496 Jan 22 12:37 echo* -rwxr-xr-x 1 root wheel 72240 Jan 22 12:37 ln* -rwxr-xr-x 1 root wheel 567772 Jan 22 12:37 ls* -rwxr-xr-x 1 root wheel 73044 Jan 22 12:37 mkdir* -rwxr-xr-x 1 root wheel 437684 Jan 22 12:37 mv* -rwxr-xr-x 1 root wheel 80156 Jan 22 12:37 pwd* -rwxr-xr-x 1 root wheel 439812 Jan 22 12:37 rm* -rwxr-xr-x 1 root wheel 69060 Jan 22 12:37 rmdir* #ls -l /usr/home/rembackup/usr/bin/total 48 -rwxr-xr-x 1 root wheel 7016 Jan 22 12:37 chgrp* -rwxr-xr-x 1 root wheel 7688 Jan 22 12:37 groups* -rwxr-xr-x 1 root wheel 7688 Jan 22 12:37 id* -rwxr-xr-x 1 root wheel 22616 Jan 22 12:37 scp* #ls -l /usr/home/rembackup/usr/sbin/total 8 -rwxr-xr-x 1 root wheel 7016 Jan 22 12:37 chown*
There you have it; these are the only commands that account can use during an SSH session.
You can also verify that the specified user account was created
for you. I’ll check for that backup
account:
# grep backup /etc/master.passwd
backup:*:1015:1015::0:0:User
&:/usr/home/rembackup//incoming:/usr/local/sbin/scponlyc
Notice that the account is restricted to the scponlyc shell. The
trailing c indicates that this is a
chroot.
Now What?
Now that you have a restricted account, test it with one of your SSH scripts. Don’t forget to set up your authentication method. Either set a password on the account or configure key-based authentication.
You can use this hack in conjunction with [Hack #38] and [Hack #39] .
See Also
man scponlyThe
scponlyhome page (http://www.sublimation.org/scponly/)
Script IP Filter Rulesets
One firewall ruleset isn’t always enough.
As a firewall administrator, you know that it takes a bit of
creative genius to create a ruleset that best reflects your network’s security needs.
Things can get more interesting if those needs vary by time of day. For
example, you may need to allow Internet access between business hours
but ban it during the evening hours. This is easy to do with two
rulebases, a couple of scripts, and trusty old cron.
Limiting Access with IP Filter
I have a FreeBSD firewall/router guarding my home network. I also happen to have a daughter who would spend her life online if she were allowed. There’s a simple solution to restricting her access to the Internet to certain times of the day without having to use a proxy.
I use FreeBSD’s IP Filter as
my firewall software. My normal set of firewall rules, /etc/ipf.rules,
allows unrestricted access to the Internet. Here’s the section of that
rulebase that controls my daughter’s access:
# --------------------------comment area begin------------------------------
# Internal Interface: ed0
# Allow internal traffic to flow freely.
# -------------------------- comment area end ------------------------------
pass in  on ed0 all
pass out on ed0 all
Note that this is not my entire rulebase, just the section
controlling the interface, ed0,
connected to the portion of the network containing my daughter’s
computer.
Also note that I did not use the normal pass in quick on ed0 all or pass out quick on
ed0 all. This is because the use of the word quick in IP Filter
tells the program not to look any further for rules applying to the
flow of traffic on an interface. If that were the case, this hack
would not work.
I saved a copy of my unrestricted rulebase as /etc/ipf.rules.allow for safekeeping. This will be my first rulebase.
# cp /etc/ipf.rules /etc/ipf.rules.allowI next edited a copy of the original rulebase file, /etc/ipf.rules, to block Natasha’s computer (IP 10.0.0.3) from accessing the outside world while still allowing her to do homework:
# --------------------------comment area begin------------------------------ # Internal Interface: ed0 # Allow internal traffic to flow freely. # -------------------------- comment area end ------------------------------ pass in on ed0 all pass out on ed0 all# --------------------------block Natasha's computer------------------------block in on ed0 from any to 10.0.0.3block out on ed0 from any to 10.0.0.3
I saved this rule file as /etc/ipf.rules.block, my second rulebase. This second ruleset will effectively block her from surfing and using the usual plethora of messaging programs.
Switching Rules on a Schedule
To implement these restrictions at a specific time, I wrote a small script:
#!/bin/sh

# copy the restrictive rules to the default ipfilter rulebase
cp /etc/ipf.rules.block /etc/ipf.rules

# cause ipfilter to re-read and apply the new rulebase
/sbin/ipf -Fa -f /etc/ipf.rules
Notice that this is a very simple Bourne shell script. As the
comments state, it copies the second, restrictive rulebase to the
rulebase used by IP Filter. It then
tells IP Filter to reread and apply
the newly copied rulebase.
I saved this script as /usr/local/bin/block.sh and made it executable:
# chmod 751 /usr/local/bin/block.shFrom there, I used cron to
schedule the restriction. First, I open up the crontab
editor:
# crontab -eand then add the line:
# minute, hour, all days, all weeks, on these days, script to run
  0       21    *         *          0-4            /usr/local/bin/block.sh
which will effectively shut down access to the outside world starting at 9:00 PM, Sunday through Thursday (i.e., school nights).
To allow access to the Internet in the morning, I need another script:
#!/bin/sh

# copy the non-restrictive rules to the default ipfilter rulebase
cp /etc/ipf.rules.allow /etc/ipf.rules

# cause ipfilter to re-read and apply the new rulebase
/sbin/ipf -Fa -f /etc/ipf.rules
This script is very similar to the first one, except that it copies over the non-restrictive rulebase. I saved this file as /usr/local/bin/allow.sh and made it executable:
# chmod 751 /usr/local/bin/allow.shOnce again, I launched crontab
-e to add the following line:
# minute, hour, all days, all weeks, on these days, script to run
  0       7     *         *          1-5            /usr/local/bin/allow.sh
This will allow access to resume at 7:00 AM, Monday to Friday. Obviously there are no restrictions on the weekends.
Hacking the Hack
While I’ve successfully used this hack at home for several years, it is easy to see how the same logic could apply to schedule multiple rulebases to suit any network’s needs. This gives an administrator much more flexible control over traffic, without the overhead of additional firewall software.
See Also
man crontabThe IP Filter HOWTO (http://www.obfuscation.org/ipf/)
Secure a Wireless Network Using PF
Protect your private wireless network from unauthorized use.
The abundance of 802.11 wireless networks has raised an important question. How can you secure a wireless network so that only recognized systems can use it?
Wireless Encryption Protocol (WEP) and MAC access lists offer some protection against unauthorized users; however, they can be difficult to maintain. With OpenBSD’s PF, we can maintain tables of recognized clients and update those tables with a single shell command. Known clients can access the Internet; unknown clients will only ever see a web page informing them that this is a private network.
For this hack, we will use dhcpd, PF, and Apache.
DHCP Configuration
We’ll use a simple DHCP configuration in /etc/dhcpd.conf like this:
shared-network GUEST-NET {
        max-lease-time 300;
        default-lease-time 120;

        option     domain-name-servers 192.168.0.1;
        option     routers 192.168.0.1;

   subnet 192.168.0.0 netmask 255.255.255.0 {
          range 192.168.0.101 192.168.0.254;
     }
}
In this case, we’re using the subnet 192.168.0.0/24. Our firewall and NAT gateway is 192.168.0.1, and it’s also configured as the DNS server for our network.
We’ve allocated a range of IP addresses (192.168.0.101 to 192.168.0.254) for distribution on a first-come, first-served basis to any host that requests an address via DHCP. Anybody that connects to our network will be able to request a valid IP address in that range. The security will come from our PF configuration.
PF Configuration
OpenBSD has an excellent FAQ on PF, along with an example of how to write a ruleset for a home or small office network. We’ll use this example as a template.
We’ll start with the sample PF configuration that allows any
host on the internal interface (represented by the macro $int_if) full access to the Internet. Then,
we will modify the rules in /etc/pf.conf so that only authorized hosts have access and set up a web server to respond to requests from unauthorized
hosts. We will also allow unauthorized hosts direct access to our DNS
server, to simplify our rules and to avoid more complex split-horizon
DNS configuration.
First, let’s create the table for authorized hosts and macros for the web server and the DNS server:
auth_server = "127.0.0.1 port 8080"
dns_server  = "192.168.0.1"
table <authorized_hosts> { 192.168.0.1, 192.168.0.11 };
These lines go near the top of /etc/pf.conf, before any queue, NAT, or filter rules.
We’ve initialized the table to contain the addresses of our NAT gateway and one other host, 192.168.0.11, a statically configured box we’d like to have access to as well. While PF has a ruleset loaded, we can add a host to the table on the fly:
# pfctl -t authorized_hosts -Tadd 192.168.0.101We can also delete a host:
# pfctl -t authorized_hosts -Tdelete 192.168.0.102and list all the authorized hosts:
# pfctl -t authorized_hosts -TshowNow we need to modify the filter rules so only our authorized hosts have access. These rules allow any host on our network to have access:
pass in  on $int_if from $int_if:network to any             keep state
pass out on $int_if from any             to $int_if:network keep state
We’ll change them like this to use our table:
pass in  on $int_if from <authorized_hosts> to any keep state
pass out on $int_if from any to <authorized_hosts> keep state
Right after those rules, we’ll add the following rules to allow unauthorized hosts to access our web server and DNS server:
pass in  on $int_if proto tcp from !<authorized_hosts> to $auth_server
pass in  on $int_if proto {tcp, udp} from any to $dns_server port domain
    keep state
Now any host in the authorized_hosts table will have full access
to the Internet. Any other hosts will only be able to lookup names and
reach the web server. We’ll add some simple rules so unauthorized
users will see a rejection page if they try to go to any web
site.
In the NAT section, we’ll add this rule:
rdr on $int_if proto tcp from !<authorized_hosts> to any port www ->
    $auth_server
This rule redirects any unknown host attempting to access a
remote machine on the www port to
the web server that will return the rejection page. We could install a
web server on the firewall box or on some separate machine. In my
case, I’ll run Apache on the firewall, listening at 127.0.0.1 and port
8080, so it won’t be confused with any other web servers I’m
running.
Apache Configuration
Apache is installed by default with OpenBSD, so we’ll reconfigure it to listen on port 8080 of the gateway (with IP address 127.0.0.1) and return the same page for every URL requested. (Apache is also available in the FreeBSD ports collection and NetBSD packages collection.)
First, we’ll enable Apache with the httpd_flags parameter in /etc/rc.conf. Next, we need to edit
Apache’s configuration file, /var/www/conf/httpd.conf. Find the Listen directive and add 127.0.0.1:8080. Next, create a VirtualHost entry like this:
<VirtualHost 127.0.0.1:8080>
  ServerAdmin none
  DocumentRoot /var/www/auth
  ErrorDocument 404 /index.html
</VirtualHost>
This tells Apache to listen to the appropriate port and IP address. For every incoming request, Apache will try to serve a page beneath the given directory. Any time it can’t find a page, it will serve the index.html page instead.
We don’t have either yet, so create the directory /var/www/auth and place an index.html like this in it:
<html>
  <head>
    <title>Unauthorized -- This is a private network</title>
  </head>
  <body>
    <h1>Unauthorized</h1>
    <p>This is a private network and you are not authorized to use
        it.</p>
  </body>
</html>
Putting it All Together
Start or restart dhcpd,
pf, and Apache like this, where
[interfaces] is the list of interfaces on
which you provide DHCP:
#kill `cat /var/run/dhcpd.pid`; dhcpd -q[interfaces] #pfctl -f /etc/pf.conf#apachectl stop && apachectl start
Congratulations! When a new host connects to your network, it
should request an address with DHCP. If so, it will receive an address
in the range of 192.168.0.101 to 192.168.0.254. If the assigned
address is not already in the authorized_hosts table, any time that host
attempts to load a web page it will receive your Unauthorized page. The firewall will
silently discard any packets destined for any other ports outside of
your network.
If you want to allow a new host to use your network, just use
pfctl to add it to the table. To
make the change permanent, add the address or a range of addresses to
the table definition in /etc/pf.conf, or even create an external
file listing allowed addresses. See the PF FAQ section on tables for
more.
Security Concerns
This technique only controls the ability of hosts on your network to route packets through your firewall. It will not protect other hosts on the same subnet from unauthorized access, so they should have reasonable local firewall rules. A wise approach might be to build a firewall with three interfaces: one external and two internal. One internal subnet would host your regular machines, and the other subnet would allow guest access with this technique, separating the subnets with additional PF rules.
Hacking the Hack
Running the web server on the
firewall is a simple approach. However, you can redirect to another
host, such as a dedicated authentication server. For simplicity, this
server should not be on the $int_if:network subnet; if it is, the
redirection becomes more complicated. The PF FAQ has a section devoted
to port forwarding in this manner.
I used Apache because it is installed by default with OpenBSD and because its configuration is trivial in this case. Almost any HTTP server will do the job, though.
See Also
OpenBSD’s PF FAQ (http://www.openbsd.org/faq/pf/)
NoCat.net’s NoCatAuth, authentication software for open wireless nodes (http://nocat.net/)
Automatically Generate Firewall Rules
Easily protect any FreeBSD workstation with a fully configured firewall.
You know the importance of being protected by a firewall. You know where to look in the manpages for details. Given enough time and trouble, you could write a firewall configuration for any situation. They’re all reasonably similar, though, so why not generate the configuration by answering a few questions?
That’s the purpose of the IPFilter setup script: to generate configuration rules for typical SOHO firewalls using FreeBSD and IPFilter. Even novice users can retain the full benefits of a firewall without first having to learn syntax. In fact, with this script, you should be able to set up a typical firewall with no FreeBSD configuration knowledge at all.
Even if you’re not a novice user, this is a great script to refer friends to as they discover FreeBSD. Now you can rest easy in the thought that your friends are protected—and you didn’t even have to find the time to show them how to set up their systems.
What the Script Does
The script uses a simple question and answer text interface. It has four main parts:
- Network settings and IPFilter firewall and IPNAT configuration
This configures internal and external network card interface IP address settings either manually or via DHCP. It creates stateful firewall rules on the external network interface and configures NAT to provide Internet connection sharing on the internal network interface.
- ADSL PPPOE configuration
This prompts for a login name, password, and Ethernet NIC to generate the /etc/ppp/ppp.conf file. It then inserts the required PPP variables in /etc/rc.conf. This starts userland PPP at bootup.
- DHCP server configuration
This checks for the installation of the ISC DHCP server. If it’s not installed, the script offers to install the latest version from the ports system or via a precompiled package.
Once installed, the script will configure the DHCP server by prompting for the addresses of the ISP’s DNS servers, the address of the internal NIC to use as the default gateway, and the IP address range and subnet mask to use for the internal LAN.
- Serial console setup
Answer “yes” to this section of the script if you plan on running the firewall headless [Hack #26] .
Installation
The easiest way to install the script is to download it to the
system that will become the firewall. I prefer the fetch command:
% fetch http://www.roq.com/bsd/ipfilterscript.tar.gzIf networking isn’t configured on that system yet, you can copy the file from another device, such as a USB flash key:
#mount -t msdos /dev/da0s1 /mnt#cp /mnt/ipfilterscript.tar.gz /tmp/
Once you have the script, extract it and run it:
#tar -zxf ipfilterscript.tar.gz#./ipfilter.pl###################################################################### 1: Would you like to setup PPPoE DSL connection (Choose 1) 2: Setup IP configuration, Firewalling and NAT (Choose 2) or 3: Setup a DHCP server (Choose 3 and hit enter) 4: Setup serial console support 5: Exit ######################################################################
If you use ADSL with PPPoE, choose 1 and press Enter. If you have ADSL but use it with a static IP, instead choose 2, which combines IP configuration, Firewalling, and NAT setup. Choosing 3 will install and configure a DHCP server. First, however, configure your network, as the script will attempt to download and install the DHCP server.
Example Usage
For this example, I will choose 2 for IP configuration. The
script lists my three Ethernet cards, rl0, xl0,
and rl1, two of which I haven’t
configured.
rl0: flags=8843<UP,BROADCAST,RUNNING,SIMPLEX,MULTICAST> mtu 1500
        inet6 fe80::202:44ff:fe36:8259%rl0 prefixlen 64 scopeid 0x1
        inet 10.0.0.5 netmask 0xff000000 broadcast 10.255.255.255
        ether 00:02:44:36:82:59
        media: Ethernet autoselect (10baseT/UTP)
        status: active
xl0: flags=8802<BROADCAST,SIMPLEX,MULTICAST> mtu 1500
        options=3<RXCSUM,TXCSUM>
        ether 00:50:da:89:bc:9f
        media: Ethernet 10baseT/UTP (10baseT/UTP <half-duplex>)
rl1: flags=8802<BROADCAST,SIMPLEX,MULTICAST> mtu 1500
        ether 00:02:44:04:14:2c
        media: Ethernet autoselect (10baseT/UTP)
        status: no carrier
lo0: flags=8049<UP,LOOPBACK,RUNNING,MULTICAST> mtu 16384
        inet6 ::1 prefixlen 128
        inet6 fe80::1%lo0 prefixlen 64 scopeid 0x4
        inet 127.0.0.1 netmask 0xff000000
#####################################################################
 Choose your external Nic, eg "fxp0" . If you are firewalling for a PPPoE
 / ADSL setup use "tun0"
#####################################################################
At the moment, I have only one Ethernet card plugged into
something. Only rl0 has active status, so it is plugged into my ADSL
modem. I’ll configure it with a static IP address by typing in
rl0 and pressing Enter. The script
now asks for my internal network card, which is rl1.
#######################################################################
 choose your internal Nic, eg "rl0"
#######################################################################
rl1
#######################################################################
 Internal nic IP, Recommended "192.168.1.1" . Hit "ENTER" for recommended
 defaults
#######################################################################
Now the script needs to know the IP address of the gateway device, behind which all of my internal machines live. The defaults are fine, so I can simply press Enter for the next few questions.
Setting Internal nic IP to 192.168.1.1
#######################################################################
 Internal nic Netmask, Just hit enter for 255.255.255.0
#######################################################################
Setting Internal nic Netmask to 255.255.255.0
When asked for my external IP, I type it in manually since I am setting up a static IP connection:
####################################################################### External nic IP, or type "DHCP" for DHCP, for connections like ADSL type "NONE" for no dhclient on external nic #######################################################################10.6.1.2Setting External nic IP to 10.6.1.2 ####################################################################### External nic netmask, eg 255.255.255.0 #######################################################################255.255.255.254Setting External Netmask to 255.255.255.254 ####################################################################### Do you want to enter a gateway default IP address? if you ISP provided you with a default gateway choose Yes Y/N, default = noyWhat is your gateway IP for your firewall machine to route to, (eg: 111.1.1.1)10.6.1.1####################################################################### Do you want statefull firewall or just allow everything and rely on IPNAT to protect you, I recommend firewalling :) Choose: "y" for statefull firewall or "n" for allow everything #######################################################################y####################################################################### Do you want to forward any ports from the firewall to a internal host ip?n####################################################################### Do you want IP Filter to log denied packets? Y/N, default = yesy#### Denied packets will be logged to /var/log/firewall.log #### ####################################################################### Do you want to install a /etc/ipfrestart script so you can easily reset your rules? Handy if you are trying out new rulesets. Y/N, default = yesy####################################################################### Do you want ftp active mode supprt? when ftping out behind a basic NAT firewall, active mode ftp wont work. This is because normal active mode ftp actually initiates a FTP connection from the server back to YOU! and requires more then basic nat to work. The day FTP is gone and fully replaced by something more secure like SSH's sftp will be a day when the internet is large degree more secure. Choose: "y" to switch on active ftp support (recommended) or "n"yGoing to write the data to these files /etc/rc.conf /etc/ipf.rules /etc//etc/ipnat.rules /etc/newsyslog.conf hit ctrl+c to abort All done, type "reboot" for changes to take effect ######################################################################## Settings for internal machines behind the firewall: Gateway: 192.168.1.1 Netmask: 255.255.255.0 DNS: (Your ISPS DNS) Clients IP: 192.168.1.2 or higher ########################################################################
Finally, the script writes the necessary information to the
required configuration files. When I reboot, the system is fully configured to
access the ISP and provide NAT and DHCP services to the
internal LAN, and it will protect all packets through its
firewall.
See Also
The IPFilterscript web site (http://www.roq.com/bsd/)
The IPFilter web site (http://coombs.anu.edu.au/~avalon/)
Automate Security Patches
Keep up-to-date with security patches.
We all know that keeping up-to-date with security patches is important. The trick is coming up with a workable plan that ensures you’re aware of new patches as they’re released, as well as the steps required to apply those patches correctly.
Michael Vince created quickpatch to assist
in this process. It allows you to automate the portions of the patching
process you’d like to automate and manually perform the steps you prefer
to do yourself.
Preparing the Script
quickpatch requires a few
dependencies: perl, cvsup, and wget. Use which to determine if you already have these
installed on your system:
% which perl cvsup wget
/usr/bin/perl
/usr/local/bin/cvsup
wget: Command not found.
Install any missing dependencies via the appropriate port (/usr/ports/lang/perl5, /usr/ports/net/cvsup-without-gui, and /usr/ports/ftp/wget, respectively).
Once you have the dependencies, download the script from http://roq.com/projects/quickpatch and untar it:
% tar xzvf quickpatch.tar.gzThis will produce an executable Perl script named quickpatch.pl. Open this script in your
favorite editor and review the first two screens of comments, up to
the #Stuff you probably don't want to
change line.
Make sure that the $release
line matches the tag you’re using in your cvs-supfile [Hack
#80] :
# The release plus security patches branch for FreeBSD that you are
# following in cvsup.
# It should always be a long the lines of RELENG_X_X , example RELENG_4_9
$release='RELENG_4_9';
The next few paths are fine as they are, unless you have a particular reason to change them:
# Ftp server mirror from where to fetch FreeBSD security advisories
$ftpserver="ftp.freebsd.org";
# Path to store patcher program files
$patchdir="/usr/src/";
# Path to store FreeBSD security advisories
$advdir="/var/db/advisories/";
$advdirtmp="$advdir"."tmp/";
If you’re planning on applying the patches manually and, when required, rebuilding your kernel yourself, leave the next section as is. If you’re brave enough to automate the works, make sure that the following paths accurately reflect your kernel configuration file and build directories:
# Path to your kernel rebuild script for source patches that require kernel
#rebuild
$kernelbuild="/usr/src/buildkernel";
#$kernelbuild="cd /usr/src ; make buildkernel KERNCONF=GENERIC && make
#installkernel KERNCONF=GENERIC ; reboot";
# Path to your system recompile scipt for patches that require full
# operating system recompile
$buildworld="/usr/src/buildworld";
#$buildworld="cd /usr/src/ ; make buildworld && make installworld ; reboot";
#Run patch command after creation, default no
$runpatchfile="0";
# Minimum advisory age in hours. This is to make sure you don't patch
# before your local cvsup server has had a
# chance to recieve the source change update to your branch, in hours
$advisory_age="24";
Review the email accounts so the appropriate account receives notifications:
# Notify email accounts, eg: qw([email protected] root@localhost);
@emails = qw(root);
Running the Hack
Run the script without any arguments to see the available options:
# ./quickpatch.pl
# Directory /var/db/advisories/ does not exist, creating
# Directory /var/db/advisories/tmp/ does not exist, creating
Quickpatch - Easy source based security update system
"./quickpatch.pl updateadv" to download / update advisories db
"./quickpatch.pl patch" or "./quickpatch.pl patch > big_patch_file" to
create patch files
"./quickpatch.pl notify" does not do anything but email you commands of what
it would do
"./quickpatch.pl pgpcheck" to PGP check advisories
Before applying any patches, it needs to know which patches exist. Start by downloading the advisories:
# ./quickpatch.pl updateadvThis will connect to ftp://ftp.freebsd.org/pub/FreeBSD/CERT/advisories and download all of the advisories to /var/db/advisories. The first time you use this command, it will take a while. However, once you have a copy of the advisories, it takes only a second or so to compare your copies with the FTP site and, if necessary, download any new advisories.
After downloading the advisories, see if your system needs patching:
# ./quickpatch.pl notify
#
If the system is fully patched, you’ll receive your prompt back. However, if the system is behind in patches, you’ll see output similar to this:
# ./quickpatch.pl notify
######################################################################
####### FreeBSD-SA-04%3A02.shmat.asc
####### Stored in file /var/db/advisories/tmp/FreeBSD-SA-04%3A02.shmat
####### Topic: shmat reference counting bug
####### Hostname: genisis - 20/2/2004 11:57:30
####### Date Corrected: 2004-02-04 18:01:10
####### Hours past since corrected: 382
####### Patch Commands
cd /usr/src
# patch < /path/to/patch
### c) Recompile your kernel as described in
<URL:http://www.freebsd.org/handbook/kernelconfig.html> and reboot the
system.
/usr/src/buildkernel
## Emailed root
It looks like this system needs to be patched against the
“schmat reference counting bug.” While running in notify mode, quickpatch emails this information to the
configured address but neither creates nor installs the patch.
To create the patch, use:
#./quickpatch.pl patch######################################################### ####### FreeBSD-SA-04%3A02.shmat.asc ####### Stored in file /usr/src/FreeBSD-SA-04%3A02.shmat ####### Topic: shmat reference counting bug ####### Hostname: genisis - 21/2/2004 10:41:54 ####### Date Corrected: 2004-02-04 18:01:10 ####### Hours past since corrected: 405 ####### Patch Commands cd /usr/src # patch < /path/to/patch ### c) Recompile your kernel as described in #<URL:http://www.freebsd.org/handbook/kernelconfig.html> and reboot the #system. /usr/src/buildkernel #file /usr/src/FreeBSD-SA-04%3A02.shmat/usr/src/FreeBSD-SA-04%3A02.shmat: Bourne shell script text executable
This mode creates the patch as a Bourne script and stores it in /usr/src. However, it is up to you to apply the patch manually. This may suit your purposes if you intend to review the patch and read any notes or caveats associated with the actual advisory.
Automating the Process
One of the advantages of having a script is that you can
schedule its execution with cron. Here is an
example of a typical cron
configuration for quickpatch.pl;
modify to suit your own purposes. Remember to create your logging
directories and touch your log
files before the first run.
# Every Mon, Wed, and Fri at 3:05 do an advisory check and download any
# newly released security advisories
5  3  *  *  1,3,5   root  /etc/scripts/quickpatch.pl updateadv >
    /var/log/quickpatch/update.log 2>1

# 20 minutes later, check to see if any new advisories are ready for use
# and email the patch commands to the configured email address
25  3   *   *  1,3,5  root   /etc/scripts/quickpatch.pl notify >>
    /var/log/quickpatch/notify.log 2>&1

# 24 hours later patch mode is run which will run the patch commands if
# no one has decided to interfere.
25  3  *   *  2,4,6   root  /etc/scripts/quickpatch.pl patch >>
    /var/log/quickpatch/patch.log 2>&1
See Also
The
quickpatch.plweb site (http://roq.com/projects/quickpatch)The FreeBSD Security Advisories page (http://www.freebsd.org/security/index.html#adv)
Scan a Network of Windows Computers for Viruses
Regardless of the size of your network, the cost of annual subscriptions for antivirus software can quickly become a pain in the . . . checkbook. Using FreeBSD’s strength as a network server, how hard could it be to hack an easier and cheaper way to administer the antivirus battle?
The solution I found uses a combination of FreeBSD and ClamAV and Sharity-Light, both of which are found in the ports collection. As seen in [Hack #19] , Sharity-Light can mount Windows shares. Once the shares are mounted, ClamAV will scan them for viruses.
Preparing the Windows Systems
For the systems you wish to virus scan, share their drives as follows:
Open My Computer and right-click on the drive you wish to share.
Select Sharing from the list of options that appear.
In the Sharing tab of the Properties window, assign a name to the new share. I’ll use
cdrivein this example. Choose a name that is both useful to you and not already in use. (If a share already exists, click on New Share.)Unless your network is completely closed to the outside world, click on Permissions and limit the access to your user. You should only need read access for scanning purposes.
If you need further assistance, search for “sharing” in Windows Help. (Click on the Start button and select Help.)
Once you’ve configured the Windows systems for sharing, it’s time to prepare the FreeBSD system.
Preparing the FreeBSD System
Install and configure Sharity-Light [Hack #19] . Remember to edit /etc/hosts to reflect the NetBIOS names of the Microsoft systems.
Then, create a mount point. Since I’ll be automating the process later on with a script, I need only one mount point. For now, I’ll test the required steps using one system:
#mkdir /mnt/winshare#shlight //winbox1/cdrive /mnt/winshare -U algould -P pwdUsing port 1653 for NFS.
Here, I’ve mounted the cdrive
share located on winbox1 to the
/mnt/winshare mount point. This
particular share has a username and password.
Installing and Running the Virus Scanner
ClamAV is a GPL antivirus application that can be used alone or
as a daemon in conjunction with mail server tools such as milter or pop3vscan (both are available in the ports
collection). Although ClamAV can detect and remove files that have
been contaminated with viruses, it does not disinfect these
files.
First, install ClamAV from the ports system:
#cd /usr/ports/security/clamav#make install clean
The ClamAV port installs several executables, including clamd, clamdscan, clamscan, freshclam, and sigtool. Each of
these commands has a manpage, as does clamav.conf, the
configuration file.
For the purposes of this project, we will be using only clamscan and freshclam. Since we will not be activating clamd, we
do not need to change the configuration file.
To update ClamAV’s virus database, execute freshclam:
# freshclam
Current working dir is /usr/local/share/clamav
Checking for a new database - started at Tue Dec 30 14:55:43 2003
Connected to clamav.elektrapro.com.
Reading md5 sum (viruses.md5): OK
viruses.db is up to date.
Reading md5 sum (viruses2.md5): OK
Downloading viruses.db2 ........... done
Database updated (containing in total 11983 signatures).
Database updated from clamav.elektrapro.com.
Once you’ve updated the virus definitions, use clamscan to scan for viruses. You don’t need
to be the superuser, but you must be able to read the files and
directories that you’re scanning. Here’s what happens when I scan an
arbitrary file in my home directory:
% clamscan todo.txt
todo.txt: OK

----------- SCAN SUMMARY -----------
Known viruses: 11982
Scanned directories: 0
Scanned files: 1
Infected files: 0
Data scanned: 0.00 Mb
I/O buffer size: 131072 bytes
Time: 0.241 sec (0 m 0 s)
One file scanned and no viruses found—good. When we scan the
Windows share, however, we will want to scan directories recursively
(using the -r option) and log the
resulting report to a file (using the -l filename
option).
To scan the Windows share mounted at /mnt/winshare and save the scan report to /var/log/clamscan.log, execute:
# clamscan -l /var/log/clamscan.log -r /mnt/winshareAt this point, thousands of filenames fly by the console, ending
in a report similar to the one shown earlier, which is saved to
/var/log/clamscan.log. clamscan will create the report file if it
does not exist. If the report file exists, it will append the new
report to the existing file. You can review the report with any text
editor.
By default, clamscan only
reports that a file has been infected—it is up to you to remove the
virus.
Automating the Process
Scanning a single share is nice, but it would be even better to scan all of the computers in the network at night. Since I can mount and scan a share without being prompted for additional information, I can automate these commands in a script.
I want each Windows system to be mounted, scanned, and unmounted in turn, and I want each system to have its own scan report log. Since I also want to put the report logs in a clamscan directory in /var/log, I need to create the directory. While I’m at it, I’ll create the script file and make it readable and executable only by root:
#mkdir /var/log/clamscan#touch /root/scanscript#chmod u+x,go-rwx /root/scanscript
Next, I’ll use my favorite editor to add the commands to /root/scanscript:
# more /root/scanscript
#! /bin/sh
# /root/scanscript
# Sequentially mount Windows shares, scan them for viruses and unmount them.

# update virus databases
freshclam

# winbox1
shlight //winbox1/cdrive /mnt/winshare -U algould -P pwd
clamscan -l /var/log/clamscan/winbox1 -r /mnt/winshare
unshlight /mnt/winshare

# winbox2
shlight //winbox2/cdrive /mnt/winshare -U algould -P pwd
clamscan -l /var/log/clamscan/winbox2 -r /mnt/winshare
unshlight /mnt/winshare

# winbox3
shlight //winbox3/cdrive /mnt/winshare -U algould -P pwd
clamscan -l /var/log/clamscan/winbox3 -r /mnt/winshare
unshlight /mnt/winshare
Now I can execute the script at will or schedule its execution
using cron.
See Also
man clamscanman freshclamman clamdman clamdscanman clamav.confman sigtoolThe Sharity-Light README and FAQ (/usr/local/share/doc/Sharity-Light/)
The Sharity-Light web site (http://www.obdev.at/products/sharity-light/)
The ClamAV web site (http://www.clamav.net/)