.NET provides a very productive development environment, thanks to two main factors. One is the .NET Framework with its rich class library. The other is Visual Studio .NET, with its many wizards.
The code you write in C# or VB.NET is translated into MSIL by the C# compiler (csc.exe) or the VB.NET compiler (vbc.exe). A few idiosyncrasies of the compilers, and how Visual Studio presents them, can cause frustration in some cases and outright trouble in others. And several things get lost in the translation to MSIL. Not all source-code statements are translated quite as you might expect. This will come to light, for instance, when I discuss the odd behavior related to re-throwing an exception.
In this chapter I will focus on Visual Studio- and compiler-related gotchas.
A compiler aids developers by checking for syntax consistency, and tries to eliminate (or at least reduce) the possibility of errors. However, there are certain anomalies that the compiler takes less seriously than you might want it to. Reporting them as warnings instead of errors may lead to code that compiles but does not behave the way you expect. I urge you to treat warnings as errors to make sure they don’t escape your notice.
I have been preaching this since I started working with .NET. There were times when I wondered how much I should emphasize it, but I was reminded recently when a client asked me to help integrate a new product with an existing one.
I began by fetching the code from the source code control system and compiled it on my machine. Since I had not registered all the necessary components, I got errors. When I went to resolve them, I found several warnings scattered among the errors. My first impulse was to ignore my principles and practices, fix the errors, and finish my task. (After all, I was asked to integrate, not to preach.) However, I get very nervous leaving warnings in my code. So, out of curiosity, I started browsing through the warnings. I could not believe my eyes when I saw the following “warning”:
warning CS0665: Assignment in conditional expression is always
constant; did you mean to use == instead of = ?
The offending code resembled the following if-clause:
if (m_theTextBox.Visible = true)
It was scary to see this crucial mistake in production code. Somehow, it had slipped through the testing and debugging process.
Once I saw this, I looked at the other warnings with a suspicious eye. The next one I encountered said that a method was hiding a method in its base class, and suggested that I use the new keyword (shadows in VB.NET). Here’s the problem: first a method is marked virtual in the base class (overridable in VB.NET); then a derived class implements a method with the same name and signature without marking it as override (overrides in VB.NET).
The result (as discussed in Gotcha #44, "Compilers are lenient toward forgotten override/overrides“) is that the derived method ends up hiding or shadowing the base method instead of overriding it. This leads to behavior that is outright wrong. What is worse is that Visual Studio hides the warning under the rug, so to speak, as Example 2-1 shows.
Example 2-1. Warnings reported by Visual Studio
✗C# (Warnings)
using System;

namespace TreatWarningsAsError
{
    public class Base
    {
        public virtual void foo() {}
    }

    public class Derived : Base
    {
public void foo() {}
    }

    public class Test
    {
        [STAThread]
        static void Main(string[] args)
        {
int val;

            Console.WriteLine("Test");
        }
    }
}✗VB.NET (Warnings)
Public Class Base

    Public Overridable Sub foo()

    End Sub
End Class

Public Class Derived
Inherits Base
               Public Sub foo()

    End Sub
End Class
Public Class Test
    Public Shared Sub Main(ByVal args() As String)
Dim val As Integer

        Console.WriteLine("Test")
    End Sub
End Class
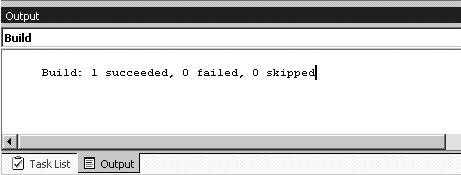
When you compile the C# code in Example 2-1, the output window displays what you see in Figure 2-1.
Since the build succeeded, you have no reason to look for warnings, right? Well, no, not exactly.
If you scroll up to view the compiler messages, you will find:
: warning CS0114: 'TreatWarningsAsError.Derived.foo()' hides
inherited member 'TreatWarningsAsError.Base.foo()'. To make the
current member override that implementation, add the override
keyword. Otherwise add the new keyword.
: warning CS0168: The variable 'val' is declared but never used
There are two warnings. One says that the method foo() in Derived hides the method foo() in Base. The other says that the variable val is declared but never used. While the second is benign, the first one definitely is not.
You may notice that Visual Studio points out warnings by putting a squiggly line on the offending statement. So why not just find the squiggly lines and fix the problems? Well, that might work in a small application. But in a large system, where you may have hundreds of classes, a change in one class can ripple through the entire system. You can’t search every single file looking for squiggly lines.
The problem here is more fundamental: Certain cases, such as the missing override/overrides or the use of = instead of ==, are key programming mistakes and should be treated as errors, not warnings.
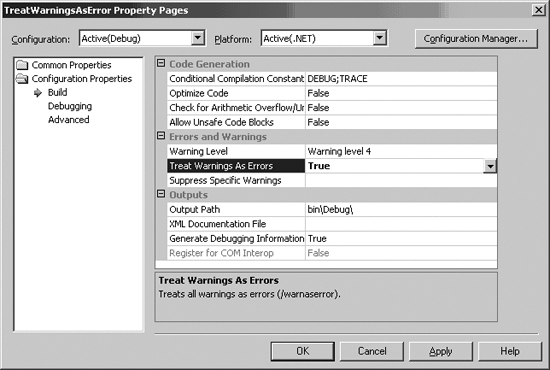
I strongly recommend that you configure the compiler to treat warnings as errors. In Visual Studio, you can do this by going into your project’s properties.
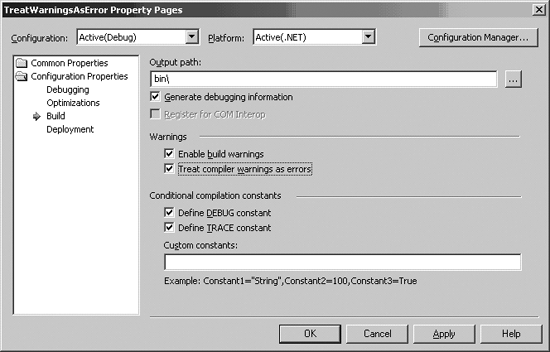
In a C# project, right click on the project name in the Solutions Explorer and click on Properties. In the resulting dialog, go to the Build entry under Configuration Properties. Change the value for the Treat Warnings As Errors property from False to True (you can easily do this with just a double click on the property name), as shown in Figure 2-2. (Figure 2-3 shows how to change the settings for a VB.NET project.)
After you make these changes, the incorrect override of the foo() method appears as an error. However, the benign warning of val not being used has disappeared in the C# version. In the VB.NET version, it did not appear in the first place.
Fortunately, you don’t have to change these settings for every project you create. You can change them at the system level so each new project will have this setting. You do that by modifying the appropriate template.
For C#, you can find these templates in the VC#VC#Wizards directory where Visual Studio .NET is installed. For instance, on my machine, it is under the C:Program FilesMicrosoft Visual Studio .NET 2003VC#VC#Wizards directory. There are four template files: default.csproj (for console applications), DefaultDll.csproj (for DLL class library projects), DefaultWebProject.csproj (for ASP.NET applications), and DefaultWinExe.csproj (for Windows applications). Example 2-2 shows you how
to add an entry to the template file to set Treat Warnings As Errors to true for every C# console project you create.
Example 2-2. Template entry to set Treat Warnings As Errors projects on C#
<VisualStudioProject>
     <CSHARP>
       <Build>
            <Settings OutputType = "Exe" NoStandardLibraries = "false" >
                <Config
                    Name = "Debug"
                    DebugSymbols = "true"
                    Optimize = "false"
                    OutputPath = ".inDebug"
                    EnableUnmanagedDebugging = "false"
                    DefineConstants = "DEBUG;TRACE"
                    WarningLevel = "4"
                IncrementalBuild = "false"
TreatWarningsAsErrors = "true"
                />

         <Config
                    Name = "Release"
                    DebugSymbols = "false"
                    Optimize = "true"
                    OutputPath = ".inRelease"
                    EnableUnmanagedDebugging = "false"
                       DefineConstants = "TRACE"
                        WarningLevel = "4"
                IncrementalBuild = "false"
TreatWarningsAsErrors = "true"
                />
            </Settings>
        </Build>
        <Files>
            <Include/>
            <Exclude/>
        </Files>
    </CSHARP>
</VisualStudioProject>
For VB.NET, the templates for different types of projects are located in different subdirectories under the vb7VBWizards directory. On my system, the file C:Program FilesMicrosoft Visual Studio .NET 2003Vb7VBWizards is the Wizard directory. The template for all console applications is the file ...Vb7VBWizardsConsoleApplicationTemplates1033ConsoleApplication.vbproj.
Example 2-3 shows how you add an entry to the template file to set Treat Warnings As Errors to true for every new VB.NET console project.
Example 2-3. Template entry to set Treat Warnings As Errors on VB.NET projects
<VisualStudioProject>
    <VisualBasic>
        <Build>
            <Settings OutputType = "Exe" StartupObject = "" >
                <Config
                    Name = "Debug"
                    DebugSymbols = "true"
                    DefineDebug = "true"
                    DefineTrace = "true"
                    IncrementalBuild = "true"
                    OutputPath = "bin"
TreatWarningsAsErrors = "true"
                />
                <Config
                    Name = "Release"
                    DebugSymbols = "false"
                    DefineDebug = "false"
                    DefineTrace = "true"
                    IncrementalBuild = "false"
                    Optimize = "true"
                    OutputPath = "bin"
TreatWarningsAsErrors = "true"
                />
            </Settings>
            <References>
                <Reference Name = "System" />
                <Reference Name = "System.Data" />
                <Reference Name = "System.XML" />
            </References>
            <Imports>
                <Import Namespace = "Microsoft.VisualBasic" />
                <Import Namespace = "System" />
                <Import Namespace = "System.Collections" />
                <Import Namespace = "System.Data" />
                <Import Namespace = "System.Diagnostics" />
            </Imports>
        </Build>
        <Files>
            <Include>
            </Include>
        </Files>
    </VisualBasic>
</VisualStudioProject>
Treating warnings as errors has side effects, however.
The main side effect of configuring the project setting to treat warnings as errors is that benign warnings will show up as errors, thus terminating the compilation. Example 2-4 shows a simple example of a class named AService created as part of a class library.
Example 2-4. Sample code with benign warnings
In the above example, while Method1() has the XML documentation tags, Method2() does not. This is not unusual. While you may want to document each method you write, sometimes there are methods that, for some reason, you don’t want to. (A method whose sole purpose is to test some feature of your code is a good example.) When you compile the above code with Treat Warnings As Errors set to True, the warning becomes an error:
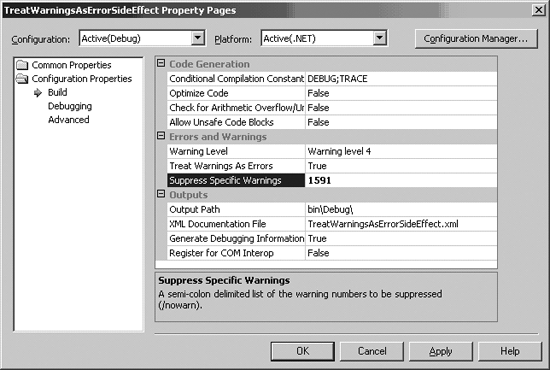
   error CS1591: Missing XML comment for publicly visible type or member
   'TreatWarningsAsErrorSideEffect.AService.Method2()'
There are two solutions to this problem. One is to go ahead and write some documentation, however sketchy, for each method. Or you can suppress warnings of this kind, as shown in Figure 2-4.
But be careful about suppressing warnings. You might not really want to suppress certain warnings. Depending on the case, there may be other alternatives or workarounds.
Not all compiler warnings are benign. Some severe problems are reported as warnings.
Therefore, I strongly recommend that you configure the compiler to treat warnings as errors. You can do this on a per-project basis, or you can modify the Visual Studio templates to affect all future projects you create.
Gotcha #44, "Compilers are lenient toward forgotten override/overrides.”
A language should avoid surprises as much as possible. Its behavior should be intuitive, consistent, and predictable. Unfortunately, both C# and VB.NET have some odd quirks. In this gotcha, I’ll pick on VB.NET.
For instance, suppose you have a hierarchy of exceptions, say Exception E2 inherits from E1, which in turn inherits from System.ApplicationException. When you place catch blocks in your code, what order should you put them in? Should you write the catch for E2 before the one for E1? Or code the catch for E1 before the catch for E2?
The C# compiler tries to help by giving you a compilation error if you place them in the wrong order. However, in VB.NET, you are in for a surprise. Consider Example 2-5.
Example 2-5. Order of catch
using System;

namespace OrderOfCatch
{
    class Program
    {
        public static void AMethod()
        {
            throw new ApplicationException();
        }

        [STAThread]
        static void Main(string[] args)
        {
            try
            {
                AMethod();
            }
catch(Exception ex)
            {
                Console.WriteLine("Caught Exception");
            }
catch(ApplicationException ae)
                // Results in compilation error.
            {
                Console.WriteLine(
                    "Caught ApplicationException");
            }
        }
    }
}✗VB.NET (CatchOrder)
Module Program
    Public Sub AMethod()
        Throw New ApplicationException
    End Sub

    Sub Main(ByVal args As String())
        Try
            AMethod()
Catch ex As Exception
            Console.WriteLine("Caught Exception")
Catch ae As ApplicationException
            Console.WriteLine("Caught ApplicationException")
        End Try
    End Sub
End Module
C# generates the following compilation error:
   error CS0160: A previous catch clause already catches all exceptions of this or a
   super type ('System.Exception').
However, VB.NET does not report an error (it does not even report a warning). Executing the VB.NET version of the code produces the output in Figure 2-5.
Instead of the catch block for System.ApplicationException being called, you end up in the catch for System.Exception.
Now let’s reverse the order of the catch blocks as shown in Example 2-6.
Example 2-6. Reversing the order of catch
Module Program
    Public Sub AMethod()
        Throw New ApplicationException
    End Sub

    Sub Main(ByVal args As String())
        Try
            AMethod()
Catch ae As ApplicationException
            Console.WriteLine("Caught ApplicationException")
Catch ex As Exception
            Console.WriteLine("Caught Exception")
        End Try
    End Sub
End Module
The program now produces the desired output, as shown in Figure 2-6.
When writing VB.NET code, you have to pay attention to the order of your catch blocks. The runtime is going to find the first matching type for a catch. If the base type appears before the derived type, even though a more specific type appears later in the catch sequence, the base type will handle the exception. This is why you see the difference in output between the two VB.NET code versions above.
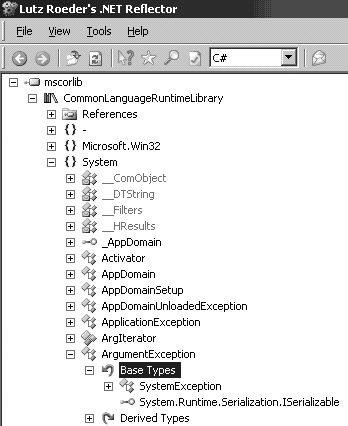
You can use the .NET Reflector tool (see the section "On the Web" in the Appendix) to find the relationship between classes by examining the Base Types and Derived Types nodes, as shown in Figure 2-7.
How does this differ in .NET 2.0 Beta 1? For the VB.NET code, the compiler gives a warning (though still not an error):
   warning BC42029: Catch block never reached, because 'System.ApplicationException'
   inherits from 'System.Exception'.
In VB.NET, if you write multiple catch statements, make sure you place them in the proper order, with catch handlers for derived exception types appearing before the catch handlers for their base types.
Sometimes you need to retrieve the metadata (type information) from a class whose name you know at compile time. If you are going to experience an error in doing this, it is better for it to occur at compile time than at runtime. Consider Example 2-7.
Example 2-7. Failure of Type.GetType()
using System;

namespace TypeOfKnownClass
{
    class Test
    {
        [STAThread]
        static void Main(string[] args)
        {
            Type theType = Type.GetType("Test");

            Console.WriteLine(theType.FullName);
        }
    }
}✗VB.NET (Typeof)
Module Test

    Sub Main()
        Dim theType As Type = Type.GetType("Test")
        Console.WriteLine(theType.FullName)
    End Sub

End Module
While the code looks simple, executing it results in a NullReferenceException. The reason for the exception is that Type.GetType() does not recognize the type Test. You must pass Type.GetType() the fully qualified name of the type prefixed by its namespace. And even if you write the fully qualified name, what if you misspell the namespace? While you can easily identify and fix this in testing, you may still waste a few minutes in the process. If the type is known at compile time, it is better to get the metadata using an alternate mechanism, shown in Example 2-8.
Example 2-8. Getting the Type metadata
using System;

namespace TypeOfKnownClass
{
    class Test
    {
        [STAThread]
        static void Main(string[] args)
        {
            Type theType = typeof(Test);

            Console.WriteLine(theType.FullName);
        }
    }
}✓VB.NET (Typeof)
Module Test

    Sub Main()
        Dim theType As Type = GetType(Test)

        Console.WriteLine(theType.FullName)
    End Sub

End Module
When you use typeof() (C#) and GetType() (VB.NET), the compiler automatically resolves the name Test to its fully qualified name. If there is any ambiguity, the compiler alerts you. This saves time and effort by moving the checking to compile time instead of run time.
Finding problems at compile time is better than waiting for them to surface at run time. If possible, that is, if the class name is known at compile time, use typeof/GetType instead of the Type.GetType() method.
Gotcha #10, "Type.GetType() may not locate all types.”
In some situations, you may need to continue propagating an exception up the call stack. For instance, you may feel that you have not handled it successfully, or perhaps you just want to log the exception. In these cases, you can throw the exception again. If e is a reference to an exception object, the call that comes to mind is throw e. But what is the consequence of this statement? This is a good example of things getting lost in the translation to MSIL. Consider Example 2-9.
Example 2-9. Behavior of a throw statement
✗C# (rethrow)
using System;

namespace ThrowingException
{
    class Test
    {
        public static void Method1()
        {
            throw new ApplicationException();
        }

        public static void Method2()
        {
            try
            {
                Method1();
            }
catch(Exception ex)
            {
                // Code to log may go here.
throw ex;
            }
        }
        public static void Method3()
        {
            try
            {
                Method1();
            }
catch(Exception)
            {
                // Code to log may go here.
throw;
            }
        }

        [STAThread]
        static void Main(string[] args)
        {
            try
            {
                Console.WriteLine("----- Calling Method2");
                Method2();
            }
            catch(Exception ex)
            {
Console.WriteLine(ex);
            }

            try
            {
                Console.WriteLine("----- Calling Method3");
                Method3();
            }
            catch(Exception ex)
            {
Console.WriteLine(ex);
            }
        }
    }
}✗VB.NET (rethrow)
Module Test

    Public Sub Method1()
        Throw New ApplicationException
    End Sub
    Public Sub Method2()
        Try
            Method1()
Catch ex As Exception
            'code to log may go here
Throw ex
        End Try
    End Sub

    Public Sub Method3()
        Try
            Method1()
Catch ex As Exception
            'code to log may go here
Throw
        End Try
    End Sub

    Public Sub Main()
        Try
            Console.WriteLine("----- Calling Method2")

            Method2()
        Catch ex As Exception
Console.WriteLine(ex)
        End Try

        Try
            Console.WriteLine("----- Calling Method3")

            Method3()
        Catch ex As Exception
Console.WriteLine(ex)
        End Try
    End Sub
End Module
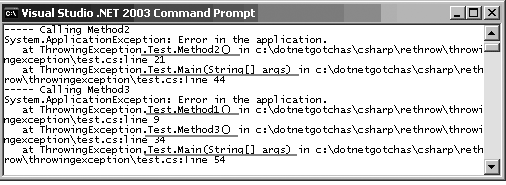
In Example 2-9, Method2() uses throw ex to propagate the exception it caught. Method3(), on the other hand, uses only throw. The output from the above program is shown in Figure 2-8.
Note that when the exception is caught in Main() from Method2() (the one that uses throw ex), the stack trace does not indicate that Method1() was the origin of the exception. However, when the exception is caught in Main() from Method3() (the one that uses throw without the ex), the stack trace points all the way to Method1(), where the exception originated.
What is the reason for this difference? It becomes clear if you use ildasm.exe to examine the assembly for Method2() and Method3(), shown in Example 2-10 as generated from the C# code.
Example 2-10. MSIL with difference between throw ex and throw
.method public hidebysig static void  Method2() cil managed
{
  // Code size       11 (0xb)
  .maxstack  1
.locals init ([0] class [mscorlib]System.Exception ex)
  .try
  {
    IL_0000:  call       void ThrowingException.Test::Method1()
    IL_0005:  leave.s    IL_000a
  }  // end .try
  catch [mscorlib]System.Exception
  {

    IL_0007:  stloc.0
    IL_0008:  ldloc.0
    IL_0009:  throw
  }  // end handler
  IL_000a:  ret
} // end of method Test::Method2

.method public hidebysig static void  Method3() cil managed
{
  // Code size       11 (0xb)
  .maxstack  1
  .try
  {
    IL_0000:  call       void ThrowingException.Test::Method1()
    IL_0005:  leave.s    IL_000a
  }  // end .try
  catch [mscorlib]System.Exception
  {

    IL_0007:  pop
    IL_0008:  rethrow
  }  // end handler
  IL_000a:  ret
} // end of method Test::Method3
As you can see from the MSIL, throw ex translates to a fresh throw on the call stack. However, throw by itself translates to a rethrow statement at the MSIL level. The latter results in the true rethrow of the original exception, whereas the former is treated as a new exception. So you would want to use throw instead of throw ex.
Another option is to use the InnerException property of the Exception class to propagate the exception details. In the catch block for Method2() you can create an exception and set the exception you caught as its constructor argument, as in the following C# code segment:
            catch(Exception ex)
            {
                // Code to log may go here.
                //throw ex;
                throw new ApplicationException(
                        "Exception logged", ex);
            }
The VB.NET version is:
        Catch ex As Exception
            'code to log may go here
            'Throw ex
            Throw New ApplicationException("Exception logged", ex)
        End Try
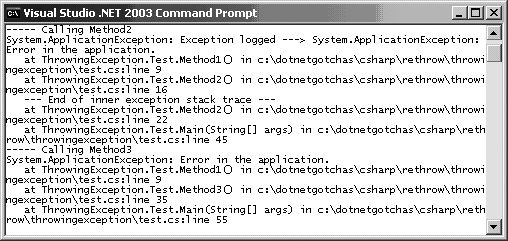
As a result of this change you will see the output shown in Figure 2-9.
The catch blocks in Main() call Console.WriteLine(ex). This in turn calls the ToString() method on the Exception, which prints the details of that exception instance. If the Exception contains a non-null InnerException, the ToString() method of Exception will also print the details of the inner exception. You can see this in the output between the "--->" (in the second line from the top of Figure 2-9) and "--- End of inner exception stack trace ---.”
Gotcha #26, "Details of exception may be hidden.”
C# is a strongly typed language. VB.NET, on the other hand, is not by default, unless you turn on the Option Strict option. When you create a VB.NET project in Visual Studio, Option Strict is set to Off. Should you leave it as Off? Or should you consider setting it to On? I will present arguments for both sides here. Let’s start with the code in Example 2-11.
Example 2-11. Effect of Option Strict Off
This concept does not apply to C#.
✓VB.NET (OptionStrict)
Public Class Program

    Public Sub foo()
        Console.WriteLine("foo called")
    End Sub

    Public Shared Sub Main()

'Very simple case
               Dim val As Integer = 2.3
        Console.WriteLine(val)

'This one is more killing
               Dim obj As Program = New Object

        obj.foo()

    End Sub

End Class
In the above example Option Strict is Off (the default). The code first assigns a double value to an Integer variable. Then it goes on to assign an Object to a reference of type Program. This has disaster written all over it, and in fact the program fails at runtime. Its output is shown in Figure 2-10.
A compiler error would really be nice in this case. As much as possible, you want to eliminate problems at compile time, not runtime. Fortunately, the VB.NET compiler will help if you set Option Strict to On.
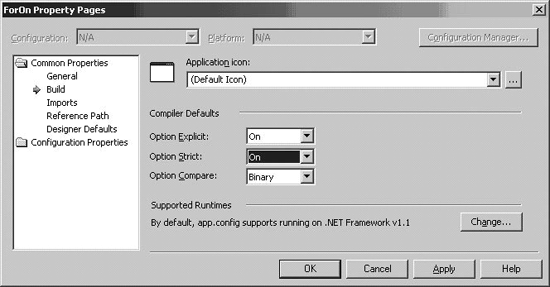
You can do this in the project settings, as shown in Figure 2-11.
Once this is set, you get the following compilation errors in the code:
Option Strict Ondisallows implicit conversions fromDoubletoIntegerOption Strict Ondisallows implicit conversions fromSystem.ObjecttoForOn.Program(whereForOnis the namespace for theProgramclass)So
Option Strict Oncan help you catch errors early, at compile time rather than runtime. It should be the default on all your projects.
Are there situations where you might prefer to have Option Strict Off? Well, not many, but sometimes it comes in handy. For instance, Option Strict Off may make for simpler code by eliminating a number of CType or DirectCast statements when interoperating with some COM components. In cases where the code is easier to write with Option Strict Off, set Option Strict to Off in the source file for those classes only.
In an application that my colleagues and I developed in C#, I had to resort to writing one of the modules in VB.NET. The reason was that I had to integrate a COM component that published only the IDispatch interface. After struggling with it for hours, I could find no way to communicate with this component using C# or VB.NET with Option Strict On.
To illustrate the point, Example 2-12 shows a scripting component representing a bank account.
Example 2-12. An example scripting COM component
<?xml version="1.0"?>
<!-- Scripting Component eBankAccount.wsc -->
<!-- This is a strip down from a component
 that does more serious work accessing a database.
 I have cut it down to bare minimum.
-->
<component>

<?component error="true" debug="true"?>

<registration
    description="eBankAccount"
    progid="eBank.Account"
    version="1.00"
    classid="{7607496c-bfae-4200-9ffb-14c04a93d009}"
>
</registration>

<public>
    <property name="balance">
        <get/>
    </property>
    <method name="deposit">
        <PARAMETER name="purpose"/>
        <PARAMETER name="amount"/>
    </method>
    <method name="withdraw">
        <PARAMETER name="purpose"/>
        <PARAMETER name="amount"/>
    </method>
</public>

<implements type="ASP" id="ASP"/>

<script language="VBScript">
<![CDATA[
OPTION EXPLICIT

dim accountNumber
dim balance

balance = 0


function get_balance()
    get_balance = balance
end function

function deposit(purpose, amount)
    balance = balance + amount
end function

function withdraw(purpose, amount)
    balance = balance - amount
end function

]]>
</script>

</component>
I wanted to access this component from within my .NET code. I tried generating a type library from the component. However, when I used tlbimp.exe to import the type library, I got this error:
     TlbImp error: System.TypeLoadException - Error: Signature has invalid ELEMENT_TYPE_*
     (element type:0x.
So how can you communicate with components like this? Because it only exposes the IDispatch interface, you can only bind to it at runtime. It has no distinct signature (methods and properties); you call all its features indirectly through the IDispatch Invoke() method.
Option Strict Off and late binding through System.Object come to the rescue (see Example 2-13).
Example 2-13. Using late binding to communicate with the component
Option Strict Off

Module Program

    Sub Main()
        Dim theComType As Type = _
            Type.GetTypeFromProgID("eBank.Account")

        Dim theComponent As Object = _
            Activator.CreateInstance(theComType)

        Console.WriteLine("Balance = {0}", _
theComponent.balance)

        Console.WriteLine("Depositing $100")
theComponent.deposit("deposit", 100)

        Console.WriteLine("Balance = {0}", _
theComponent.balance)

    End Sub

End Module
In the code in Example 2-13, even though the project level setting is Option Strict On, in this class file I have set Option Strict Off. Without this setting at the top of the file, I would have gotten compilation errors when I accessed the balance property and when I invoked the deposit() method.
But with Option Strict Off, I was able to dynamically create an instance of the component using the Activator.CreateInstance() method of the Type object obtained from the prog ID (”eBank.Account“). The above code produces the output shown in Figure 2-12.
Set Option Strict to On to improve type checking of your VB.NET code. On rare occasions, you may find setting Option Strict Off to be of benefit, especially when you need to interoperate with late-binding COM Components exposing only the IDispatch interface. In these cases, set Option Strict Off only in those isolated files (classes) that interact with the components.
Serialization is a mechanism that allows converting an object tree into a series of bytes. The most effective use of serialization is in remoting, where objects are passed by value between AppDomains or between applications. Another use of serialization is to store a snapshot of your object tree into a storage medium like a file. You can get a minimum level of support by just marking the type with a Serializable attribute. This is quite powerful, and almost effortless to implement.
If a type is flagged as Serializable, it indicates to the Serializer that an instance of the class may be serialized. If any type in the graph of the object being serialized is not Serializable, the CLR will throw a SerializationException. All fields in your type are serialized except those you mark with the NonSerialized attribute.
However, there are problems. The biggest problem with serializing to a file is versioning. If the version of a class changes after one of its objects is serialized, then the object can’t be deserialized. One way to get around this limitation is to implement the ISerializable interface.
When a class implements ISerializable, the ISerializable.GetObjectData() method is invoked during the serialization process. A special constructor with the same signature as GetObjectData() is called during deserialization. Both these methods are passed a SerializationInfo object. Think of this object as a data bag or a hash table. During serialization, you can store key-value pairs into the SerializationInfo object. When you deserialize the object, you can ask for these values using their keys.
So how do you deal with versioning? If you remove a field from the class, just don’t ask for its value during deserialization. But what if you add a field to the class? When you ask for that field during deserialization, an exception is thrown if the object being deserialized is from an older version. Consider Examples 2-14 and 2-15.
Example 2-14. A serialization example (C#)
//Engine.cs
using System;

namespace Serialization
{
    [Serializable]
    public class Engine
    {
        private int power;

        public Engine(int thePower)
        {
            power = thePower;
        }

        public override string ToString()
        {
            return power.ToString();
        }

    }
}

//Car.cs
using System;
using System.Runtime.Serialization;

namespace Serialization
{
    [Serializable]
    public class Car : ISerializable
    {
        private int yearOfMake;
        private Engine theEngine;

        public Car(int year, Engine anEngine)
        {
            yearOfMake = year;
            theEngine = anEngine;
        }

        public override string ToString()
        {
            return yearOfMake + ":" + theEngine;
        }

        #region ISerializable Members
        public Car(SerializationInfo info,
            StreamingContext context)
        {
            yearOfMake = info.GetInt32("yearOfMake");
            theEngine = info.GetValue("theEngine",
                    typeof(Engine)) as Engine;
        }

        public void GetObjectData(SerializationInfo info,
            StreamingContext context)
        {
            info.AddValue("yearOfMake", yearOfMake);
            info.AddValue("theEngine", theEngine);
        }

        #endregion
    }
}

//Test.cs
using System;
using System.IO;
using System.Runtime.Serialization.Formatters.Binary;

namespace Serialization
{
    class Test
    {
        [STAThread]
        static void Main(string[] args)
        {
            Console.WriteLine(
                "Enter s to serialize, d to deserialize");
            string input = Console.ReadLine();

            if (input.ToUpper() == "S")
            {
                Car aCar = new Car(2004, new Engine(500));

                Console.WriteLine("Serializing " + aCar);
                FileStream strm = new FileStream("output.dat",
                    FileMode.Create, FileAccess.Write);
                BinaryFormatter formatter =
                    new BinaryFormatter();
                formatter.Serialize(strm, aCar);
                strm.Close();
            }
            else
            {
                FileStream strm = new FileStream("output.dat",
                    FileMode.Open, FileAccess.Read);
                BinaryFormatter formatter
                    = new BinaryFormatter();
                Car aCar = formatter.Deserialize(strm) as Car;
                strm.Close();
                Console.WriteLine("DeSerialized " + aCar);
            }
        }
    }
}
Example 2-15. A serialization example (VB.NET)
✓VB.NET (ReflectionToSerialize)
'Engine.vb
<Serializable()> _
Public Class Engine
    Private power As Integer

    Public Sub New(ByVal thePower As Integer)
        power = thePower
    End Sub

    Public Overrides Function ToString() As String
        Return power.ToString()
    End Function
End Class

'Car.vb
Imports System.Runtime.Serialization

<Serializable()> _
Public Class Car
    Implements ISerializable

    Private yearOfMake As Integer
    Private theEngine As Engine

    Public Sub New(ByVal year As Integer, ByVal anEngine As Engine)
        yearOfMake = year
        theEngine = anEngine
    End Sub

    Public Overrides Function ToString() As String
        Return yearOfMake & ":" & theEngine.ToString()
    End Function
    Public Sub New( _
        ByVal info As SerializationInfo, _
        ByVal context As StreamingContext)
        yearOfMake = info.GetInt32("yearOfMake")
        theEngine = CType(info.GetValue("theEngine", _
             GetType(Engine)), Engine)
    End Sub
    Public Sub GetObjectData(ByVal info As SerializationInfo, _
        ByVal context As StreamingContext) _
            Implements ISerializable.GetObjectData
        info.AddValue("yearOfMake", yearOfMake)
        info.AddValue("theEngine", theEngine)
    End Sub
End Class

'Test.vb
Imports System.IO
Imports System.Runtime.Serialization.Formatters.Binary

Module Test

    Public Sub Main()
        Console.WriteLine( _
            "Enter s to serialize, d to deserialize")

        Dim input As String = Console.ReadLine()

        If input.ToUpper() = "S" Then
            Dim aCar As Car = New Car(2004, New Engine(500))

            Console.WriteLine("Serializing " & aCar.ToString())

            Dim strm As FileStream = New FileStream("output.dat", _
                 FileMode.Create, FileAccess.Write)

            Dim formatter As New BinaryFormatter
            formatter.Serialize(strm, aCar)
            strm.Close()
        Else
            Dim strm As FileStream = New FileStream("output.dat", _
                 FileMode.Open, FileAccess.Read)
            Dim formatter As New BinaryFormatter
            Dim aCar As Car = CType(formatter.Deserialize(strm), Car)
            strm.Close()
            Console.WriteLine("DeSerialized " & aCar.ToString())
        End If
    End Sub
End Module
In the previous code, you either serialize or deserialize a Car object. The code is pretty straightforward so far. Now, let’s run it once to serialize the Car object and then run it again to deserialize it. You get the outputs shown in Figures 2-13 and Figures 2-14.
Now let’s modify the Car class by adding a miles field. How can you handle this during deserialization from an older version? If you simply write the code to fetch the miles field within the special constructor you will get an exception; the deserialization will fail because the field is missing. Now, how can you process this in your code? One way is to just handle the exception and move on.
The Car class with the required code change is shown in Example 2-16.
Example 2-16. Handling an exception during deserialization
//Car.cs
using System;
using System.Runtime.Serialization;

namespace Serialization
{
    [Serializable]
    public class Car : ISerializable
    {
        private int yearOfMake;
        private Engine theEngine;
private int miles = 0;

        public Car(int year, Engine anEngine)
        {
            yearOfMake = year;
            theEngine = anEngine;
        }

        public override string ToString()
        {
return yearOfMake + ":" + miles + ":" + theEngine;
        }

        #region ISerializable Members

        public Car(SerializationInfo info,
            StreamingContext context)
        {
            yearOfMake = info.GetInt32("yearOfMake");
            theEngine = info.GetValue("theEngine",
                typeof(Engine)) as Engine;


            try

            {

                miles = info.GetInt32("miles");

            }

            catch(Exception)

            {

                //Shhhhh, let's move on quietly.

            }
        }

        public void GetObjectData(SerializationInfo info,
            StreamingContext context)
        {
            info.AddValue("yearOfMake", yearOfMake);
            info.AddValue("theEngine", theEngine);

            info.AddValue("miles", miles);
        }

        #endregion
    }
}
VB.NET (ReflectionToSerialize)
'Car.vb
Imports System.Runtime.Serialization

<Serializable()> _
Public Class Car
    Implements ISerializable

    Private yearOfMake As Integer
    Private theEngine As Engine
Private miles As Integer = 0
    Public Sub New(ByVal year As Integer, ByVal anEngine As Engine)
        yearOfMake = year
        theEngine = anEngine
    End Sub

    Public Overrides Function ToString() As String
Return yearOfMake & ":" & miles & ":" & theEngine.ToString()
    End Function

    Public Sub New( _
        ByVal info As SerializationInfo, _
        ByVal context As StreamingContext)
        yearOfMake = info.GetInt32("yearOfMake")
        theEngine = CType(info.GetValue("theEngine", _
             GetType(Engine)), Engine)


        Try

            miles = info.GetInt32("miles")

        Catch ex As Exception

            'Shhhhh, let's move on quietly.

        End Try
    End Sub
    Public Sub GetObjectData(ByVal info As SerializationInfo, _
        ByVal context As StreamingContext) _
            Implements ISerializable.GetObjectData
        info.AddValue("yearOfMake", yearOfMake)
        info.AddValue("theEngine", theEngine)
info.AddValue("miles", miles)
    End Sub
End Class
In the special deserialization constructor, you catch the exception if the miles field is missing. While this approach works, the problem with it is twofold. First, as more fields are added and more versioning happens, you might end up with several of these try-catch blocks. The code will get cluttered and difficult to read. Second, if you look for a number of missing fields, each one triggers an exception. This will impact performance. In a sense, you are using exceptions for the wrong purpose. As you are building an application and modifying your classes, fields may very well come and go. So you should handle this situation in the normal flow of your program instead of as an exception.
It would have been nice if the SerializationInfo class had provided a way to find out if a value exists for a given key without raising an exception. Since it doesn’t, you can use an enumerator to loop through the available values and populate your object. You can then use reflection to identify the target fields, and only populate the ones that actually exist in the serialization stream. The code in Examples 2-17 and 2-18 does just that.
Example 2-17. Using reflection to serialize and deserialize (C#)
//Car.cs
using System;
using System.Runtime.Serialization;

namespace Serialization
{
    [Serializable]
    public class Car : ISerializable
    {
        private int yearOfMake;
        private Engine theEngine;
        private int miles = 0;

        public Car(int year, Engine anEngine)
        {
            yearOfMake = year;
            theEngine = anEngine;
        }

        public override string ToString()
        {
            return yearOfMake + ":" + miles + ":" + theEngine;
        }

        #region ISerializable Members

        public Car(SerializationInfo info,
            StreamingContext context)
        {
SerializationHelper.SetData(typeof(Car), this, info);
        }

        public virtual void GetObjectData(SerializationInfo info,
            StreamingContext context)
        {
SerializationHelper.GetData(typeof(Car), this, info);
        }

        #endregion
    }
}

//SerializationHelper.cs
using System;
using System.Runtime.Serialization;
using System.Reflection;
namespace Serialization
{
    public class SerializationHelper
    {
        public static void SetData(
            Type theType, Object instance, SerializationInfo info)
        {

            SerializationInfoEnumerator enumerator =
                info.GetEnumerator();

            while(enumerator.MoveNext())
            {
                string fieldName = enumerator.Current.Name;

                FieldInfo theField
                    = theType.GetField(fieldName,
                    BindingFlags.Instance |
                    BindingFlags.DeclaredOnly |
                    BindingFlags.Public |
                    BindingFlags.NonPublic);
                if (theField != null)
                {
                    theField.SetValue(instance, enumerator.Value);
                }
            }
        }

        public static void GetData(
            Type theType, Object instance, SerializationInfo info)
        {

            FieldInfo[] fields = theType.GetFields(
                BindingFlags.Instance |
                BindingFlags.DeclaredOnly |
                BindingFlags.Public |
                BindingFlags.NonPublic);

            for(int i = 0; i < fields.Length; i++)
            {
                // Do not serialize NonSerialized fields
                if(!fields[i].IsNotSerialized)
                {
                    info.AddValue(fields[i].Name,
                        fields[i].GetValue(instance));
                }
            }
        }
    }
}
Example 2-18. Using reflection to serialize and deserialize (VB.NET)
✓VB.NET (ReflectionToSerialize)
'Car.vb
Imports System.Runtime.Serialization
Imports System.Reflection

<Serializable()> _
Public Class Car
    Implements ISerializable

    Private yearOfMake As Integer
    Private theEngine As Engine
    Private miles As Integer = 0

    Public Sub New(ByVal year As Integer, ByVal anEngine As Engine)
        yearOfMake = year
        theEngine = anEngine
    End Sub

    Public Overrides Function ToString() As String
        Return yearOfMake & ":" & miles & ":" & theEngine.ToString()
    End Function

    Public Sub New( _
        ByVal info As SerializationInfo, _
        ByVal context As StreamingContext)


        SerializationHelper.SetData(GetType(Car), Me, info)
    End Sub

    Public Overridable Sub GetObjectData(ByVal info As SerializationInfo, _
        ByVal context As StreamingContext) _
            Implements ISerializable.GetObjectData


        SerializationHelper.GetData(GetType(Car), Me, info)
    End Sub
End Class


'SerializationHelper.vb

Imports System.Runtime.Serialization
Imports System.Reflection

Public Class SerializationHelper
    Public Shared Sub SetData( _
    ByVal theType As Type, ByVal instance As Object, _
    ByVal info As SerializationInfo)

        Dim enumerator As SerializationInfoEnumerator = _
            info.GetEnumerator()

        While enumerator.MoveNext()
            Dim fieldName As String = enumerator.Current.Name
            Dim theField As FieldInfo = _
                 theType.GetField(fieldName, _
                    BindingFlags.Instance Or _
                    BindingFlags.DeclaredOnly Or _
                    BindingFlags.Public Or _
                    BindingFlags.NonPublic)

            If Not theField Is Nothing Then
                theField.SetValue(instance, enumerator.Value)
            End If
        End While
    End Sub

    Public Shared Sub GetData( _
           ByVal theType As Type, _
           ByVal instance As Object, _
           ByVal info As SerializationInfo)

        Dim fields() As FieldInfo = theType.GetFields( _
            BindingFlags.Instance Or _
            BindingFlags.Public Or _
            BindingFlags.NonPublic)

        Dim i As Integer

        For i = 0 To fields.Length - 1
            'Do not serialize NonSerializable Fields
            If Not fields(i).IsNotSerialized Then
                info.AddValue(fields(i).Name, _
                 fields(i).GetValue(instance))
            End If
        Next
    End Sub

End Class
Let’s first take a look at the GetObjectData() method that performs the serialization. It calls the SerializationHelper’s GetData() method. This method serializes all fields that are not marked with a NonSerialized attribute.
In the special deserialization constructor, you call the SerializationHelper’s SetData() method, which enumerates the keys in the SerializationInfo object. For each key found, the method checks if it exists in the class, and if so, sets its value.
Notice that the GetObjectData() method is virtual/Overridable and that it only serializes its own members, not those in its base class. Classes further derived from your class can take care of serializing their own members by overriding GetObjectData() and writing a special deserialization constructor, as shown in Example 2-19.
Example 2-19. Serialization and deserialization of a derived class
//DerivedCar.cs

        public DerivedCar(SerializationInfo info,
            StreamingContext context)
            : base(info, context)
        {

            SerializationHelper.SetData(
                typeof(DerivedCar), this, info);
        }

        public override void GetObjectData(SerializationInfo info,
            StreamingContext context)
        {

            base.GetObjectData(info, context);
            SerializationHelper.GetData(
                typeof(DerivedCar), this, info);
}✓VB.NET (ReflectionToSerialize)
'DerivedCar.vb


    Public Sub New( _
        ByVal info As SerializationInfo, _
        ByVal context As StreamingContext)

        MyBase.New(info, context)

        SerializationHelper.SetData( _

            GetType(DerivedCar), Me, info)
    End Sub

    Public Overrides Sub GetObjectData( _

        ByVal info As SerializationInfo, _
        ByVal context As StreamingContext)

        MyBase.GetObjectData(info, context)
        SerializationHelper.GetData(GetType(DerivedCar), Me, info)
    End Sub
The serialization code that uses reflection will work for fields added and removed between versions. But it does not handle a field that gets removed in one version and then added back in a later one, with the same name but with a different intent, different semantics, or a different type. The difference in type can be handled by putting in a few more checks and balances, but the difference in semantics is a hard one. Further, this approach will fail if local security settings prohibit querying for private fields using reflection.
One option to get around these problems is to use a version number and to serialize or deserialize appropriate fields based on the version number. You can use this somewhat lengthy approach if the above options will not work.
Using exceptions to determine if a member should be deserialized is expensive, and is also an inappropriate use of exceptions. It is better to rely on reflection to achieve this goal, and the code is more extensible. Or handle the versioning yourself by using the version number.
It is better to create a blank solution and create projects in it rather than starting out creating a project. The advantages of this are:
You can add other projects to the solution as desired (and in a typical application you will want to).
In a large application you can create different solutions with a subset of projects for different purposes. A project may belong to more than one solution at a time.
Say you have created a blank solution named MyApp in the C:projects directory. Also assume you have created projects like a class library named MyLib from within this solution. By default, the MyLib project is placed in the C:projectsMyAppMyLib directory. Now say you want to create a Web project within the same solution, either an ASP.NET Web Application or an ASP.NET Web Service. If you specify the location of the service as http://localhost/MyWebApp, then the project for MyWebApp is unfortunately created in the C:inetpubwwwroot directory (or wherever IIS is installed). This is undesirable, as you would like to keep all files related to your solution together, or at least in your own preferred location. The problem is worse if you move an existing solution to a new machine by bringing it over from a source code control system.
In this gotcha I discuss two things:
how to create a solution with a Web project
how to open a solution that contains a Web project and is stored in Visual Source Safe.
Before creating a Web project, create a virtual directory. The easiest way to do that is in Windows Explorer.
In the following example, I assume that you have already created a blank solution named CreatingWebApp. In that solution you want to create an ASP.NET Web Application. If you click on Add → New Project in Solution Explorer, a project will be created under the C:inetpubwwwroot directory. However, you would like for the project to reside under the CreatingWebApp directory.
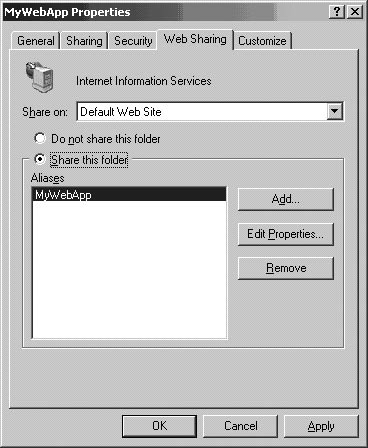
First you use Windows Explorer to create MyWebApp as a subdirectory of CreatingWebApp. Then you right click on it (in Windows Explorer) and select Properties. In the Properties window, you go to the Web Sharing tab as shown in Figure 2-15.
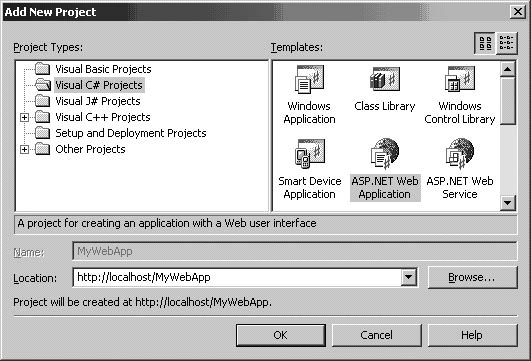
In this tab select the “Share this folder” radio button. In the dialog that pops up, accept the defaults and click OK. This process tells IIS that your new directory is the location of the virtual directory MyWebApp. Now in Visual Studio you can create the Web application simply by providing the location as http://localhost/MyWebApp, as shown in Figure 2-16.
The project-related files will now be created under the CreatingWebAppMyWebApp directory.
You should take a similar approach before opening any solution containing a Web App project for the first time. First make the directory a virtual directory, then open the solution in Visual Studio.
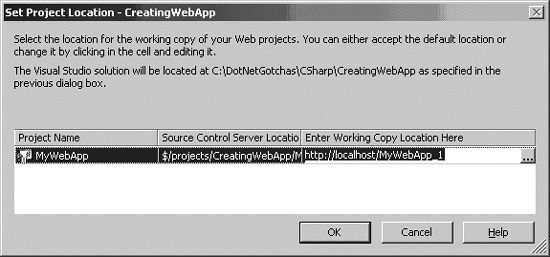
Things get a bit more complicated when you open projects that are stored in Visual Source Safe (VSS). Suppose you have a solution in VSS containing one or more Web projects. You want to open it on a new machine belonging to a new developer on your team. I have wasted significant time on this whenever I forgot to follow the correct sequence of steps. When you open a solution in Visual Studio, if that solution is in VSS, Visual Studio tries to get the latest version. For non-Web applications, this is not much of a problem. However, if the project is a Web App, you’ll be presented with the Set Project Location - CreatingWebApp dialog shown in Figure 2-17.
Let’s examine the problem scenario. First, you placed the solution created above in VSS. Then you removed the directory from your local hard drive and got the latest version of the solution from VSS. You made sure that MyWebApp is a virtual directory referring to the physical location of the MyWebApp directory. Then you double-clicked on the CreatingWebApp.sln solution file.
That is when you got the error message shown in Figure 2-17. What’s the problem?
When you open the Web App, Visual Studio looks in the virtual directory and finds the project-related files. Overwriting the files in a Web application may not be the best thing to do. So, as a precaution, Visual Studio asks you to enter a different working directory. How do you avoid this problem? Here are the steps to follow:
Fetch the source code and related files from VSS.
Create the virtual directory for your Web project.
Leave the Web project directory in place, but remove all its contents.
Double-click on the .sln file and open the solution with Web projects in it.
This will automatically pull your Web project files from VSS.
The above steps are only needed the first time you bring the files over, or if you change the location where you keep your source code locally.
It is better to start by creating a blank solution and then creating projects in it. Also, set up a virtual directory before creating a Web App on localhost. Further, if the solution has Web Apps and you have it checked into Visual Source Safe, opening the solution the first time on a new machine requires following a specific set of steps:
Fetch the files.
Create a virtual directory.
Delete the contents of the virtual directory.
Open the solution.
Writing XML-style documentation is supported in C# out of the box. Third-party tools can be used to generate XML documentation for VB.NET code. The next version of Visual Basic (Visual Basic 2005, which is also known as the Whidbey release) will support XML comments directly. There are two advantages to writing this documentation. One, it serves to specify what your code does, without regard to how it does it. This can be useful for users of your API—both internal users and external users. Second, it provides IntelliSense when your classes are used.
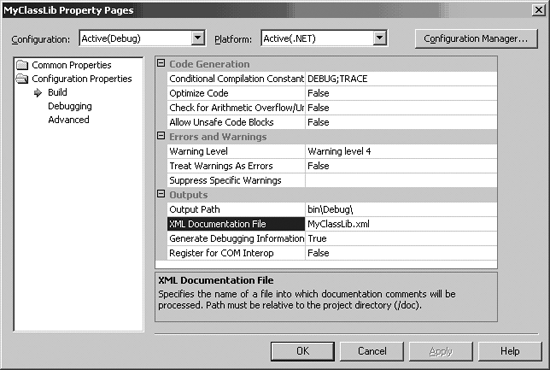
However, the XML document must have the same name as your assembly and must have the .xml extension. When an assembly is referenced in a project, Visual Studio brings over not only the assembly, but also the related XML documentation file. If it is named something other than the exact name of the assembly, this process does not happen and IntelliSense does not provide the details of your classes, methods, properties, etc.
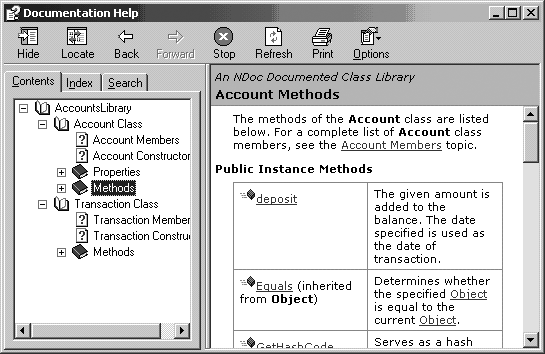
As mentioned, the usefulness of the XML documentation goes beyond IntelliSense. Open source tools like NDoc (See the section "On the Web" in the Appendix) may be used to produce MSDN-like or HTML documentation. Figure 2-18 shows an example of what NDoc produces.
Figure 2-19 shows how you can configure the C# project settings to generate the XML document. Given that the XML documentation file name should be the same as the assembly name, a checkbox instead of a textbox for XML Documentation File would have been appropriate.
Name the XML documentation file the same as your assembly name to ensure that IntelliSense will work properly.
Gotcha #18, "Creating Web apps can be painful.”

