
Chapter 5. Building Web Applications
Within a short few years, ASP.NET has become a favorite tool of web applications developers and now, with the release of ASP.NET 2.0, it has undergone its second major upgrade. With ASP.NET 2.0, Microsoft has made major improvements based on feedback from its millions of customers as well as the company’s own experience in developing and deploying web sites and portals. The rise of competing tools such as Macromedia Flash and open source PHP have also encouraged Microsoft to focus with particular intensity on improving the ease of use of ASP.NET while reducing the amount of code developers must write to create web applications.
For the Visual Basic 2005 programmer, the new release of ASP.NET is yet another bonanza, making web application development more accessible then ever to those with Visual Basic skills. Among its many improvements, ASP.NET 2.0 ships with dozens of new ready-to-use controls, considerably reducing the amount of code you need to write to achieve professional results. In fact, a stated aim of the Microsoft web development tools team is to reduce the amount of code you write to perform common web site tasks by up to 70%. In addition, ASP.NET 2.0 comes with some neat improvements, such as cross-page posting and the ability to insert client script into a page. You will learn about some of these features in this chapter.
The new features in ASP.NET 2.0 can be grouped into three broad categories: new controls and control functionality, improvements to the Page Framework, and new services and APIs.
- Controls
ASP.NET 2.0 ships with more than 50 new controls that make the life of a web application developer easier by eliminating the need to write code. Specifically, there are new controls that help you to perform data access, site navigation, login, and personalization with Web Parts.
- Page Framework
ASP.NET 2.0 supports some useful additions to its Page Framework, most importantly establishing a common look and feel on a site through a feature known as Master Pages. In addition to Master Pages, ASP.NET 2.0 supports “theming” through Themes and Skins, allowing you to maintain a consistent look and feel for your web sites and their controls. Another noteworthy feature in ASP.NET is its improved support for localization, which reduces the amount of work you need to do to internationalize your web applications.
- Services and APIs
Behind the various new ASP.NET 2.0 controls for web site development lie the foundation services and APIs that do the heavy lifting the controls need to do their work. For example, behind the new Login controls you’ll find the new Membership APIs, which perform such tasks as user authentication, registration of new users, etc. If the controls don’t do what you need, you can make use of these APIs directly in code.
In this chapter, you will build a simple e-commerce web application using several of the most powerful and interesting features of Visual Studio 2005 and ASP.NET 2.0. The site will enable users—whether or not they are authenticated—to browse a list of books and add one or more to a shopping cart. Once a user is ready to checkout, the site will display a page asking the user either to log in or register as a new member and then proceed to log in as a new member.
As you build the site, you’ll get a feel for the following Visual Studio 2005 and ASP.NET 2.0 features:
How to create a consistent look and feel for your web site using Master Pages
How to use the new Profiling services to save items into a shopping cart and keep track of them when a user registers and logs into the site
How to use the new security controls to create user accounts and to authenticate users
How to use new Member services to create a members-only directory of pages
How to display data using the
GridViewcontrol
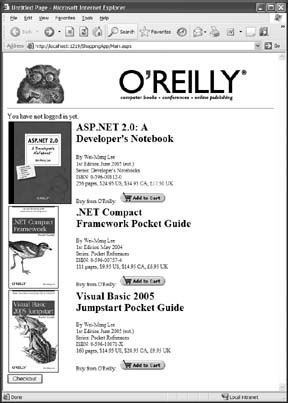
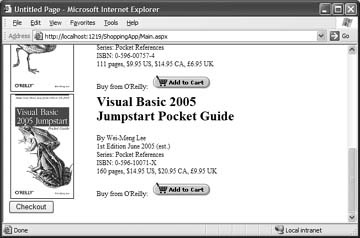
Of course, since this is a Visual Basic 2005 book, you’ll also get to write some code. Figure 5-1 shows how the main page of application will look when it is completed. Users will click on the Add to Cart buttons to add items to their shopping cart and click on the Checkout button to go to the login page to sign in and make a purchase.
Building the Storefront
The first step toward building the example in this chapter is to create the Storefront page shown in Figure 5-1. You’ll first create a Master Page to set the look and feel of the site and then derive the Storefront page from it. Once the page is created, you’ll add the controls needed to define its buttons and to display the books. To get started, you’ll use Visual Studio 2005 to create a new Visual Basic web application.
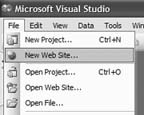
On the Visual Studio menu bar, click File → New Web Site…, as shown in Figure 5-2. The New Web Site dialog box will display.
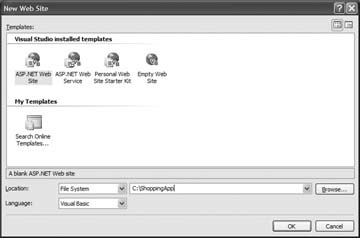
In the New Web Site dialog, select the ASP.NET Web Site template. Select File System as its Location, and Visual Basic as the Language you will use. Name the project C:ShoppingApp. Figure 5-3 shows the result. Click OK to continue. Visual Studio 2005 will create the site and display its files in the Solution Explorer. Take a look at the toolbar, which lists an entirely different set of controls specifically provided for building web applications. You’ll be using a number of these later in the chapter.
Building a Site Template Using a Master Page
Visual Studio 2005 and ASP.NET 2.0 now support the creation of special pages known as Master Pages that you can use to give a common look and feel to every page on your site. The implementation resembles the visual page inheritance found in Windows Forms, for those who have used that popular framework, though strictly speaking, it is not the same. You can create a single Master Page to specify the common elements shared by all the pages of your site. You then create web pages that draw on content from the Master Page.
For the e-commerce site, you will first create a Master Page to define the header that will appear on every page. The header consists of two images, one showing the O’Reilly company logo and the other displaying the O’Reilly company name.
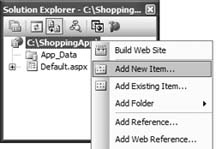
To create the Master Page, right-click on the project name in Solution Explorer and then select Add New Item… (see Figure 5-4).
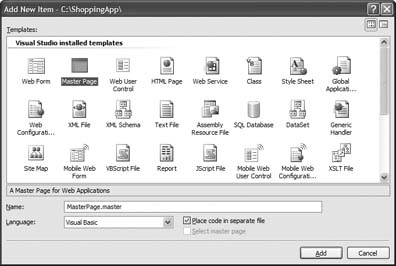
In the Add New Item dialog, select the Master Page template and use the default name, MasterPage.master, as shown in Figure 5-5. Click Add to create the page.
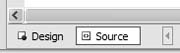
Since you’ll be using controls to add elements to the Master Page, go to the MasterPage.master page and switch to the Design view by clicking on the Design button at the bottom left of the page, as shown in Figure 5-6.
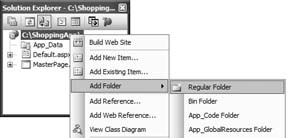
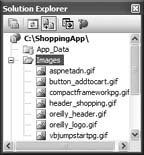
Your project will make use of a number of images, so you need to create a folder to store them. Add a folder to the project and name it Images by right-clicking on the project name in Solution Explorer and selecting Add Folder → Regular Folder, as shown in Figure 5-7
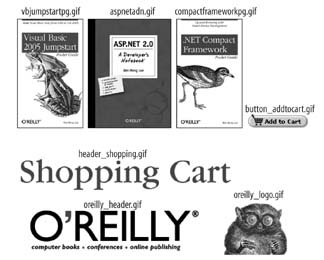
Copy the images shown in Figure 5-8 into the C:ShoppingAppImages folder. You’ll use these images to build your application. When you’ve finished, the Images folder should look like the one shown in Figure 5-9.
Tip
The images can be downloaded from this book’s support site athttp://www.oreilly.com/catalog/vbjumpstartpg/.
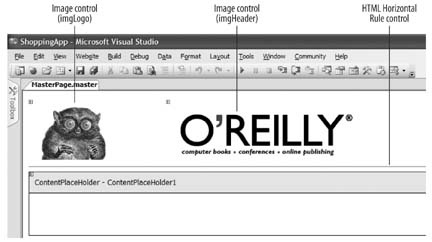
Now you’re finally ready to lay out the elements of the Master Page. Drag and drop two Image controls and an HTML Horizontal Rule control from the Toolbox onto the page, as shown in Figure 5-10 Set the names of the controls to those shown in the figure. Make sure the controls are positioned above the
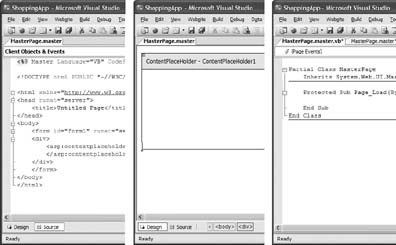
ContentPlaceHoldercontrol (simply position your cursor to the left of theContentPlaceHoldercontrol and press the Enter key a few times to move the control downward).In Visual Studio 2005, a Web Form is displayed in Source view by default. Source displays the HTML and other markup a web browser uses to construct a web page you’ve designed. In Source view, you can directly modify HTML elements and their attributes as well as the controls contained within it. To switch to Design view, click on the Design button at the bottom of the screen. In Design view, you can visually inspect the page and drag and drop controls from the Toolbox onto the form. To view the code behind of the form, you can simply double-click on the form and the code behind will appear. In Code view, you use Visual Basic to write the business logic for your application and service the events raised by the various controls on the page. The figure shows each of the three views.
Tip
The
ContentPlaceHoldercontrol (populated by default in a Master Page) is a place holder for Content pages (pages that inherit from the Master Page) to populate with controls.Set the
ImageUrlproperty of theimgLogo control to ~/Images/oreilly_ logo.gifand that of theimgHeadercontrol to~/Images/oreilly_header.gif. The two GIF files contain the O’Reilly company logo and company header, respectively.Save the project (click File → Save All).
Building the Storefront Using a Content Page
Now that the Master Page is completed, you’re ready to create the Storefront page. You’ll do this by deriving (or inheriting) a Content page from the Master Page and then populating it with controls. The Storefront page will display a list of titles that users can add to a shopping cart.
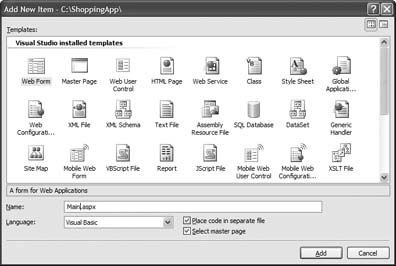
To create a blank Content page, right-click on the project name (ShoppingApp) in the Solution Explorer and select “Add New Item….” In the Template window of the Add New Item dialog box, select Web Form and set its name to Main.aspx. To let Visual Studio 2005 know that you want to use a Master Page, check the “Select master page” checkbox at the bottom of the dialog, as shown in Figure 5-11 Click Add to move to the next step.
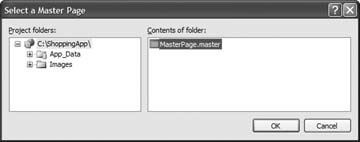
Now it’s time to choose the Master Page. When Visual Studio 2005 displays the Select a Master Page dialog box, select MasterPage.master in the Contents of folder pane, as shown in Figure 5-12. Click OK to proceed to the next step.
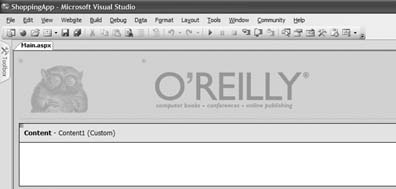
Visual Studio 2005 will display the new page, Main.aspx, with the contents of the Master Page grayed out, as shown in Figure 5-13. The grayed out sections of the page are meant to indicate that content derived from the Master Page cannot be edited in the Main.aspx form. Notice that the new page contains a Content control.
You’ll customize the new page,Main.aspx, by adding controls to the Content control in the next step.
Now we’ll add the content, specifically the Storefront items available for users to select. Selection in your store will be limited to three items (my O’Reilly books). We’ll use a 3 x 2 table to lay out their images and their purchase information.
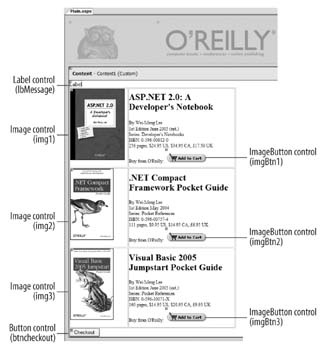
To add content to a Content control, you’ll typically drag-and-drop controls from the Toolbox onto it. You can also type text directly into a Content control if you wish. In the Content control, insert a 3 x 2 table (go to Table → Layout) and then populate the table cells with the controls shown in Figure 5-14. Also, type in the text as shown in the figure. You can drag and drop the detailed information of each book from the following URLs:
Set the properties for the controls as follows:
Creating a Shopping Cart
When a user clicks on the Add to Cart button on the Main.aspx page, you’ll want the item to be saved in a shopping cart, a key feature of the application that you’ll now implement. To save items, you’ll use the new Profile service (exposed via the Profile object) in ASP.NET 2.0. Think of the Profile service as an ASP.NET mechanism to persistently store a user’s information, similar to the Session object. Unlike a Profile object, however, a Session object is valid only for the duration of a session; after the session has expired, the Session object is deleted. The Profile service, however, retains its information until you explicitly remove it from the data store.
Moreover, the Profile object has several advantages over the Session object, such as:
- Non-volatility
Profile object data is persisted in data stores, whereas Session variables are saved in memory.
- Strong typing
Profile object properties are strongly typed, unlike Session variables, which are stored as objects and typecast during runtime.
- Efficient implementation
Profile properties are loaded only when they’re needed, unlike Session variables, all of which are loaded whenever any one of them is accessed.
In this section, you use the Profile service to implement a shopping cart.
In addition to creating the shopping cart itself, you add forms so that when it comes time to check out, users can either log in to access the members’ only area of the site, or register and then log in. You’ll use Forms authentication rather than Windows authentication to identify a user.
First, you need to create the business object that implements the functionality of a shopping cart. Add a new class to the project and name it ShoppingCart.vb. (Right-click on project name in Solution Explorer and select Add New Item…. Then select the Class template and rename it ShoppingCart.vb.) You will be asked if you wish to save the file in the App_Code folder (see Figure 5-15), which is recommended. Click Yes.
Code the ShoppingCart.vb class file as shown in Example 5-1.
Example 5-1. ShoppingCart.vbImports Microsoft.VisualBasic Imports System.Xml.Serialization Namespace OReilly Public Structure itemType Dim isbn As String Dim qty As Integer End Structure<XmlInclude(GetType(itemType))>_Public Class Cart '---use public for Xml serialization--- Public items As New _ System.Collections.Generic.List(Of itemType) Public Sub AddItem(ByVal isbn As String, _ ByVal qty As Integer) Dim cartItem As New itemType cartItem.isbn = isbn cartItem.qty = qty items.Add(cartItem) End Sub End Class End NamespaceTip
You need to specify the
XmlIncludeattribute to allowXmlSerializerto recognize a type when it serializes or deserializes theitemTypedata type.An item is represented using the
itemTypestructure containing its ISBN number as well as the quantity. TheCartclass contains anAddItemmethod that adds items to a genericListobject (located in theSystem.Collections.Genericnamespace). Notice that you use theOReillynamespace to uniquely identify theitemTypestructure andCartclass that you have defined in this file.Before building the actual registration and login forms, you’ll first specify how users are to be authenticated. With web applications for Internet users, you should use Forms authentication, instead of the Windows authentication that ASP.NET uses by default (see “Forms Versus Windows Authentication”). Changing the authentication mode of a web application from Windows to Forms requires changing the mode attribute of the authentication element in its Web.config file. You’ll first need to add a Web.config file to your project.
To add a Web.config file to your project, right-click on the project in Solution Explorer and select Add New Item → Web Configuration File). Visual Studio will create and display the contents of the file.
Locate the <
authentication> element in the file and change itsmodeattribute fromWindowstoFormsin the editor, as shown in Example 5-2.To use the Profile service to store a user shopping cart, you need to define a
profileproperty for the cart and specify its characteristics. To do that, add the markup shown in bold in Example 5-3 to Web.config.Example 5-3. Defining the shoppingcart profile proper<system.web>
<anonymousIdentification enabled="true"/> <profile> <properties> <add name="shoppingcart" allowAnonymous="true" type="OReilly.Cart" serializeAs="Xml"/> </properties> </profile> …You define the type for the
shoppingcartprofile property asOReilly.Cart. This type refers to theCartclass that you have defined in ShoppingCart.vb. Theshoppingcartprofile property will be serialized as an XML string so that it can be stored in a database.Tip
To save the value of an object to disk, you need to serialize it into XML or binary format. In this case, you’ve chosen the XML method.
The <
anonymousIdentification> element must be added in addition to theshoppingcartproperty because an Internet user viewing your cart may not yet be an authenticated user of the application. To keep track of an unknown user, ASP.NET needs to assign a unique identifier to the anonymous user.- readOnly
Indicates whether the property is read-only.
- serializeAs
Represents how the property value should be stored in the database. Possible values are
String(default),Xml,Binary, andProviderSpecific.- provider
Is the name of the profile provider to use.
- defaultValue
Is the default value of the property.
- allowAnonymous
Indicates whether the property can store values by anonymous users.
Switch to the code behind of Main.aspx and add the code for the
imgBtn_Clickmethod shown in Example 5-4. This method retrieves the shopping cart of the current user—whether authenticated or anonymous—and then adds the selected item to it. The updated shopping cart is then saved to theProfileobject.Example 5-4. Add to Cart button (imgBtn) Click event handlerProtected Sub imgBtn_Click( _ ByVal sender As Object, _ ByVal e As System.Web.UI.ImageClickEventArgs) _ Handles imgBtn1.Click, imgBtn2.Click, imgBtn3.Click
Dim myCart As OReilly.Cart '---retrieve the existing cart myCart = Profile.shoppingcart If myCart Is Nothing Then myCart = New OReilly.Cart End If Dim isbn As String Select Case CType(sender, ImageButton).ID Case "imgBtn1" : isbn = "0-596-00812-0" Case "imgBtn2" : isbn = "0-596-00757-4" Case "imgBtn3" : isbn = "0-596-10071-X" End Select lblMessage.Text = "You have added " & isbn myCart.AddItem(isbn, 1) '---save the cart back into the profile Profile.shoppingcart = myCartEnd SubFor simplicity, you will add an item selected by the user into the shopping cart, even though the item might already be present in the cart.
Note that this subroutine handles the click event of three
ImageButtoncontrols. This is accomplished by theHandlesstatement:Handles imgBtn1.Click, imgBtn2.Click, imgBtn3.Click
When any of the
ImageButtoncontrols is clicked, this subroutine will check which control fired the event by first converting thesenderobject into anImageButtoncontrol and then examining the ID (control name) of the control:Select Case CType(sender, ImageButton).ID Case "imgBtn1" : isbn = "0-596-00812-0" Case "imgBtn2" : isbn = "0-596-00757-4" Case "imgBtn3" : isbn = "0-596-10071-X" End SelectOf course, if you have a lot of titles on a page you can check the ISBN using a database, but for this simple example you will hardcode the information.
Code the
Page_Loadevent so that when the page (Main.aspx) is loaded, it can check theMembershipclass to check to see if the user is authenticated and print out the related information about the user (see Example 5-5).If the user is authenticated, the
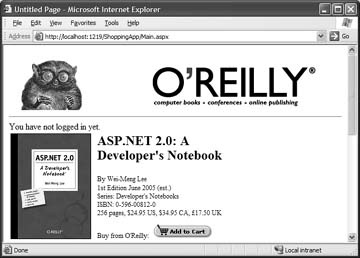
GetUsermethod from theMembershipclass will return information about the authenticated user, or else it will returnNothing.To test the application, select Main.aspx in Solution Explorer and then press F5. Since you haven’t logged in yet, you should see the message “You have not logged in yet,” as shown in Figure 5-16.
Add a few items into the shopping cart by clicking on the Add to Cart buttons, and the items will then be added to the
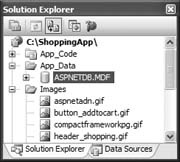
Profileobject. Refresh the App_Data folder in Solution Explorer and you will see the ASPNETDB.MDF database file (see Figure 5-17).Tip
Bear in mind that at this moment, you have not yet been authenticated and are therefore an anonymous user.
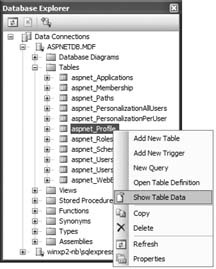
Let’s take a quick look at the information saved by the
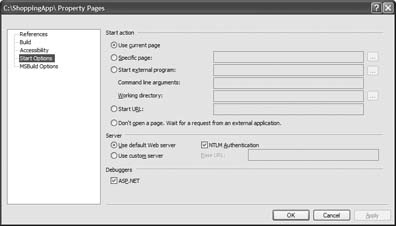
Profileobject. Double-click on the ASPNETDB.MDF file. The Database Explorer window will appear, as shown in Figure 5-18. Expand the Tables item and locate the aspnet_Profile table. This table will contain the items saved in your shopping cart. Right-click on aspnet_Profile and select “Show Table Data.”ASP.NET 1.x required you to explicitly set a start page for your project so that a specific page is loaded when you press F5 to debug the application. In ASP.NET 2.0, you can still set a specific page as the start page if you want. However, in ASP.NET 2.0 the start page by default is the currently selected page (currently selected either because you’re editing it or because you selected the page in Solution Explorer). This feature saves you the trouble of setting a start page when you just want to debug a page you’re working on at the moment.
This option is configurable via the project Property Pages dialog. To invoke it, right-click on the project name, ShoppingApp, in Solution Explorer and then select Property Pages. Select the Start Options item shown in the figure.
Notice that the
shoppingcartprofile property is saved as an XML string in thePropertyValuesStringfield (see Figure 5-19).The string itself is shown in Example 5-6.
Example 5-6. Content of PropertyValuesString<?xml version="1.0" encoding="utf-16"?> <Cart xmlns:xsi="http://www.w3.org/2001/XMLSchema-instance" xmlns:xsd="http: //www.w3.org/2001/XMLSchema"> <items> <anyType xsi:type="itemType"> <isbn>0-596-00812-0</isbn> <qty>1</qty> </anyType> <anyType xsi:type="itemType"> <isbn>0-596-00757-4</isbn> <qty>1</qty> </anyType> <anyType xsi:type="itemType"> <isbn>0-596-10071-X</isbn> <qty>1</qty> </anyType> </items> </Cart>The
UserIDof the user is a long string of characters (a GUID). You can verify this by looking into the aspnet_Users table (see Figure 5-20).

Members Area
Now that anonymous users can visit your site and add items to the shopping cart, they need the ability to log in when they’re ready to check out and purchase their selections. In this section you will create a checkout page that only authenticated users can access.
Creating New User Accounts
When a user has finished shopping (i.e., selecting items in the storefront), you need to some way to authenticate her so that you can retrieve particulars such as shipping address, credit card number, and so on. In this section, you will build a page through which the user can register as a member of your site.
First, as always, you need to create the registration page. Add a new Web Form to the project and name it Register.aspx. Select MasterPage.master as the Master Page once again to assure Register.aspx has the same look and feel as other pages on your site.
Drag and drop the
CreateUserWizardcontrol from the Login tab in the Toolbox onto the Content control in Register.aspx. TheCreateUserWizardcontrol is a visual control that prompts the user to supply the necessary information to create a new user account.Now set the look and feel of the registration form. On the
CreateUserWizardTasks menu, click on the Auto Format… link to apply the Professional scheme to the control.You’ll want the Main.aspx page to be loaded when the user has finished registering a new account. Set the
ContinueDestinationPageUrlproperty (through the Properties window) of theCreateUserWizardcontrol to Main.aspx.Now position the control on the page. Highlight the
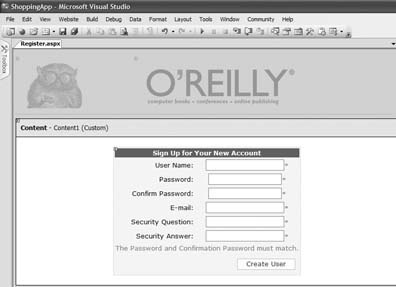
CreateUserWizardcontrol and select Format → Justify → Center on the Visual Studio menu bar to centralize the position of the control on the page. The Register.aspx page should now look like Figure 5-21.
Creating a Login Page
Once you have created a registration page, you’ll want to create a login page so returning customers can log into the web site.
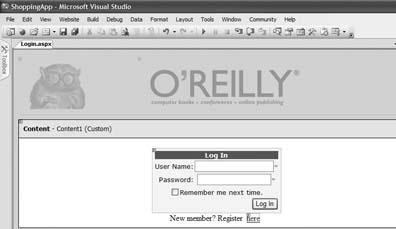
First, create the login page. Add a new Web Form to the project and name it Login.aspx. Select MasterPage.master as the Master Page once again to assure Login.aspx has the same look and feel as other pages on your site.
Now create a login form for users to complete. Drag and drop the
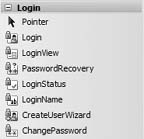
Logincontrol from the Login tab in the Toolbox onto the Login.aspx page. The Login control allows a user to log into your web site using theMembershipclass that you have seen earlier.ASP.NET 2.0 ships with several new Login controls (such as
Login, LoginView, LoginStatus, LoginName, CreateUserWizard, andChangePassword) to help you accomplish tasks such as user authentication, display of login status and login name, and more. The figure shows the various new Login controls in the Toolbox.Set the look and feel of the control. Using the Login Tasks menu, click on the Auto Format… link to apply the Elegant scheme to the control.
Under the Login control, type the text “New Member? Register here.” At the end of the text, add a
LinkButtoncontrol from the Toolbox (see Figure 5-22).Finally, set the
PostBackUrlproperty of theLinkButtoncontrol to ~/Register.aspx so that the Register.aspx page will be loaded to help an unregistered user create a new account. Also, set theContinueDestinationPageUrlproperty of the Login control to Main.aspx so that upon successful login, the user would be redirected to Main.aspx.
Restrict Unauthorized Access to Pages
So far, you have seen how to easily add a login page to your web site and how you can allow users to register for a new account in your application. In this section, you will add a new members-only folder to your web site and restrict access to authenticated users only.
First, create the folder in your project that will contain the restricted pages. To add a new folder to your project right-click on the project name, ShoppingApp in the Solution Explorer and then select Add Folder → Regular Folder. Name the folder Members.
Next, set the authorization required to access the folder. In Web.config, add the markup shown in bold in Example 5-7 to restrict anonymous users from accessing the files contained within the Members folder.
Example 5-7. Denying anonymous users access to the Members page… </system.web>
<location path="Members"> <system.web> <authorization> <deny users="?" /> </authorization> </system.web> </location></configuration>The <
location> element together with the <authorization> element allows you to restrict access to a particular folder on your web site. In this case, you have used the <deny> element to prevent all anonymous (represented by “?”) users from accessing the Members folder.
Checking Out from the Store
While an unauthenticated user is selecting items on the Storefront page (Main.aspx) of ShoppingApp and adding them to the shopping cart, the Profile service treats the user as anonymous. Once the user has finished choosing items, clicks on the Checkout button to check out, and is authenticated, you need to take special steps to preserve the items he has added to the shopping cart. This is because the profile data that was saved while the user was anonymous is lost when he switches from using a GUID to using a user ID for identification. To migrate the profile of the user, you need to transfer whatever information was saved in the anonymous profile to the user profile.
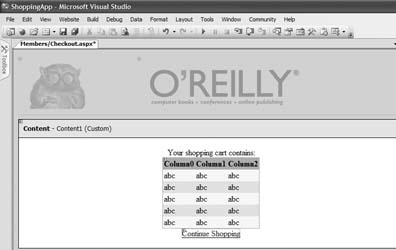
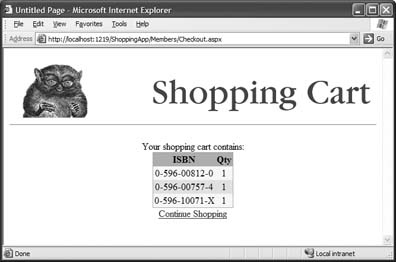
In this section, you will learn how to migrate an anonymous profile to an authenticated profile once a user has been authenticated. Using the authenticated profile, you’ll display a Checkout page that shows the user what’s in the shopping cart and offers the option to continue shopping. The completed page is shown in Figure 5-25.
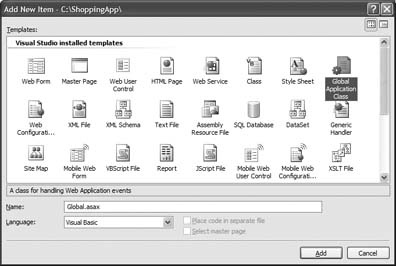
First, add a Global.asax file to the project (Figure 5-23). (Right-click on project name in Solution Explorer and then select Add New Item…. Select Global Application Class.) You will need the Global.asax file to service an event (see the next step) when the user changes from an anonymous state to an authenticated one. Visual Studio opens the file for you after adding it to your project.
Type the
Profile_MigrateAnonymousevent handler shown in Example 5-8 into Global.asax. TheProfile_MigrateAnonymousevent is raised whenever a user changes her status from anonymous to authenticated (when she logs into the application via the Login.aspx page).You can get the anonymous ID from the
AnonymousIdproperty (in theProfileMigrateEventArgsclass) and then use theGetProfilemethod to retrieve the anonymous profile. The retrieved profile can then be assigned to the authenticated user profile. You will also delete the old profile associated with the anonymous user.Example 5-8. Profile_MigrateAnonymous event handlerSub Profile_MigrateAnonymous(ByVal sender As Object, _ ByVal e As ProfileMigrateEventArgs) Dim anonymousProfile As ProfileCommon = _ Profile.GetProfile(e.AnonymousID) If anonymousProfile.shoppingcart IsNot Nothing Then Profile.shoppingcart = anonymousProfile.shoppingcart End If '---delete the items associated with the anonymous user ProfileManager.DeleteProfile(e.AnonymousID) '---clear the anonymous identifier from the request ' so that this event will not fire for an authenticated ' user AnonymousIdentificationModule.ClearAnonymousIdentifier End SubNow you’ll create the Checkout page that will be used to display the items currently stored in the user’s shopping cart. Add a new Web Form to the Members folder and select the MasterPage.master Master Page. Name the new Web Form Checkout.aspx.
Populate the form with a
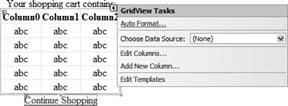
GridViewcontrol and apply the Sand & Sky scheme to it. (Select Auto Format… in theGridViewTasks menu; see Figure 5-24.)Also, add a
LinkButtoncontrol under theGridViewcontrol and set its Text property to “Continue Shopping” and itsPostBackUrlproperty to ~/Main.aspx. The results are shown in Figure 5-25.Tip
The
GridViewcontrol in ASP.NET 2.0 is similar to theDataGridViewcontrol you have seen in Chapter 4, except thatGridViewis web based andDataGridViewis Windows based.In the code behind of Checkout.aspx, code the
Form_Loadevent as shown in Example 5-9. The Checkout.aspx page will first create a dataset containing all the items in the shopping cart and then use it to bind to theGridViewcontrol. It also changes the image in theimgHeadercontrol in the Master Page using theFindControlmethod in theMasterproperty.Example 5-9. Checkout. aspx Form_Load eventImports System.Data Protected Sub Page_Load(ByVal sender As Object, _ ByVal e As System.EventArgs) Handles Me.Load Dim myCart As OReilly.Cart myCart = Profile.shoppingcart Dim item As OReilly.itemType '---change the image Dim masterImage As Image masterImage = CType(Master.FindControl("imgHeader"), _< Image) If masterImage IsNot Nothing Then masterImage.ImageUrl = "~/Images/header_shopping.gif" End If '---create a dataset--- Dim ds As New DataSet ds.Tables.Add("Items") ds.Tables("Items").Columns.Add("ISBN") ds.Tables("Items").Columns.Add("Qty") Dim row As DataRow '---return all the items as a dataset--- For Each item In myCart.items row = ds.Tables("Items").NewRow row("ISBN") = item.isbn row("Qty") = item.qty ds.Tables("Items").Rows.Add(row) Next '---Bind the GridView control to the dataset GridView1.DataSource = ds GridView1.DataBind() End SubYou locate the controls you want to modify on the Master Page by using the
FindControlmethod of theMasterproperty, then supplying the name and type of the control you want to modify. Once the control is located, you can change its properties as if it were a local object.Masteris a special property exposed by the Web Form as a handle with which to access the Master Page. However, theMasterproperty is valid only on pages that reference a Master Page.You can programmatically check if a page is using a Master Page by doing this:
    If Master Is Nothing Then
         '---Page does not use master page---
          …
    End If
You’ll want Checkout.aspx to be displayed when a user clicks on the Checkout button in Main.aspx. So, as a last step, go to Main.aspx and set the
PostPackUrlproperty of the Checkout button in Main.aspx to ~/ Members/Checkout.aspx so that the user can be brought to the Checkout.aspx page to check out. If an unauthenticated user clicks on the Checkout button, he will be redirected to Login.aspx.
Testing the Application
With the entire application built, it is now time to test it out.
To get started, select Main.aspx in Solution Explorer and then press F5 to debug the application.
In Main.aspx, add a few items into the shopping cart, as shown in Figure 5-26.
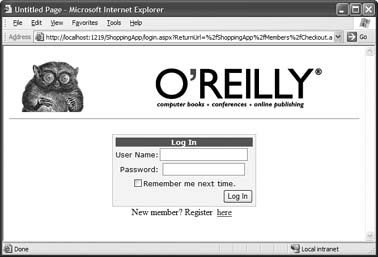
When you are done adding the items, click the Checkout button and you will be redirected to the Login.aspx page (see Figure 5-27).
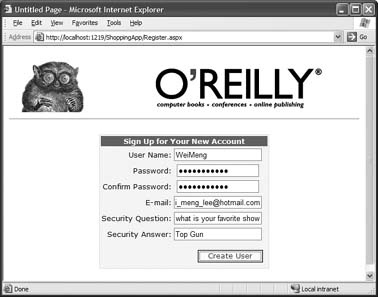
Since you have not registered for an account yet, click on the “here” link to load the Register.aspx page (see Figure 5-28). Enter the required information and click Create User.
Tip
You should use a strong password consisting of a mixture of alphanumeric values and special characters. For example, you can use password such as
pass@word1. ASP.NET 2.0 requires passwords to have a mixture of numerals (0–9), letters (a–z, A–Z), and special characters (such as # and !). It will also reject passwords that are less than seven characters.If the registration is successful, you will see the page shown in Figure 5-29. Click Continue to return to the Main.aspx page.
In Main.aspx, if you now click on the Checkout button, you will be redirected to the Checkout.aspx page (see Figure 5-30). All the items that you have added before you log in are now displayed in the
GridViewcontrol. You can click on the Continue Shopping link to return to Main.aspx to continue adding items into your shopping cart.

Summary
In this chapter, you built a simple e-commerce application that uses some of the new features in ASP.NET 2.0. You have seen how to use a Master Page to maintain a consistent look and feel for the pages in your site. You have also seen how information about users can be persisted using the Profile service. Last but not least, you have learned how easy it is to implement security in your web applications using the new set of security controls built to work with the underlying Membership class.