
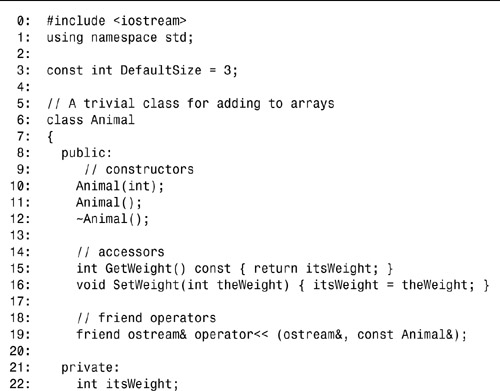
Day 19. Templates
A powerful tool for C++ programmers is “parameterized types” or templates. Templates are so useful that a library containing a number of routines using templates has been adopted into the definition of the C++ language.
Today, you will learn
• What a template is and how templates can be used
• How to create class templates
• How to create function templates
• What the Standard Template Library (STL) is and how to use some of the templates within it
What Are Templates?
At the end of Week 2, you saw how to build a PartsList object and how to use it to create a PartsCatalog. If you want to build on the PartsList object to make a list of cats, you have a problem: PartsList only knows about parts.
To solve this problem, you can create a List base class. You could then cut and paste much of the PartsList class into the new CatsList declaration. Later, when you want to make a list of Car objects, you would then have to make a new class, and again you would cut and paste.
Needless to say, this is not a satisfactory solution. Over time, you can expect the List class and its derived classes will need to be extended. The task of making certain that all the needed changes are propagated to all the related classes could quickly become a nightmare.
Alternatively, you could inherit Cat from Part, so that a cat could fit into the parts inheritance hierarchy, and so that a collection of parts could hold cats as well. Obviously, this is a problem in terms of keeping a cleanly conceptual class hierarchy because cats are not normally parts.
You could also create a List class that would contain something like “Object” and inherit all objects from this base class. However, this relaxes strong typing and makes it harder to have the compiler enforce correctness in your program. What you really want is a way to create a family of related classes, whose only difference is the type of the thing that they operate on; and you want to have only one place to make changes to that class so that your maintenance effort can be kept low.
The creation and use of templates can solve these problems. Although templates were not a part of the original C++ language, they are now a part of the standard and an integral part of the language. Like all of C++, they are type-safe and very flexible. They can, however, be intimidating to the newer C++ programmer. After you understand them, however, you will see that they are a powerful feature of the language.
Templates enable you to create a class that can have the type of the things it works on be changed. For example, you can use them to show the compiler how to make a list of any type of thing, rather than creating a set of type-specific lists—a PartsList is a list of parts; a CatsList is a list of cats. The only way in which they differ is the type of the thing on the list. With templates, the type of the thing on the list becomes a parameter to the definition of the class. You can create a family of classes from the template, each of which is set up to work on a different type of thing.
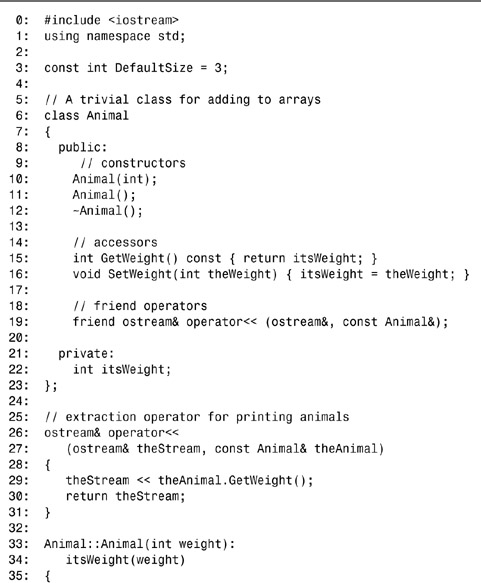
A common component of virtually all C++ libraries is an array class. You know it would be tedious and inefficient to create one array class for integers, another for doubles, and yet another for an array of Animals. Templates let you declare a single, parameterized array class. You can then specify the type that the object will be for each instance of the array.
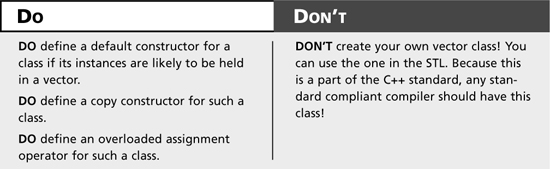
Although the Standard Template Library provides a standardized set of container classes, including arrays, lists, and so forth, the best way to learn about templates is to create your own! In the next few sections, you’ll explore what it takes to write your template class so that you fully understand how templates work. In a commercial program, however, you would almost certainly use the STL classes for this purpose rather than creating your own. On the other hand, you will want to create templates for your own applications and leverage this powerful capability.
Instantiation is the act of creating a specific type from a template. The individual classes are called instances of the template.
Note
Instances of a template are distinct from instances of objects created using the template. Most commonly, “instantiation” is used to refer to creating an instance (object) from a class. Be certain to be clear about the context when using or reading the word “instantiation.”
Parameterized templates provide you with the ability to create a general class and pass types as parameters to that class to build specific instances.
Before you can instantiate a template, however, you need to define one.
Building a Template Definition
You begin the basic declaration of a template using the template keyword followed by a parameter for the type. The format of this is:
template <class T>
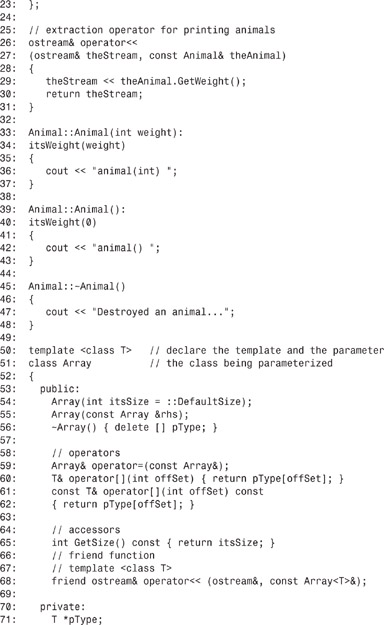
In this case, template and class are keywords that you use. T is a placeholder—like a variable name. As such, it can be any name you desire; however, either T or Type is generally used. The value of T will be a data type.
Because the keyword class can be confusing when used in this context, you can alternatively use the keyword typename:
template <typename T>
In today’s lesson, you will see the keyword class used because it is what you will see more often in programs that have already been created. The keyword typename, however, is clearer at indicating what you are defining when the parameter is a primitive type rather than a class.
Going back to the example of creating your own array list, you can use the template statement to declare a parameterized type for the Array class—you can use this to create a template for an array as shown here:
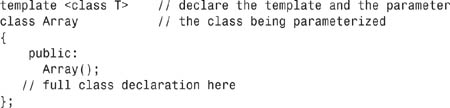
This code is the basics for declaring a template class called Array. The keyword template is used at the beginning of every declaration and definition of a template class. The parameters of the template are after the keyword template. Like with functions, the parameters are the things that will change with each instance. In the array template being created in the preceding example, you want the type of the objects stored in the array to be changeable. One instance might store an array of integers and another might store an array of Animals.
In this example, the keyword class is used, followed by the identifier T. As stated before, the keyword class indicates that this parameter is a type. The identifier T is used throughout the rest of the template definition to refer to the parameterized type. Because this class is now a template, one instance could substitute int for T and one could substitute the type Cat. If written correctly, the template should be able to accept any valid data type (or class) as the value for T.
You set the type for your template when you declare a variable that will be an instance of it. This can be done using the following format:
className<type> instance;
In this case, className is the name of your template class. instance is the name of the instance, or object, you are creating. type is exactly that—the data type you want to use for the instance you are creating.
For example, to declare an int and an Animals instance of the parameterized Array class, you would write:
Array<int> anIntArray;
Array<Animal> anAnimalArray;
The object anIntArray is of the type array of integers; the object anAnimalArray is of the type array of Animals. You can now use the type Array<int> anywhere you would normally use a type—as the return value from a function, as a parameter to a function, and so forth. To help bring some this together for you, Listing 19.1 provides the full declaration of the stripped-down Array template. Be aware that this isn’t a complete program, rather a listing focused on how the template is defined.
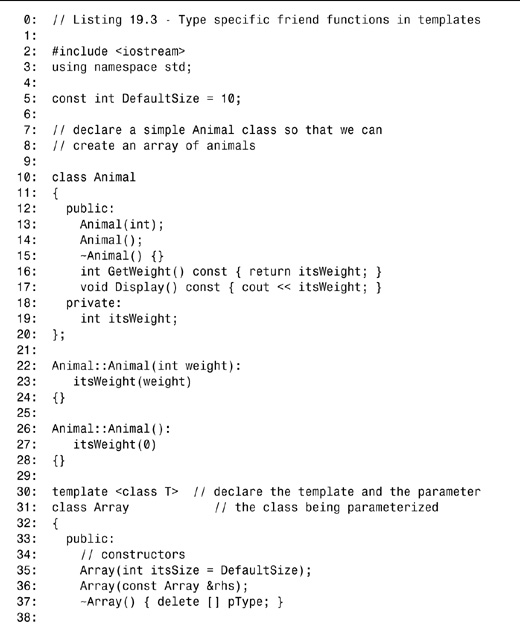
Listing 19.1. A Template of an Array Class
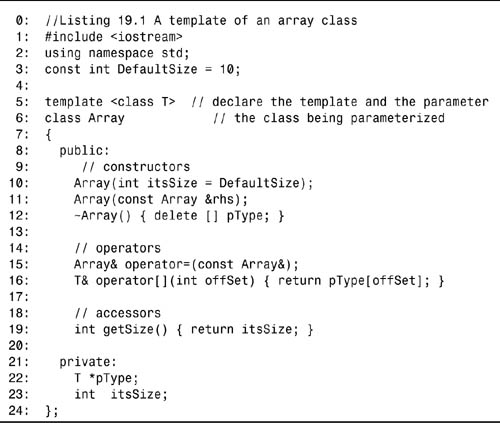
There is no output, because this is not a complete program. Rather, this is the definition of a scaled-down template.
![]()
The declaration of the template begins on line 5 with the keyword template followed by the parameter. In this case, the parameter is identified to be a type by the keyword class, and the identifier T is used to represent the parameterized type. As mentioned earlier, you could also have used the word typename instead of class:
5: template <typename T> // declare the template and the parameter
You should use whichever word is clearer for you, although, it is recommended to use class when the type is a class and typename when it is not a class.
From line 6 until the end of the template on line 24, the rest of the declaration is like any other class declaration. The only difference is that wherever the type of the object would normally appear, the identifier T is used instead. For example, operator[] would be expected to return a reference to an object in the array, and, in fact, it is declared to return a reference to a T.
When an instance of an integer array is defined, T is replaced with an integer, so the operator= that is provided to that array returns a reference to an integer. This is equivalent to the following:
int& operator[](int offSet) { return pType[offSet]; }
When an instance of an Animal array is declared, the operator= provided to the Animal array returns a reference to an Animal:
Animal& operator[](int offSet) { return pType[offSet]; }
In a way, this is very much like how a macro works, and, in fact, templates were created to reduce the need for macros in C++.
Using the Name
Within the class declaration, the word Array can be used without further qualification. Elsewhere in the program, this class is referred to as Array<T>. For example, if you do not write the constructor within the class declaration, then when you declare this function, you must write
template <class T>
Array<T>::Array(int size):
itsSize = size
{
pType = new T[size];
for (int i = 0; i < size; i++)
pType[i] = 0;
}
Because this is part of a template, the declaration on the first line of this code fragment is required to identify the type for the function (class T). On the second line, you see that the template name is Array<T>, and the function name is Array(int size). In addition, you see that the function takes an integer parameter.
The remainder of the function is the same as it would be for a nontemplate function, except that anywhere the array type would be used, the parameter T is used. You see this on the line declaring a new array (new T[size]).
Tip
It is a common and preferred method to get the class and its functions working as a simple declaration before turning it into a template. This simplifies development, allowing you first to concentrate on the programming objective, and then later to generalize the solution with templates.
Also, you must define template functions in the file where the template is declared. Unlike other classes, where the declaration of a class and its member functions and the necessary member function definitions can be split between a header and a .cpp file, templates require both to be in either a header or .cpp file. If you are sharing the template with other parts of your project, it is common to either define the member function inline to the template class declaration, or to define them below the class declaration in the header file.
Implementing the Template
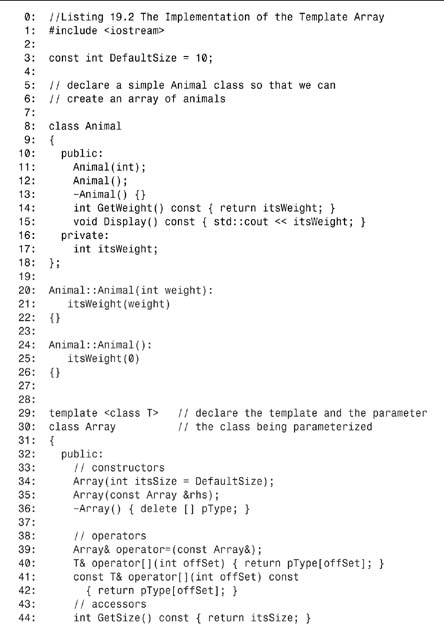
After you have a template defined, you’ll want to use it. The full implementation of the Array template class requires implementation of the copy constructor, operator=, and so forth. Listing 19.2 provides the code for your Array template as well as a simple driver program that uses the template.
Note
Some older compilers do not support templates. Templates are, however, part of the ANSI C++ standard. All major compiler vendors support templates in their current versions. If you have a very old compiler, you won’t be able to compile and run the exercises in today’s lesson. It’s still a good idea to read through the entire lesson, however, and return to this material when you upgrade your compiler.
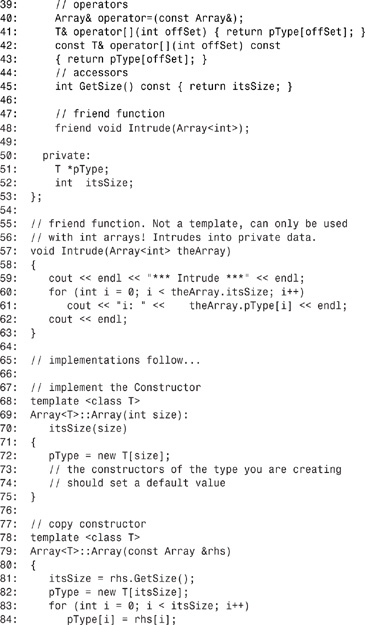
Listing 19.2. The Implementation of the Template Array

![]()

![]()
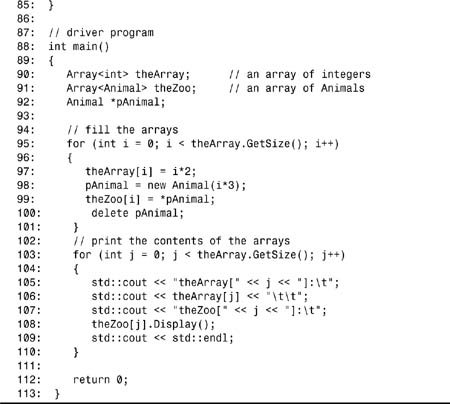
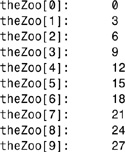
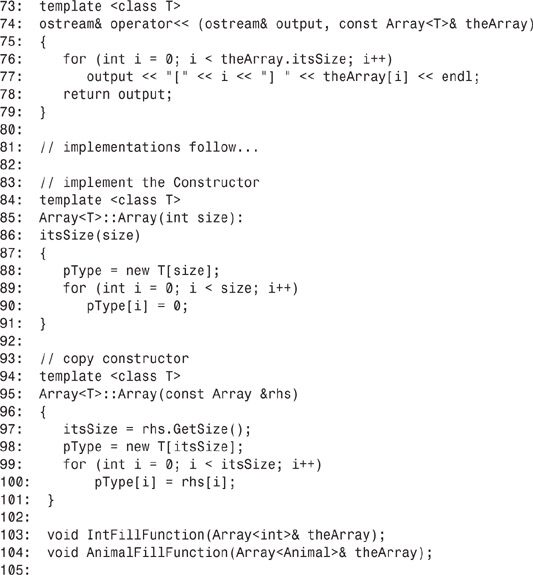
This is a pretty basic program; however, it illustrates creating and using a template. In this case, an Array template is defined and then used to instantiate to Array objects of types int and Animal. The integer array is filled with integers that are twice the value of the index to the array. The Array made of Animal objects is called theZoo. It is filled with values that are equal to three times the index value.
Digging into the code, you see that lines 8–26 provide a stripped-down Animal class, created here so that objects of a user-defined type are available to add to the array.
The statement on line 29 declares that what follows is a template and that the parameter to the template is a type, designated as T. As previously mentioned, this line could have also been declared using typename instead of class.
You can see on lines 34 and 35 that the Array template class has two constructors as shown. The first takes a size and defaults to the constant integer DefaultSize.
The assignment and offset operators are declared, with the latter declaring both a const and a non-const variant. The only accessor provided is GetSize() on line 44, which returns the size of the array.
You can certainly imagine a fuller interface, and, for any serious Array program, what has been supplied here would be inadequate. At a minimum, operators to remove elements, to expand the array, to pack the array, and so forth would be required. If you were to use the Array class from the Standard Template Library, you would find that all this functionality has been provided. You’ll learn more about that later in today’s lesson.
The private data in the Array template class consists of the size of the array and a pointer to the actual in-memory array of objects.
Starting on line 53, you can see the code for the implementation of some of the member functions from your template class. Because these are defined outside of the primary class definition, you must once again state that these are a part of the template. You do this with the same statement you placed before the class. You see this on line 54. You also indicate that the Array is a template class by then including the type parameter after the class name. You have declared your type parameter to be T on line 53, so for the Array class, you use Array<T> with your member functions. You see this on line 55.
Within the member function, you can then use the T parameter anywhere you would have ordinarily used the type of the array. For example, on line 58 the class’ pointer, pType, is set to point to a new array of items. The items will be of type T, which is the type you declare when instantiating an object with this template class. When each item of a given type is created, its construction should initialize it.
You see this same process repeated with the declaration of the copy constructor on lines 64–71 and the overloading of the equals operator on lines 74–85.
Your Array template class is actually used on lines 90 and 91. On line 90, it is used to instantiate an object called theArray that uses the template with ints. On line 91, theZoo is instantiated to be an Array of type Animal.
The rest of the listing does what was described earlier and is pretty easy to follow.
Passing Instantiated Template Objects to Functions
If you want to pass an Array object to a normal function, you must pass a particular instance of the array, not a template. To create a function that can receive a specific instance of an Array, you declare the type as follows:
void SomeFunction(Array<theType>&);
where SomeFunction is the name of the function you are passing the Array object to, and theType is the type of the object you are creating. Therefore, if SomeFunction() takes an integer array as a parameter, you can write
void SomeFunction(Array<int>&); // ok
but you cannot write
void SomeFunction(Array<T>&); // error!
because there is no way to know what a T& is. You also cannot write
void SomeFunction(Array &); // error!
because there is no class Array—only the template and the instances.
To create nonmember functions that have some of the advantages of templates, you can declare a template function. This is accomplished in a similar manner to declaring a template class and defining a template member function. First, you indicate that your function is a template, and then you use the template parameter where you otherwise would have used a type or class name:
template <class T>
void MyTemplateFunction(Array<T>&); // ok
In this example, the function MyTemplateFunction() is declared to be a template function by the declaration on the top line. Note that template functions can have any name, the same as other functions can.
Template functions can also take instances of the template in addition to the parameterized form. The following is an example:
template <class T>
void MyOtherFunction(Array<T>&, Array<int>&); // ok
Note that this function takes two arrays: a parameterized array and an array of integers. The former can be an array of any object, but the latter is always an array of integers. A little bit later today, you will see a template function in action.
Templates and Friends
You learned about friends on Day 16, “Advanced Inheritance.” Template classes can declare three types of friends:
• A nontemplate friend class or function
• A general template friend class or function
• A type-specific template friend class or function
The following sections cover the first two of these.
Nontemplate Friend Classes and Functions
It is possible to declare any class or function to be a friend to your template class. Each instance of the class will treat the friend properly, as if the declaration of friendship had been made in that particular instance.
Listing 19.3 adds a trivial friend function, Intrude(), to the template definition of the Array class. The driver program then invokes Intrude().
Because Intrude() is a friend, it can then access the private data of the Array. Because Intrude() is not a template function, it can only be passed Arrays of type int.
Listing 19.3. Nontemplate Friend Function
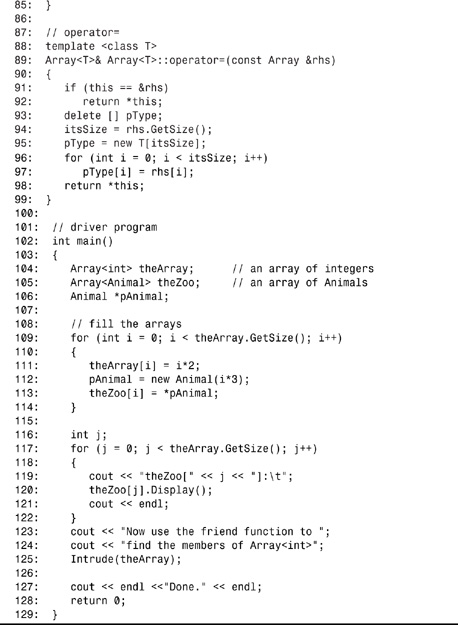
![]()
![]()
The declaration of the Array template has been extended to include the friend function Intrude(). This addition on line 48 declares that every instance of an int Array considers Intrude() to be a friend function; thus, Intrude() has access to the private member data and functions of the Array instance.
The Intrude() function is defined on lines 57–63. On line 60, Intrude() accesses itsSize directly, and on line 61, it accesses pType directly. This trivial use of these members was unnecessary because the Array class provides public accessors for this data, but it serves to demonstrate how friend functions can be declared with templates.
General Template Friend Class or Function
It would be helpful to add a display operator to the Array class so that values could be sent to an output steam and treated appropriately based on their type. One approach is to declare a display operator for each possible type of Array, but this undermines the whole point of having made Array a template.
What is needed is an insertion operator that works for any possible type of Array:
ostream& operator<< (ostream&, Array<T>&);
To make this work, operator<< needs to be declared to be a template function:
template <class T>
ostream& operator<< (ostream&, Array<T>&)
Now that operator<< is a template function, you need only to provide an implementation. Listing 19.4 shows the Array template extended to include this declaration and provides the implementation for the operator<<.
Listing 19.4. Using Operator ostream
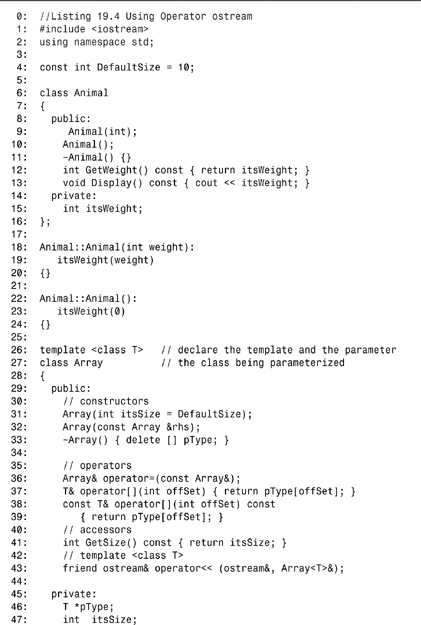
If you are using a Microsoft compiler, uncomment line 42. Based on the C++ standards, this line should not be necessary; however, it is needed to compile with the Microsoft C++ compiler.
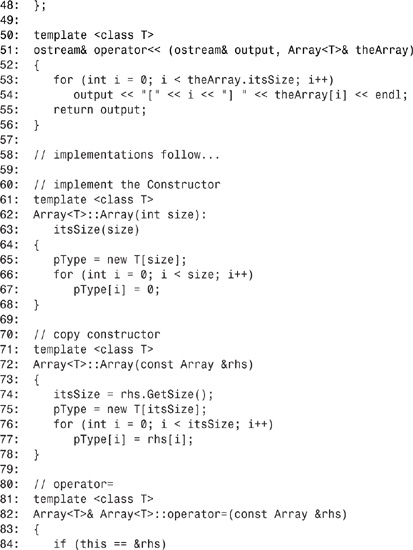
![]()
Enter an offset (0-9) and a value. (-1 to stop): 1 10
Enter an offset (0-9) and a value. (-1 to stop): 2 20
Enter an offset (0-9) and a value. (-1 to stop): 3 30
Enter an offset (0-9) and a value. (-1 to stop): 4 40
Enter an offset (0-9) and a value. (-1 to stop): 5 50
Enter an offset (0-9) and a value. (-1 to stop): 6 60
Enter an offset (0-9) and a value. (-1 to stop): 7 70
Enter an offset (0-9) and a value. (-1 to stop): 8 80
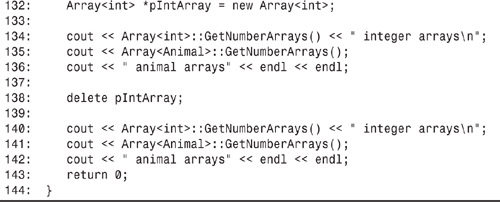
Enter an offset (0-9) and a value. (-1 to stop): 9 90
Enter an offset (0-9) and a value. (-1 to stop): 10 10
***Please use values between 0 and 9.***
Enter an offset (0-9) and a value. (-1 to stop): -1 -1
Here’s the entire array:
[0] 0
[1] 10
[2] 20
[3] 30
[4] 40
[5] 50
[6] 60
[7] 70
[8] 80
[9] 90
![]()
On line 43, the function template operator<<() is declared to be a friend of the Array class template. Because operator<<() is implemented as a template function, every instance of this parameterized array type automatically has an operator<<().
The implementation for this operator starts on line 50. Using a simple loop on lines 53 and 54, every member of an array is called in turn. This only works if an operator<<() is defined for every type of object stored in the array.
It is worth pointing out that this listing also required that the overloading of operator[]. You can see on line 37 that this was done using the template type as well.
Using Template Items
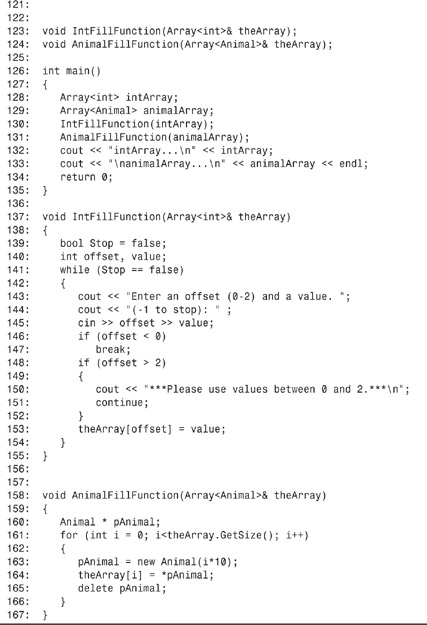
You can treat template items as you would any other type. You can pass them as parameters, either by reference or by value, and you can return them as the return values of functions, also by value or by reference. Listing 19.5 demonstrates how to pass template objects.
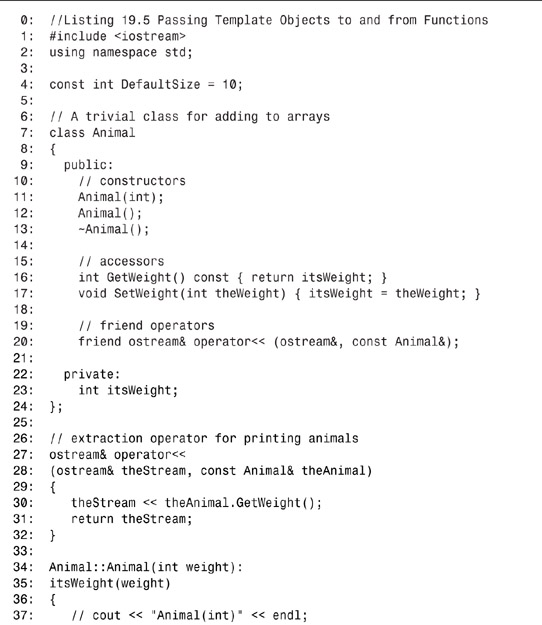
Listing 19.5. Passing Template Objects to and from Functions

Note
If you are using a Microsoft compiler, uncomment line 65. Based on the C++ standards, this line should not be necessary; however, it is needed to compile with the Microsoft compiler.
![]()
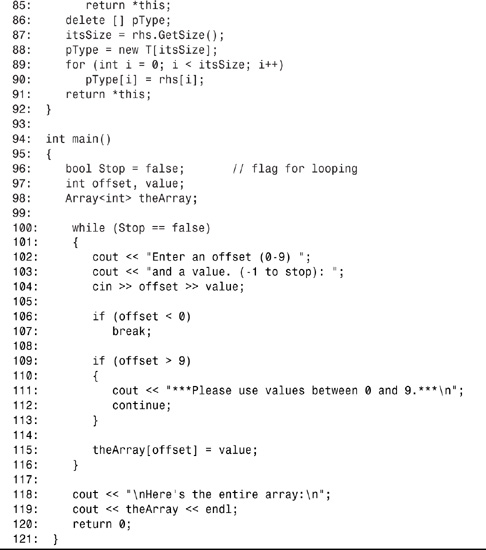
Enter an offset (0-9) and a value. (-1 to stop): 1 10
Enter an offset (0-9) and a value. (-1 to stop): 2 20
Enter an offset (0-9) and a value. (-1 to stop): 3 30
Enter an offset (0-9) and a value. (-1 to stop): 4 40
Enter an offset (0-9) and a value. (-1 to stop): 5 50
Enter an offset (0-9) and a value. (-1 to stop): 6 60
Enter an offset (0-9) and a value. (-1 to stop): 7 70
Enter an offset (0-9) and a value. (-1 to stop): 8 80
Enter an offset (0-9) and a value. (-1 to stop): 9 90
Enter an offset (0-9) and a value. (-1 to stop): 10 10
***Please use values between 0 and 9.***
Enter an offset (0-9) and a value. (-1 to stop): -1 -1
intArray:...
[0] 0
[1] 10
[2] 20
[3] 30
[4] 40
[5] 50
[6] 60
[7] 70
[8] 80
[9] 90
animalArray:...
[0] 0
[1] 100
[2] 200
[3] 300
[4] 400
[5] 500
[6] 600
[7] 700
[8] 800
[9] 900
![]()
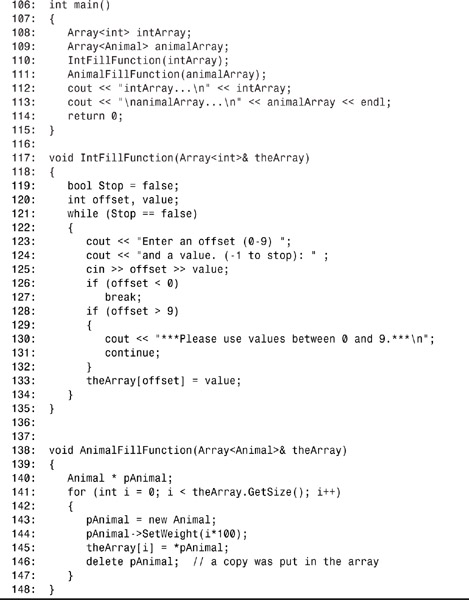
Most of the Array class implementation is left out to save space. The Animal class is declared on lines 7–24. Although this is a stripped-down and simplified class, it does provide its own insertion operator (<<) to allow the printing of Animals. As you can see in the definition of the insertion operator on lines 27–32, printing simply prints the current weight of the Animal.
Note that Animal has a default constructor. This is necessary because, when you add an object to an array, the object’s default constructor is used to create the object. This creates some difficulties, as you’ll see.
On line 103, the function IntFillFunction() is declared. The prototype indicates that this function takes an integer Array. Note that this is not a template function. IntFillFunction() expects only one type of an Array—an integer array. Similarly, on line 104, AnimalFillFunction() is declared to take an Array of Animal.
The implementations for these functions are different from one another because filling an array of integers does not have to be accomplished in the same way as filling an array of Animals.
Using Specialized Functions
If you uncomment the print statements in Animal’s constructors and destructor in Listing 19.5, you’ll find unanticipated extra constructions and destructions of Animals.
When an object is added to an array, the object’s default constructor is called. The Array constructor, however, goes on to assign 0 to the value of each member of the array, as shown on lines 89 and 90 of Listing 19.5.
When you write someAnimal = (Animal) 0;, you call the default operator= for Animal. This causes a temporary Animal object to be created, using the constructor, which takes an integer (zero). That temporary is used as the right-hand side of the operator= and then is destroyed.
This is an unfortunate waste of time because the Animal object was already properly initialized. However, you can’t remove this line because integers are not automatically initialized to a value of 0. The solution is to teach the template not to use this constructor for Animals, but to use a special Animal constructor.
You can provide an explicit implementation for the Animal class, as indicated in Listing 19.6. This type of specification is called specialization of the template.
Listing 19.6. Specializing Template Implementations

If you are using a Microsoft compiler, uncomment line 67. Based on the C++ standards, this line should not be necessary; however, it is needed to compile with the Microsoft compiler.
Note
Line numbers have been added to the output to make analysis easier. Line numbers will not appear in your output.
![]()
First run
1: animal() animal() animal() Enter an offset (0-2) and a value. (-1 to stop): 0 0
2: Enter an offset (0-2) and a value. (-1 to stop): 0 1
3: Enter an offset (0-2) and a value. (-1 to stop): 1 2
4: Enter an offset (0-2) and a value. (-1 to stop): 2 3
5: Enter an offset (0-2) and a value. (-1 to stop): -1 -1
6: animal(int) Destroyed an animal...animal(int) Destroyed an animal...animal(int) Destroyed an animal...initArray...
7: [0] 0
8: [1] 1
9: [2] 2
10:
11: animal array...
12: [0] 0
13: [1] 10
14: [2] 20
15:
16: Destroyed an animal...Destroyed an animal...Destroyed an animal...
Second run
1: animal(int) Destroyed an animal...
2: animal(int) Destroyed an animal...
3: animal(int) Destroyed an animal...
4: Enter an offset (0-9) and a value. (-1 to stop): 0 0
5: Enter an offset (0-9) and a value. (-1 to stop): 1 1
6: Enter an offset (0-9) and a value. (-1 to stop): 2 2
7: Enter an offset (0-9) and a value. (-1 to stop): 3 3
8: animal(int)
9: Destroyed an animal...
10: animal(int)
11: Destroyed an animal...
12: animal(int)
13: Destroyed an animal...
14: initArray...
15: [0] 0
16: [1] 1
17: [2] 2
18:
19: animal array...
20: [0] 0
21: [1] 10
22: [2] 20
23:
24: Destroyed an animal...
25: Destroyed an animal...
26: Destroyed an animal...
![]()
Listing 19.6 reproduces both classes in their entirety so that you can see the creation and destruction of temporary Animal objects. The value of DefaultSize has been reduced from 10 to 3 to simplify the output.
The Animal constructors and destructors on lines 33–48 each print a statement indicating that they are called.
On lines 75–82, the template behavior of an Array constructor is declared. On lines 116–120, the specialized constructor for an Array of Animals is demonstrated. Note that in this special constructor, the default constructor is allowed to set the initial value for each Animal, and no explicit assignment is done.
The first time this program is run, the first set of output is shown. Line 1 of the output shows the three default constructors called by creating the array. The user enters four numbers for the array, and these are entered into the integer array.
Execution jumps to AnimalFillFunction(). Here, a temporary Animal object is created on the heap on line 163, and its value is used to modify the Animal object in the array on line 164. On line 165, the temporary Animal is destroyed. This is repeated for each member of the array and is reflected in the output on line 6.
At the end of the program, the arrays are destroyed, and when their destructors are called, all their objects are destroyed as well. This is reflected in the output on line 16.
For the second set of output, the special implementation of the array of character constructor, shown on lines 116–120 of the program, is commented out. When the program is run again, the template constructor, shown on lines 75–82 of the program, is run when the Animal array is constructed. This causes temporary Animal objects to be called for each member of the array on lines 80 and 81 of the program, and is reflected in the second set of output on lines 1–3.
In all other respects, the output for the two runs is identical, as you would expect.
Static Members and Templates
A template can declare static data members. A unique set of static data is created for each class type that can be created from the template. That is, if you add a static member to the Array class (for example, a counter of how many arrays have been created), you have one such member per type: one for all the arrays of Animals and another for all the arrays of integers. Listing 19.7 adds a static member and a static function to the Array class.
Listing 19.7. Using Static Member Data and Functions with Templates

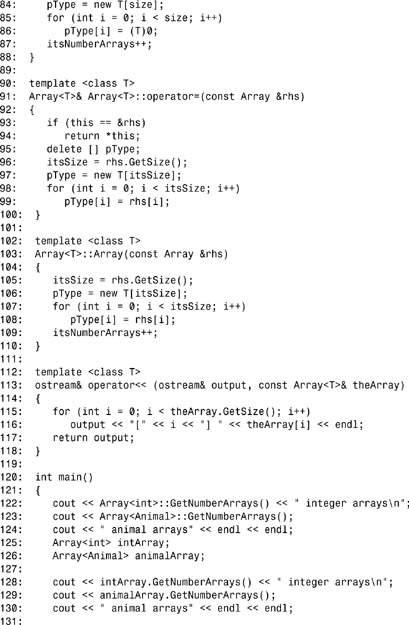
![]()
0 integer arrays
0 animal arrays
1 integer arrays
1 animal arrays
2 integer arrays
1 animal arrays
1 integer arrays
1 animal arrays
![]()
The Array class has added the static variable tsNumberArrays on line 74, and because this data is private, the static public accessor GetNumberArrays() was added on line 66.
Initialization of the static data is accomplished with a full template qualification, as shown on lines 77 and 78. The constructors of Array and the destructor are each modified to keep track of how many arrays exist at any moment.
Accessing the static members is the same as accessing the static members of any class: You can do so with an existing object, as shown on lines 134 and 135, or by using the full class specification, as shown on lines 128 and 129. Note that you must use a specific type of array when accessing the static data. One variable exists for each type.
The Standard Template Library
As it is said, there is no point in reinventing the wheel. The same is true in creating programs with C++. This is why the Standard Template Library (STL) became popular. As with other components of the Standard C++ Library, the STL is portable between various operating systems.
All the major compiler vendors now offer the STL as part of their compilers. The STL is a library of template-based container classes, including vectors, lists, queues, and stacks. The STL also includes a number of common algorithms, including sorting and searching.
The goal of the STL is to give you an alternative to reinventing the wheel for these common requirements. The STL is tested and debugged, offers high performance, and is free. Most important, the STL is reusable; after you understand how to use an STL container, you can use it in all your programs without reinventing it.
Using Containers
A container is an object that holds other objects. The Standard C++ Library provides a series of container classes that are powerful tools that help C++ developers handle common programming tasks.
Two types of Standard Template Library container classes are sequence and associative. Sequence containers are designed to provide sequential and random access to their members, or elements. Associative containers are optimized to access their elements by key values. All of the STL container classes are defined in namespace std.
Understanding Sequence Containers
The Standard Template Library sequence containers provide efficient sequential access to a list of objects. The Standard C++ Library provides five sequence containers: vector, list, stack, deque, and queue.
The Vector Container
You often use arrays to store and access a number of elements. Elements in an array are of the same type and are accessed with an index. The STL provides a container class vector that behaves like an array but that is more powerful and safer to use than the standard C++ array.
A vector is a container optimized to provide fast access to its elements by an index. The container class vector is defined in the header file <vector> in namespace std (see Day 18, “Creating and Using Namespaces,” for more information on the use of namespaces).
A vector can grow itself as necessary. Suppose that you have created a vector to contain 10 elements. After you have filled the vector with 10 objects, the vector is full. If you then add another object to the vector, the vector automatically increases its capacity so that it can accommodate the eleventh object. Here is how the vector class is defined:
template <class T, class Allocator = allocator<T>> class vector
{
// class members
};
The first argument (class T) is the type of the elements in the vector. The second argument (class Allocator) is an allocator class. Allocators are memory managers responsible for the memory allocation and deallocation of elements for the containers. The concept and implementation of allocators are advanced topics that are beyond the scope of this book.
By default, elements are created using the operator new() and are freed using the operator delete(). That is, the default constructor of class T is called to create a new element. This provides another argument in favor of explicitly defining a default constructor for your own classes. If you do not, you cannot use the standard vector container to hold a set of instances of your class.
You can define vectors that hold integers and floats as follows:
![]()
Usually, you would have some idea as to how many elements a vector will contain. For instance, suppose that in your school, the maximum number of students is 50. To create a vector of students in a class, you will want the vector to be large enough to contain 50 elements. The standard vector class provides a constructor that accepts the number of elements as its parameter. So, a vector of 50 students can be defined as follows:
vector<Student> MathClass(50);
A compiler allocates enough memory spaces for 50 Students; each element is created using the default constructor Student::Student().
The number of elements in a vector can be retrieved using a member function size(). For the Student vector MathClass that was just defined, Student.size()returns 50.
Another member function capacity() tells us exactly how many elements a vector can accommodate before its size needs to be increased. You will see more on this later.
A vector is said to be empty if no element is in a vector; that is, the vector’s size is zero. To make it easier to test whether a vector is empty, the vector class provides a member function empty() that evaluates to true if the vector is empty.
To assign a Student object Harry to the MathClass, the subscripting operator [] is used:
MathClass[5] = Harry;
The subscript starts at 0. As you might have noticed, the overloaded assignment operator of the Student class is used here to assign Harry to the sixth element in MathClass. Similarly, to find out Harry’s age, access his record using:
MathClass[5].GetAge();
As mentioned earlier, vectors can grow automatically when you add more elements than they can handle. For instance, suppose one class in your school has become so popular that the number of students exceeds 50. Well, it might not happen to our math class, but who knows, strange things do happen. When the fifty-first student, Sally, is added to the MathClass, the vector can expand to accommodate her.
You can add an element into a vector in several ways; one of them is push_back():
MathClass.push_back(Sally);
This member function appends the new Student object Sally to the end of the vector MathClass. Now, MathClass has 51 elements, and Sally is placed at MathClass[50].
For this function to work, our Student class must define a copy constructor. Otherwise, this push_back() function will not be able to make a copy of object Sally.
STL does not specify the maximum number of elements in a vector; the compiler vendors are in better positions to make this decision. The vector class provides a member function that tells you what this magic number is in your compiler: max_size().
Listing 19.8 demonstrates the members of the vector class that have been discussed so far. You will see that the standard string class is used in this listing to simplify the handling of strings. For more details about the string class, check your compiler’s documentation.
Listing 19.8. Vector Creation and Element Access
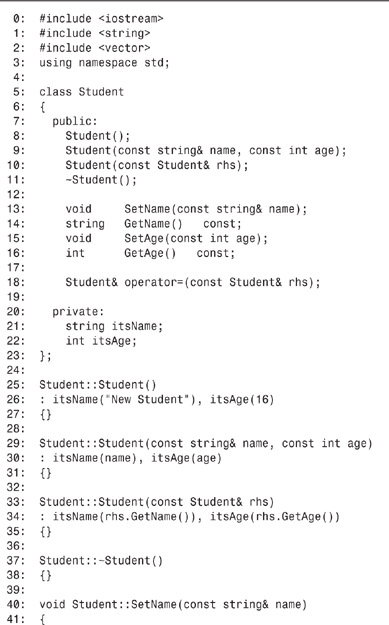

![]()
Our Student class is defined on lines 5–23. Its member function implementations are on lines 25–65. It is simple and vector-container friendly. For the reasons discussed earlier, a default constructor, a copy constructor, and an overloaded assignment operator are all defined. Note that its member variable itsName is defined as an instance of the string class. As you can see here, it is much easier to work with a STL C++ string than with a C-style string char*.
The template function ShowVector() is declared on lines 73 and 75 and defined on lines 115–128. It demonstrates the usage of some of the vector member functions: max_size(), size(), capacity(), and empty(). As you can see from the output, the maximum number of Student objects a vector can accommodate is 214,748,364 in Visual C++. This number might be different for other types of elements. For instance, a vector of integers can have up to 1,073,741,823 elements. If you are using other compilers, you might have a different value for the maximum number of elements.
On lines 124 and 125, the value of each element in the vector is displayed using the overloaded insertion operator <<, which is defined on lines 67–71.
In the main routine for this program, four students are created on lines 81–84. On line 86, an empty vector, properly named EmptyClass, is defined using the default constructor of the vector class. When a vector is created in this way, no space is allocated for it by the compiler. As you can see in the output produced by ShowVector(EmptyClass), its size and capacity are both zero.
On line 90, a vector of three Student objects is defined. Its size and capacity are both three. Elements in the GrowingClass are assigned with the Student objects on lines 94–96 using the subscripting operator [].
The fourth student, Peter, is added to the vector on line 100. This increases the size of the vector to four. Interestingly, its capacity is now set to six. This means that the compiler has allocated enough space for up to six Student objects.
Because vectors must be allocated to a continuous block of memory, expanding them requires a set of operations. First, a new block of memory large enough for all four Student objects is allocated. Second, the three elements are copied to this newly allocated memory and the fourth element is appended after the third element. Finally, the original memory block is returned to the memory. When a large number of elements are in a vector, this deallocation and reallocation process can be time-consuming. Therefore, the compiler employs an optimization strategy to reduce the possibility of such expensive operations. In this example, if you append one or two more objects to the vector, no need exists to deallocate and reallocate memory.
On lines 104 and 105, the subscripting operator [] is again used to change the member variables for the first object in the GrowingClass.
The vector container class has other member functions. The front() function returns a reference to the first element in a list. The back() function returns a reference to the last element. The at() function works like the subscript operator []. It is safer than the vector implementation of [] because it checks whether the subscript passed to it is within the range of available elements (although, of course, you could code a subscript operator to perform the same check). If the index is out of range, it throws an out_of_range exception. (Exceptions are covered tomorrow.)
The insert() function inserts one or more nodes into a given position in a vector. The pop_back() function removes the last element from a vector. And finally, a remove() function removes one or more elements from a vector.
The List Container
A list is a container designed to be optimal when you are frequently inserting and deleting elements. The list STL container class is defined in the header file <list> in the namespace std. The list class is implemented as a doubly-linked list, where each node has links to both the previous node and the next node in the list.
The list class has all the member functions provided by the vector class. As you have seen in “Week 2 in Review,” you can traverse a list by following the links provided in each node. Typically, the links are implemented using pointers. The standard list container class uses a mechanism called the iterator for the same purpose.
An iterator is a generalization of a pointer and attempts to avoid some of the dangers of a pointer.
You can dereference an iterator to retrieve the node to which it points. Listing 19.9 demonstrates the use of iterators in accessing nodes in a list.
Listing 19.9. Traverse a List Using an Iterator
0: #include <iostream>
1: #include <list>
2: using namespace std;
3:
4: typedef list<int> IntegerList;
5:
6: int main()
7: {
8: IntegerList intList;
9:
10: for (int i = 1; i <= 10; ++i)
11: intList.push_back(i * 2);
12:
13: for (IntegerList::const_iterator ci = intList.begin();
14: ci != intList.end(); ++ci)
15: cout << *ci << " ";
16:
17: return 0;
18: }
![]()
2 4 6 8 10 12 14 16 18 20
![]()
Listing 19.9 uses the STL’s list template. On line 1, the necessary include file is #included. This pulls in the code for the list template from the STL.
On line 4, you see the use of the typedef commend. In this case, instead of using list<int> throughout the listing, the typedef lets you use IntegerList. This is much easier to read.
On line 8, intList is defined as a list of integers using the typedef that was just created. The first 10 positive even numbers are added to the list using the push_back() function on lines 10 and 11.
On lines 13–15, each node in the list is accessed using a constant iterator. This indicates that there is no intent to change the nodes with this iterator. If you want to change a node pointed to be an iterator, you need to use a non-const iterator instead:
intList::iterator
The begin() member function returns an iterator pointing to the first node of the list. As can be seen here, the increment operator ++ can be used to point an iterator to the next node. The end() member function is kind of strange—it returns an iterator pointing to one-pass-last node of a list. You must be certain that your iterator doesn’t reach end()!
The iterator is dereferenced the same as a pointer, to return the node pointed to, as shown on line 15.
Although iterators are introduced here with the list class, the vector class also provides iterators. In addition to functions introduced in the vector class, the list class also provides the push_front() and pop_front() functions that work just like push_back() and pop_back(). Instead of adding and removing elements at the back of the list, they add and remove elements in the front of the list.
The Stacks Container
One of the most commonly used data structures in computer programming is the stack. The stack, however, is not implemented as an independent container class. Instead, it is implemented as a wrapper of a container. The template class stack is defined in the header file <stack> in the namespace std.
A stack is a continuously allocated block that can grow or shrink at the back end. Elements in a stack can only be accessed or removed from the back. You have seen similar characteristics in the sequence containers, notably vector and deque. In fact, any sequence container that supports the back(), push_back(), and pop_back() operations can be used to implement a stack. Most of the other container methods are not required for the stack and are, therefore, not exposed by the stack.
The STL stack template class is designed to contain any type of objects. The only restriction is that all elements must be of the same type.
A stack is a LIFO (last in, first out) structure. The classic analogy for a stack is this: A stack is like a stack of dishes at a salad bar. You add to the stack by placing a dish on top (pushing the stack down), and you take from the stack by “popping” the top dish (the one most recently added to the stack) off the top.
By convention, the open end of a stack is often called the top of the stack, and operations carried out to a stack are often called push and pop. The stack class inherits these conventional terms.
Note
The STL stack class is not the same as the stack mechanism used by compilers and operating systems, in which stacks can contain different types of objects. The underlying functionality, however, is very similar.
The Deque Container
A deque is like a double-ended vector—it inherits the vector container class’s efficiency in sequential read and write operations. But, in addition, the deque container class provides optimized front-end and back-end operations. These operations are implemented similarly to the list container class, where memory allocations are engaged only for new elements. This feature of the deque class eliminates the need to reallocate the whole container to a new memory location, as the vector class has to do. Therefore, deques are ideally suited for applications in which insertions and deletions take place at either one or both ends, and for which sequential access of elements is important. An example of such an application is a train-assembly simulator, in which carriages can join the train at both ends.
The Queues Container
A queue is another commonly used data structure in computer programming. Elements are added to the queue at one end and taken out at the other.
A queue is like a line at the theater. You enter the queue at the back, and you leave the queue at the front. This is known as a FIFO (first in, first out) structure; a stack is a LIFO (last in, first out) structure. Of course, every once in a while, you’re second-to-last in a long line at the supermarket when someone opens a new register and grabs the last person in line—turning what should be a FIFO queue into a LIFO stack, and making you grind your teeth in frustration.
Like the stack, the queue is implemented as a wrapper class to a container. The container must support front(), back(), push_back(), and pop_front() operations.
Understanding Associative Containers
You have seen that a vector is like an enhanced version of an array. It has all the characteristics of an array and some additional features. Unfortunately, the vector also suffers from one of the significant weaknesses of arrays: You cannot find an element using any index other than its offset in the container. Associative containers, on the other hand, provide fast random access based on keys that are associated with values.
The sequence containers are designed for sequential and random access of elements using the index or an iterator, the associative containers are designed for fast random access of elements using keys. The Standard C++ Library provides five associative containers: map, multimap, set, multiset, and bitset.
The Map Container
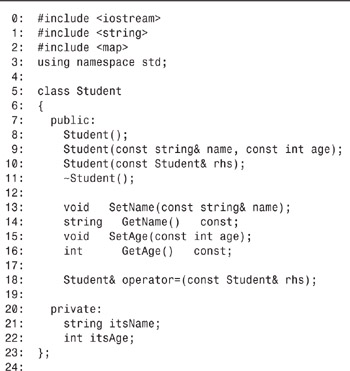
The first associate container you will learn about is the map. The name comes from the idea that they contain “maps,” which are the key to the associated value, just as a point on a paper map corresponds to a real place on earth. In the following example (Listing 19.10), a map is used to implement the school class example shown in Listing 19.8.
Listing 19.10. A Map Container Class
![]()
MathClass:
Bill: Bill is 17 years old
Harry: Harry is 18 years old
Peter: Peter is 16 years old
Sally: Sally is 15 years old
We know that Bill is 17 years old
![]()
In this example, a class is created and four students are added. The list of students is then printed. After printing this list, Bill is printed along with his age; however, rather than using a numeric indexer like previous example, Bill’s name is used to find his age. This is made possible using the map template.
Digging into the code, you see that most of the listing is the Student class. This is code you should be able to understand at this point.
The unique items in this listing start on line 2, where the header file <map> is included because the standard map container class is being used. On line 73, you can see that a prototype is provided for the ShowMap function. You can also see that this is a template function. It is used to display the elements in a map.
On line 76, typedef is used to define SchoolClass as a map of elements; each consists of a (key, value) pair. The first value in the pair is a string that is the key value. In this example, for SchoolClass, the students’ names are this key value. The key value of elements in the map container must be unique; that is, no two elements can have the same key value. The second value in the pair is the actual object, a Student object in the example. The pair data type is implemented in the STL as a struct of two members: namely, first and second. These members can be used to access a node’s key and value.
You can take a look at the ShowMap() function on lines 103–111. The ShowMap() function uses a constant iterator to access a map object. On line 108, ci->first points to the key, or a student’s name. ci->second points to the Student object.
All that remains to review in this listing is the main() function on lines 78–98. Back on lines 80–83, four Student objects are created. The MathClass is defined as an instance of our SchoolClass on line 85. On lines 86–89, the four students (actually the Student objects) are added to the MathClass using the following syntax:
map_object[key_value] = object_value;
On line 86, you can see that the key_value being used is the name from a Student object. This name is obtained using the GetName() method from the Student object. The object_value is a Student object.
The push_back() or insert() functions could also have been used to add a (key, value) pair to the map; you can look up your compiler’s documentation for more details.
After all Student objects have been added to the map, you can access any of them using their key values. On lines 94–96, MathClass["Bill"] is used to retrieve Bill’s record. Bill is the key value. You could just as easily have used any of the other student’s names to access their records.
Other Associative Containers
The multimap container class is a map class without the restriction of unique keys. More than one element can have the same key value.
The set container class is also similar to the map class. The only difference is that its elements are not (key, value) pairs. An element is only the key. The multiset container class is a set class that allows duplex key values.
Finally, the bitset container class is a template for storing a sequence of bits.
Working with the Algorithm Classes
A container is a useful place to store a sequence of elements. All standard containers define operations that manipulate the containers and their elements. Implementing all these operations in your own sequences, however, can be laborious and prone to error. Because most of those operations are likely to be the same in most sequences, a set of generic algorithms can reduce the need to write your own operations for each new container. The standard library provides approximately 60 standard algorithms that perform the most basic and commonly used operations of containers.
Standard algorithms are defined in <algorithm> in namespace std.
To understand how the standard algorithms work, you need to understand the concept of function objects. A function object is an instance of a class that defines the overloaded operator(). Therefore, it can be called as a function. Listing 19.11 demonstrates a function object.
Listing 19.11. A Function Object
0: #include <iostream>
1: using namespace std;
2:
3: template<class T>
4: class Print
5: {
6: public:
7: void operator()(const T& t)
8: {
9: cout << t << " ";
10: }
11: };
12:
13: int main()
14: {
15: Print<int> DoPrint;
16: for (int i = 0; i < 5; ++i)
17: DoPrint(i);
18: return 0;
19: }
![]()
0 1 2 3 4
![]()
On lines 3–11, a template class named Print is defined. As you can see, this is a standard template class. On lines 6–9, the operator () is overloaded to take an object and outputs it to the standard output. On line 15, DoPrint is defined as an instance of the Print class using an int value. With this, you can now use DoPrint just like a function to print any integer values, as shown on line 17. The standard algorithm classes work just like DoPrint. They have overloaded the operator() so you can use them like functions.
Nonmutating Sequence Operations
Nonmutating sequence operations are components from the algorithm library that perform operations that don’t change the elements in a sequence. These include operators such as for_each(), find(), search(), and count(). Listing 19.12 shows how to use a function object and the for_each algorithm to print elements in a vector.
Listing 19.12. Using the for_each() Algorithm
0: #include <iostream>
1: #include <vector>
2: #include <algorithm>
3: using namespace std;
4:
5: template<class T>
6: class Print
7: {
8: public:
9: void operator()(const T& t)
10: {
11: cout << t << " ";
12: }
13: };
14:
15: int main()
16: {
17: Print<int> DoPrint;
18: vector<int> vInt(5);
19:
20: for (int i = 0; i < 5; ++i)
21: vInt[i] = i * 3;
22:
23: cout << "for_each()" << endl;
24: for_each(vInt.begin(), vInt.end(), DoPrint);
25: cout << endl;
26:
27: return 0;
28: }
![]()
for_each()
0 3 6 9 12
![]()
Note that all C++ standard algorithms are defined in <algorithm>, so it is included on line 2 of the listing. Although most of the program should be easy for you, one line, however, is worth reviewing. On line 24, the for_each() function is called to go through each element in the vector vInt. For each element in the vector, it invokes the DoPrint function object and passes the element to DoPrint.operator(). This results in the value of the element to be printed on the screen.
Mutating Sequence Operations
Mutating sequence operations perform operations that change the elements in a sequence, including operations that fill or reorder collections. Listing 19.13 shows the fill() algorithm.
Listing 19.13. A Mutating Sequence Algorithm
0: #include <iostream>
1: #include <vector>
2: #include <algorithm>
3: using namespace std;
4:
5: template<class T>
6: class Print
7: {
8: public:
9: void operator()(const T& t)
10: {
11: cout << t << " ";
12: }
13: };
14:
15: int main()
16: {
17: Print<int> DoPrint;
18: vector<int> vInt(10);
19:
20: fill(vInt.begin(), vInt.begin() + 5, 1);
21: fill(vInt.begin() + 5, vInt.end(), 2);
22:
23: for_each(vInt.begin(), vInt.end(), DoPrint);
24: cout << endl << endl;
25:
26: return 0;
27: }
![]()
1 1 1 1 1 2 2 2 2 2
![]()
The only new content in this listing is on lines 20 and 21, where the fill() algorithm is used. The fill algorithm fills the elements in a sequence with a given value. On line 20, it assigns an integer value 1 to the first five elements in vInt. The last five elements of vInt are assigned with integer 2 on line 21.
Sorting and Related Operations
The third category of algorithms is the sorting and related operations subclass. Within this set of operations, you find merging, partial sorts, partial sorts with copying, binary searches, lower and upper bounds checks, set intersections, set differencing, minimums, maximums, permutations, and more. You can check your compiler’s documentation or the C++ standards documentation for specific information on each of these operations.
Note
It is beyond the scope of this book to go into details on all the operations in the algorithm and other Standard Template Library classes. You can check your compiler’s documentation or the C++ standards to get more details on the classes and operations available as well as the details on their parameters and usage. In addition, entire books are available on the STL and its usage.
Summary
Today, you learned how to create and use templates. Templates are a key part of the C++ standard and a built-in facility of C++. Templates are used to create parameterized types—types that change their behavior based on parameters passed in at creation. They are a way to reuse code safely and effectively.
The definition of the template determines the parameterized type. Each instance of the template is an actual object, which can be used like any other object—as a parameter to a function, as a return value, and so forth.
Template classes can also declare three types of friend functions: nontemplate, general template, and type-specific template. A template can declare static data members, in which case each instance of the template has its own set of static data.
If you need to specialize behavior for some template functions based on the actual type, you can override a template function with a particular type. This works for member functions as well.
In the second half of today’s lesson, you learned that the C++ standard includes information on the Standard Template Library (STL). The STL includes numerous template and operations for you to use.
Q&A
Q Why use templates when macros will do?
A Templates are type-safe and built in to the language, so they are checked by the compiler—at least when you instantiate the class to create a particular variable.
Q What is the difference between the parameterized type of a template function and the parameters to a normal function?
A A regular function (nontemplate) takes parameters on which it can take action. A template function enables you to parameterize the type of a particular parameter to the function. That is, you can pass an Array of Type to a function and then have the Type determined by the definition of the variable that is an instance of the class for a specific type.
Q When do I use templates and when do I use inheritance?
A Use templates when all the behavior, or virtually all the behavior, is unchanged, except in regard to the type of the item on which your class acts. If you find yourself copying a class and changing only the type of one or more of its members, it might be time to consider using a template. Also, use a template when you are tempted to change a class to operate on a higher-level ancestor class (reducing type-safety) of its operands, or to make two unrelated classes share a common ancestor so that your class can work with both of them (again, reducing type-safety).
Q When do I use general template friend classes?
A When every instance, regardless of type, should be a friend to this class or function.
Q When do I use type-specific template friend classes or functions?
A When you want to establish a one-to-one relationship between two classes. For example, array<int> should match iterator<int>, but not iterator<Animal>.
Workshop
The Workshop provides quiz questions to help you solidify your understanding of the material covered and exercises to provide you with experience in using what you’ve learned. Try to answer the quiz and exercise questions before checking the answers in Appendix D, and be certain you understand the answers before continuing to tomorrow’s lesson.
Quiz
1. What is the difference between a template and a macro?
2. What is the difference between the parameter in a template and the parameter in a function?
3. What is the difference between a type-specific template friend class and a general template friend class?
4. Is it possible to provide special behavior for one instance of a template but not for other instances?
5. How many static variables are created if you put one static member into a template class definition?
6. What attributes must your class have to be used with the standard containers?
7. What does STL stand for and why is the STL important?
Exercises
1. Create a template based on this List class:
class List
{
private:
public:
List():head(0),tail(0),theCount(0) {}
virtual ~List();
void insert( int value );
void append( int value );
int is_present( int value ) const;
int is_empty() const { return head == 0; }
int count() const { return theCount; }
private:
class ListCell
{
public:
ListCell( int value, ListCell *cell = 0):val(value),
next(cell){}
int val;
ListCell *next;
};
ListCell *head;
ListCell *tail;
int theCount;
};
2. Write the implementation for the List class (nontemplate) version.
3. Write the template version of the implementations.
4. Declare three list objects: a list of Strings, a list of Cats, and a list of ints.
5. BUG BUSTERS: What is wrong with the following code? (Assume the List template is defined and Cat is the class defined earlier in the book.)
List<Cat> Cat_List;
Cat Felix;
CatList.append( Felix );
cout << "Felix is "
<< ( Cat_List.is_present( Felix ) ) ? "" : "not "
<< "present" << endl;
Hint (this is tough): What makes Cat different from int?
6. Declare friend operator== for List.
7. Implement friend operator== for List.
8. Does operator== have the same problem as in Exercise 5?
9. Implement a template function for swap that exchanges two variables.