
In the promised land of Connected Systems, we will be able to build a service using our favorite tools and technologies without introducing constraints as to who might be able to consume that service. It follows that in this WS-* world, where my service can be accessed by anyone or anything with an Internet connection, who that caller is and what he can access becomes rather important.
Unfortunately, as I write, at the dawn of 2006, Information Technology is suffering from an identity crisis that threatens the evolution of Connected Systems and “Web 2.0.” What is at stake here? Well, to quote Ray Ozzie:
“The environment has changed yet again—this time around services. Computing and communications technologies have dramatically and progressively improved to enable the viability of a services-based model. The ubiquity of broadband and wireless networking has changed the nature of how people interact, and they’re increasingly drawn toward the simplicity of services and service-enabled software that “just works.” Businesses are increasingly considering what services-based economics of scale might do to help them reduce infrastructure costs or deploy solutions as-needed and on [a] subscription basis.”
The environment has changed but we are missing one major piece: There is no identity layer for the Internet. The Internet was built without a way to know who you are dealing with. The consequences of this omission are evident: Users are beset by the perils of identity theft, “phishing,” and “pharming.” Day to day, we face either struggling with a growing list of usernames and passwords or compromising our security by reusing them. To add insult to injury, every time we register with a new site we are made to type in the same information we’ve supplied to every other site while—coincidentally or not—we endure nauseating quantities of spam in our in-boxes and blogs!
Businesses, on the other hand, are blessed with a veritable busload of identity technologies—a number exceeded only by the profusion of identity integration products that promise to help bring order out of the chaos of identity balkanization. Single Sign-On (SSO) is an elusive goal and Identity Management is a complex process. When you add the challenges of regulatory compliance to the mix, you can almost hear the cries of pain and frustration. It’s no wonder the idea of outsourcing has become so attractive!
The banks are facing losses from online fraud. A directive from the Federal Financial Institutions Examination Council (FFIEC)—comprising the United States’ five federal banking regulators—recommends that financial institutions deploy security measures such as multifactor authentication to authenticate their online banking customers by the end of 2006.
Many governments, notably in Belgium, the U.K. and Ireland, plan to introduce smartcard-based identity cards, augmenting existing eGovernment systems such as online tax returns. In the realm of healthcare, the obvious potential of electronic patient records is undermined by the challenges around patient privacy and access control.
How on earth can we hope to make progress in this complex minefield?
Well, there is hope. Some people, both talented and experienced, have been thinking hard about these issues. Crucially, there has been a continual open discussion and feedback from experts across the industry.
What are the requirements of an open and inclusive “user-centric” identity system? What are its properties? What might it look like? Given the diverse backgrounds, interests, and goals of the participating parties, there has been a remarkable degree of consensus.
There is even a technology (the chapter title gives it away somewhat) that helps us build an identity infrastructure for the Web. But before we get to that, let’s take a step back and look at what identity is in the context of IT systems.
Someone’s identity includes his or her physical appearance, beliefs, interests, likes and dislikes, reputation, and history. It can cover everything vaguely interesting about the person.
At the risk of boring you stupid, I’ll take myself as an example. I am thus the subject and my identity can be (partially) expressed using the following statements:
I am English.
I am married.
I am over 21.
I am employed by Microsoft.
I have an excellent reputation as a buyer on eBay.
I am a member of Netflix.
I read the Guardian newspaper.
I have a blog at http://blogs.msdn.com/nigelwa.
I have Frequence Plus Carte Rouge.
If we express this information digitally I become the digital subject:
A digital subject is a person or thing represented in the digital realm which is being described.
Humans are not the only possible digital subjects. We might equally deal with groups, devices, policies, resources, or relationships (such as between a user and a device).
With a sprinkling of XML, each of the claims above can help form my digital identity:
A digital identity is a set of claims made by one digital subject about itself or another digital subject.
Claims can take many forms: a simple identifier such as REDMOND
igelwa, personal information (my name and address), membership of a group (Netflix), a capability (my credit limit is $5,000) or knowledge of a key.
Do you believe all of them? Why? Why not? Would showing you my passport or my driver’s license increase your level of belief in my proposed age? What if the Human Resources department at Microsoft were asserting that I was an employee?
By using the word claim in the definition of digital identity, we make a subtle but deliberate choice. In a closed directory-based domain (for example, a Windows Server 2003 domain), we typically deal in security assertions, meaning “confident and forceful statements of fact or belief.” This confidence is well-merited: It is a closed, administered system. However, if we want to have an open and broad-reaching identity system (we do), it helps to reflect the element of doubt inherent in dealing with parties on the Internet. How confident you are in the veracity of these claims depends on who the identity provider is, their reputation, and your relationship with them. Oh, and whether the claims have reached you intact and without being tampered with! In this case, I am the identity provider (and my security token is a Sams book). Perhaps you might have greater confidence in my age if shown my passport or my certificat de mariage—or digital versions of those documents signed by a government authority. You might have less faith if you saw them in an English tabloid newspaper.
This claim model is extremely flexible—we can express a subject’s identity in pretty much any way we choose to. It has another very valuable property: It enables us to tackle the concerns of the general public around privacy and anonymity. On the Internet—even more than elsewhere—our natural desire is to remain anonymous until the moment we choose to reveal our identity, and even then we want to disclose the minimum amount of information possible (for example, revealing that I am over 21 without revealing my age). But how can an identity system preserve anonymity? Surely “anonymous identity” is an oxymoron?!
Well, anonymity is as much a part of identity as recognition. Anonymity is the null set of identity—and is very much a part of what we’re trying to achieve. Many existing identity systems rely on unique identifiers. This is a critically useful constraint (to say the least) but not necessarily one we always want to apply. This is a flaw in URL-based systems—by their very definition, they resolve to a location.
The key idea is that identifying a subject needn’t have anything to do with knowing who that subject is “in the real world.” We can use a pseudo-identity to represent a user, not a real identity, and associate that with zero or more claims. The fact that a certain user has a consistent pseudo-identity over time allows us to gauge the quality of that user without having any idea of who he really is.
Summarizing, we are going to represent a subject’s digital identity using a set of claims supplied in a secure and verifiable way by an identity provider. The claims are packaged in a security token that can travel over process and machine boundaries to wherever they are required.
If you are a corporate developer, then likely you will be intimately familiar with the world of pain that is Single Sign-On. The amount of time spent getting applications to accept a corporate standard authentication mechanism is astounding. Although there seems to be a trend for enterprises to consolidate around Active Directory—the twin lures of Exchange Server and Group Policy proving too strong to resist—it will be many years, if ever, before one directory service becomes a de facto standard.
Regardless of which directory an organization standardizes on, the entries in that directory are best limited to the employees and resources of that organization. We really don’t want to have to maintain a directory entry for every single employee of every business partner we deal with. The right way to do it is via identity federation.
Microsoft’s Active Directory Federation Services (ADFS) uses WS-Trust and WS-Federation to build a bridge between two companies’ Active Directories. In effect, Company A is set up to trust certain security tokens from company B and/or vice versa.
To give a concrete example, Microsoft has a company store where you can buy gorgeous Microsoft-branded merchandise such as mugs and umbrellas. Employees can order these collectors’ items via a hosted website run by an outside company—with its own directory. In the past, Microsoft employees have had to be issued—and worse, had to remember—a separate username and password for this site. By setting up a trust relationship between an account ADFS server on the Microsoft side and a resource ADFS server on the hosting company side, Microsoft employees can now authenticate using their habitual AD credentials, seamlessly gain access to the company store website, and buy 10 mugs and a cordless mouse to celebrate.
The separation of responsibilities here is entirely logical. Microsoft maintains its directory of employees and their spending limits. The hosting company concentrates on processing orders without the hassle of maintaining a shadow account for every Microsoft employee who buys a T-shirt. The employees, meanwhile, have the pleasure of a seamless experience and the untold joy of one fewer username and password to remember.
Federation is a powerful solution for cooperating businesses—but what about identity outside of corporate domains? What about identity for Internet users?
As I mentioned before, there is no identity infrastructure built into the Internet and thus no way to know who you’re dealing with. Attempts at a solution have been ad hoc kludges, difficult to understand, hard to automate, and vulnerable from a security point of view. Furthermore, every new solution creates another identity silo we have to connect to.
Our digital identities end up locked into these silos. There is no way for me to move my Amazon book-purchasing history or my Netflix movie-viewing history to, say, Barnes & Noble or Blackwells. My excellent reputation with eBay is hard earned; I would like to be able to use it with other sites.
Obviously, what we really need is for everyone to agree on just one solution. Fat chance, I hear you say, but the industry has a history of moving away from proprietary siloed technologies such as X.400 and Token-Ring toward standardized, simple, open protocols like TCP/IP, HTML, and SMTP. The WS-* protocols have broad industry support; why can’t we just devise an identity system for the Internet and have done with it?
Although this would be a great relief for everybody, it is important to realize that each of the technologies available today has its compelling use cases, its merits, and its faults. In short, it is an extremely difficult task to select a single identity technology that can satisfy all existing scenarios and, furthermore, anticipate every single future one.
There are two classic approaches to complex computing problems like this. One is to have a very simple system with an extensibility mechanism so that it can be adapted to each problem domain (for example, SOAP); the other is to add a level of indirection that provides a consistent experience and hides multiple underlying technology implementations (for example, TCP/IP over Ethernet and Token-Ring).
But before we decide on which fundamental approach to take—and each has its advocates—it would be wise to examine previous efforts at solving the identity problem. We can learn from their successes and their failures—both technological and sociological—in a range of contexts. From that analysis we hope to identify the characteristics that our identity system must possess in order to be successful.
Although there have been a number of efforts in this area, the two that spring to mind are Microsoft’s (much-maligned) Passport and Public Key Infrastructure (PKI).
What prevented the Passport identity system from being successful? Well, that question’s a bit harsh: There are currently more than 250 million Passport users and more than a billion Passport logons per day. So it is a success as an identity provider for MSN. However, as an identity provider for the Internet, it simply didn’t cut the mustard.
The problem is that Microsoft is the identity provider for every transaction. Regardless of whether you trust the company—or believe it to be the very incarnation of evil—this arrangement is not always appropriate or desirable. When I disclose my digital identity, only those parties whose presence is truly justified should be involved. We can formalize this requirement as follows:
Digital identity systems must be designed so [that] the disclosure of identifying information is limited to parties having a necessary and justifiable place in a given identity relationship.
This is the law of justifiable parties and it is one of seven “laws of identity” published and refined online at www.identityblog.com. The ability of identity experts to directly influence the formation of these laws via the “blogosphere” has produced an industry-wide consensus that the laws are sound, accurate, and complete. These laws are the best tools available to us for evaluating new and existing identity systems.
I will uncover the rest of the laws in a moment, but first let’s take a look at PKI.
PKI, as many of those immersed in it will tell you, is a wonderful technology that is set to take the world by storm. Unfortunately, PKI’s advocates have been saying this for a long time! There is no doubt that it is an extremely powerful and useful technology, but it can be costly, it can be complex to manage, and it is overkill in simple contexts.
Despite its flaws, PKI is the nearest we have to a universal identity system today. It is PKI that provides us with the security backbone of the Internet. It is SSL certificates that allow us to conduct secure transactions over the Web. If we are to build an Internet identity layer and are not averse to a bit of reuse, it might be prudent to take advantage of this existing infrastructure—provided it doesn’t cause us to fall afoul of the laws.
It is revealing that even a strong technology like PKI, with a choice of vendors and identity providers (namely, the certificate authorities), has not been universally deployed. Without being overly pessimistic, there probably isn’t a “one size fits all” identity solution.
It is this point, combined with the reality of a large existing installed base of identity silos, that helps us decide whether the “simple and extensible” or the “level of indirection” approach is most likely to gain traction and succeed.
In short, the indirection method has the greater potential. What’s more, it has the advantage of not precluding the simple/extensible approach. Nascent identity technologies can evolve naturally under the all-encompassing wing of indirection. Perhaps, over time, a simple/extensible solution will become dominant—but it will still be able to interoperate with legacy technologies.
Therefore, what we require is an identity metasystem, or system of systems, that provides that level of indirection, encompasses existing identity technologies, and obeys the laws of identity.
And now to the rest of the laws.…
Here are the laws of identity as stated at www.identityblog.com:
User Control and Consent
Technical identity systems must only reveal information identifying a user with the user’s consent.
Minimal Disclosure for a Constrained Use
The solution which discloses the least amount of identifying information and best limits its use is the most stable long-term solution.
Justifiable Parties
Digital identity systems must be designed so the disclosure of identifying information is limited to parties having a necessary and justifiable place in a given identity relationship.
Directional Identity
A universal identity system must support both “omni-directional” identifiers for use by public entities and “unidirectional” identifiers for use by private entities, thus facilitating discovery while preventing unnecessary release of correlation handles.
Pluralism of Operators and Technologies
A universal identity system must channel and enable the inter-working of multiple identity technologies run by multiple identity providers.
Human Integration
The universal identity metasystem must define the human user to be a component of the distributed system integrated through unambiguous human-machine communication mechanisms offering protection against identity attacks.
Consistent Experience across Contexts
The unifying identity metasystem must guarantee its users a simple, consistent experience while enabling separation of contexts through multiple operators and technologies.
The laws, I hope, are pretty self-explanatory, but I’ll attempt to clarify or emphasize where appropriate. For a more detailed explanation, take a look at the Laws of Identity whitepaper.
The first law states that the user must be in control, be informed, and give their consent before the system releases personal information. This law is at the heart of the oft-used term user-centric identity management (as opposed to domain-centric).
The second and third laws are common sense: Identity information is sensitive so reveal the minimal amount to the fewest people necessary.
The fourth law says that an identity system should support both public and private identities. A website like Amazon has a public identity. The more people who know that identity the better, as far as Amazon is concerned: The Amazon people are happy for it to be broadcast everywhere. A private individual, on the other hand, wants to share her identity only in a point-to-point fashion, not broadcast it to the whole world.
The fifth law we’ve already covered. The sixth law emphasizes that the user is a fundamental part of the system, not an afterthought.
The seventh law derives from the preceding two. If we accept that the human factor is crucial and there will be a mixture of operators and technologies, then there must be a unified experience across contexts for the system to be usable.
So we need an identity metasystem. What does it look like? Well, it has to obey the laws of identity, expose the strengths of its constituent identity systems, provide interoperability between them, and enable the creation of a consistent and straightforward user interface over all of them.
Just to emphasize the point, it should be completely open and nonproprietary: It is “the identity metasystem” not “the Microsoft or IBM or whoever identity metasystem.”
There are three roles in the metasystem:
Subjects, the entities about whom claims are made
Identity Providers (IPs), which issue digital identities
Relying Parties (RPs), which require digital identities
To give but one example to illustrate the roles, when I buy a book online I am the subject, my bank is the identity provider giving my credit-card details, and the online bookstore is the relying party consuming those details to enable me to buy a copy of The Idiot’s Guide to PKI.
If you remember, our identity is packaged in a security token containing claims made by an identity provider. In the preceding example the online bookstore might specify that it requires a token that contains my name, address, and credit-card claims. I can then ask my bank to provide the required security token with proof that it was issued by them and a way to prove I am the rightful possessor of the token. When I give this token to the online bookstore, they verify that it came from my bank, and that I am the rightful purchaser, and they extract the claims and complete the transaction.
Notice here that the user is at the center. Potentially the token could have gone directly from bank to bookstore—from identity provider to relying party—but instead it goes via the user so that she has control and consent over the release of identity information.
Expanding a little on the example, you can see a number of requirements for the system to work.
First, the relying party needs a way to specify the claims it requires in a way that everyone understands: “I need first name, surname, and address claims.” Likewise, the identity provider needs a way to specify the claims it is able to supply.
Second, the relying party and the identity provider may use completely different identity systems with different token formats—this is a metasystem, remember! So both parties need a technology-agnostic way to express the kinds of security tokens that they understand: “I need a SAML 1.1 or SAML 2.0 security token.”
Furthermore, it would be useful if the identity provider and relying party could negotiate the types of claims they can use: “I can provide tokens of these types: X, Y”; “ I can receive tokens of these types: Y, Z”—”Okay, let’s use token type Y because we both understand that.”
This is a bit like people communicating via languages and raises an interesting idea. If I speak English and French but you speak only Japanese, Swedish, and German, we can still communicate provided we can find someone who can understand, say, French and Japanese. Provided we trust that person not to make things up or fall victim to Chinese Whispers (as in the game of Telephone), we can interoperate perfectly well.
Within the context of our identity system, we may need to translate not only the type of token but also the claims themselves. For example, my identity provider may provide a “date of birth” claim, but the relying party may require an “older than 21” claim. Or my company may provide an “is at job level 1000” claim, but the relying party needs an “is a manager” or “is an executive” claim.
What we need is a token translation service: a trusted service that can receive tokens of one type and convert them to tokens of another type. Such beasts exist and they are commonly known as security token services (or STSs).
Furthermore, the user cannot “just” ask an identity provider for a security token—that’s not very secure! The user has to authenticate to the identity provider in some way and prove who she is. Put another way, the user must supply some kind of security token (asserting her identity) in order to get a security token back (also asserting her identity) that she can give to the relying party.
Thus it becomes clear that
Identity providers are security token services.
All interactions with security token services involve giving one kind of security token and getting another one back.
Meanwhile, at the center of everything lies the user. Regardless of the complex flow of claims, tokens, and token types between the different systems within the metasystem, we want the user to have a simple, consistent experience and be able to control the release of information.
These requirements can be summarized as stated here:
Negotiation. —Way to enable relying party, subject, and identity provider to negotiate technical policy requirements
Encapsulation. —Technology-agnostic way to exchange policies and claims between identity provider and relying party.
Claims transformation. —Trusted way to change one set of claims regardless of token format into another.
User experience. —Consistent user interface across multiple systems and technologies.
The architecture that enables the identity metasystem to be implemented—allowing us to meet the preceding requirements and link together identity providers, subjects, and relying parties—is the WS-* Web Services architecture (http://msdn.microsoft.com/webservices/). This set of open specifications is available for anyone to use on a reasonable and nondiscriminatory basis and has been adopted across the industry. For our purposes, the key specifications for the metasystem are WS-SecurityPolicy, WS-MetadataExchange (WS-MEX), and WS-Trust.
WS-SecurityPolicy allows us to describe the security token and claim requirements of a service in policy, and WS-MetadataExchange allows us to query and retrieve these service policies. WS-Trust defines the mechanism for requesting and receiving security tokens. In other words, it defines how a security token service communicates to the world. As you have seen, this is very simple: There is a Request for a Security Token (RST) and a subsequent Request for a Security Token Response (RSTR). Figure 14.1 helps show how everything fits together.
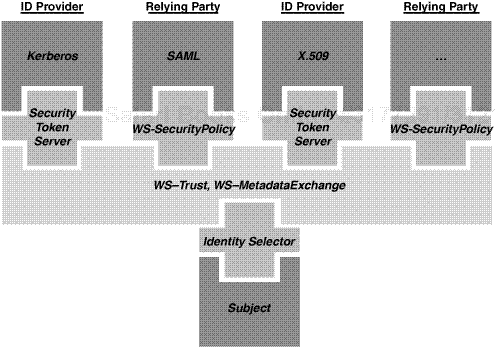
There are multiple relying parties, each with different token and claim requirements expressed using WS-SecurityPolicy. If we want to access one of these relying parties, we can find out their policy using WS-MEX. After we know their requirements, we can select a matching identity provider (or chain of providers).
For example, a relying party may require SAML 1.1 tokens containing my name and SSN from “any” identity provider. I can then select one of the identity providers that is able to provide the right token for the job.
The identity selector in the diagram is the “consistent user experience” part of the metasystem. After being invoked by an application, the identity selector performs the negotiation between the relying party and identity provider(s), displays the matching identity providers and relying parties to the subject, allows the user to select appropriately, obtains a security token containing the requested claims, and releases it to the requestor—all under the supervision of the subject (that is, the user).
Furthermore, the identity selector should be agnostic to specific security token types and identity mechanisms. You could use the most esoteric security token imaginable and the identity selector will just pass it on. It is a conduit for identity flow under user control between identity providers and relying parties.
InfoCard is an identity selector that runs on Windows Vista, Windows XP SP2, and Windows Server 2003 SP1. It ships as part of WinFx along with WCF. However, it is both hoped and expected that there will be identity selectors on other operating systems such as the Apple Mac and Linux. The identity metasystem is inclusive of all technologies and platforms and, to the amazement and disbelief of some, it is entirely possible to build an end-to-end solution without having any Microsoft software whatsoever.
There will, of course, be an Active Directory Security Token Service (AD/STS), but there will also be STSes from other vendors and on other platforms. Indeed there is already an STS implementation on Linux by Ping Identity. To test the true interoperable nature of the technology, Kim Cameron runs his blog on the LAMP stack and uses InfoCard to log in!
Now that we’re a few pages into a chapter on InfoCard, it’s high time I provided a one-paragraph definition of InfoCard that tries to encapsulate its qualities:
The InfoCard system is a new feature of Windows that allows users to control the use of their digital identity via the simple and familiar metaphor of a set of cards. When a user wants to access an online service, rather than providing his username and password or filling in a form, he selects an appropriate card from a special, security-hardened UI. This “InfoCard” represents the digital identity of the user and enables the service to receive the data it needs to authenticate and authorize the user. This information is provided in a secure and consistent way by identity providers such as the user’s employer, his bank, his government, or indeed the user himself. It is an interactive system and the user can determine exactly what information is disclosed and to whom, while the identity provider asserts the validity of the information. By utilizing standard interoperable protocols such as WS-Security and WS-Trust, the system is able to provide users with a simple, consistent, and secure sign-on experience to trusted websites and Web services.
In other words, in the same way I might present my driver’s license in an American bar to prove I’m older than 21, or use my gym card to prove I’m a member of my gym, or provide my passport to prove I’m British, I can use a virtual card to assert one or more claims (for example, “I am older than 21”) when interacting with a website or service.
Perhaps the easiest thing to do at this point is to create a card and then you’ll get a better idea of what I’m talking about.
When you install WinFX, you should find a new icon in your Control Panel (classic view please):
If you double-click this, you should get the dialog shown in Figure 14.2.
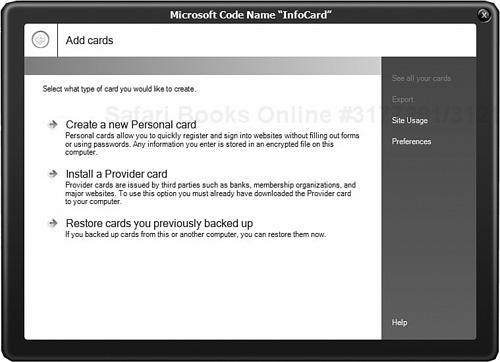
As you can see, there are two types of cards, personal cards and provider cards. The names are reasonably descriptive: provider cards (also known as managed cards) are given to you by an identity provider such as your bank, your company, or your government; personal cards (also known as self-issued cards) are created by you personally. Their most common use is to log in to websites that you use usernames and passwords with today. If you have a user account at a website today, you can use an InfoCard tomorrow—the site just needs to add InfoCard support to the existing username and password support it already has, and this process has been designed to be as simple and as nondisruptive as possible.
You can create several personal cards to represent your identity in different contexts. For example, your Xbox Live identity is likely to be different from your Amazon identity. You can also use the same card in different contexts—for example, a card providing minimal information for use at sites where you don’t want to reveal things like your address or email address. The same principles apply to provider cards: You can have more than one card from a single identity provider and use the same card in many different places (an InfoCard representing your credit-card details would be pretty useless otherwise!).
Go ahead and create some personal cards and experiment with exporting and importing them. Open the exported .crds file in Notepad to see what it looks like.
There are only 12 claims associated with personal cards:
GivenName
Surname
EmailAddress
StreetAddress
Locality
StateOrProvince
PostalCode
Country
PrimaryPhone
DateOfBirth
Gender
PrivatePersonalIdentifier
It is up to you what values you put in the 11 claims that appear in the UI. The one that doesn’t appear in the UI is the PrivatePersonalIdentifier (PPID). It is generated by the InfoCard system and is what, when you’re using a personal card, uniquely identifies you to a site. Without a PPID it would be impossible to provide a consistent, personalized experience if the only claims you provided were GivenName = “Maria”, Surname= “Gonzalez”, and StateOrProvince=”CA”—there are 10,000 Maria Gonzalezes in LA county alone (this is known in identity circles as the “Maria Gonzales problem”!).
InfoCard’s main purpose in life is to help users to authenticate and be authorized at websites and services in a simple, secure, and flexible way. It enables identity providers to supply claims for those sites to consume. It’s important to understand that InfoCards enable the user to retrieve personal identity information from identity providers but InfoCards do not contain claims.
InfoCards contain metadata concerning which claims can be provided and where and how to get them. They do not contain identity data, but only metadata (that is, data about the data). Nor do cards actually go anywhere off the user’s machine (across the wire). They stay on the client machine unless the user decides to export them or they are roamed within a domain.
Let’s go through an example to make this clearer. Suppose my bank gives me an InfoCard to represent my credit-card information. The bank emails me a signed .crd file and I import it (naturally, since InfoCards are metadata, their ultimate expression is as an XML document). When I use that card to make a payment at a website, the InfoCard system sends an RST to the bank’s security token service (the IP/STS) and I get back an RSTR with a signed, encrypted security token with the credit-card data in it, ready to pass on to the website (the RP) provided that I, the user, give my consent to release that information. It is security tokens containing claims that pass over the wire, not cards. In the end, choosing an InfoCard is just an elegant way to get hold of a security token.
The semantics of using a personal card are exactly the same as for a provider card. The card contains details about which claims can be retrieved, where they are, and how to get them—only in this case the security token service is local and the data is sitting on my hard disk.
Extending this model further, in the near future we will have portable security token services (pSTSes) that contain personally identifiable information. These will come in all shapes and sizes: thumb drives, mobile phones, and Pocket PCs. There might even be a use for those fancy digital wristwatches that Bill Gates promotes every couple of years or so. These solutions will provide both mobility and security but the concept is exactly the same: The InfoCard points to an STS that provides security tokens containing claims.
Personal cards provide some of the most commonly used claims, but it is hardly an exhaustive list (er, 12). This is by design. By including these basic claims, InfoCard helps the user avoid some tediously repetitive typing, but these are not exactly interesting claims. And that is the whole point: There’s not much incentive for a bad guy to go looking for this information. It would be easier to look in the phone book! We are purposely avoiding having a honeypot of personal information on the user’s machine. The cards that represent the really interesting data are the provider cards, and all that they have in them is metadata. It’s my bank’s server that has my account details and it’s the government-run server that has my Social Security information—which is, of course, exactly how it should be.
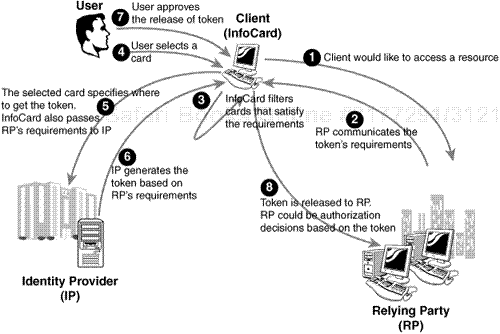
We’ve covered how to create InfoCards and what’s in them (metadata!) but how are they actually used in practice? Figure 14.3 shows the interaction between the user, the identity provider, and the relying party.
Now let’s dig into the next layer of detail. Figure 14.4 shows the message flow sequence from the Guide to Integrating with InfoCard.
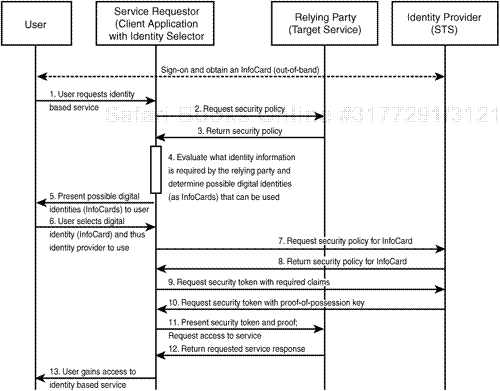
This basic message flow is the same for all InfoCard interactions, with variations based on the number of security token services. For example, the relying party can have an STS controlling access to a resource. This is typically the case with websites where access control is commonly regulated using cookies. Also, as with our language example earlier, there can be any number of identity provider STSes where one security token is exchanged for another until the security token required by the relying party is obtained and presented (this is easily configured in WCF config files).
Let’s use a real-world example to make this STS chaining a little clearer. Suppose I want to buy an HP computer from an online retailer and I know that my employer, Microsoft, has an employee purchase arrangement with HP. The retailer also has a relationship with HP; he orders stock from them and accepts HP partner discounts. The retailer needs to see a security token from HP in order for me to get my discount. In turn, to get that, I need to provide HP with proof that I work for Microsoft. So this is what happens:
I select my Microsoft provider InfoCard and authenticate to the Microsoft STS using my domain credentials or my smartcard. I receive a security token that has a claim that I am a Microsoft employee.
This token is presented to the HP STS. Because the HP STS has a trust relationship with the Microsoft STS, it can see that the token is valid (it’s signed using a private key known only to Microsoft), and it checks a proof-of-possession key that helps prove that I am the rightful user of the token.
The HP STS issues another security token (signed using an HP cert and with a proof-of-possession key from HP).
This security token is presented to the retailer service. The retailer checks the token for validity, sees that it comes from HP and that I am the rightful owner, and gives me my $1 discount.
It is worth clarifying how one authenticates to an STS (you have to prove who you are in order to be issued a security token!). InfoCard supports four ways to authenticate users to the initial identity provider STS: Kerberos, X.509 (software and hardware based), a personal InfoCard, and a username and password. When you select a provider card, you can be prompted for the associated credentials such as a password, a personal InfoCard, a smartcard and pin—or the InfoCard system may use a client certificate or your Kerberos credentials, in which case the authentication is seamless.
The identity provider specifies which authentication method to use in the security policy that InfoCard retrieves using WS-MEX. It also obtains security binding information, endpoint information, and the like.
For fine details on interactions between the identity provider, the user, and the relying party, the best place to look is in the Guide to Integrating with InfoCard (aimed at vendors interoperating with InfoCard) and the Technical Reference for InfoCard v1.0 in Windows.
The Kerberos authentication method dovetails nicely with Microsoft’s Active Directory Security Token Service when it becomes available. System administrators will use an admin console to set up trust relationships with organizations and define which Active Directory attributes are exposed as claims. Then a user just selects his company’s provider InfoCard to gain access to a trusted partner’s application or website. All the necessary authentication and access control is done seamlessly and painlessly in the background.
The InfoCard system installed with WinFx consists logically of three things:
An InfoCard service responsible for creating self-issued security tokens and retrieving security tokens from security token services
An InfoCard data store
A user interface component that is used to manage and select InfoCards
Figure 14.5 shows the logical architecture of the InfoCard system.
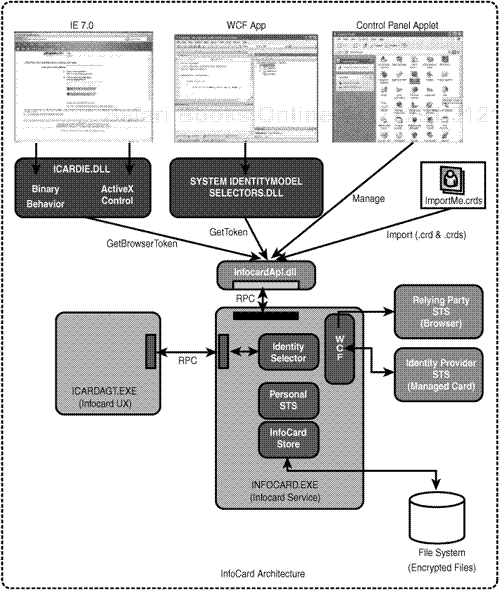
The central part of the system is the infocard.exe service, which handles all token and management requests and runs as Local System. It creates the UI Agent process, icardagt.exe, to interact with the user, and this runs as the user on a private desktop, communicating with infocard.exe via RPC.
Running the UI in a separate desktop helps ensure that personal identity information is displayed in a secure way, protecting against phishing and shatter attacks and disclosure of personal information.
There is one component, infocardapi.dll, that handles all entry points into the InfoCard system and is loaded into the client process (the browser, a WCF app, or the Control Panel applet). It has no public types but is dynamically loaded by System.IdentityModel.Selectors.dll in WCF clients and by icardie.dll in IE7.
The only other process is created when the user needs to use the Open File dialog, such as when importing or exporting a card or choosing an image. This process runs in the context of the user on the normal user desktop.
The icardie.dll component is the bridge between IE7 and the InfoCard system and it ships with IE7 (from the IE7 Beta 2 Preview onward). The InfoCard system is exposed to web developers in two ways, a binary behavior and a COM object, but they have a shared implementation for accessing infocardapi.dll using the GetBrowserToken() API.
Both binary behaviors and ActiveX objects are compatible with other browsers (a mandatory requirement for any browser solution), have minimal impact on existing sites, and provide a seamless user experience should InfoCard not be present on the user’s system, that is, if WinFx has not been installed.
ActiveX controls have the advantage of being well-known to web developers but can be disabled in high-security environments. Binary behaviors, though less familiar, are available even when the browser is configured to use high security settings and ActiveX controls are disabled.
WCF applications access InfoCard via System.IdentityModel.Selectors.dll. This .dll is installed in the global assembly cache (GAC), and the API used is GetToken(). However, as far as WCF developers are concerned, they simply need to add a reference to System.ServiceModel and select the IssuedToken client credential type to launch the InfoCard process.
Both the GetToken() and the GetBrowserToken() methods return signed and encrypted (using the identity of the recipient) security tokens ready to be dispatched to the server/service.
The identity selector module in infocard.exe is the component that does all the hard work. It retrieves IP and RP policies using WS-MetadataExchange, evaluating what identity information is required and determining which possible digital identities (that is, InfoCards) can be used. It then calls the UI process, icardagt.exe, to display those cards to the user (cards not meeting the RP’s policy are greyed out).
If the user selects a card, the identity selector knows which identity provider (and STS) to contact from the card’s metadata. It may have to ask the IP/STS for its security policy via WS-MEX, but in any case the identity selector does the WS-Trust dance with the IP/STS. It sends an RST asking for a security token containing the claims required by the relying party’s policy. The IP/STS then returns an RSTR containing a signed security token for the RP, a proof-of-possession key, and, optionally, a display token to show the user what’s in the security token proper. As the name implies, the proof key enables the user to prove to the relying party that he/she/it is the rightful bearer of the security token.
The identity provider STS can be an external service (for example, my bank or my company), in which case it is represented by a provider card supplied to me by the identity provider. Or it can be my personal STS that provides the security token, in which case it is represented by a personal card. In either case, the logical semantics are the same—and furthermore, extend to portable, device-based STSes—but in the case of personal cards it is the InfoCard system, infocard.exe, that creates a SAML 1.1 security token using data stored locally in the InfoCard store.
After the InfoCard system has received a security token from the IP, the user is prompted (via the UI agent) whether to send the token to the relying party to gain access to the site or service.
Relying parties are required to have an X.509 certificate (preferably a high-assurance certificate) to identify themselves but also so that security tokens sent to them can be encrypted using the certificate’s public key. What this means is that a security token destined for a relying party is totally opaque to the InfoCard system. This is by design: Identity selectors need to be security token agnostic, and it follows that there shouldn’t be a requirement for InfoCard to understand every token that passes by. However, the user needs to have a way to see the contents of the token in order to know what personally identifiable information is being sent to the RP.
The solution is to have an optional display token sent by the identity provider to the user along with the normal security token (which is destined for the relying party). It is the display token that is displayed to the user so that the user makes an informed decision on whether to proceed.
At the relying party, the recipient of the security token can be either a service endpoint or a relying party STS (aka a resource STS) which controls access to the relying party’s site or service. The relying party cracks open the token and authenticates and authorizes the user based on the claims in the token (and the provider of those claims). In the browser case, the RSTR from the resource STS is a browser cookie. This means that access to a website after authenticating via InfoCard is exactly the same as an existing solution using username and password authentication.
WCF services can also use a resource STS. That way, once the user has authenticated using a security token from an IP, access to a service is controlled by the relying party and there is no longer a requirement for an IP security token. Although the client app can cache the IP’s security token as a performance optimization—at least until the token is no longer fresh—this gives the relying party control.
After you receive a provider InfoCard from an identity provider—in a way that enables you to trust that the card is authentic—you can use the cryptographic information it contains to authenticate to the identity provider and communicate securely.
Personal InfoCards and their (limited) information are created by the user and stored locally, but they also contain an RSA key pair to enable security tokens to be signed by the personal IP. I will cover how this is generated in a moment.
The InfoCard system is an interactive system (not programmatic) that does not authorize release of personal information without explicit user approval. It is therefore the user who is responsible for protecting his personal information. The system aids the user in making intelligent decisions by providing an intuitive user interface and detailed information about the entity requesting a security token. Information is gathered from the recipient’s X.509 certificate including logos (when present) and displayed to the user. This UI, combined with the use of high-assurance certificates, enables the user to make an informed decision to trust the recipient. Furthermore, all UI and display of this info is done using a private desktop accessible only by the LSA that hides the user’s desktop. This helps to prevent phishing and screen-scraping attacks.
There is an encrypted and signed InfoCard store per user and it is ACL’d for Local System access only. Data in the store is encrypted using AES256, and the symmetric key used is doubly encrypted using DPAPI (256-bit AES keys), first using the user’s DPAPI key and then again using the System DPAPI key. InfoCard allows only one level of role access—normal user access. This way only the user can access the data and only via a System process (that is, Infocard.exe) that impersonates the user. Even when this data is loaded into memory, it remains encrypted until it is needed.
Individual InfoCards can also be protected by a password, which is useful for cases in which a Windows login is shared. However, this feature notwithstanding, if someone learns your Windows password, they will have access to your InfoCards. The mitigation here is to have a device like a portable STS or a smartcard to provide multifactor authentication. I should also point out that if you log in with admin privileges and run some malware, it doesn’t matter how well designed a piece of software is—but there’s nothing new here. The mitigation is to try to not log in as an administrator (the default in Vista) and to avoid running software of dubious origin.
InfoCards are XML documents issued by identity providers (including self-issued) and stored by the user on the storage device of their choice. An InfoCard does not contain any security sensitive data per se. It simply represents the security token issuance relationship of the user with an identity provider. The actual request and issuance of the corresponding security tokens will be authenticated and secure. You should note that the metadata exchanges to retrieve policy are in plain text.
Each card includes in its metadata an element called CardID that is a globally unique URI for that card. It is generated by, and only meaningful to, identity providers. For personal cards, the CardID is assigned by the system automatically at the time of card creation. For provider cards, the identity provider assigns a unique CardID for each card it issues, and this is included in requests for security tokens by the user.
As mentioned earlier, with personal cards the user is represented by a PrivatePersonalIdentifier (PPID) claim. This is created by hashing together the CardID and the relying party’s organizational ID (the OLSCID derived from the X509 certificate of the site or service). This means a user can use the same card at multiple sites and there will be a different PPID for each one: Sites are unable to collude and track the user. It is this claim that is used when a user authenticates to an identity provider STS using a personal card.
Identity providers may or may not need to provide a user identifier to the relying party. The identity provider may just need to supply a security token with, say, an “over 21” age claim. However, if the identity provider does need to provide a user identifier, the PPID claim is a good choice. An identity provider can choose to use any mechanism of its choice to generate the PPID for the user as long as it can consistently reproduce it for that user.
Ultimately it is at the discretion of the relying party and identity provider in any given business context as to what is suitable as a persistent user identifier. For a government-run identity provider, a Social Security number may be a good identifier and an ISP could provide an email address. Both could also support PPID as a generic identifier (and a method to generate it) if they chose to.
Security tokens generated by an identity provider have to be signed with a trusted/well-known key that the recipient of the token can validate. For provider cards this is done by the identity provider using an X.509 certificate.
However, with personal cards we have two technical problems to overcome. We need an asymmetric key pair to sign security tokens but, more than that, we would like a key pair per site to again avoid correlation issues between sites. Also, once we have these keys, we need a way to roam them with the cards for a consistent user experience.
The solution is to use a master key per card. This is a 256-bit random number that is hashed with the relying party’s organizational ID to create a seed for the Crypto API to generate per-site, per-card (and ANSI X9.31–compliant) RSA key pairs. To be able to roam the store itself, InfoCard uses the Crypto API and PKCS#5 to generate a 256-bit AES key from the user’s password.
Relying parties must have a public key pair for identity and encryption. The public key is used to encrypt security tokens destined for the relying party. Similarly, any tokens from an identity provider that are destined for the user (such as display tokens) must be encrypted to ensure that the claims are visible to the IP, the RP, and the user only. When username and password authentication is used with an IP/STS, the channel must be secured using SSL. For Kerberos a symmetric key is used, and for hardware- and software-based X.509 an asymmetric key pair is used. Authentication to an STS using a personal card can use either a symmetric or an asymmetric key pair for the security binding. Authentication to an STS using a provider card is not permitted.
One final security feature to note: InfoCard is able to obtain a security token from an identity provider without revealing the identity of the relying party to the identity provider. This is the default mode and we refer to the security token as an unscoped token. This is Law 2 at work!
Now let’s write some code to see how InfoCard is accessed.
I like to provide very simple examples (“as simple as possible but no simpler” to quote someone who should know) to illustrate a feature, so my apologies to those who prefer something more complex or interesting. It is best practice to use svcutil for creating client proxies, but I have coded by hand for brevity and clarity.
It is important to stress that the code presented here was written and tested using a beta 2 build of WinFx. Unfortunately, features such as browser integration are not available before the February CTP (Community Technical Preview), so I have used an early version of that (the latest that was available to me at the time of writing). The upside for you is that this sample code—or something very similar—should work with all builds from the February CTP onward. The downside is that there is a chance that by some quirk of fate my code will not work on the final beta 2 build. If this is the case, please accept my abject apologies. I hope the difference is not so great as to impair your enjoyment of getting the code to work and seeing InfoCard in action.
So let’s take a very basic WCF app and add InfoCard support. We’re not going to use an STS—in either this example or the browser example that follows—it’s just about showing how InfoCard works at a basic level.
The application consists of a service—which will be our relying party—and a client app that communicates with the service via WCF. Both are very simple console apps. You’ll need to create a solution (InfocardHelloWorld, say) and two console application projects (InfocardHelloClient and InfocardHelloService, say).
Here are the code listings of the applications we’re going to add InfoCard to. For each project you will need to add a reference to System.ServiceModel.
First the contract, contract.cs, a copy of which is in both the client and the service projects:
using System.ServiceModel;

namespace HelloService
{
    [ServiceContract]
    interface IHello
    {
        [OperationContract]
        string Say();
    }
}
Now the service code, program.cs:
using System;
using System.ServiceModel;

namespace HelloService
{
    class Hello : IHello
    {
        public string Say()
        {
            return "Hello World";
        }
    }

    class Program
    {
        static void Main(string[] args)
        {
            ServiceHost sh = new ServiceHost(typeof(Hello),
              new Uri("http://localhost:4123/helloService"));
            sh.Open();
            Console.WriteLine("Listening....");
            Console.ReadKey();

            sh.Close();        // close the service
        }
    }
}
And the service configuration file, app.config:
<?xml version="1.0" encoding="utf-8" ?>
<configuration>
  <system.serviceModel>

    <services>
      <service name="HelloService.Hello">
        <endpoint address="helloEndpoint"
          contract="HelloService.IHello"
          binding="wsHttpBinding"
          bindingConfiguration="helloBinding">
        </endpoint>
      </service>
    </services>
    <bindings>
      <wsHttpBinding>
        <binding name="helloBinding">
        </binding>
      </wsHttpBinding>
    </bindings>

  </system.serviceModel>
</configuration>
Now the client pieces. First, the client code, program.cs (note that this is the same filename as the server-side code—as with contract.cs and app.config—but it resides in a different project and directory):
using System;
using System.ServiceModel;

namespace HelloClient
{
    class Program
    {
        static void Main(string[] args)
        {
            ChannelFactory<HelloService.IHello> cnFactory =
              new ChannelFactory<HelloService.IHello>("helloClient");
            HelloService.IHello chn = cnFactory.CreateChannel();
            Console.WriteLine(chn.Say());

            // Clean up
            cnFactory.Close(); // close the client's channel
            Console.ReadKey();
        }
    }
}
And finally the client configuration file, app.config:
<?xml version="1.0" encoding="utf-8" ?>
<configuration>
  <system.serviceModel>

    <client>
      <endpoint
         name="helloClient"
         address="http://localhost:4123/helloService/helloEndpoint"
         contract="HelloService.IHello"
         binding="wsHttpBinding"
         bindingConfiguration="helloBinding">
      </endpoint>
    </client>

    <bindings>
      <wsHttpBinding>
        <binding name="helloBinding">
        </binding>
      </wsHttpBinding>
    </bindings>

  </system.serviceModel>
</configuration>
There, we’re done. This should compile and successfully run a basic WCF “Hello World” application.
What do we need to do to add InfoCard to our application? Well, the key point is that we don’t have to write any code to enable InfoCard. We can enable InfoCard via the client and server app.config files.
This is consistent with the WCF vision of enabling administrators to make configuration changes without having to recompile. Everything you can do in config you can still do in code, but by using config files you add deployment flexibility to your application. If you want to limit that flexibility, you can use binding requirements and custom channels to prevent inappropriate changes.
Here we are selecting InfoCard as a credential type in the WCF classes, a way to transfer credentials from the client to the server. Let’s start with the server app.config:
We need to update the service binding to use message-level security and the InfoCard credential type, which is IssuedToken:
<bindings>
  <wsHttpBinding>
    <binding name="helloBinding">
      <security mode="Message">
        <message clientCredentialType="IssuedToken" />
      </security>
    </binding>
  </wsHttpBinding>
</bindings>
Now we’ll adjust the client’s app.config to match the server. This is identical to the server binding:
<bindings>
  <wsHttpBinding>
    <binding name="helloBinding">
      <security mode="Message">
        <message clientCredentialType="IssuedToken" />
      </security>
    </binding>
  </wsHttpBinding>
</bindings>
We’ve specified that the client should use InfoCard to pass credentials to the service, but how does the service identify itself to the client app? How does the client—or, more specifically, the user of the client app—trust the server?
One of the bedrock requirements of the InfoCard system is that any potential recipients of my digital identity must identify themselves to me using cryptographically verifiable but human-friendly means. Only then can I make a rational decision on whether to trust that party and provide them with information.
The way servers identify themselves on the Internet today is by using PKI certificates—typically purchased from Certificate Authorities such as VeriSign or Thawte.
InfoCard takes advantage of this. A service must identify itself using an SSL certificate. Furthermore, the relying party behind the service should identify itself by the use of high-assurance certificates (this is preferred but not mandatory). After all, the user does not trust a service endpoint per se but rather the company or organization providing the service endpoint.
Consequently, the X.509 certificate should identify the organization behind the server and, to help the human in the system, the certificate should utilize logotypes [RFC 3709] for the issuer organization (the Certificate Authority) and the subject organization (the relying party). Logotypes provide a mechanism by which signed JPEG or GIF images are bound to the certificate to help us recognize the relevant parties and make an informed decision to trust or not to trust. It is these logos that are displayed in the trust (or RIP) dialog.
Let’s install a certificate for our service to use. You’re welcome to try your own, but one place you can find a certificate that uses logotypes is in the Microsoft Federated Identity and Access Resource Kit for Sept 2005 Community Technology Preview. This can be found at http://www.microsoft.com/downloads. However, the code in the Resource Kit will work only with the earlier September WinFx CTP. It will not work with beta 2. We are using it only as a source for some certificates.
When you extract the Resource Kit MSI file, a Certificates-and-Logos folder is created in C:Program FilesMicrosoft Federated Identity and Access Resource Kit - Sept 2005 CTPInfoCardWalkthroughStepByStepSamples.
Fabrikam-Contoso.pfx contains the public/private key pair so it needs to be installed on the server (password xyz). Fabrikam-Contoso-Public.cer has just the public key and will need to be installed on the client.
To import, launch the Microsoft Management Console (MMC) from a command prompt and choose Add/Remove Snap-in from the File menu. Next click the Add button and double-click the Certificates snap-in. Choose My user account and Finish, then doubleclick the Certificates snap-in again and choose Computer account, then Local computer and Finish. Close the dialog and click OK.
We import the .pfx file by expanding the Certificates (Local Computer) node, right-clicking the Personal node, and choosing All Tasks and Import. In the wizard make sure you select Fabrikam-Contoso.pfx (the default file type is .cer). As you go through the wizard, keep the defaults, but select Automatically Select the Certificate Store Based on the Type of Certificate. You should get a warning dialog saying that Windows cannot confirm the origin of the certificate and asking whether you still want to install the certificate (you say yes!). This will place the Fabrikam certificate in Local Computer Personal Certificates and an INFOCARD certificate in Trusted Root Certification Authorities Certificates. You will need to do a refresh for the certificates to show up in the MMC UI.
For the client we need access to a certificate containing (just) the public key. So we import the .cer file by expanding the Certificates—Current User node, right-clicking the Trusted People node, and doing an import of the Fabrikam-Contoso-Public.cer file, making sure that the certificate gets placed in the Trusted People store.
Now we can modify the client and service app.config files so that WCF and InfoCard can locate and use these certificates. Let’s start with the service and its app.config.
The correct mechanism for hooking up WCF to a resource on the local machine is to use a behavior. This should sit beneath the entire <bindings> section (that is, between </bindings> and </system.serviceModel>):
<behaviors>
  <behavior name="helloServiceBehavior"
    returnUnknownExceptionsAsFaults="true" >
    <serviceCredentials>
      <serviceCertificate
        findValue="Fabrikam"
        storeLocation="LocalMachine"
        storeName="My"
        x509FindType="FindBySubjectName" />
      </serviceCredentials>
  </behavior>
</behaviors>
Here you can see we are using a certificate called Fabrikam in the LocalMachine Personal (“My”) store. If you’ve used your own certificates (for example, from a certificate authority, Certificate Services, or the makecert utility), you will need to make the appropriate changes.
We refer to the behavior by adding a behaviorConfiguration attribute to our service description:
<service
  name="HelloService.Hello"
  behaviorConfiguration="helloServiceBehavior">
We have now enabled WCF to access the certificate and the private key so that it can now use it for signing and decryption. However, we are not quite finished because we need to allow access to the certificate via an endpoint reference to enable identity and token encryption. Our entire <services> section now looks like this:
<services>
  <service
    name="HelloService.Hello"
    behaviorConfiguration="helloServiceBehavior">
    <endpoint
      address="helloEndpoint"
      contract="HelloService.IHello"
      binding="wsHttpBinding"
      bindingConfiguration="helloBinding">
      <identity>
        <certificateReference
          findValue="Fabrikam"
          storeLocation="LocalMachine"
          storeName="My"
          x509FindType="FindBySubjectName" />
      </identity>
    </endpoint>
  </service>
</services>
After this is in place, we have finished our service configuration. Next is the client’s app.config. On the server side we need a behavior to access the private key. On the client we can either add a behavior or use the MetadataResolver class to retrieve the certificate information via WS-MetadataExchange. Let’s take the behavior approach:
<behaviors>
  <behavior name="helloClientBehavior">
    <clientCredentials>
      <serviceCertificate>
        <authentication
          certificateValidationMode="PeerOrChainTrust"/>
        <defaultCertificate
          findValue="Fabrikam"
          storeLocation="CurrentUser"
          storeName="TrustedPeople"
          x509FindType="FindBySubjectName" />
      </serviceCertificate>
    </clientCredentials>
  </behavior>
</behaviors>
And add a reference to that behavior:
<client>
  <endpoint
    name="helloClient"
    address="http://localhost:4123/helloService/helloEndpoint"
    contract="HelloService.IHello"
    binding="wsHttpBinding"
    bindingConfiguration="helloBinding"
    behaviorConfiguration="helloClientBehavior">
  </endpoint>
</client>
And again we need to allow the InfoCard system access to encrypt the identity so our <client> section looks like this:
<client>
<endpoint
name="helloClient"
address="http://localhost:4123/helloService/helloEndpoint"
contract="HelloService.IHello"
binding="wsHttpBinding"
bindingConfiguration="helloBinding"
behaviorConfiguration="helloClientBehavior">
<identity>
<certificateReference
findValue="Fabrikam"
storeLocation="CurrentUser"
storeName="TrustedPeople"
x509FindType="FindBySubjectName" />
</identity>
</endpoint>
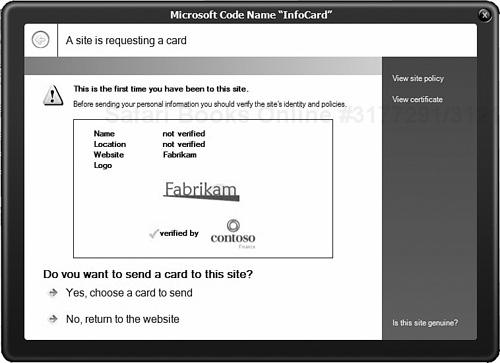
</client>Now comes the moment of truth: Run the application and see what happens. If all goes well, you should get the Trust dialog, looking something like what’s shown in Figure 14.6. You’ll see how to display the logos in a moment.
You click Yes, Choose a Card to Send; then, if you already have some cards, you will get what is shown in Figure 14.7.
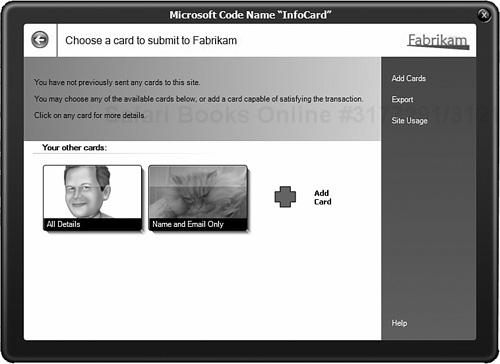
If you have yet to create any cards, you will see a dialog similar to the Add Cards dialog shown earlier where you have the choice of creating a new Personal (“self-issued”) card, installing a card provided to you by an identity provider (a .crd file), restoring an exported card (a .crds file), or simply returning to the website without doing anything—the user is in control!
After you choose a personal card, a security token is created by the personal STS and, with your approval, sent to the service. The service doesn’t actually do anything with the security token at this point and simply displays “Hello World.”
Step through the code so that you understand at exactly which point the InfoCard dialog is launched.
If you don’t choose a card, you will get an ugly Unhandled Exception error, so let’s add some code to the client to catch the exception and handle it gracefully. In the HelloClient project, add a reference to System.IdentityModel.Selectors and open Program.cs. Next add the following statement at the top of the file:
using System.IdentityModel.Selectors;
Then in the body of Program.cs modify Main() so that it looks like the following:
static void Main(string[] args)
        {
            try
            {
                ChannelFactory<HelloService.IHello> cnFactory =
                    new ChannelFactory<HelloService.IHello>("helloClient");
                HelloService.IHello chn = cnFactory.CreateChannel();
                Console.WriteLine(chn.Say());
                cnFactory.Close();
            }
            catch (UserCancellationException)
            {
                Console.WriteLine("User has cancelled");
            }
            catch (UntrustedRecipientException)
            {
                Console.WriteLine("User does not trust the recipient");
            }
            catch (ServiceNotStartedException)
            {
                Console.WriteLine("InfoCard service not started");
            }
            catch (InfoCardException ice)
            {
                Console.WriteLine("Generic InfoCard exception :" + ice.Message);
            }

            catch (Exception e)
            {
                Console.WriteLine("Other exceptions :" + e.Message);
            }
            finally
            {
                Console.ReadKey();
            }
        }
Experiment a bit and see whether the exceptions are caught properly.
As stated previously, the service’s certificate includes links to the subject and issuer logos. To verify this, you can open up MMC and the Certificates snap-in and look at the properties of the Fabrikam certificate. Under the 1.3.6.1.5.5.7.1.12 field there are links to the subject and issuer logos.
http://localhost/ServiceModelSamples/fabrikam.gif is the link for the subject logo; http://localhost/ServiceModelSamples/contoso.gif is the link for the issuer logo. These logos cannot be modified because a hash of each logo is also a part of the certificate. However, for these logos to be accessed, we need to place them in an http://localhost/ServiceModelSamples virtual directory.
Use the Internet Manager (inetmgr.exe) MMC snap-in to create a virtual directory called ServiceModelSamples under the Default Web Site (choose context menu, New, Virtual Directory) and point it at the directory containing the certificates. Accept the default settings elsewhere in the wizard.
Launch Internet Explorer and make sure that the logos display correctly using the URLs given earlier:
http://localhost/ServiceModelSamples/fabrikam.gif
http://localhost/ServiceModelSamples/contoso.gif
Now run the application again and you should see the logos appear in the Trust dialog.
Where would these logos be hosted in real life? Normally, a relying party would host its logo (the subject), and the issuer’s logo would be hosted by the Certificate Authority. Alternatively, a third party could provide the hosting service.
The next step is to write some service code to crack open the security token selected by the user and passed to the service.
In the HelloService project, add a reference to System.IdentityModel.Claims.
Next we’ll modify the service implementation in program.cs.
Add two using statements:
using System.IdentityModel.Claims;
using System.IdentityModel.Policy;
Next modify the Hello class to display the claims in the service console window:
class Hello : IHello
    {
        public string Say()
        {
            GetIdentity();
            return "Hello World";
        }

        private void GetIdentity()
        {
            AuthorizationContext ctx =
              OperationContext.Current.ServiceSecurityContext.
              AuthorizationContext;
            foreach (ClaimSet claimSet in ctx.ClaimSets)
            {
                foreach (Claim claim in claimSet)
                {
                    Console.WriteLine();
                    Console.WriteLine(claim.ClaimType);
                    Console.WriteLine(claim.Resource);
                    Console.WriteLine(claim.Right);
                }
            }
            return;
        }
    }
Now run the application and see what you get in the service console window.
You probably expected to see more claims. The reason you didn’t is that we are using wsHttpBinding. This binding only allows a restricted claim set. To take advantage of all the claims in a security token, we need to use a federated binding.
Open the service app.config and add the following binding inside the <bindings> section after the existing <wsHttpBinding> section:
<wsFederationHttpBinding>
  <binding name="helloFederatedBinding">
    <security mode="Message">
      <message issuedTokenType="urn:oasis:names:tc:SAML:1.0:assertion">
        <claims>
          <add claimType="http://schemas.microsoft.com/ws/2005/05/identity/claims
/emailaddress"/>
          <add claimType="http://schemas.microsoft.com/ws/2005/05/identity/claims/givenname"/>
          <add claimType="http://schemas.microsoft.com/ws/2005/05/identity/claims/surname"/>
          <add claimType="http://schemas.microsoft.com/ws/2005/05/identity/claims
/privatepersonalidentifier"/>
          <!-- add more claims here-->
        </claims>
        <issuer address="http://schemas.microsoft.com/ws/2005/05/identity/issuer/self"/>
      </message>
    </security>
  </binding>
</wsFederationHttpBinding>
/emailaddress"/>
<add claimType="http://schemas.microsoft.com/ws/2005/05/identity/claims/givenname"/>
<add claimType="http://schemas.microsoft.com/ws/2005/05/identity/claims/surname"/>
<add claimType="http://schemas.microsoft.com/ws/2005/05/identity/claims
/privatepersonalidentifier"/>
<!-- add more claims here-->
</claims>
<issuer address="http://schemas.microsoft.com/ws/2005/05/identity/issuer/self"/>
</message>
</security>
</binding>
</wsFederationHttpBinding>Here we are specifying a policy that will only accept security tokens containing the EmailAddress, GivenName, Surname, and PrivatePersonalIdentifier claims and we are accepting self-issued security tokens.
We also need to modify our service endpoint to use this binding:
binding="wsFederationHttpBinding"
bindingConfiguration="helloFederatedBinding"
That’s our service app.config. Now let’s turn our attention to the client app.config.
Cut and paste the <wsFederationHttpBinding> section you just entered into the <bindings> section or the client app.config, again after the existing <wsHttpBinding> section. Then change the binding and binding configuration under the client <endpoint>:
binding="wsFederationHttpBinding"
bindingConfiguration="helloFederatedBinding"
Now run the application again and see what you get. This time you should get the EmailAddress, GivenName, Surname, and PrivatePersonalIdentifier claims displayed in the service console window.
Implementing InfoCard in websites is, if anything, easier than adding it to a WCF application. InfoCard is supported by Internet Explorer 7.0 and will work with builds after the IE7 Beta 2 Preview (the magic ingredient is icardie.dll, but you must also have the rest of the InfoCard system installed via WinFx). I hope also that by the time this book gets into your hands you will be able to try this code (successfully) on other browsers.
Go into IIS Manager and create a virtual directory, called, say, infocard. Into that directory we will put four files, but first we will use the Fabrikam certificate from the preceding WCF sample to provide an SSL certificate for the site to provide a secure channel. Right-click Default Web Site and select the Directory Security tab. Then click the Server Certificate button and choose Assign an Existing Certificate. Provided you have imported the .pfx file into your certificate store, the Fabrikam certificate should be visible in the Available Certificates dialog. Select it and finish the wizard.
If you want to see the spectacular way IE7 warns you when an SSL certificate name does not match the URL of a website, you can omit the next step, which is to modify the hosts file in C:WINDOWSsystem32driversetc to have the following entry:
127.0.0.1 localhost fabrikam
This makes it a slightly smoother experience because you can refer to the site as http://fabrikam. If you omit this step, be sure to modify the code and config that follow to use the correct URLs.
Now, provided you have ASP.NET installed (if you installed .NET 2.0 before IIS, you won’t), you can now create the four files that illustrate the InfoCard experience on a web page. Again, the following examples are as simple as possible but no simpler.
The first file is the default web page, default.htm:
<html>
  <head>
    <title>InfoCard</title>
  </head>
  <body>
    <form name="ctl00" method="post" action="https://fabrikam/infocard/Main.aspx" id="ctl00">
      <input type="submit" name="InfoCardSignin" value="Log in using InfoCard"
 id="InfoCardSignin" />
      <OBJECT type="application/infocard" name="xmlToken">
        <PARAM Name="tokenType" Value="urn:oasis:names:tc:SAML:1.0:assertion">
        <PARAM Name="issuer" Value="http://schemas.microsoft.com/ws/2005/05/identity
/issuer/self">
        <PARAM Name="requiredClaims" Value="http://schemas.microsoft.com/ws/2005/05
/identity/claims/givenname, http://schemas.microsoft.com/ws/2005/05/identity/claims/surname">
      </OBJECT>
    </form>
  </body>
</html>
This is an HTML page with a button that posts to the next page, main.aspx. The magic is in the <OBJECT> tag (we are using the ActiveX control in icardie.dll), which has a special type, application/infocard, and three PARAM tags specifying the token type (SAML 1.0), the token issuer (self-issued), and the required claims (first name and surname).
Next is main.aspx:
<%@ ValidateRequest="false" Language="C#" AutoEventWireup="true" CodeFile="Main.aspx.cs"
And main.aspx.cs:
using System;

public partial class _Default : System.Web.UI.Page
{
  protected void Page_Load(object sender, EventArgs e)
  {
    string tokenString = Request["xmlToken"];

    if (null == tokenString)
    {
      Response.Redirect("default.htm?error=logonFailed");
    }
    else
    {
      this.Label1.Text = "Hello, world!";
    }
  }
}
Finally there is the web.config file (actually, our example is so simple that this can be omitted):
<?xml version="1.0"?>
<configuration>
  <appSettings/>
  <connectionStrings/>
  <system.web>
    <compilation debug="true">
      <assemblies>
        <add assembly="System.Xml, Version=2.0.0.0, Culture=neutral,
 PublicKeyToken=b77a5c561934e089"/>
        <add assembly="System, Version=2.0.0.0, Culture=neutral,
 PublicKeyToken=b77a5c561934e089"/>
        <add assembly="System.Security, Version=2.0.0.0, Culture=neutral,
 PublicKeyToken=B03F5F7F11D50A3A"/>
      </assemblies>
    </compilation>
    <authentication mode="Windows"/>
    <customErrors mode="Off"/>
  </system.web>
</configuration>
Try browsing directly to http://fabrikam/infocard/main.aspx. You will be redirected to http://fabrikam/infocard/default.htm because you do not have the security token. However, if you click on the button and select a card, you will able to get to main.aspx. We are not doing anything with the claims in the security token, but we could crack open the token, examine the claims, and make authentication and authorization decisions based on them. There will be functionality for doing this easily in a future WinFx CTP. A full website solution would have a relying party STS return a cookie for the browser to use to access pages on the site.
The IE7 Beta 2 Preview doesn’t yet support the binary behavior implementation of InfoCard, but I’ll include the code here for your information and for later builds. This is the binary behavior equivalent of default.htm. Again, it’s pretty simple:
<html XMLNS:ic>
  <body>
    <form method="post" action="https://fabrikam/infocard/Main.aspx" >
      <ic:informationCard name='xmlToken' style='behavior:url(#default#informationCard)'
issuer='http://schemas.microsoft.com/ws/2005/05/identity/issuer/self' tokenType='urn:oasis
:names:tc:SAML:1.0:assertion'>
      <ic:add claimType='http://schemas.microsoft.com/ws/2005/05/identity/claims
/givenname' optional='false'/>
      <ic:add claimType='http://schemas.microsoft.com/ws/2005/05/identity/claims/surname '
 optional='false'/>
      <ic:/informationCard>
    <input type="submit" name="InfoCardSignin" value="Log in using InfoCard"
 id="InfoCardSignin" />
    </form>
  </body>
</html>The primary goals of the InfoCard system are to do the following:
Enable the use of digital identity in the form of claims in security tokens as authentication and/or authorization data using Web service mechanisms.
Allow users flexibility in their choice of digital identities they want to employ, and put users squarely in control of the use of their identities in digital interactions.
Support cryptographically verifiable but human-friendly identification of the recipients of a user’s digital identities.
Enable interoperability with identity providers and relying parties using open protocols to allow an identity ecosystem to thrive.
Remain agnostic of specific security token types and identity mechanisms so as to effectively be a conduit for identity flow under user control between identity providers and relying parties.
Safeguard user privacy by providing privacy-friendly identity mechanisms to help thwart tracking of users’ online behavior and unsolicited collusion.
Provide a simple identity provider to allow users to construct and employ self-issued identities in Web service interactions when acceptable.
I hope you can see that InfoCard does a good job of meeting these goals. We’re not even at beta 2 and there is still some work to be done. The next release of the Microsoft Federated Identity and Access Resource Kit will have more samples of using IE, managed cards, and security token services, showing end-to-end InfoCard solutions. Stay tuned!