
9. Using Styles for Consistency
In This Chapter
- Learn about the different types of styles and create your own styles on-the-fly with QuickStyles.
- Apply the styles that come with WordPerfect to your own documents.
- Create and edit your own styles to speed up your formatting tasks and to ensure a consistent appearance.
- Use QuickFormat to copy the formatting from one section of text to other sections.
This chapter teaches you how to use the formatting commands you learned in previous chapters to create styles. A style is a collection of commands that you can apply all at once, instead of working through the same series of steps, over and over again, to apply formatting.
Styles speed up the formatting process and make it possible to make editing changes on-the-fly. They also ensure a consistent appearance among documents. For example, you could use styles for book manuscripts, presentation materials, financial reports, legal briefs, medical reports, and more.
Understanding Styles
A style is basically a collection of formatting commands, such as font type, size, underlining, and so on, that you put together and save with a name. The next time you want to apply those commands to some text, you use the style instead. Obviously, applying a style is much faster than repeating a series of steps to generate the proper format.
But that isn’t the only reason you want to use styles. The real benefit is when you start fine-tuning the format. Let’s say that you decide not to italicize your headings. If you had italicized the headings by selecting the text and applying italic, you would have to go back to each heading and remove the italic code. Instead, you create a heading style so that all you have to do is remove the italic from the style and voilà! Every heading is automatically updated to reflect the new formatting in the style.
Think about this for a minute. You can format an entire project, such as a newsletter, and then go back and play around with the styles and have the changes reflected automatically, throughout the whole document. Furthermore, if you are trying to achieve some sort of consistency among the documents that you and your co-workers create, a set of standard styles is the way to go.
There are two types of styles in WordPerfect: open and paired.
Open Styles
An open style is turned on and left on. The settings in the style stay in effect through the end of the document, or until another corresponding open style is found. The DocumentStyle, which contains the settings for the entire document, is an open style. Another example might be an open style that you insert in the document to start a different method of page numbering. That style remains in effect until another page numbering open style is found.
Paired Styles
As opposed to an open style that continues until (and unless) a different style is inserted, a paired style is self-limiting. A paired style is really two styles used in tandem (“paired”): an on style and an off style, similar to the pair of bold codes that surround boldface text. The first code turns on bold; the second code turns it off. It’s the same with paired styles. The first code turns on the style formatting; the second turns it off. Both paragraph (or heading) and character styles are paired styles.
A common example is a heading style that changes the font size, applies bold, and marks the text for a table of contents. The codes before the text increase the font size, turn on bold, and begin marking the text for the table of contents. The ending code switches back to the original font size, turns off bold, and ends the marking for the table of contents.
Using QuickStyle to Create Your Own Styles
What if I told you that all you need to create your own collection of styles is a formatted document or two? Seriously. You’ve already put in the time to set up everything—here’s your chance to take advantage of it! All you have to do is click in some formatted text in your existing document and then use QuickStyle to combine all the formatting codes in your selection into a custom style, as explained below.
You could also type some “dummy” text in a blank document and format it the way you want. Then use the QuickStyle feature to save that formatting as a style.
 Tip
TipYou can open the QuickStyle dialog box by opening the drop-down Styles list on the property bar and selecting QuickStyle (on the bottom of the list).
To use QuickStyle to create a style
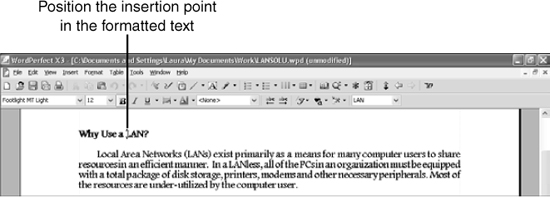
- Position the insertion point anywhere in the formatted text. For example, in Figure 9.1, the formatted text is a heading that uses a 14-point Arial italic font. You don’t even have to select the text.
Figure 9.1 You can format text first, and then use QuickStyle to create a style based on the format you used.
- Choose Format, Styles (Alt+F8) to open the Styles dialog box.
- Click QuickStyle to display the QuickStyle dialog box (see Figure 9.2).
Figure 9.2 In the QuickStyle dialog box, you name the style and select the type of style you want to create.
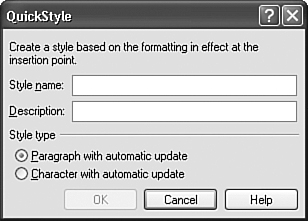
- Type a name for the style in the Style Name text box. The name can be up to 20 characters long.
- (Optional) Type a longer description in the Description text box. This can be useful later if you want to use the style but can’t remember what it does by the name alone.
- Choose Paragraph with Automatic Update if you want the style to apply to an entire paragraph, or Character with Automatic Update if you want to format only selected text.
- Click OK to add the style to your current document and to return to the Styles dialog box. Your new style appears in the Available Styles list (see Figure 9.3).
- Choose Close to close the Styles dialog box.
Figure 9.3 The newly created style appears in the list of Available Styles.
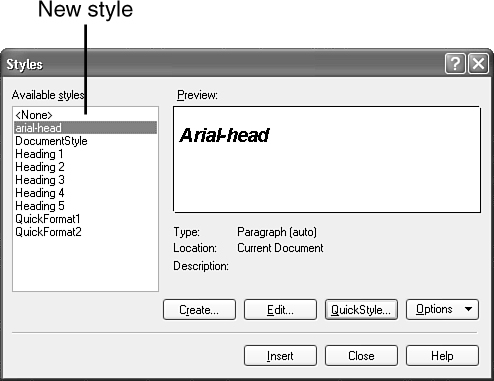
When you select a style, WordPerfect displays the effect of the style in the Preview box and also shows the description if you provided one.
Using WordPerfect’s Existing Heading Styles
WordPerfect has a few predefined heading styles that you can use in your documents. If you’re in a hurry, or you don’t care to learn how to create your own heading styles, you can use WordPerfect’s heading styles to format your text.
To apply one of WordPerfect’s heading styles
- Select the text that you want to format.
- Click the Styles drop-down list on the property bar (see Figure 9.4).
Figure 9.4 The fastest way to select a style is to choose one from the Styles list on the property bar.
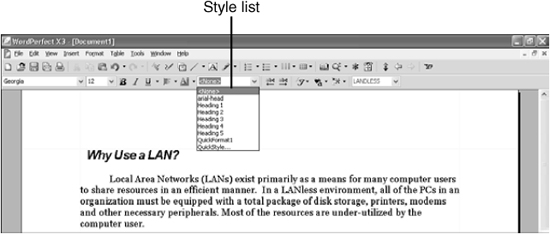
- Click the style you want to use. WordPerfect applies the style to the text.
Notice that if you hover over a style name, the RealTime Preview feature shows you how the heading will look with that style applied. To select a style from the Styles dialog box
- Choose Format, Styles (Alt+F8). WordPerfect displays the Styles dialog box.
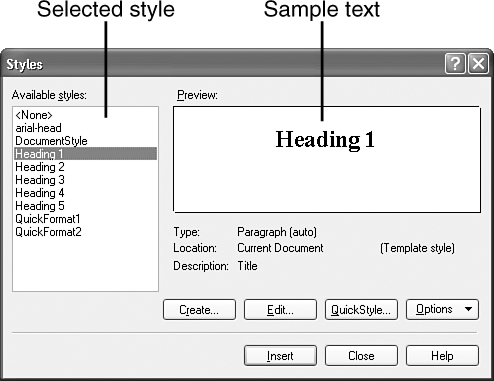
- In the Available Styles list, click the style you want to use. WordPerfect displays an approximation of the effect of the style in the Preview box (see Figure 9.5).
Figure 9.5 The Styles dialog box enables you to preview the effect of a style before you insert it.
- Click Insert to apply the style to the selected text.
Building Your Own Styles
The heading styles are convenient, but they have limited use, so you will probably want to start creating your own styles right away. You’ve already seen how the QuickStyle feature makes it easy to create styles from text that you have already formatted.
You can also create a style from scratch with the Styles Editor. The next time you start a new project, take a few minutes and create the styles that you will need. Then you can apply the styles as you generate the content.
To build your own style
- Choose Format, Styles (Alt+F8) to open the Styles dialog box.
- Choose Create to open the Styles Editor dialog box (see Figure 9.6).
Figure 9.6 The Styles Editor allows you to create styles from scratch.
- Type a style name in the Style Name text box.
- (Optional) Type a description (for example, centered, 14-point Arial text) in the Description text box.
- In the Type drop-down menu, choose Paragraph if you want the style to apply to an entire paragraph, Character if you want to format only selected text, or Document to create an open style that you can apply anywhere in a document and have the rest of the text formatted with it.
Although WordPerfect X3 is compatible with Microsoft Word in most respects, Word cannot use text in a style. If you create a WordPerfect style that contains text, the text won’t display when your document is converted into Word. If the document is edited in Word, the text might not reappear when the document is reopened in WordPerfect.
- Use the menus and the property bar in the Styles Editor to insert formatting codes just as you would in a document. The menus in the Style Editor do not contain all of WordPerfect’s formatting commands and features; only the commands and features that can be used in a style are available.
- When you’re finished, click OK to save your style in the current document.
- Choose Close to close the Styles dialog box.
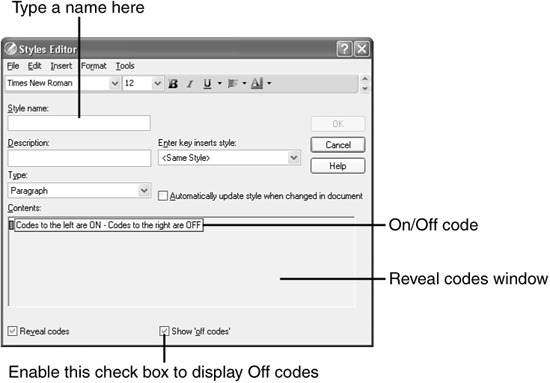
 Caution
If necessary, place a check mark next to the Show ‘Off Codes’ option. In the Reveal Codes window, you should see a code that says Codes on the left are ON - Codes on the right are OFF. This is actually one of the more powerful aspects of the Style feature. You can position a set of codes that should be in effect before the selected text and another set of codes to be in effect after the selected text. You can also include text before or after this code if you want to include text in the style. For example, a heading style might have a font code to select a different font for the heading before the text and another font code to switch back to the body text font after the heading text.
 Note
NoteBy default, styles you create from scratch are saved only in the current document. To make those styles available in all new documents, be sure to do the following before creating a style: Choose Format, Styles, then click Options, Settings. Choose Save New Styles to Default Template, and click OK.
Editing Styles
Using the same techniques you learned in the previous section on creating your own styles, you can edit your styles and make adjustments to them. You can also edit the DocumentStyle, which contains the formatting codes for all new documents. This is how you can customize the default settings to suit your needs.
Revising Your Styles
After you create a style and apply it to some text, you can make changes to that style, and those changes will automatically be reflected in any text to which the style has been applied. You will think someone just waved a magic wand over your document because it’s almost instantaneous.
To edit a style
- Choose Format, Styles (Alt+F8) to open the Styles dialog box.
- Select the style that you want to edit in the Available Styles list.
- Click Edit to open the Styles Editor dialog box (refer to Figure 9.5) and display the contents of the style.
- Either use the menus to insert new codes, or double-click the existing codes to edit them.
- Click OK when you’re finished with your changes.
- Click Close to close the Styles dialog box and update the document.
Customizing the Default Settings
As mentioned in Chapter 1, WordPerfect has a set of default format settings. The margins are 1 inch on all four sides, documents are single-spaced, there are tabs every 1/2 inch, and so on. These settings are stored in the default template. Because of these defaults, you can start creating documents as soon as the software is installed.
After you’ve worked in WordPerfect for a while, you might develop a set of formatting standards that you use in your documents. Instead of making these selections every time you create a document, you can edit the default settings to meet your needs.
If you want to create a new style that is similar to another style, you can save some time by editing one of your existing styles rather than creating a new style from scratch. When you edit your style, give it a new name and then make the changes.
The three ways to edit the default settings for the current document are as follows:
- Choose File, Document, Current Document Style.
- Choose Format, Styles. Select DocumentStyle in the Available Styles list; then choose Edit.
- Turn on Reveal Codes (choose View, Reveal Codes; Alt+F3). In the Reveal Codes window, double-click the Open Style: DocumentStyle code at the beginning of the document.
WordPerfect displays the Styles Editor dialog box with the default language code in the Reveal Codes window (see Figure 9.7). Make the necessary changes. The selections that you make here will be reflected in the document as soon as you switch back to it.
Figure 9.7 Edit the Document Style to customize the default settings.
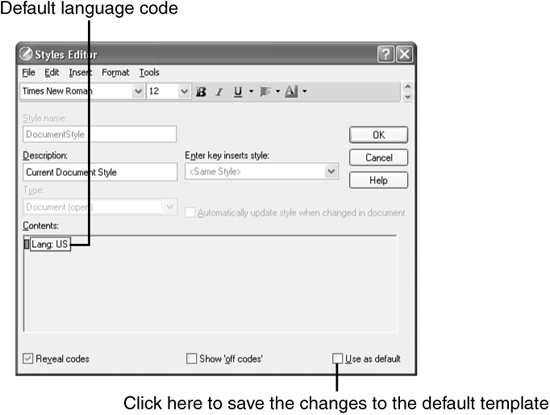
If you want your new settings to affect all new documents, you will have to save the changes to the default template. Place a check mark in the Use as Default check box. You will be prompted to apply this new style to all new documents. Click Yes to save your changes, or No to abandon the changes.
Changes to the default template do not change the styles in documents that you have already created. Such changes apply only to new documents that you create after updating the default template.
Using QuickFormat
WordPerfect’s QuickFormat feature enables you to create a temporary style that you can then apply to other parts of the document. It’s perfect for those situations in which you need to do some repetitive formatting, but you don’t really need to create a style.
- Begin by choosing the formatting you want to apply to another section of text—either a heading or any contiguous characters. The formatting you choose at this point will be copied to other sections of the document.
- Position the insertion point anywhere in the formatted text.
- Choose Format, QuickFormat, or click the QuickFormat button on the toolbar. WordPerfect displays the QuickFormat dialog box (see Figure 9.8).

Figure 9.8 The QuickFormat dialog box enables you to capture a formatting style and apply it to selected text or headings.
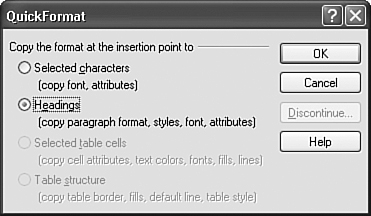
- Click Headings or Selected Characters, depending on whether you want to apply the style to a heading you’ve created (or text that you wish to use as a heading) or to any other text that you select.
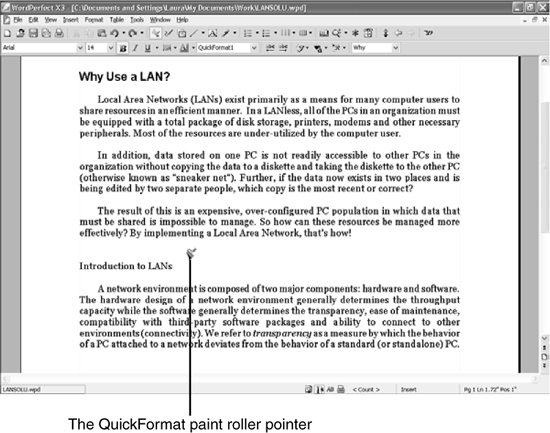
- Click OK. A new mouse pointer appears; this one is shaped like a paint roller (see Figure 9.9).
Figure 9.9 The mouse pointer changes to indicate that you will apply a heading style when you click the mouse.
- If you chose Headings, click anywhere in the paragraph that you want to format; the formatting will be applied to the entire paragraph. If you chose Selected characters, click and drag the mouse pointer across the text that you want to format; the formatting will be applied to the selected text.
- Continue through the document, clicking each heading or selecting sections of text to apply the QuickFormat style.
- To turn off QuickFormat, choose Format, QuickFormat; or click the QuickFormat button on the toolbar.