
Chapter 9. Creating Your Yahoo! Store
What You’ll Learn in This Chapter
• How to add a product
• How to create a section to categorize your products
• How to customize your page layout and properties
• How to publish your site
Now that you have chosen your Yahoo! Merchant Solutions package and signed up for an account, let’s get started building your store.
In this chapter, will focus on those who don’t know or have very little experience with HTML (a web page markup language) and want to use Store Editor’s easy to use online forms to build their storefront as quickly as possible. As an example, we’ll actually build a real live Chinese Antiquities online store (store.dynastyantiquities.com) and publish it for business. This site will sell antiques from the Chinese dynasties. You’ll learn how to add products, images, and sections, customize your page layout, and publish the site.
Planning Your Website Content
Plan your website content before you start creating your website. When planning your website, keep the goal of your site in mind. Consider how your target audience will navigate through your site and not how you would navigate through your site. Take a look at competitors or other successful online retailers to learn how they structured their websites.
Although each website is unique, there are certain essential elements that make up a winning website:
• Persuasive home page: Your home page should include your logo, top–level category navigation menu, unique selling position, featured products, special offers, and new items.
• Navigation menu: How will your customers move from one page to another? They will need to know where they are at all times. Keep your top–level navigation menu consistent throughout all your pages.
• Section pages: Group related products. Creating categories help organize your products, especially if you have a large number of items.
• Item pages: Your item pages need to provide vital detailed information about the product. Provide a clear picture of your product. Add multiple views of the product if necessary.
• Contact us/about us page: Provide an overview of your company, company address and phone number, return policy, technical support email or phone number, and shipping information. Many customers will want to make sure that you are a real live company.
• Privacy policy: A privacy policy will ensure customers that their personal information will not be misused.
• Shopping cart/checkout page: Make sure your customers can easily access the shopping cart or checkout page to proceed to finalizing their transactions. These pages are created automatically based on a form you complete.
Consider creating a flowchart when drafting your website content. Get different perspectives from others by showing them your proposed site layout. Others may pick up something that you might have missed.
Organizing Your Materials
Before you begin creating your first product, gather all the information and files you need to build your store. This will help you keep organized and get your store up and running as quickly as possible. Consider using a spreadsheet program such as Microsoft Excel to help organize your product data. You can use Excel to cut and paste your product information into the Product Add form to eliminate having to type most of your data again. If someone else is helping you add product descriptions or pricing, you can print out the Excel spreadsheet and have the person fill in the blanks or you can just email them the Excel file. This will help you save time and speed up the process.
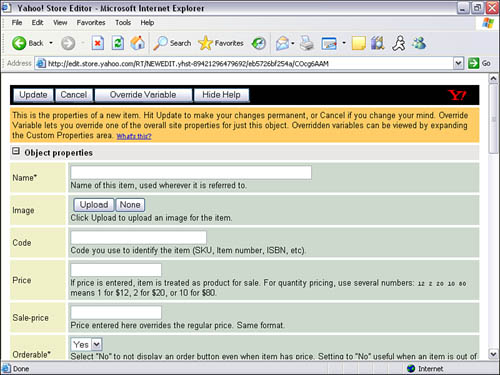
Required Fields
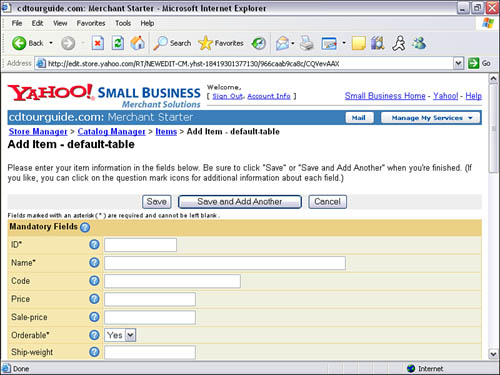
The Add Item form contains 23 product properties also known as fields. You can enter data, select data from drop–down menus, or upload images. Each product must contain the following required fields:
Tip
The ID is also used for uploading multiple images. If you name the image file to match its corresponding product ID, the system automatically places the image in the respective product page. For example, if you have a product with an ID of zd100, the image filename must be zd100.jpg.
• ID: A unique ID for internal use only. IDs are not displayed to the customer and must not contain any symbols, spaces, or non–alphanumeric characters. Make sure you come up with a naming convention and stick with it.
• Name: The name of your product. The name will also be used as the title tag for the product’s web page.
• Code: A unique code. You can use a product SKU (Stock Keeping Unit) if available.
• Price: The amount you want to sell the item for.
• Orderable: Is the product orderable? If marked no, the buy button will not display.
• Taxable: Whether the product should be taxed. If marked no, no taxes will be added.
Optional Fields
The following fields are also part of the Add Item form. These fields were designed to accommodate a wide range of products. Depending on your product, you might or might not choose to enter product data into these fields.
• Sale–price: The new discounted amount.
• Ship–weight: The amount the product weighs. Can be used to calculate shipping cost.
• Image: Product photograph you can upload.
• Options: Product options such as size and color.
• Headline: Any text in the Headline field will replace the page name. A more descriptive name can be added here for display.
• Caption: The text for the description of the product. The text will be displayed underneath the Headline.
• Abstract: Used when text is needed for a description on another page.
• Download: If you are selling soft goods (downloadable products), you can upload the files here.
• Product–URL: The exact web page location of the product page. This will help customers go back to the product page during checkout. The product title will be linked to the URL you enter. If you are using Store Editor or Catalog Manager, this will automatically be generated for you even though a URL will not be displayed in the field.
These are the default fields in the Add Item form. You can also add your own custom fields by editing the product tables in Catalog Manager. Don’t feel as if you have to add data to every optional field. The fields are there to accommodate a wide range of products.
Figure 9.1. Add Item form using Store Editor.
Product Images
What’s a product description without a picture? So, gather all the product photos you want to use. Consider putting them all in one file folder on your computer for easy access. If you need to adjust color, resize, or brighten an image, make sure you do that before uploading your images. You can always go back and upload the images again or change an image later, but it’s easier to do it the first time around since you’re already in the Add Item form.
Tip
Product descriptions—Spend some time and write a description that will help sell your product. Research other websites to see what the buzz words are to entice the customer. Survey potential customers to see what they are looking for and make sure you include that information.
Getting Started
If you haven’t already done so, go ahead and log in to your Merchant Solutions account at smallbusiness.yahoo.com/merchant/.
Caution
If you are planning on using the product description or product photo from the manufacturer, make sure you get permission in writing first. You do not want to infringe on any copyright. Also for better search engine placement, consider rewording the product description that came from the manufacturer. This will reduce your chances of getting penalized by the search engine’s duplicate content filter. Make sure your page contains at least 80% original content.
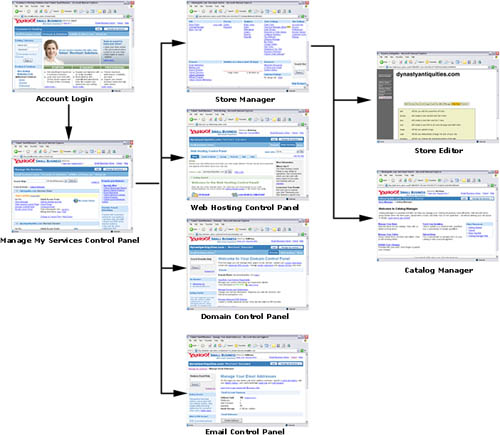
Once you log in, it will take you to the Manage My Services home page. From here, you can go to the Store Manager to work on your store; the Web Hosting Control Panel to view stats, manage files, and view recent backups; the Domain Control Panel to manage advance DNS settings and sub–domains; and the Email Control Panel to manage and create email accounts.
The flowchart shown in Figure 9.2 has been provided to show you how to navigate to the different control panels and to the Store Editor and Catalog Manager.
Figure 9.2. Control panel flowchart.
Getting to Know the Store Manager
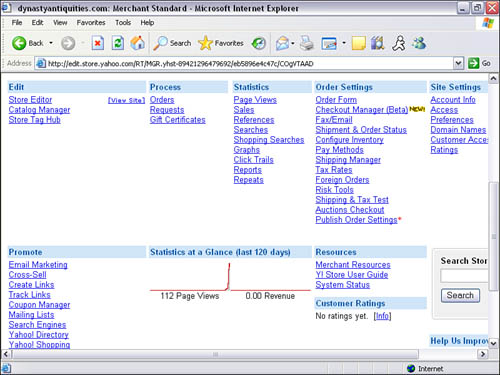
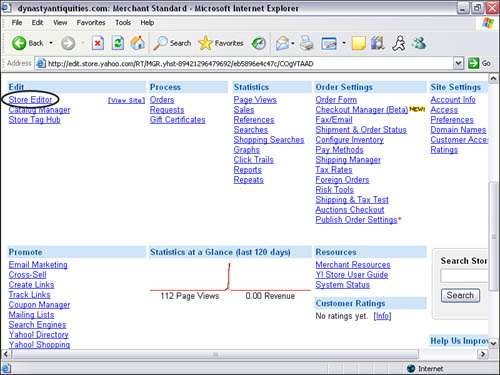
Go ahead and click on the Store Manager link so we can take a look at all the tools and options to help build your store. Make sure you click through each service to familiarize yourself with what Yahoo! Merchant Solutions has to offer.
From the Store Manager, you can process your orders, edit your store, customize your order form, set up shipping rates, set up tax tables, view statistics, add users to the account, promote the site, and much more. As you can see in Figure 9.3, there are a lot of tools and properties to help build and customize your store.
Creating Your First Section
If you have a lot of products that need to be categorized and grouped, you will want to create sections for easy navigation. You do not want to have hundreds of products on one page. Once you create a section, a button will be created in the navigation menu. In this example, we have various antiques from the Chinese dynasties. We want to group them by their particular dynasty. The first Chinese dynasty is the Zhou Dynasty. Let’s create our first section.
- When the form appears, the following properties are available. The only property that is required is the Name field, but we’ll go ahead and add information in the Headline and Caption fields, as seen in Figure 9.4.
a. Name
b. Image
c. Headline
d. Caption
e. Abstract
f. Icon
g. Inset
h. Label
i. Product URL
j. Path
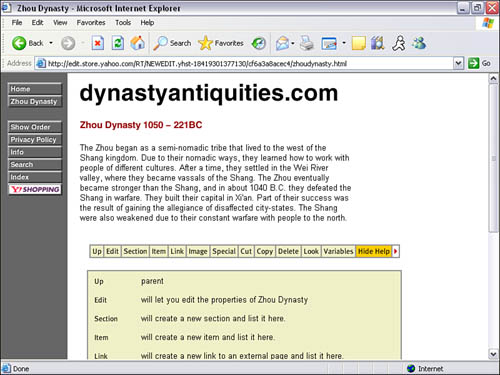
- Once you finish filling out the form, go ahead and click Update. Once you click Update, your new section will appear. As you can see in Figure 9.5, the Zhou Dynasty button has been created under the Home button.

Figure 9.5. The Zhou Dynasty button was created as a result of creating a section, as described in the demo.
To create additional sections, click on the Up button to go back to the home page and repeat the previous steps. You can create as many sections as you wish. If you forget to click on the Up button, a subsection will be created within the newly created Zhou Dynasty section and a button will not be created in the navigation menu.
Now that we have created a section, let’s take a look at adding our first product.
Two Ways to Add a Product
There are two ways to add products to your online store. You can use the Store Editor or the Catalog Manager. Every time you create a product in Catalog Manager, the product is also created in Store Editor. And vice versa, if you are using Store Editor to create a product, a product record is also created in the Catalog Manager. So whatever method you choose, the product data will be available in both Store Editor and Catalog Manager. Although you can create products in both, we recommend creating the product in Store Editor and using the Store Manager to manage your products. We’ll show you how to create your product using both methods. In the following example, we’ll create a product in the Zhou Dynasty section we created earlier.
Caution
If you add a product before adding a section in Store Editor, a button will also be created with the product name in the menu column. This is fine if you have a few products and want them displayed in your navigation menu. If you have a lot of products and want to categorize them, you will want to create a section first before you create the product. If you make a mistake and create the product first, you can always move the product into its section later.
Store Editor
Using Store Editor will help you visually place the products where you want them to go. All you have to do is navigate to the particular section and add the item.
Before we get started, let’s get to know the Editor Toolbar in Store Editor. To get to the toolbar, click on the Store Editor link in the Store Manager. The toolbar will appear on every page in Store Editor as shown in Figure 9.6.
Figure 9.6. Screenshot Editor toolbar.
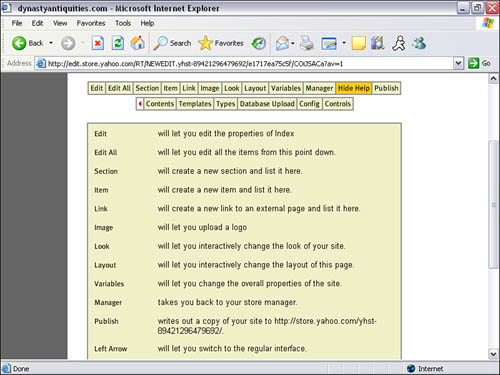
Standard Edit Toolbar
• Edit: Edit the properties of the page or product you are on.
• Edit All: Allows you to edit all the products from this point down.
• Section: Create a section and a button will be created in the navigation menu.
• Item: Create a new item.
• Link: Create a hyperlink to an external or internal page.
• Image: Lets you upload an image.
• Look: Change the look of the site.
• Layout: Change the layout of the page.
• Variables: Change the overall properties of the site.
• Manager: Takes you back to the Store Manager page.
• Publish: Upload the development store to your live store.
Advanced Editor Toolbar
The advanced toolbar will appear as a second row underneath the standard toolbar when you click on the red triangle next to the Publish button.
• Contents: Takes you to the table of contents or tree of the site.
• Template: View all built–in and custom templates.
• Types: Takes you to the built–in and custom types page.
• Database Upload: Lets you upload data files to the store.
• Config: Lets you edit properties such as editor toolbar location, default templates, and default items in Store Editor.
• Controls: Set Store Editor properties such as mode and editor entry page, or access advanced features such as search, multiple image upload, and edit multiple items.
Creating Your First Product with Store Editor
- In Store Manager, click on the Store Editor Link as shown in Figure 9.7.
Figure 9.7. Store Editor link in Store Manager.
- If you want to place the product in a section, navigate to that particular section.
- On the Editor toolbar, click on the Item button.
- Input the information for you product on the Add Item form as shown in Figure 9.8. You do not have to enter data into every field. As mentioned earlier in the chapter, the only required fields are ID, Name, Code, Taxable, Orderable, and Price. In Store Editor, the ID is automatically generated for you.
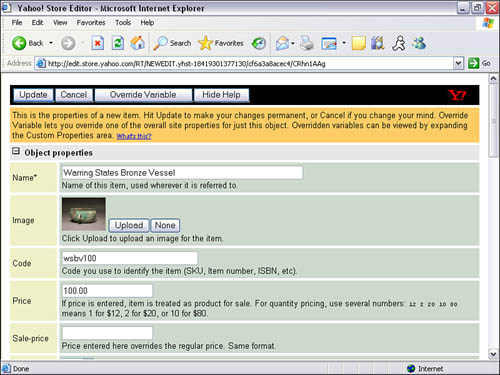
- To upload a product image, click on the Upload button next to the Image property. Another page will appear with a dialog box so you can browse and upload your image. Once you are done, click on the Send button. This will take you back to the Add Item form.
- Once you are done, click on the Update button at the top of the form.
Great! Now you have created your first product. To create additional products, just repeat the previous steps, starting with step 2.
To view a video on how to create a product with Store Editor, go to www.MyEcommerceSuccess.com.
Catalog Manager
Let’s take a look at a few advantages of using Catalog Manager.
• Viewing and sorting products: You can view up to 100 products at a time. You can also sort your products by any of the fields. Want to sort by all your products by price? All you have to do is click on the price link.
• Organizing your products by tables: You can categorize your products by creating separate tables. Tables are perfect for seasonal products. You can create or upload a Christmas product line table and delete the whole table once the season is over.
• Deleting or moving multiple items: It’s easy to delete or move multiple items with the item page.
• Downloading product data: Catalog Manager has an upload and download tool. You can download a CSV data file of all your products. In Catalog Manager, you can use the Add Item page to add a product, or add another product in the CSV data file and upload the file.
Creating Your First Product in Catalog Manager
Follow these steps to create a product using Catalog Manager:
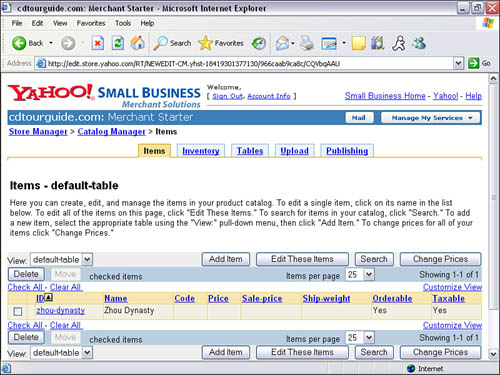
- In Store Manager, click on the Catalog Manager link.
- Once you are in Catalog Manager, click on the Manage Your Item link. This will take you to the item’s page, where you can add items or manage all your items as shown in Figure 9.9.
Figure 9.9. Add Item page in Catalog Manager.
- To add an item, click on the Add Item button. As you can see in Figure 9.10, the Add Item page is very similar to the Add Item page in Store Editor.
Figure 9.10. Add Item form in Catalog Manager.
- Once you are done filling out the form, click on the Save button.
You’ve now created a product in Catalog Manager. Although you have created a product, if you navigate to the Store Editor, you will not see the product. This is because the product has not been linked to the home page or any section. You will need to go into the content tree under the Content button on the toolbar in Store Editor to move the product to the area you want. For this reason, it is easier to use Store Editor to navigate and add your product.
Getting to Know Catalog Manager
Since you’re already in Catalog Manger, let’s take a look at the five tools to help you manage your inventory.
• Items: Add, edit, sort, and manage all your products.
• Tables: Create tables to separate and group products. Tables can be used to help organize your products.
• Inventory: Manage the availability of your products. You can manage the inventory levels of each product.
• Upload: You may use a Comma–Separated Value (CSV) file to manage your products, add products, and upload them to Catalog Manager. If you have a lot of products, you may also want to look into using the CSV file to add and manage them. You can also create sections and products within sections on the fly using the CSV upload feature.
• Publish Your Changes: Changes to your store do not go live until you publish the catalog.
Editing Your Product in the Store Editor
One of the key benefits to editing your product in Store Editor is that you get to see exactly what the page will look like. You can edit, remove, or add product details, images, pricing, and so on. To edit your product
- Click on Store Editor in the Store Manager.
- Just like a web page, navigate to the product you would like to edit.
- Click on the Edit button in the toolbar.
- Once you are done making the changes, click on the Update button on the top of the form. This will return you to the product page with the new changes. You can preview the changes before publishing the site.
Adding Product Options
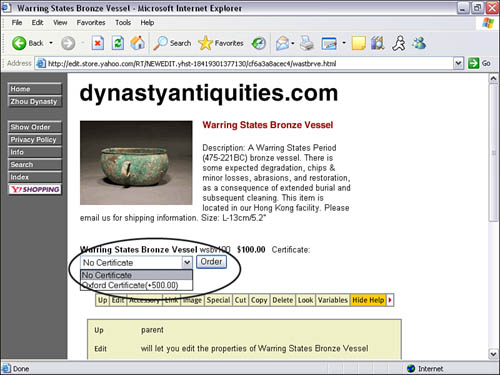
You can create order options such as size, color, and incremental pricing. Once you add an option, a drop–down menu will be displayed on your product page, as shown in Figure 9.11.
Figure 9.11. Options are displayed as a drop–down menu.
Creating options can be done in either Store Editor or Catalog Manager.
Here are two examples of how the parameters must be entered into the Options field.
Size Small Medium Large
Color Red Blue “Dark Green”
You can also set up your options for incremental pricing. For example, say you are selling T–shirts and have 3 sizes. The Small is $10, the Medium is $15, and the Large is $20. Here’s how you would enter the parameters in the Options field:
Size Small Medium(+5.00) Large(+10.00)
If the customer selects Small, no incremental price is added because the product price has already been set to $10. If the customer selects Medium, a $5 charge will be added to the already set price of $10, totaling $15.
Note regarding the Options field
• If the option has multiple words, you must enclose them between double–quotes (“Dark Green”).
• You can have more than one set of options, but they have to be separated by a line break or double space in the Options field.
• You cannot add more than one space between the attributes.
• HTML is not supported in the Options field.
Adding Product Images
There are two ways to add product images: You can upload product images one–by–one or you can upload multiple images at the same time.
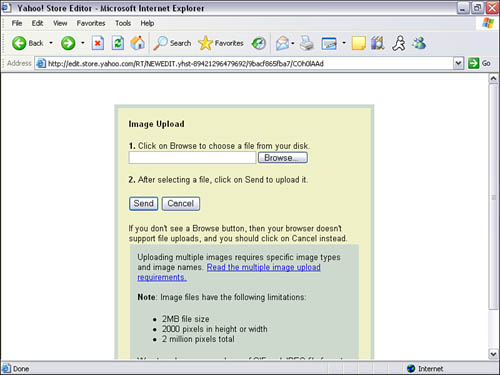
If you upload images one–by–one, you can select the Upload button shown in Figure 9.12 while editing your product or while adding a new product. After you click on the Upload button, you will be taken to another page where you can choose the location of your image to upload, as shown in Figure 9.13. This is a great option for stores with few products.
Figure 9.12. Image Upload button.
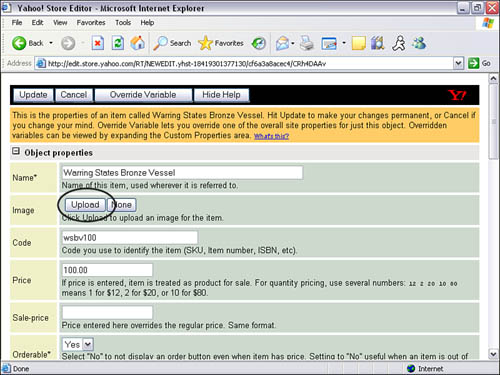
Figure 9.13. Image Upload form.
If you have a lot of products, using the multiple image upload will help you save time. This feature will upload all your images at once. How does the system know where to put the images? The name of each file must exactly match the ID of the product page. If you used the Store Editor to create your product, the product ID was created for you and you must go back into the Catalog Manager to find out what the ID is. If you used Catalog Manager to create your product, the product ID is something you entered. You can also go back into Catalog Manager to view the product ID.
The Yahoo! store supports both .jpg and .gif image formats.
For example, if your product ID is zd100, your image file name must be zd100.jpg. If it’s a .gif, the image file name must be zd100.gif.
All images must be in a zip file in order to upload. This will help reduce the file size and speed up the file upload time. You may upload as many zip files as you wish, but only one zip file maybe uploaded at a time. If you don’t have a zip program, you may download WinZip (winzip.com) or another zip utility program.
- Once you have added all the image files into the zip file, click on the Store Editor link in the Store Manager control panel.
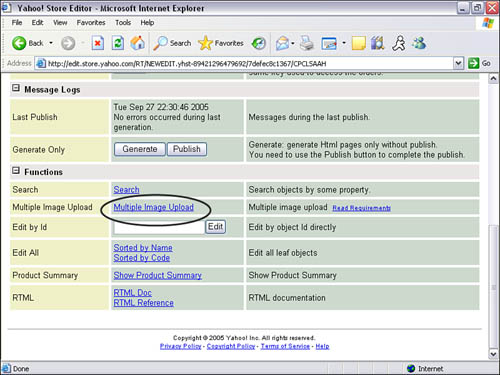
- When the Store Editor homepage appears, click on the Red Triangle on the toolbar to display the advanced settings.
- In the advanced settings, click on the Controls button.
- Scroll down until you see the Multiple Image Upload link and click on the link, as shown in Figure 9.14.
- Once you click on the link, a dialog box will appear where you can browse and upload your zip file.
Figure 9.14. Multiple Image Upload link.
Although you can see all the images you’ve uploaded in the Store Editor, the changes will not be live until you publish the site.
Customizing Your Page Layout and Navigation
Now that you have created a section and added products, let’s take a look at how to change the look and feel of the website. The Variables page has six sections that control the appearance of your site. Any changes made on this page will change the template for all your pages in your store. The best way to figure out how each setting affects the appearance of your store is to dive right in and test each of the settings to see whether it’s what you want. If you don’t like the changes, just change back the setting.
To get to the variables page
- Click on the Store Editor from the Store Manager.
- Click the Store Editor link.
- Click on the Variables button.
The six variable sections include
• Colors and Typefaces: Background color, link color, button color and size, font size and type.
• Image Dimensions: Image height and width for thumbnails, insets, and items.
• Page Layout: Overall page architect including page width, number of columns, position of the navigation menu, and elements in the head and contents area.
Tip
You can also override global style properties to create page–specific styles. There is an override variable button on the Product Edit form. Navigate to the page you would like to override the variable for, and click on the Edit button on the toolbar.
• Button Properties: Option to upload custom buttons for various buttons used throughout the site and capability to change order of the buttons in the navigation menu.
• Page Properties: Keywords and footer content for every page.
• Store Properties: Commerce–related properties such as price text, currency display style, and minimum dollar amount order setting.
Editing the Home Page
You can’t just have a blank home page with a title. Let’s take a look at editing the home page. Editing the home page is just like editing a product page.
- From the Store Manager, click on the Store Editor link. This will take you to the home page of your site.
- Once you are on the home page, click on the Edit button on the toolbar.
- This will take you to the Edit page for the home page as shown in Figure 9.15.
Figure 9.15. Edit form for the home page.

From the Edit page, you can customize your home page with some of the following useful options:
• Page Title: Add a page title.
• Message: Add text to your site.
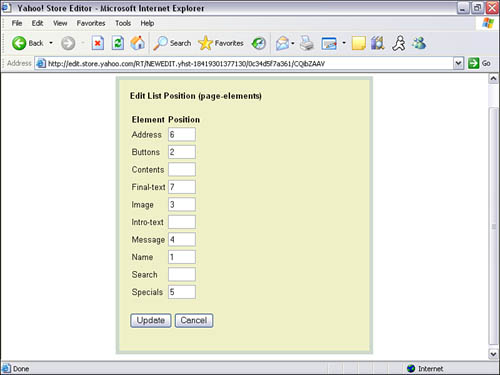
• Page–elements: Change the order of the elements of the page as shown in Figure 9.16.
• Image: Upload an image.
• Buttons: Change the order of the buttons in the site–wide navigation menu.
• Columns: Number of columns you want your products displayed is on the home page.
Figure 9.16. Page-elements change order form.
Adding Products to the Home Page
What if you have a product that’s in a section and want to display it on the home page? Having products on the home page can keep the site fresh and bring attention to products, especially if they are on sale. Let’s take a look at how to make a copy of the product and display it on the home page.
- In Store Editor, navigate to the product you would like to add to the home page.
- On the toolbar, click on the Special button. Once you click on the Special button, you will be returned to the section page.
- Now go back to the home page and view your product.
You can add as many products as you wish to the home page. Entice repeat visitors by keeping the home page fresh with new or rotating products. Some visitors will not go past the home page if they think the site has not been updated.
Publishing Your Store
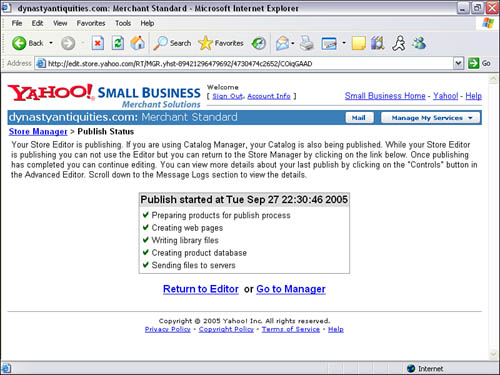
Ready to go live? It’s as easy as clicking a button. Just go back to the home page of the Store Editor and click on the Publish button on the toolbar. A Publish page will show you the publishing status, as shown in Figure 9.17.
Figure 9.17. Publish Status screen.
Although you can publish the store for live viewing, you will need to set up the merchant account, tax rates, shipping options, and pay methods (which credit cards you will accept). The good news is you will only need to do this once.
Now that you’ve published your storefront, the next chapter will show you how to set up your Yahoo! store order process.