
Now that we have explored HTTP in general, we can return to our discussion of CGI and see how our scripts interact with HTTP servers to produce dynamic content. After you have read this chapter, you’ll understand how to write basic CGI scripts and fully understand all of our previous examples. Let’s get started by looking at a script now.
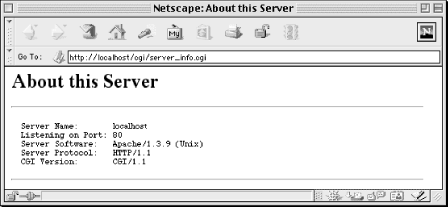
This script displays some basic information, including CGI and HTTP revisions used for this transaction and the name of the server software:
#!/usr/bin/perl -wT

print <<END_OF_HTML;
Content-type: text/html

<HTML>
<HEAD>
    <TITLE>About this Server</TITLE>
</HEAD>
<BODY>
<H1>About this Server</H1>
<HR>
<PRE>
  Server Name:       $ENV{SERVER_NAME}
  Listening on Port: $ENV{SERVER_PORT}
  Server Software:   $ENV{SERVER_SOFTWARE}
  Server Protocol:   $ENV{SERVER_PROTOCOL}
  CGI Version:       $ENV{GATEWAY_INTERFACE}
</PRE>
<HR>
</BODY>
</HTML>
END_OF_HTML
When you request the URL for this CGI script, it produces the output shown in Figure 3.1.
This simple example demonstrates the basics about how scripts work with CGI:
These details define what we will call the CGI environment . Let’s explore this environment in more detail.
CGI establishes a particular environment in which CGI scripts operate. This environment includes such things as what current working directory the script starts in, what variables are preset for it, where the standard file handles are directed, and so on. In return, CGI requires that scripts be responsible for defining the content of the HTTP response and at least a minimal set of HTTP headers.
When CGI scripts are executed, their current working directory is typically the directory in which they reside on the web server; at least this is the recommended behavior according to the CGI standard, though it is not supported by all web servers (e.g., Microsoft’s IIS). CGI scripts are generally executed with limited permissions. On Unix systems, CGI scripts execute with the same permission as the web server which is generally a special user such as nobody, web, or www. On other operating systems, the web server itself may need to be configured to set the permissions that CGI scripts have. In any event, CGI scripts should not be able to read and write to all areas of the file system. You may think this is a problem, but it is actually a good thing as you will learn in our security discussion in Chapter 8.
Perl scripts generally start with three standard file handles predefined: STDIN, STDOUT, and STDERR. CGI Perl scripts are no different. These file handles have particular meaning within a CGI script, however.
When a web server receives an HTTP request directed to a CGI script, it reads the HTTP headers and passes the content body of the message to the CGI script on STDIN. Because the headers have already been removed, STDIN will be empty for GET requests that have no body and contain the encoded form data for POST requests. Note that there is no end-of-file marker, so if you try to read more data than is available, your CGI script will hang, waiting for more data on STDIN that will never come (eventually, the web server or browser should time out and kill this CGI script but this wastes system resources). Thus, you should never try to read from STDIN for GET requests. For POST requests, you should always refer to the value of the Content-Length header and read only that many bytes. We’ll see how to read this information in Chapter 4 in Chapter 4.
Perl CGI scripts return their output to the web server by printing to STDOUT. This may include some HTTP headers as well as the content of the response, if present. Perl generally buffers output on STDOUT and sends it to the web server in chunks. The web server itself may wait until the entire output of the script has finished before sending it onto the client. For example, the iPlanet (formerly Netscape) Enterprise Server buffers output, while Apache (1.3 and higher) does not.
CGI does not designate how web servers should handle output to STDERR, and servers implement this in different ways, but they almost always produces a 500 Internal Server Error reply. Some web servers, like Apache, append STDERR output to the web server’s error log, which includes other errors such as authorization failures and requests for documents not on the server. This is very helpful for debugging errors in CGI scripts.
Other servers, such as those by iPlanet, do not distinguish between STDOUT and STDERR; they capture both as output from the script and return them to the client. Nevertheless, outputting data to STDERR will typically produce a server error because Perl does not buffer STDERR, so data printed to STDERR often arrives at the web server before data printed to STDOUT. The web server will then report an error because it expects the output to start with a valid header, not the error message. On iPlanet, only the server’s error message, and not the complete contents of STDERR, is then logged.
We’ll discuss strategies for handling STDERR output in our discussion of CGI script debugging in Chapter 15.
CGI scripts are given predefined
environment variables that provide
information about the web server as well as the client. Much of this
information is drawn from the
headers of the HTTP request. In Perl,
environment variables are available to your script via the global
hash %ENV
.
You are free to add, delete, or change any of the values of
%ENV. Subprocesses created by your script will
also inherit these environment variables, along with any changes
you’ve made to them.
The
standard CGI environment variables
listed in Table 3.1 should be available on any
server supporting CGI. Nonetheless, if you loop through all the keys
in %ENV, you will probably not see all the
variables listed here. If you recall, some HTTP request headers are
used only with certain requests. For example, the
Content-length header is sent only with POST
requests. The environment variables that map to these HTTP request
headers will thus be missing when its corresponding header field is
missing. In other words, $ENV{CONTENT_LENGTH} will
only exist for POST requests.
Table 3-1. Standard CGI Environment Variables
|
Environment Variable |
Description |
|---|---|
|
AUTH_TYPE |
The authentication method used to validate a user. This is blank if the request did not require authentication. |
|
CONTENT_LENGTH |
The length of the data (in bytes) passed to the CGI program via standard input. |
|
CONTENT_TYPE |
The media type of the request body, such as "application/x-www-form-urlencoded “. |
|
DOCUMENT_ROOT |
The directory from which static documents are served. |
|
GATEWAY_INTERFACE |
The revision of the Common Gateway Interface that the server uses. |
|
PATH_INFO |
Extra path information passed to a CGI program. |
|
PATH_TRANSLATED |
The translated version of the path given by the variable PATH_INFO. |
|
QUERY_STRING |
The query information from requested URL (i.e., the data following “?”). |
|
REMOTE_ADDR |
The remote IP address of the client making the request; this could be the address of an HTTP proxy between the server and the user. |
|
REMOTE_HOST |
The remote hostname of the client making the request; this could also be the name of an HTTP proxy between the server and the user. |
|
REMOTE_IDENT |
The user making the request, as reported by their ident daemon. Only some Unix and IRC users are likely to have this running. |
|
REMOTE_USER |
The user’s login, authenticated by the web server. |
|
REQUEST_METHOD |
The HTTP request method used for this request. |
|
SCRIPT_NAME |
The URL path (e.g., /cgi/program.cgi) of the script being executed. |
|
SERVER_NAME |
The server’s hostname or IP address. |
|
SERVER_PORT |
The port number of the host on which the server is listening. |
|
SERVER_PROTOCOL |
The name and revision of the request protocol, e.g., “HTTP/1.1”. |
|
SERVER_SOFTWARE |
The name and version of the server software that is answering the client request. |
Any HTTP headers that the web server does not recognize as standard headers, as well as a few other common headers, are also available to your script. The web server follows these rules for creating the name of the environment variable:
The field name is capitalized.
All dashes are converted to underscores.
The prefix HTTP_ is added to the name.
Table 3.2 provides a list of some of the more common of these environment variables.
Table 3-2. Additional CGI Environment Variables
|
Environment Variable |
Description |
|---|---|
|
HTTP_ACCEPT |
A list of the media types the client can accept. |
|
HTTP_ACCEPT_CHARSET |
A list of the character sets the client can accept. |
|
HTTP_ACCEPT_ENCODING |
A list of the encodings the client can accept. |
|
HTTP_ACCEPT_LANGUAGE |
A list of the languages the client can accept. |
|
HTTP_COOKIE |
A name-value pair previously set by the server. |
|
HTTP_FROM |
The email address of the user making the request; most browsers do not pass this information, since it is considered an invasion of the user’s privacy. |
|
HTTP_HOST |
The hostname of the server from the requested URL (this corresponds to the HTTP 1.1 Host field). |
|
HTTP_REFERER |
The URL of the document that directed the user to this CGI program (e.g., via a hyperlink or via a form). |
|
HTTP_USER_AGENT |
The name and version of the client’s browser. |
A secure server typically adds many more environment variables for secure connections. Much of this information is based on X.509 and provides information about the server’s and possibly the browser’s certificates. Because you really won’t need to understand these details in order to write CGI scripts, we won’t get into X.509 or secure HTTP transactions in this book. For more information, refer to RFC 2511 or the public key infrastructure working group’s web site at http://www.imc.org/ietf-pkix/.
The names of the environment variables supplied to your script for secure connections vary by server. The HTTPS environment variable (see Table 3.3) is commonly supported, however, and useful to test whether your connection is secure; unfortunately its values vary between servers. Refer to your server’s documentation for more information or use Example 3.1 or Example 3.2 to generate data for your server.
Table 3-3. Common Environment Variable for Secure Servers
|
Environment Variable |
Description |
|---|---|
|
HTTPS |
This variable can be used as a flag to indicate whether the connection is secure; its values vary by server (e.g., “ON” or “on” when secure and blank or “OFF” when not). |
Finally, the web server may provide additional environment variables beyond those mentioned in this section. Most web servers also allow the administrator to add environment variables via a configuration file. You might take advantage of this feature if you have several CGI scripts that all share common configuration information, such as the name of the database server to connect to. Having the variable defined once in the web server’s configuration file makes it easy to change later.
Because browsers and web servers may provide additional environment variables to your script, it’s often helpful to have a list of environment variables that is specific to your web server. Example 3.1 shows a short script that is easy to remember and type in when you find yourself working on a new system. It generates a handy list of environment variables specific to that web server. Remember that the browser may also affect this list. For example, HTTP_COOKIE will only appear if the browser supports cookies, if cookies have not been disabled, and if the browser had received a previous request from this web server to set a cookie.
Example 3-1. env.cgi
#!/usr/bin/perl -wT
# Print a formatted list of all the environment variables

use strict;

print "Content-type: text/html

";

my $var_name;
foreach $var_name ( sort keys %ENV ) {
    print "<P><B>$var_name</B><BR>";
    print $ENV{$var_name};
}
This simply produces an alphabetic list of the environment variable names and their values, shown in Figure 3.2.
Because this is simply a quick-and-dirty script, we omitted some details that should be included in production CGI scripts, and which are included in the other examples. For example, we did not print a valid HTML document (it is missing the enclosing HTML, HEADER, and BODY tags). This should certainly be added if the script were to grow beyond a few lines or if you intended for people other than yourself to use it.
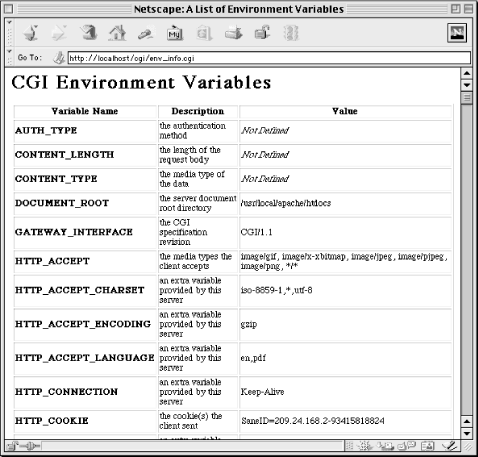
Example 3.2 shows a more elaborate version that displays all of the environment variables that CGI and your web server define, along with a brief explanation of the standard variables.
Example 3-2. env_info.cgi
#!/usr/bin/perl -wT

use strict;

my %env_info = (
    SERVER_SOFTWARE     => "the server software",
    SERVER_NAME         => "the server hostname or IP address",
    GATEWAY_INTERFACE   => "the CGI specification revision",
    SERVER_PROTOCOL     => "the server protocol name",
    SERVER_PORT         => "the port number for the server",
    REQUEST_METHOD      => "the HTTP request method",
    PATH_INFO           => "the extra path info",
    PATH_TRANSLATED     => "the extra path info translated",
    DOCUMENT_ROOT       => "the server document root directory",
    SCRIPT_NAME         => "the script name",
    QUERY_STRING        => "the query string",
    REMOTE_HOST         => "the hostname of the client",
    REMOTE_ADDR         => "the IP address of the client",
    AUTH_TYPE           => "the authentication method",
    REMOTE_USER         => "the authenticated username",
    REMOTE_IDENT        => "the remote user is (RFC 931): ",
    CONTENT_TYPE        => "the media type of the data",
    CONTENT_LENGTH      => "the length of the request body",
    HTTP_ACCEPT         => "the media types the client accepts",
    HTTP_USER_AGENT     => "the browser the client is using",
    HTTP_REFERER        => "the URL of the referring page",
    HTTP_COOKIE         => "the cookie(s) the client sent"
);

print "Content-type: text/html

";

print <<END_OF_HEADING;

<HTML>
<HEAD>
    <TITLE>A List of Environment Variables</TITLE>
</HEAD>

<BODY>
<H1>CGI Environment Variables</H1>

<TABLE BORDER=1>
  <TR>
    <TH>Variable Name</TH>
    <TH>Description</TH>
    <TH>Value</TH>
  </TR>
END_OF_HEADING

my $name;

# Add additional variables defined by web server or browser
foreach $name ( keys %ENV ) {
    $env_info{$name} = "an extra variable provided by this server"
        unless exists $env_info{$name};
}

foreach $name ( sort keys %env_info ) {
    my $info = $env_info{$name};
    my $value = $ENV{$name} || "<I>Not Defined</I>";
    print "<TR><TD><B>$name</B></TD><TD>$info</TD><TD>$value</TD></TR>
";
}

print "</TABLE>
";
print "</BODY></HTML>
";
The %env_info
hash contains the standard environment
variable names and their descriptions. The while
loop iterates over %ENV with the
each command to add any additional environment
variables defined by the current web server. Then the
foreach loop iterates through the combined list
and displays the name, description, and value of each environment
variable. Figure 3.3 shows what the output will
look in a browser window.
This covers most of CGI input, but we have not discussed how to read the message body for POST requests. We will return to that topic when we discuss forms in the next chapter. Right now, let’s look at CGI output.
Every CGI script must print a header line, which the server uses to build the full HTTP headers of its response. If your CGI script produces invalid headers or no headers, the web server will generate a valid response for the client—generally a 500 Internal Server Error message.
Your CGI has the option of displaying full or partial headers. By default, CGI scripts should return only partial headers.
CGI scripts must output one of the following three headers:
Let’s review each of these options.
The most common response for CGI scripts is to return HTML. A script must indicate to the server the media type of content it is returning prior to outputting any content. This is why all of the CGI scripts you have seen in the previous examples contained the following line:
print "Content-type: text/html

";
You can send other HTTP headers from a CGI script, but this header field is the minimum necessary in order to output a document. HTML documents are by no means the only form of media type that may be outputted by CGI scripts. By specifying a different media type, you can output any type of document that you can imagine. For example, Example 3.4 later in this chapter shows how to return a dynamic image.
The two newlines at the end the Content-type header tell the web server that this is the last header line and that subsequent lines are part of the body of the message. This correlates to the extra CRLF that we discussed in the last chapter, which separates HTTP headers from the content body (see the upcoming sidebar, Line Endings).
Sometimes, it’s not necessary to build an HTML document with your CGI script. In fact, unless the output varies from one visit to another, it is a good idea to create a simple, static HTML page (in addition to the CGI script), and forward the user to that page by using the Location header. Why? Interface changes are far more common than program logic changes, and it is much easier to reformat an HTML page than to make changes to a CGI script. Plus, if you have multiple CGI scripts that return the same message, then having them all forward to a common document reduces the number of resources you need to maintain. Finally, you get better performance. Perl is fast, but your web server will always be faster. It’s a good idea to take advantage of any opportunity you have to shift work from your CGI scripts to your web server.
To forward a user to another URL, simply print the Location header with the URL to the new location:
print "Location: static_response.html

";
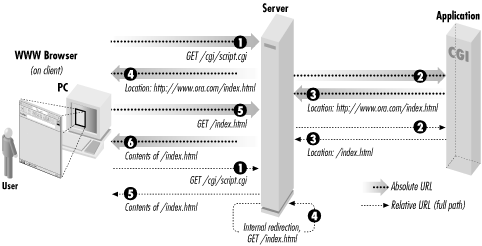
The URL may be absolute or relative. An absolute URL or a relative URL with a relative path is sent back to the browser, which then creates another request for the new URL. A relative URL with a full path produces an internal redirect. An internal redirect is handled by the web server without talking to the browser. It gets the contents of the new resource as if it had received a new request, but it then returns the content for the new resource as if it is the output of your CGI script. This avoids a network response and request; the only difference to users is a faster response. The URL displayed by their browser does not change for internal redirects; it continues to show the URL of the original CGI script. See Figure 3.4 for a visual display of server redirection.
When redirecting to absolute URLs, you may include a Content-type header and content body for the sake of older browsers, which may not forward automatically. Modern browsers will immediately fetch the new URL without displaying this content.
The Status header is different than the other headers because it does not map directly to an HTTP header, although it is associated with the status line. This field is used only to exchange information between the CGI script and the web server. It specifies the status code the server should include in the status line of the request. This field is optional: if you do not print it, the web server will automatically add a status of 200 OK to your output if you print a Content-type header, and a status of 302 Found if you print a Location header.
If you do print a status code, you are not bound to use the status code’s associated message, but you should not try to use a status code for something other than for which it was intended. For example, if your CGI script must connect to a database in order to generate its output, you might return 503 Database Unavailable if the database has no free connections. The standard error message for 503 messages is Service Unavailable , so our database message is an appropriately similar use of this status code.
Whenever you return an error status code, you should also return a Content-type header and a message body describing the reason for the error in human terms. Some browsers provide their own messages to users when they receive status codes indicating an error, but most do not. So unless you provide a message, many users will get an empty page or a message telling them “The document contains no data.” If you don’t want to admit to having a problem, you can always fall back to the ever-popular slogan, “The system is currently unavailable while we perform routine maintenance.”
Here is the code to report our database error:
print <<END_OF_HTML;
Status: 503 Database Unavailable
Content-type: text/html

<HTML>
<HEAD><TITLE>503 Database Unavailable</TITLE></HEAD>
<BODY>
  <H1>Error</H1>
  <P>Sorry, the database is currently not available. Please
    try again later.</P>
</BODY>
</HTML>
END_OF_HTML
Below is a short description of the common status headers along with when (and whether) to use them in your CGI scripts:
- 200 OK
200 is by far the most common status code returned by web servers; it indicates that the request was understood, it was processed successfully, and a response is included in the content. As we discussed earlier, the web server automatically adds this header when you print the required Content-type header, so the only time you need to print this status yourself is to output complete nph- headers, which we discuss in the next section.
- 204 No Response
204 indicates that the request was okay, it was processed successfully, but no response is provided. When a browser receives this status code, it does nothing. It simply continues to display whatever page it was displaying before the request. A 200 response without a content body, on the other hand, may produce a “Document contains no data” error in the user’s browser. Web users generally expect feedback, but there are some instances when this response (or lack of response) makes sense. One example is a situation when you need client code such as JavaScript or Java to report something to the web server without updating the current page.
- 301 Moved Permanently
301 indicates that the URL of the requested resource has changed. All 300-level responses must contain a Location header field specifying a new URL for the resource. If the browser receives a 301 response to a GET request, it should automatically fetch the resource from the new location. If the browser receives a 301 response to a POST request, however, the browser should confirm with the user before redirecting the POST request. Not all browsers do this, and many even change the request method of the new request to GET.
Responses with this status code may include a message for the user in case the browser does not handle redirection automatically. Because this status code indicates a permanent move, a proxy or a browser that has a cached copy of this response will simply use it in the future instead of reconfirming the change with the web server.
- 302 Found
302 responses function just like 301 responses, except that the move is temporary, so browsers should direct all future requests to the original URL. This is the status code that is returned to browsers when your script prints a Location header (except for full paths, see Section 3.3.1.2 earlier). As with 301 status codes, browsers should check with the user before forwarding a POST request to another URL. Because the 302 status has become so popular, and because so many browsers have been guilty of silently changing POST requests to GET requests during the redirect, HTTP/1.1 more or less gave up on trying to get compliance on this status code and defines two new status codes: 303 See Other and 307 Temporary Redirect.
- 303 See Other
303 is new for HTTP/1.1. It indicates that the resource has temporarily moved and that it should be obtained from the new URL via a GET request, even if the original request method was POST. This status code allows the web server (and the CGI script developer) to explicitly request the incorrect behavior that 302 responses caused in most browsers.
- 307 Temporary Redirect
307 is new for HTTP/1.1. It also indicates a temporary redirection. However, HTTP/1.1 browsers that support this status code must prompt the user if they receive this status code in response to a POST request and must not automatically change the request method to GET. This is the same behavior required for 302 status codes, but browsers that implement this code should actually do the right thing.
Thus 302, 303, and 307 all indicate the same thing except when the request was a POST. In that case, the browser should fetch the new URL with a GET request for 303, confirm with the user and then fetch the new URL with a POST request for 307, and do either of those for 302.
- 400 Bad Request
400 is a general error indicating that the browser sent an invalid request due to bad syntax. Examples include an invalid Host header field or a request with content but without a Content-type header. You should not have to return a 400 status because the web server should recognize these problems and reply with this error status code for you instead of calling your CGI script.
- 401 Unauthorized
401 indicates that the requested resource is in a protected realm. When browsers receive this response, they should ask the user for a login and password and resend the original request with this additional information. If the browser again receives a 401 status code, then the login was declined. The browser generally notifies the user and allows the user to reenter the login information. 401 responses should include a WWW-Authenticate header field indicating the name of the protected realm.
The web server handles authentication for you (although mod_perl lets you dig into it if you wish) before invoking your CGI scripts. Therefore, you should not return this status code from CGI scripts; use 403 Forbidden instead.
- 403 Forbidden
403 indicates that the client is not allowed to access the requested resource for some reason other than needing a valid HTTP login. Remember reading in Chapter 1, that CGI scripts must have the correct permissions set up in order to run? Your browser will receive a 403 status if you attempt to run CGI scripts that do not have the correct execute permissions.
You might return this status code for certain protected CGI scripts if the user fails to meet some criteria such as having a particular IP address, a particular browser cookie, etc.
- 404 Not Found
Undoubtedly, you have run across this status code. It’s the online equivalent of a disconnected phone number. 404 indicates that the web server can’t find the resource you asked for. Either you misentered a URL or you followed a link that is old and no longer accurate.
You might use this status code in CGI scripts if the user passes extra path information that is invalid.
- 405 Not Allowed
405 indicates that the resource requested does not support the request method used. Some CGI scripts are written to support only POST requests or only GET requests. This status would be an appropriate response if the wrong request method is received; in practice, this status code is not often used. 405 replies must include an Allow header containing a list of valid request methods for the resource.
- 408 Request Timed Out
When a transaction takes a long time, the web browser usually gives up before the web server. Otherwise, the server will return a 408 status when it has grown tired of waiting. You should not return this status from CGI scripts. Use 504 Gateway Timed Out instead.
- 500 Internal Server Error
As you begin writing CGI scripts, you will become far too familiar with this status. It indicates that something happened on the server that caused the transaction to fail. This almost always means a CGI script did something wrong. What could a CGI script do wrong you ask? Lots: syntax errors, runtime errors, or invalid output all might generate this response. We’ll discuss strategies for debugging unruly CGI scripts in Chapter 15.
- 503 Service Unavailable
503 indicates that the web server is unable to respond to the request due to a high volume of traffic. These responses may include a Retry-After header with the date and time that the browser should wait until before retrying. Generally web servers manage this themselves, but you might issue this status if your CGI script recognizes that another resource (such as a database) required by the script has too much traffic.
- 504 Gateway Timed Out
504 indicates that some gateway along the request cycle timed out while waiting for another resource. This gateway could be your CGI script. If your CGI script implements a time-out handler when calling another resource, such as a database or another Internet server, then it should return a 504 response.
We list these status codes here to be complete, but keep in mind that you do not have to print your own status code, even for errors. Although sending a status code to report an error might be the most appropriate action according to the HTTP protocol, you may prefer to simply redirect users to a help page or return a summary of the error as normal output (with a 200 OK status).
Thus far, all the CGI scripts that we’ve discussed simply return partial header information. We leave it up to the server to fill in the other headers and return the document to the browser. We don’t have to rely on the server though. We can also develop CGI scripts that generate a complete header.
CGI scripts that generate their own headers are called nph (non-parsed headers) scripts. The server must know in advance whether the particular CGI script intends to return a complete set of headers. Web servers handle this differently, but most recognize CGI scripts with a nph- prefix in their filename.
When sending complete headers, you must at least send the status line plus the Content-type and Server headers. You must print the entire status line; you should not print the Status header. As you will recall, the status line includes the protocol and version string (e.g., “HTTP/1.1”), but as you should recall, CGI provides this to you in the environment variable SERVER_PROTOCOL. Always use this variable in your CGI scripts, instead of hardcoding it, because the version in the SERVER_PROTOCOL may vary for older clients.
Example 3.3 provides a simple example that illustrates nph scripts.
Example 3-3. nph-count.cgi
#!/usr/bin/perl -wT

use strict;

print "$ENV{SERVER_PROTOCOL} 200 OK
";
print "Server: $ENV{SERVER_SOFTWARE}
";
print "Content-type: text/plain

";

print "OK, starting time consuming process ...
";

# Tell Perl not to buffer our output
$| = 1;

for ( my $loop = 1; $loop <= 30; $loop++ ) {
    print "Iteration: $loop
";
    ## Perform some time consuming task here ##
    sleep 1;
}

print "All Done!
";
nph scripts were more common in the past, because versions of Apache prior to 1.3 buffered the output of standard CGI scripts (those generating partial headers) but did not buffer the output of nph scripts. By creating nph scripts, your output was sent immediately to the browser as it was generated. However Apache 1.3 no longer buffers CGI output, so this feature of nph scripts is no longer needed with Apache. Other web servers, such as iPlanet Enterprise Server 4, buffer both standard CGI as well as nph output. You can find out how your web server handles buffering by running Example 3.3.
Save the file as nph-count.cgi and access it from your browser; then save a copy as count.cgi and update it to output partial headers by commenting out the status line and the Server header:
# print "$ENV{SERVER_PROTOCOL} 200 OK
";
# print "Server: $ENV{SERVER_SOFTWARE}
";
Access this copy of the CGI script and compare the result. If your browser pauses for thirty seconds before displaying the page, then the server is buffering the output; if you see the lines displayed in real time, then it is not.
At this point, we have covered the fundamentals of how CGI scripts work, but the concepts may still seem a little abstract. The following sections present examples that demonstrate how to implement what we’ve discussed.
CGI scripts are not restricted to generating HTML. Example 3.4 produces an image after choosing an image format that the browser supports. Recall that the browser sends the Accept HTTP header listing the media types it supports. Actually, browsers generally specify only the newer media types they support and pass a wildcard to match everything else. In this example, we’ll send an image in the new PNG format if the browser specifies that it supports PNG, and a JPEG otherwise.
You may ask why we would want to do this. Well, JPEG images use a lossy form of compression. Although they are ideal for natural images like photographs, images with sharp lines and details (such as screenshots or text) can become blurred. PNG images, like GIF images, do not use lossy compression. They are typically larger than JPEG images (it depends on the image), but they provide sharp detail. And unlike GIFs, which are limited to 256 colors, PNGs can support millions of colors and even eight-bit transparency. So we will provide a high-color, high-detail PNG if possible, or a JPEG otherwise.
If a user calls this with http://localhost/cgi/image_fetch.cgi/new_screenshot.png, he or she will actually get new_screenshot.png or new_screenshot.jpeg depending on what the browser supports. This allows you to include a single link in your HTML pages that works for everyone. Example 3.4 shows the source to our CGI script.
Example 3-4. image_fetch.cgi
#!/usr/bin/perl -wT

use strict;

my $image_type = $ENV{HTTP_ACCEPT} =~ m|image/png| ? "png" : "jpeg";
my( $basename ) = $ENV{PATH_INFO} =~ /^(w+)/;
my $image_path = "$ENV{DOCUMENT_ROOT}/images/$basename.$image_type";

unless ( $basename and -B $image_path and open IMAGE, $image_path ) {
    print "Location: /errors/not_found.html

";
    exit;
}

my $buffer;
print "Content-type: image/$image_type

";
binmode;

while ( read( IMAGE, $buffer, 16_384 ) ) {
    print $buffer;
}
We set $image_type to “png” or
“jpeg” depending on whether the browser sent
image/png as part of its
Accept header. Then we set
$basename to the first word of the additional path
information, which is “new_screenshot” in our previous
example. We only care about the base name because we add our own
extension when we actually fetch the file.
Our images are in the images directory at the
root of the web server’s document tree, so we build a path to
the image and assign it to $image_path. Note that
we build this path before we validate that the URL we received
actually contains additional path information. If
$ENV{PATH_INFO} is empty or starts with a
nonalphanumeric character, then obviously this path is invalid.
That’s okay though; we will validate this in the next step.
We delayed the validation so we can perform all of our tests at once. We test that the additional path information contains a name, that the full path to the file we constructed points to a binary file, and that we are able to open the file. If any of these tests fail, then we simply report that the file is not found. We do this by forwarding to a static page that contains our error message. Creating a single, static document for general errors like 404 Not Found is an easy way to produce error pages that are customized to match your site design and are easy to maintain.
If we opened the file successfully, we read and print the file in
16KB
increments. Calling
binmode
is necessary for systems
like Win32 or MacOS that do not use newlines as the
end-of-line character; it
doesn’t hurt on Unix systems.
In addition to domain-based security, most HTTP servers also support another method of security, known as user authentication. We discussed user authentication briefly in the last chapter. When configured for user authentication, specified files or directories within a given realm are set up to allow access only by certain users. A user attempting to open the URLs associated with these files is prompted for a name and password.
The username and password is checked by the server, and if
legitimate, the user is allowed access. In addition to allowing the
user access to the protected file, the server also maintains the
user’s name and passes it to any subsequent CGI programs that
are called. The server passes the username in the
$ENV{REMOTE_USER} environment variable.
A CGI script can therefore use server authentication information to
identify users. Here is a snippet of code that illustrates what you
can do with the $ENV{REMOTE_USER} environment
variable:
$remote_user = $ENV{REMOTE_USER};

if ( $remote_user eq "mary" ) {
    print "Welcome Mary, how is your company doing these days?
";
} elsif ( $remote_user eq "bob" ) {
    print "Hey Bob, how are you doing? I heard you were sick.
";
}One of the great benefits of the Web is its flexibility. One person can create a page on their server and include links to others’ pages on other servers. These links can even include links to images on other servers. Unfortunately, if you have popular images, you may not appreciate this last feature. Say, for example, you are an artist and you display your images on your web site. You may not want other sites to include your artwork in their web pages simply by including image links pointing to your server. One solution, shown in Example 3.5, is to check the URL that referred the user to the image via the Referer HTTP header field.[5]
Example 3-5. check_referer.cgi
#!/usr/bin/perl -wT

use strict;

# The directory where images are stored; this shouldn't be in the
# server's doc tree so users can't browse images except via this script.
my $image_dir = "/usr/local/apache/data/images";

my $referer  = $ENV{HTTP_REFERER};
my $hostname = quotemeta( $ENV{HTTP_HOST} || $ENV{SERVER_NAME} );

if ( $referer and $referer !~ m|^http://$hostname/| ) {
    display_image( "copyright.gif" );
}
else {
    # Verify that the image name doesn't contain any unsafe characters.
    my( $image_file ) = $ENV{PATH_INFO} =~ /^([w+.]+)$/ or
        not_found(  );
    display_image( $image_file );
}
sub display_image {
    my $file = shift;
    my $full_path = "$image_dir/$file";

    # We'll simply report that the file isn't found if we can't open it.
    open IMAGE, $full_path or not_found(  );

    print "Pragma: no-cache
";
    print "Content-type: image/gif

";

    binmode;
    my $buffer = "";
    while ( read( IMAGE, $buffer, 16_384 ) ) {
        print $buffer;
    }
    close IMAGE;
}

sub not_found {
    print <<END_OF_ERROR;
Status: 404 Not Found
Content-type: text/html

<html>
<head>
  <title>File Not Found</title>
</head>

<body>
  <h1>File Not Found</h1>

  <p>Sorry, but you requested an image that could not be found.
    Please check the URL you entered and try again.</p>
</body>
</html>
END_OF_ERROR

    exit;
}
This script displays an image with a copyright notice if the user came from a different web site. For the copyright notice, the script assumes that there is a file called copyright.gif in the same directory as the other images. Not all browsers implement the Referer HTTP header, and we don’t want visitors using these browsers to get the wrong image in error. So we only display the copyright image if the user both presents a Referer header and it is from a different server. Also, we have to be conscious of caching on the Web. Browsers might cache images, and they may be behind any number of proxy servers that also implement their own caches. Thus, we output an additional header to request that this message not be cached. This should avoid the user getting a cached copyright notice image when they visit the real site. If you are especially paranoid (and do not mind the extra traffic it causes), then you could also output a Pragma: no-cache header for the real images too.
If the image is not found, it sends a response with a 404 status. You may wonder why it would send an HTML message when it was likely the request was the result of an image tag and the browser is planning on displaying the response as an image in an HTML page. Actually, neither web servers nor CGI scripts have any way of determining the context of any request. Web servers always display 404 errors when they cannot locate a resource. In this case the browser will likely display an icon, such as a broken image, to indicate that there was an error. If the user chooses to view the image separately by directly referencing it, he or she will see the error message.
This solution should stop casual hijackers. It won’t stop thieves. It’s always possible for someone to visit your site, download your images, and put copies of them up on their own site.
[5] The Referer header is not as reliable as you might hope. Not all browsers provide it, and as we will see in Chapter 8, it’s possible for clients to provide a false Referer header. However, in this scenario, the culprits are other servers, not the users themselves, and it is not possible for other servers to cause clients to provide false headers.