
CHAPTER 14
Internal Leaks
We’ll Cover
One of the most common and easiest ways organizational information is leaked is by someone working inside an organization. This chapter will prepare you to conduct a post-mortem investigation—that is, after an internal leak has occurred. I’ll cover how to investigate internal leaks and simple scenarios to get you started with an investigation.
IMHO
Most IT professionals are likely to think they know the obvious ways information can be leaked from an organization, but they may not fully understand the mechanics. I worked in IT for years before entering the computer forensics industry, so I am familiar with how IT professionals think. My eyes were opened to an entirely new perspective when I entered the computer forensics world, and I am far more paranoid now than I was when I was in IT. Electronic information has become so ubiquitous that it is difficult to know where to begin looking for misconduct.
Why Internal Leaks Happen
The reasons and causes leading to an individual leaking internal information are numerous. An internal leak is a great threat to an organization precisely because it comes from the inside, where critical data is often far too easy to access, because all the protections in place are focused on outside intruders. Many threats are present in the age of the Internet; however, the easiest way to get information is still to “walk it out the door,” and this is easiest done by someone on the inside. This chapter does not present a case study on how to prevent internal leaks; instead, it will educate you regarding the ways internal leaks can occur and offer techniques you can use to identify credible forensic evidence.
Following are some examples of types of internal leaks.
It is amazing what some people think they can get away with, and often do, because of poor security practices and limited internal reviews and auditing of business practices. Performing a security review and audit and keeping people on their toes can help keep dishonest fingers out of the cookie jar; a competent and outside consultancy is best suited for such a job. Letting people within the organization know you have the tools, training, and processes in place to be able to track or discover what they have done if they choose to abuse their corporate privileges, even if moderately exaggerated, is a valid method of deterrence against the potential criminal.
In Actual Practice
The burden is on you to analyze the evidence to determine the facts pertaining to the matter. Once you are notified or have knowledge of an internal leak, you should deal with the matter promptly and according to commonly accepted forensic practices, or you could be in for trouble if the evidence and/or your findings regarding the matter make their way to court. This is especially important for the first responder who first handles the evidence. Even if the first responder is not trained in forensic techniques, getting them to document their actions can be enough to assure that the evidence is acceptable in court. Chain of custody starts with whoever first possesses the evidence; your ability to explain what happened to it while you were interacting with it is just as important. If you can’t explain how things came to exist before forensic imaging, your evidence may be excluded in court. For some commonly accepted forensic practices, go to www.swgde.org.
Investigating Internal Leaks
Forensic artifacts are time-sensitive, because normal usage of a computer can and will overwrite information that can be critical for the investigation. This is why it is so important to act in an expedient and proper manner to preserve the hard drive, external devices, file server, cell phone, e-mail, tape backups, and other relevant data and storage devices without arousing the suspect’s suspicions. If you can gather the evidence without the suspect’s knowledge, the suspect will not be able to cover their tracks and hide or destroy evidence.
In Actual Practice
Avoid the temptation to examine a suspect’s PC to look for smoking guns before taking the proper forensic route. For example, one of my clients asked an IT person to examine the files on a PC of a suspected employee. Unfortunately for this client, the IT person moved and/or copied files on this computer and then opened the files. By doing this, the IT person changed meta-data and possibly overwrote data in drive freespace—data that is critical to the investigation! Such activity could destroy the very evidence you are trying to find.
In addition, if a judge has issued a protective order to preserve the person’s computer, and you go snooping around after the order has gone into effect (even if you merely boot the PC), you have violated the court order and the judge is not going to be happy. A computer hard drive should be preserved when possible as a forensic image before you go snooping around.
In any forensic investigation, when looking for files that might have been copied to external media, you must take the following basic steps:
1. Review the registry files: Look for user activity in UserAssist and RecentDocs in NTUSER.DAT. Look for the use of external storage devices by examining USBStor in SYSTEM.
2. Look for file activity by reviewing LNK (Windows shortcut) files.
3. Wrap up the investigation by obtaining and examining any involved external storage devices.
LINGO
Meta-data is data about the data. It commonly contains information such as the creation, modification, and access times of a file. However, on an application-by-application basis, the meta-data can also contain things like the author’s name, the name of the computer that created the file, which printer the file was sent to, who the file was e-mailed to, what the original name of the file was, and more! Understanding what kind of meta-data is kept by your company’s applications is important so you know what to look for.
Reviewing the Registry Files
You’ll typically start an investigation by reviewing registry files to search for user activity and externally attached devices. This multiple-step process involves the review of each user’s NTUSER.DAT on the system—not just the primary user—and documenting the individual details. It is also important that you look at create dates for important system directories such as Windows, Users, and Program Files and compare those to the create dates for NTUSER.DAT. This helps you establish the age of the system and user profiles. You can add evidence using Forensic Toolkit, EnCase Forensics, or SANS Investigative Forensic Toolkit (SIFT) software suites.
Following are Microsoft Windows registry file locations as of 2011:
User Activity: UserAssist and RecentDocs in NTUSER.DAT
In the user’s NTUSER.DAT file, the UserAssist key will allow you to see recent user activity and the Start menu jump list, and RecentDocs will show recently used documents by file extension. Sometimes this artifact can be a gold mine; other times, not so much. The RecentDocs registry key holds recent activities performed by the user—unless the user cleared the activity, disabled the RecentDocs feature, or used another tool such as CCleaner or SIFT Workstation’s Forensic Log Analysis GUI (FLAG) to clean it out.
For the following examples, I created a text file using Notepad and saved it to a USB thumbdrive. In Figure 14-1, you can see that I used Notepad; Figure 14-2 shows the reference to a LNK file; notice the timestamps used in these figures. Keeping track of date-time’s correctly is critical to the success of your analysis. Keep notes of what you are doing and when you did it. Good notes also help with justification for your work later on.

Figure 14-1 Viewing Notepad’s execution in UserAssist
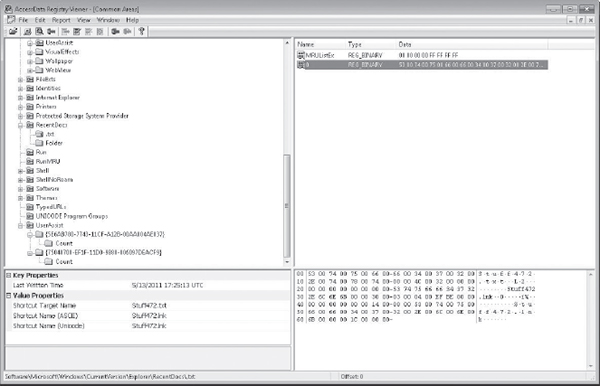
Figure 14-2 Viewing a LNK file access in UserAssist
CCleaner CCleaner (or Crap Cleaner) is a popular free tool that can be used to clear out a user’s activity from a system. We frequently find this program on suspect systems and often the registry keys are empty because of its use.
The UserAssist and RecentDocs entries are found at the following locations:
In Figure 14-1, you can see (under Value Properties at the lower left) that I used Notepad on May 13, 2011.
In Figure 14-2, under Value Properties, you can see an entry for a text file with a corresponding LNK file value, which indicates that we might be able to find an LNK file that will tell us more on the drive.
FLAG Using FLAG in Mozilla Firefox in SIFT Workstation did not properly decode UserAssist (as shown in Figure 14-3). (Note that as of this book’s writing FLAG is still in beta preview.)
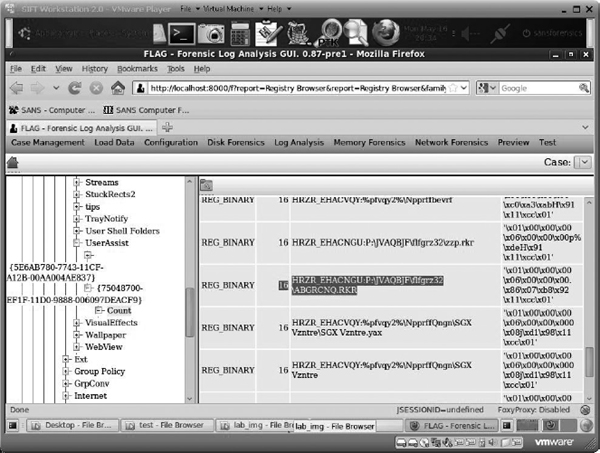
Figure 14-3 Examining UserAssist records in FLAG for SIFT Workstation
I like to review the registry using at least two tools to limit the risk of missing something obvious or running into a nuance in one of the tools. It slows me down a little, but I’d rather be sure than miss something important! A free registry parsing tool that provides easy to read output is RegRipper (http://regripper.wordpress.com/regripper/) by Harlan Carvey.
External Devices: USBStor in the SYSTEM Registry
Let’s review USBStor in the SYSTEM registry file to look for possible external devices. The USBStor contains information for devices attached via USB and can have a large number of entries in older systems. The USBStor can be found at [HKLM]SYSTEMCurrentControlSetEnumUSBSTOR.
The following examples are from three forensic kits: AccessData’s Registry Viewer, EnCase Forensic, and SIFT FLAG. Figure 14-4 shows an example using AccessData’s Registry Viewer component. Figure 14-5 shows how EnCase Forensic renders the USBStor. As you can see, both packages show consistent information regarding the external device. FLAG, shown in Figure 14-6, shows consistent information regarding the USBStor.
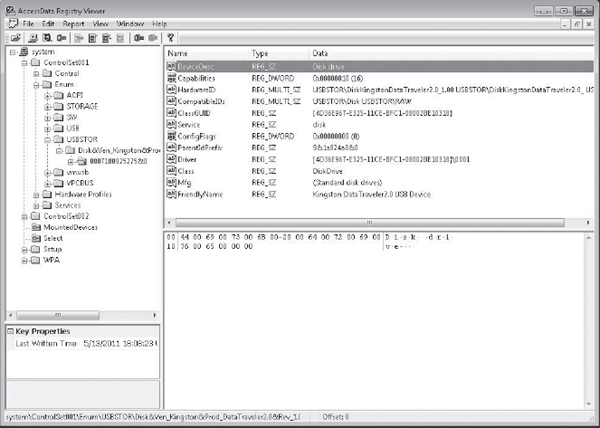
Figure 14-4 Viewing the USBStor key in Registry Viewer
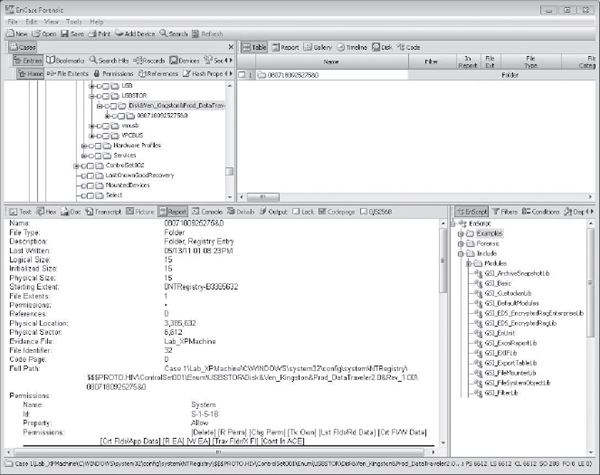
Figure 14-5 Viewing USBStor in EnCase
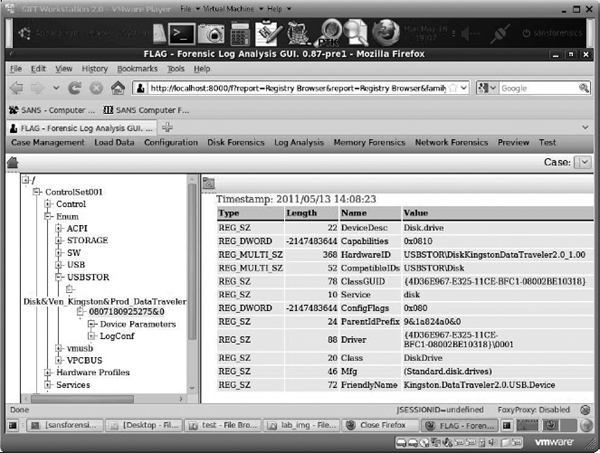
Figure 14-6 Viewing USBStor in FLAG for SIFT
Analysis As you can see, a USB thumb-drive was attached on May 13. The internal serial number assigned to it by Windows is 0807180825275&0, and we have the “friendly name” for the device: Kingston Data Traveler. Now we have something specific to look for when we’re identifying LNK files, in addition to the file Stuff472.txt that we are interested in tracking down—which we found being accessed in the LNK file.
If a user has restore points enabled in Windows 7 or Vista, you can convert the forensic image to a virtual machine and use a tool called Shadow Copy Explorer to open the shadow copies to retrieve previous versions of the registry and files! You can test this on your machine for fun and see what’s been stored over time. This leads us in to the next section. For Windows XP systems, restore points will keep copies of LNK files that existed previously on the system.
Identifying LNK Files
A LNK file is created when a file is first accessed. Looking through LNK files can be an exhaustive and painstaking process. For this example, I made it less of a grind by using a clean install of Windows XP in a virtual machine. In actual practice, you’ll often come across a computer that has been in use for years and may have been reinstalled, been upgraded, had multiple users, and have bad blocks. This further complicates your search.
In many cases, you will need to data carve a case to recover LNK files that have been deleted.
In Figure 14-7, I have found the LNKs for stuff472.txt and the external device.
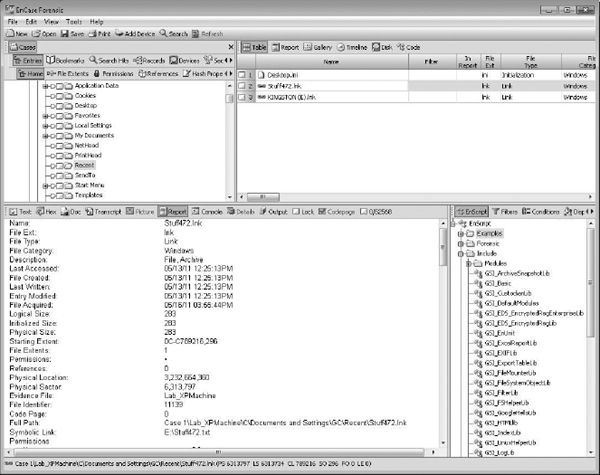
Figure 14-7 Viewing LNK files in EnCase
Scrolling down in the EnCase view, you can see more, as shown in Figure 14-8. Unfortunately, the volume name, serial, and base path are all the way at the bottom of the EnCase rendered report.

Figure 14-8 Viewing LNK details in EnCase
Forensic Toolkit keeps it simple and easy to view (Figure 14-9).
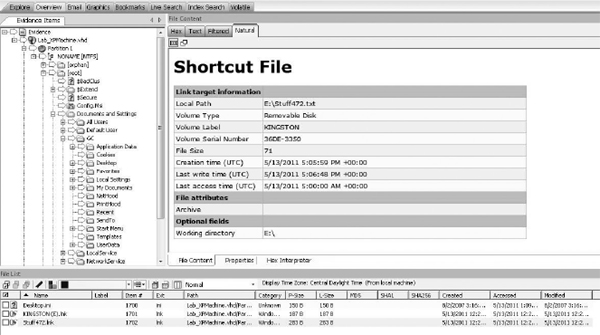
Figure 14-9 Viewing LNK files in Forensic Toolkit
We open the second LNK file that we see, called KINGSTON (E).lnk (Figure 14-10).
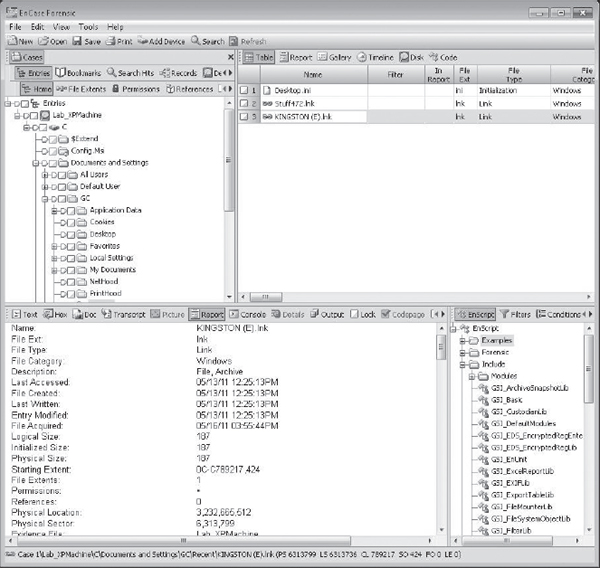
Figure 14-10 Viewing the second LNK file in EnCase
Once again, Forensic Toolkit is easier to review, as shown in Figure 14-11. However, notice the dates. Forensic Toolkit shows a date of 1/1/1980, but EnCase shows 5/13/11. That’s because a LNK file actually has two sets of dates. The first set that reflects 5/13/11 is the time the LNK file itself was created. The second set that reflects 1/1/1980 is the time the thumb drive was formatted. This is the default date in DOS when no date is set that you’ll see in many FAT file systems. The same applies to any file that a LNK file points at. This means you can determine when a file was copied onto a device by looking at the creation time of the file the LNK file is pointing to, and you can determine the first time the file was accessed on your suspect’s machine by looking at the creation time of the LNK file itself!
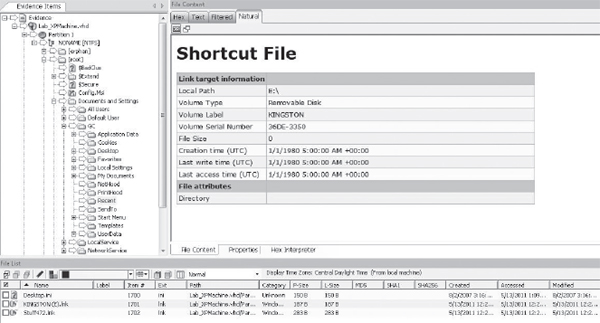
Figure 14-11 Viewing the E: drive shortcut in Forensic Toolkit
With Forensic Toolkit, in this example, you’d have to look at the files listed in the File List tab in the bottom of the screen to see create date and modified date, because the renderer is displaying only the actual contents of the LNK file. EnCase, on the other hand, adds file system meta-data to the report to show created/written/acquired in a consolidated view. It is important that you keep the distinction in mind so you don’t get confused.
In Figure 14-11, you can see that I have found the LNK file in the Documents and Settings<user>Recent directory as it is highlighted in the file tree in the left frame.
In both Forensic Toolkit and EnCase, you can see the smoking gun. The LNK file shows the file was saved to drive E:.
Always keep in mind the way each tool handles date-time. Notice that Forensic Toolkit specifies the timestamps in UTC (Coordinated Universal Time) and EnCase does not use UTC. However, the Forensic Toolkit date-time in File List frame at the bottom of the interface is adjusted for the time zone you specified for the evidence. It’s easy to get tripped up when you’re making a case based on timestamps—and many examiners do!
I regret that I was unable to create examples for LNK files in SIFT that I felt provided quality comparable to the other two products. The tools in SIFT have their strengths and are quickly evolving as a free alternative to expensive tools forensic tools, however.
Wrapping Up the Investigation
We now have what we need to show that Stuff472.txt was saved to an external device. We also know when the file was saved, the Windows serial number associated with the thumbdrive, the volume serial, and the drive letter where it was saved, as well as when it was saved. The next logical step in the investigation would be to request access to the thumbdrive. It’s always important to confirm what actually exists on external devices, since our artifacts never tell us everything that exists on a device. Our analysis does not end here, however; there are still more artifacts to examine!
Ensure that you document your findings in a clear and organized fashion so that you can be prepared when you are asked for details pertaining to the case. Stick to the facts you can prove.
Using File System Meta-data to Track Leaked or Printed Materials
Printed or modified files can easily be re-rendered or they can be carried out the door. Although it can be difficult to determine whether a document has been printed, there are some things to know that can help you.
Examples of important documents for many companies are proprietary CAD drawings (.DWG) containing highly technical and proprietary designs. A CAD document, or any other important documents, can also be printed and taken off site with the suspect.
By reviewing the meta-data embedded in a document through full text indexing engines such as dtSearch (which is a component of the Forensic Toolkit), you have a chance of catching these types of file meta-data.
IMHO
I often print files to PDF for a report or when I pay bills. When I print a document to a PDF printer, some information regarding the source file is retained in the rendered file by default. I use an inexpensive software suite called Pdf995. In past cases, I have come across CAD diagrams printed to PDF and then burned to CD or copied to an external device. When opening a PDF file I printed from an Office 2010 Word document using Pdf995, I was able to identify the source file I used, as shown in this illustration.
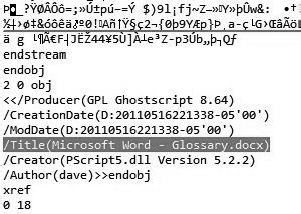
As you can see, the source document I printed was called Glossary.docx, and my username is dave. The create date and modified date are also embedded. This can, of course, be stripped, but if you are lucky, your suspect is too lazy or uneducated to take care of this. You can see this data within the forensic tool that you use or within the PDF reader itself by looking at the file’s properties within the PDF application.
CAD files contain their own internal meta-data that is separate from file system meta-data, and this internal meta-data shows when the innards were last modified and by whom. This is important, because changing one tiny attribute in a CAD (.DWG) file will change the MD5 signature. This even includes the simple act of opening, zooming in or out, and then saving the file since the last saved date is retained within the file! This makes CAD investigations doubly challenging, so they require extra care and deep analysis.
Microsoft Office documents created in Office versions prior to Office 2007 retained Component Object Model/Object Linking and Embedding (COM/OLE) fragments that can contain meta-data, including print history. In Office 2007, the document formats were overhauled and became compressed zip files that contained a series of XML files, as shown in Figures 14-12 and 14-13. However, they still contain the last printed meta-data.
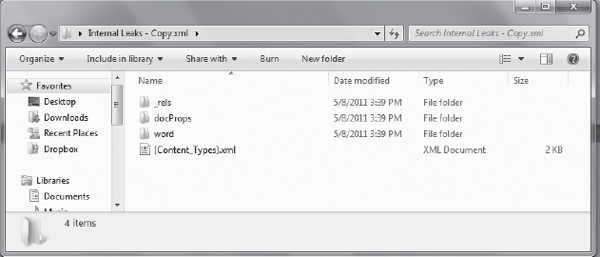
Figure 14-12 Viewing the content of an Office 2010 document
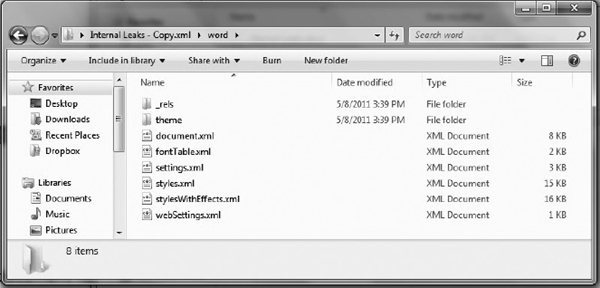
Figure 14-13 Exploring the content of the Word 2010 document archive
Examples of Office 2010 Word document content is shown in Figures 14-12 and 14-13.
Other places you can look to recover evidence of print jobs includes carving out printer spools from the unallocated space and examining the network printer’s local storage, if it’s a model that includes some kind of hard drive.
We’ve Covered
In this chapter, we expanded on what we saw in Chapter 13 regarding external device access to learn more about the user’s activities. Tracking program execution, document metadata, and file access helps develop a timeline of events that creates a compelling narrative. Every case you work on will present you with new applications and new artifacts you’ve never seen before, but building on this base knowledge will help you to know what to expect.
Why internal leaks happen
How to investigate internal leaks
Using file system meta-data to track leaked or printed materials
..................Content has been hidden....................
You can't read the all page of ebook, please click here login for view all page.